buttons MINI 3 door 2014 Owner's Manual
[x] Cancel search | Manufacturer: MINI, Model Year: 2014, Model line: 3 door, Model: MINI 3 door 2014Pages: 240, PDF Size: 11.05 MB
Page 18 of 240
CockpitVehicle features and op‐
tions
This chapter describes all standard, country-
specific and optional features offered with theseries. It also describes features that are not
necessarily available in your car, e. g., due to
the selected options or country versions. This
also applies to safety-related functions and sys‐
tems.
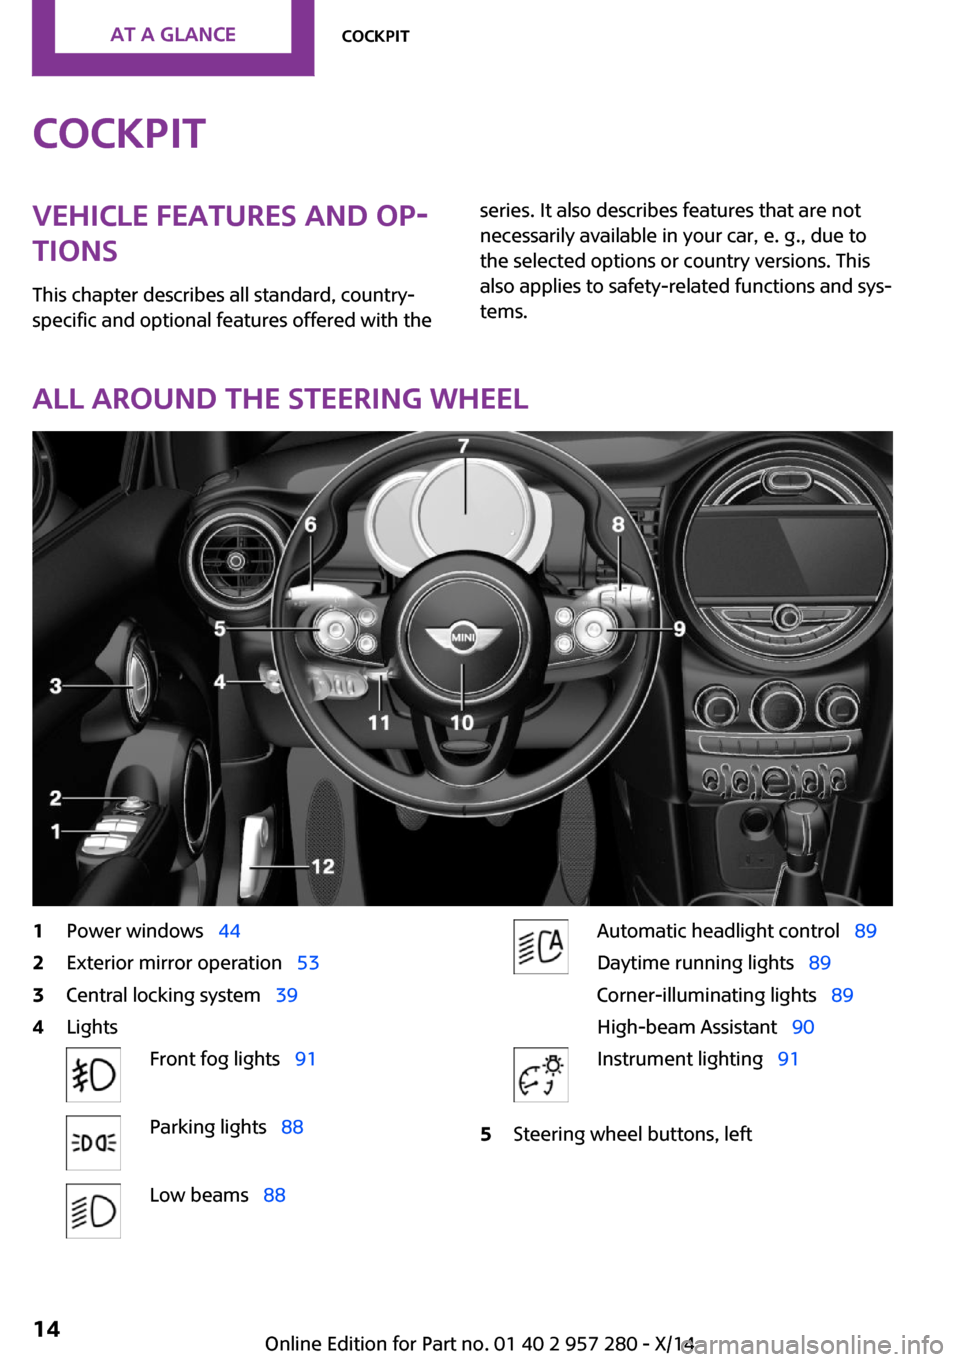
All around the steering wheel
1Power windows 442Exterior mirror operation 533Central locking system 394LightsFront fog lights 91Parking lights 88Low beams 88Automatic headlight control 89
Daytime running lights 89
Corner-illuminating lights 89
High-beam Assistant 90Instrument lighting 915Steering wheel buttons, leftSeite 14AT A GLANCECockpit14
Online Edition for Part no. 01 40 2 957 280 - X/14
Page 19 of 240
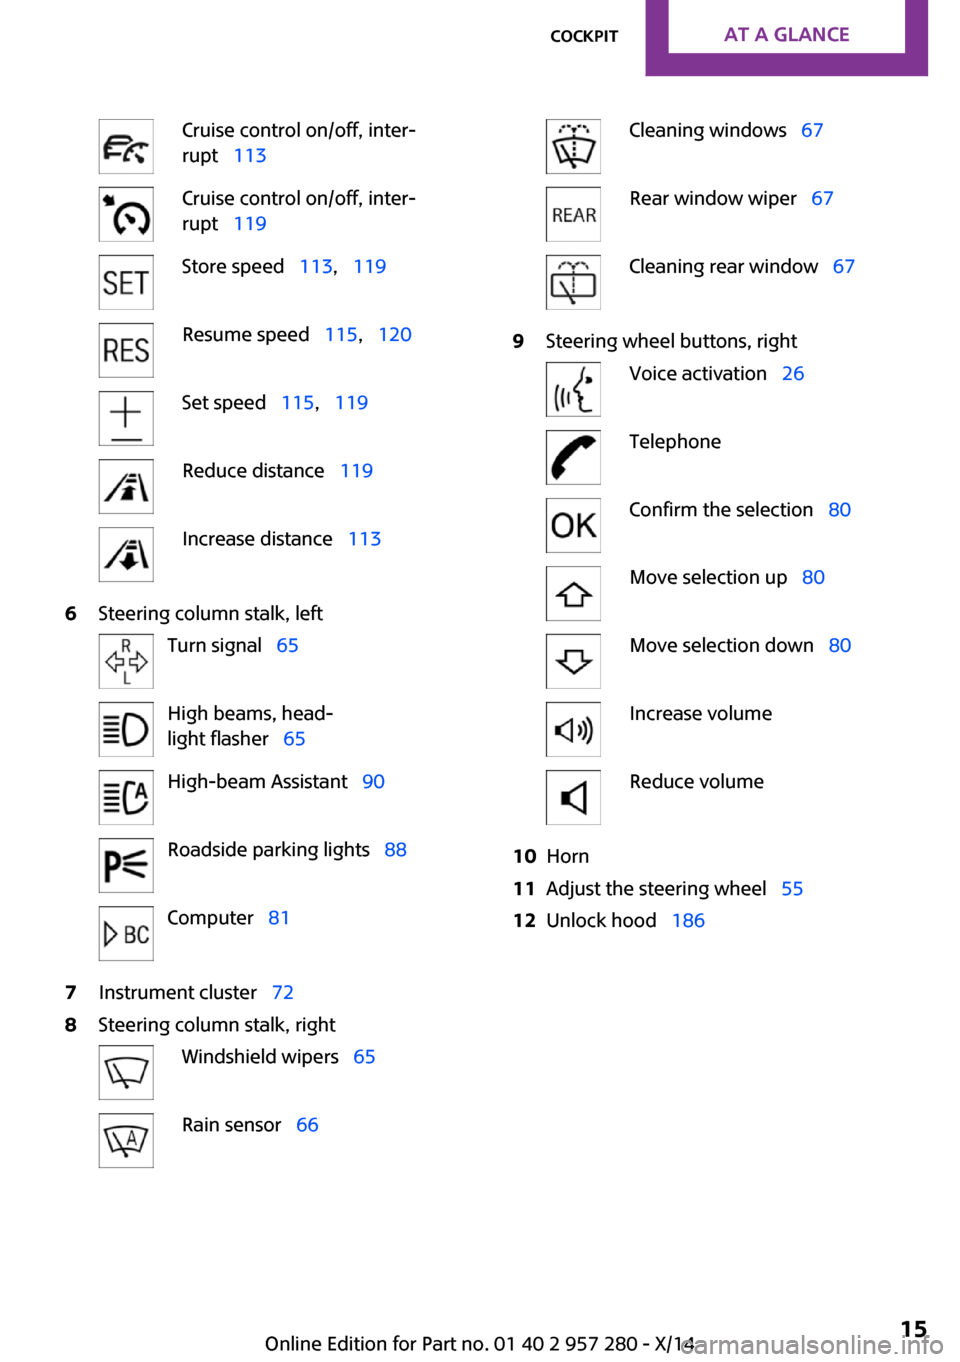
Cruise control on/off, inter‐
rupt 113Cruise control on/off, inter‐
rupt 119Store speed 113, 119Resume speed 115, 120Set speed 115, 119Reduce distance 119Increase distance 1136Steering column stalk, leftTurn signal 65High beams, head‐
light flasher 65High-beam Assistant 90Roadside parking lights 88Computer 817Instrument cluster 728Steering column stalk, rightWindshield wipers 65Rain sensor 66Cleaning windows 67Rear window wiper 67Cleaning rear window 679Steering wheel buttons, rightVoice activation 26TelephoneConfirm the selection 80Move selection up 80Move selection down 80Increase volumeReduce volume10Horn11Adjust the steering wheel 5512Unlock hood 186Seite 15CockpitAT A GLANCE15
Online Edition for Part no. 01 40 2 957 280 - X/14
Page 20 of 240
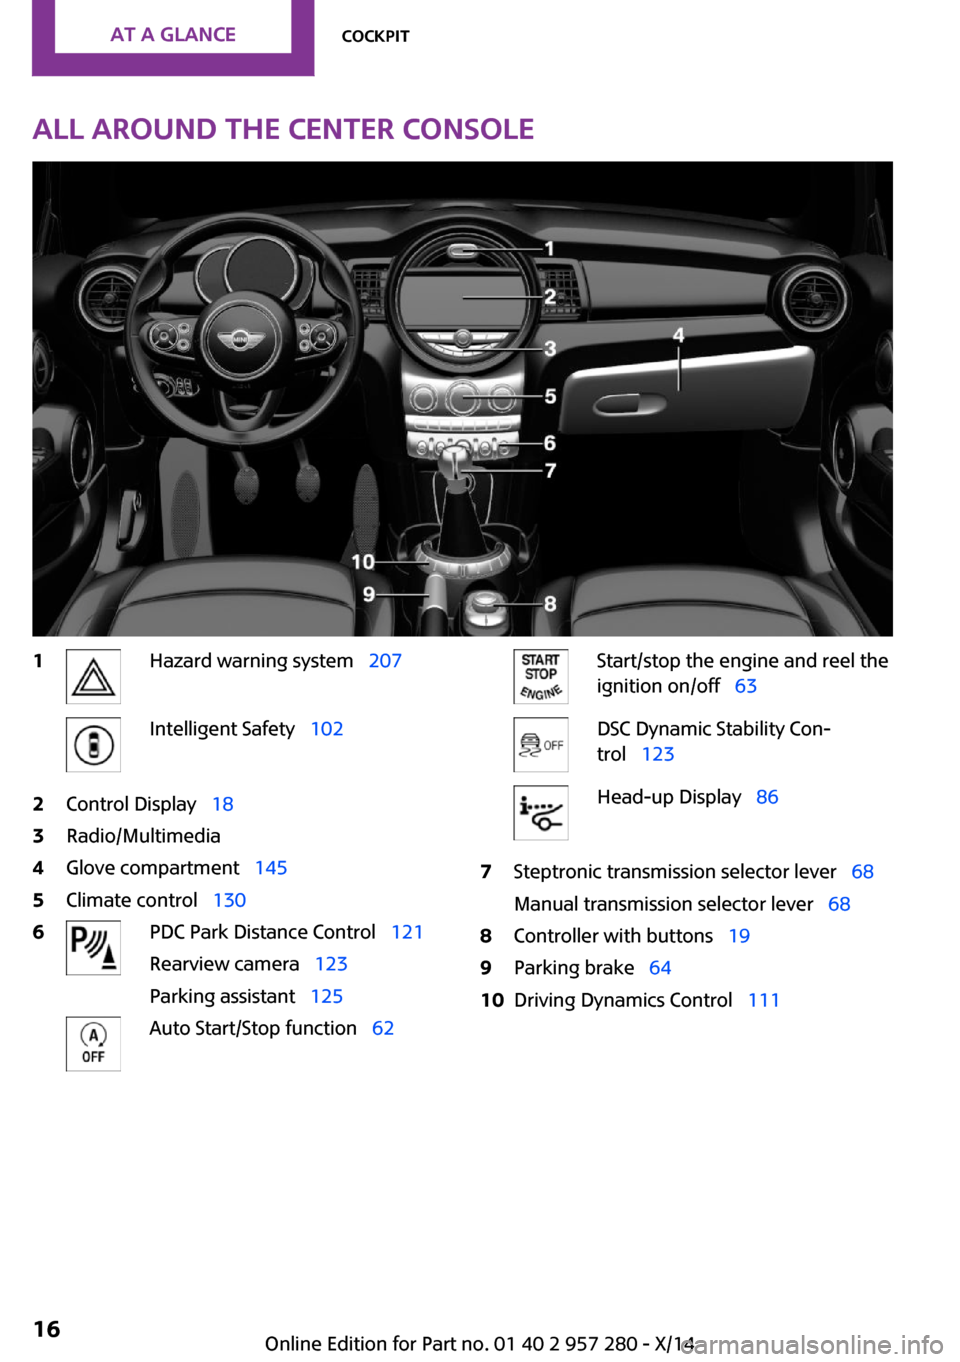
All around the center console1Hazard warning system 207Intelligent Safety 1022Control Display 183Radio/Multimedia4Glove compartment 1455Climate control 1306PDC Park Distance Control 121
Rearview camera 123
Parking assistant 125Auto Start/Stop function 62Start/stop the engine and reel the
ignition on/off 63DSC Dynamic Stability Con‐
trol 123Head-up Display 867Steptronic transmission selector lever 68
Manual transmission selector lever 688Controller with buttons 199Parking brake 6410Driving Dynamics Control 111Seite 16AT A GLANCECockpit16
Online Edition for Part no. 01 40 2 957 280 - X/14
Page 22 of 240
Onboard monitorVehicle features and op‐
tions
This chapter describes all standard, country-
specific and optional features offered with the
series. It also describes features that are not
necessarily available in your car, e. g., due to
the selected options or country versions. This
also applies to safety-related functions and sys‐
tems.
The concept The onboard monitor combines the functions
of a multitude of switches. Thus, these func‐ tions can be operated from a central location.
Using the onboard monitor during a trip
To avoid becoming distracted and posing
an unnecessary hazard to your vehicle's occu‐
pants and to other traffic, never attempt to use the controls or enter information unless traffic
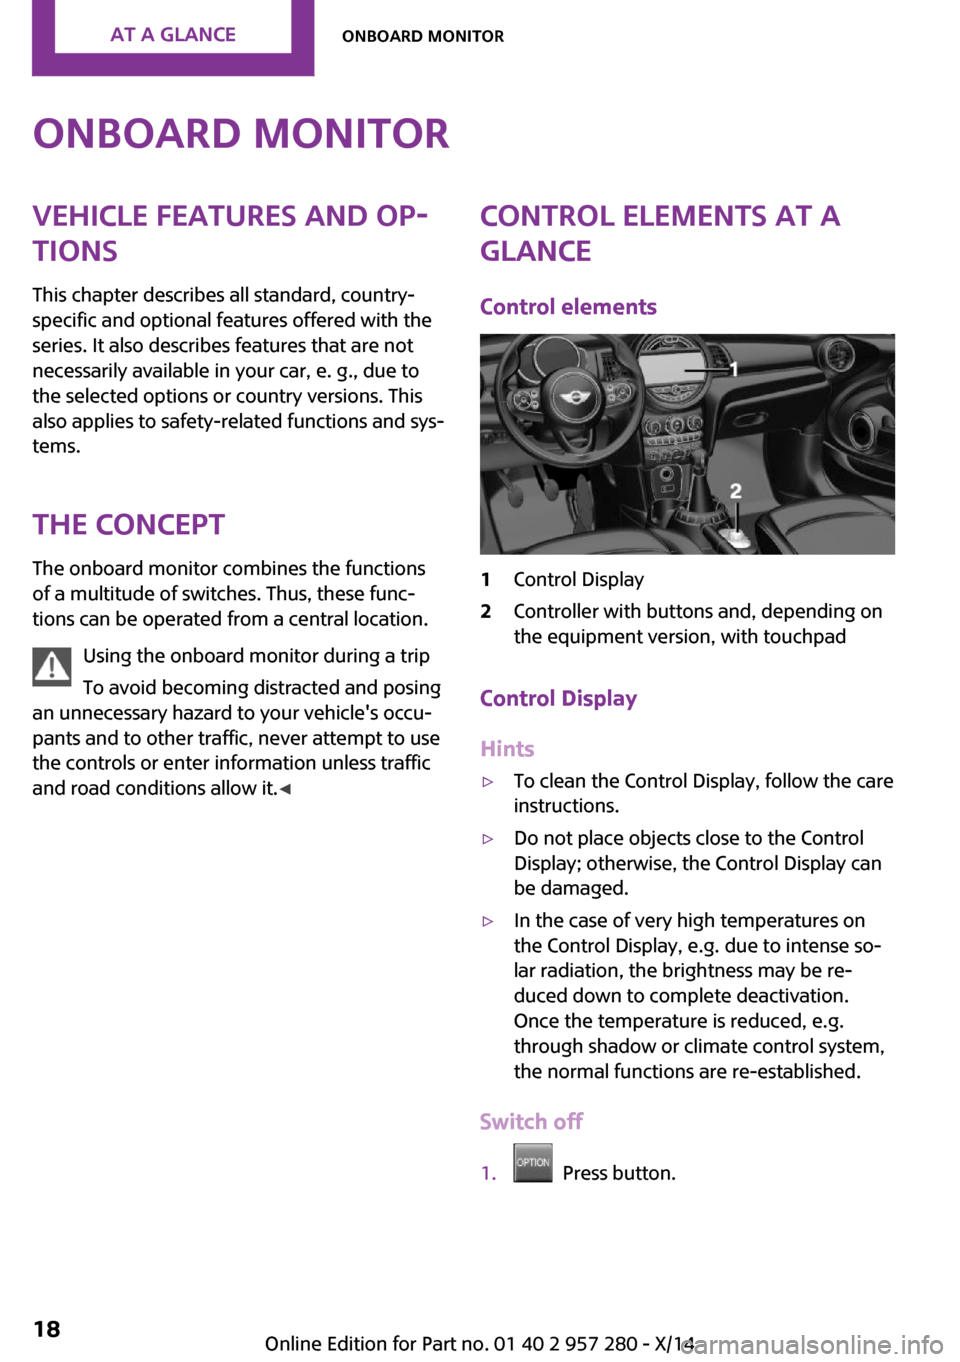
and road conditions allow it. ◀Control elements at a
glance
Control elements1Control Display2Controller with buttons and, depending on
the equipment version, with touchpad
Control Display
Hints
▷To clean the Control Display, follow the care
instructions.▷Do not place objects close to the Control
Display; otherwise, the Control Display can
be damaged.▷In the case of very high temperatures on
the Control Display, e.g. due to intense so‐
lar radiation, the brightness may be re‐
duced down to complete deactivation.
Once the temperature is reduced, e.g.
through shadow or climate control system,
the normal functions are re-established.
Switch off
1. Press button.
Seite 18AT A GLANCEOnboard monitor18
Online Edition for Part no. 01 40 2 957 280 - X/14
Page 23 of 240
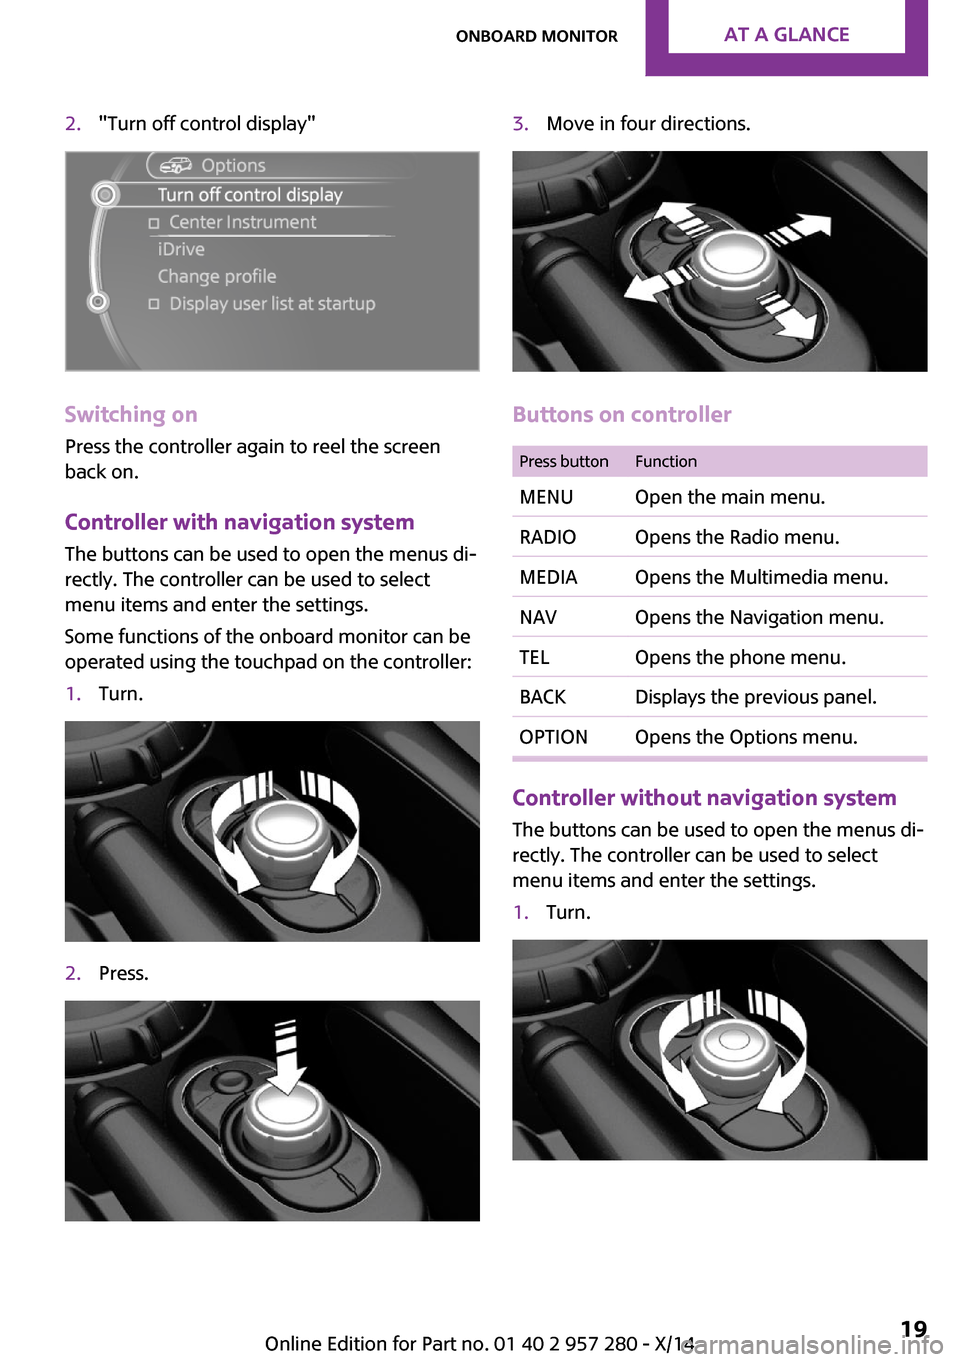
2."Turn off control display"
Switching on
Press the controller again to reel the screen
back on.
Controller with navigation system
The buttons can be used to open the menus di‐
rectly. The controller can be used to select
menu items and enter the settings.
Some functions of the onboard monitor can be
operated using the touchpad on the controller:
1.Turn.2.Press.3.Move in four directions.
Buttons on controller
Press buttonFunctionMENUOpen the main menu.RADIOOpens the Radio menu.MEDIAOpens the Multimedia menu.NAVOpens the Navigation menu.TELOpens the phone menu.BACKDisplays the previous panel.OPTIONOpens the Options menu.
Controller without navigation system
The buttons can be used to open the menus di‐
rectly. The controller can be used to select
menu items and enter the settings.
1.Turn.Seite 19Onboard monitorAT A GLANCE19
Online Edition for Part no. 01 40 2 957 280 - X/14
Page 24 of 240
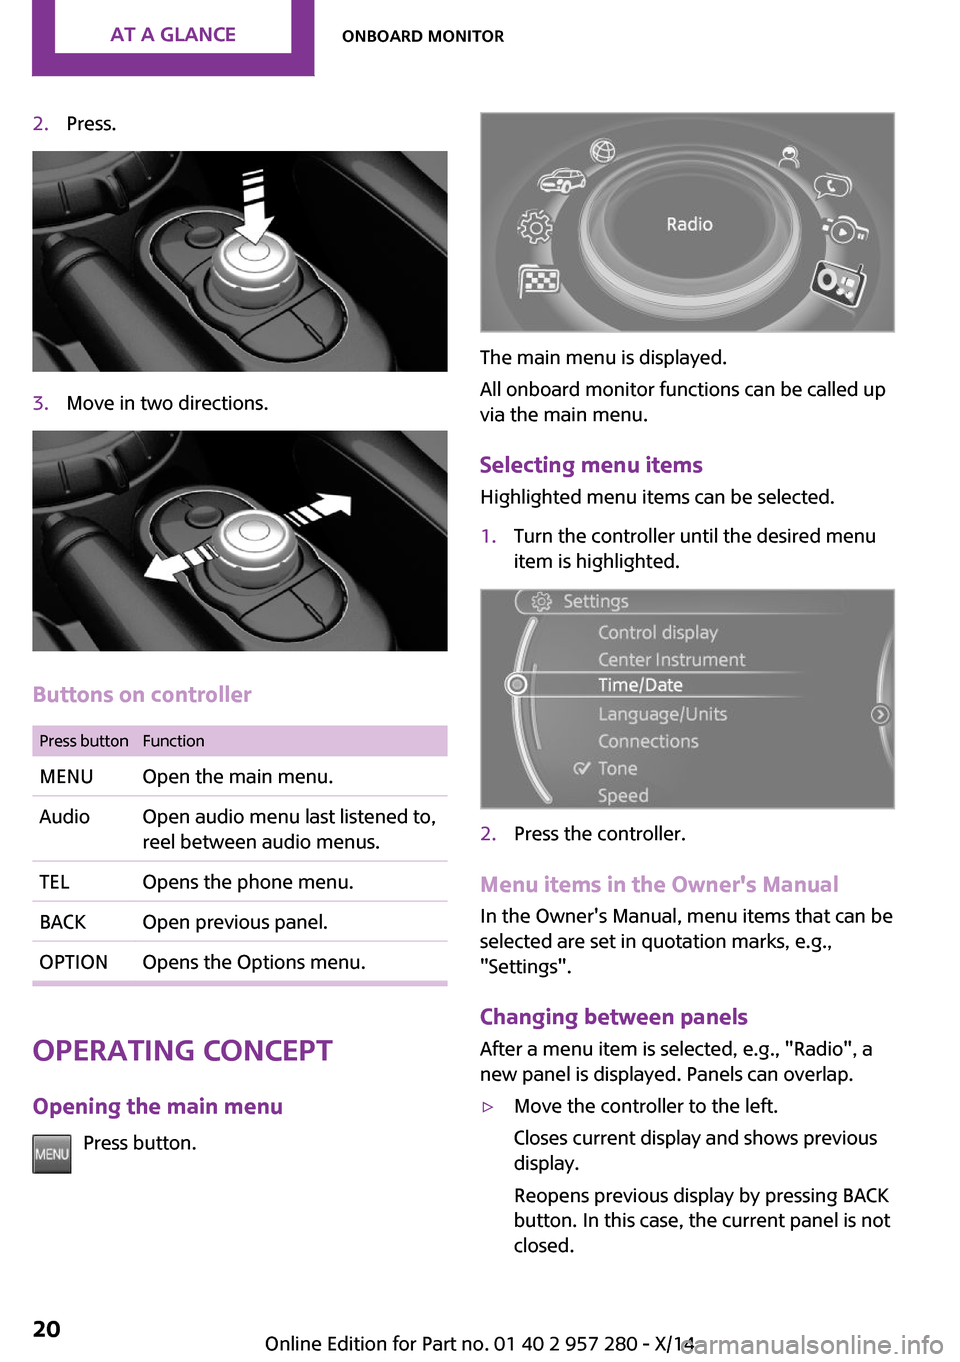
2.Press.3.Move in two directions.
Buttons on controller
Press buttonFunctionMENUOpen the main menu.AudioOpen audio menu last listened to,
reel between audio menus.TELOpens the phone menu.BACKOpen previous panel.OPTIONOpens the Options menu.
Operating concept
Opening the main menu Press button.
The main menu is displayed.
All onboard monitor functions can be called up
via the main menu.
Selecting menu items Highlighted menu items can be selected.
1.Turn the controller until the desired menu
item is highlighted.2.Press the controller.
Menu items in the Owner's Manual
In the Owner's Manual, menu items that can be
selected are set in quotation marks, e.g.,
"Settings".
Changing between panels
After a menu item is selected, e.g., "Radio", a
new panel is displayed. Panels can overlap.
▷Move the controller to the left.
Closes current display and shows previous
display.
Reopens previous display by pressing BACK
button. In this case, the current panel is not
closed.Seite 20AT A GLANCEOnboard monitor20
Online Edition for Part no. 01 40 2 957 280 - X/14
Page 28 of 240
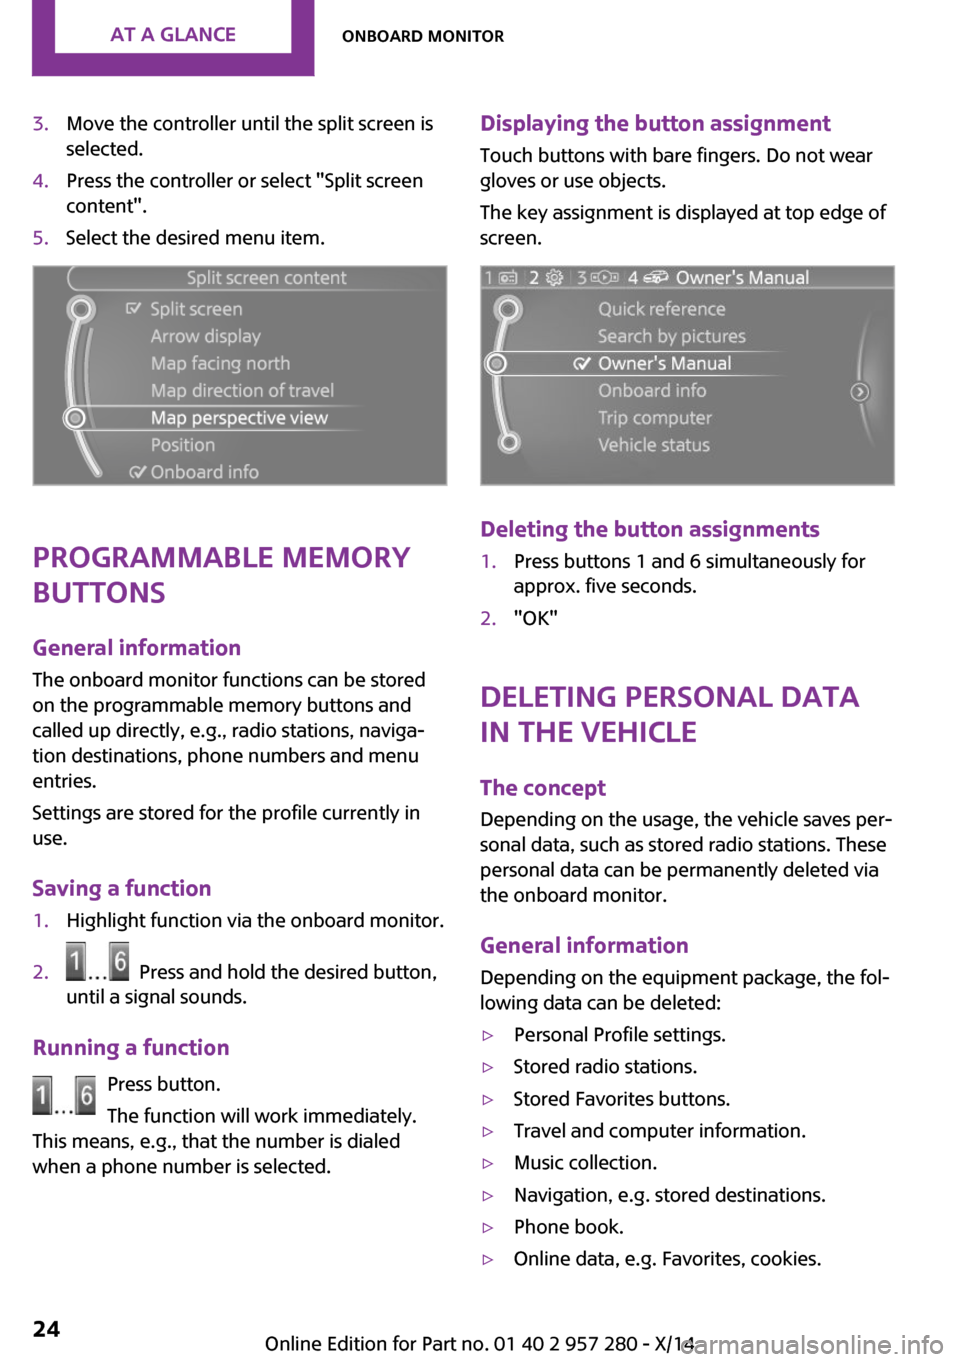
3.Move the controller until the split screen is
selected.4.Press the controller or select "Split screen
content".5.Select the desired menu item.
Programmable memory
buttons
General information
The onboard monitor functions can be stored
on the programmable memory buttons and
called up directly, e.g., radio stations, naviga‐
tion destinations, phone numbers and menu
entries.
Settings are stored for the profile currently in
use.
Saving a function
1.Highlight function via the onboard monitor.2. Press and hold the desired button,
until a signal sounds.
Running a function
Press button.
The function will work immediately.
This means, e.g., that the number is dialed
when a phone number is selected.
Displaying the button assignment
Touch buttons with bare fingers. Do not wear
gloves or use objects.
The key assignment is displayed at top edge of
screen.
Deleting the button assignments
1.Press buttons 1 and 6 simultaneously for
approx. five seconds.2."OK"
Deleting personal data
in the vehicle
The concept
Depending on the usage, the vehicle saves per‐
sonal data, such as stored radio stations. These
personal data can be permanently deleted via
the onboard monitor.
General information Depending on the equipment package, the fol‐
lowing data can be deleted:
▷Personal Profile settings.▷Stored radio stations.▷Stored Favorites buttons.▷Travel and computer information.▷Music collection.▷Navigation, e.g. stored destinations.▷Phone book.▷Online data, e.g. Favorites, cookies.Seite 24AT A GLANCEOnboard monitor24
Online Edition for Part no. 01 40 2 957 280 - X/14
Page 34 of 240
Scroll forward.
Context help - Owner's Manual to the
temporarily selected function
You may open the relevant information di‐
rectly.
Opening via the onboard monitor To move directly from the application on theControl Display to the options menu:1. Press button or move the controller to
the right repeatedly until the "Options"
menu is displayed.2."Display Owner's Manual"
Opening when a Check Control
message is displayed
Directly from the Check Control message on the
Control Display:
"Display Owner's Manual"
Changing between a function and the
Owner's Manual
To reel from a function, e. g., radio, to the Own‐
er's Manual on the Control Display and to alter‐
nate between the two displays:
1. Press button or move the controller to
the right repeatedly until the "Options"
menu is displayed.2."Display Owner's Manual"3.Select the desired page in the Owner's
Manual.4. Press button again to return to last
displayed function.5. Press button to return to the page of
the Owner's Manual displayed last.To alternate permanently between the last dis‐
played function and the Owner's Manual re‐
peat steps 4 & 5. Opens a new display every
time.
Programmable memory buttons
General information The Owner's Manual can be stored on the pro‐
grammable memory buttons and called up di‐
rectly.
Storing1.Select "Owner's Manual" via the onboard
monitor.2. Press and hold the desired button,
until a signal sounds.
Executing
Press button.
The Owner's Manual is displayed im‐
mediately.
Seite 30AT A GLANCEIntegrated Owner's Manual in the vehicle30
Online Edition for Part no. 01 40 2 957 280 - X/14
Page 40 of 240
▷Changes to the settings are automatically
saved in the profile currently activated.▷Unlocking the car activates the profile that
is stored in the remote control.▷Your personal settings will be recognized
and activated even if the vehicle had been
operated with another remote control.
Adjusting
The settings for the following systems and func‐
tions are saved in the active profile. The scope
of storable settings is country- and equipment-
dependable.
▷Unlocking and locking.▷Lights.▷Radio.▷Instrument cluster.▷Programmable memory buttons.▷Volumes, tone.▷Onboard monitor.▷Climate control.▷Navigation.▷Park Distance Control PDC.▷Rearview camera▷Head-up Display.▷Driving Dynamics Control.▷Cruise control.▷Driving Assistant.
Profile management
Opening profiles
Regardless of the remote control in use a differ‐
ent profile may be activated.
1. "Settings"2."Profiles"3.Select a profile.
The activated profile is assigned to the currently
used remote control.
Renaming profiles1. "Settings"2."Profiles"
The current profile is selected.3.Open "Options".4."Rename current profile"
Resetting profiles The settings of the active profile are reset to
their default values.
1. "Settings"2."Profiles"
The current profile is selected.3.Open "Options".4."Reset current profile"
Exporting profiles
Most settings of the active profile and the
saved contacts can be exported.
This can be helpful for securing and retrieving
personal settings, before delivering the vehicle
to a workshop, e.g. Profiles can be taken to an‐
other vehicle equipped with the Personal Pro‐
file function.
Export is made via the USB port to a USB de‐
vice.
Popular file systems for USB devices are sup‐
ported. FAT32 and exFAT are the recom‐
mended formats for profile export. Other for‐
mats may not support the export.
1. "Settings"2."Profiles"3."Export profile"4."USB device"
Importing profiles
Profiles stored on a USB device can be im‐
ported via the USB interface.
Seite 36CONTROLSOpening and closing36
Online Edition for Part no. 01 40 2 957 280 - X/14
Page 43 of 240
▷this device must accept any interference re‐
ceived, including interference that may
cause undesired operation.
Any unauthorized modifications or changes to
these devices could void the user's authority to
operate this equipment.
Without remote control From the outside Locking from the outside
Do not lock the vehicle from the outside
with people inside the car, as the vehicle can‐
not be unlocked from inside without special
knowledge. ◀
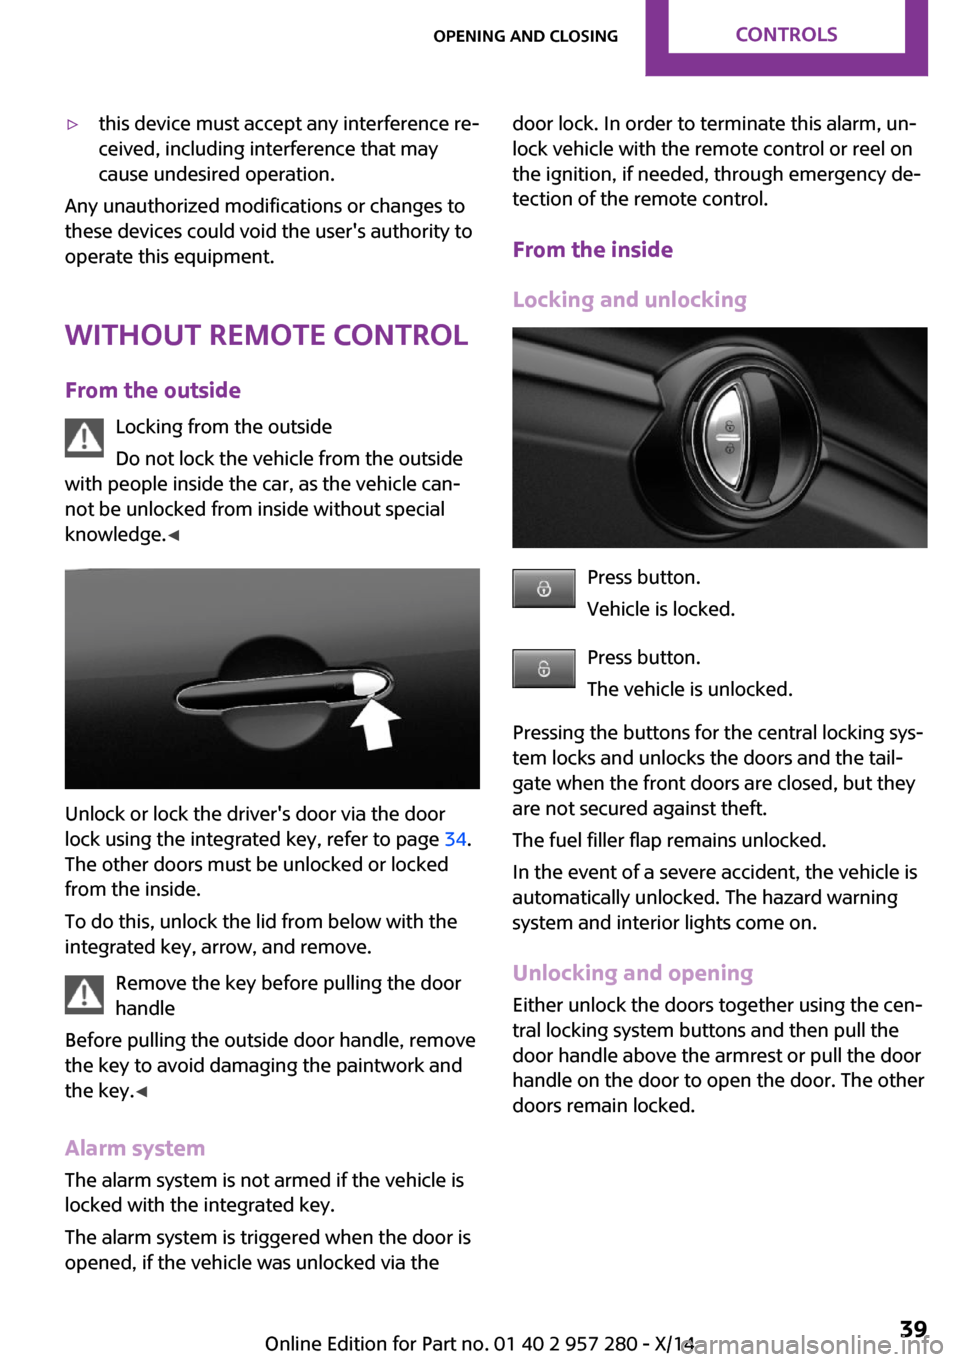
Unlock or lock the driver's door via the door
lock using the integrated key, refer to page 34.
The other doors must be unlocked or locked
from the inside.
To do this, unlock the lid from below with the
integrated key, arrow, and remove.
Remove the key before pulling the door
handle
Before pulling the outside door handle, remove
the key to avoid damaging the paintwork and
the key. ◀
Alarm system
The alarm system is not armed if the vehicle is
locked with the integrated key.
The alarm system is triggered when the door is
opened, if the vehicle was unlocked via the
door lock. In order to terminate this alarm, un‐
lock vehicle with the remote control or reel on
the ignition, if needed, through emergency de‐
tection of the remote control.
From the inside
Locking and unlocking
Press button.
Vehicle is locked.
Press button.
The vehicle is unlocked.
Pressing the buttons for the central locking sys‐
tem locks and unlocks the doors and the tail‐
gate when the front doors are closed, but they
are not secured against theft.
The fuel filler flap remains unlocked.
In the event of a severe accident, the vehicle is
automatically unlocked. The hazard warning
system and interior lights come on.
Unlocking and opening
Either unlock the doors together using the cen‐
tral locking system buttons and then pull the
door handle above the armrest or pull the door
handle on the door to open the door. The other
doors remain locked.
Seite 39Opening and closingCONTROLS39
Online Edition for Part no. 01 40 2 957 280 - X/14