ESP MINI Clubman 2008 Owner's Guide
[x] Cancel search | Manufacturer: MINI, Model Year: 2008, Model line: Clubman, Model: MINI Clubman 2008Pages: 164, PDF Size: 2.74 MB
Page 89 of 164
ReferenceAt a glance Controls Driving tips Mobility
87
In the MINI Clubman, remove the third head
restraint if necessary, refer to Head restraints,
Removing, page32.
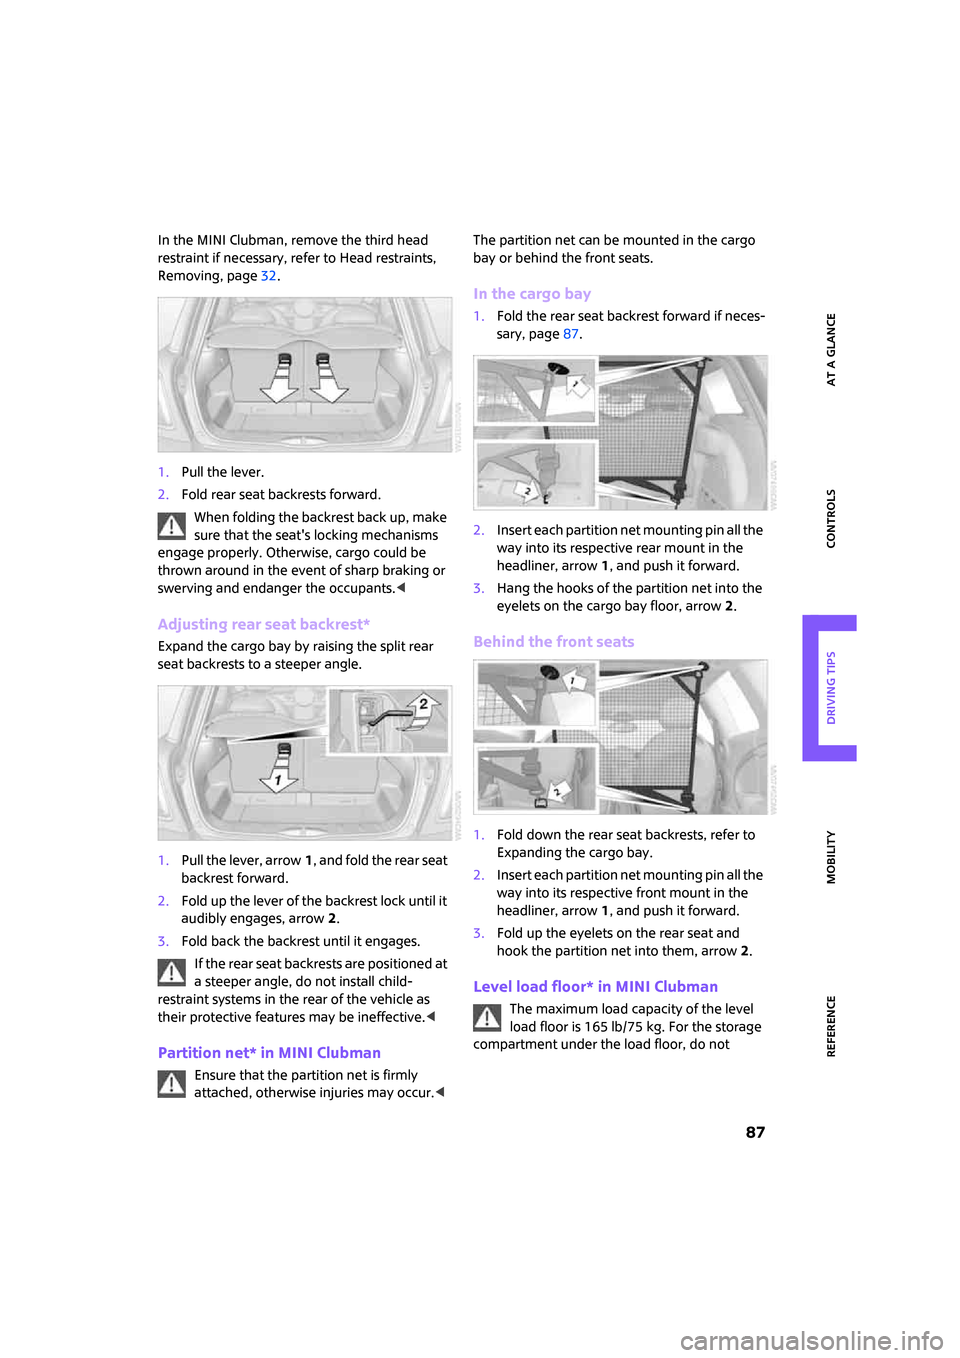
1.Pull the lever.
2.Fold rear seat backrests forward.
When folding the backrest back up, make
sure that the seat's locking mechanisms
engage properly. Otherwise, cargo could be
thrown around in the event of sharp braking or
swerving and endanger the occupants.<
Adjusting rear seat backrest*
Expand the cargo bay by raising the split rear
seat backrests to a steeper angle.
1.Pull the lever, arrow1, and fold the rear seat
backrest forward.
2.Fold up the lever of the backrest lock until it
audibly engages, arrow2.
3.Fold back the backrest until it engages.
If the rear seat backrests are positioned at
a steeper angle, do not install child-
restraint systems in the rear of the vehicle as
their protective features may be ineffective.<
Partition net* in MINI Clubman
Ensure that the partition net is firmly
attached, otherwise injuries may occur.
In the cargo bay
1.Fold the rear seat backrest forward if neces-
sary, page87.
2.Insert each partition net mounting pin all the
way into its respective rear mount in the
headliner, arrow 1, and push it forward.
3.Hang the hooks of the partition net into the
eyelets on the cargo bay floor, arrow2.
Behind the front seats
1.Fold down the rear seat backrests, refer to
Expanding the cargo bay.
2.Insert each partition net mounting pin all the
way into its respective front mount in the
headliner, arrow1, and push it forward.
3.Fold up the eyelets on the rear seat and
hook the partition net into them, arrow2.
Level load floor* in MINI Clubman
The maximum load capacity of the level
load floor is 165 lb/75 kg. For the storage
compartment under the load floor, do not
Page 90 of 164
Things to remember when driving
88
exceed a maximum load of 55 lb/25 kg, other-
wise damage may occur.<
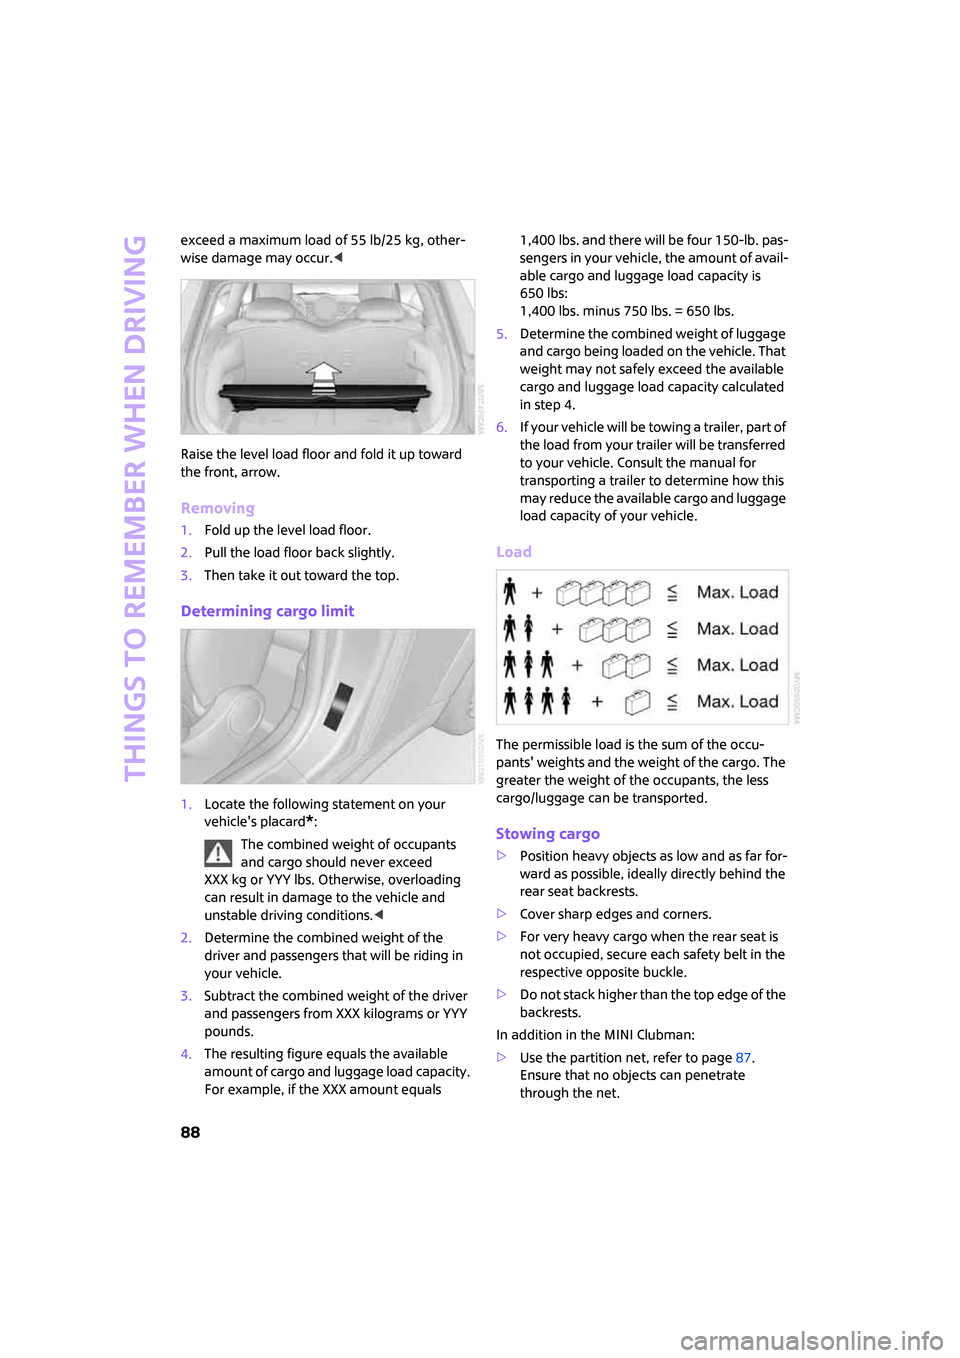
Raise the level load floor and fold it up toward
the front, arrow.
Removing
1.Fold up the level load floor.
2.Pull the load floor back slightly.
3.Then take it out toward the top.
Determining cargo limit
1.Locate the following statement on your
vehicle's placard
*:
The combined weight of occupants
and cargo should never exceed
XXX kg or YYY lbs. Otherwise, overloading
can result in damage to the vehicle and
unstable driving conditions.<
2.Determine the combined weight of the
driver and passengers that will be riding in
your vehicle.
3.Subtract the combined weight of the driver
and passengers from XXX kilograms or YYY
pounds.
4.The resulting figure equals the available
amount of cargo and luggage load capacity.
For example, if the XXX amount equals 1,400 lbs. and there will be four 150-lb. pas-
sengers in your vehicle, the amount of avail-
able cargo and luggage load capacity is
650 lbs:
1,400 lbs. minus 750 lbs. = 650 lbs.
5.Determine the combined weight of luggage
and cargo being loaded on the vehicle. That
weight may not safely exceed the available
cargo and luggage load capacity calculated
in step 4.
6.I f y o u r v e h icl e w i ll be t o w i n g a t r a il e r , pa r t o f
the load from your trailer will be transferred
to your vehicle. Consult the manual for
transporting a trailer to determine how this
may reduce the available cargo and luggage
load capacity of your vehicle.
Load
The permissible load is the sum of the occu-
pants' weights and the weight of the cargo. The
greater the weight of the occupants, the less
cargo/luggage can be transported.
Stowing cargo
>Position heavy objects as low and as far for-
ward as possible, ideally directly behind the
rear seat backrests.
>Cover sharp edges and corners.
>For very heavy cargo when the rear seat is
not occupied, secure each safety belt in the
respective opposite buckle.
>Do not stack higher than the top edge of the
backrests.
In addition in the MINI Clubman:
>Use the partition net, refer to page87.
Ensure that no objects can penetrate
through the net.
Page 91 of 164
ReferenceAt a glance Controls Driving tips Mobility
89
Securing cargo
>Secure smaller and lighter items using
retaining or draw straps
*.
>Heavy-duty cargo straps
* for securing larger
and heavier objects are available at your
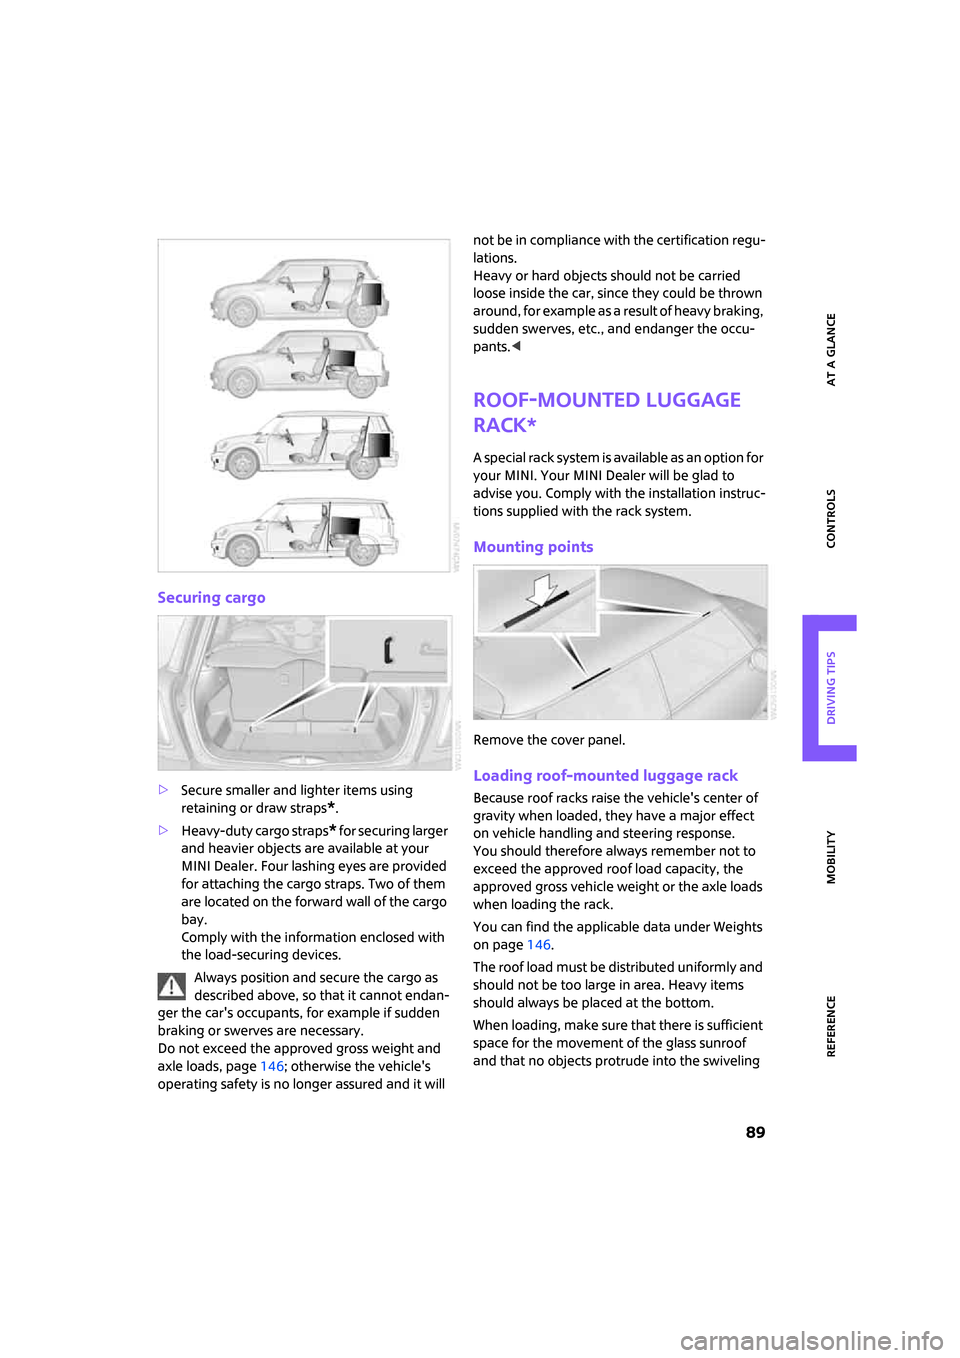
MINI Dealer. Four lashing eyes are provided
for attaching the cargo straps. Two of them
are located on the forward wall of the cargo
bay.
Comply with the information enclosed with
the load-securing devices.
Always position and secure the cargo as
described above, so that it cannot endan-
ger the car's occupants, for example if sudden
braking or swerves are necessary.
Do not exceed the approved gross weight and
axle loads, page146; otherwise the vehicle's
operating safety is no longer assured and it will not be in compliance with the certification regu-
lations.
Heavy or hard objects should not be carried
loose inside the car, since they could be thrown
around, for example as a result of heavy braking,
sudden swerves, etc., and endanger the occu-
pants.<
Roof-mounted luggage
rack*
A special rack system is available as an option for
your MINI. Your MINI Dealer will be glad to
advise you. Comply with the installation instruc-
tions supplied with the rack system.
Mounting points
Remove the cover panel.
Loading roof-mounted luggage rack
Because roof racks raise the vehicle's center of
gravity when loaded, they have a major effect
on vehicle handling and steering response.
You should therefore always remember not to
exceed the approved roof load capacity, the
approved gross vehicle weight or the axle loads
when loading the rack.
You can find the applicable data under Weights
on page146.
The roof load must be distributed uniformly and
should not be too large in area. Heavy items
should always be placed at the bottom.
When loading, make sure that there is sufficient
space for the movement of the glass sunroof
and that no objects protrude into the swiveling
Page 97 of 164
ReferenceAt a glance Controls Driving tips Mobility
95
When refueling, insert the filler nozzle com-
pletely into the filler pipe. Avoid lifting the filler
nozzle while filling the tank, as that would lead
to
>premature pump shutoff
>reduced efficiency of the fuel-vapor recov-
ery system.
The fuel tank is full when the filler nozzle clicks
off the first time.
Fuel tank capacity
If the range displayed is less than
30 miles/50 km, be sure to refuel; other-
wise engine functions are not guaranteed and
damage could occur.<
MINI Cooper, MINI Cooper S
Approx. 13.2 US gallons/50 liters, including the
reserve capacity of 2.1 US gallons/8 liters.
Fuel specifications
Do not fill the tank with leaded fuel, as this
would cause damage to the catalytic con-
verter.
Do not fill the tank with E85, i.e. fuel containing
85% ethanol, nor with FlexFuel. Otherwise the
engine and fuel supply system will be dam-
aged.<
Required fuel
Super Premium gasoline/AKI 91
This gasoline is highly recommended.
However, you may also use gasoline with less
AKI. The minimum AKI Rating is 87.
If you use gasoline with this minimum AKI Rat-
ing, the engine may produce knocking sounds
when starting at high outside temperatures. This
has no effect on the engine life.
Do not use any gasoline below the speci-
fied minimum fuel grade. Otherwise the
engine could be damaged.<
Use high-quality brands
Field experience has indicated significant
differences in fuel quality: volatility, composi-
tion, additives, etc., among gasolines offered for
sale in the United States and Canada. Fuels con-
taining up to and including 10 % ethanol or
other oxygenates with up to 2.8 % oxygen by
weight, that is, 15 % MTBE or 3 % methanol plus
an equivalent amount of co-solvent, will not
void the applicable warranties with respect to
defects in materials or workmanship.
The use of poor-quality fuels may result in
driveability, starting and stalling problems
especially under certain environmental condi-
tions such as high ambient temperature and
high altitude.
Should you encounter driveability problems
which you suspect could be related to the fuel
you are using, we recommend that you respond
by switching to a recognized high-quality brand
such as gasoline that is advertised as Top Tier
Detergent Gasoline.
Failure to comply with these recommendations
may also result in unscheduled maintenance.<
Page 98 of 164
Wheels and tires
96
Wheels and tires
Tire inflation pressures
Information for your safety
It is not merely the tires' service life, but also
driving comfort and, to a great extent, driving
safety that depend on the condition of the tires
and the maintenance of the specified tire pres-
sure.
Checking pressure
Check the tire inflation pressure regularly
and correct it, if necessary: at least twice a
month and before starting long trips. If you fail
to observe this precaution you may be driving
on tires with incorrect tire pressures, a condition
that can not only compromise your vehicle's
driving stability, but also lead to tire damage and
the risk of an accident. Do not drive with
deflated, i.e. flat tires, except when using Run-
Flat Tires. A flat tire will seriously impair your
vehicle's handling and braking response.
Attempts to drive on a flat tire can lead to loss of
control over the vehicle.<
Check the tire inflation pressures only on cold
tires. This means after a maximum of 1.25 miles/
2 km driving or when the vehicle has been
parked for at least 2 hours. When tires are warm,
the tire inflation pressure is higher.
After correcting the tire inflation pressure,
reinitialize the Flat Tire Monitor, page60,
or reset the Tire Pressure Monitor, page61.<
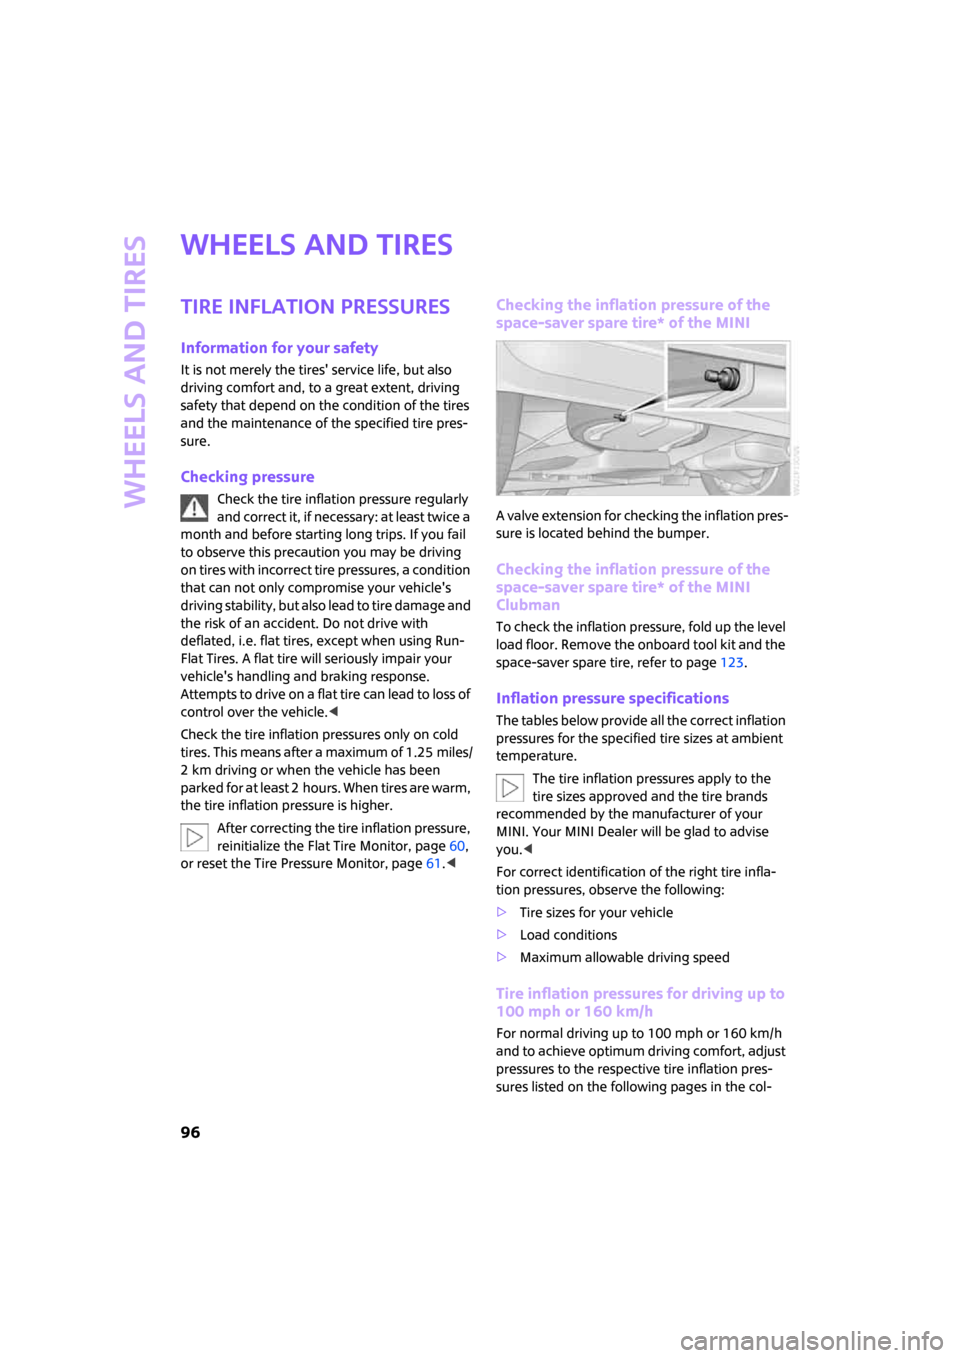
Checking the inflation pressure of the
space-saver spare tire* of the MINI
A valve extension for checking the inflation pres-
sure is located behind the bumper.
Checking the inflation pressure of the
space-saver spare tire* of the MINI
Clubman
To check the inflation pressure, fold up the level
load floor. Remove the onboard tool kit and the
space-saver spare tire, refer to page123.
Inflation pressure specifications
The tables below provide all the correct inflation
pressures for the specified tire sizes at ambient
temperature.
The tire inflation pressures apply to the
tire sizes approved and the tire brands
recommended by the manufacturer of your
MINI. Your MINI Dealer will be glad to advise
you.<
For correct identification of the right tire infla-
tion pressures, observe the following:
>Tire sizes for your vehicle
>Load conditions
>Maximum allowable driving speed
Tire inflation pressures for driving up to
100 mph or 160 km/h
For normal driving up to 100 mph or 160 km/h
and to achieve optimum driving comfort, adjust
pressures to the respective tire inflation pres-
sures listed on the following pages in the col-
Page 99 of 164
ReferenceAt a glance Controls Driving tips Mobility
97
umns for traveling speeds up to a maximum of
100 mph or 160 km/h.
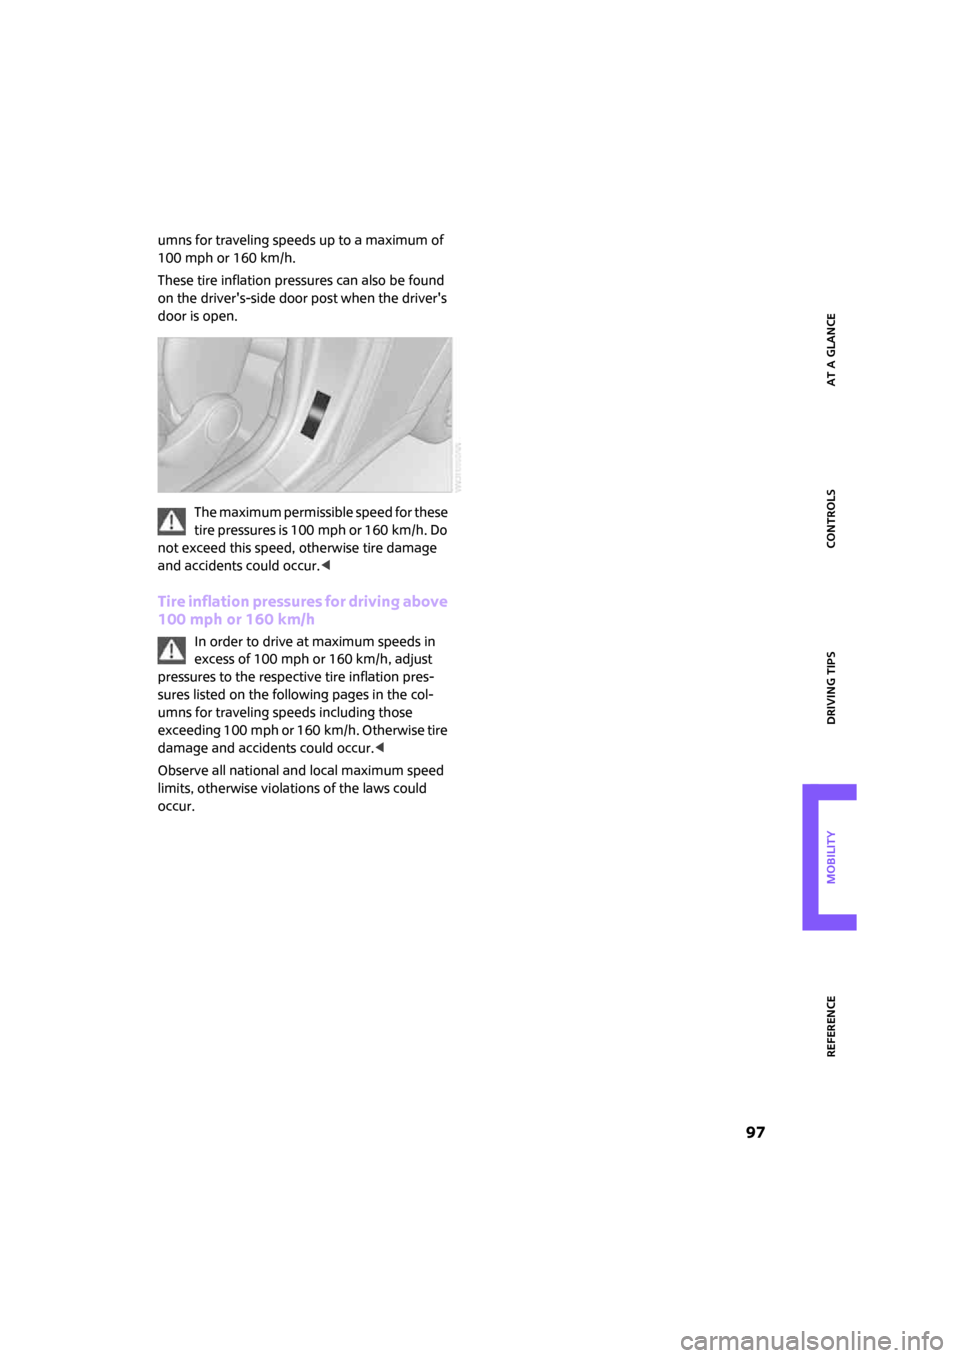
These tire inflation pressures can also be found
on the driver's-side door post when the driver's
door is open.
The maximum permissible speed for these
tire pressures is 100 mph or 160 km/h. Do
not exceed this speed, otherwise tire damage
and accidents could occur.<
Tire inflation pressures for driving above
100 mph or 160 km/h
In order to drive at maximum speeds in
excess of 100 mph or 160 km/h, adjust
pressures to the respective tire inflation pres-
sures listed on the following pages in the col-
umns for traveling speeds including those
exceeding 100 mph or 160 km/h. Otherwise tire
damage and accidents could occur.<
Observe all national and local maximum speed
limits, otherwise violations of the laws could
occur.
Page 104 of 164
Wheels and tires
102
Tire coding
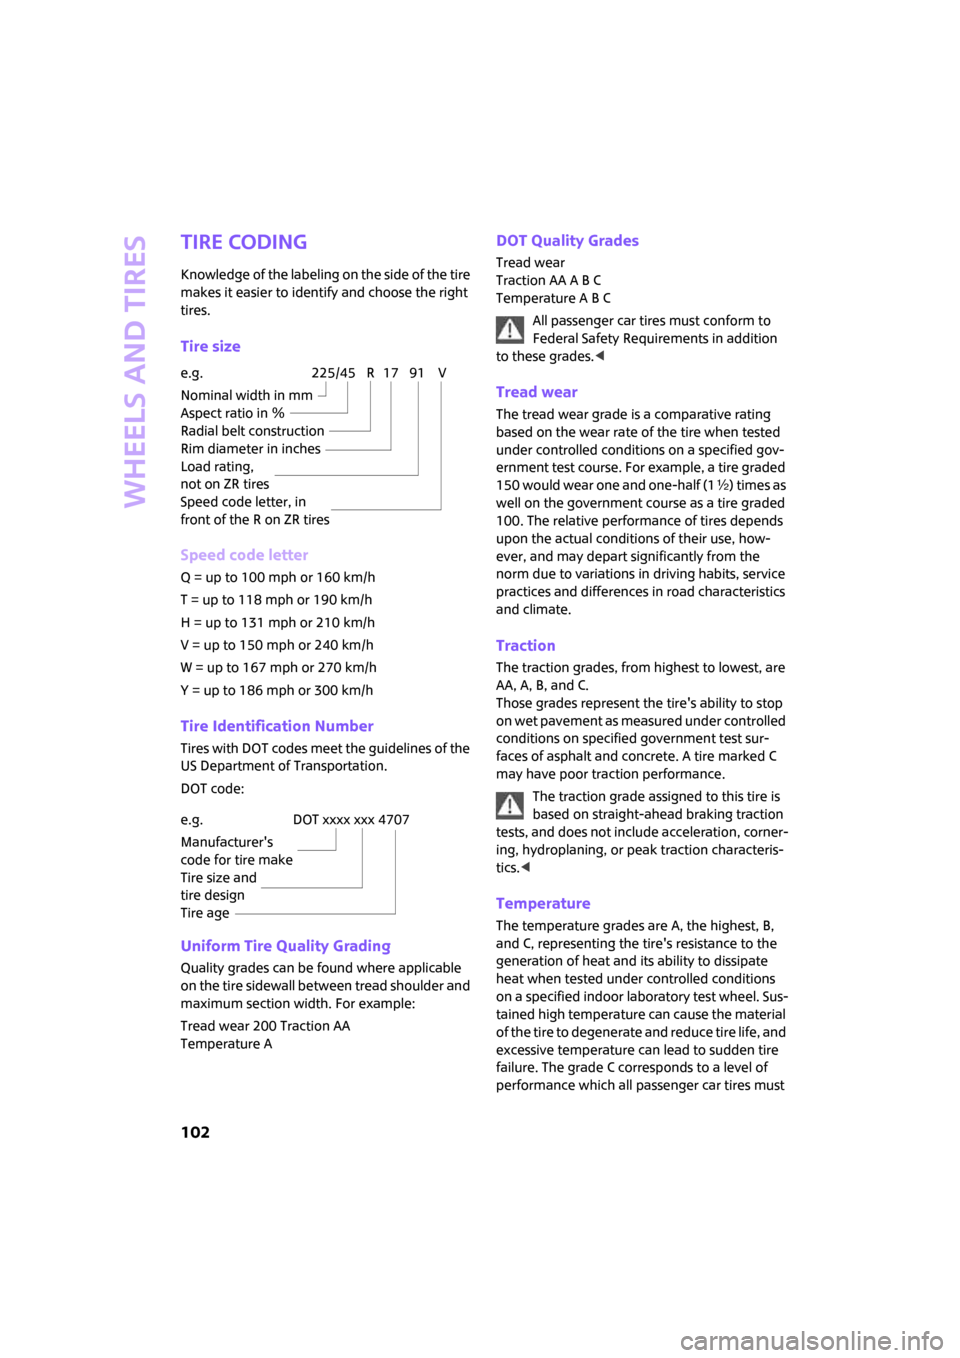
Knowledge of the labeling on the side of the tire
makes it easier to identify and choose the right
tires.
Tire size
Speed code letter
Q = up to 100 mph or 160 km/h
T = up to 118 mph or 190 km/h
H = up to 131 mph or 210 km/h
V = up to 150 mph or 240 km/h
W = up to 167 mph or 270 km/h
Y = up to 186 mph or 300 km/h
Tire Identification Number
Tires with DOT codes meet the guidelines of the
US Department of Transportation.
DOT code:
Uniform Tire Quality Grading
Quality grades can be found where applicable
on the tire sidewall between tread shoulder and
maximum section width. For example:
Tread wear 200 Traction AA
Temperature A
DOT Quality Grades
Tread wear
Traction AA A B C
Temperature A B C
All passenger car tires must conform to
Federal Safety Requirements in addition
to these grades.<
Tread wear
The tread wear grade is a comparative rating
based on the wear rate of the tire when tested
under controlled conditions on a specified gov-
ernment test course. For example, a tire graded
150 would wear one and one-half (1γ) times as
well on the government course as a tire graded
100. The relative performance of tires depends
upon the actual conditions of their use, how-
ever, and may depart significantly from the
norm due to variations in driving habits, service
practices and differences in road characteristics
and climate.
Traction
The traction grades, from highest to lowest, are
AA, A, B, and C.
Those grades represent the tire's ability to stop
on wet pavement as measured under controlled
conditions on specified government test sur-
faces of asphalt and concrete. A tire marked C
may have poor traction performance.
The traction grade assigned to this tire is
based on straight-ahead braking traction
tests, and does not include acceleration, corner-
ing, hydroplaning, or peak traction characteris-
tics.<
Temperature
The temperature grades are A, the highest, B,
and C, representing the tire's resistance to the
generation of heat and its ability to dissipate
heat when tested under controlled conditions
on a specified indoor laboratory test wheel. Sus-
tained high temperature can cause the material
of the tire to degenerate and reduce tire life, and
excessive temperature can lead to sudden tire
failure. The grade C corresponds to a level of
performance which all passenger car tires must e.g.
Nominal width in mm
Aspect ratio in Ξ
Radial belt construction
Rim diameter in inches
Load rating,
not on ZR tires
Speed code letter, in
front of the R on ZR tires
225/45 R 17 91 V
e.g.
Manufacturer's
code for tire make
Tire size and
tire design
Tire ageDOT xxxx xxx 4707
Page 105 of 164
ReferenceAt a glance Controls Driving tips Mobility
103
meet under the Federal Motor Vehicle Safety
Standard No. 109. Grades B and A represent
higher levels of performance on the laboratory
test wheel than the minimum required by law.
The temperature grade for this tire is
established for a tire that is properly
inflated and not overloaded. Excessive speed,
underinflation, or excessive loading, either sep-
arately or in combination, can cause heat
buildup and possible tire failure.<
RSC – Run-Flat Tires
You will recognize Run-Flat Tires by a circular
symbol containing the letters RSC on the side of
the tire, page104.
M+S
Winter and all-season tires.
These have better winter properties than sum-
mer tires.
XL
Designation for specially reinforced tires.
Tire condition
Inspect your tires regularly for tread wear, signs
of damage and for foreign objects lodged in the
tread. Check the tread depth.
Tread depth
The tread depth should not drop below 1/8 in/
3 mm, although, for example, European legisla-
tion only specifies a minimum tread depth of
1/16 in/1.6 mm. At tread depths below 1/8 in/
3 mm there is an increased risk of high-speed
hydroplaning, even when only small amounts of
water are present on the road surface.
Winter tires
When winter tires wear down past a tread depth
of 1/6 in/4 mm, they become perceptibly less
suitable for winter conditions. In the interest of
safety, new tires should be installed.
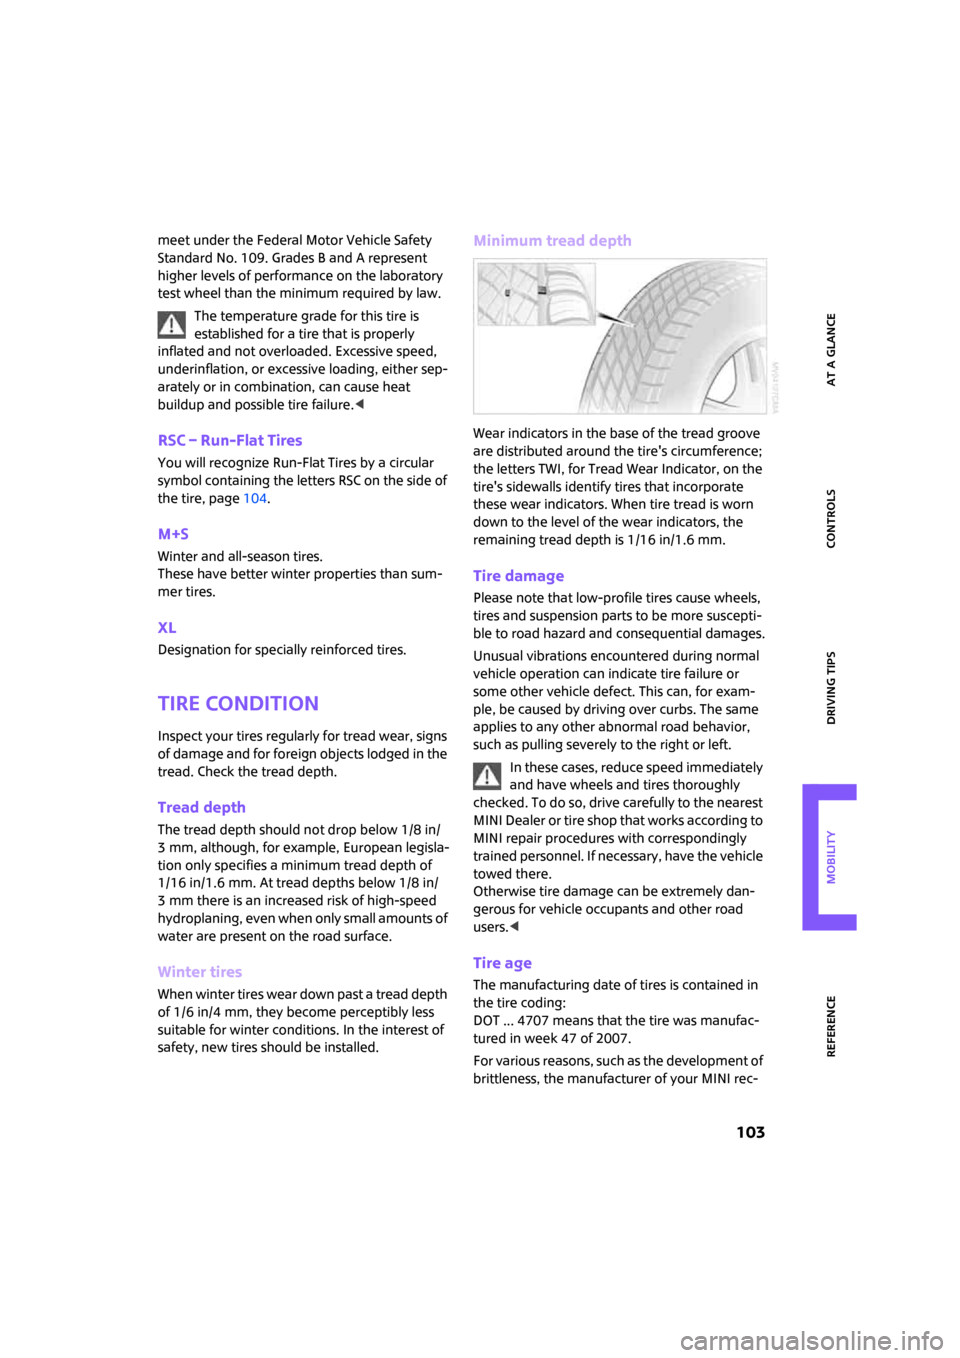
Minimum tread depth
Wear indicators in the base of the tread groove
are distributed around the tire's circumference;
the letters TWI, for Tread Wear Indicator, on the
tire's sidewalls identify tires that incorporate
these wear indicators. When tire tread is worn
down to the level of the wear indicators, the
remaining tread depth is 1/16 in/1.6 mm.
Tire damage
Please note that low-profile tires cause wheels,
tires and suspension parts to be more suscepti-
ble to road hazard and consequential damages.
Unusual vibrations encountered during normal
vehicle operation can indicate tire failure or
some other vehicle defect. This can, for exam-
ple, be caused by driving over curbs. The same
applies to any other abnormal road behavior,
such as pulling severely to the right or left.
In these cases, reduce speed immediately
and have wheels and tires thoroughly
checked. To do so, drive carefully to the nearest
MINI Dealer or tire shop that works according to
MINI repair procedures with correspondingly
trained personnel. If necessary, have the vehicle
towed there.
Otherwise tire damage can be extremely dan-
gerous for vehicle occupants and other road
users.<
Tire age
The manufacturing date of tires is contained in
the tire coding:
DOT ... 4707 means that the tire was manufac-
tured in week 47 of 2007.
For various reasons, such as the development of
brittleness, the manufacturer of your MINI rec-
Page 106 of 164
Wheels and tires
104
ommends tire replacement after no more than
6 years, regardless of the actual wear of the
tires.
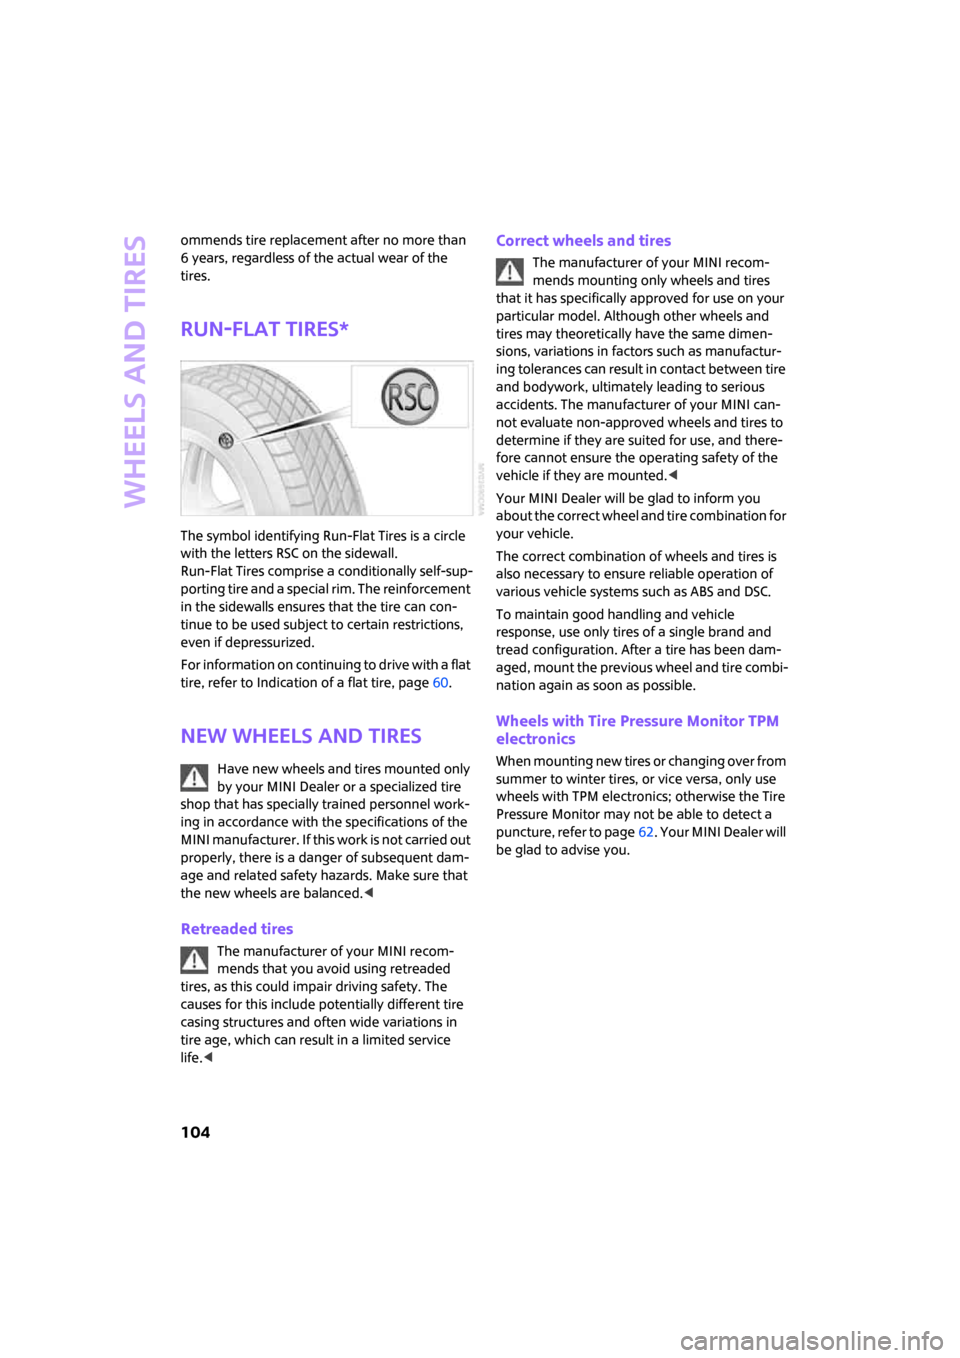
Run-Flat Tires*
The symbol identifying Run-Flat Tires is a circle
with the letters RSC on the sidewall.
Run-Flat Tires comprise a conditionally self-sup-
porting tire and a special rim. The reinforcement
in the sidewalls ensures that the tire can con-
tinue to be used subject to certain restrictions,
even if depressurized.
For information on continuing to drive with a flat
tire, refer to Indication of a flat tire, page60.
New wheels and tires
Have new wheels and tires mounted only
by your MINI Dealer or a specialized tire
shop that has specially trained personnel work-
ing in accordance with the specifications of the
MINI manufacturer. If this work is not carried out
properly, there is a danger of subsequent dam-
age and related safety hazards. Make sure that
the new wheels are balanced.<
Retreaded tires
The manufacturer of your MINI recom-
mends that you avoid using retreaded
tires, as this could impair driving safety. The
causes for this include potentially different tire
casing structures and often wide variations in
tire age, which can result in a limited service
life.<
Correct wheels and tires
The manufacturer of your MINI recom-
mends mounting only wheels and tires
that it has specifically approved for use on your
particular model. Although other wheels and
tires may theoretically have the same dimen-
sions, variations in factors such as manufactur-
ing tolerances can result in contact between tire
and bodywork, ultimately leading to serious
accidents. The manufacturer of your MINI can-
not evaluate non-approved wheels and tires to
determine if they are suited for use, and there-
fore cannot ensure the operating safety of the
vehicle if they are mounted.<
Your MINI Dealer will be glad to inform you
about the correct wheel and tire combination for
your vehicle.
The correct combination of wheels and tires is
also necessary to ensure reliable operation of
various vehicle systems such as ABS and DSC.
To maintain good handling and vehicle
response, use only tires of a single brand and
tread configuration. After a tire has been dam-
aged, mount the previous wheel and tire combi-
nation again as soon as possible.
Wheels with Tire Pressure Monitor TPM
electronics
When mounting new tires or changing over from
summer to winter tires, or vice versa, only use
wheels with TPM electronics; otherwise the Tire
Pressure Monitor may not be able to detect a
puncture, refer to page62. Your MINI Dealer will
be glad to advise you.
Page 109 of 164
ReferenceAt a glance Controls Driving tips Mobility
107
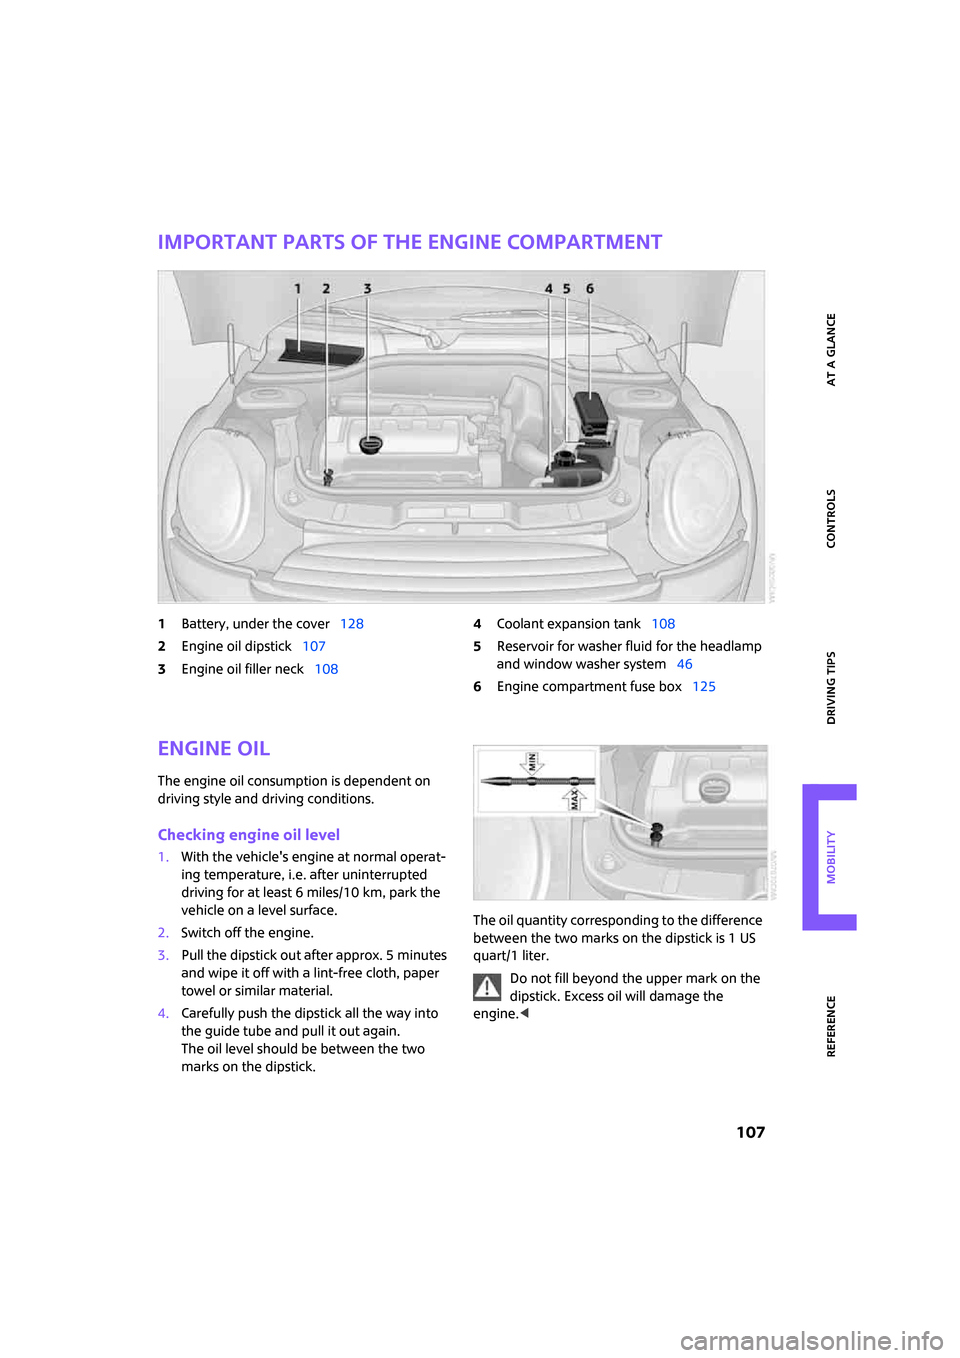
Important parts of the engine compartment
1Battery, under the cover128
2Engine oil dipstick107
3Engine oil filler neck1084Coolant expansion tank108
5Reservoir for washer fluid for the headlamp
and window washer system46
6Engine compartment fuse box125
Engine oil
The engine oil consumption is dependent on
driving style and driving conditions.
Checking engine oil level
1.With the vehicle's engine at normal operat-
ing temperature, i.e. after uninterrupted
driving for at least 6 miles/10 km, park the
vehicle on a level surface.
2.Switch off the engine.
3.Pull the dipstick out after approx. 5 minutes
and wipe it off with a lint-free cloth, paper
towel or similar material.
4.Carefully push the dipstick all the way into
the guide tube and pull it out again.
The oil level should be between the two
marks on the dipstick.The oil quantity corresponding to the difference
between the two marks on the dipstick is 1 US
quart/1 liter.
Do not fill beyond the upper mark on the
dipstick. Excess oil will damage the
engine.<