stop start MINI Clubman 2009 (Mini Connected) User Guide
[x] Cancel search | Manufacturer: MINI, Model Year: 2009, Model line: Clubman, Model: MINI Clubman 2009Pages: 218, PDF Size: 3.69 MB
Page 86 of 218
Lamps
84
Switching off
Press the lever up or down to the pressure point.
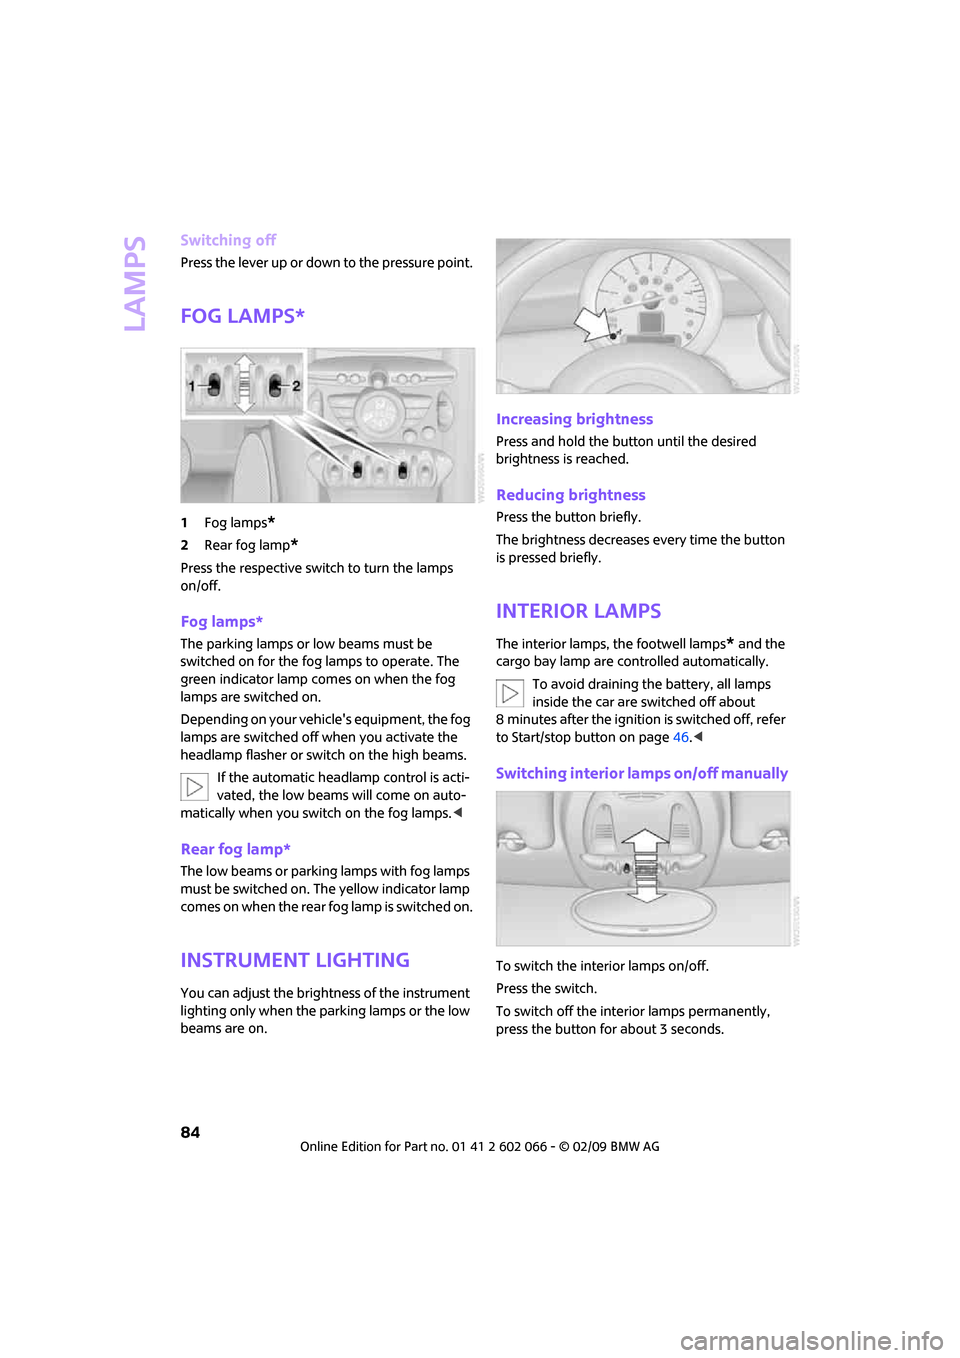
Fog lamps*
1Fog lamps*
2Rear fog lamp*
Press the respective switch to turn the lamps
on/off.
Fog lamps*
The parking lamps or low beams must be
switched on for the fog lamps to operate. The
green indicator lamp comes on when the fog
lamps are switched on.
Depending on your vehicle's equipment, the fog
lamps are switched off when you activate the
headlamp flasher or switch on the high beams.
If the automatic headlamp control is acti-
vated, the low beams will come on auto-
matically when you switch on the fog lamps.<
Rear fog lamp*
The low beams or parking lamps with fog lamps
must be switched on. The yellow indicator lamp
c o m e s o n w h e n t h e r e a r f o g l a m p i s s w i t c h e d o n .
Instrument lighting
You can adjust the brightness of the instrument
lighting only when the parking lamps or the low
beams are on.
Increasing brightness
Press and hold the button until the desired
brightness is reached.
Reducing brightness
Press the button briefly.
The brightness decreases every time the button
is pressed briefly.
Interior lamps
The interior lamps, the footwell lamps* and the
cargo bay lamp are controlled automatically.
To avoid draining the battery, all lamps
inside the car are switched off about
8 minutes after the ignition is switched off, refer
to Start/stop button on page46.<
Switching interior lamps on/off manually
To switch the interior lamps on/off.
Press the switch.
To switch off the interior lamps permanently,
press the button for about 3 seconds.
Page 122 of 218
Destination guidance
120
Destination guidance
Starting destination
guidance
Onboard monitor, for operating principle refer
to page16.
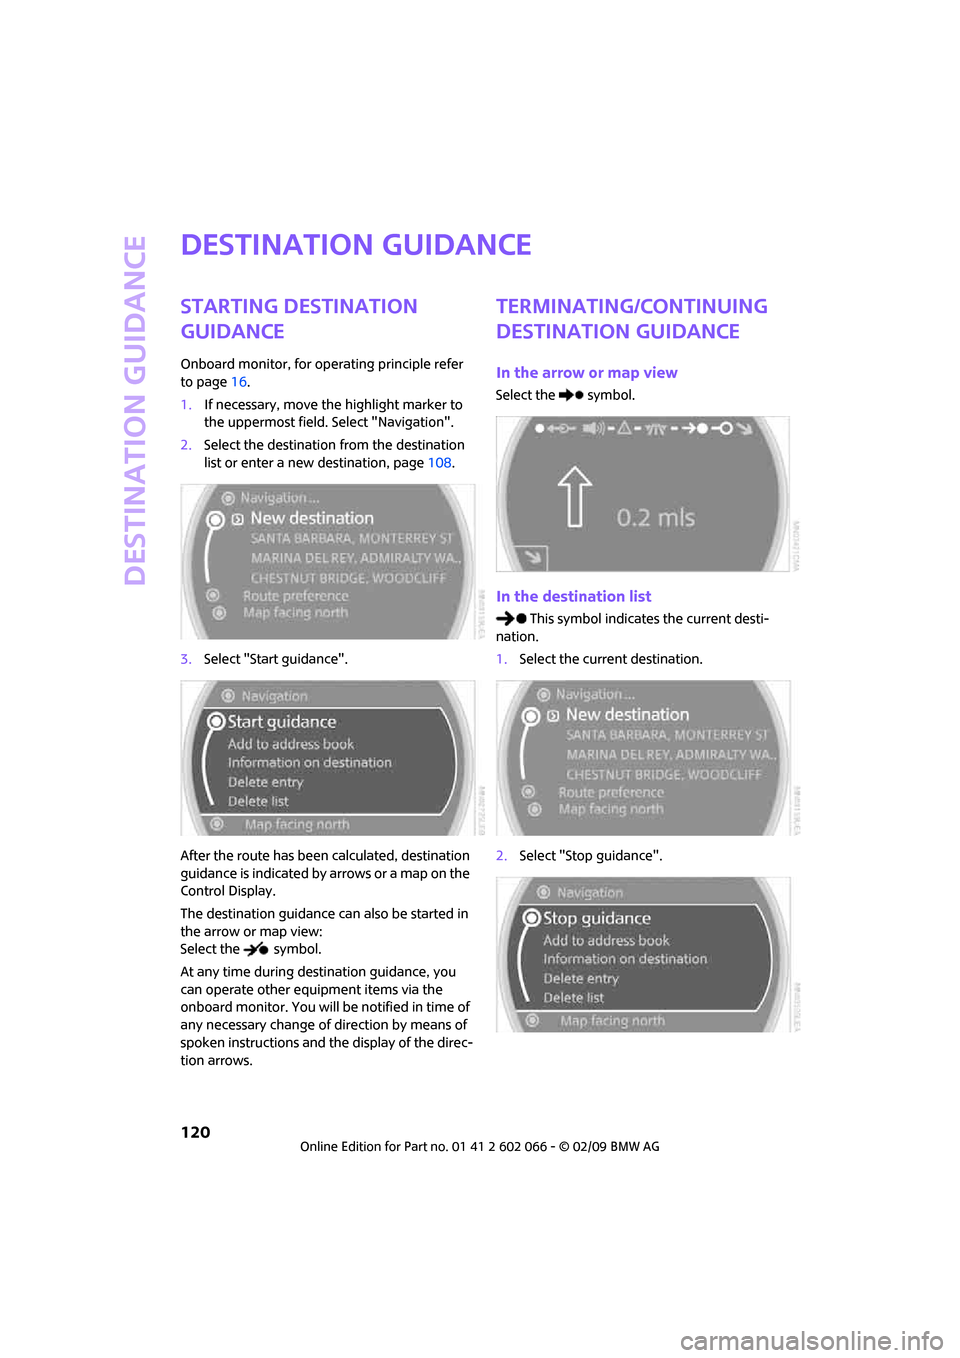
1.If necessary, move the highlight marker to
the uppermost field. Select "Navigation".
2.Select the destination from the destination
list or enter a new destination, page108.
3.Select "Start guidance".
After the route has been calculated, destination
guidance is indicated by arrows or a map on the
Control Display.
The destination guidance can also be started in
the arrow or map view:
Select the symbol.
At any time during destination guidance, you
can operate other equipment items via the
onboard monitor. You will be notified in time of
any necessary change of direction by means of
spoken instructions and the display of the direc-
tion arrows.
Terminating/continuing
destination guidance
In the arrow or map view
Select the symbol.
In the destination list
This symbol indicates the current desti-
nation.
1.Select the current destination.
2.Select "Stop guidance".
Page 123 of 218
MOBILITYAT A GLANCE CONTROLS DRIVING TIPS ENTERTAINMENT
121
NAVIGATION REFERENCE
If you did not reach the destination before the
end of the last journey, the following question
will appear in the display at the start of the next
journey:
"Continue guidance to destination?".
The destination guidance starts automatically
after a short time.
Starting destination guidance
immediately
Select "Yes".
Route display
You have the option of displaying various views
of the route during destination guidance.
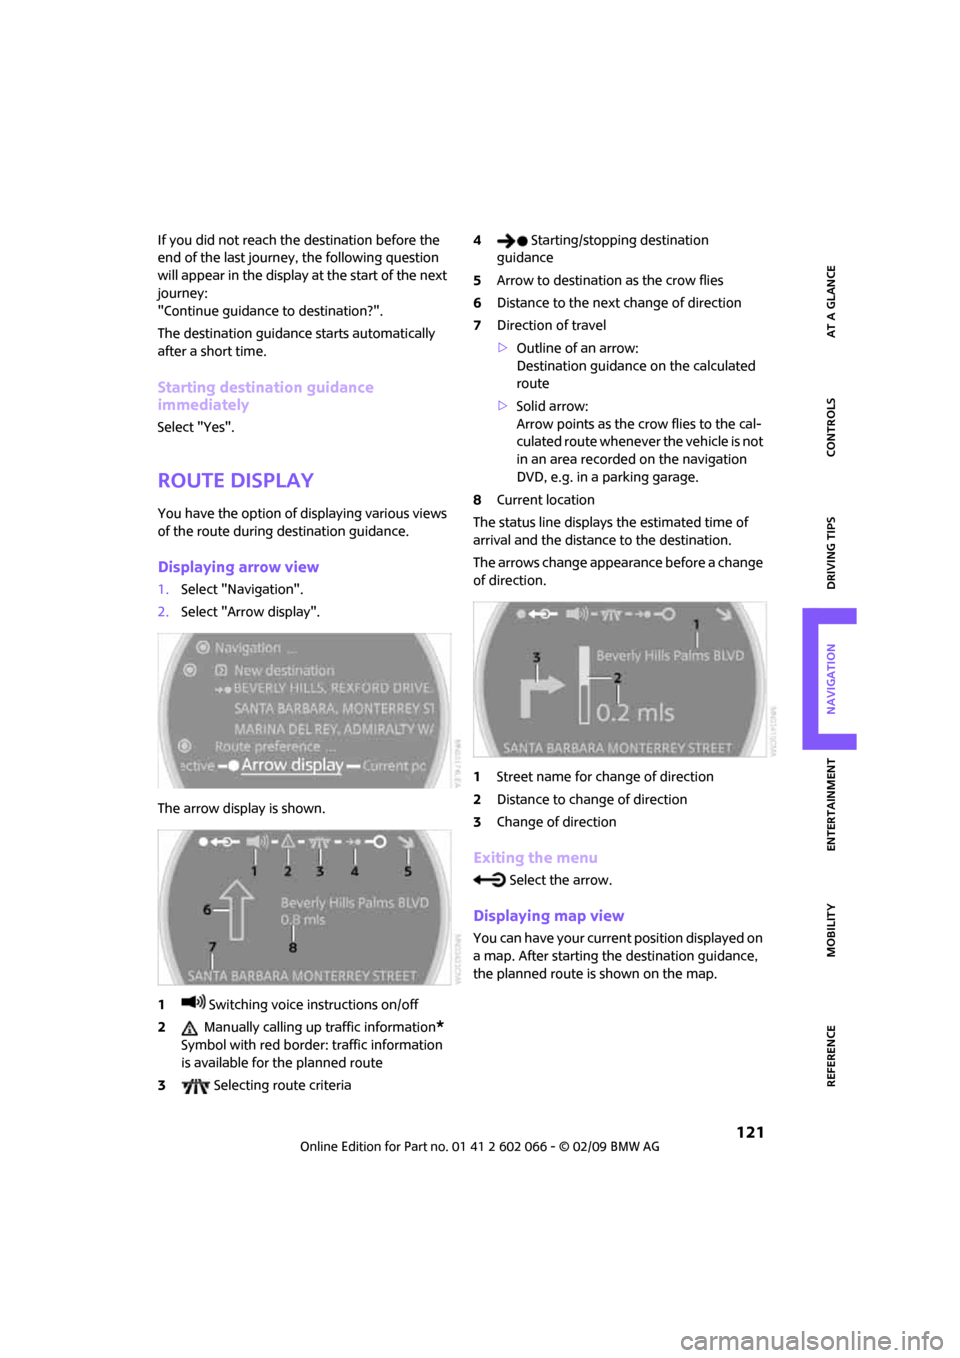
Displaying arrow view
1.Select "Navigation".
2.Select "Arrow display".
The arrow display is shown.
1 Switching voice instructions on/off
2 Manually calling up traffic information
*
Symbol with red border: traffic information
is available for the planned route
3 Selecting route criteria4 Starting/stopping destination
guidance
5Arrow to destination as the crow flies
6Distance to the next change of direction
7Direction of travel
>Outline of an arrow:
Destination guidance on the calculated
route
>Solid arrow:
Arrow points as the crow flies to the cal-
culated route whenever the vehicle is not
in an area recorded on the navigation
DVD, e.g. in a parking garage.
8Current location
The status line displays the estimated time of
arrival and the distance to the destination.
The arrows change appearance before a change
of direction.
1Street name for change of direction
2Distance to change of direction
3Change of direction
Exiting the menu
Select the arrow.
Displaying map view
You can have your current position displayed on
a map. After starting the destination guidance,
the planned route is shown on the map.
Page 124 of 218
Destination guidance
122
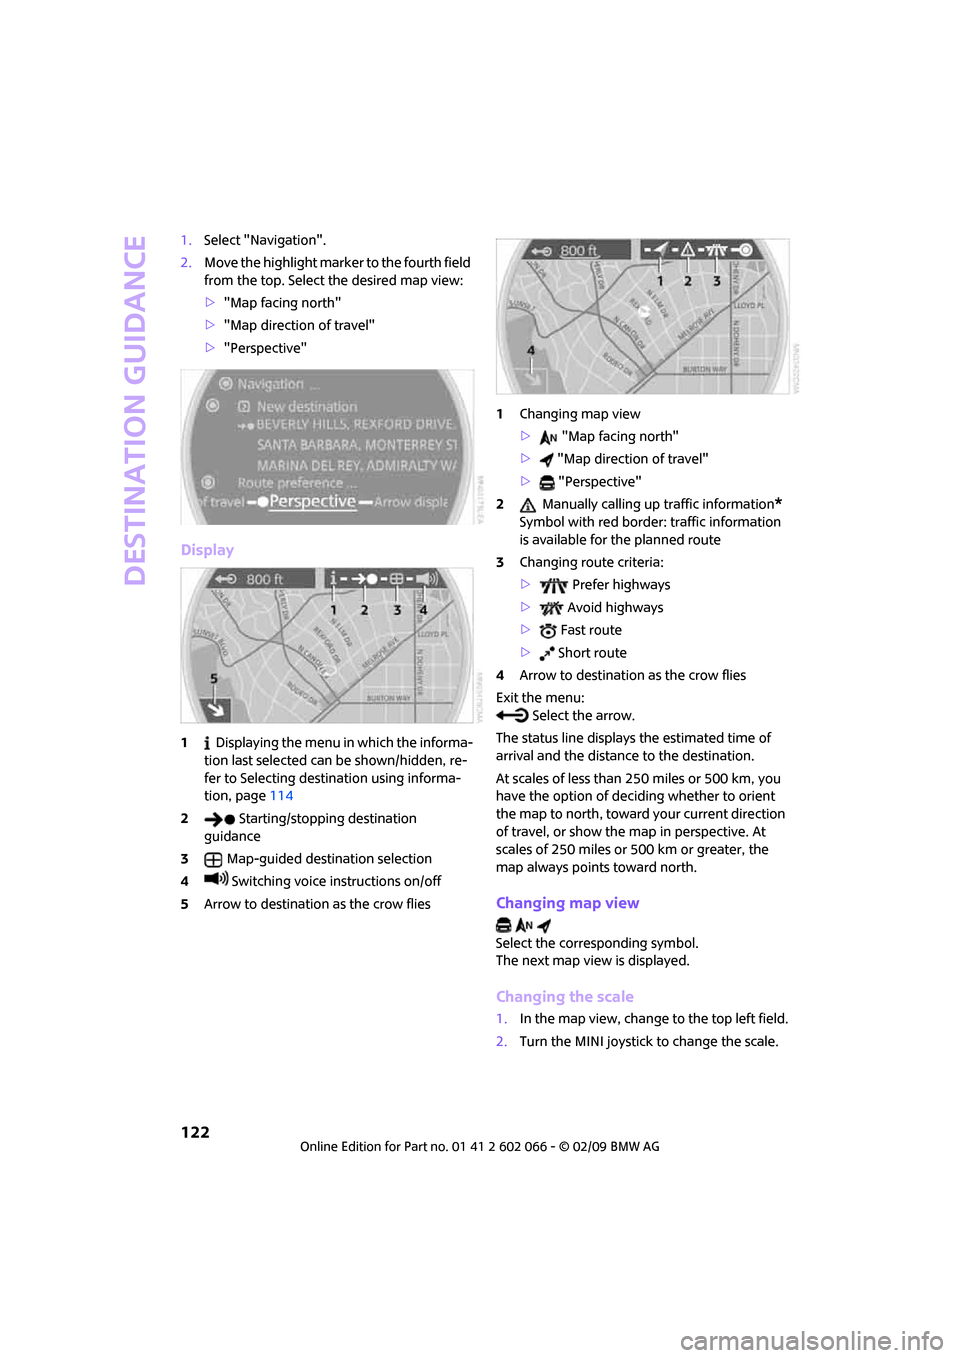
1.Select "Navigation".
2.Move the highlight marker to the fourth field
from the top. Select the desired map view:
>"Map facing north"
>"Map direction of travel"
>"Perspective"
Display
1 Displaying the menu in which the informa-
tion last selected can be shown/hidden, re-
fer to Selecting destination using informa-
tion, page114
2 Starting/stopping destination
guidance
3Map-guided destination selection
4 Switching voice instructions on/off
5Arrow to destination as the crow flies1Changing map view
> "Map facing north"
> "Map direction of travel"
> "Perspective"
2 Manually calling up traffic information
*
Symbol with red border: traffic information
is available for the planned route
3Changing route criteria:
> Prefer highways
> Avoid highways
> Fast route
> Short route
4Arrow to destination as the crow flies
Exit the menu:
Select the arrow.
The status line displays the estimated time of
arrival and the distance to the destination.
At scales of less than 250 miles or 500 km, you
have the option of deciding whether to orient
the map to north, toward your current direction
of travel, or show the map in perspective. At
scales of 250 miles or 500 km or greater, the
map always points toward north.
Changing map view
Select the corresponding symbol.
The next map view is displayed.
Changing the scale
1.In the map view, change to the top left field.
2.Turn the MINI joystick to change the scale.
Page 131 of 218
MOBILITYAT A GLANCE CONTROLS DRIVING TIPS ENTERTAINMENT
129
NAVIGATION REFERENCE
What to do if …
What to do if …
>a navigation DVD is inserted, but an instruc-
tion to insert the DVD appears on the Control
Display?
The navigation DVD may not be the correct
DVD for the navigation system. This infor-
mation is indicated on the DVD label.
>you request the current position of your
vehicle, but do not receive a precise display?
The system is unable to receive enough GPS
signals at your current position due to
obstructions, your current position is not yet
available on your navigation DVD, or the sys-
tem is in the process of calculating your cur-
rent position. As a rule, reception is guaran-
teed when you are in the open.
>the destination guidance does not accept a
destination?
The data of the destination is not stored on
the navigation DVD that is loaded. Choose a
destination as close as possible to the origi-
nal one.
>the destination guidance does not accept an
address without the street name?
On the navigation DVD, no downtown area
can be determined for the city or town
entered. Enter any street, or a destination
such as the railway station in the selected
town, and then start the destination guid-
ance.
>you want to enter a destination for the des-
tination guidance, but it is not possible to
select the letters for your desired entry?
The data of the destination is not stored on
the navigation DVD that is loaded. In this
case, the system will not offer you any letters
to choose from. Choose a destination as
close as possible to the original one.
>the system stops furnishing directions on
which way to turn as you approach inter-
sections?
You are driving in an area that has not yet
been completely recorded on the navigation
DVD. Instead of an arrow indicating a turn, you will see an arrow which indicates the
general direction of your planned route. Or
you have left the recommended route and
the system requires a few seconds to calcu-
late a new recommended route.
>the navigation system does not react to
entries?
If the battery was disconnected, it takes
about 10 minutes before the system is once
again operational.
Page 191 of 218
MOBILITYAT A GLANCE CONTROLS DRIVING TIPS ENTERTAINMENT
189
NAVIGATION REFERENCE
Vehicles with a catalytic converter should only
be tow-started when the engine is cold, vehicles
with an automatic transmission cannot be tow-
started at all.
1.Switch on hazard warning flashers, comply
with local regulations.
2.Switch on the ignition, page46.
3.Shift into 3rd gear.
4.Have the vehicle tow-started with the clutch
completely depressed and then slowly re-
lease the clutch. After the engine starts, im-
mediately depress the clutch completely
again.
5.Stop at a suitable location, remove the tow
bar or rope and switch off the hazard warn-
ing flashers.
6.Have the vehicle checked.
Page 198 of 218
Short commands for the voice activation system
196
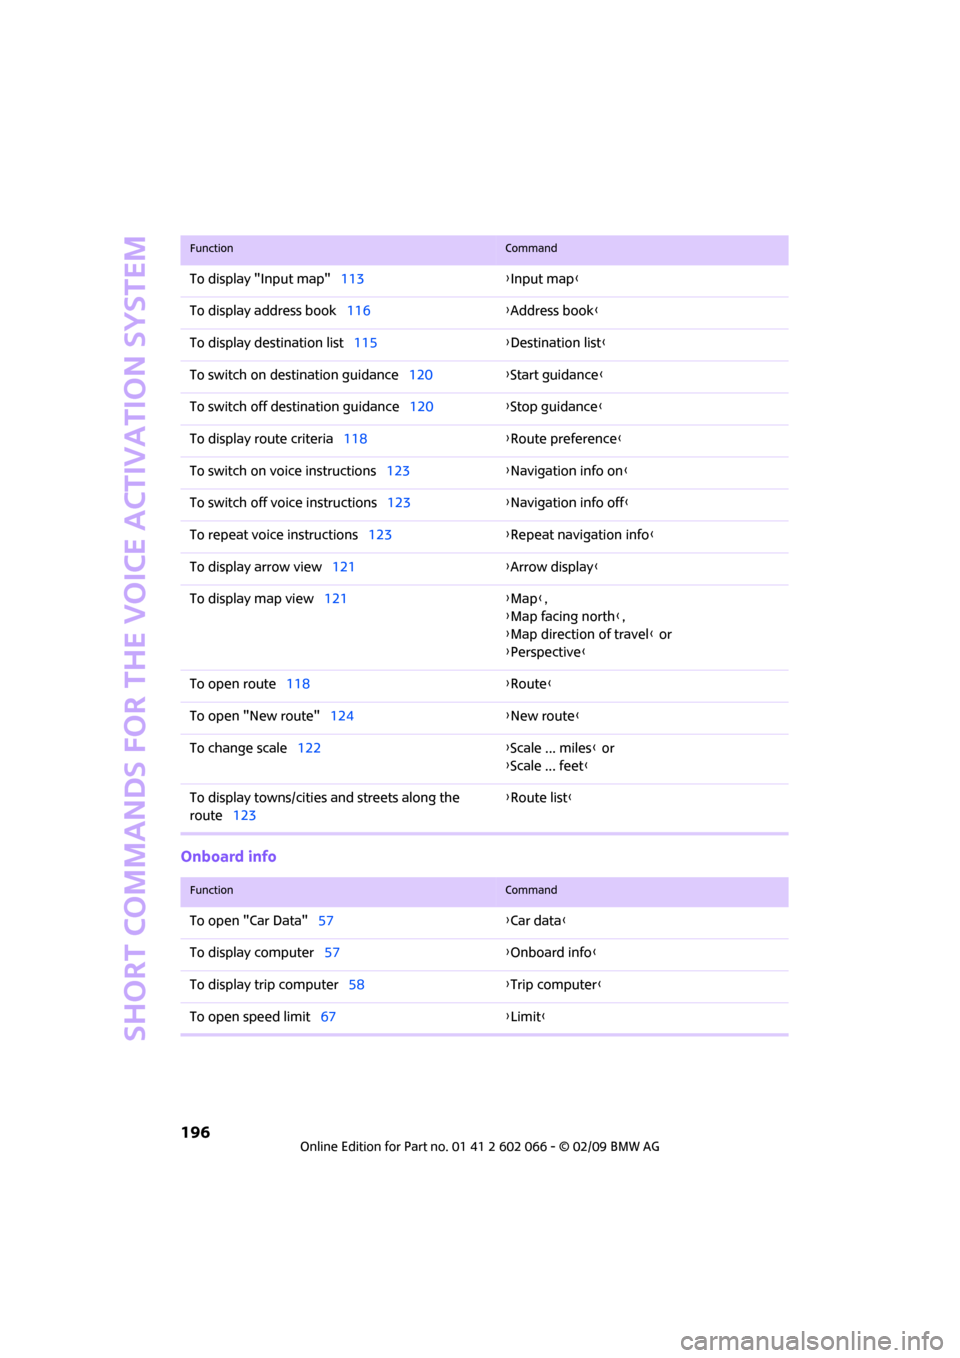
Onboard info
To display "Input map"113{Input map}
To display address book116{Address book}
To display destination list115{Destination list}
To switch on destination guidance120{Start guidance}
To switch off destination guidance120{Stop guidance}
To display route criteria118{Route preference}
To switch on voice instructions123{Navigation info on}
To switch off voice instructions123{Navigation info off}
To repeat voice instructions123{Repeat navigation info}
To display arrow view121{Arrow display}
To display map view121{Map},
{Map facing north},
{Map direction of travel} or
{Perspective}
To open route118 {Route}
To open "New route"124{New route}
To change scale122{Scale ... miles} or
{Scale ... feet}
To display towns/cities and streets along the
route123{Route list}
FunctionCommand
FunctionCommand
To open "Car Data"57{Car data}
To display computer57{Onboard info}
To display trip computer58{Trip computer}
To open speed limit67{Limit}
Page 211 of 218
209
MOBILITYAT A GLANCE CONTROLS DRIVING TIPS ENTERTAINMENT NAVIGATION REFERENCE
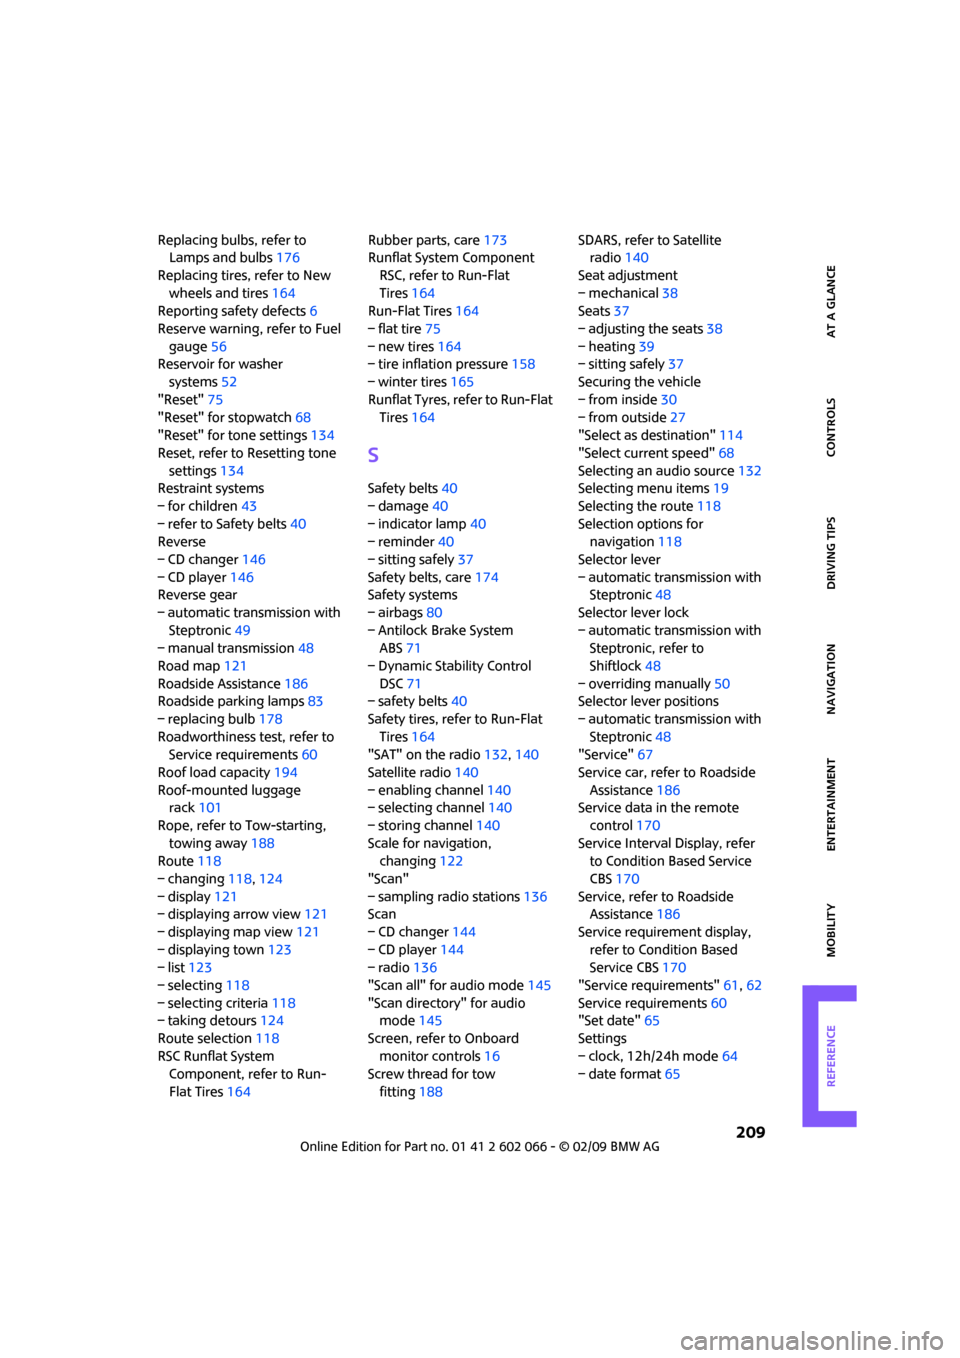
Replacing bulbs, refer to
Lamps and bulbs176
Replacing tires, refer to New
wheels and tires164
Reporting safety defects6
Reserve warning, refer to Fuel
gauge56
Reservoir for washer
systems52
"Reset"75
"Reset" for stopwatch68
"Reset" for tone settings134
Reset, refer to Resetting tone
settings134
Restraint systems
– for children43
– refer to Safety belts40
Reverse
– CD changer146
– CD player146
Reverse gear
– automatic transmission with
Steptronic49
– manual transmission48
Road map121
Roadside Assistance186
Roadside parking lamps83
– replacing bulb178
Roadworthiness test, refer to
Service requirements60
Roof load capacity194
Roof-mounted luggage
rack101
Rope, refer to Tow-starting,
towing away188
Route118
– changing118,124
– display121
– displaying arrow view121
– displaying map view121
– displaying town123
– list123
– selecting118
– selecting criteria118
– taking detours124
Route selection118
RSC Runflat System
Component, refer to Run-
Flat Tires164Rubber parts, care173
Runflat System Component
RSC, refer to Run-Flat
Tires164
Run-Flat Tires164
– flat tire75
– new tires164
– tire inflation pressure158
– winter tires165
Runflat Tyres, refer to Run-Flat
Tires
164
S
Safety belts40
– damage40
– indicator lamp40
– reminder40
– sitting safely37
Safety belts, care174
Safety systems
– airbags80
– Antilock Brake System
ABS71
– Dynamic Stability Control
DSC71
– safety belts40
Safety tires, refer to Run-Flat
Tires164
"SAT" on the radio132,140
Satellite radio140
– enabling channel140
– selecting channel140
– storing channel140
Scale for navigation,
changing122
"Scan"
– sampling radio stations136
Scan
– CD changer144
– CD player144
– radio136
"Scan all" for audio mode145
"Scan directory" for audio
mode145
Screen, refer to Onboard
monitor controls16
Screw thread for tow
fitting188SDARS, refer to Satellite
radio140
Seat adjustment
– mechanical38
Seats37
– adjusting the seats38
– heating39
– sitting safely37
Securing the vehicle
– from inside30
– from outside27
"Select as destination"114
"Select current speed"68
Selecting an audio source132
Selecting menu items19
Selecting the route118
Selection options for
navigation118
Selector lever
– automatic transmission with
Steptronic48
Selector lever lock
– automatic transmission with
Steptronic, refer to
Shiftlock48
– overriding manually
50
Selector lever positions
– automatic transmission with
Steptronic48
"Service"67
Service car, refer to Roadside
Assistance186
Service data in the remote
control170
Service Interval Display, refer
to Condition Based Service
CBS170
Service, refer to Roadside
Assistance186
Service requirement display,
refer to Condition Based
Service CBS170
"Service requirements"61,62
Service requirements60
"Set date"65
Settings
– clock, 12h/24h mode64
– date format65
Page 212 of 218
From A to Z
210
Shifting gears
– automatic transmission with
Steptronic49
– manual transmission48
Shiftlock
– automatic transmission, refer
to Changing selector lever
positions48
Short commands for the voice
activation system195
"Short route" in
navigation118
Shortest route in navigation,
refer to Selecting route118
"Show current position"114
"Show destination
position"114
Shuffled, refer to Random
– CD changer146
– CD player146
Side airbags80
Side door, rear, refer to
Clubdoor31
Side turn signal indicator
– replacing bulb179
Side windows, refer to
Windows35
Signal horn, refer to Horn10
Sitting safely37
– airbags37
– safety belts37
– with head restraint37
Size, refer to Dimensions193
Sliding/tilt sunroof
– refer to Glass sunroof,
electric34
Slot for remote control46
Smokers' package, refer to
Ashtray93
Snap-in adapter, refer to
Center armrest storage
compartment91
Snow chains165
Socket for Onboard Diagnosis
OBD170
Socket, refer to Connecting
electrical appliances93
Song search, refer to Playing a
track144Sound output for
entertainment on/off132
Space-saver spare tire
– changing tires182
– inflation pressure158
Spare wheel, refer to Space-
saver spare tire182
Speaking, refer to Voice
instructions from navigation
system123
Special oils, refer to Approved
engine oils168
Speed192
– with winter tires165
Speed control, refer to Cruise
control53
Speed limit
67
– setting67
Speed limit warning, refer to
Speed limit67
"Speed volume", refer to Tone
control134
Speed-dependent volume133
Speedometer12
Split rear seat backrest, refer to
Expanding the cargo bay98
Splitdoor31
– opening from outside31
– unlocking with remote
control29
Sport button73
Stability control, refer to
Driving stability control
systems71
"Start guidance"115,117
Start menu17
Start/stop button46
– starting the engine46
– switching off the engine47
Starting assistance, refer to
Jump starting186
Starting, refer to Starting the
engine46
Starting the engine
– start/stop button46
Start-off assistance, refer to
– DSC71
– Hill Start Assist73"State / Province" in
destination entry109
Station, refer to Radio135
"Status"61
Status of this Owner's Manual
at time of printing4
Steering wheel41
– adjustment41
– buttons on steering wheel11
– lock46
– shift paddles49
Steptronic, refer to Automatic
transmission with
Steptronic48
"Stopwatch"68
Stopwatch68
Storage area
– cargo bay97
Storage compartment, front
passenger side92
Storage compartments91
Storage space
– storage compartments91
"Store in address book" in
navigation116
"Store" on the radio137,141
Storing current position
116
Storing radio stations137
Storing the vehicle175
Storing tires165
Stowage, refer to Storage
compartments91
"Street" in destination
entry110
Summer tires, refer to Wheels
and tires158
Switches, refer to Cockpit10
Switching off
– engine47
Switching off the engine
– start/stop button46
Switching on
– audio132
– CD changer132
– CD player132
– radio132
Switching on the hour
signal64