warning light MINI Clubman 2009 Owner's Manual (Mini Connected)
[x] Cancel search | Manufacturer: MINI, Model Year: 2009, Model line: Clubman, Model: MINI Clubman 2009Pages: 218, PDF Size: 3.69 MB
Page 14 of 218
Cockpit
12
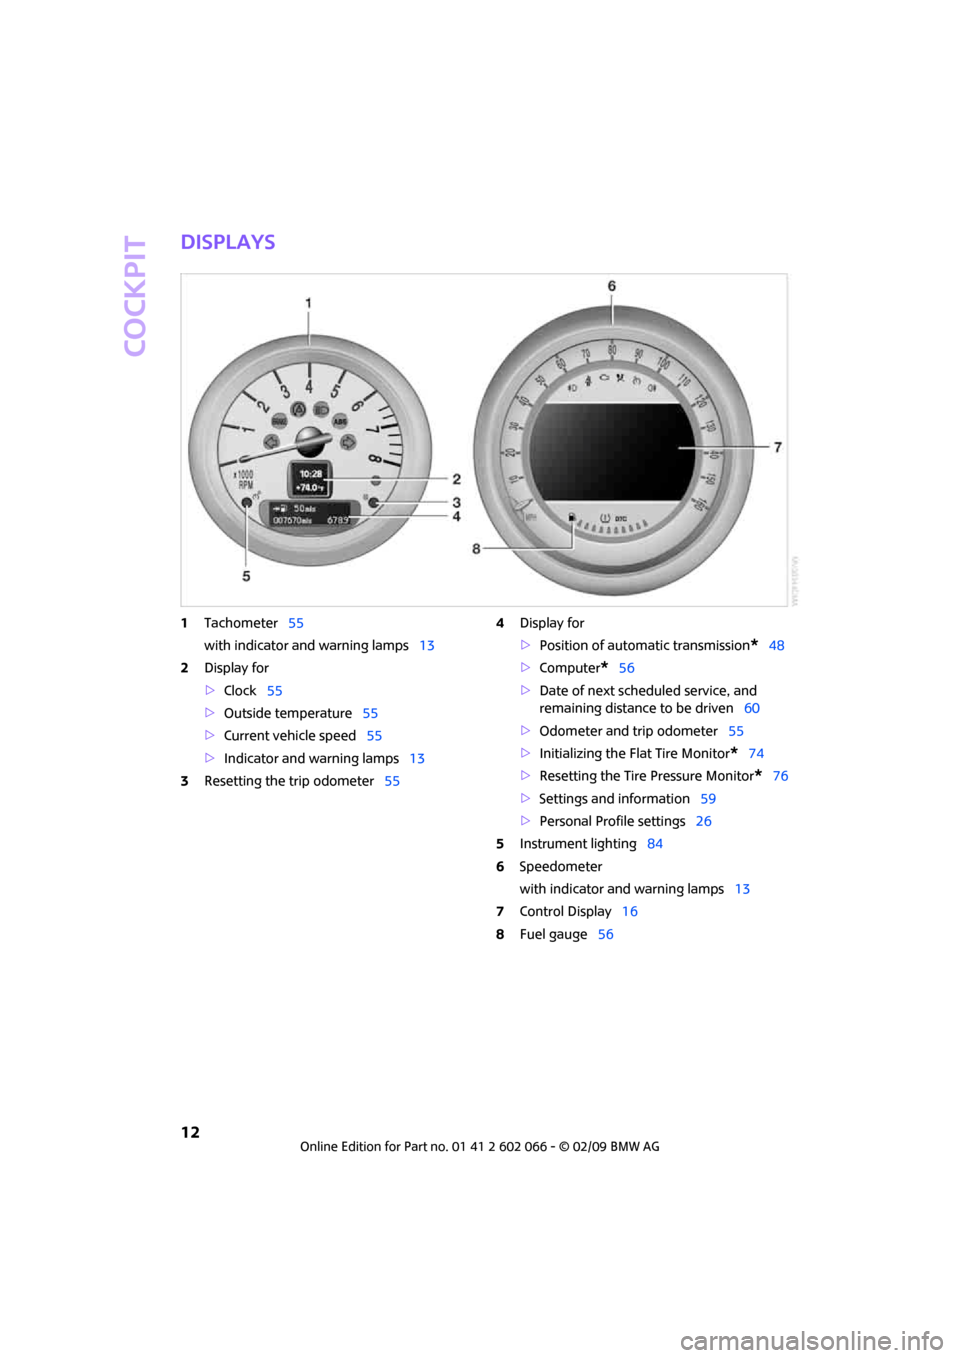
Displays
1Tachometer55
with indicator and warning lamps13
2Display for
>Clock55
>Outside temperature55
>Current vehicle speed55
>Indicator and warning lamps13
3Resetting the trip odometer554Display for
>Position of automatic transmission
*48
>Computer
*56
>Date of next scheduled service, and
remaining distance to be driven60
>Odometer and trip odometer55
>Initializing the Flat Tire Monitor
*74
>Resetting the Tire Pressure Monitor
*76
>Settings and information59
>Personal Profile settings26
5Instrument lighting84
6Speedometer
with indicator and warning lamps13
7Control Display16
8Fuel gauge56
Page 15 of 218
MOBILITYAT A GLANCE CONTROLS DRIVING TIPS ENTERTAINMENT
13
NAVIGATION REFERENCE
Indicator and
warning lamps
The concept
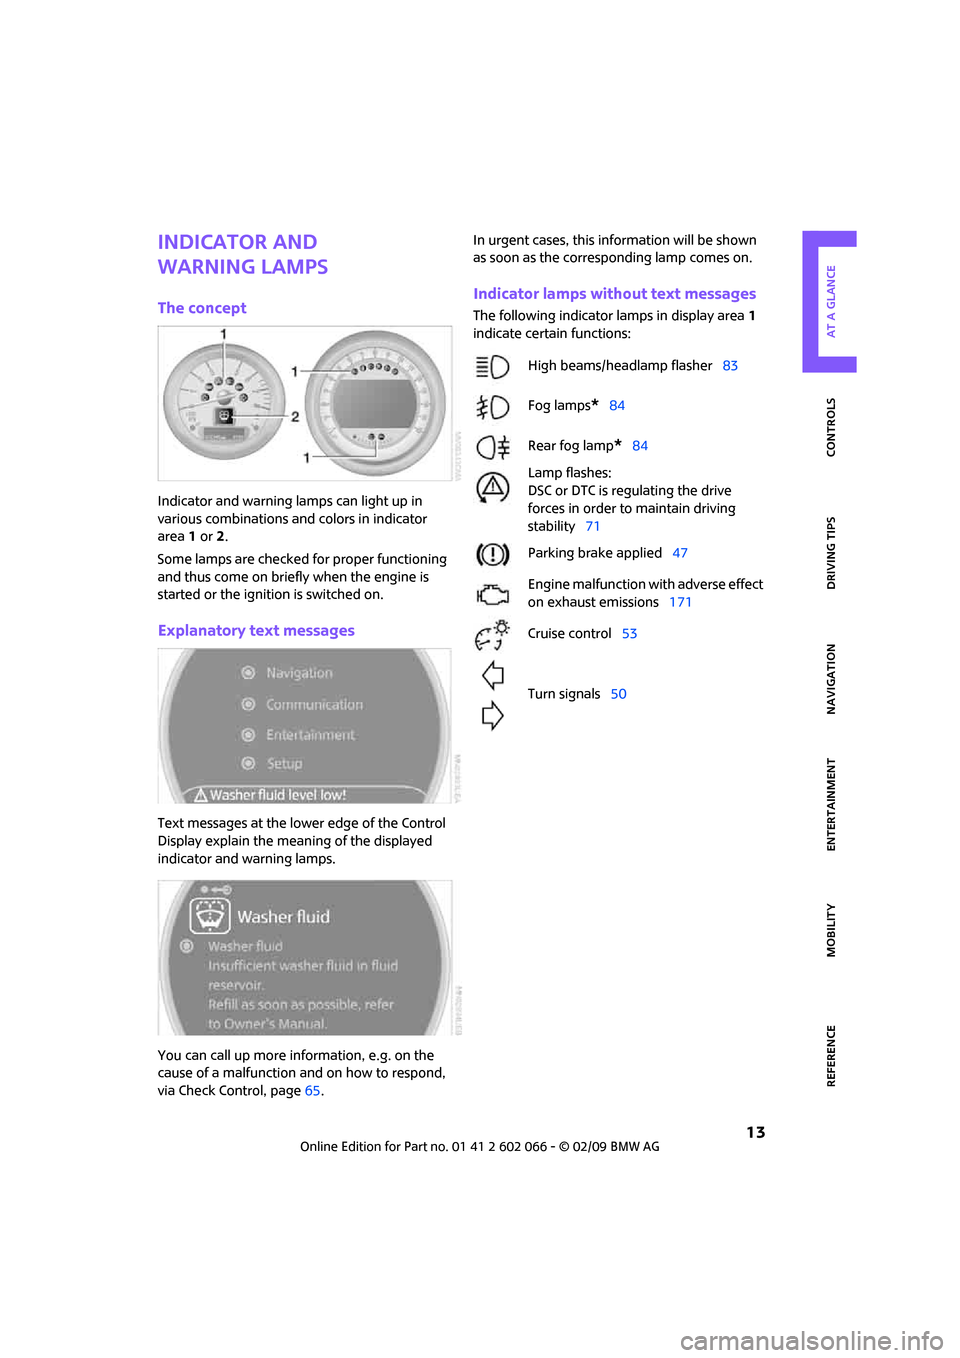
Indicator and warning lamps can light up in
various combinations and colors in indicator
area 1 or2.
Some lamps are checked for proper functioning
and thus come on briefly when the engine is
started or the ignition is switched on.
Explanatory text messages
Text messages at the lower edge of the Control
Display explain the meaning of the displayed
indicator and warning lamps.
You can call up more information, e.g. on the
cause of a malfunction and on how to respond,
via Check Control, page65.In urgent cases, this information will be shown
as soon as the corresponding lamp comes on.
Indicator lamps without text messages
The following indicator lamps in display area 1
indicate certain functions:
High beams/headlamp flasher83
Fog lamps
*84
Rear fog lamp
*84
Lamp flashes:
DSC or DTC is regulating the drive
forces in order to maintain driving
stability71
Parking brake applied47
Engine malfunction with adverse effect
on exhaust emissions171
Cruise control53
Turn signals50
Page 17 of 218
MOBILITYAT A GLANCE CONTROLS DRIVING TIPS ENTERTAINMENT
15
NAVIGATION REFERENCE
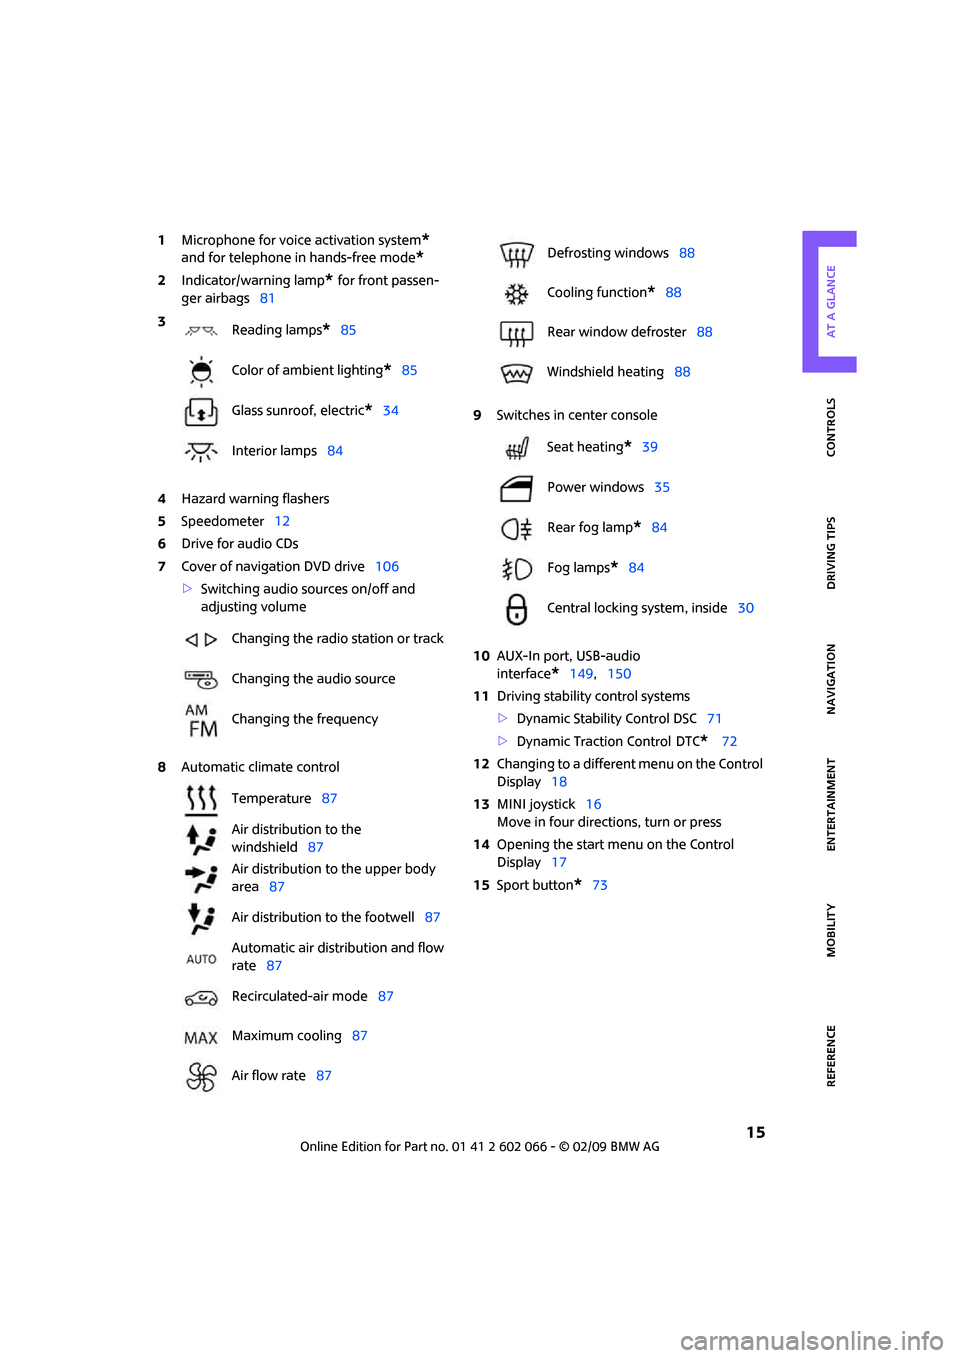
1Microphone for voice activation system*
and for telephone in hands-free mode*
2Indicator/warning lamp* for front passen-
ger airbags81
4Hazard warning flashers
5Speedometer12
6Drive for audio CDs
7Cover of navigation DVD drive106
>Switching audio sources on/off and
adjusting volume
8Automatic climate control9Switches in center console
10AUX-In port, USB-audio
interface
*149,150
11Driving stability control systems
>Dynamic Stability Control DSC71
>Dynamic Traction Control
DTC* 72
12Changing to a different menu on the Control
Display18
13MINI joystick16
Move in four directions, turn or press
14Opening the start menu on the Control
Display17
15Sport button
*73 3
Reading lamps
*85
Color of ambient lighting
*85
Glass sunroof, electric
*34
Interior lamps84
Changing the radio station or track
Changing the audio source
Changing the frequency
Temperature87
Air distribution to the
windshield87
Air distribution to the upper body
area87
Air distribution to the footwell87
Automatic air distribution and flow
rate87
Recirculated-air mode87
Maximum cooling87
Air flow rate87
Defrosting windows88
Cooling function
*88
Rear window defroster88
Windshield heating88
Seat heating
*39
Power windows35
Rear fog lamp
*84
Fog lamps
*84
Central locking system, inside30
Page 29 of 218
MOBILITYAT A GLANCE CONTROLS DRIVING TIPS ENTERTAINMENT
27
NAVIGATION REFERENCE
>Settings for the displays on the onboard
monitor, in the speedometer and in the
tachometer:
>12h/24h mode of the clock64
>Date format65
>Brightness of the Control Display69
>Language on the Control Display68
>Units of measure for fuel consumption,
distance covered/remaining distances
and temperature60
>Show visual warning for Park Distance Con-
trol PDC
*70
>Light settings:
>Pathway lighting82
>Daytime running lamps83
>Automatic climate control: activating/deac-
tivating the AUTO program, setting the tem-
perature, air volume and air distribution87
>Entertainment:
>Audio volume133
>Tone control133
>Speed-dependent volume control133
Central locking system
The concept
The central locking system is ready for operation
whenever the driver's door is closed.
The system simultaneously engages and
releases the locks on the following:
>Doors
>Splitdoor
>Fuel filler door
Operating from outside
>Via the remote control
>Via the door lock
*
>In cars with convenient access*, via the door
handles on the driver's and passenger's
sides.The anti-theft system is also operated at the
same time. It prevents the doors from being
unlocked using the lock buttons or door han-
dles. The remote control can also be used to
switch on/off the welcome lamps and interior
lamps. The alarm system
* is also activated or
deactivated, page31.
Operating from inside
Button for central locking system, page30.
In the event of a sufficiently severe accident, the
central locking system unlocks automatically. In
addition, the hazard warning flashers and inte-
rior lamps come on.
Opening and closing:
from outside
Persons or animals in a parked vehicle
could lock the doors from the inside. Take
the key with you when you leave the vehicle so
that the vehicle can be opened from the out-
side.<
Using the remote control
Unlocking
Press the button.
The welcome lamps and interior lamps come on.
Unlocking mode
You can also set which parts of the car are
unlocked. The setting is stored for the remote
control in use.
Onboard monitor, for operating principle refer
to page16.
1.Press the button.
This opens the start menu.
2.Move the MINI joystick to highlight "Setup"
and press the MINI joystick.
Page 35 of 218
MOBILITYAT A GLANCE CONTROLS DRIVING TIPS ENTERTAINMENT
33
NAVIGATION REFERENCE
the remote control within the immediate vicinity
or in the passenger compartment.
Convenient access supports the following
functions:
>Unlocking/locking the vehicle
>Unlocking the splitdoor by itself
>Starting the engine
>Convenient operation
Functional requirements
>The vehicle or the splitdoor can only be
locked when the vehicle detects that the
remote control currently in use is outside of
the vehicle.
>The vehicle cannot be locked or unlocked
again until after approx. 2 seconds.
>The engine can only be started when the
vehicle detects that the remote control is
inside the vehicle.
>The doors and splitdoor must be closed to
be able to operate the windows and glass
sunroof.
Comparison to standard remote controls
In general, there is no difference between using
convenient access or pressing the buttons on
the remote control to carry out the functions
mentioned above.
Instructions on opening and closing are found
starting on page26.
Special features regarding the use of convenient
access are described below.
If you notice a brief delay while opening or
closing the windows or glass sunroof, the
system is checking whether a remote control is
inside the vehicle. Repeat the opening or closing
procedure, if necessary.<
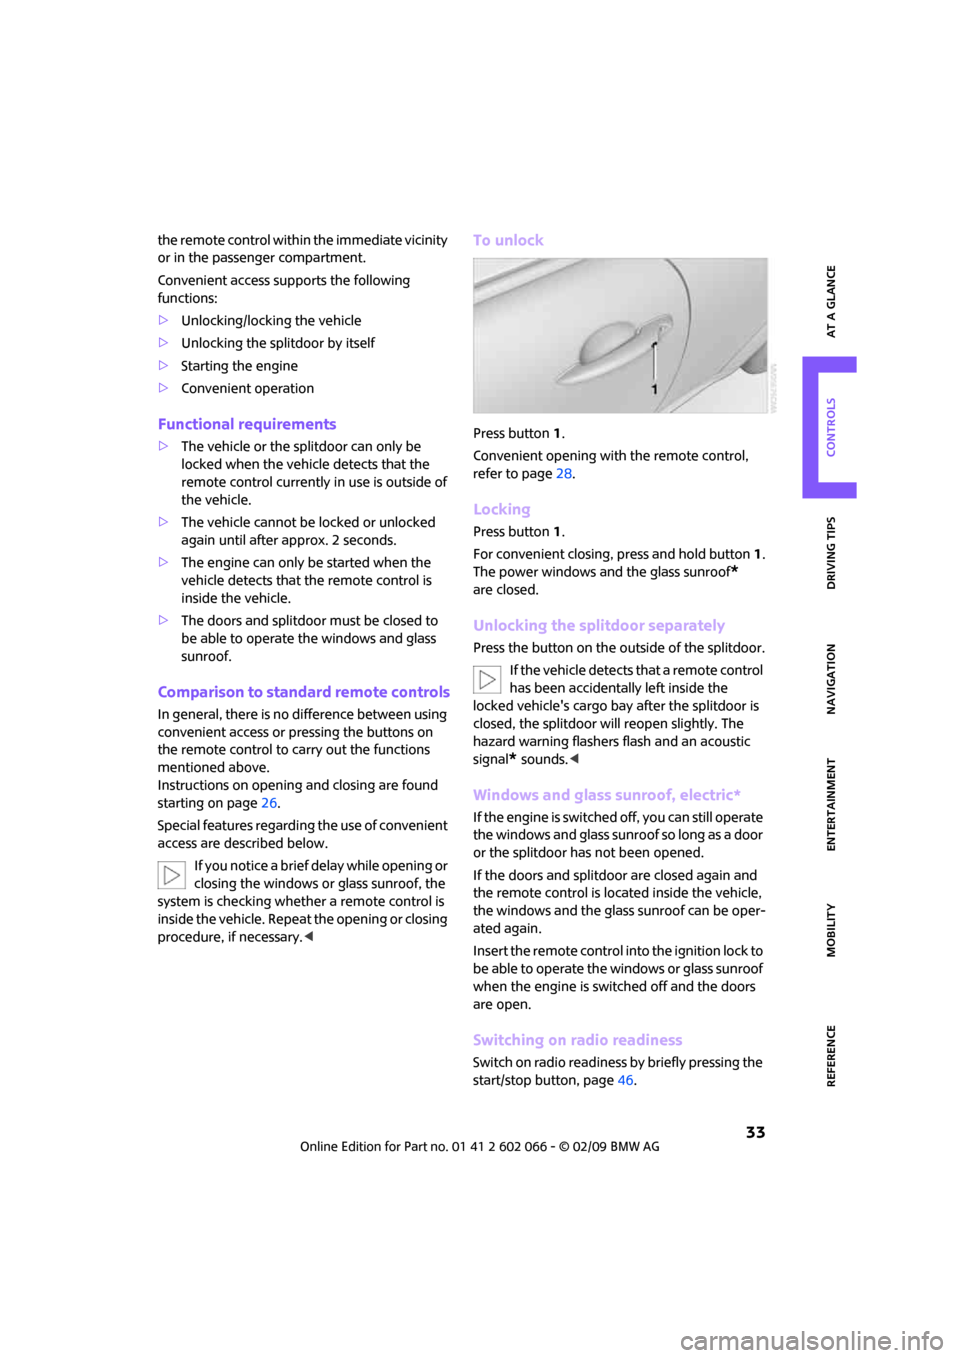
To unlock
Press button 1.
Convenient opening with the remote control,
refer to page28.
Locking
Press button 1.
For convenient closing, press and hold button 1.
The power windows and the glass sunroof
*
are closed.
Unlocking the splitdoor separately
Press the button on the outside of the splitdoor.
If the vehicle detects that a remote control
has been accidentally left inside the
locked vehicle's cargo bay after the splitdoor is
closed, the splitdoor will reopen slightly. The
hazard warning flashers flash and an acoustic
signal
* sounds.<
Windows and glass sunroof, electric*
If the engine is switched off, you can still operate
the windows and glass sunroof so long as a door
or the splitdoor has not been opened.
If the doors and splitdoor are closed again and
the remote control is located inside the vehicle,
the windows and the glass sunroof can be oper-
ated again.
Insert the remote control into the ignition lock to
be able to operate the windows or glass sunroof
when the engine is switched off and the doors
are open.
Switching on radio readiness
Switch on radio readiness by briefly pressing the
start/stop button, page46.
Page 48 of 218
Driving
46
Driving
Ignition lock
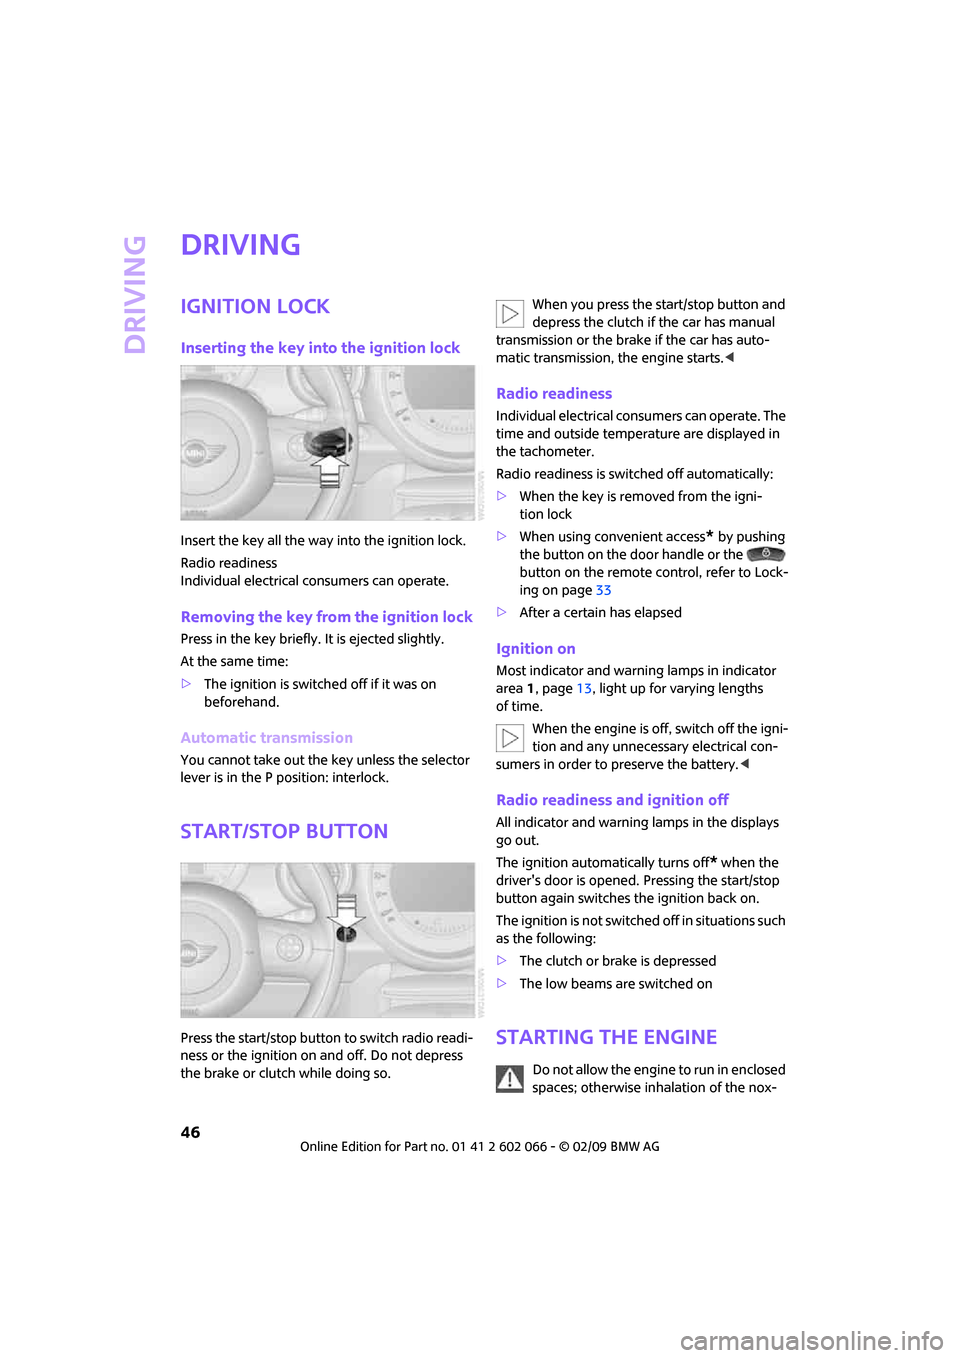
Inserting the key into the ignition lock
Insert the key all the way into the ignition lock.
Radio readiness
Individual electrical consumers can operate.
Removing the key from the ignition lock
Press in the key briefly. It is ejected slightly.
At the same time:
>The ignition is switched off if it was on
beforehand.
Automatic transmission
You cannot take out the key unless the selector
lever is in the P position: interlock.
Start/stop button
Press the start/stop button to switch radio readi-
ness or the ignition on and off. Do not depress
the brake or clutch while doing so.When you press the start/stop button and
depress the clutch if the car has manual
transmission or the brake if the car has auto-
matic transmission, the engine starts.<
Radio readiness
Individual electrical consumers can operate. The
time and outside temperature are displayed in
the tachometer.
Radio readiness is switched off automatically:
>When the key is removed from the igni-
tion lock
>When using convenient access
* by pushing
the button on the door handle or the
button on the remote control, refer to Lock-
ing on page33
>After a certain has elapsed
Ignition on
Most indicator and warning lamps in indicator
area 1, page13, light up for varying lengths
of time.
When the engine is off, switch off the igni-
tion and any unnecessary electrical con-
sumers in order to preserve the battery.<
Radio readiness and ignition off
All indicator and warning lamps in the displays
go out.
The ignition automatically turns off
* when the
driver's door is opened. Pressing the start/stop
button again switches the ignition back on.
The ignition is not switched off in situations such
as the following:
>The clutch or brake is depressed
>The low beams are switched on
Starting the engine
Do not allow the engine to run in enclosed
spaces; otherwise inhalation of the nox-
Page 56 of 218
Driving
54
Increasing speed
Press button3 repeatedly until the desired
speed is reached. Every time you press the but-
ton, the speed increases by approx. 1 mph or
approx. 2 km/h.
Accelerating using the button
Press and hold button3.
The vehicle accelerates without pressure on the
accelerator pedal. After the button is released,
the driving speed is maintained and stored.
Decreasing speed
Press button4 repeatedly until the desired
speed is reached.
The functions here are the same as for increas-
ing the speed or accelerating, except that the
speed will be decreased.
Resuming a speed stored beforehand
Press button 1.
The last speed stored is achieved again and
maintained.
The stored speed is cleared when the ignition is
switched off.
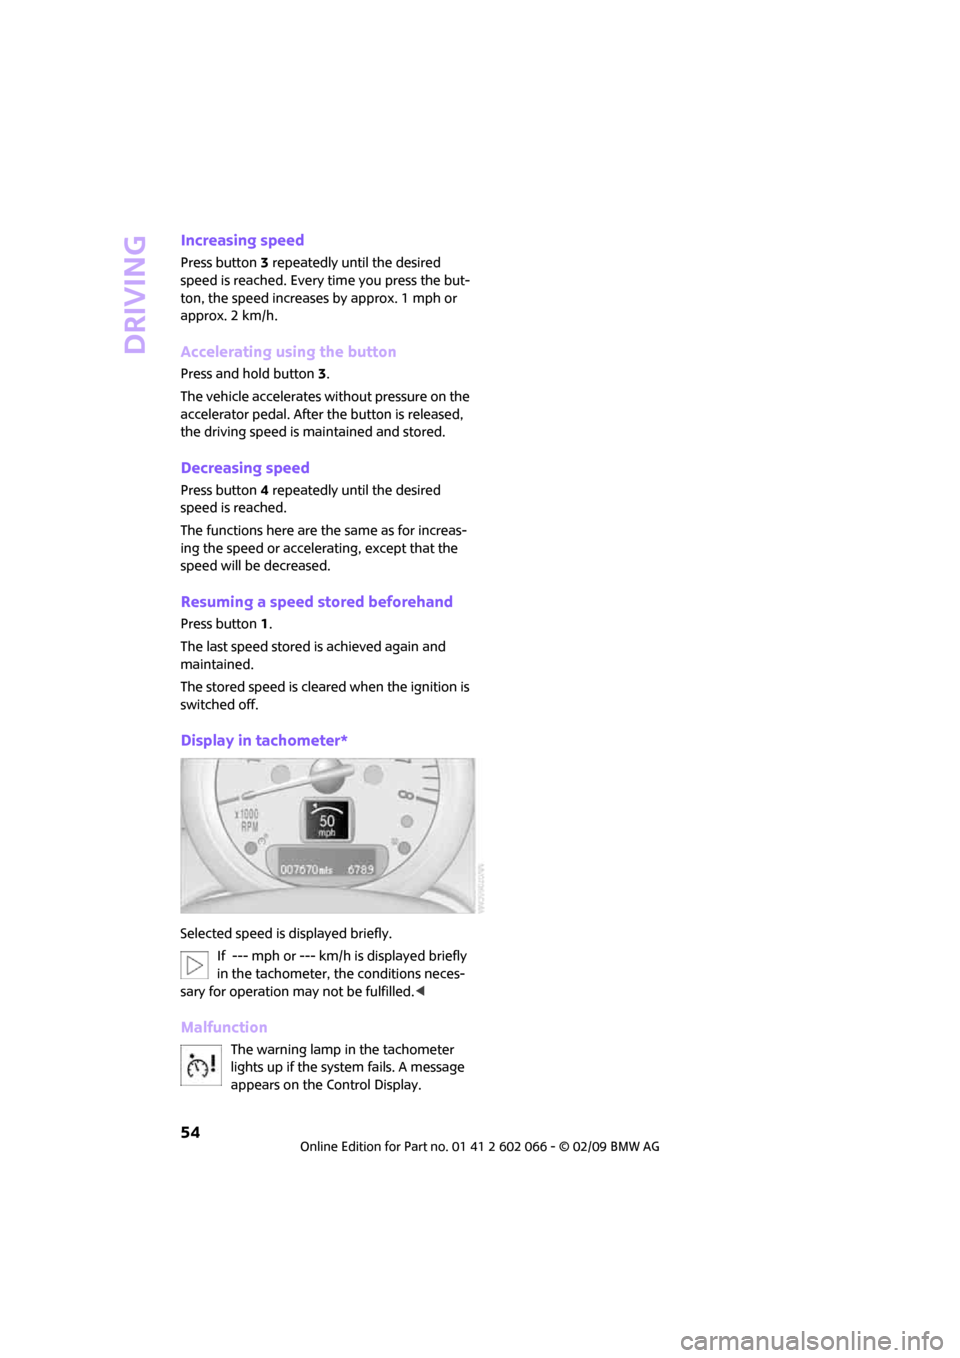
Display in tachometer*
Selected speed is displayed briefly.
If --- mph or --- km/h is displayed briefly
in the tachometer, the conditions neces-
sary for operation may not be fulfilled.<
Malfunction
The warning lamp in the tachometer
lights up if the system fails. A message
appears on the Control Display.
Page 57 of 218
MOBILITYAT A GLANCE CONTROLS DRIVING TIPS ENTERTAINMENT
55
NAVIGATION REFERENCE
Everything under control
Odometer, outside
temperature display,
clock
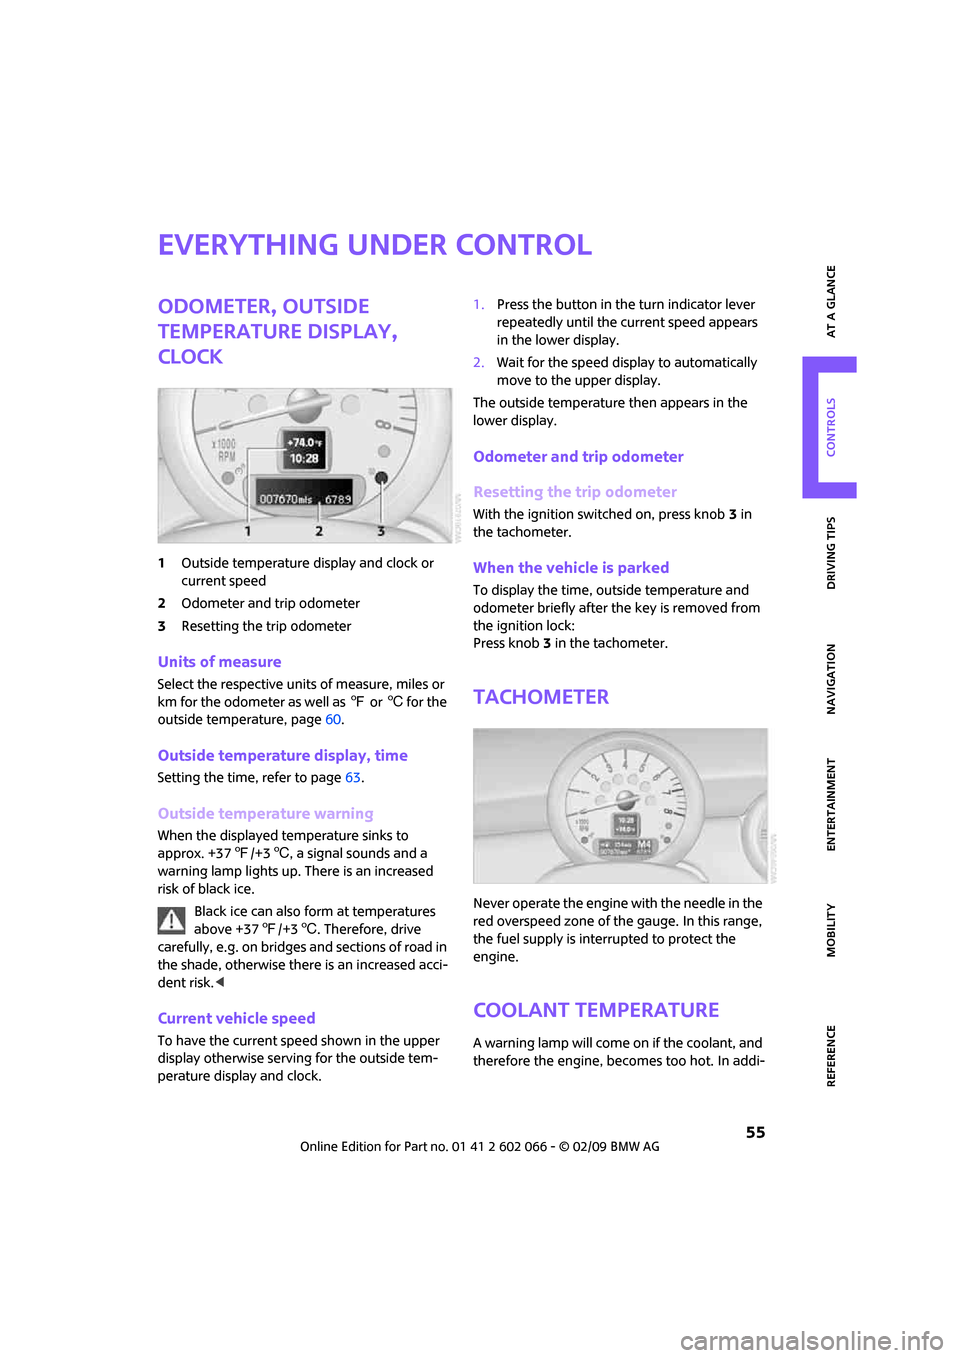
1Outside temperature display and clock or
current speed
2Odometer and trip odometer
3Resetting the trip odometer
Units of measure
Select the respective units of measure, miles or
km for the odometer as well as 7 or 6 for the
outside temperature, page60.
Outside temperature display, time
Setting the time, refer to page63.
Outside temperature warning
When the displayed temperature sinks to
approx. +377/+36, a signal sounds and a
warning lamp lights up. There is an increased
risk of black ice.
Black ice can also form at temperatures
above +377/+36. Therefore, drive
carefully, e.g. on bridges and sections of road in
the shade, otherwise there is an increased acci-
dent risk.<
Current vehicle speed
To have the current speed shown in the upper
display otherwise serving for the outside tem-
perature display and clock.1.Press the button in the turn indicator lever
repeatedly until the current speed appears
in the lower display.
2.Wait for the speed display to automatically
move to the upper display.
The outside temperature then appears in the
lower display.
Odometer and trip odometer
Resetting the trip odometer
With the ignition switched on, press knob 3 in
the tachometer.
When the vehicle is parked
To display the time, outside temperature and
odometer briefly after the key is removed from
the ignition lock:
Press knob 3 in the tachometer.
Tachometer
Never operate the engine with the needle in the
red overspeed zone of the gauge. In this range,
the fuel supply is interrupted to protect the
engine.
Coolant temperature
A warning lamp will come on if the coolant, and
therefore the engine, becomes too hot. In addi-
Page 67 of 218
MOBILITYAT A GLANCE CONTROLS DRIVING TIPS ENTERTAINMENT
65
NAVIGATION REFERENCE
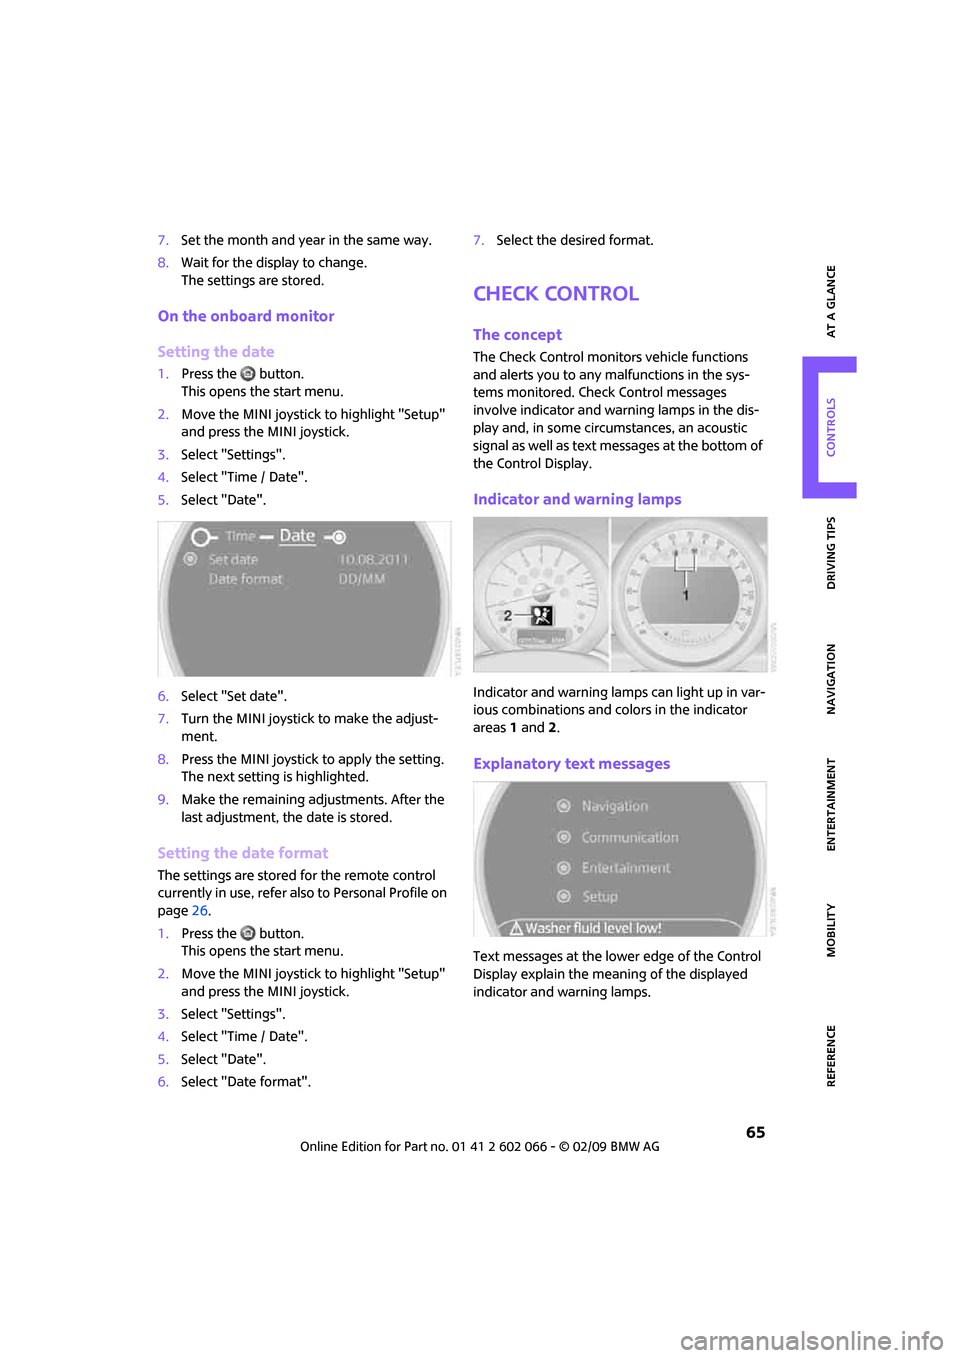
7.Set the month and year in the same way.
8.Wait for the display to change.
The settings are stored.
On the onboard monitor
Setting the date
1.Press the button.
This opens the start menu.
2.Move the MINI joystick to highlight "Setup"
and press the MINI joystick.
3.Select "Settings".
4.Select "Time / Date".
5.Select "Date".
6.Select "Set date".
7.Turn the MINI joystick to make the adjust-
ment.
8.Press the MINI joystick to apply the setting.
The next setting is highlighted.
9.Make the remaining adjustments. After the
last adjustment, the date is stored.
Setting the date format
The settings are stored for the remote control
currently in use, refer also to Personal Profile on
page26.
1.Press the button.
This opens the start menu.
2.Move the MINI joystick to highlight "Setup"
and press the MINI joystick.
3.Select "Settings".
4.Select "Time / Date".
5.Select "Date".
6.Select "Date format".7.Select the desired format.
Check Control
The concept
The Check Control monitors vehicle functions
and alerts you to any malfunctions in the sys-
tems monitored. Check Control messages
involve indicator and warning lamps in the dis-
play and, in some circumstances, an acoustic
signal as well as text messages at the bottom of
the Control Display.
Indicator and warning lamps
Indicator and warning lamps can light up in var-
ious combinations and colors in the indicator
areas 1 and2.
Explanatory text messages
Text messages at the lower edge of the Control
Display explain the meaning of the displayed
indicator and warning lamps.
Page 69 of 218
MOBILITYAT A GLANCE CONTROLS DRIVING TIPS ENTERTAINMENT
67
NAVIGATION REFERENCE
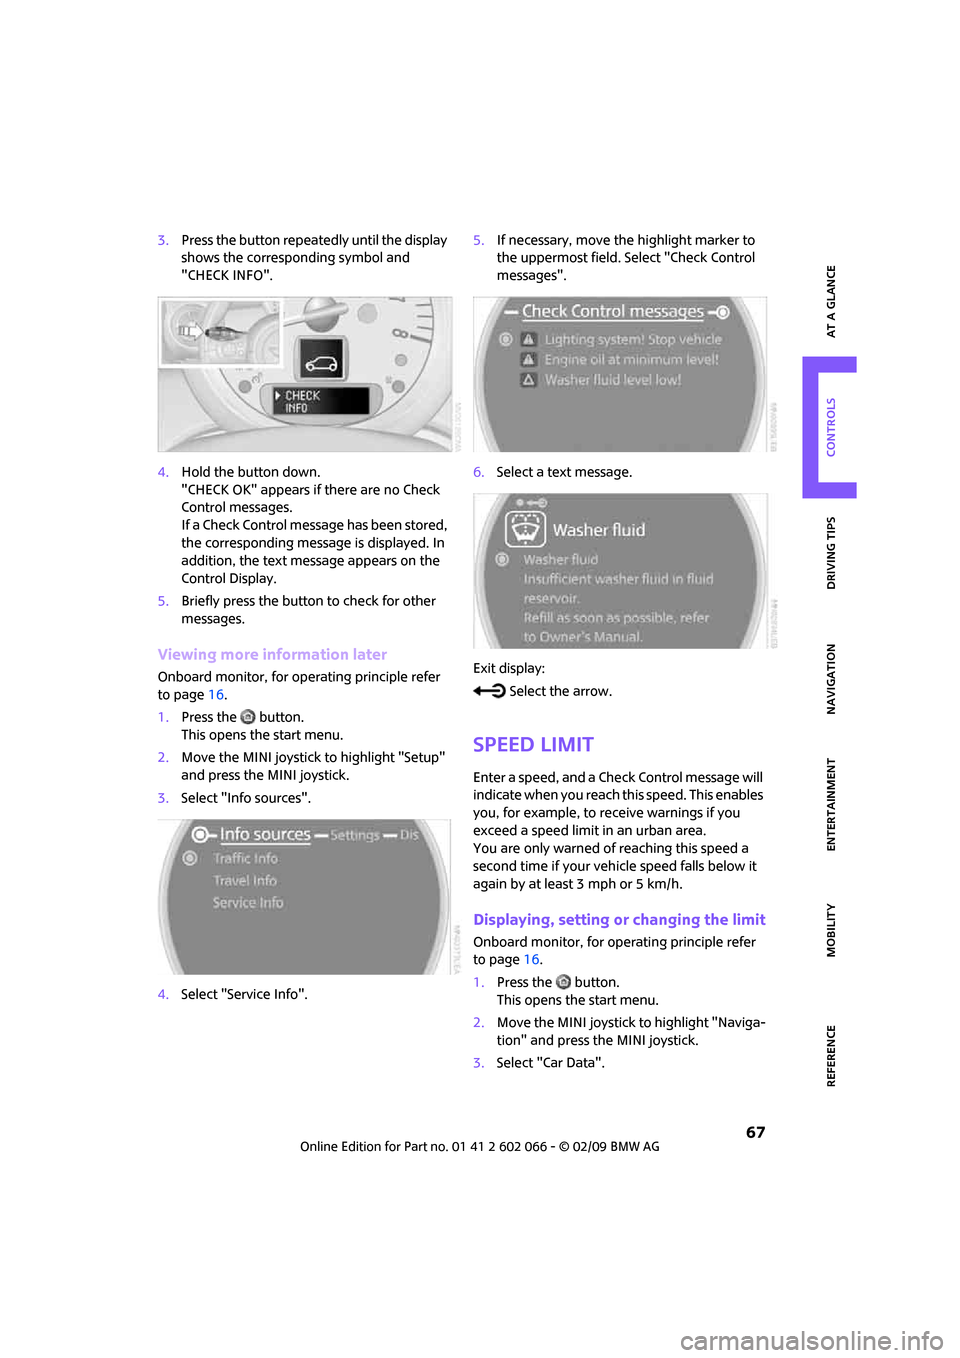
3.Press the button repeatedly until the display
shows the corresponding symbol and
"CHECK INFO".
4.Hold the button down.
"CHECK OK" appears if there are no Check
Control messages.
If a Check Control message has been stored,
the corresponding message is displayed. In
addition, the text message appears on the
Control Display.
5.Briefly press the button to check for other
messages.
Viewing more information later
Onboard monitor, for operating principle refer
to page16.
1.Press the button.
This opens the start menu.
2.Move the MINI joystick to highlight "Setup"
and press the MINI joystick.
3.Select "Info sources".
4.Select "Service Info".5.If necessary, move the highlight marker to
the uppermost field. Select "Check Control
messages".
6.Select a text message.
Exit display:
Select the arrow.
Speed limit
Enter a speed, and a Check Control message will
indicate when you reach this speed. This enables
you, for example, to receive warnings if you
exceed a speed limit in an urban area.
You are only warned of reaching this speed a
second time if your vehicle speed falls below it
again by at least 3 mph or 5 km/h.
Displaying, setting or changing the limit
Onboard monitor, for operating principle refer
to page16.
1.Press the button.
This opens the start menu.
2.Move the MINI joystick to highlight "Naviga-
tion" and press the MINI joystick.
3.Select "Car Data".