warning MINI Clubman 2009 Owner's Guide
[x] Cancel search | Manufacturer: MINI, Model Year: 2009, Model line: Clubman, Model: MINI Clubman 2009Pages: 158, PDF Size: 2.51 MB
Page 106 of 158
Under the bonnet
104
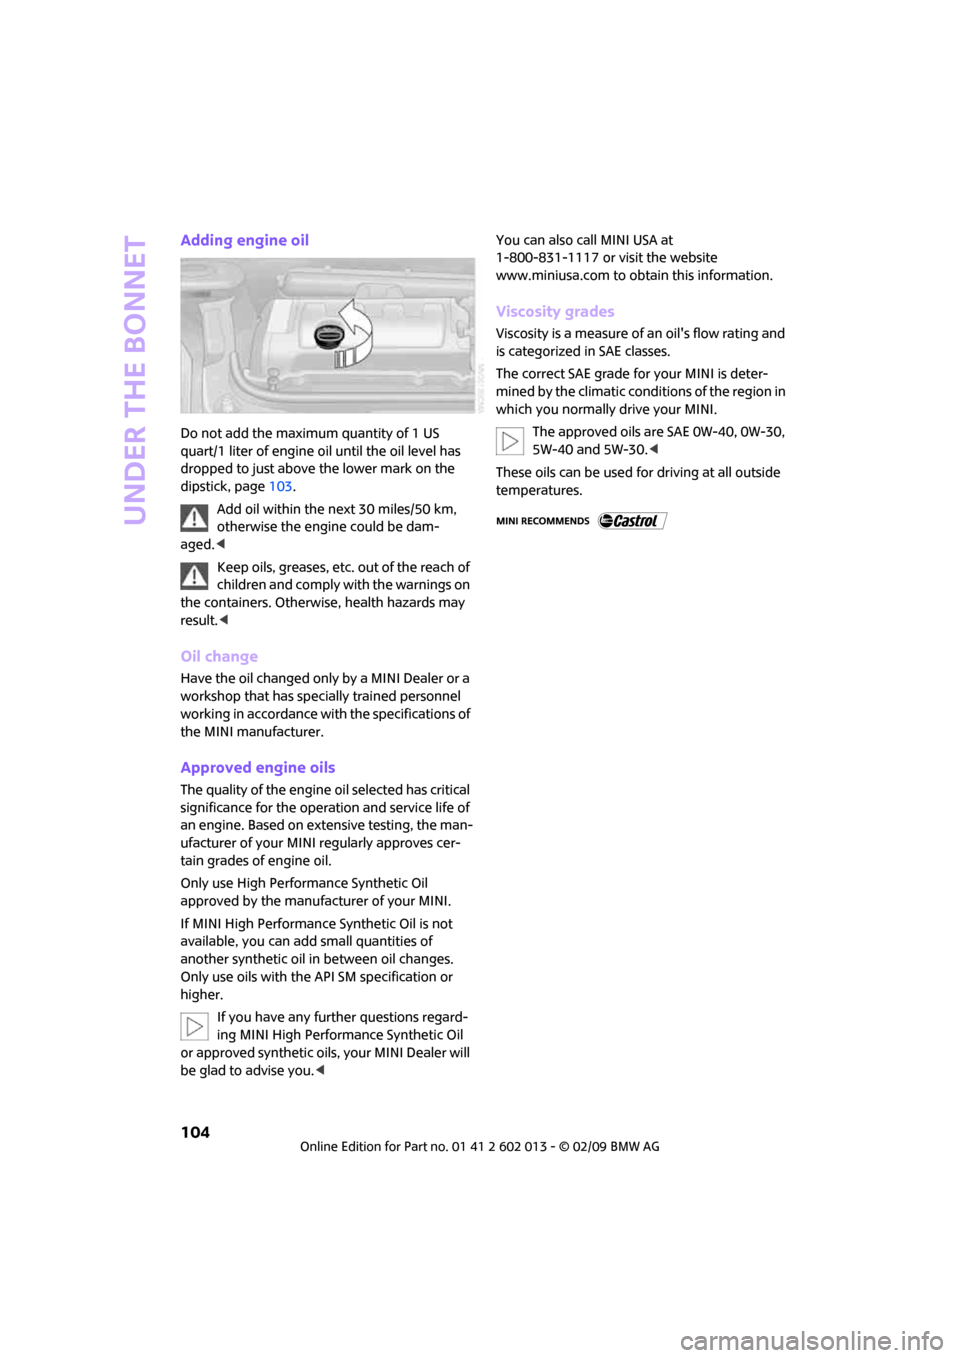
Adding engine oil
Do not add the maximum quantity of 1 US
quart/1 liter of engine oil until the oil level has
dropped to just above the lower mark on the
dipstick, page103.
Add oil within the next 30 miles/50 km,
otherwise the engine could be dam-
aged.<
Keep oils, greases, etc. out of the reach of
children and comply with the warnings on
the containers. Otherwise, health hazards may
result.<
Oil change
Have the oil changed only by a MINI Dealer or a
workshop that has specially trained personnel
working in accordance with the specifications of
the MINI manufacturer.
Approved engine oils
The quality of the engine oil selected has critical
significance for the operation and service life of
an engine. Based on extensive testing, the man-
ufacturer of your MINI regularly approves cer-
tain grades of engine oil.
Only use High Performance Synthetic Oil
approved by the manufacturer of your MINI.
If MINI High Performance Synthetic Oil is not
available, you can add small quantities of
another synthetic oil in between oil changes.
Only use oils with the API SM specification or
higher.
If you have any further questions regard-
ing MINI High Performance Synthetic Oil
or approved synthetic oils, your MINI Dealer will
be glad to advise you.
www.miniusa.com to obtain this information.
Viscosity grades
Viscosity is a measure of an oil's flow rating and
is categorized in SAE classes.
The correct SAE grade for your MINI is deter-
mined by the climatic conditions of the region in
which you normally drive your MINI.
The approved oils are SAE 0W-40, 0W-30,
5W-40 and 5W-30.<
These oils can be used for driving at all outside
temperatures.
Page 109 of 158
REFERENCEAT A GLANCE CONTROLS DRIVING TIPS MOBILITY
107
Exhaust emission values
The warning lamps come on. The
exhaust emission values have turned
poor and there is a danger of engine
damage. You can continue your jour-
ney, but moderate your speed and exercise
due caution. Have the car checked as soon as
possible.
Under certain circumstances, one of the lamps
will flash or light up continuously. This indicates
excessive misfiring or a malfunction in the
engine. If this happens, reduce your speed and
visit the nearest MINI Dealer as soon as possible.
Severe misfiring can quickly lead to serious dam-
age of emissions-related components, espe-
cially the catalytic converter. In addition,
mechanical engine components can become
damaged.
If the fuel filler cap is not properly tightened, the
OBD system may conclude that fuel vapors are
escaping, causing an indicator to light up. If the
filler cap is then tightened, the indicator should
go out within a few days.
Event data recorders
Your vehicle may be equipped with one or sev-
eral measuring or diagnostic modules or a
device for recording or sending certain vehicle
data or information.
Page 110 of 158
Care
108
Care
Car-care products
Regular cleaning and care helps to maintain the
value of your MINI.
The manufacturer of your MINI recommends
using manufacturer-approved products to clean
and care for your vehicle.
MINI Service would be pleased to advise you
on cleaning and care products and services for
your MINI.
The ingredients of original MINI CareProd-
ucts have been tested, and the products
have been tested in the laboratory and in prac-
tice. They offer optimum care and protection for
your vehicle.<
Do not use any cleansers containing alco-
hol or solvents as these may cause dam-
age.<
Cleaning agents may contain hazardous
or health-damaging substances. Follow
the warning and hazard instructions on the
packaging. For interior cleaning, always open
the doors or windows of the vehicle.
Do not use any products that are not intended
for cleaning the vehicle.<
External care
Washing your vehicle
Especially during the winter months the
vehicle should be frequently washed. Dirt
and road salt can damage the vehicle.<
After washing the vehicle, apply the
brakes briefly to dry them, otherwise
water can reduce braking efficiency over the
short term and the brake rotors can corrode.<
Car washes
Preference should be given to cloth car washes.Do not use automatic high-pressure car
washes, otherwise water may drip into the
vehicle around the windows.<
Before driving into the car wash, check if the sys-
tem is suitable for your MINI. Observe the fol-
lowing points:
>Dimensions of the vehicle, page141
>If necessary: Fold in the outside mirrors,
page32.
>Maximum permissible tire width
Avoid car washes with tracks higher than
4 in/10 cm, otherwise the chassis could be
damaged.<
Preparations for driving into the car wash:
>Unscrew the rod antenna.
>Deactivate the rain sensor
* to prevent unin-
tentional wiping.
>Deactivate the rear window wiper
* and pro-
tect it from damage. Ask the car wash oper-
ator about measures that can be taken to
protect the wipers.
>Remove additional attachments, e.g. spoil-
ers or telephone antennas, if there is a pos-
sibility that they could be damaged.
Automatic transmission
Before driving into the car wash, make sure that
the vehicle can roll:
1.Place the remote control, even with conve-
nient access, in the ignition lock.
2.Move the selector lever to position N.
3.Release the parking brake.
4.Switch off the engine.
5.Insert the remote control in the ignition lock
so that the vehicle can roll.
Steam jets/high-pressure washers
When using steam jets or high-pressure
washers, ensure that you maintain a suffi-
cient distance to the vehicle and do not exceed a
Page 118 of 158
Replacing components
116
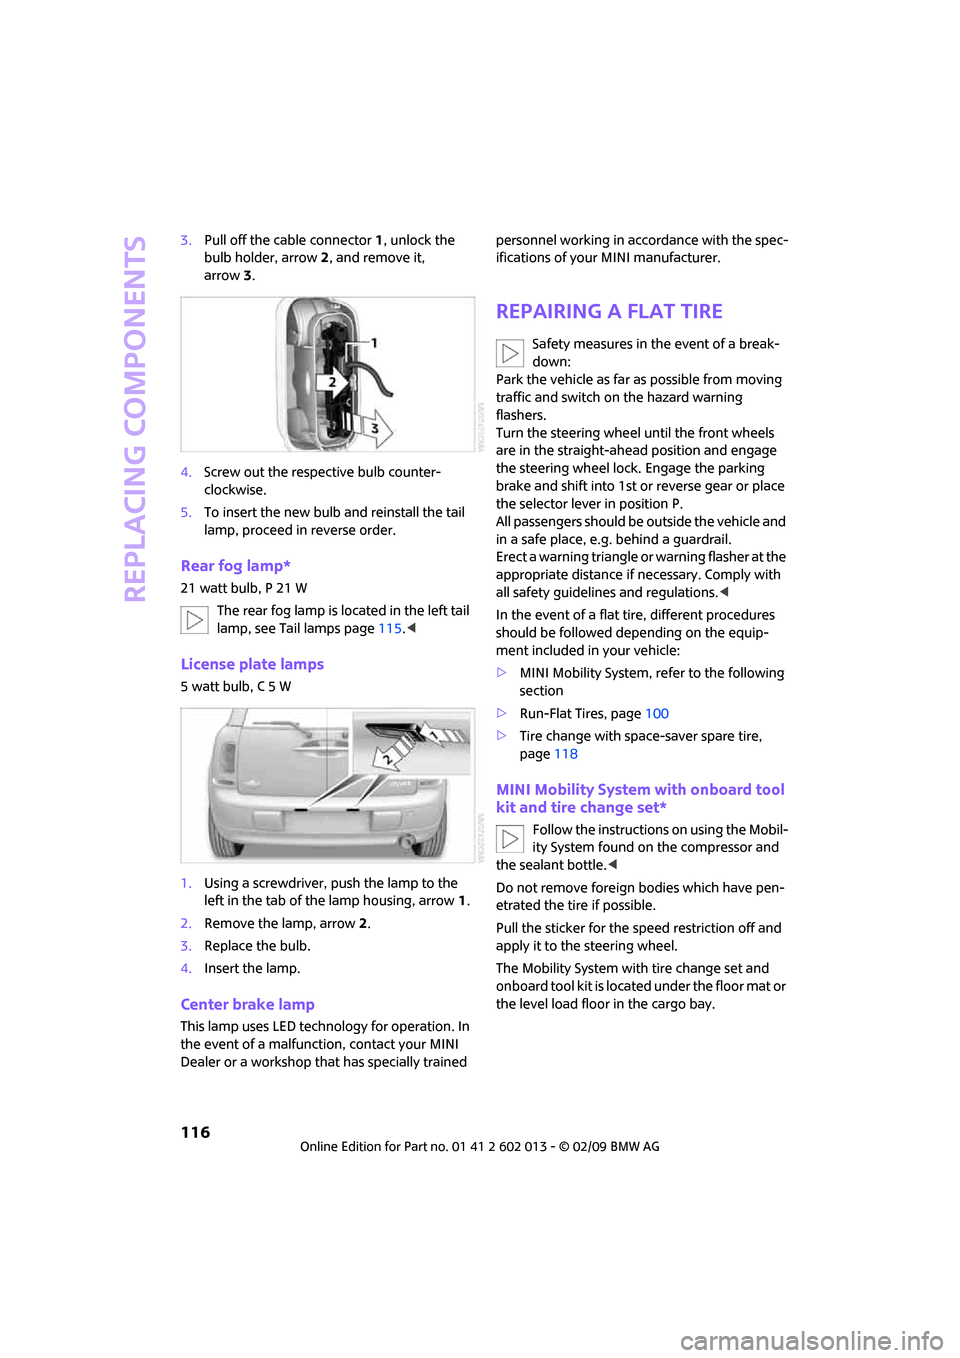
3.Pull off the cable connector 1, unlock the
bulb holder, arrow2, and remove it,
arrow3.
4.Screw out the respective bulb counter-
clockwise.
5.To insert the new bulb and reinstall the tail
lamp, proceed in reverse order.
Rear fog lamp*
21 watt bulb, P 21 W
The rear fog lamp is located in the left tail
lamp, see Tail lamps page115.<
License plate lamps
5 watt bulb, C 5 W
1.Using a screwdriver, push the lamp to the
left in the tab of the lamp housing, arrow1.
2.Remove the lamp, arrow 2.
3.Replace the bulb.
4.Insert the lamp.
Center brake lamp
This lamp uses LED technology for operation. In
the event of a malfunction, contact your MINI
Dealer or a workshop that has specially trained personnel working in accordance with the spec-
ifications of your MINI manufacturer.
Repairing a flat tire
Safety measures in the event of a break-
down:
Park the vehicle as far as possible from moving
traffic and switch on the hazard warning
flashers.
Turn the steering wheel until the front wheels
are in the straight-ahead position and engage
the steering wheel lock. Engage the parking
brake and shift into 1st or reverse gear or place
the selector lever in position P.
All passengers should be outside the vehicle and
in a safe place, e.g. behind a guardrail.
Erect a warning triangle or warning flasher at the
appropriate distance if necessary. Comply with
all safety guidelines and regulations.<
In the event of a flat tire, different procedures
should be followed depending on the equip-
ment included in your vehicle:
>MINI Mobility System, refer to the following
section
>Run-Flat Tires, page100
>Tire change with space-saver spare tire,
page118
MINI Mobility System with onboard tool
kit and tire change set*
Follow the instructions on using the Mobil-
ity System found on the compressor and
the sealant bottle.<
Do not remove foreign bodies which have pen-
etrated the tire if possible.
Pull the sticker for the speed restriction off and
apply it to the steering wheel.
The Mobility System with tire change set and
onboard tool kit is located under the floor mat or
the level load floor in the cargo bay.
Page 124 of 158
Giving and receiving assistance
122
Giving and receiving assistance
Roadside Assistance
The Roadside Assistance service is there to
assist you around the clock in the event of a
breakdown, including on weekends and public
holidays.
The phone numbers of the Roadside Assistance
in your home country can be found in the Con-
tact brochure.
First aid pouch*
Some of the articles contained in the first aid
pouch have a limited service life. Therefore,
check the expiration dates of the contents
regularly and replace any items in good time, if
necessary.
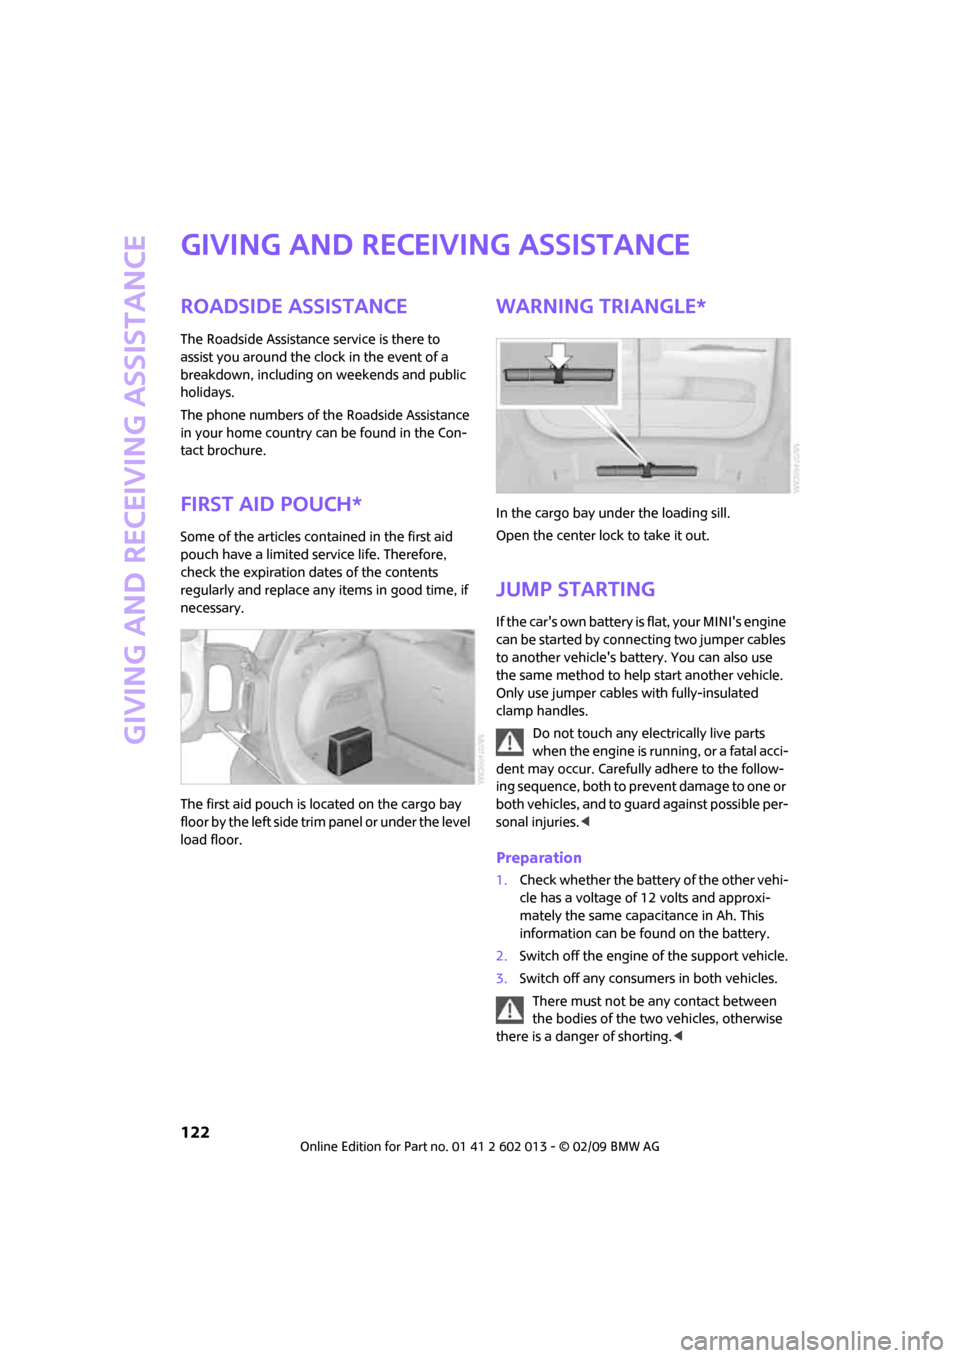
The first aid pouch is located on the cargo bay
floor by the left side trim panel or under the level
load floor.
Warning triangle*
In the cargo bay under the loading sill.
Open the center lock to take it out.
Jump starting
If the car's own battery is flat, your MINI's engine
can be started by connecting two jumper cables
to another vehicle's battery. You can also use
the same method to help start another vehicle.
Only use jumper cables with fully-insulated
clamp handles.
Do not touch any electrically live parts
when the engine is running, or a fatal acci-
dent may occur. Carefully adhere to the follow-
ing sequence, both to prevent damage to one or
both vehicles, and to guard against possible per-
sonal injuries.<
Preparation
1.Check whether the battery of the other vehi-
cle has a voltage of 12 volts and approxi-
mately the same capacitance in Ah. This
information can be found on the battery.
2.Switch off the engine of the support vehicle.
3.Switch off any consumers in both vehicles.
There must not be any contact between
the bodies of the two vehicles, otherwise
there is a danger of shorting.<
Page 126 of 158
Giving and receiving assistance
124
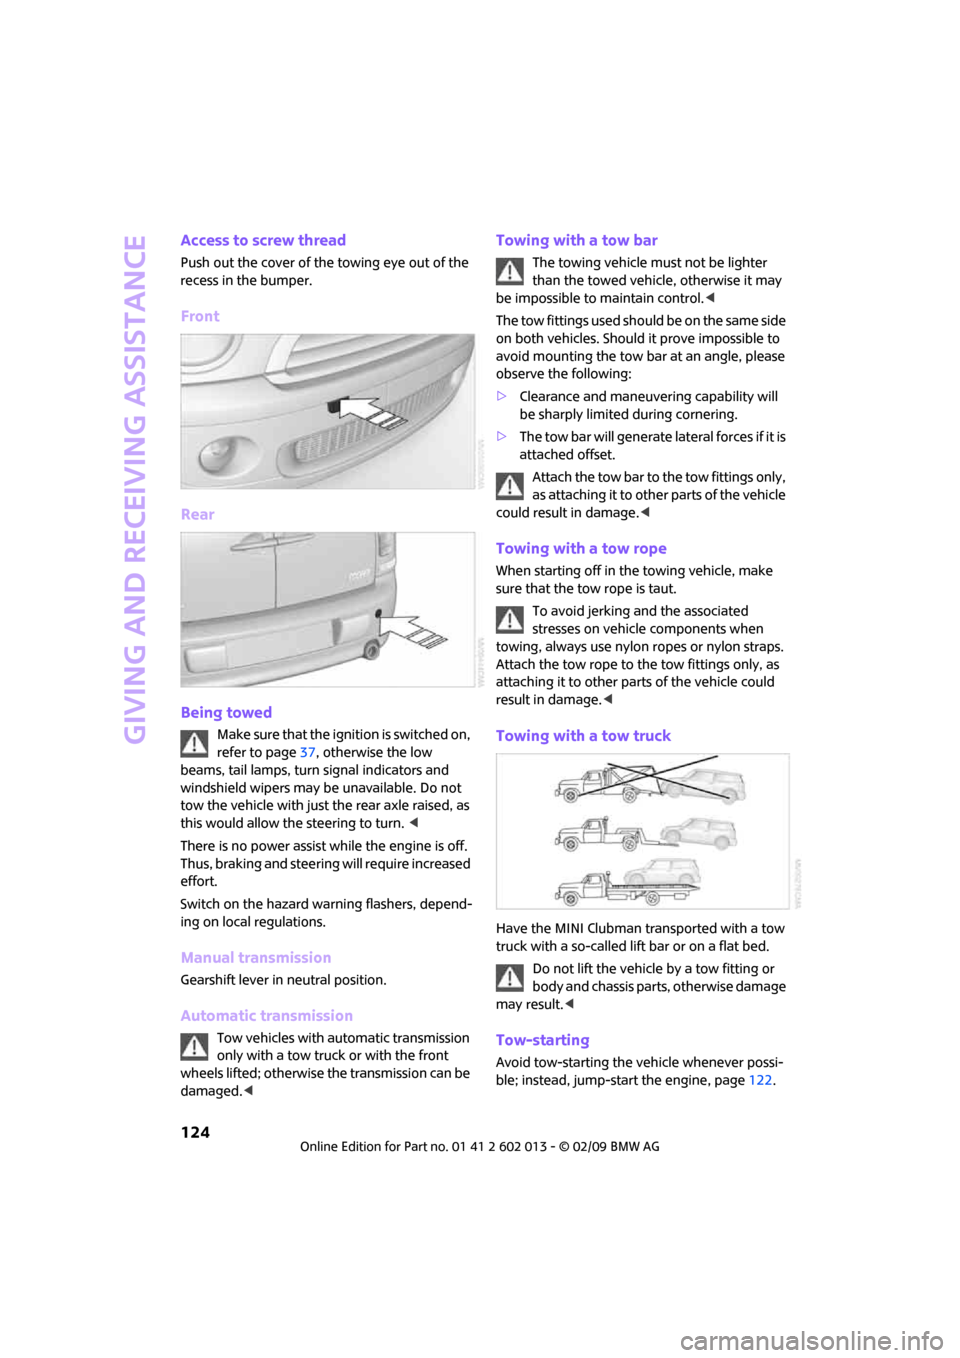
Access to screw thread
Push out the cover of the towing eye out of the
recess in the bumper.
Front
Rear
Being towed
Make sure that the ignition is switched on,
refer to page37, otherwise the low
beams, tail lamps, turn signal indicators and
windshield wipers may be unavailable. Do not
tow the vehicle with just the rear axle raised, as
this would allow the steering to turn. <
There is no power assist while the engine is off.
Thus, braking and steering will require increased
effort.
Switch on the hazard warning flashers, depend-
ing on local regulations.
Manual transmission
Gearshift lever in neutral position.
Automatic transmission
Tow vehicles with automatic transmission
only with a tow truck or with the front
wheels lifted; otherwise the transmission can be
damaged.<
Towing with a tow bar
The towing vehicle must not be lighter
than the towed vehicle, otherwise it may
be impossible to maintain control.<
The tow fittings used should be on the same side
on both vehicles. Should it prove impossible to
avoid mounting the tow bar at an angle, please
observe the following:
>Clearance and maneuvering capability will
be sharply limited during cornering.
>The tow bar will generate lateral forces if it is
attached offset.
Attach the tow bar to the tow fittings only,
as attaching it to other parts of the vehicle
could result in damage.<
Towing with a tow rope
When starting off in the towing vehicle, make
sure that the tow rope is taut.
To avoid jerking and the associated
stresses on vehicle components when
towing, always use nylon ropes or nylon straps.
Attach the tow rope to the tow fittings only, as
attaching it to other parts of the vehicle could
result in damage.<
Towing with a tow truck
Have the MINI Clubman transported with a tow
truck with a so-called lift bar or on a flat bed.
Do not lift the vehicle by a tow fitting or
body and chassis parts, otherwise damage
may result.<
Tow-starting
Avoid tow-starting the vehicle whenever possi-
ble; instead, jump-start the engine, page122.
Page 127 of 158
REFERENCEAT A GLANCE CONTROLS DRIVING TIPS MOBILITY
125
Vehicles with a catalytic converter should only
be tow-started when the engine is cold, vehicles
with an automatic transmission cannot be tow-
started at all.
1.Switch on hazard warning flashers, comply
with local regulations.
2.Switch on the ignition, page37.
3.Shift into 3
rd gear.
4.Have the vehicle tow-started with the clutch
completely depressed and then slowly
release the clutch. After the engine starts,
immediately depress the clutch completely
again.
5.Stop at a suitable location, remove the tow
bar or rope and switch off the hazard warn-
ing flashers.
6.Have the vehicle checked.
Page 128 of 158
Indicator and warning lamps
126
Indicator and warning lamps
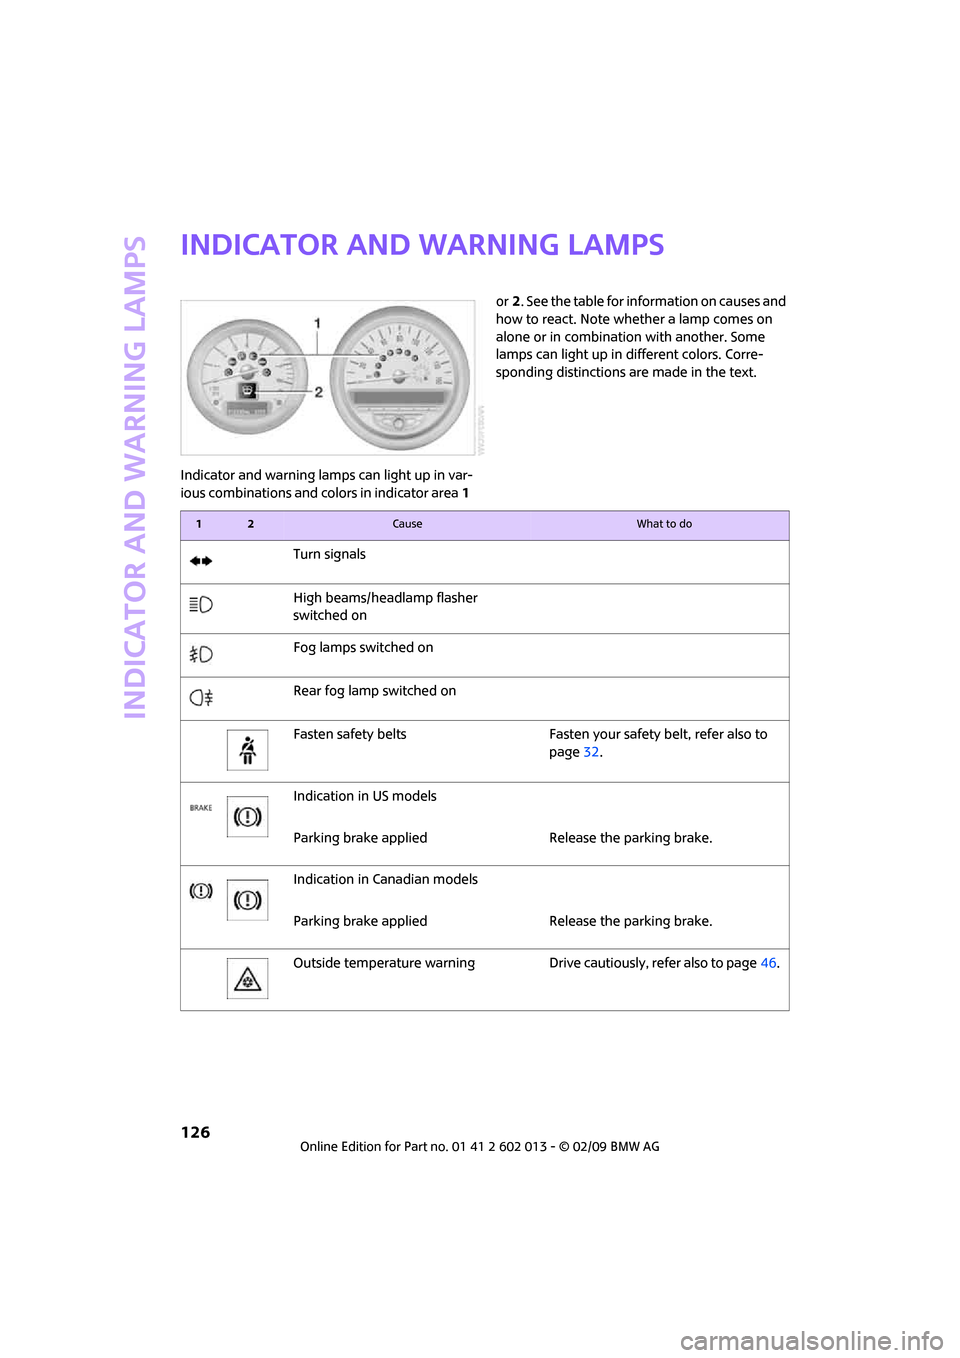
Indicator and warning lamps can light up in var-
ious combinations and colors in indicator area 1 or2. See the table for information on causes and
how to react. Note whether a lamp comes on
alone or in combination with another. Some
lamps can light up in different colors. Corre-
sponding distinctions are made in the text.
12Cause What to do
Turn signals
High beams/headlamp flasher
switched on
Fog lamps switched on
Rear fog lamp switched on
Fasten safety belts Fasten your safety belt, refer also to
page32.
Indication in US models
Parking brake applied Release the parking brake.
Indication in Canadian models
Parking brake applied Release the parking brake.
Outside temperature warning Drive cautiously, refer also to page46.
Page 130 of 158
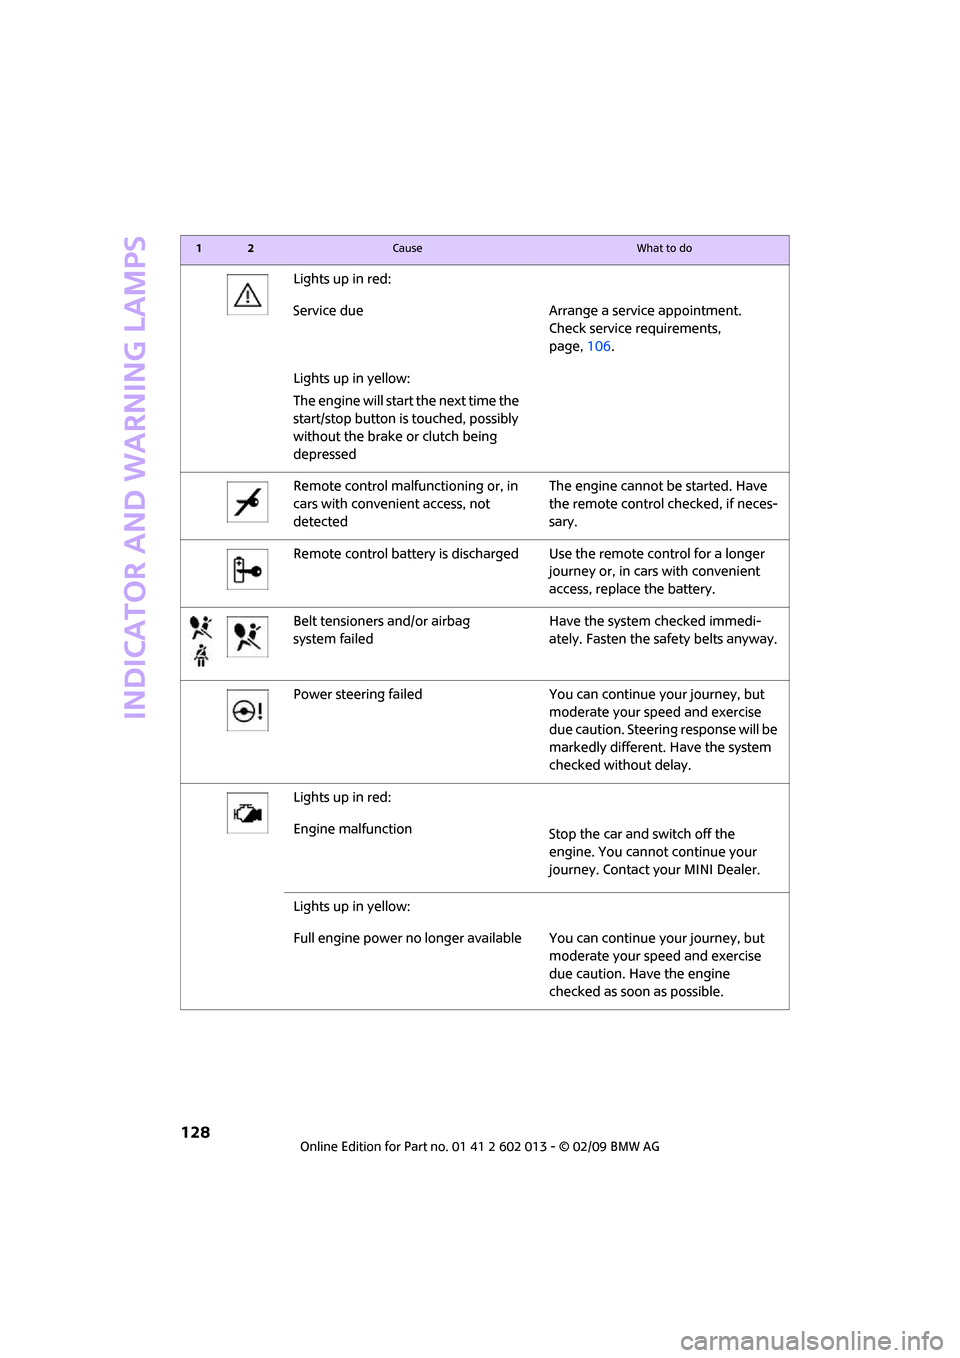
Indicator and warning lamps
128
Lights up in red:
Service due Arrange a service appointment.
Check service requirements,
page, 106.
Lights up in yellow:
The engine will start the next time the
start/stop button is touched, possibly
without the brake or clutch being
depressed
Remote control malfunctioning or, in
cars with convenient access, not
detectedThe engine cannot be started. Have
the remote control checked, if neces-
sary.
Remote control battery is dischargedUse the remote control for a longer
journey or, in cars with convenient
access, replace the battery.
Belt tensioners and/or airbag
system failedHave the system checked immedi-
ately. Fasten the safety belts anyway.
Power steering failed You can continue your journey, but
moderate your speed and exercise
due caution. Steering response will be
markedly different. Have the system
checked without delay.
Lights up in red:
Engine malfunction
Stop the car and switch off the
engine. You cannot continue your
journey. Contact your MINI Dealer.
Lights up in yellow:
Full engine power no longer available You can continue your journey, but
moderate your speed and exercise
due caution. Have the engine
checked as soon as possible.
12Cause What to do
Page 132 of 158
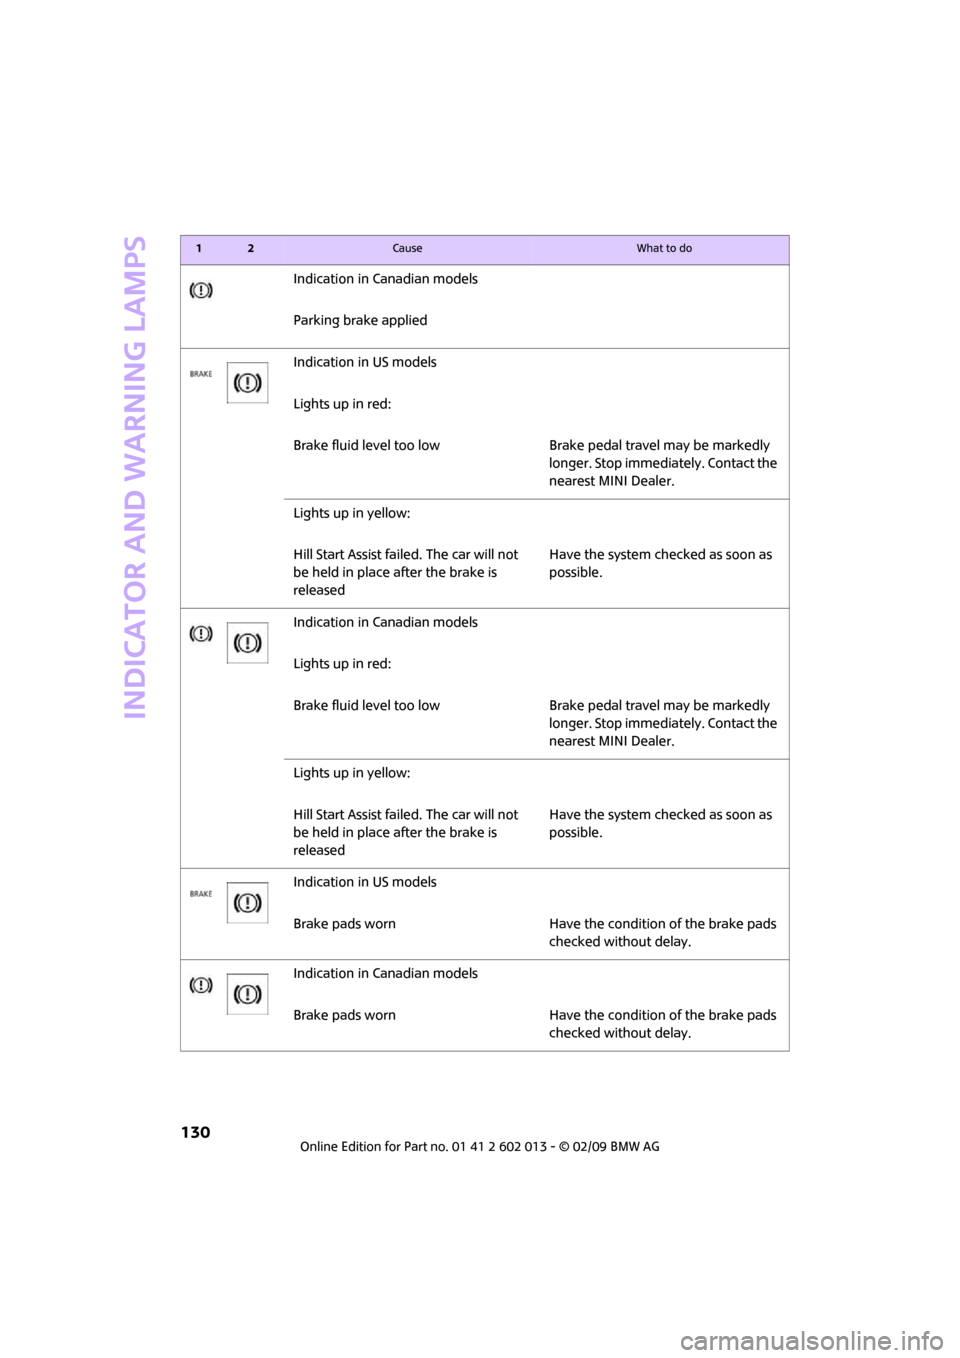
Indicator and warning lamps
130
Indication in Canadian models
Parking brake applied
Indication in US models
Lights up in red:
Brake fluid level too low Brake pedal travel may be markedly
longer. Stop immediately. Contact the
nearest MINI Dealer.
Lights up in yellow:
Hill Start Assist failed. The car will not
be held in place after the brake is
releasedHave the system checked as soon as
possible.
Indication in Canadian models
Lights up in red:
Brake fluid level too low Brake pedal travel may be markedly
longer. Stop immediately. Contact the
nearest MINI Dealer.
Lights up in yellow:
Hill Start Assist failed. The car will not
be held in place after the brake is
releasedHave the system checked as soon as
possible.
Indication in US models
Brake pads worn Have the condition of the brake pads
checked without delay.
Indication in Canadian models
Brake pads worn Have the condition of the brake pads
checked without delay.
12Cause What to do