parking brake MINI Clubman 2010 Owner's Manual (Mini Connected)
[x] Cancel search | Manufacturer: MINI, Model Year: 2010, Model line: Clubman, Model: MINI Clubman 2010Pages: 218, PDF Size: 3.97 MB
Page 15 of 218
MOBILITYAT A GLANCE CONTROLS DRIVING TIPS ENTERTAINMENT
13
NAVIGATION REFERENCE
Indicator and warning
lamps
The concept
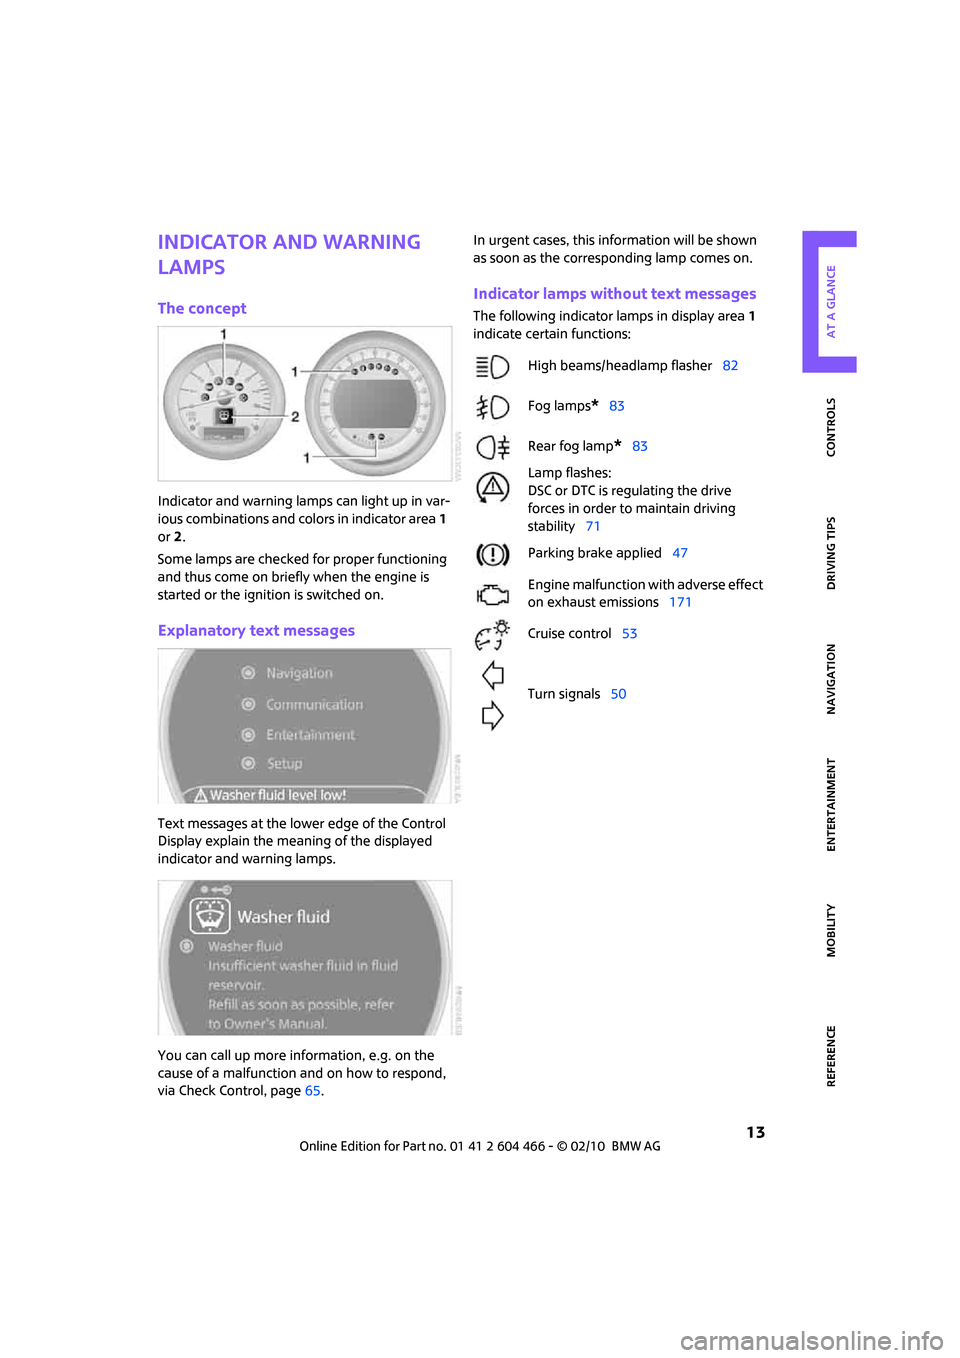
Indicator and warning lamps can light up in var-
ious combinations and colors in indicator area 1
or2.
Some lamps are checked for proper functioning
and thus come on briefly when the engine is
started or the ignition is switched on.
Explanatory text messages
Text messages at the lower edge of the Control
Display explain the meaning of the displayed
indicator and warning lamps.
You can call up more information, e.g. on the
cause of a malfunction and on how to respond,
via Check Control, page65.In urgent cases, this information will be shown
as soon as the corresponding lamp comes on.
Indicator lamps without text messages
The following indicator lamps in display area 1
indicate certain functions:
High beams/headlamp flasher82
Fog lamps
*83
Rear fog lamp
*83
Lamp flashes:
DSC or DTC is regulating the drive
forces in order to maintain driving
stability71
Parking brake applied47
Engine malfunction with adverse effect
on exhaust emissions171
Cruise control53
Turn signals50
Page 49 of 218
MOBILITYAT A GLANCE CONTROLS DRIVING TIPS ENTERTAINMENT
47
NAVIGATION REFERENCE
Starting the engine
Do not allow the engine to run in enclosed
areas; otherwise, inhalation of the noxious
exhaust gases can lead to loss of consciousness
and death. Exhaust gases contain carbon mon-
oxide, an odorless and colorless, but highly toxic
gas. Never leave an unattended vehicle with the
engine running; otherwise, such a vehicle repre-
sents a potential safety hazard.
Before leaving the car while the engine is run-
ning, place the transmission in neutral or move
the selector lever to position P and forcefully
apply the parking brake to prevent the car from
moving.<
Avoid frequent starting in quick succes-
sion or repeated start attempts in which
the engine does not start. Otherwise, the fuel is
not burned or inadequately burned and there is
a danger of overheating and damaging the cat-
alytic converter.<
Do not let the engine warm up with the vehicle
at a standstill. Move off immediately at a moder-
ate engine speed.
When starting the engine, do not depress the
accelerator pedal.
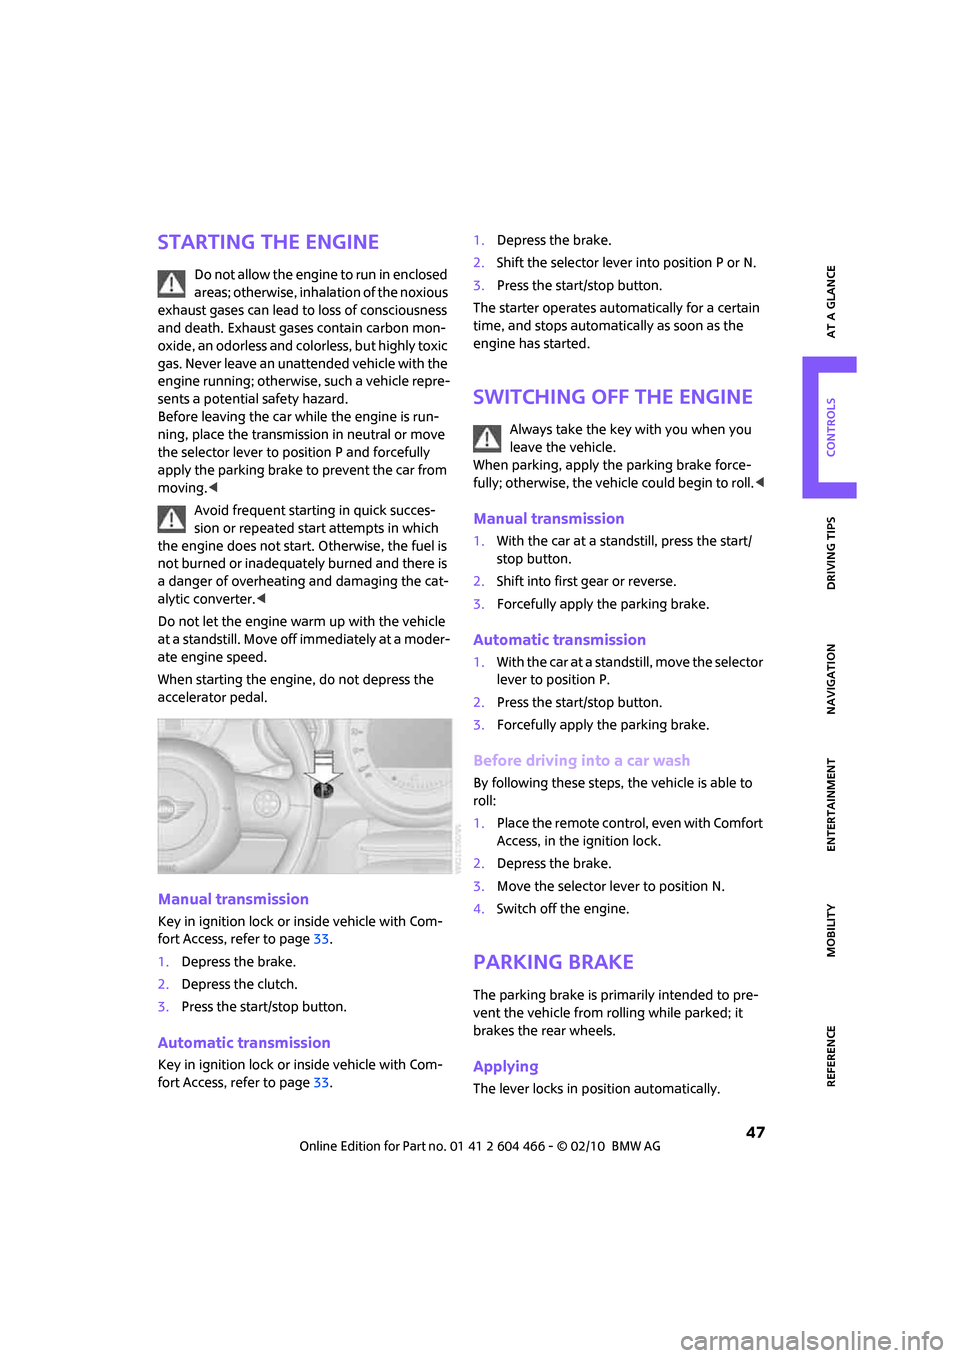
Manual transmission
Key in ignition lock or inside vehicle with Com-
fort Access, refer to page33.
1.Depress the brake.
2.Depress the clutch.
3.Press the start/stop button.
Automatic transmission
Key in ignition lock or inside vehicle with Com-
fort Access, refer to page33.1.Depress the brake.
2.Shift the selector lever into position P or N.
3.Press the start/stop button.
The starter operates automatically for a certain
time, and stops automatically as soon as the
engine has started.
Switching off the engine
Always take the key with you when you
leave the vehicle.
When parking, apply the parking brake force-
fully; otherwise, the vehicle could begin to roll.<
Manual transmission
1.With the car at a standstill, press the start/
stop button.
2.Shift into first gear or reverse.
3.Forcefully apply the parking brake.
Automatic transmission
1.With the car at a standstill, move the selector
lever to position P.
2.Press the start/stop button.
3.Forcefully apply the parking brake.
Before driving into a car wash
By following these steps, the vehicle is able to
roll:
1.Place the remote control, even with Comfort
Access, in the ignition lock.
2.Depress the brake.
3.Move the selector lever to position N.
4.Switch off the engine.
Parking brake
The parking brake is primarily intended to pre-
vent the vehicle from rolling while parked; it
brakes the rear wheels.
Applying
The lever locks in position automatically.
Page 50 of 218
Driving
48
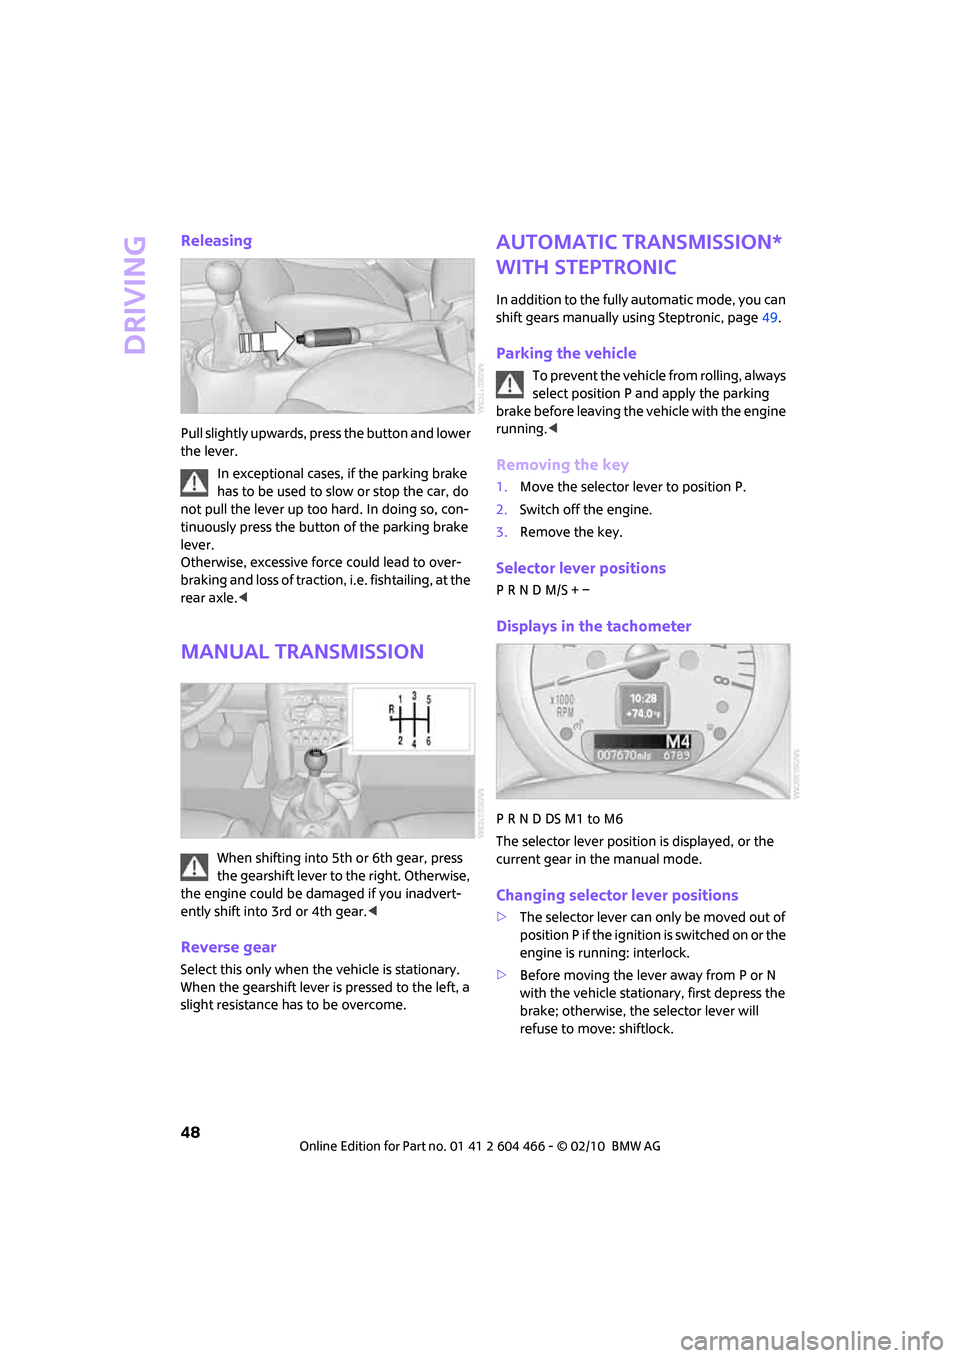
Releasing
Pull slightly upwards, press the button and lower
the lever.
In exceptional cases, if the parking brake
has to be used to slow or stop the car, do
not pull the lever up too hard. In doing so, con-
tinuously press the button of the parking brake
lever.
Otherwise, excessive force could lead to over-
braking and loss of traction, i.e. fishtailing, at the
rear axle.<
Manual transmission
When shifting into 5th or 6th gear, press
the gearshift lever to the right. Otherwise,
the engine could be damaged if you inadvert-
ently shift into 3rd or 4th gear.<
Reverse gear
Select this only when the vehicle is stationary.
When the gearshift lever is pressed to the left, a
slight resistance has to be overcome.
Automatic transmission*
with Steptronic
In addition to the fully automatic mode, you can
shift gears manually using Steptronic, page49.
Parking the vehicle
To prevent the vehicle from rolling, always
select position P and apply the parking
brake before leaving the vehicle with the engine
running.<
Removing the key
1.Move the selector lever to position P.
2.Switch off the engine.
3.Remove the key.
Selector lever positions
P R N D M/S + –
Displays in the tachometer
P R N D DS M1 to M6
The selector lever position is displayed, or the
current gear in the manual mode.
Changing selector lever positions
>The selector lever can only be moved out of
position P if the ignition is switched on or the
engine is running: interlock.
>Before moving the lever away from P or N
with the vehicle stationary, first depress the
brake; otherwise, the selector lever will
refuse to move: shiftlock.
Page 52 of 218
Driving
50
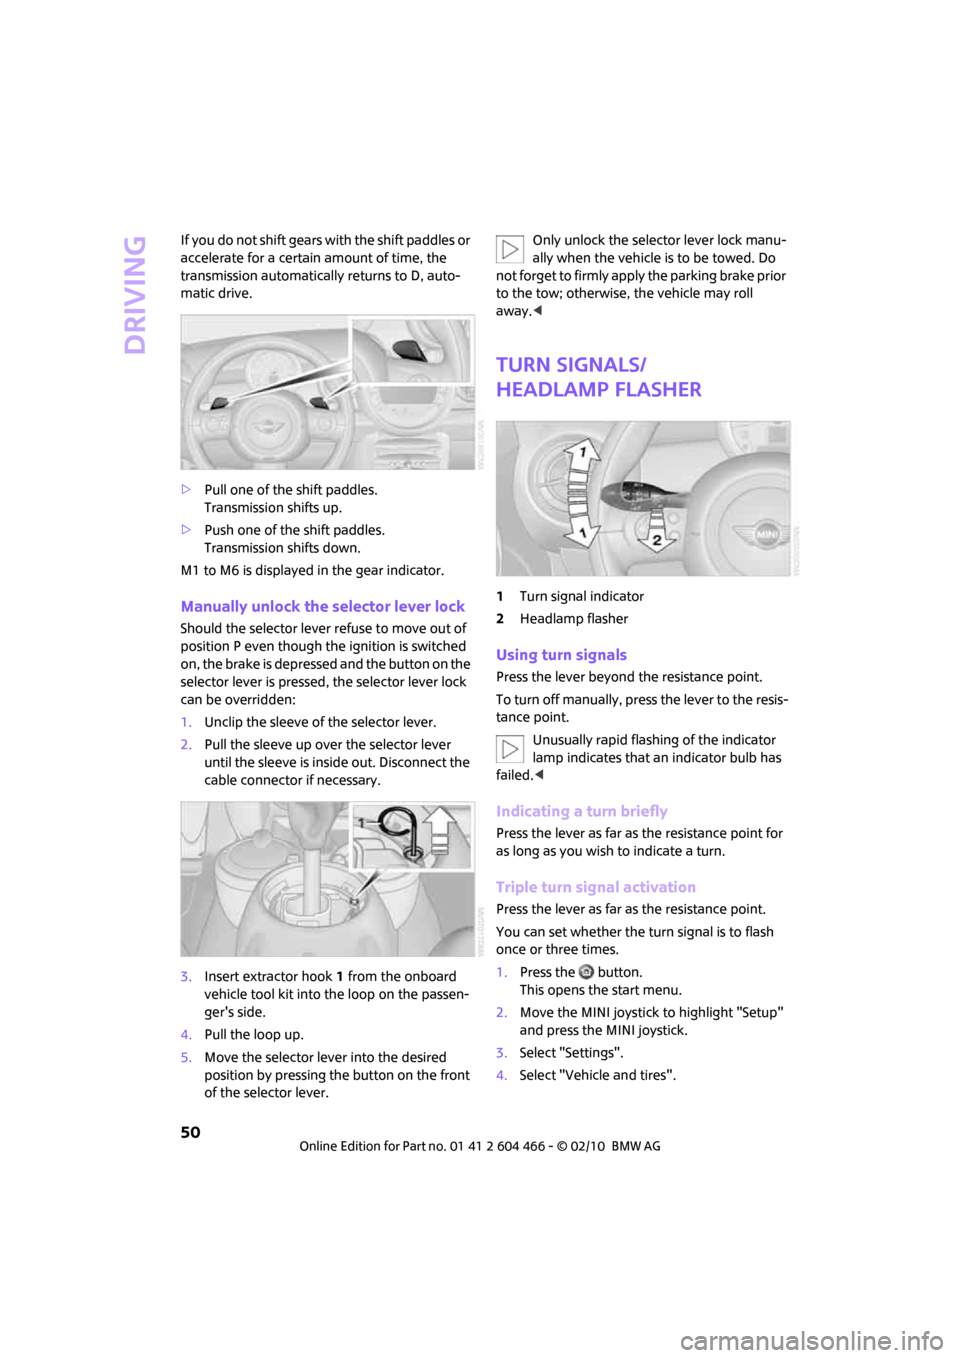
If you do not shift gears with the shift paddles or
accelerate for a certain amount of time, the
transmission automatically returns to D, auto-
matic drive.
>Pull one of the shift paddles.
Transmission shifts up.
>Push one of the shift paddles.
Transmission shifts down.
M1 to M6 is displayed in the gear indicator.
Manually unlock the selector lever lock
Should the selector lever refuse to move out of
position P even though the ignition is switched
on, the brake is depressed and the button on the
selector lever is pressed, the selector lever lock
can be overridden:
1.Unclip the sleeve of the selector lever.
2.Pull the sleeve up over the selector lever
until the sleeve is inside out. Disconnect the
cable connector if necessary.
3.Insert extractor hook1 from the onboard
vehicle tool kit into the loop on the passen-
ger's side.
4.Pull the loop up.
5.Move the selector lever into the desired
position by pressing the button on the front
of the selector lever.Only unlock the selector lever lock manu-
ally when the vehicle is to be towed. Do
not forget to firmly apply the parking brake prior
to the tow; otherwise, the vehicle may roll
away.<
Turn signals/
headlamp flasher
1Turn signal indicator
2Headlamp flasher
Using turn signals
Press the lever beyond the resistance point.
To turn off manually, press the lever to the resis-
tance point.
Unusually rapid flashing of the indicator
lamp indicates that an indicator bulb has
failed.<
Indicating a turn briefly
Press the lever as far as the resistance point for
as long as you wish to indicate a turn.
Triple turn signal activation
Press the lever as far as the resistance point.
You can set whether the turn signal is to flash
once or three times.
1.Press the button.
This opens the start menu.
2.Move the MINI joystick to highlight "Setup"
and press the MINI joystick.
3.Select "Settings".
4.Select "Vehicle and tires".
Page 75 of 218
MOBILITYAT A GLANCE CONTROLS DRIVING TIPS ENTERTAINMENT
73
NAVIGATION REFERENCE
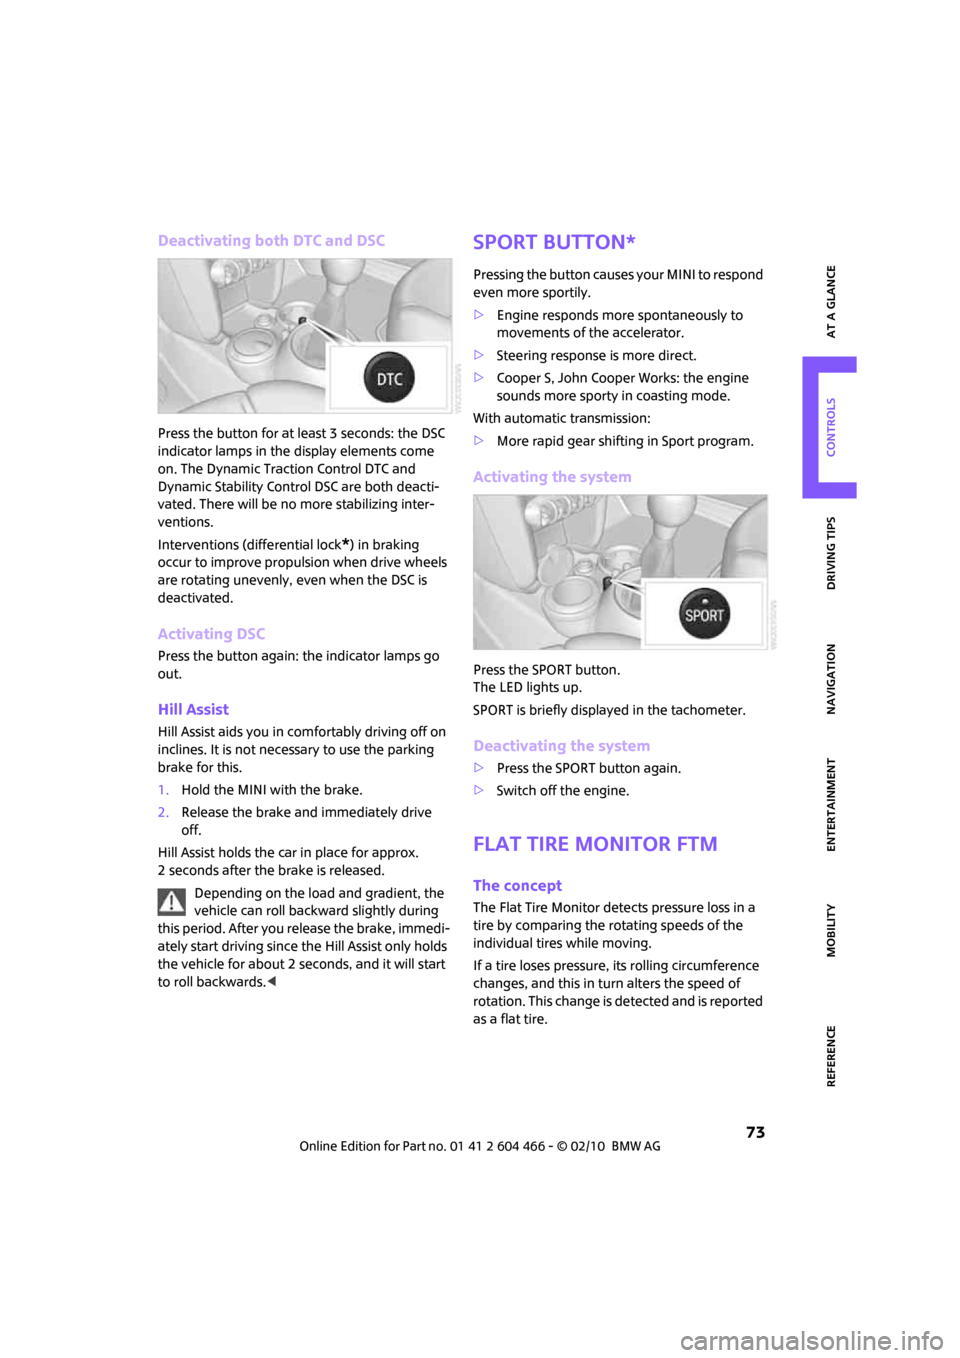
Deactivating both DTC and DSC
Press the button for at least 3 seconds: the DSC
indicator lamps in the display elements come
on. The Dynamic Traction Control DTC and
Dynamic Stability Control DSC are both deacti-
vated. There will be no more stabilizing inter-
ventions.
Interventions (differential lock
*) in braking
occur to improve propulsion when drive wheels
are rotating unevenly, even when the DSC is
deactivated.
Activating DSC
Press the button again: the indicator lamps go
out.
Hill Assist
Hill Assist aids you in comfortably driving off on
inclines. It is not necessary to use the parking
brake for this.
1.Hold the MINI with the brake.
2.Release the brake and immediately drive
off.
Hill Assist holds the car in place for approx.
2 seconds after the brake is released.
Depending on the load and gradient, the
vehicle can roll backward slightly during
this period. After you release the brake, immedi-
ately start driving since the Hill Assist only holds
the vehicle for about 2 seconds, and it will start
to roll backwards.<
Sport button*
Pressing the button causes your MINI to respond
even more sportily.
>Engine responds more spontaneously to
movements of the accelerator.
>Steering response is more direct.
>Cooper S, John Cooper Works: the engine
sounds more sporty in coasting mode.
With automatic transmission:
>More rapid gear shifting in Sport program.
Activating the system
Press the SPORT button.
The LED lights up.
SPORT is briefly displayed in the tachometer.
Deactivating the system
>Press the SPORT button again.
>Switch off the engine.
Flat Tire Monitor FTM
The concept
The Flat Tire Monitor detects pressure loss in a
tire by comparing the rotating speeds of the
individual tires while moving.
If a tire loses pressure, its rolling circumference
changes, and this in turn alters the speed of
rotation. This change is detected and is reported
as a flat tire.
Page 99 of 218
MOBILITYAT A GLANCE CONTROLS DRIVING TIPS ENTERTAINMENT
97
NAVIGATION REFERENCE
The risk of hydroplaning increases with declining
tread depth on the tires, refer also to Tread
depth on page164.
Driving through water
Drive through water on the road only if it is
not deeper than 1 ft/30 cm, and then only
at walking speed at the most. Otherwise, the
vehicle's engine, the electrical systems and the
transmission may be damaged.<
Parking brake on inclines
On inclines, do not hold the vehicle with
the clutch; use the parking brake. Other-
wise, greater clutch wear will result.<
For information on driving off using Hill Assist
*,
refer to page73.
Braking safely
Your MINI is equipped with ABS. If you are in a
situation which requires full braking, it is best to
brake using maximum brake pressure. Since the
vehicle maintains steering responsiveness, you
can still avoid possible obstacles with a mini-
mum of steering effort.
The pulsation of the brake pedal, together with
the sound of hydraulic regulation, indicates that
ABS is actively taking effect.
Driving in wet conditions
When roads are wet or there is heavy rain, briefly
exert gentle pressure on the brake pedal every
few miles. Monitor traffic conditions to ensure
that this maneuver does not endanger other
road users. The heat generated in this process
helps dry the pads and rotors to ensure that
Then full braking force will be immediately avail-
able when it is needed.
Hills
To prevent overheating and the resulting
reduced efficiency of the brake system,
drive long or steep downhill gradients in the
gear in which the least braking is required. Even
light but consistent brake pressure can lead to
high temperatures, brake wear and possibly
even brake failure.
sary. This strategy helps you avoid placing
excessive loads on the brake system. Downshift-
ing in manual mode of the automatic transmis-
sion, page49.
Never drive with the clutch held down,
with the transmission in neutral or with
the engine switched off; otherwise, engine brak-
ing action will not be present or there will be no
power assistance to the brakes or steering.
Never allow floor mats, carpets or any other
objects to protrude into the area around the
pedals; otherwise, pedal function could be
impaired.<
Corrosion on brake rotors
When the vehicle is driven only occasionally,
during extended periods when the vehicle is not
used at all, and in operating conditions where
brake applications are less frequent, there is an
increased tendency for corrosion to form on
rotors, while contaminants accumulate on the
brake pads. This occurs because the minimum
pressure which must be exerted by the pads
during brake applications to clean the rotors is
not reached.
Should corrosion form on the brake rotors, the
brakes will tend to respond with a pulsating
effect that even extended application will fail to
cure.
When the vehicle is parked
Condensation forms while the automatic climate
control is in operation, and then exits under the
vehicle. Traces of condensed water under the
vehicle are therefore normal.
In the MINI Cooper S, the coolant pump may
continue to run for some time after the engine is
switched off. This will generate noise in the
engine compartment.
Page 174 of 218
Care
172
Care
Car-care products
Regular cleaning and care helps to maintain the
value of your MINI.
The manufacturer of your MINI recommends
using manufacturer-approved products to clean
and care for your vehicle.
MINI Service would be pleased to advise you on
cleaning and care products and services for your
MINI.
The ingredients of original MINI Care Prod-
ucts have been tested, and the products
have been tested in the laboratory and in prac-
tice. They offer optimum care and protection for
your vehicle.<
Do not use any cleansers containing alco-
hol or solvents as these may cause dam-
age.<
Cleaning agents may contain hazardous
or health-damaging substances. Follow
the warning and hazard instructions on the
packaging. For interior cleaning, always open
the doors or windows of the vehicle.
Do not use any products that are not intended
for cleaning the vehicle.<
External care
Washing your vehicle
Especially during the winter months the
vehicle should be frequently washed. Dirt
and road salt can damage the vehicle.<
After washing the vehicle, apply the
brakes briefly to dry them; otherwise,
water can reduce braking efficiency over the
short term and the brake rotors can corrode.<
Car washes
Preference should be given to cloth car washes.Do not use automatic high-pressure car
washes; otherwise, water may drip into
the vehicle around the windows.<
Before driving into the car wash, check if the sys-
tem is suitable for your MINI. Observe the fol-
lowing points:
>Dimensions of the vehicle, page193
>If necessary: fold in the outside mirrors,
page 41.
>Maximum permissible tire width
Avoid car washes with tracks higher than
4 in/10 cm; otherwise, the chassis could
be damaged.<
Preparations for driving into the car wash:
>Unscrew the rod antenna.
>Deactivate the rain sensor
* to prevent unin-
tentional wiping.
>Deactivate the rear window wiper
* and pro-
tect it from damage. Ask the car wash oper-
ator about measures that can be taken to
protect the wipers.
>Remove additional attachments, e.g. spoil-
ers or telephone antennas, if there is a pos-
sibility that they could be damaged.
Automatic transmission
Before driving into the car wash, make sure that
the vehicle can roll:
1.Place the remote control, even with Comfort
Access, in the ignition lock.
2.Move the selector lever to position N.
3.Release the parking brake.
4.Switch off the engine.
5.Insert the remote control in the ignition lock
so that the vehicle can roll.
Steam jets/high-pressure washers
When using steam jets or high-pressure
washers, ensure that you maintain suffi-
cient clearance to the vehicle and do not exceed
a temperature of 1407/606.
Page 182 of 218
Replacing components
180
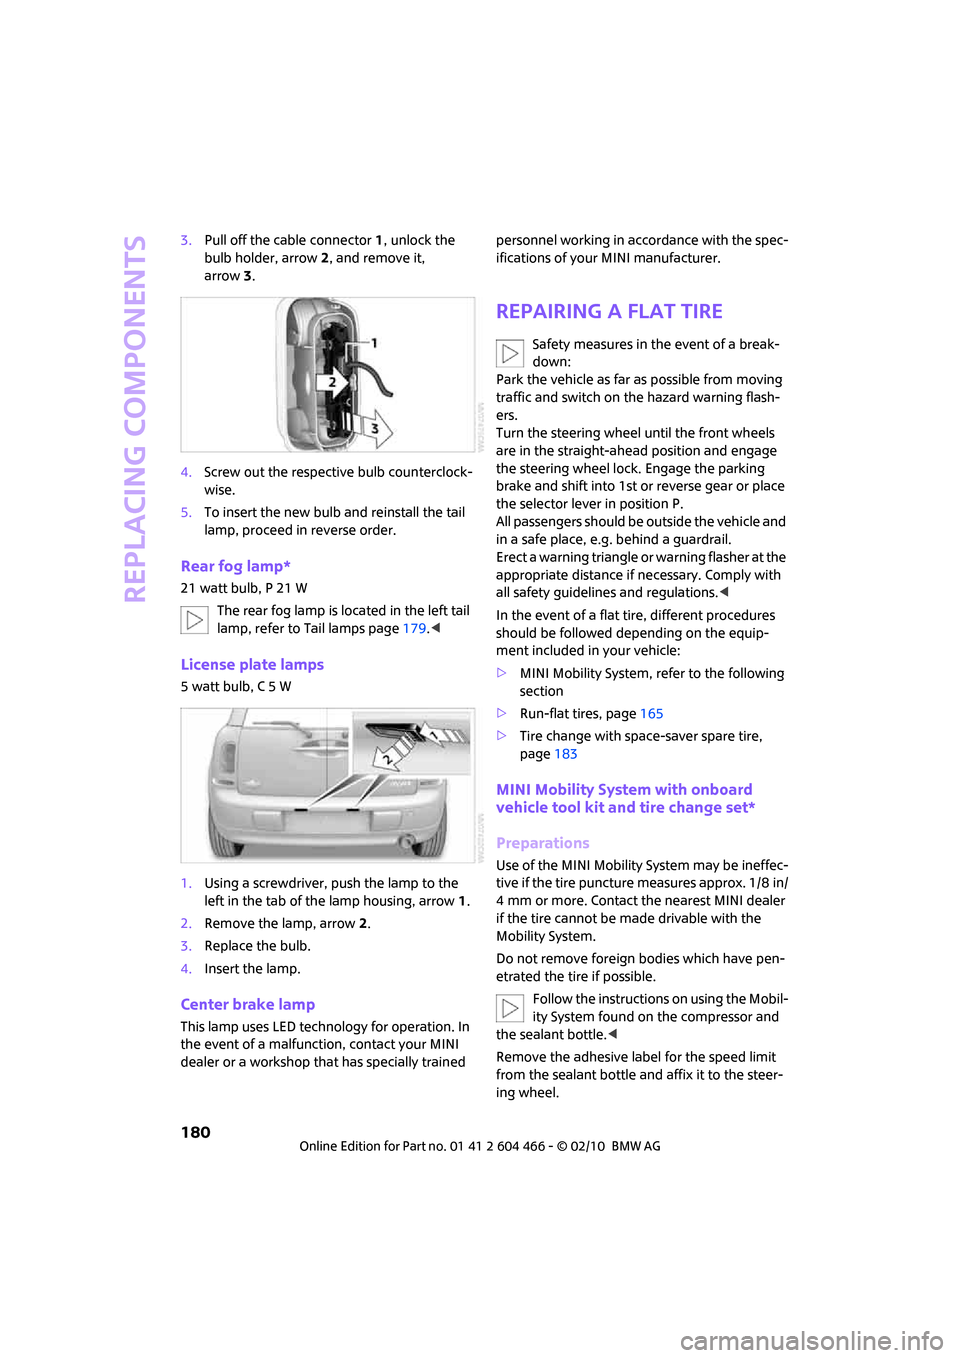
3.Pull off the cable connector 1, unlock the
bulb holder, arrow2, and remove it,
arrow3.
4.Screw out the respective bulb counterclock-
wise.
5.To insert the new bulb and reinstall the tail
lamp, proceed in reverse order.
Rear fog lamp*
21 watt bulb, P 21 W
The rear fog lamp is located in the left tail
lamp, refer to Tail lamps page179.<
License plate lamps
5 watt bulb, C 5 W
1.Using a screwdriver, push the lamp to the
left in the tab of the lamp housing, arrow1.
2.Remove the lamp, arrow 2.
3.Replace the bulb.
4.Insert the lamp.
Center brake lamp
This lamp uses LED technology for operation. In
the event of a malfunction, contact your MINI
dealer or a workshop that has specially trained personnel working in accordance with the spec-
ifications of your MINI manufacturer.
Repairing a flat tire
Safety measures in the event of a break-
down:
Park the vehicle as far as possible from moving
traffic and switch on the hazard warning flash-
ers.
Turn the steering wheel until the front wheels
are in the straight-ahead position and engage
the steering wheel lock. Engage the parking
brake and shift into 1st or reverse gear or place
the selector lever in position P.
All passengers should be outside the vehicle and
in a safe place, e.g. behind a guardrail.
Erect a warning triangle or warning flasher at the
appropriate distance if necessary. Comply with
all safety guidelines and regulations.<
In the event of a flat tire, different procedures
should be followed depending on the equip-
ment included in your vehicle:
>MINI Mobility System, refer to the following
section
>Run-flat tires, page165
>Tire change with space-saver spare tire,
page183
MINI Mobility System with onboard
vehicle tool kit and tire change set*
Preparations
Use of the MINI Mobility System may be ineffec-
tive if the tire puncture measures approx. 1/8 in/
4 mm or more. Contact the nearest MINI dealer
if the tire cannot be made drivable with the
Mobility System.
Do not remove foreign bodies which have pen-
etrated the tire if possible.
Follow the instructions on using the Mobil-
ity System found on the compressor and
the sealant bottle.<
Remove the adhesive label for the speed limit
from the sealant bottle and affix it to the steer-
ing wheel.
Page 203 of 218
REFERENCEAT A GLANCE CONTROLS DRIVING TIPS MOBILITY
201
Avoid highways in
navigation118
"Avoid tollroads" in
Navigation118
Axle loads, refer to
Weights194
B
Background lighting, refer to
Ambient lighting84
Backrests, refer to Seats37
Backup lamps
– replacing bulb179
Balance, tone control133
Band-aids, refer to First aid
pouch186
Bar, refer to Tow-starting,
towing away188
Bass sounds, refer to Tone
control133
Bass sounds, refer to Treble
and bass133
Bass, tone control133
Battery185
– charging185
– disposal34,185
– jump-starting186
– temporary power failure185
Battery renewal
– remote control34
Being towed188
Belt tensioner, refer to Safety
belts40
Belts, refer to Safety belts40
Beverage holders, refer to
Cupholders91
Black ice, refer to Outside
temperature warning55
Blower, refer to Air flow rate86
Bottle holders, refer to
Cupholders91
Brake Assist71
Brake fluid, refer to Service
requirements60Brake lamps
– replacing bulbs179
Brake pads, breaking in96
Brake rotors97
– brakes96
– breaking in96
Brake system96
– breaking in96
– disc brakes97
– MINI Maintenance
System170
Brakes
– ABS71
– breaking in96
– MINI Maintenance
System170
– parking brake47
– service requirements60
Brakes, refer to Braking
safely97
Breakdown service, refer to
Roadside Assistance186
Break-in period
96
Breaking in the clutch96
"Brightness" on the Control
Display69
Bulb changing, refer to Lamps
and bulbs176
Button for starting the
engine46
Buttons on the steering
wheel11
C
California Proposition 65
warning5
Can holders, refer to
Cupholders91
Capacities194
Car battery, refer to Vehicle
battery185
Car care172
"Car Data"57
Car key, refer to Keys/remote
controls26Car phone
– installation location, refer to
Center armrest90
– refer to separate Owner's
Manual
Car radio, refer to Radio135
Car wash, care172
Car washes172
Care172
– car washes172
– car-care products172
– CD/DVD drives175
– external172
– high-pressure washers172
– internal174
– leather174
– manual washing173
– upholstery and fabrics174
– windows173
– wiper blades173
Cargo area
– capacity194
Cargo bay98
– Comfort Access33
– doors, refer to Splitdoor31
– lamp83
– opening from outside31
– trunk lid, refer to Splitdoor31
Cargo bay doors, refer to
Splitdoor31
Cargo bay, expanding98
Cargo bay lamp83
Cargo bay partition net, refer
to Partition net99
Cargo loading99
– securing cargo100
– stowing cargo100
– vehicle98
Cargo, securing100
Carpets, care174
Catalytic converter, refer to
Hot exhaust system96
"Categories"141
"CD"132,143
Page 205 of 218
REFERENCEAT A GLANCE CONTROLS DRIVING TIPS MOBILITY
203
Date
– setting64
– setting format65
"Date format"65
"Daytime running lamps"82
Daytime running lights82
DBC Dynamic Brake Control,
refer to Brake Assist71
Deactivating front passenger
airbags79
Deadlocking, refer to
Locking28
Defect
– door lock30
– fuel filler flap156
Defogging windows87
Defrost position, refer to
Defrosting windows87
Defrosting windows87
Defrosting windows and
removing condensation
– automatic climate control87
Defrosting windshield, refer to
Defrosting windows87
Destination address
– deleting117
– entering108,111
Destination for navigation
– destination list115
– entry108
– home address117
– manual entry108,111
– selecting from address
book116
– selecting using
information114
– selecting via map113
– storing116
Destination guidance120
– changing specified route118
– displaying route121
– distance and arrival120
– interrupting120
– starting120
– taking detours124
– terminating/continuing120
– voice instructions123
– volume for voice
instructions123Destination list for navigation
system115
Destinations recently driven
to115
Detour, refer to Driving around
a traffic congestion127
Differential, breaking in96
Digital clock55
Digital radio, refer to HD
Radio138
Dimensions193
Dipstick, engine oil168
Direction instructions, refer to
Voice instructions123
Directional indicators, refer to
Turn signals50
Directory for navigation, refer
to Address book115
Displacement, refer to Engine
data192
Display lighting, refer to
Instrument lighting83
"Display off"20
Display, refer to Onboard
monitor controls16
Displays12
– instrument combination12
– on the Control Display16
Displays and controls10
Displays, care174
Disposal
– of coolant169
– remote control battery34
– vehicle battery185
"Dist. to dest."58
Distance remaining to service,
refer to Service
requirements60
Distance warning, refer to Park
Distance Control PDC70
Door
– rear, refer to Clubdoor31
Door key, refer to Integrated
key/remote control26
Door lock29
Door lock, confirmation
signals28
"Door locks"28,30
Doors, manual operation30DOT Quality Grades163
Double doors, refer to
Splitdoor31
Drinks holders, refer to
Cupholders91
Drive-off assistant, refer to Hill
Assist73
Driving around a traffic
congestion127
Driving dynamics control, refer
to Sport button73
Driving lamps, refer to Parking
lamps/low beams81
Driving notes96
Driving off on inclines, refer to
Hill Assist73
Driving route, refer to
Displaying route121
Driving stability control
systems71
Driving through water
97
Driving tips, refer to Driving
notes96
Dry air, refer to Cooling
function87
DTC Dynamic Traction Control
DTC72
DVD for navigation106
Dynamic Brake Control DBC,
refer to Brake Assist71
Dynamic Stability Control
DSC71
Dynamic Traction Control72
E
Eject button, refer to Buttons
on the CD player132
Electrical malfunction
– door lock30
– fuel filler flap156
Electronic brake-force
distribution71
Electronic Stability Program
ESP, refer to Dynamic
Stability Control DSC71