lock MINI Clubman 2010 Owner's Guide
[x] Cancel search | Manufacturer: MINI, Model Year: 2010, Model line: Clubman, Model: MINI Clubman 2010Pages: 160, PDF Size: 2.58 MB
Page 96 of 160
Refueling
94
Refueling
Switch off the engine before refueling;
otherwise, fuel cannot be added to the
tank and a message will be displayed.<
Take all precautionary measures and
observe all applicable regulations when
handling fuel. Do not carry any spare fuel con-
tainers in your vehicle. They can develop a leak
and cause an explosion or cause a fire in the
event of an accident.<
Fuel filler flap
Opening
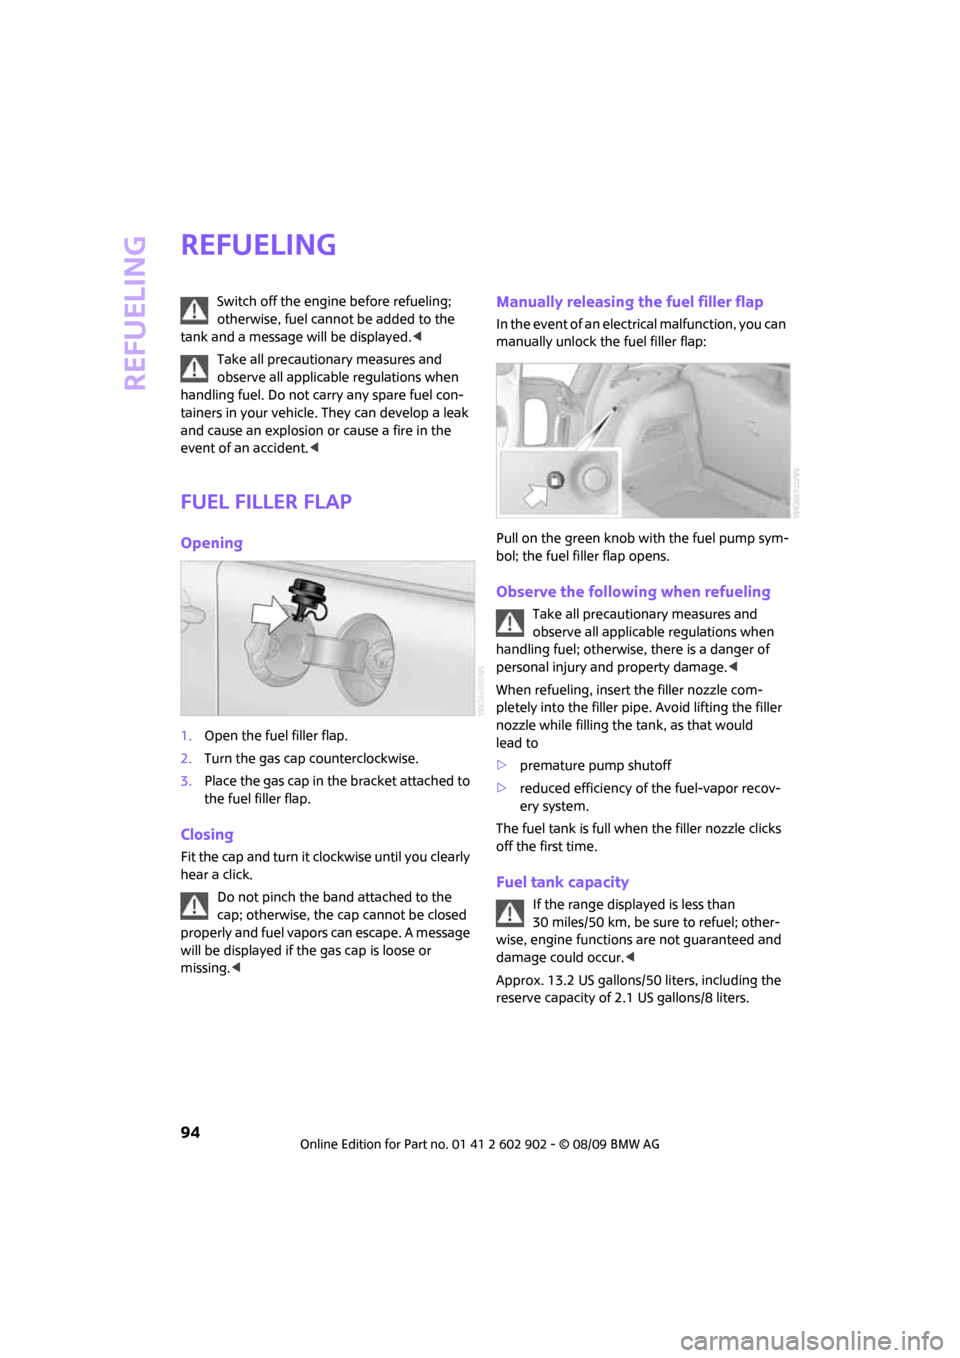
1.Open the fuel filler flap.
2.Turn the gas cap counterclockwise.
3.Place the gas cap in the bracket attached to
the fuel filler flap.
Closing
Fit the cap and turn it clockwise until you clearly
hear a click.
Do not pinch the band attached to the
cap; otherwise, the cap cannot be closed
properly and fuel vapors can escape. A message
will be displayed if the gas cap is loose or
missing.<
Manually releasing the fuel filler flap
In the event of an electrical malfunction, you can
manually unlock the fuel filler flap:
Pull on the green knob with the fuel pump sym-
bol; the fuel filler flap opens.
Observe the following when refueling
Take all precautionary measures and
observe all applicable regulations when
handling fuel; otherwise, there is a danger of
personal injury and property damage.<
When refueling, insert the filler nozzle com-
pletely into the filler pipe. Avoid lifting the filler
nozzle while filling the tank, as that would
lead to
>premature pump shutoff
>reduced efficiency of the fuel-vapor recov-
ery system.
The fuel tank is full when the filler nozzle clicks
off the first time.
Fuel tank capacity
If the range displayed is less than
30 miles/50 km, be sure to refuel; other-
wise, engine functions are not guaranteed and
damage could occur.<
Approx. 13.2 US gallons/50 liters, including the
reserve capacity of 2.1 US gallons/8 liters.
Page 107 of 160
REFERENCEAT A GLANCE CONTROLS DRIVING TIPS MOBILITY
105
Under the bonnet
Do not work on the car unless you possess
the necessary technical knowledge. If you
are not familiar with the regulations to be
observed, have the necessary work on your
vehicle carried out only by a MINI dealer or a
workshop that has specially trained personnel
working in accordance with the specifications of
the MINI manufacturer. If this work is not carried
out properly, there is a danger of subsequent
damage and related safety hazards.<
Bonnet
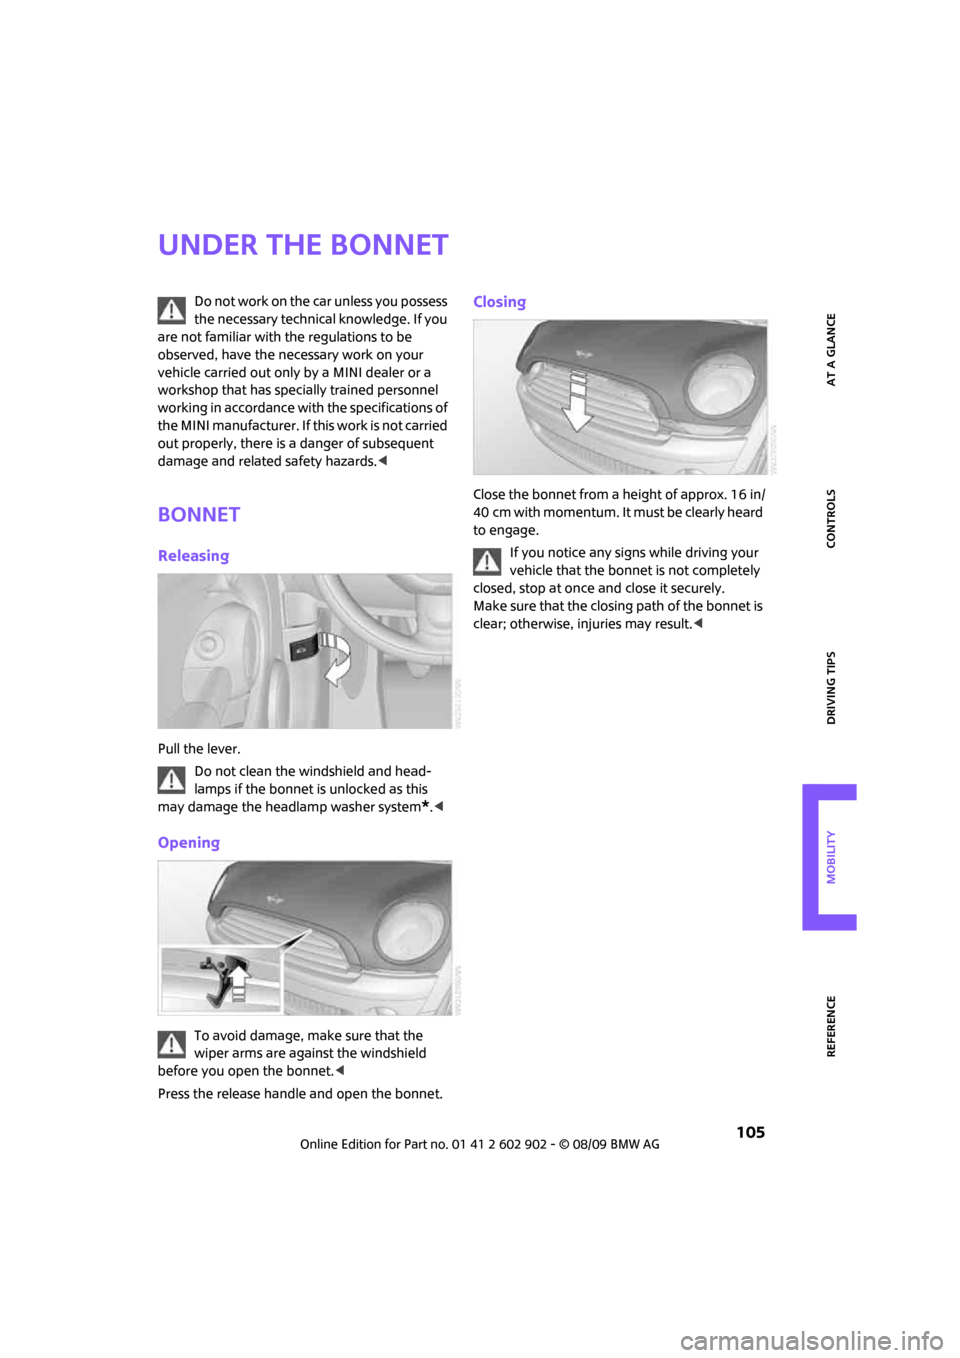
Releasing
Pull the lever.
Do not clean the windshield and head-
lamps if the bonnet is unlocked as this
may damage the headlamp washer system
*.<
Opening
To avoid damage, make sure that the
wiper arms are against the windshield
before you open the bonnet.<
Press the release handle and open the bonnet.
Closing
Close the bonnet from a height of approx. 16 in/
40 cm with momentum. It must be clearly heard
to engage.
If you notice any signs while driving your
vehicle that the bonnet is not completely
closed, stop at once and close it securely.
Make sure that the closing path of the bonnet is
clear; otherwise, injuries may result.<
Page 109 of 160
REFERENCEAT A GLANCE CONTROLS DRIVING TIPS MOBILITY
107
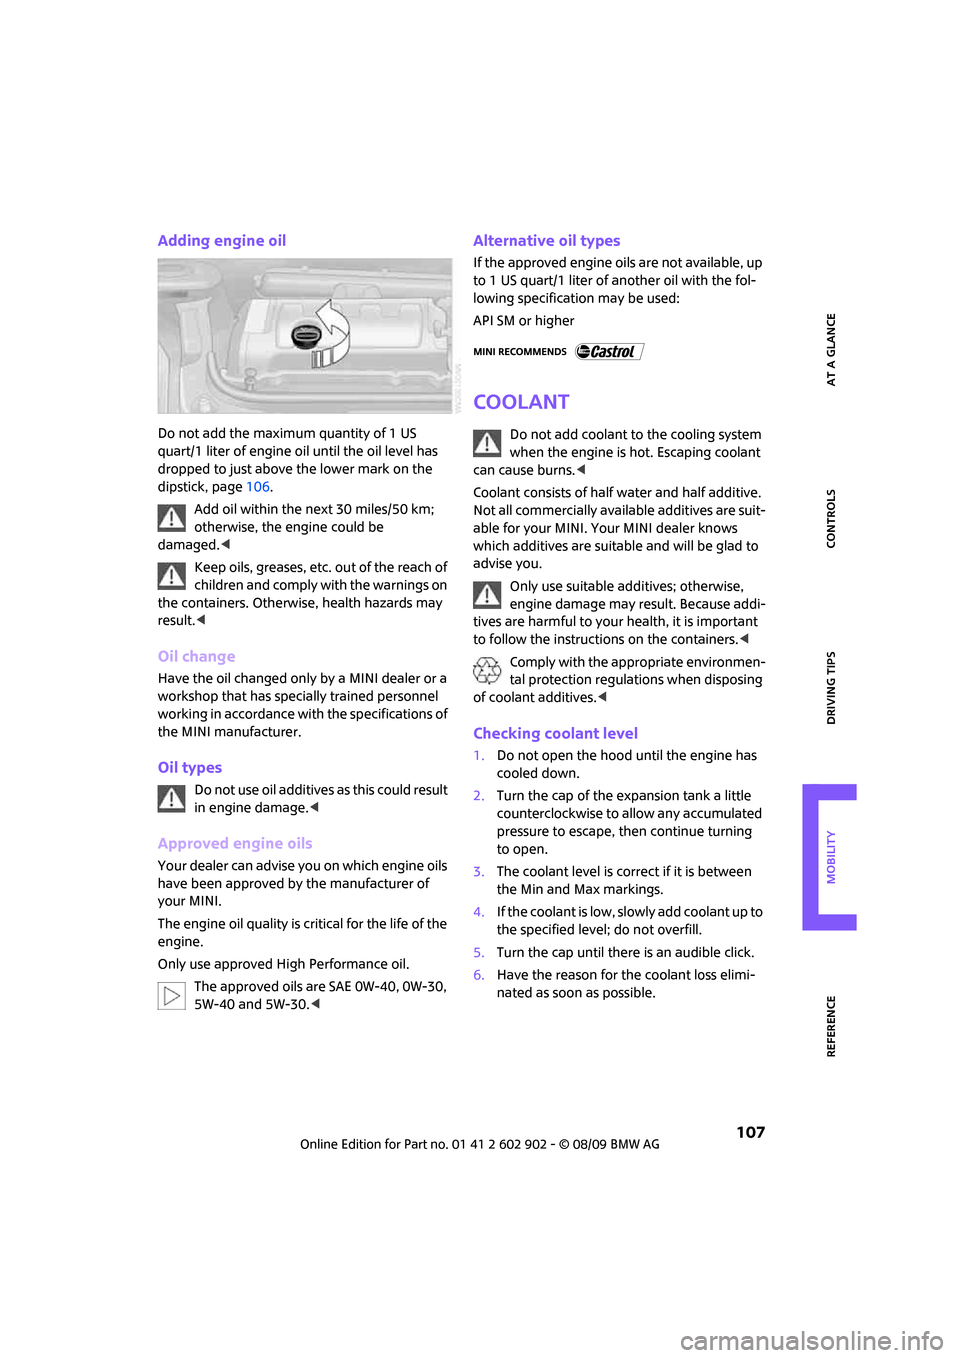
Adding engine oil
Do not add the maximum quantity of 1 US
quart/1 liter of engine oil until the oil level has
dropped to just above the lower mark on the
dipstick, page106.
Add oil within the next 30 miles/50 km;
otherwise, the engine could be
damaged.<
Keep oils, greases, etc. out of the reach of
children and comply with the warnings on
the containers. Otherwise, health hazards may
result.<
Oil change
Have the oil changed only by a MINI dealer or a
workshop that has specially trained personnel
working in accordance with the specifications of
the MINI manufacturer.
Oil types
Do not use oil additives as this could result
in engine damage.<
Approved engine oils
Your dealer can advise you on which engine oils
have been approved by the manufacturer of
your MINI.
The engine oil quality is critical for the life of the
engine.
Only use approved High Performance oil.
The approved oils are SAE 0W-40, 0W-30,
5W-40 and 5W-30.<
Alternative oil types
If the approved engine oils are not available, up
to 1 US quart/1 liter of another oil with the fol-
lowing specification may be used:
API SM or higher
Coolant
Do not add coolant to the cooling system
when the engine is hot. Escaping coolant
can cause burns.<
Coolant consists of half water and half additive.
Not all commercially available additives are suit-
able for your MINI. Your MINI dealer knows
which additives are suitable and will be glad to
advise you.
Only use suitable additives; otherwise,
engine damage may result. Because addi-
tives are harmful to your health, it is important
to follow the instructions on the containers.<
Comply with the appropriate environmen-
tal protection regulations when disposing
of coolant additives.<
Checking coolant level
1.Do not open the hood until the engine has
cooled down.
2.Turn the cap of the expansion tank a little
counterclockwise to allow any accumulated
pressure to escape, then continue turning
to open.
3.The coolant level is correct if it is between
the Min and Max markings.
4.If the coolant is low, slowly add coolant up to
the specified level; do not overfill.
5.Turn the cap until there is an audible click.
6.Have the reason for the coolant loss elimi-
nated as soon as possible.
Page 112 of 160
Care
110
Care
Car-care products
Regular cleaning and care helps to maintain the
value of your MINI.
The manufacturer of your MINI recommends
using manufacturer-approved products to clean
and care for your vehicle.
MINI Service would be pleased to advise you
on cleaning and care products and services for
your MINI.
The ingredients of original MINI CareProd-
ucts have been tested, and the products
have been tested in the laboratory and in prac-
tice. They offer optimum care and protection for
your vehicle.<
Do not use any cleansers containing
alcohol or solvents as these may cause
damage.<
Cleaning agents may contain hazardous
or health-damaging substances. Follow
the warning and hazard instructions on the
packaging. For interior cleaning, always open
the doors or windows of the vehicle.
Do not use any products that are not intended
for cleaning the vehicle.<
External care
Washing your vehicle
Especially during the winter months the
vehicle should be frequently washed. Dirt
and road salt can damage the vehicle.<
After washing the vehicle, apply the
brakes briefly to dry them; otherwise,
water can reduce braking efficiency over the
short term and the brake rotors can corrode.<
Car washes
Preference should be given to cloth car washes.
Do not use automatic high-pressure car
washes; otherwise, water may drip into
the vehicle around the windows.<
Before driving into the car wash, check if the sys-
tem is suitable for your MINI. Observe the fol-
lowing points:
>Dimensions of the vehicle, page143
>If necessary: Fold in the outside mirrors,
page 35.
>Maximum permissible tire width
Avoid car washes with tracks higher than
4 in/10 cm; otherwise, the chassis could
be damaged.<
Preparations for driving into the car wash:
>Unscrew the rod antenna.
>Deactivate the rain sensor
* to prevent unin-
tentional wiping.
>Deactivate the rear window wiper
* and pro-
tect it from damage. Ask the car wash oper-
ator about measures that can be taken to
protect the wipers.
>Remove additional attachments, e.g. spoil-
ers or telephone antennas, if there is a pos-
sibility that they could be damaged.
Automatic transmission
Before driving into the car wash, make sure that
the vehicle can roll:
1.Place the remote control, even with Comfort
Access, in the ignition lock.
2.Move the selector lever to position N.
3.Release the parking brake.
4.Switch off the engine.
5.Insert the remote control in the ignition lock
so that the vehicle can roll.
Page 116 of 160

Replacing components
114
Replacing components
Onboard vehicle tool kit
Your vehicle comes with an onboard vehicle tool
kit that varies with the equipment version; it is
stored underneath the level load floor.
>Mobility System with onboard vehicle tool
kit and tire change set
*118
>Tire change set with onboard vehicle tool kit
for space-saver spare tire121
Wiper blades
Changing the front wiper blades
1.Fold up the wiper arm.
2.Position the wiper blade horizontally.
3.Press the securing spring, arrow.
4.Unhook the wiper blade toward the wind-
shield.
5.Pull the wiper blade past the wiper arm
toward the top.
6.Insert the new wiper blade.7.Press into position until you hear it engage.
8.Fold down the wiper arm.
To avoid damage, make sure that the
wiper arms are against the windshield
before you open the bonnet.<
Changing the rear wiper blade
1.Fold out the wiper arm and hold it.
2.Press together the locking spring, arrow 1,
and fold out the wiper blade.
3.Pull the wiper blade away from and out of
the catch mechanism, arrow 2.
4.Press the new wiper blade into the fixture
until it engages audibly.
Lamps and bulbs
Lamps and bulbs make an essential contribution
to vehicle safety. They should, therefore, be
handled carefully. The manufacturer of your
MINI recommends having your MINI dealer per-
form any work that you do not feel competent to
perform yourself or that is not described here.
Never touch the glass of new bulbs with
your bare fingers, as even minute
amounts of contamination will burn into the
bulb's surface and reduce its service life. Use a
clean tissue, cloth or something similar, or hold
the bulb by its base.<
You can obtain a selection of replacement bulbs
at your MINI dealer.
Page 118 of 160
Replacing components
116
Replacing the bulb
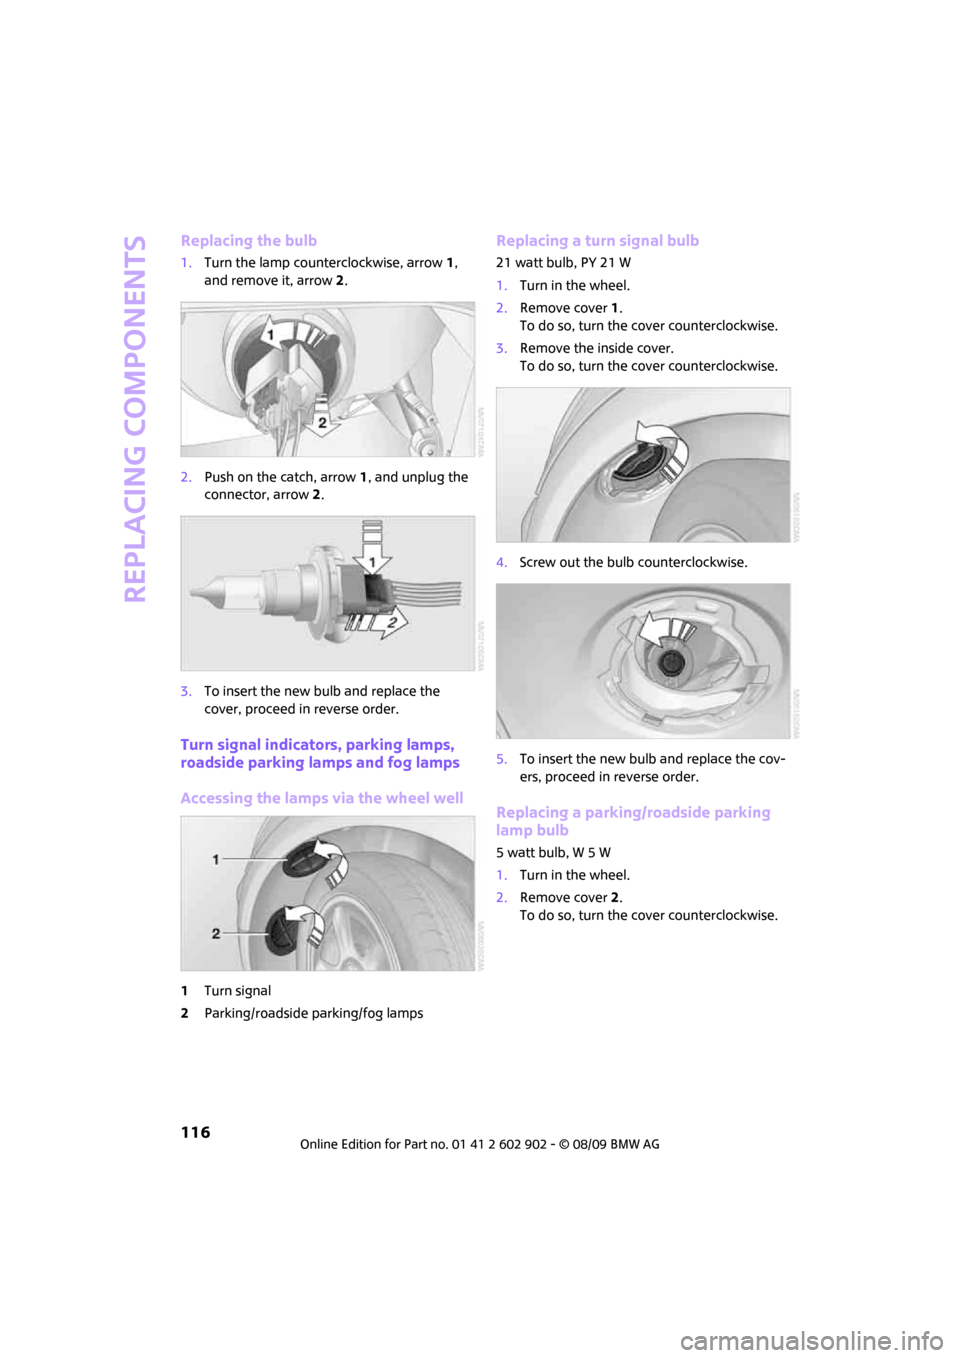
1.Turn the lamp counterclockwise, arrow1,
and remove it, arrow2.
2.Push on the catch, arrow 1, and unplug the
connector, arrow2.
3.To insert the new bulb and replace the
cover, proceed in reverse order.
Turn signal indicators, parking lamps,
roadside parking lamps and fog lamps
Accessing the lamps via the wheel well
1Turn signal
2Parking/roadside parking/fog lamps
Replacing a turn signal bulb
21 watt bulb, PY 21 W
1.Turn in the wheel.
2.Remove cover 1.
To do so, turn the cover counterclockwise.
3.Remove the inside cover.
To do so, turn the cover counterclockwise.
4.Screw out the bulb counterclockwise.
5.To insert the new bulb and replace the cov-
ers, proceed in reverse order.
Replacing a parking/roadside parking
lamp bulb
5 watt bulb, W 5 W
1.Turn in the wheel.
2.Remove cover 2.
To do so, turn the cover counterclockwise.
Page 119 of 160
REFERENCEAT A GLANCE CONTROLS DRIVING TIPS MOBILITY
117
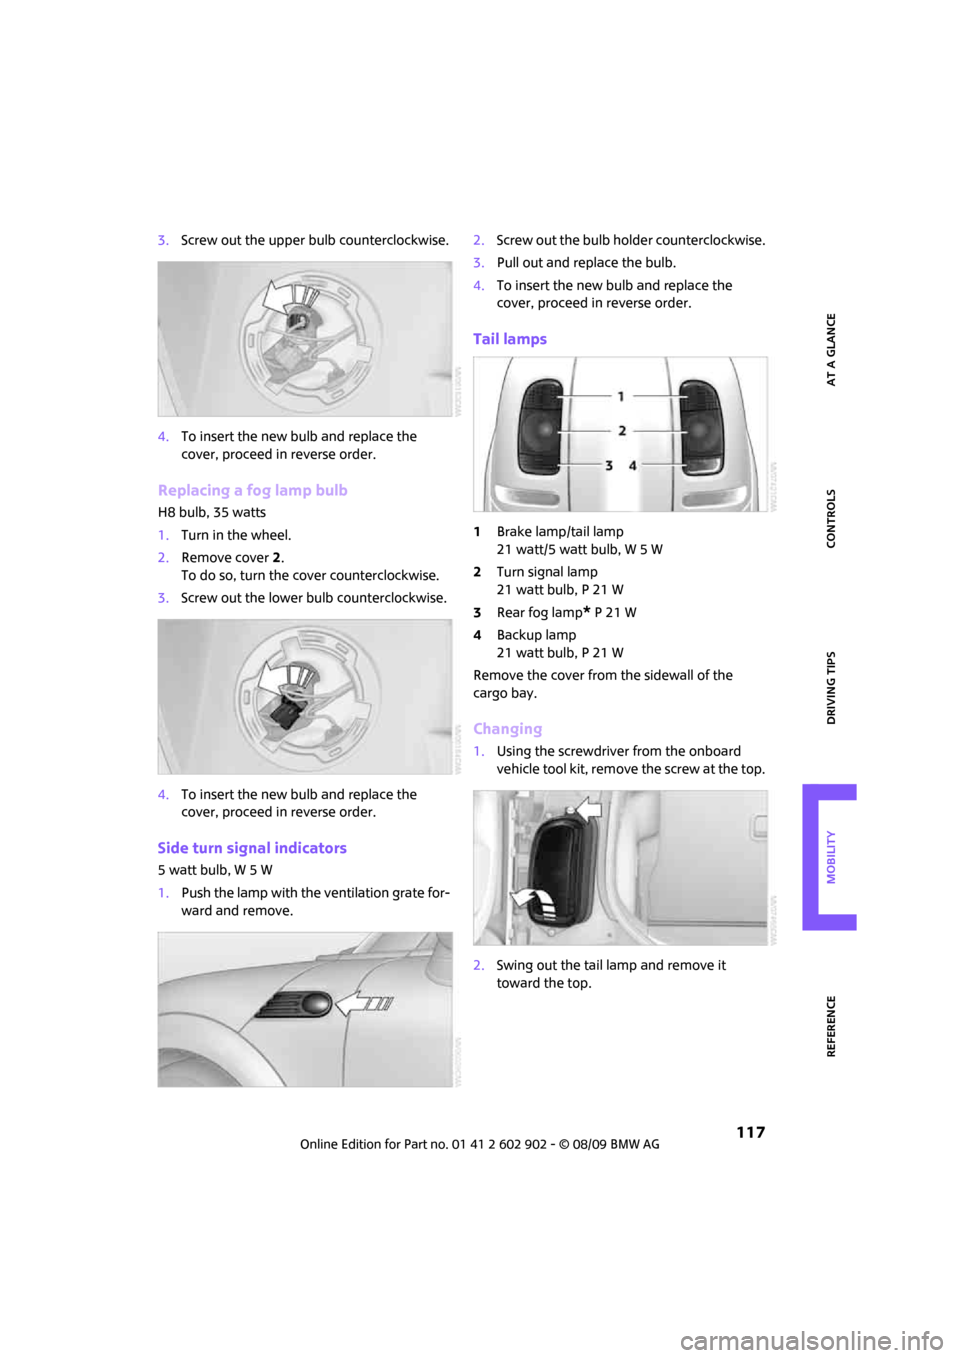
3.Screw out the upper bulb counterclockwise.
4.To insert the new bulb and replace the
cover, proceed in reverse order.
Replacing a fog lamp bulb
H8 bulb, 35 watts
1.Turn in the wheel.
2.Remove cover 2.
To do so, turn the cover counterclockwise.
3.Screw out the lower bulb counterclockwise.
4.To insert the new bulb and replace the
cover, proceed in reverse order.
Side turn signal indicators
5 watt bulb, W 5 W
1.Push the lamp with the ventilation grate for-
ward and remove.2.Screw out the bulb holder counterclockwise.
3.Pull out and replace the bulb.
4.To insert the new bulb and replace the
cover, proceed in reverse order.
Tail lamps
1Brake lamp/tail lamp
21 watt/5 watt bulb, W 5 W
2Turn signal lamp
21 watt bulb, P 21 W
3Rear fog lamp
* P 21 W
4Backup lamp
21 watt bulb, P 21 W
Remove the cover from the sidewall of the
cargo bay.
Changing
1.Using the screwdriver from the onboard
vehicle tool kit, remove the screw at the top.
2.Swing out the tail lamp and remove it
toward the top.
Page 120 of 160
Replacing components
118
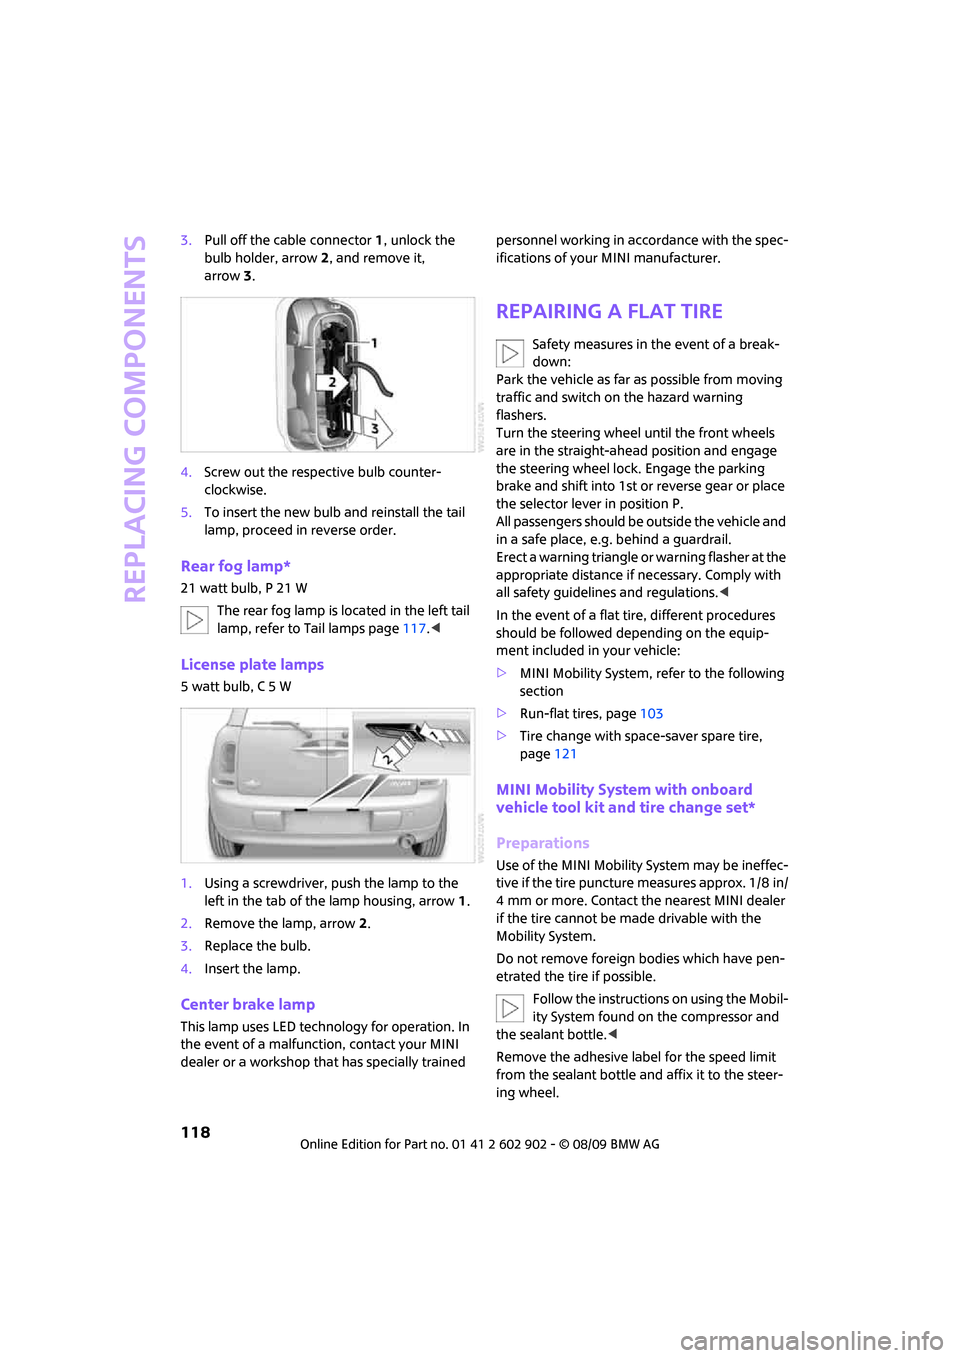
3.Pull off the cable connector 1, unlock the
bulb holder, arrow2, and remove it,
arrow3.
4.Screw out the respective bulb counter-
clockwise.
5.To insert the new bulb and reinstall the tail
lamp, proceed in reverse order.
Rear fog lamp*
21 watt bulb, P 21 W
The rear fog lamp is located in the left tail
lamp, refer to Tail lamps page117.<
License plate lamps
5 watt bulb, C 5 W
1.Using a screwdriver, push the lamp to the
left in the tab of the lamp housing, arrow1.
2.Remove the lamp, arrow 2.
3.Replace the bulb.
4.Insert the lamp.
Center brake lamp
This lamp uses LED technology for operation. In
the event of a malfunction, contact your MINI
dealer or a workshop that has specially trained personnel working in accordance with the spec-
ifications of your MINI manufacturer.
Repairing a flat tire
Safety measures in the event of a break-
down:
Park the vehicle as far as possible from moving
traffic and switch on the hazard warning
flashers.
Turn the steering wheel until the front wheels
are in the straight-ahead position and engage
the steering wheel lock. Engage the parking
brake and shift into 1st or reverse gear or place
the selector lever in position P.
All passengers should be outside the vehicle and
in a safe place, e.g. behind a guardrail.
Erect a warning triangle or warning flasher at the
appropriate distance if necessary. Comply with
all safety guidelines and regulations.<
In the event of a flat tire, different procedures
should be followed depending on the equip-
ment included in your vehicle:
>MINI Mobility System, refer to the following
section
>Run-flat tires, page103
>Tire change with space-saver spare tire,
page121
MINI Mobility System with onboard
vehicle tool kit and tire change set*
Preparations
Use of the MINI Mobility System may be ineffec-
tive if the tire puncture measures approx. 1/8 in/
4 mm or more. Contact the nearest MINI dealer
if the tire cannot be made drivable with the
Mobility System.
Do not remove foreign bodies which have pen-
etrated the tire if possible.
Follow the instructions on using the Mobil-
ity System found on the compressor and
the sealant bottle.<
Remove the adhesive label for the speed limit
from the sealant bottle and affix it to the steer-
ing wheel.
Page 124 of 160
Replacing components
122
Do not use a wooden block or similar object as a
support base for the jack, as this would prevent
it from extending to its full support height and
reduce its load-carrying capacity.
Do not lie under the vehicle or start the engine
when the vehicle is supported by the jack; other-
wise, there is a risk of fatal injury.<
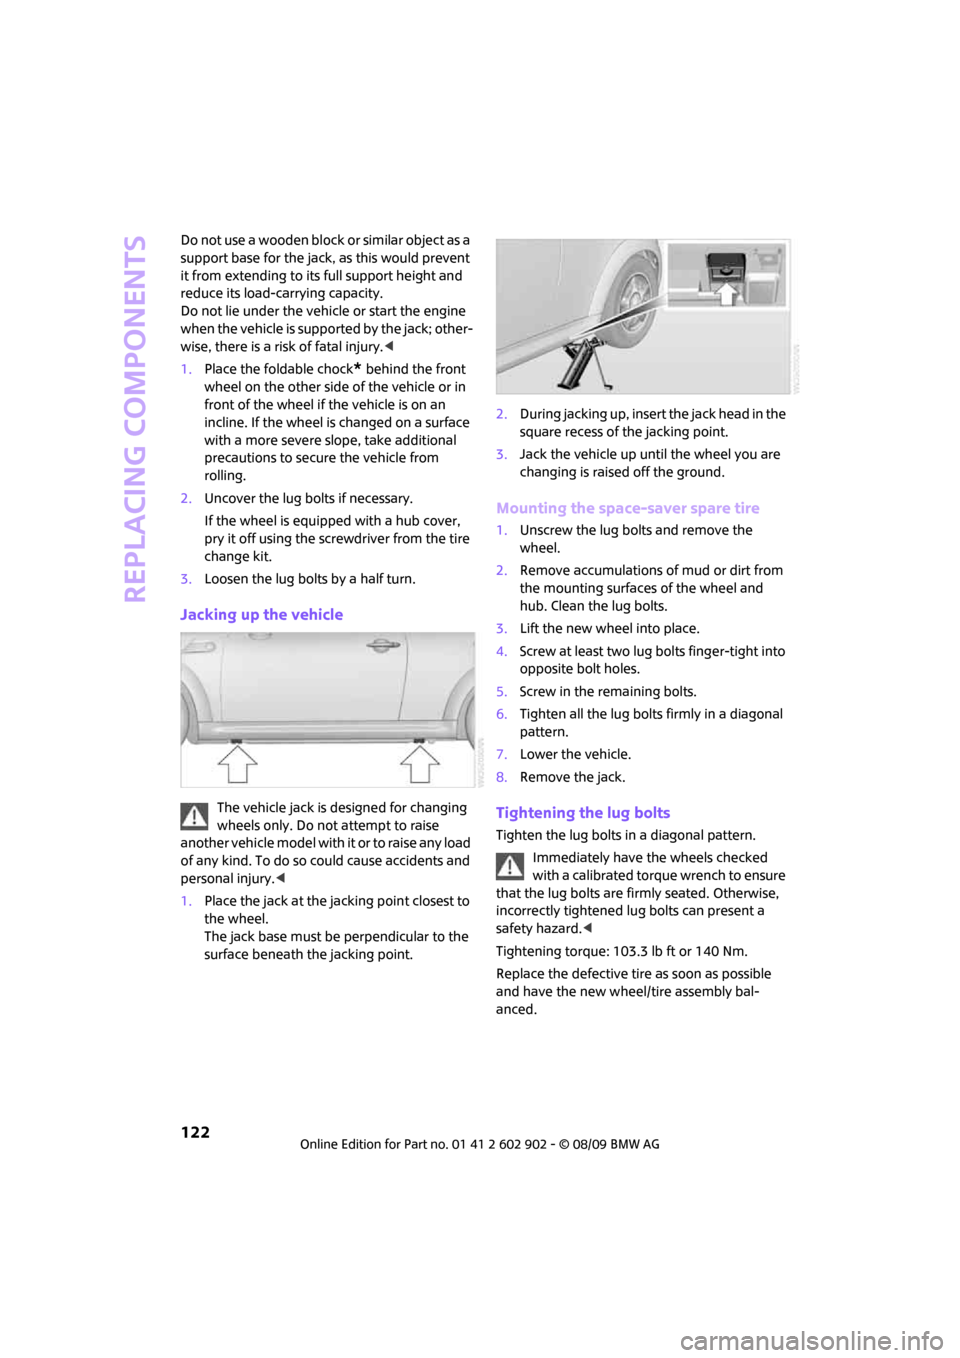
1.Place the foldable chock
* behind the front
wheel on the other side of the vehicle or in
front of the wheel if the vehicle is on an
incline. If the wheel is changed on a surface
with a more severe slope, take additional
precautions to secure the vehicle from
rolling.
2.Uncover the lug bolts if necessary.
If the wheel is equipped with a hub cover,
pry it off using the screwdriver from the tire
change kit.
3.Loosen the lug bolts by a half turn.
Jacking up the vehicle
The vehicle jack is designed for changing
wheels only. Do not attempt to raise
another vehicle model with it or to raise any load
of any kind. To do so could cause accidents and
personal injury.<
1.Place the jack at the jacking point closest to
the wheel.
The jack base must be perpendicular to the
surface beneath the jacking point.2.During jacking up, insert the jack head in the
square recess of the jacking point.
3.Jack the vehicle up until the wheel you are
changing is raised off the ground.
Mounting the space-saver spare tire
1.Unscrew the lug bolts and remove the
wheel.
2.Remove accumulations of mud or dirt from
the mounting surfaces of the wheel and
hub. Clean the lug bolts.
3.Lift the new wheel into place.
4.Screw at least two lug bolts finger-tight into
opposite bolt holes.
5.Screw in the remaining bolts.
6.Tighten all the lug bolts firmly in a diagonal
pattern.
7.Lower the vehicle.
8.Remove the jack.
Tightening the lug bolts
Tighten the lug bolts in a diagonal pattern.
Immediately have the wheels checked
with a calibrated torque wrench to ensure
that the lug bolts are firmly seated. Otherwise,
incorrectly tightened lug bolts can present a
safety hazard.<
Tightening torque: 103.3 lb ft or 140 Nm.
Replace the defective tire as soon as possible
and have the new wheel/tire assembly bal-
anced.
Page 126 of 160

Giving and receiving assistance
124
Giving and receiving assistance
Roadside Assistance
The Roadside Assistance service is there to assist
you around the clock in the event of a break-
down, including on weekends and public
holidays.
The phone numbers of the Roadside Assistance
in your home country can be found in the Con-
tact brochure.
First aid pouch*
Some of the articles contained in the first aid
pouch have a limited service life. Therefore,
check the expiration dates of the contents regu-
larly and replace any items in good time, if nec-
essary.
The first aid pouch is located on the cargo bay
floor by the left side trim panel or under the level
load floor.
Warning triangle*
In the cargo bay under the loading sill.
Open the center lock to take it out.
Jump-starting
If the car's own battery is flat, your MINI's engine
can be started by connecting two jumper cables
to another vehicle's battery. You can also use
the same method to help start another vehicle.
Only use jumper cables with fully-insulated
clamp handles.
Do not touch any electrically live parts
when the engine is running, or a fatal acci-
dent may occur. Carefully adhere to the follow-
ing sequence, both to prevent damage to one or
both vehicles, and to guard against possible per-
sonal injuries.<
Preparation
1.Check whether the battery of the other vehi-
cle has a voltage of 12 volts and approxi-
mately the same capacitance in Ah. This
information can be found on the battery.
2.Switch off the engine of the support vehicle.
3.Switch off any consumers in both vehicles.
There must not be any contact between
the bodies of the two vehicles; otherwise,
there is a danger of shorting.<