USB MINI Clubman 2010 Owner's Manual
[x] Cancel search | Manufacturer: MINI, Model Year: 2010, Model line: Clubman, Model: MINI Clubman 2010Pages: 160, PDF Size: 2.58 MB
Page 17 of 160

REFERENCE
AT A GLANCE CONTROLS DRIVING TIPS MOBILITY
15
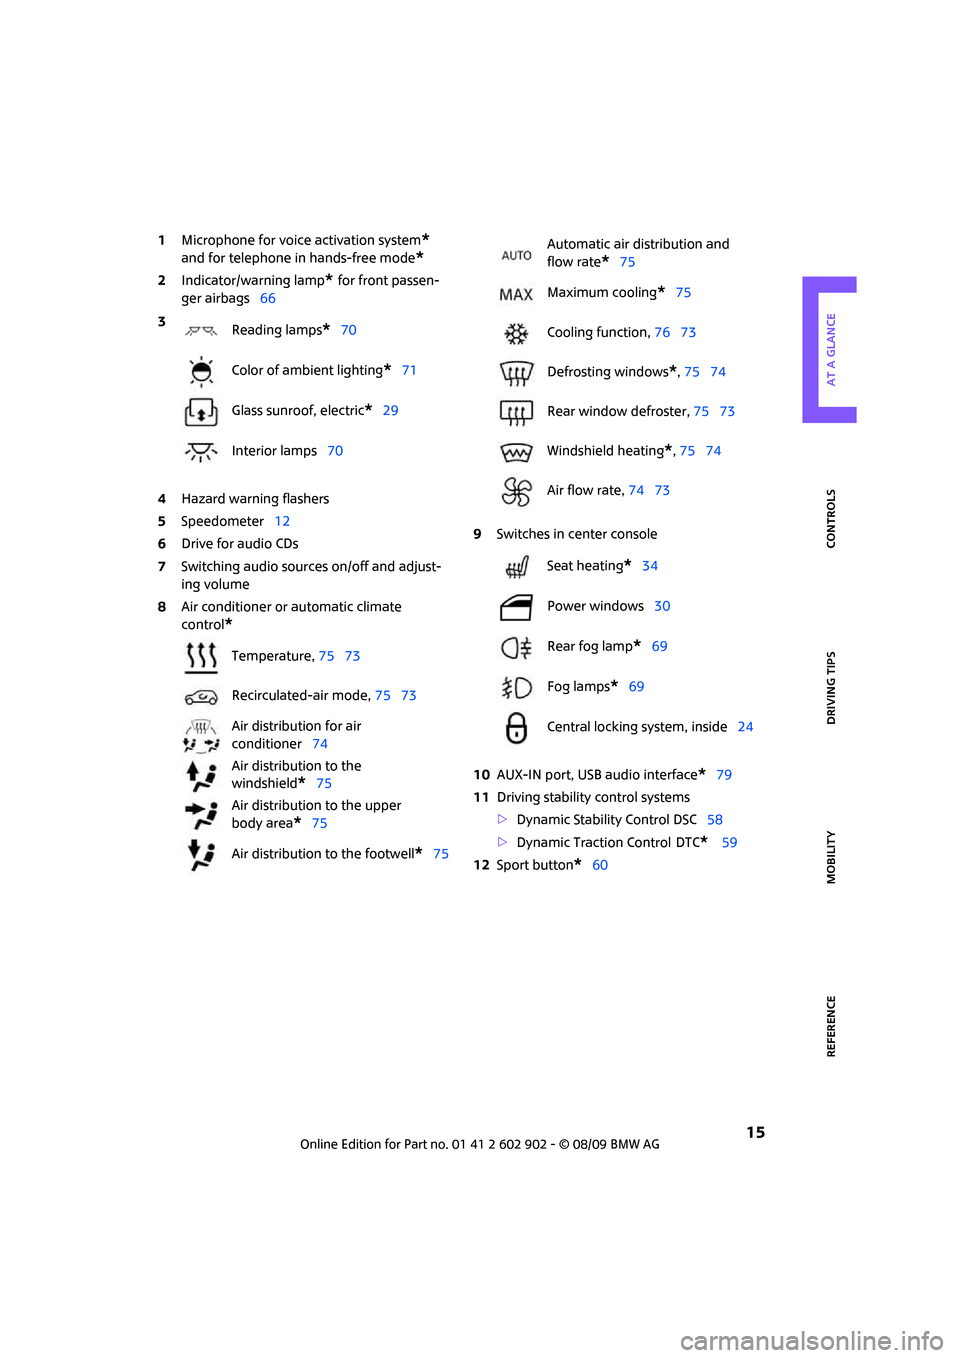
1Microphone for voice activation system*
and for telephone in hands-free mode*
2Indicator/warning lamp* for front passen-
ger airbags66
4Hazard warning flashers
5Speedometer12
6Drive for audio CDs
7Switching audio sources on/off and adjust-
ing volume
8Air conditioner or automatic climate
control
*
9Switches in center console
10AUX-IN port, USB audio interface
*79
11Driving stability control systems
>Dynamic Stability Control DSC58
>Dynamic Traction Control
DTC* 59
12Sport button
*60 3
Reading lamps
*70
Color of ambient lighting
*71
Glass sunroof, electric
*29
Interior lamps70
Temperature, 75 73
Recirculated-air mode, 75 73
Air distribution for air
conditioner74
Air distribution to the
windshield
*75
Air distribution to the upper
body area
*75
Air distribution to the footwell
*75
Automatic air distribution and
flow rate
*75
Maximum cooling
*75
Cooling function, 76 73
Defrosting windows
*, 75 74
Rear window defroster, 75 73
Windshield heating
*, 75 74
Air flow rate, 74 73
Seat heating
*34
Power windows30
Rear fog lamp
*69
Fog lamps
*69
Central locking system, inside24
Page 81 of 160

REFERENCEAT A GLANCE CONTROLS DRIVING TIPS MOBILITY
79
To prevent injury in the event of an acci-
dent, close the glove compartment after
use while the vehicle is being driven.<
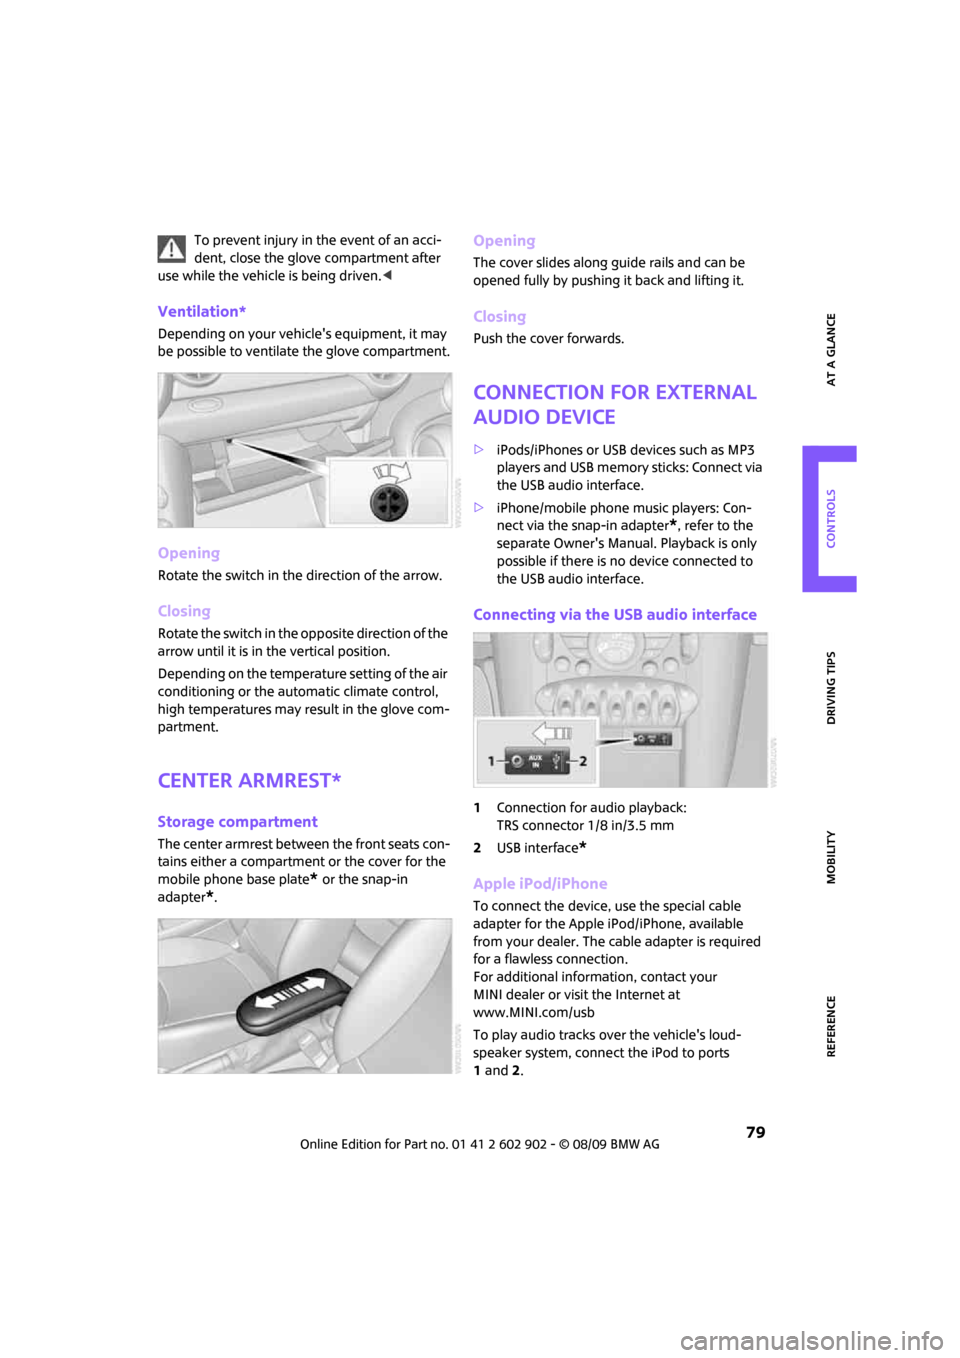
Ventilation*
Depending on your vehicle's equipment, it may
be possible to ventilate the glove compartment.
Opening
Rotate the switch in the direction of the arrow.
Closing
Rotate the switch in the opposite direction of the
arrow until it is in the vertical position.
Depending on the temperature setting of the air
conditioning or the automatic climate control,
high temperatures may result in the glove com-
partment.
Center armrest*
Storage compartment
The center armrest between the front seats con-
tains either a compartment or the cover for the
mobile phone base plate
* or the snap-in
adapter
*.
Opening
The cover slides along guide rails and can be
opened fully by pushing it back and lifting it.
Closing
Push the cover forwards.
Connection for external
audio device
>iPods/iPhones or USB devices such as MP3
players and USB memory sticks: Connect via
the USB audio interface.
>iPhone/mobile phone music players: Con-
nect via the snap-in adapter
*, refer to the
separate Owner's Manual. Playback is only
possible if there is no device connected to
the USB audio interface.
Connecting via the USB audio interface
1Connection for audio playback:
TRS connector 1/8 in/3.5 mm
2USB interface
*
Apple iPod/iPhone
To connect the device, use the special cable
adapter for the Apple iPod/iPhone, available
from your dealer. The cable adapter is required
for a flawless connection.
For additional information, contact your
MINI dealer or visit the Internet at
www.MINI.com/usb
To play audio tracks over the vehicle's loud-
speaker system, connect the iPod to ports
1and2.
Page 82 of 160

Practical interior accessories
80
The iPod/iPhone's menu structure is supported
by the USB audio interface.
USB device
To play audio tracks over the vehicle's loud-
speaker system, connect the USB device to
port2.
Notes
Do not expose the audio device to
extreme environmental conditions, e. g.
very high temperatures, refer to the operating
instructions of the audio device. Otherwise, the
audio device may become damaged, which
could compromise safety while driving.<
>The USB audio interface supplies the con-
nected audio devices with power, provided
that this is supported by the audio device.
Therefore, do not connect the USB audio
device to the power socket in the vehicle
during operation.
>Do not forcibly connect the plug to the USB
interface.
>Do not connect devices such as fans or
lamps to the USB audio interface.
>Do not connect USB hard disks.
>Do not use the USB audio interface to charge
external devices.
Storage compartments
In the vehicle interior
Depending on your vehicle's equipment, you
will find storage compartments in the doors,
next to the rear seats and in the center console
*.
Nets
* are located in the passenger footwell and
on the backs of the front seat backrests.
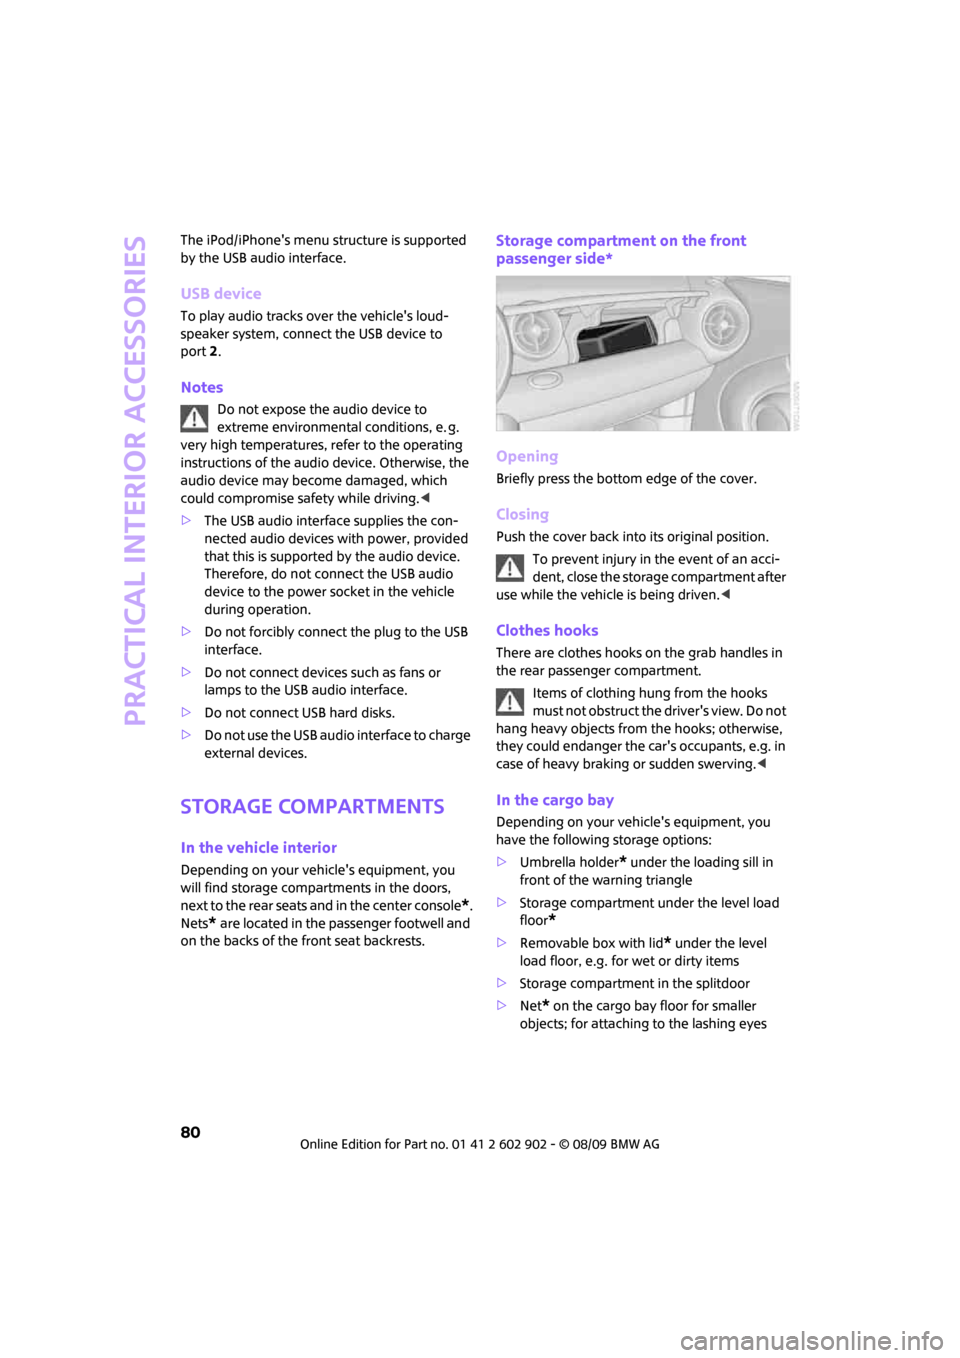
Storage compartment on the front
passenger side*
Opening
Briefly press the bottom edge of the cover.
Closing
Push the cover back into its original position.
To prevent injury in the event of an acci-
dent, close the storage compartment after
use while the vehicle is being driven.<
Clothes hooks
There are clothes hooks on the grab handles in
the rear passenger compartment.
Items of clothing hung from the hooks
must not obstruct the driver's view. Do not
hang heavy objects from the hooks; otherwise,
they could endanger the car's occupants, e.g. in
case of heavy braking or sudden swerving.<
In the cargo bay
Depending on your vehicle's equipment, you
have the following storage options:
>Umbrella holder
* under the loading sill in
front of the warning triangle
>Storage compartment under the level load
floor
*
>Removable box with lid* under the level
load floor, e.g. for wet or dirty items
>Storage compartment in the splitdoor
>Net
* on the cargo bay floor for smaller
objects; for attaching to the lashing eyes
Page 157 of 160

REFERENCEAT A GLANCE CONTROLS DRIVING TIPS MOBILITY
155
Transmission
– automatic transmission with
Steptronic42
– manual transmission42
– overriding selector lever lock
for automatic transmission
with Steptronic44
Transport securing devices,
refer to Securing cargo88
Transporting children safely37
Tread depth, refer to Minimum
tire tread102
Trip odometer49
Trip-distance counter, refer to
Trip odometer49
Triple turn signal activation44
Turn signal indicator44
– front, replacing bulb116
– indicator lamp12
– rear, replacing bulb117
– side, replacing bulb117
Turning circle, refer to
Dimensions143
Tying down loads, refer to
Cargo loading88
U
Uniform Tire Quality Grading
UTQR101
Units
– average fuel consumption52
– temperature52
Universal garage door opener,
refer to Integrated universal
remote control77
Universal remote control77
Unlatching, refer to
Unlocking28
Unlocking
– from inside24
– from outside21
– tailgate28
– without remote control, refer
to Comfort Access27
Upholstery, care112
USB audio interface79
V
Vehicle
– battery123
– breaking in84
– cargo loading86
– dimensions143
– Identification Number, refer
to Engine compartment106
– parking41
– storage113
– weight144
Vehicle jack121
– jacking points122
Ventilation
– air conditioner76
Vents, refer to Air vents72
Vents, refer to Ventilation76
Volume of cargo area144
W
Warning and indicator
lamps13,128
Warning messages, refer to
Check Control55
Warning triangle124
Washer fluid47
– capacity of reservoir47
Washer fluid reservoir47
Waste tray, refer to Ashtray81
Water on roads, refer to
Driving through water85
Waterfall lighting, refer to
Ambient lighting71
Wear indicators in tires, refer to
Minimum tread depth102
Weights144
Welcome lamps67
Wheel stud wrench
– space-saver spare tire121
Wheelbase, refer to
Dimensions143
Wheels and tires96
Wheels, new103
Width, refer to
Dimensions143
Window washer, refer to
Washer fluid47Window washer reservoir,
refer to Washer fluid
– volume, refer to
Capacities144
Windows30
– closing30
– convenient operation22
– opening30
– pinch protection system30
Windshield
– cleaning46
– defrosting and removing
condensation74,75
Windshield, defrosting, refer to
Defrosting windows74,75
Windshield washer system45
– washer fluid47
– washer nozzles47
Windshield wiper blades,
changing114
Windshield wipers, refer to
Wiper system45
Winter tires104
– storage104
Wiper blade replacement114
Wiper system45
Work in the engine
compartment105
Wrench/screwdriver, refer to
Onboard vehicle tool kit114
X
Xenon lamps
– replacing bulb115