towing MINI Clubman 2010 Owner's Manual
[x] Cancel search | Manufacturer: MINI, Model Year: 2010, Model line: Clubman, Model: MINI Clubman 2010Pages: 160, PDF Size: 2.58 MB
Page 28 of 160
Opening and closing
26
Opening
In some market-specific versions, the
splitdoor cannot be unlocked using
the remote control unless the vehicle is
unlocked first.
Only drive with the splitdoor fully closed; other-
wise, the tail lamps will be obscured and driving
safety will be compromised.<
Press the button in the handle or the but-
ton of the remote control for an extended time.
The splitdoor is unlocked.
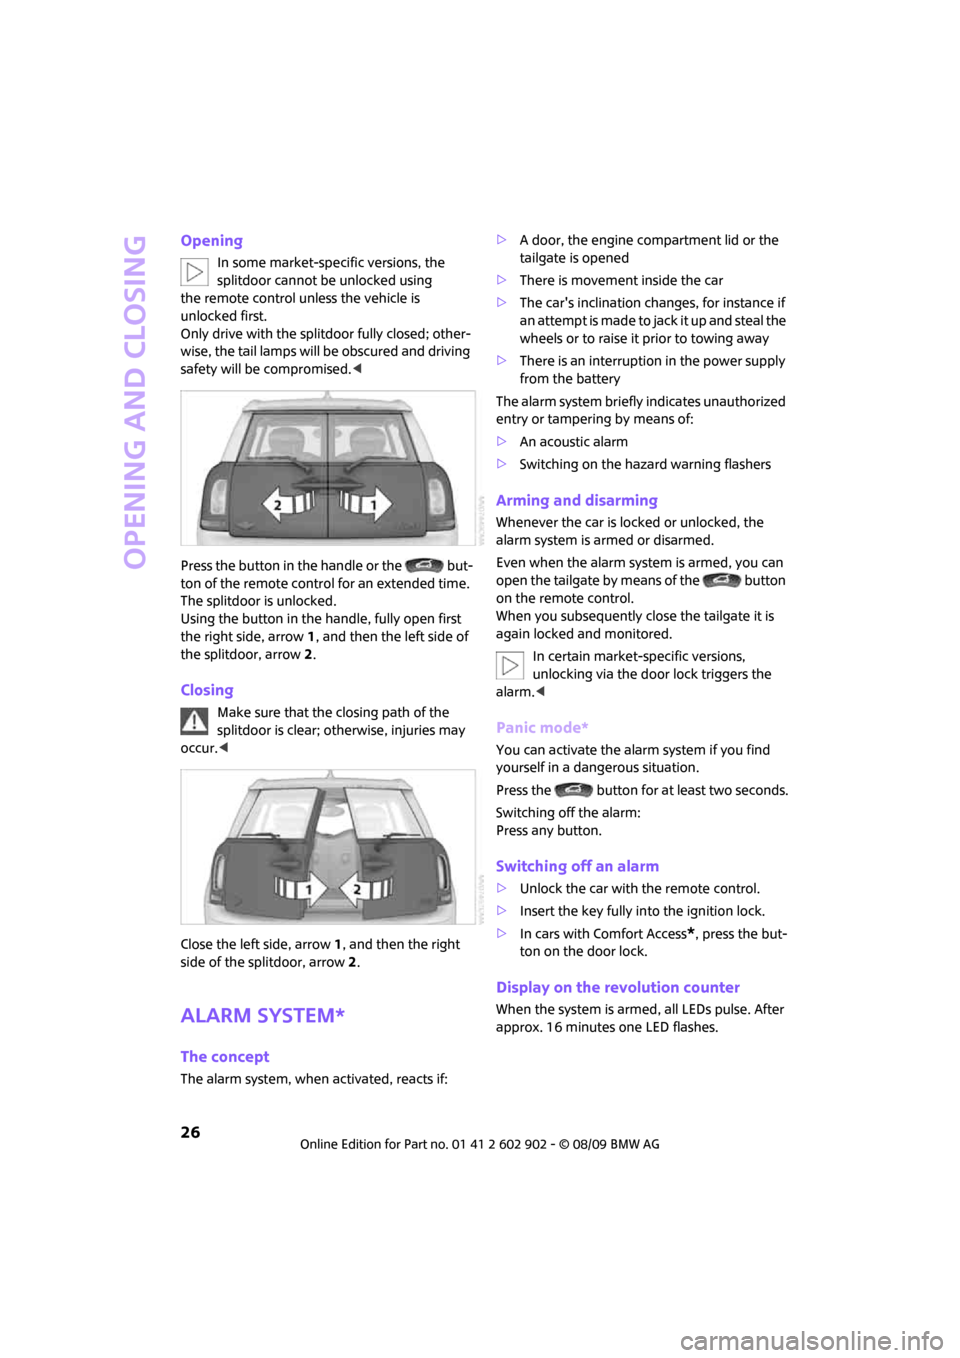
Using the button in the handle, fully open first
the right side, arrow1, and then the left side of
the splitdoor, arrow2.
Closing
Make sure that the closing path of the
splitdoor is clear; otherwise, injuries may
occur.<
Close the left side, arrow1, and then the right
side of the splitdoor, arrow2.
Alarm system*
The concept
The alarm system, when activated, reacts if:>A door, the engine compartment lid or the
tailgate is opened
>There is movement inside the car
>The car's inclination changes, for instance if
an attempt is made to jack it up and steal the
wheels or to raise it prior to towing away
>There is an interruption in the power supply
from the battery
The alarm system briefly indicates unauthorized
entry or tampering by means of:
>An acoustic alarm
>Switching on the hazard warning flashers
Arming and disarming
Whenever the car is locked or unlocked, the
alarm system is armed or disarmed.
Even when the alarm system is armed, you can
open the tailgate by means of the button
on the remote control.
When you subsequently close the tailgate it is
again locked and monitored.
In certain market-specific versions,
unlocking via the door lock triggers the
alarm.<
Panic mode*
You can activate the alarm system if you find
yourself in a dangerous situation.
Press the button for at least two seconds.
Switching off the alarm:
Press any button.
Switching off an alarm
>Unlock the car with the remote control.
>Insert the key fully into the ignition lock.
>In cars with Comfort Access
*, press the but-
ton on the door lock.
Display on the revolution counter
When the system is armed, all LEDs pulse. After
approx. 16 minutes one LED flashes.
Page 90 of 160
Things to remember when driving
88
2.Determine the combined weight of the
driver and passengers that will be riding in
your vehicle.
3.Subtract the combined weight of the driver
and passengers from XXX kilograms or YYY
pounds.
4.The resulting figure equals the available
amount of cargo and luggage load capacity.
For example, if the XXX amount equals
1,400 lbs. and there will be four 150 lbs. pas-
sengers in your vehicle, the amount of avail-
able cargo and luggage load capacity is
650 lbs:
1,400 lbs. minus 750 lbs. = 650 lbs.
5.Determine the combined weight of luggage
and cargo being loaded on the vehicle. That
weight may not safely exceed the available
cargo and luggage load capacity calculated
in step 4.
6.I f y o u r v e h icl e w i ll be t o w i n g a t r a il e r , pa r t o f
the load from your trailer will be transferred
to your vehicle. Consult the manual for
transporting a trailer to determine how this
may reduce the available cargo and luggage
load capacity of your vehicle.
Load
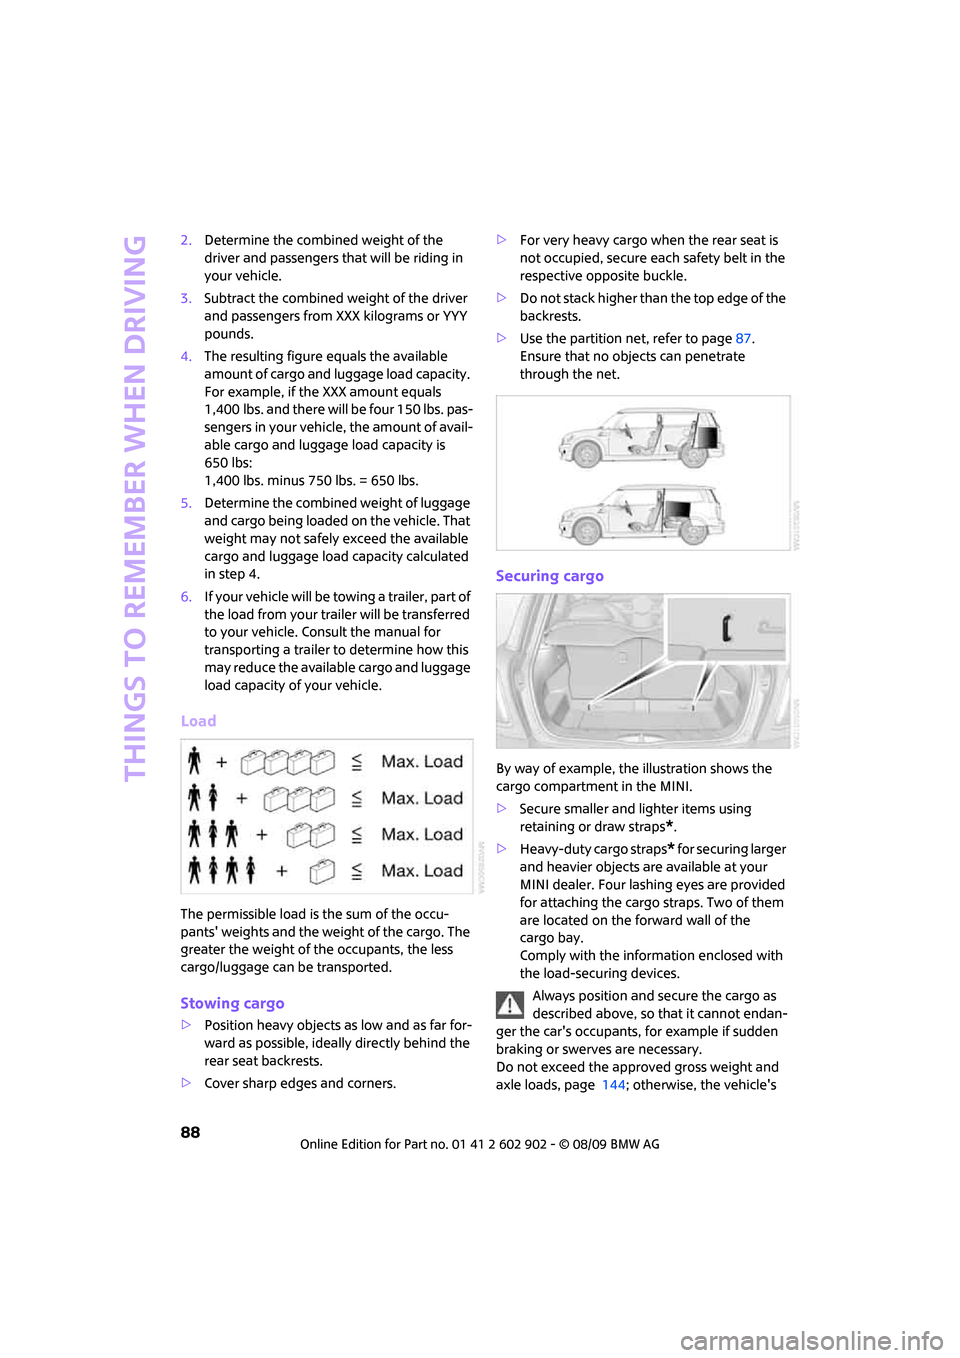
The permissible load is the sum of the occu-
pants' weights and the weight of the cargo. The
greater the weight of the occupants, the less
cargo/luggage can be transported.
Stowing cargo
>Position heavy objects as low and as far for-
ward as possible, ideally directly behind the
rear seat backrests.
>Cover sharp edges and corners.>For very heavy cargo when the rear seat is
not occupied, secure each safety belt in the
respective opposite buckle.
>Do not stack higher than the top edge of the
backrests.
>Use the partition net, refer to page87.
Ensure that no objects can penetrate
through the net.
Securing cargo
By way of example, the illustration shows the
cargo compartment in the MINI.
>Secure smaller and lighter items using
retaining or draw straps
*.
>Heavy-duty cargo straps
* for securing larger
and heavier objects are available at your
MINI dealer. Four lashing eyes are provided
for attaching the cargo straps. Two of them
are located on the forward wall of the
cargo bay.
Comply with the information enclosed with
the load-securing devices.
Always position and secure the cargo as
described above, so that it cannot endan-
ger the car's occupants, for example if sudden
braking or swerves are necessary.
Do not exceed the approved gross weight and
axle loads, page 144; otherwise, the vehicle's
Page 121 of 160

REFERENCEAT A GLANCE CONTROLS DRIVING TIPS MOBILITY
119
The Mobility System with tire change set and
onboard vehicle tool kit is located under the
floor mat or the level load floor in the cargo bay.
1Compressor
2Valve removal tool
3Wheel stud wrench
*
4Vehicle jack*
5Torx insert bit for screwdriver
6Flat screwdriver/Phillips screwdriver, towing
eyelet
7Hub cover remover
8Sealant bottle
Sealant and compressor
1Sealant bottle and adhesive label with speed
limit
2Filling hose
Note the use-by date on the sealant
bottle.<3Plug and cable for the socket in the vehicle
interior, page81
4Holder for the sealant bottle
5Compressor
6Pressure gauge for indicating the tire infla-
tion pressure
7On/off switch
8Release button for reducing the tire inflation
pressure
9Connection hose to connect the compressor
and sealant bottle or the compressor and
wheel
Connector, cable and connection hose are
stored in the compressor housing.
Using the Mobility System
To repair a tire puncture with the Mobility Sys-
tem, proceed as follows:
>Fill the tire with sealant
>Distribute the sealant
>Correct the tire inflation pressure
Filling the tire with sealant
Proceed in the specified order; otherwise,
sealant may emerge under high
pressure.<
1.Shake the sealant bottle.
2.Pull the connection hose9 out of the com-
pressor housing fully and screw it onto the
connector of the sealant bottle. Make sure
that the hose is not kinked.
3.Insert the sealant bottle on the compressor
housing in an upright position.
Page 123 of 160

REFERENCEAT A GLANCE CONTROLS DRIVING TIPS MOBILITY
121
Changing wheels
Space-saver spare tire*
To change a space-saver spare tire, proceed as
follows:
>Remove the space-saver spare tire,
page121
>Prepare for tire change, page121
>Jack up vehicle, page122
>Mount space-saver spare tire, page122
>Tighten lug bolts, page122
>Drive with space-saver spare tire, page121
Tire change set for a space-saver
spare tire*
In vehicles with the space-saver spare tire, the
tire change set with the onboard vehicle tool kit
is located beneath the floor mat or level load
floor in the cargo bay.
1Folding chock and cover for defective wheel
2Vehicle jack
3Wheel stud wrench
4Hub cover remover
5Flat screwdriver/Phillips screwdriver
6Torx insert bit for screwdriver
7Towing eyelet
The onboard vehicle tool kit includes a pouch
with a plastic bag in which you can place the
damaged wheel.
Removing the space-saver spare tire
The space-saver spare tire is located under the
tire change set in the cargo bay.
1.Fold up the floor mat.
2.Unscrew the nut, arrow, and remove the
space-saver spare tire.
Driving with the space-saver spare tire
Drive cautiously and do not exceed a
speed of 50 mph/80 km/h. Changes may
occur in vehicle handling such as lower track sta-
bility during braking, longer braking distances
and changes in self-steering properties when
close to the handling limit. These properties are
more noticeable with winter tires.<
Only one space-saver spare tire may be
mounted at one time. Mount a wheel and
tire of the original size as soon as possible, to
avoid any safety risks.<
Check the tire inflation pressure at the ear-
liest opportunity and correct it if neces-
sary. Replace the defective tire as soon as possi-
ble and have the new wheel/tire assembly
balanced.<
Preparing for a tire change
Observe the safety precautions regarding
flat tires on page118.<
Additional safety measures when chang-
ing tires:
Only change the tire when parked on a surface
that is level, firm and not slippery.
The vehicle or the jack could slip sideways on
soft or slippery support surfaces, such as snow,
ice, flagstones, etc.
Page 127 of 160

REFERENCEAT A GLANCE CONTROLS DRIVING TIPS MOBILITY
125
Connecting jumper cables
Connect the jumper cables in the correct
order, so that no sparks which could cause
injury occur.<
1.Open the battery cover in the engine com-
partment to access the positive terminal of
your MINI.
2.Attach one terminal clamp of the plus/+
jumper cable to the positive terminal of the
battery or to a starting-aid terminal of the
vehicle providing assistance.
3.Attach the second terminal clamp of the
plus/+ jumper cable to the positive terminal
of the battery or a starting-aid terminal of
the vehicle to be started.
4.Attach one terminal clamp of the minus/–
jumper cable to the negative terminal of the
battery or to an engine or body ground of
the assisting vehicle.
Body ground in MINI:
5.Attach the second terminal clamp of the
minus/– jumper cable to the negative termi-
nal of the battery or to the engine or body
ground of the vehicle to be started.
Starting the engine
1.Start the engine of the donor vehicle and
allow it to run for a few minutes at slightly
increased idle speed.
2.Start the engine of the other vehicle in the
usual manner.
If the first start attempt is not successful,
wait a few minutes before another attempt
in order to allow the discharged battery to
recharge.
3.Let the engines run for a few minutes.
4.Disconnect the jumper cables by reversing
the above connecting sequence.
If necessary, have the battery checked and
recharged.
Never use spray fluids to start the
engine.<
Tow-starting,
towing away
Observe the applicable laws and regu-
lations for tow-starting and towing
vehicles.<
Do not transport any passengers other
than the driver in a vehicle that is being
towed.<
Using a tow fitting
The screw-in tow fitting must always be carried
in the car. It can be screwed in at the front or
rear of the MINI.
It is stored in the onboard vehicle tool kit in the
cargo bay underneath the cover on the right-
hand side, page114.
Use only the tow fitting provided with the
vehicle and screw it all the way in. Use the
tow fitting for towing on paved roads only. Avoid
lateral loading of the tow fitting, e.g. do not lift
the vehicle by the tow fitting. Otherwise, the tow
fitting and the vehicle could be damaged.<
Page 128 of 160
Giving and receiving assistance
126
Access to screw thread
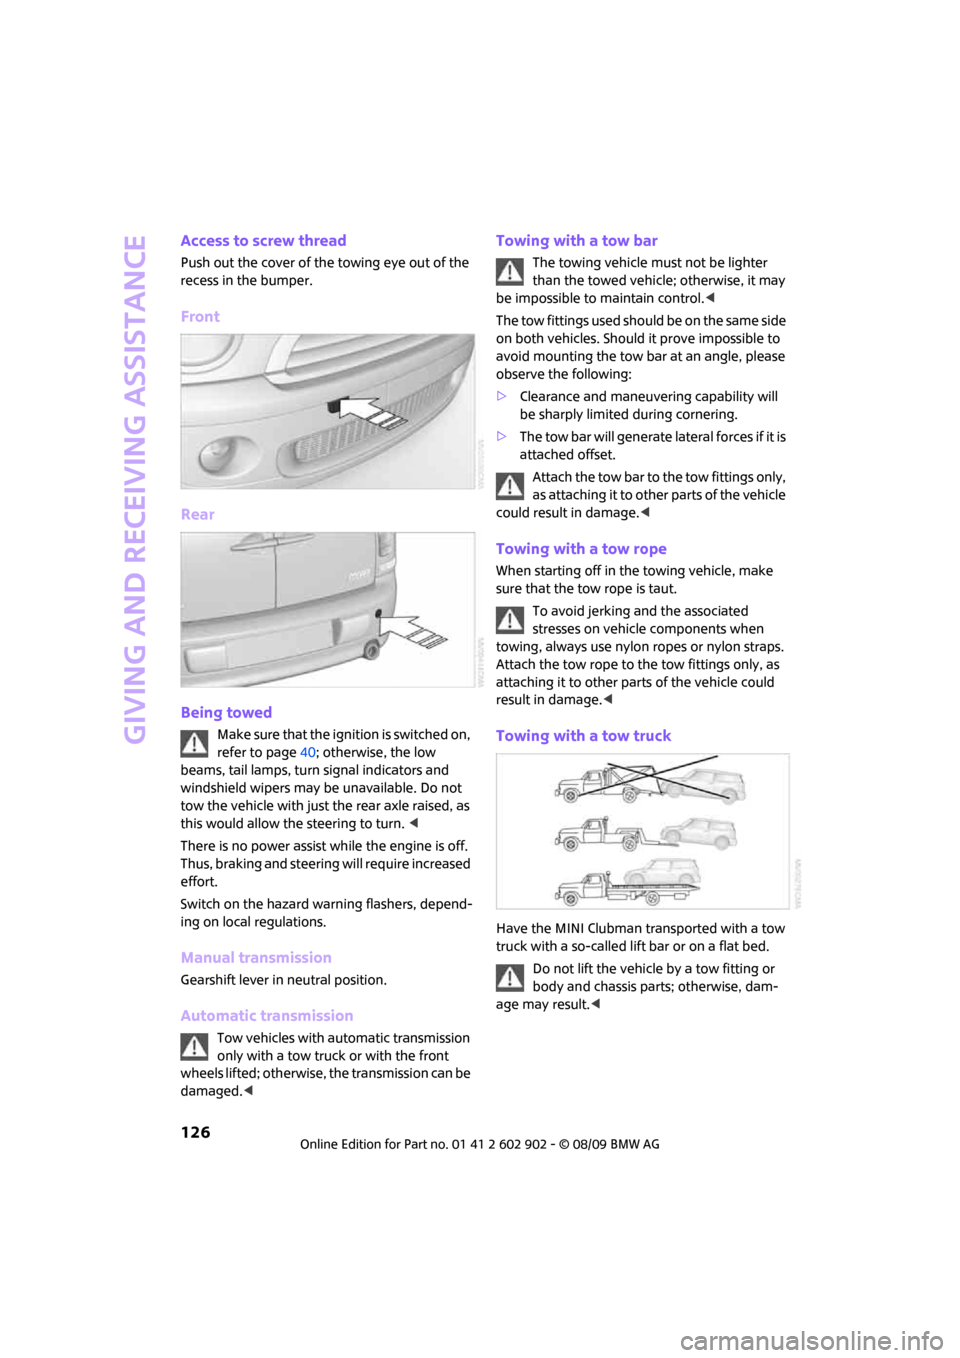
Push out the cover of the towing eye out of the
recess in the bumper.
Front
Rear
Being towed
Make sure that the ignition is switched on,
refer to page40; otherwise, the low
beams, tail lamps, turn signal indicators and
windshield wipers may be unavailable. Do not
tow the vehicle with just the rear axle raised, as
this would allow the steering to turn. <
There is no power assist while the engine is off.
Thus, braking and steering will require increased
effort.
Switch on the hazard warning flashers, depend-
ing on local regulations.
Manual transmission
Gearshift lever in neutral position.
Automatic transmission
Tow vehicles with automatic transmission
only with a tow truck or with the front
wheels lifted; otherwise, the transmission can be
damaged.<
Towing with a tow bar
The towing vehicle must not be lighter
than the towed vehicle; otherwise, it may
be impossible to maintain control.<
The tow fittings used should be on the same side
on both vehicles. Should it prove impossible to
avoid mounting the tow bar at an angle, please
observe the following:
>Clearance and maneuvering capability will
be sharply limited during cornering.
>The tow bar will generate lateral forces if it is
attached offset.
Attach the tow bar to the tow fittings only,
as attaching it to other parts of the vehicle
could result in damage.<
Towing with a tow rope
When starting off in the towing vehicle, make
sure that the tow rope is taut.
To avoid jerking and the associated
stresses on vehicle components when
towing, always use nylon ropes or nylon straps.
Attach the tow rope to the tow fittings only, as
attaching it to other parts of the vehicle could
result in damage.<
Towing with a tow truck
Have the MINI Clubman transported with a tow
truck with a so-called lift bar or on a flat bed.
Do not lift the vehicle by a tow fitting or
body and chassis parts; otherwise, dam-
age may result.<
Page 148 of 160
From A to Z
146
From A to Z
INDEX
A
Accessories, refer to Your
individual vehicle4
Activated-charcoal filter for
automatic climate control76
Additives
– coolant107
– engine oil107
Adjusting temperature inside
the car, refer to Air
conditioner73
Adjusting temperature inside
the car, refer to Automatic
climate control74
Air conditioner72
Air conditioning mode
– air conditioner73
– automatic climate control74
– ventilation76
Air distribution
– automatic75
– individual74
– manual74
Air flow rate73,74
– air conditioning system73
– automatic climate control74
– heating, ventilation73
Air outlets, refer to Air vents72
Air pressure, checking, refer to
Tire inflation pressure96
Air recirculation, refer to
Recirculated-air
mode73,75
Air supply
– air conditioner73
– automatic climate control74
– ventilation76
Air vents72
Airbags65
– sitting safely31
– warning lamp66Airing, refer to Ventilation76
AKI, refer to Fuel
specifications95
Alarm system26
All-season tires, refer to Winter
tires104
Ambient air, refer to
Recirculated-air
mode73,75
Ambient lighting71
Antenna, care110
Antifreeze
– coolant107
– washer fluid47
Antilock Brake System ABS58
Anti-theft alarm system, refer
to Alarm system26
Anti-theft system
21
Approved axle loads, refer to
Weights144
Approved engine oils107
Approved gross vehicle
weight, refer to Weights144
Armrest, refer to Center
armrest79
Ashtray81
Assistant systems, refer to
– Dynamic Stability Control
DSC58
Audio device, external79
AUTO program for automatic
climate control75
Automatic
– air distribution75
– air flow rate75
– cruise control47
– headlamp control67
Automatic climate control72
– automatic air distribution75Automatic transmission with
Steptronic42
– interlock42
– overriding selector lever
lock44
– shiftlock42
– sport program43
AUX-IN, refer to External audio
device79
Average fuel consumption50
– setting the units52
Average speed50
Axle loads, refer to
Weights144
B
Background lighting, refer to
Ambient lighting71
Backrests, refer to Seats31
Backup lamps
– replacing bulb117
Band-aids, refer to First aid
pouch124
Bar, refer to Tow-starting,
towing away126
Battery123
– charging123
– disposal29,123
– jump-starting124
– temporary power failure123
Battery renewal
– remote control29
Being towed126
Belt tensioner, refer to Safety
belts34
Belts, refer to Safety belts34
Beverage holders, refer to
Cupholders81
Blower, refer to Air flow
rate73,74
Bonnet105
Page 149 of 160
REFERENCEAT A GLANCE CONTROLS DRIVING TIPS MOBILITY
147
Bottle holders, refer to
Cupholders81
Brake Assist58
Brake fluid, refer to Service
requirements53
Brake lamps
– replacing bulbs117
Brake pads, breaking in84
Brake rotors85
– brakes84
– breaking in84
Brake system84
– breaking in84
– disc brakes85
– MINI Maintenance
System108
Brakes
– ABS58
– breaking in84
– MINI Maintenance
System108
– parking brake41
– service requirements53
Brakes, refer to Braking
safely85
Breakdown service, refer to
Roadside Assistance124
Break-in period84
Breaking in the clutch84
Bulb changing, refer to Lamps
and bulbs114
Button for starting the
engine40
Buttons on the steering
wheel11
C
California Proposition 65
warning5
Can holders, refer to
Cupholders81
Capacities144
Car battery, refer to Vehicle
battery123
Car care110
Car key, refer to Keys/remote
controls20Car phone
– installation location, refer to
Center armrest79
– refer to separate Owner's
Manual
Car wash, care110
Car washes110
Care110
– car washes110
– car-care products110
– CD/DVD drives113
– external110
– high-pressure washers111
– internal112
– leather112
– manual washing111
– upholstery and fabrics112
– windows111
– wiper blades111
Cargo area
– capacity144
Cargo bay86
– Comfort Access28
– doors, refer to Splitdoor25
– lamp70
– opening from outside26
– trunk lid, refer to Splitdoor25
Cargo bay doors, refer to
Splitdoor25
Cargo bay, expanding86
Cargo bay lamp70
Cargo bay partition net, refer
to Partition net87
Cargo loading87
– securing cargo88
– stowing cargo88
– vehicle86
Cargo, securing88
Carpets, care112
Catalytic converter, refer to
Hot exhaust system84
Center armrest79
Center brake lamp118
Center console, refer to
Around the center
console14Central locking system21
– Comfort Access27
– from inside24
– from outside21
Changing bulbs114
Changing wheels121
Chassis number, refer to
Engine compartment106
Check Control55
Child restraint systems37
Child seats37
Child-restraint fixing system
LATCH38
Chrome parts, care111
Chrome parts, refer to
Care110
Cigarette lighter81
Cleaning headlamps46
– washer fluid47
Clock49
– 12h/24h mode52
– setting time55
Closing
– from inside24
– from outside21
Clothes hooks80
Clubdoor25
Cockpit10
Cold start, refer to Starting the
engine41
Comfort Access27
– replacing the battery29
Comfort access
– what to observe before
entering a car wash28
Comfort area, refer to Around
the center console14
Compartment for remote
control, refer to Ignition
lock40
Computer50
Condensation, refer to When
the vehicle is parked85
Condition Based Service
CBS108
Configuring settings, refer to
Personal Profile20
Confirmation signals for
vehicle locking/unlocking22
Page 151 of 160
REFERENCEAT A GLANCE CONTROLS DRIVING TIPS MOBILITY
149
Engine
– breaking in84
– data142
– overheated, refer to Coolant
temperature49
– speed142
– starting41
– starting, Comfort Access27
– switching off41
Engine compartment106
Engine coolant, refer to
Coolant107
Engine oil
– adding107
– additives, refer to Approved
engine oils107
– alternative oil types107
– approved engine oils107
– capacity107
– checking level106
– dipstick106
– intervals between changes,
refer to Service
requirements53
– MINI Maintenance
System108
Engine oil level, checking106
Engine output, refer to Engine
data142
Engine starting, refer to
Starting the engine41
Error messages, refer to Check
Control55
ESP Electronic Stability
Program, refer to Dynamic
Stability Control DSC58
Exhaust system, refer to Hot
exhaust system84
Exterior mirrors35
– adjusting35
– automatic heating35
– folding in and out35
External audio device79
Eyes
– for tow-starting and towing
away125
– for tying down loads88F
Failure messages, refer to
Check Control55
Failure of an electrical
consumer123
Fasten safety belts reminder,
refer to Seat belt
reminder34
Fastening safety belts, refer to
Safety belts34
Filter
– microfilter for air
conditioner74
– microfilter/activated-
charcoal filter for automatic
climate control76
Fine wood, care112
First aid pouch124
Fixture for remote control,
refer to Ignition lock40
Flash when locking/
unlocking22
Flat tire
– run-flat tires103
– Tire Pressure Monitor TPM62
Flat Tire Monitor FTM60
– indicating a flat tire61
– initializing the system60
– snow chains60
– system limits60
Flat tires, refer to Tire
condition102
Floor mats, care112
Floor plate, refer to Level load
floor87
Fog lamps
– replacing bulb116,118
Folding rear seat backrest86
Footbrake, refer to Braking
safely85
Footwell lamps70
For your own safety5
Front airbags65
Front fog lamps69
– indicator lamp128
– replacing bulb116Front seat adjustment31
Frost on windows, refer to
Defrosting windows74,75
FTM, refer to Flat Tire
Monitor60
Fuel95
– gauge50
– high-quality brands95
– quality95
– specifications95
– tank capacity144
Fuel clock, refer to Fuel
gauge50
Fuel display, refer to Fuel
gauge50
Fuel filler flap94
– releasing in the event of
electrical malfunction94
Fuses123
G
Garage door opener, refer to
Integrated universal remote
control77
Gasoline
– refer to Average
consumption50
Gasoline display, refer to Fuel
gauge50
Gasoline, refer to Required
fuel95
Gear indicator
– automatic transmission with
Steptronic42
Gear shifting
– automatic transmission42
– manual transmission42
Gearshift lever
– automatic transmission with
Steptronic42
– manual transmission42
General driving notes84
Glass sunroof, electric29
– convenient operation22,24
– opening, closing29
– raising29
– remote control22
Page 152 of 160
From A to Z
150
Glove compartment78
Grills, refer to Air vents72
Gross vehicle weight, refer to
Weights144
H
Halogen lamps
– replacing bulb115
Handbrake, refer to Parking
brake41
Hands-free system14
Hazard warning flashers14
Head airbags65
Head restraints33
– sitting safely31
Headlamp control,
automatic67
Headlamp flasher44
– indicator lamp11,128
Headlamps
– replacing bulb115
Headlamps, care111
Heated
– mirrors35
– rear window73,75
– seats34
Heating72
– mirrors35
– rear window73,75
– seats34
Heavy loads, refer to Stowing
cargo88
Height adjustment
– seats32
– steering wheel36
Height, refer to
Dimensions143
High beams69
– headlamp flasher69
– indicator lamp128
– replacing bulb115
High water, refer to Driving
through water85
Hill Assist59
Hills85
Holders for cups81
Homepage4Horn10
Hot exhaust system84
Hydroplaning84
I
Ice warning49
Icy roads, refer to Outside
temperature warning49
Ignition40
– switched off40
– switched on40
Ignition key position 1, refer to
Radio readiness40
Ignition key position 2, refer to
Ignition on40
Ignition key, refer to
Integrated key/remote
control20
Ignition lock40
Imprint2
Indicator and warning
lamps13,128
– Tire Pressure Monitor TPM63
Indicator lighting, refer to
Instrument lighting70
Individual air distribution74
Individual settings, refer to
Personal Profile20
Inflation pressure monitoring,
refer to Tire Pressure Monitor
TPM62
Initializing
– Flat Tire Monitor FTM60
– glass sunroof, electric30
Instrument cluster, refer to
Displays12
Instrument lighting70
Instrument panel, refer to
Cockpit10
Instrument panel, refer to
Displays12
Integrated key20
Integrated universal remote
control77
Interior lamps70
– remote control23Interior rearview mirror35
– automatic dimming
feature35
Interlock42
Intermittent mode of the
wipers45
Internet page4
J
Jacking points122
Jets, refer to Window washer
nozzles47
Jumpering, refer to Jump-
starting124
Jump-starting124
K
Key Memory, refer to Personal
Profile20
Key, refer to Keys/remote
controls20
Keyless go, refer to Comfort
Access27
Keyless opening and closing,
refer to Comfort Access27
Kickdown43
– automatic transmission with
Steptronic43
Knock control95
L
Lamps and bulbs, replacing
bulbs114
Lamps, refer to Parking lamps/
Low beams67
Lashing eyes, refer to Securing
cargo88
LATCH child-restraint fixing
system38
Leather care112
LEDs light-emitting diodes115
Length, refer to
Dimensions143
Level load floor87
License plate lamp
– bulb replacement118