MINI Clubman 2011 (Mini Connected) Manual Online
Manufacturer: MINI, Model Year: 2011, Model line: Clubman, Model: MINI Clubman 2011Pages: 256, PDF Size: 3.75 MB
Page 81 of 256

Technology for driving comfort and safetyCONTROLS
79
Automatic deactivation of the front
passenger airbags
An analysis of the impression in the front pas-
senger seat cushion determines whether and
how the seat is occupied. The front and side air-
bags for the front passenger are activated or
deactivated by the system accordingly.The indicator lamp above the interior rear-
view mirror shows th e current status of
the front passenger airbags, deactivated or acti-
vated, refer to Status of front passenger airbags
below. <
Before transporting a child on the front
passenger seat, read the safety precau-
tions and handling instructions under Transport-
ing children safely, page 43.
The front and side airbags can also be deacti-
vated by adolescents and adults sitting in certain
positions; the indicator lamp for the front pas-
senger airbags comes on. In such cases, the pas-
senger should change his or her sitting position
so that the front passenger airbags are activated
and the indicator lamp goes out. If the desired
airbag status cannot be achieved by changing
the sitting position, transport the relevant pas-
senger on a rear seat. Do not attach covers,
cushions, ball mats or other items to the front
passenger seat unless they are specifically rec-
ommended by the manufacturer of your MINI.
Do not place items under the seat which could
press against the seat from below. Otherwise, a
correct analysis of th e seat cushion is not
ensured. <
Status of front passenger airbags
The indicator lamp for the front passenger air-
bags shows the functional status of the front
passenger's front and side airbags in accordance
with whether and how th e front passenger seat
is occupied. The indica tor lamp shows whether
the front passenger airbags are activated or
deactivated.
> The indicator lamp co mes on as intended
when a child in a specially designated child
restraint system is detected on the seat.
The front and side airbags for the front pas-
senger are not activated.
Most child seats are detected by the
system. This particularly applies to
child seats that were required by NHTSA at
the time of manufacture of the vehicle. After
installing a child seat, check that the indica-
tor lamp for the front passenger airbags
lights up. It indicates that the child seat has
been detected and that the front passenger
airbags are deactivated. <
> The indicator lamp does not come on as long
as a person of sufficient size and in a correct
sitting position is detected on the seat.
The front and side airbags for the front pas-
senger are activated.
> The indicator lamp does not come on if the
seat is empty.
The front and side airbags for the front pas-
senger are not activated.
Page 82 of 256

CONTROLSTechnology for driving comfort and safety
80
Operational readiness of airbag system
As of radio readiness, page46, the warning
lamp lights up briefly to indicate that the entire
airbag system and the be lt tensioners are oper-
ational.
Airbag system malfunction
> The warning lamp does not come on when
radio readiness is switched on.
> The warning lamp stays lit continuously.
In the event of a fault in the airbag system,
have it checked without delay; otherwise,
there is the risk that the system will not function
as intended even if a severe accident occurs. <
Page 83 of 256
LampsCONTROLS
81
Lamps
Parking lamps/low beams
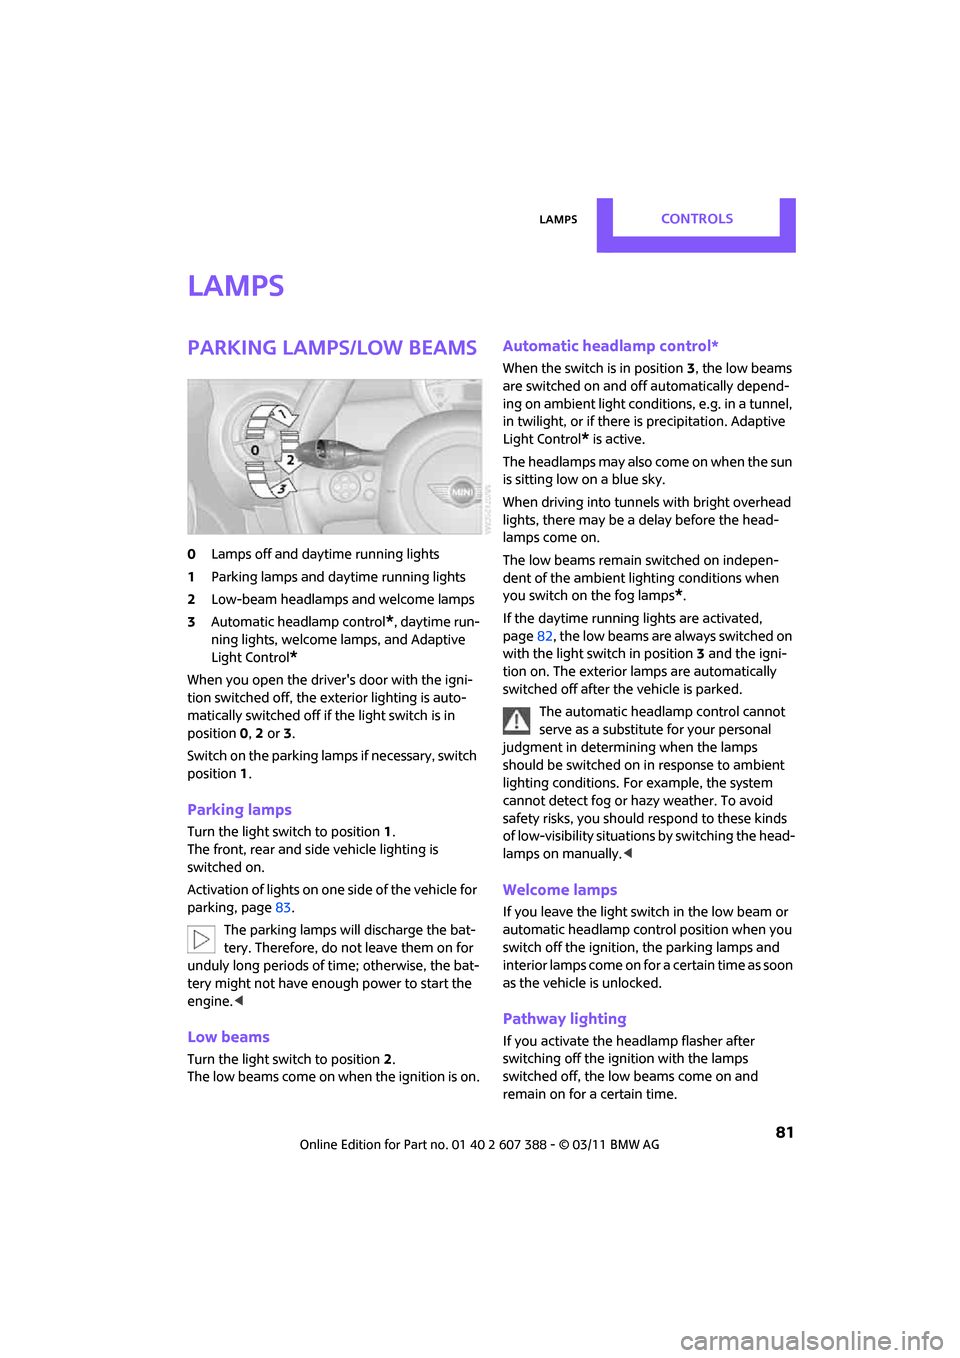
0Lamps off and daytime running lights
1 Parking lamps and daytime running lights
2 Low-beam headlamps and welcome lamps
3 Automatic headlamp control
*, daytime run-
ning lights, welcome lamps, and Adaptive
Light Control
*
When you open the driver's door with the igni-
tion switched off, the exterior lighting is auto-
matically switched off if the light switch is in
position 0, 2 or 3.
Switch on the parking lamps if necessary, switch
position 1.
Parking lamps
Turn the light switch to position 1.
The front, rear and side vehicle lighting is
switched on.
Activation of lights on one side of the vehicle for
parking, page 83.
The parking lamps will discharge the bat-
tery. Therefore, do not leave them on for
unduly long periods of time; otherwise, the bat-
tery might not have enough power to start the
engine. <
Low beams
Turn the light switch to position 2.
The low beams come on when the ignition is on.
Automatic headlamp control*
When the switch is in position 3, the low beams
are switched on and of f automatically depend-
ing on ambient light condit ions, e.g. in a tunnel,
in twilight, or if there is precipitation. Adaptive
Light Control
* is active.
The headlamps may also come on when the sun
is sitting low on a blue sky.
When driving into tunnels with bright overhead
lights, there may be a delay before the head-
lamps come on.
The low beams remain switched on indepen-
dent of the ambient lighting conditions when
you switch on the fog lamps
*.
If the daytime running lights are activated,
page 82, the low beams are al ways switched on
with the light switch in position 3 and the igni-
tion on. The exterior lamps are automatically
switched off after the vehicle is parked.
The automatic headlamp control cannot
serve as a substitute for your personal
judgment in determin ing when the lamps
should be switched on in response to ambient
lighting conditions. For example, the system
cannot detect fog or hazy weather. To avoid
safety risks, you should respond to these kinds
of low-visibility situations by switching the head-
lamps on manually. <
Welcome lamps
If you leave the light switch in the low beam or
automatic headlamp control position when you
switch off the ignition, the parking lamps and
interior lamps come on fo r a certain time as soon
as the vehicle is unlocked.
Pathway lighting
If you activate the headlamp flasher after
switching off the ignition with the lamps
switched off, the lo w beams come on and
remain on for a certain time.
Page 84 of 256
CONTROLSLamps
82
The setting is stored for the remote control in
use, refer to Personal Profile, page 26.
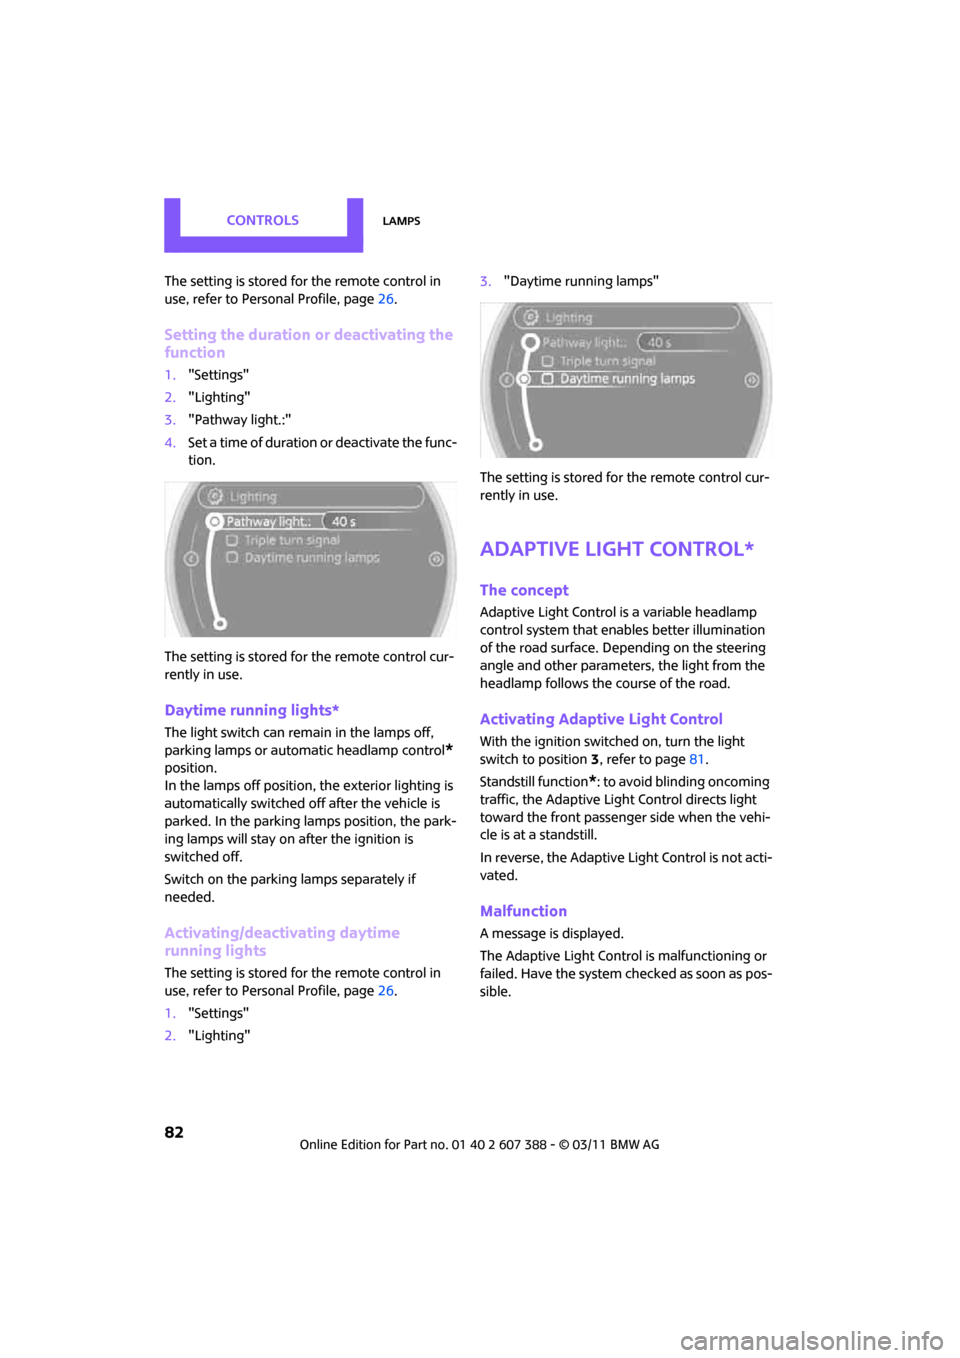
Setting the duration or deactivating the
function
1."Settings"
2. "Lighting"
3. "Pathway light.:"
4. Set a time of duration or deactivate the func-
tion.
The setting is stored fo r the remote control cur-
rently in use.
Daytime running lights*
The light switch can remain in the lamps off,
parking lamps or automatic headlamp control
*
position.
In the lamps off position, the exterior lighting is
automatically switched off after the vehicle is
parked. In the parking lamps position, the park-
ing lamps will stay on after the ignition is
switched off.
Switch on the parking lamps separately if
needed.
Activating/deactivating daytime
running lights
The setting is stored for the remote control in
use, refer to Pers onal Profile, page 26.
1. "Settings"
2. "Lighting" 3.
"Daytime running lamps"
The setting is stored fo r the remote control cur-
rently in use.
Adaptive Light Control*
The concept
Adaptive Light Control is a variable headlamp
control system that enables better illumination
of the road surface. Depending on the steering
angle and other parameters, the light from the
headlamp follows the course of the road.
Activating Adaptive Light Control
With the ignition switched on, turn the light
switch to position 3, refer to page 81.
Standstill function
*: to avoid blinding oncoming
traffic, the Adaptive Light Control directs light
toward the front passenger side when the vehi-
cle is at a standstill.
In reverse, the Adaptive Light Control is not acti-
vated.
Malfunction
A message is displayed.
The Adaptive Light Control is malfunctioning or
failed. Have the system checked as soon as pos-
sible.
Page 85 of 256
LampsCONTROLS
83
High beams/
roadside parking lamps
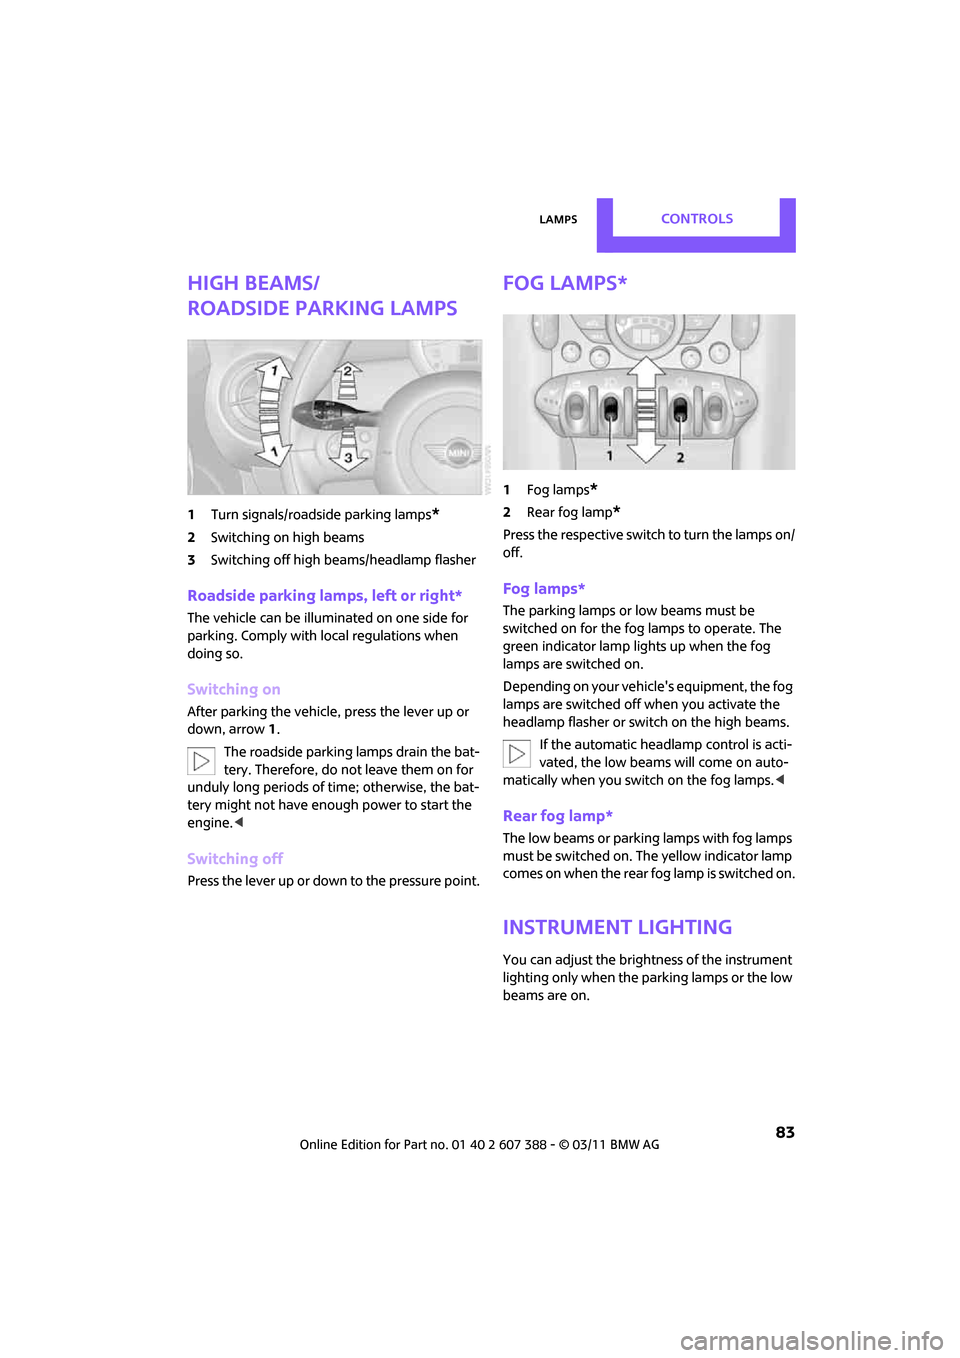
1Turn signals/roadside parking lamps*
2Switching on high beams
3 Switching off high be ams/headlamp flasher
Roadside parking lamps, left or right*
The vehicle can be illumi nated on one side for
parking. Comply with local regulations when
doing so.
Switching on
After parking the vehicle, press the lever up or
down, arrow 1.
The roadside parking lamps drain the bat-
tery. Therefore, do not leave them on for
unduly long periods of time; otherwise, the bat-
tery might not have enough power to start the
engine. <
Switching off
Press the lever up or down to the pressure point.
Fog lamps*
1Fog lamps*
2Rear fog lamp*
Press the respective switch to turn the lamps on/
off.
Fog lamps*
The parking lamps or low beams must be
switched on for the fog lamps to operate. The
green indicator lamp lights up when the fog
lamps are switched on.
Depending on your vehicle's equipment, the fog
lamps are switched off when you activate the
headlamp flasher or switch on the high beams.
If the automatic headlamp control is acti-
vated, the low beams will come on auto-
matically when you switch on the fog lamps. <
Rear fog lamp*
The low beams or parking lamps with fog lamps
must be switched on. The yellow indicator lamp
comes on when the rear fog lamp is switched on.
Instrument lighting
You can adjust the brightness of the instrument
lighting only when the parking lamps or the low
beams are on.
Page 86 of 256
CONTROLSLamps
84
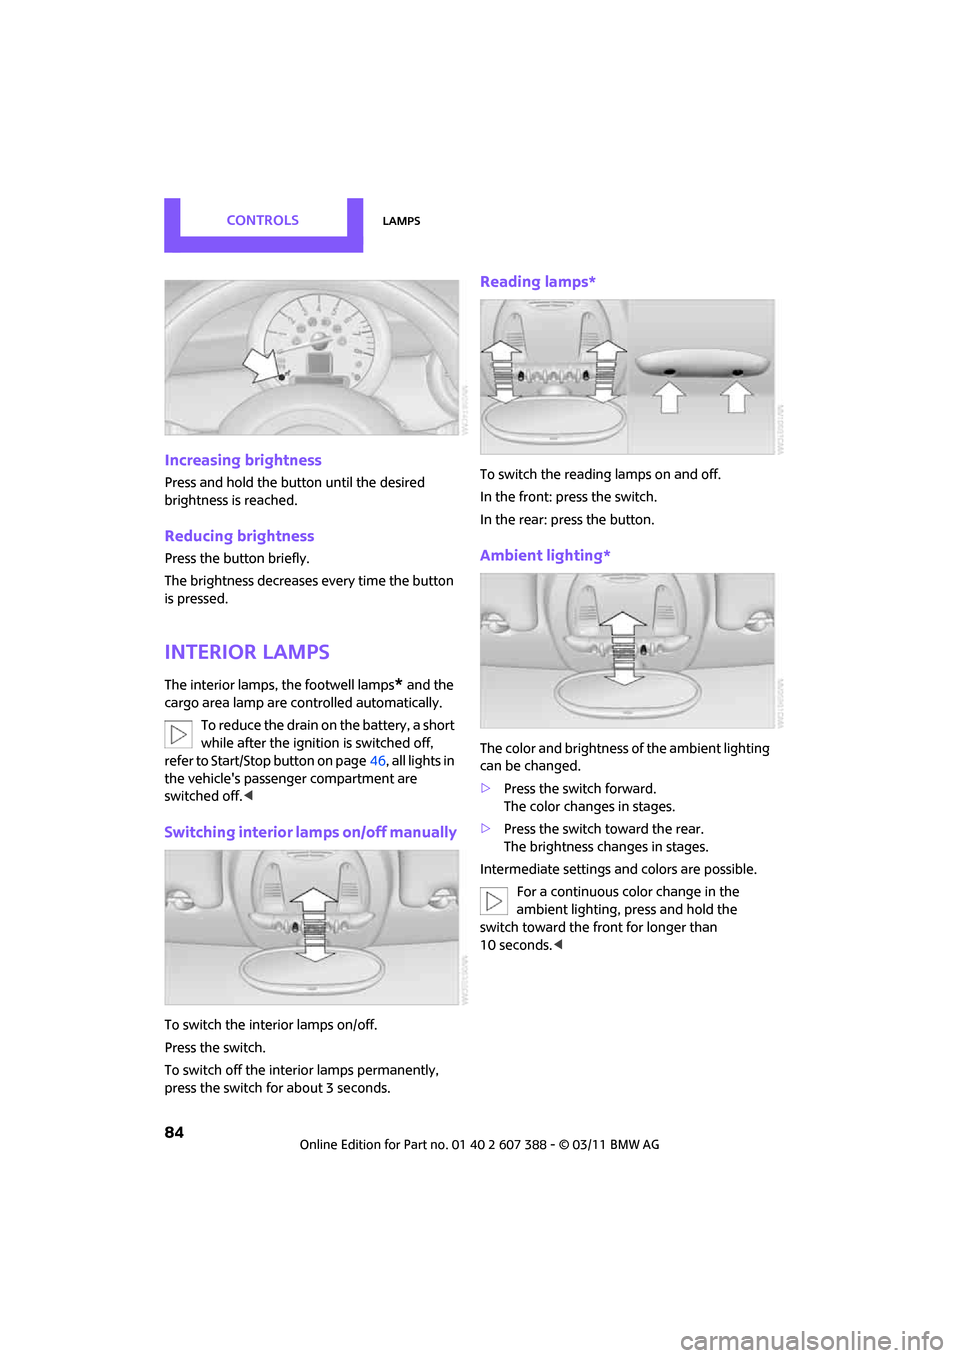
Increasing brightness
Press and hold the button until the desired
brightness is reached.
Reducing brightness
Press the button briefly.
The brightness decreases every time the button
is pressed.
Interior lamps
The interior lamps, the footwell lamps* and the
cargo area lamp are co ntrolled automatically.
To reduce the drain on the battery, a short
while after the ignition is switched off,
refer to Start/Stop button on page 46, all lights in
the vehicle's passenger compartment are
switched off. <
Switching interior lamps on/off manually
To switch the interior lamps on/off.
Press the switch.
To switch off the interior lamps permanently,
press the switch for about 3 seconds.
Reading lamps*
To switch the reading lamps on and off.
In the front: press the switch.
In the rear: press the button.
Ambient lighting*
The color and brightness of the ambient lighting
can be changed.
> Press the switch forward.
The color changes in stages.
> Press the switch toward the rear.
The brightness changes in stages.
Intermediate settings and colors are possible. For a continuous color change in the
ambient lighting, press and hold the
switch toward the front for longer than
10 seconds. <
Page 87 of 256
ClimateCONTROLS
85
Climate
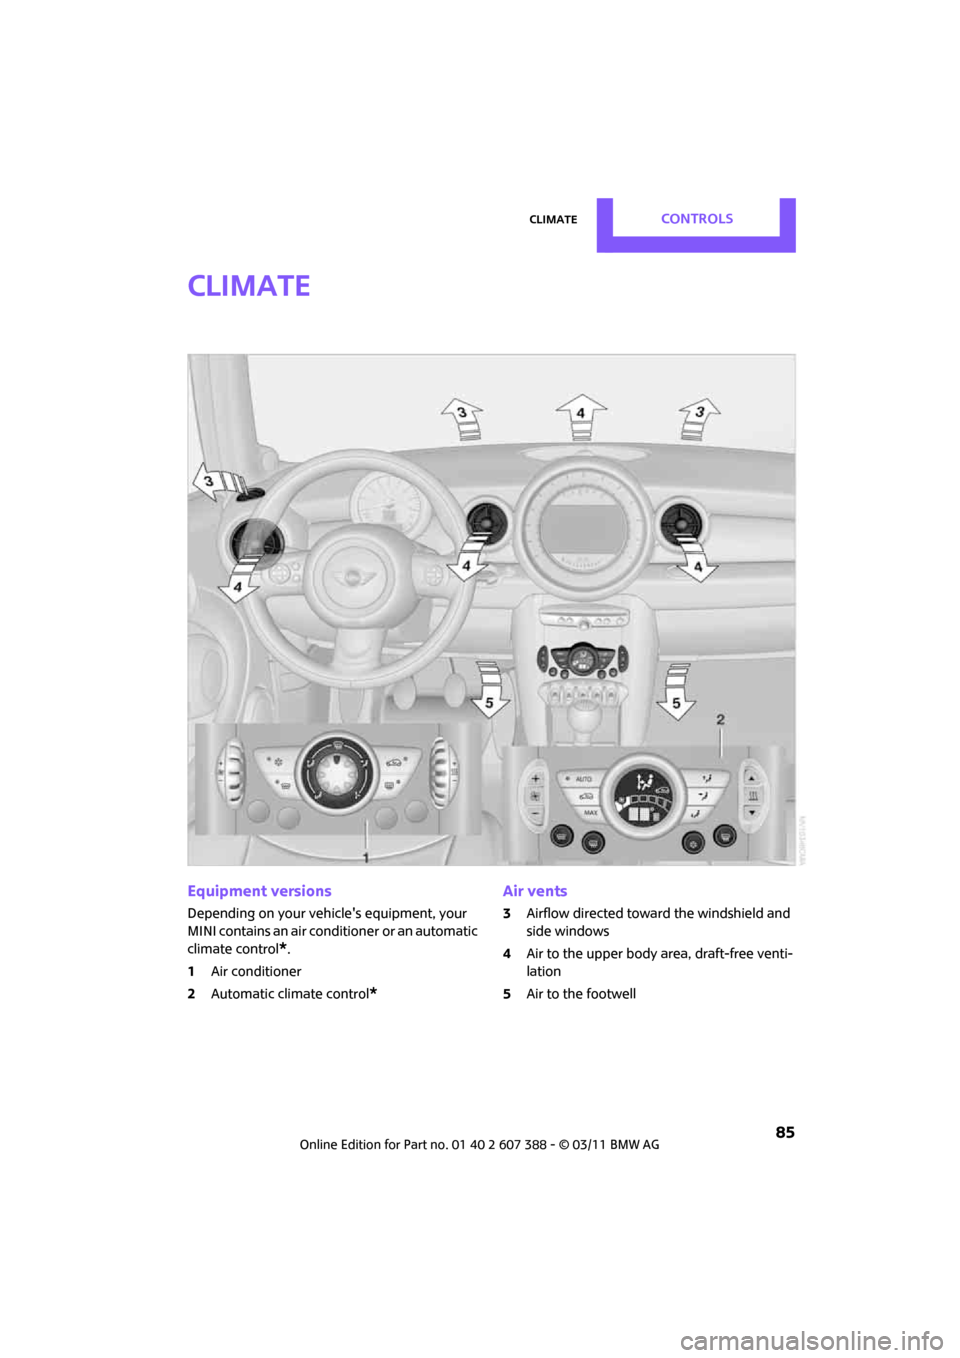
Equipment versions
Depending on your vehicle's equipment, your
MINI contains an air conditioner
or an automatic
climate control
*.
1 Air conditioner
2 Automatic climate control
*
Air vents
3Airflow directed toward the windshield and
side windows
4 Air to the upper body area, draft-free venti-
lation
5 Air to the footwell
Page 88 of 256
CONTROLSClimate
86
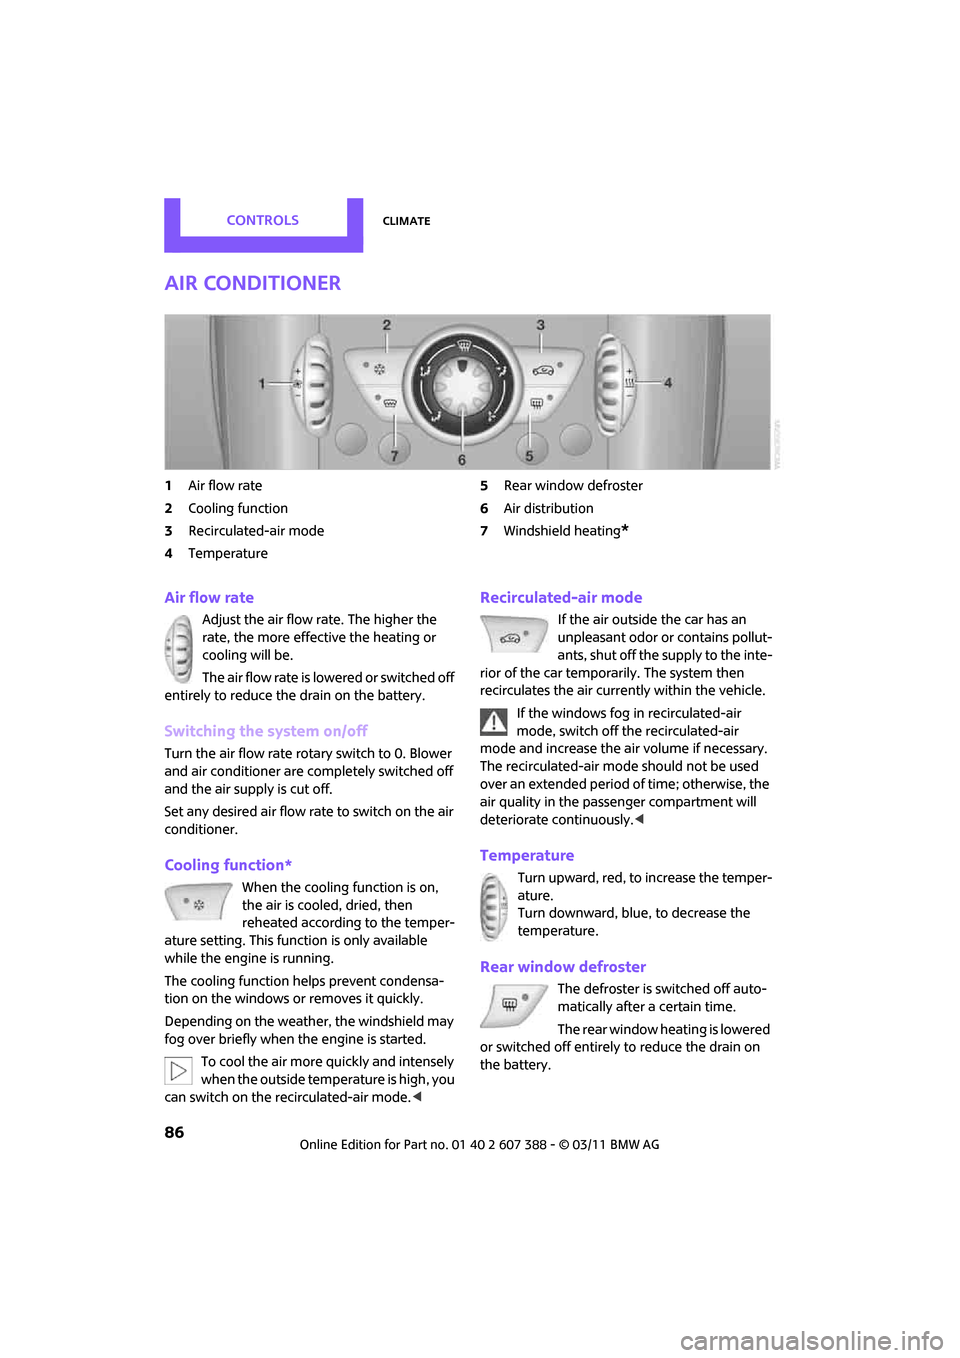
Air conditioner
1Air flow rate
2 Cooling function
3 Recirculated-air mode
4 Temperature 5
Rear window defroster
6 Air distribution
7 Windshield heating
*
Air flow rate
Adjust the air flow rate. The higher the
rate, the more effective the heating or
cooling will be.
The air flow rate is lowered or switched off
entirely to reduce the drain on the battery.
Switching the system on/off
Turn the air flow rate rota ry switch to 0. Blower
and air conditioner are co mpletely switched off
and the air supply is cut off.
Set any desired air flow rate to switch on the air
conditioner.
Cooling function*
When the cooling function is on,
the air is cooled, dried, then
reheated according to the temper-
ature setting. This function is only available
while the engine is running.
The cooling function helps prevent condensa-
tion on the windows or removes it quickly.
Depending on the weather, the windshield may
fog over briefly when the engine is started.
To cool the air more quickly and intensely
when the outside temperature is high, you
can switch on the recirculated-air mode. <
Recirculated-air mode
If the air outside the car has an
unpleasant odor or contains pollut-
ants, shut off the supply to the inte-
rior of the car temporarily. The system then
recirculates the air currently within the vehicle.
If the windows fog in recirculated-air
mode, switch off the recirculated-air
mode and increase the air volume if necessary.
The recirculated-air mode should not be used
over an extended period of time; otherwise, the
air quality in the passenger compartment will
deteriorate continuously.<
Temperature
Turn upward, red, to increase the temper-
ature.
Turn downward, blue, to decrease the
temperature.
Rear window defroster
The defroster is switched off auto-
matically after a certain time.
The rear window heating is lowered
or switched off entirely to reduce the drain on
the battery.
Page 89 of 256
ClimateCONTROLS
87
Air distribution
Direct the flow of air to the
windows , to the upper body
area or to the footwell .
Intermediate settings are possible.
Windshield heating*
The windshield heating is switched
off automatically after a short time.
The front window heating is low-
ered or switched off entirely to reduce the drain
on the battery.
Defrosting windows and removing
condensation
1. Set air flow rate to the maximum level.
2. Set air distributi on to position .
Condensation is removed from the windows
more quickly when the cooling function
* is
also activated.
3. Set to the highest temperature, red.
4. Deactivate recirculated-air mode.
5. Turn on windshield heating if necessary.
6. Turn on rear window defroster if necessary.
Microfilter
The microfilter captures dust and pollen. The
microfilter is changed by your MINI dealer dur-
ing routine maintenance work.
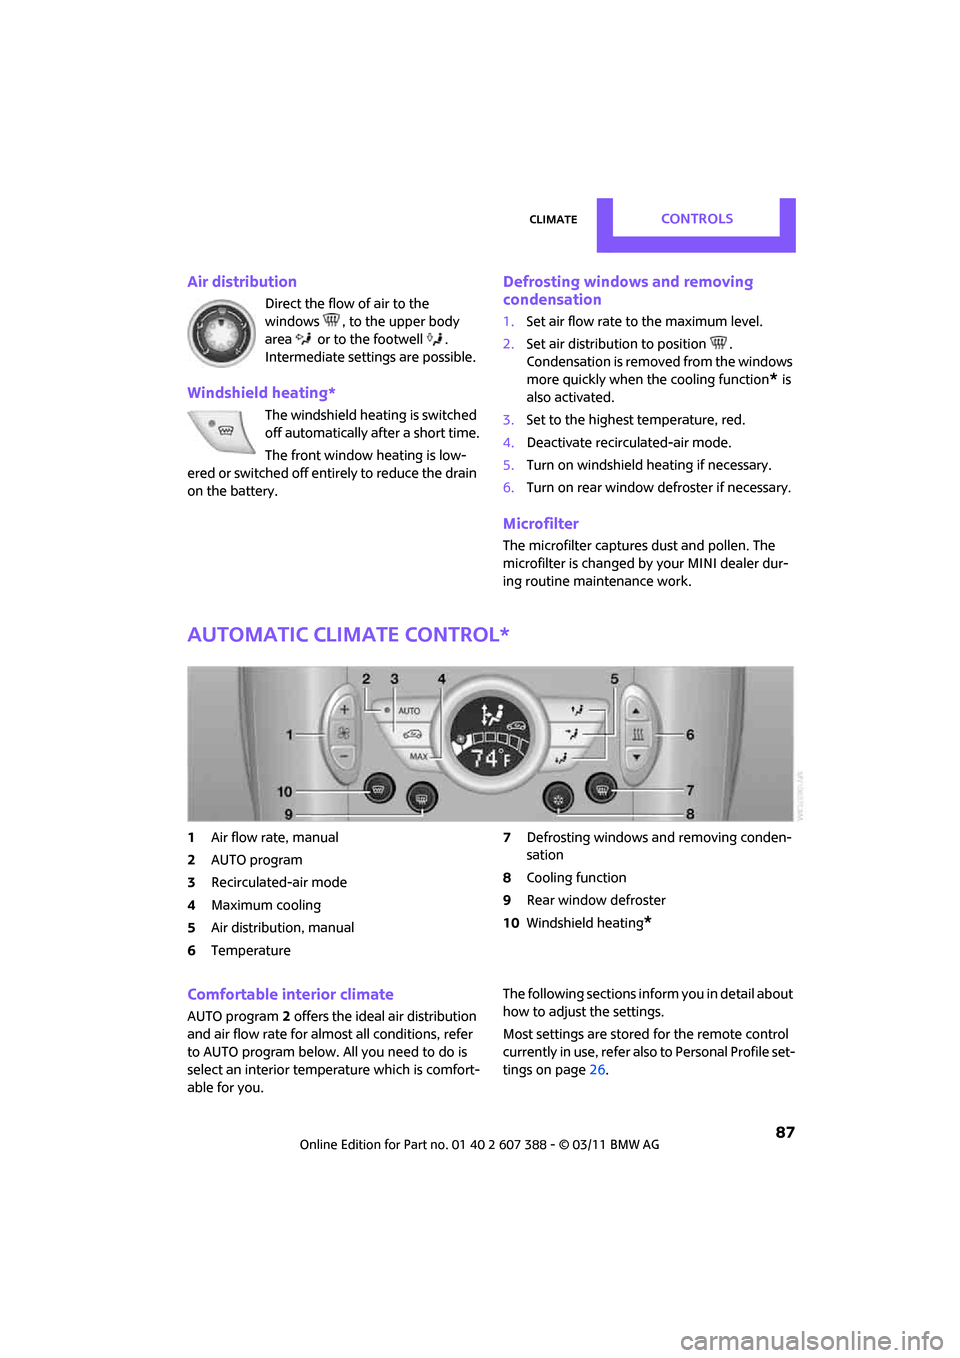
Automatic clim ate control*
1Air flow rate, manual
2 AUTO program
3 Recirculated-air mode
4 Maximum cooling
5 Air distribution, manual
6 Temperature 7
Defrosting windows and removing conden-
sation
8 Cooling function
9 Rear window defroster
10 Windshield heating
*
Comfortable interior climate
AUTO program 2 offers the ideal air distribution
and air flow rate for almost all conditions, refer
to AUTO program below. All you need to do is
select an interior temp erature which is comfort-
able for you. The following sections info
rm you in detail about
how to adjust the settings.
Most settings are stored for the remote control
currently in use, refer also to Personal Profile set-
tings on page 26.
Page 90 of 256
CONTROLSClimate
88
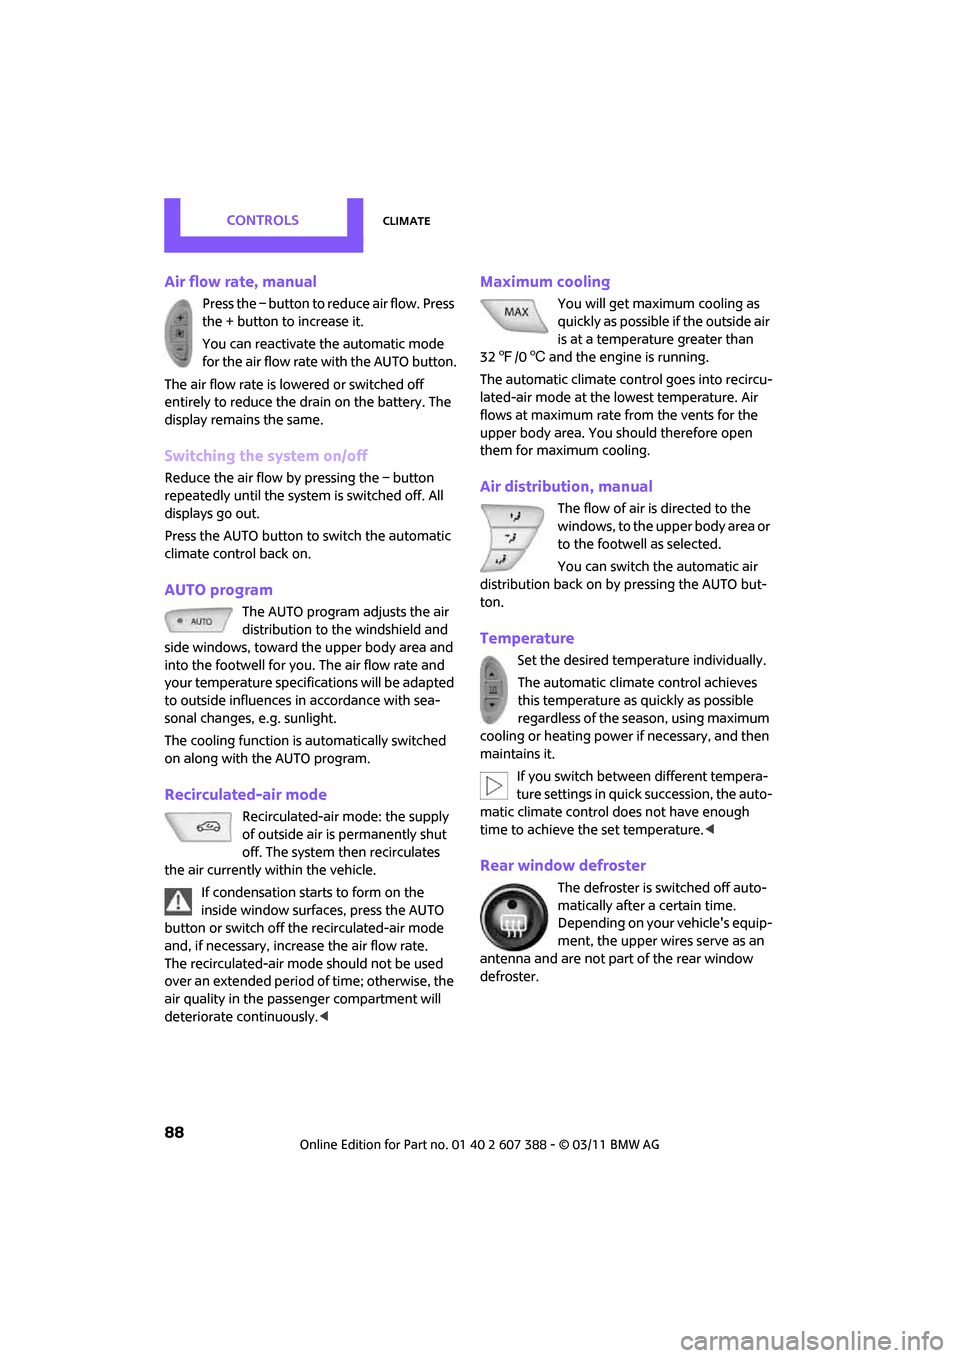
Air flow rate, manual
Press the – button to reduce air flow. Press
the + button to increase it.
You can reactivate the automatic mode
for the air flow rate with the AUTO button.
The air flow rate is lo wered or switched off
entirely to reduce the drain on the battery. The
display remains the same.
Switching the system on/off
Reduce the air flow by pressing the – button
repeatedly until the system is switched off. All
displays go out.
Press the AUTO button to switch the automatic
climate control back on.
AUTO program
The AUTO program adjusts the air
distribution to the windshield and
side windows, toward the upper body area and
into the footwell for you. The air flow rate and
your temperature specifications will be adapted
to outside influences in accordance with sea-
sonal changes, e.g. sunlight.
The cooling function is automatically switched
on along with the AUTO program.
Recirculated-air mode
Recirculated-air mode: the supply
of outside air is permanently shut
off. The system then recirculates
the air currently within the vehicle.
If condensation starts to form on the
inside window surfac es, press the AUTO
button or switch off the recirculated-air mode
and, if necessary, increa se the air flow rate.
The recirculated-air mode should not be used
over an extended period of time; otherwise, the
air quality in the passenger compartment will
deteriorate continuously. <
Maximum cooling
You will get maximum cooling as
quickly as possible if the outside air
is at a temperature greater than
32 7 /06 and the engine is running.
The automatic clim ate control goes into recircu-
lated-air mode at the lowest temperature. Air
flows at maximum rate from the vents for the
upper body area. You should therefore open
them for maximum cooling.
Air distribution, manual
The flow of air is directed to the
windows, to the upper body area or
to the footwell as selected.
You can switch the automatic air
distribution back on by pressing the AUTO but-
ton.
Temperature
Set the desired temperature individually.
The automatic climate control achieves
this temperature as quickly as possible
regardless of the season, using maximum
cooling or heating power if necessary, and then
maintains it.
If you switch between different tempera-
ture settings in quick succession, the auto-
matic climate control does not have enough
time to achieve the set temperature. <
Rear window defroster
The defroster is switched off auto-
matically after a certain time.
Depending on your vehicle's equip-
ment, the upper wires serve as an
antenna and are not part of the rear window
defroster.