USB MINI Clubman 2011 Owner's Manual (Mini Connected)
[x] Cancel search | Manufacturer: MINI, Model Year: 2011, Model line: Clubman, Model: MINI Clubman 2011Pages: 256, PDF Size: 3.75 MB
Page 17 of 256
CockpitAT A GLANCE
15
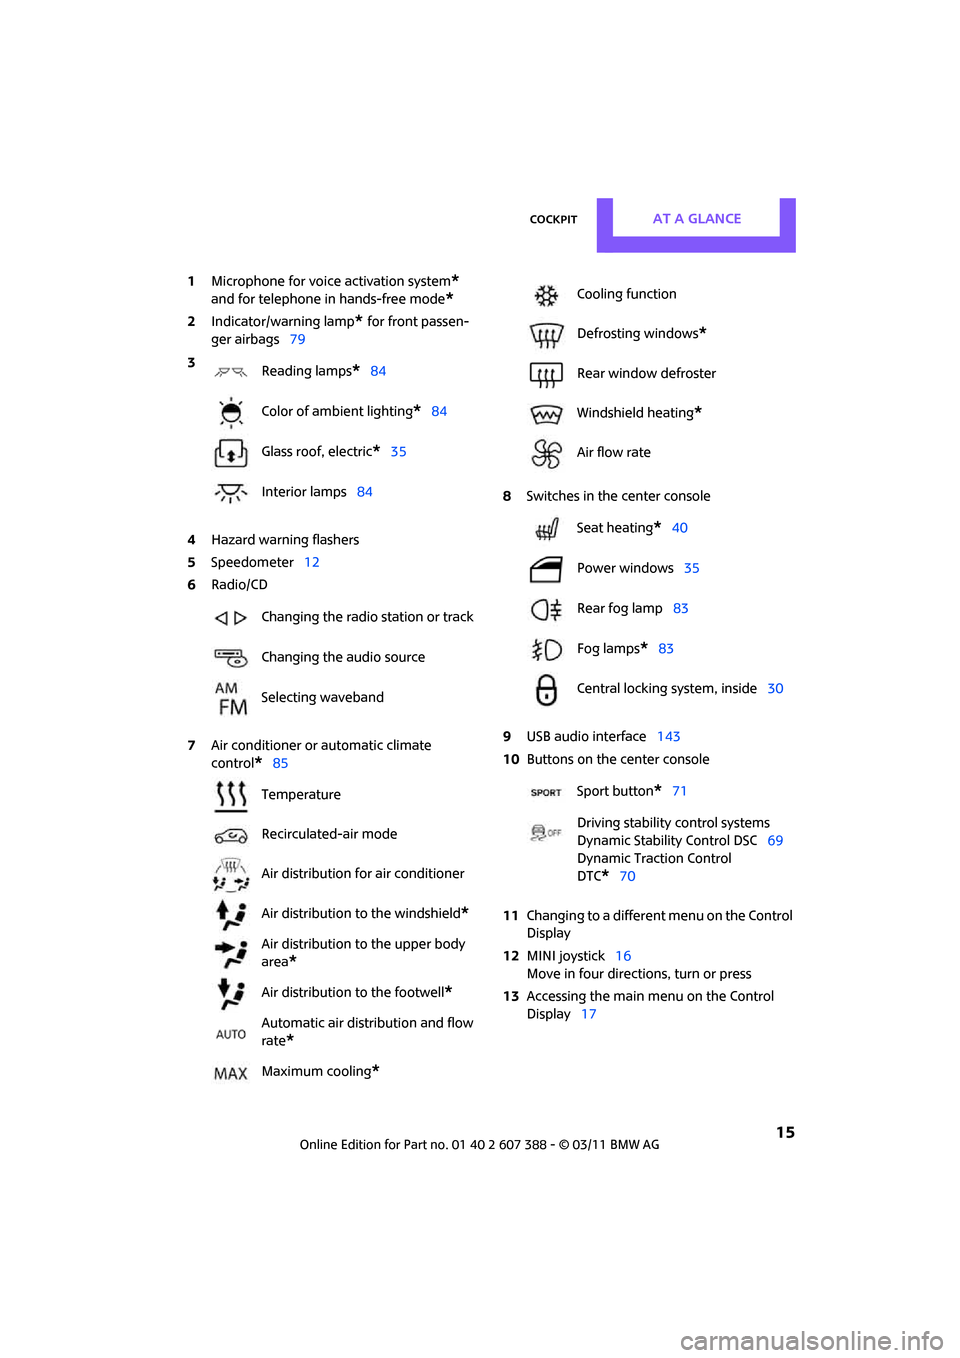
1Microphone for voice activation system*
and for telephone in hands-free mode*
2Indicator/warning lamp* for front passen-
ger airbags 79
4 Hazard warning flashers
5 Speedometer 12
6 Radio/CD
7 Air conditioner or automatic climate
control
*85 8
Switches in the center console
9 USB audio interface 143
10 Buttons on the center console
11 Changing to a differen t menu on the Control
Display
12 MINI joystick 16
Move in four directions, turn or press
13 Accessing the main me nu on the Control
Display 17
3
Reading lamps
*84
Color of ambient lighting
*84
Glass roof, electric
*35
Interior lamps 84
Changing the radio station or track
Changing the audio source
Selecting waveband
Temperature
Recirculated-air mode
Air distribution for air conditioner
Air distribution to the windshield
*
Air distribution to the upper body
area
*
Air distribution to the footwell*
Automatic air distribution and flow
rate
*
Maximum cooling*
Cooling function
Defrosting windows
*
Rear window defroster
Windshield heating
*
Air flow rate
Seat heating
*40
Power windows 35
Rear fog lamp 83
Fog lamps
*83
Central locking system, inside 30
Sport button
*71
Driving stability control systems
Dynamic Stability Control DSC 69
Dynamic Traction Control
DTC*70
Page 94 of 256
CONTROLSPractical interior accessories
92
If the LED2 does not flash rapidly after
approx. 60 seconds, alter the distance and
repeat this step.
Canada: if the LED is not flashing rapidly
after 60 seconds, chan ge the distance and
repeat the step or, if the programming was
interrupted by the hand-held transmitter,
press and hold the memory button and
press the button on the hand-held transmit-
ter for 2 seconds and release several times.
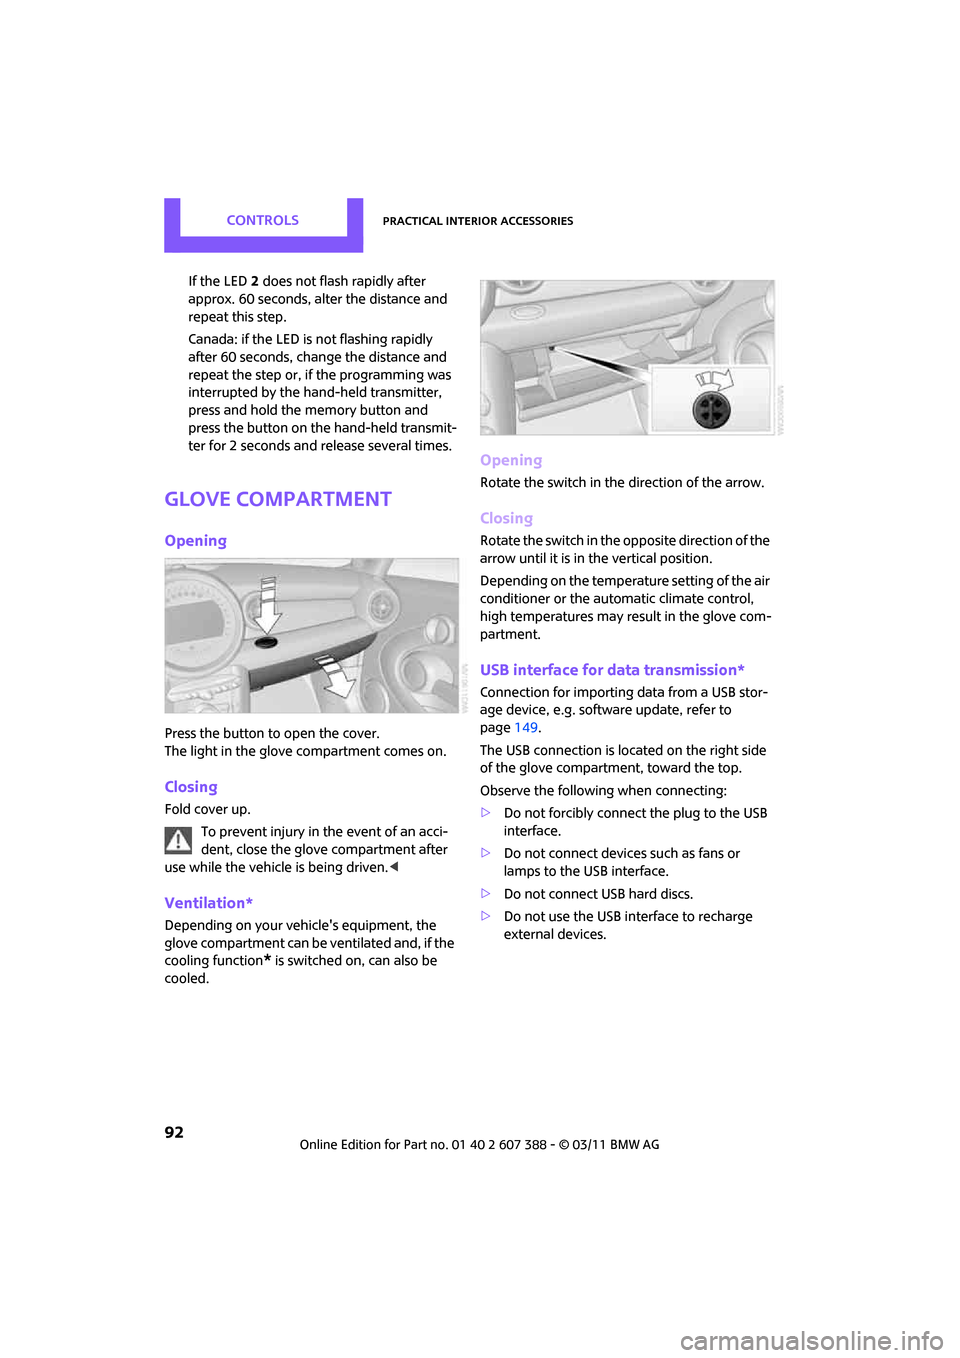
Glove compartment
Opening
Press the button to open the cover.
The light in the glove compartment comes on.
Closing
Fold cover up.
To prevent injury in the event of an acci-
dent, close the glove compartment after
use while the vehicle is being driven. <
Ventilation*
Depending on your vehicle's equipment, the
glove compartment can be ventilated and, if the
cooling function
* is switched on, can also be
cooled.
Opening
Rotate the switch in the direction of the arrow.
Closing
Rotate the switch in the opposite direction of the
arrow until it is in the vertical position.
Depending on the temperature setting of the air
conditioner or the automatic climate control,
high temperatures may result in the glove com-
partment.
USB interface for data transmission*
Connection for importing data from a USB stor-
age device, e.g. software update, refer to
page 149.
The USB connection is located on the right side
of the glove compartment, toward the top.
Observe the following when connecting:
> Do not forcibly connect the plug to the USB
interface.
> Do not connect devices such as fans or
lamps to the USB interface.
> Do not connect USB hard discs.
> Do not use the USB interface to recharge
external devices.
Page 110 of 256
NAVIGATIONNavigation system
108
Navigation system
General information
The navigation system can determine the pre-
cise position of the vehicle, with the aid of satel-
lites and vehicle sensors, and can reliably guide
you to every entered destination.
Enter data only with the vehicle station-
ary, and always give priority to the appli-
cable traffic regulations in the event of any con-
tradiction between traffic and road conditions
and the instructions issu ed by the navigation
system. Failure to take to this precaution can
place you in violation of the law and put vehicle
occupants and other ro ad users in danger.<
Navigation data
General information
Navigation data are stored in the vehicle and
can be updated.
You can obtain navigation data and an activa-
tion code from your MINI dealer.
Updating the data can take several hours,
depending on the volume of data.
> Update data while driving to reduce the
drain on the battery.
> The update is resumed automatically when
a trip is continued after an interruption.
> Only the main functions of the navigation
system are available during updating.
> You can inquire as to the status of the
update.
> The data are stored in the vehicle.
> After the updating process is complete, the
system restarts.
> The medium with the na vigation data can be
removed after the update.
Information on navigation data
1. "Navigation"
2. Open "Options".
3. "Navigation system version"
Information about the data version is displayed.
Updating the navigation data
1.Insert USB storage device with navigation
data
>Into the USB interface in the glove com-
partment
*
>Into the USB audio interface*.
2. Follow the instructions on the on-board
computer.
3. Enter the activation code of the USB storage
device.
4. Begin driving.
After you begin to drive, the system restarts and
updates the navigation data as you drive
*.
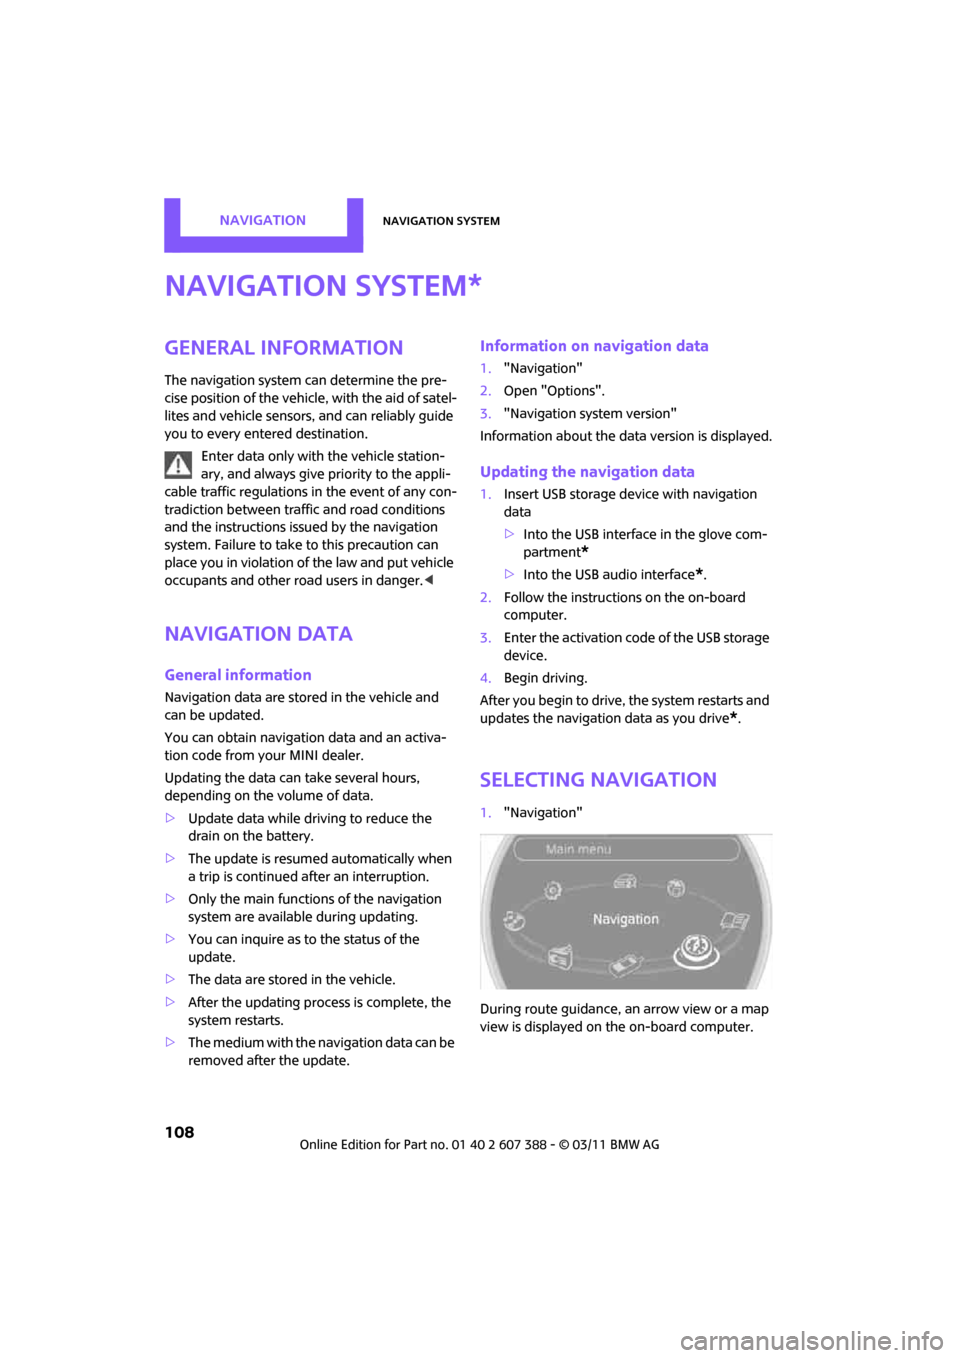
Selecting navigation
1. "Navigation"
During route guidance, an arrow view or a map
view is displayed on the on-board computer.
*
Page 144 of 256

ENTERTAINMENTExternal devices
142
External devices
Overview
AUX-IN connection
Overview
>It is possible to connect audio devices, e.g.
MP3 players. Sound is output over the vehi-
cle speakers.
> Recommended settings: mid-level tone and
volume settings on the audio device. Tone
may depend on the quality of the audio files.
Connecting
1USB interface
2 Connection for audio playback:
TRS connector 1/8"/3.5 mm
For audio playback through the vehicle speak-
ers, connect the headphones or line-out con-
nection of the device to the AUX-IN
connection 2.
Starting audio playback
The audio device must be switched on.
1. "CD/Multimedia"
2. Or "External devices" if applicable
3. "AUX front"
Sound is output on the vehicle loudspeakers.
Volume
The volume of the sound output depends on the
audio device. If this volume differs markedly
from the volume of the other audio sources, it is
advisable to adjust the volumes.
Adjusting volume
1. "CD/Multimedia"
2. Or "External devices" if applicable
3. "AUX front"
4. "Volume"
5. Turn MINI joystick until the desired volume
is set and then press the MINI joystick.
SymbolMeaning
USB audio interface*
Mobile phone audio interface*
Bluetooth audio*
AUX-IN connection
Page 145 of 256

External devicesENTERTAINMENT
143
USB audio interface*/
mobile phone audio
interface*
Overview
It is possible to connect external audio devices.
They are operated using the on-board com-
puter. Sound is output over the vehicle speakers.
Options for connecting external devices
> Connection via USB audio interface: Apple
devices, USB devices such as MP3 players,
USB memory sticks, or mobile phones that
are supported by the USB audio interface.
> Connection via the snap-in adapter
*, when
equipped with extended connectivity of the
music player in the mobile phone: Apple
iPhone or mobile phones. Playback is only
possible if no plug is present in the USB
audio interface.
Because of the large number of audio devices
available on the market , an operation via the
vehicle cannot be guaranteed for every audio
device/mobile phone.
Ask your MINI dealer for suitable audio devices/
mobile phones.
Audio files
Playback of standard audio files is possible:
> MP3
> WMA
> WAV (PCM)
> AAC
*, M4A*
>Without voice activation system: playback
lists: M3U
> With voice activation system: playback lists:
M3U, WPL
*, PLS*
Video files*
Playback of standard vi deo files with a compati-
ble Apple device is possible:
> MPEG4
> H.264
Connect via the USB audio interface
1USB interface
2 Connection for audi o/video playback:
TRS connector 1/8"/3.5 mm
Apple device
A special adapter cable* is available for con-
necting the Apple device. The adapter cable is
required for a proper connection.
Further information:
> At: www.mini.com /connectivity.
> At your MINI dealer.
For audio playback over the vehicle speakers,
connect the Apple device using the special
adapter cable with AV-IN connection 2 and USB
interface 1 or using a flexible adapter cable
*
with a USB interface 1.
The USB audio interface supports the menu
structure of the Apple device.
USB device
To protect the USB interface and USB device
from mechanical damage, connect them with a
flexible adapter cable.
Connect the USB device to the USB interface 1.
Page 146 of 256
ENTERTAINMENTExternal devices
144
After initial connection
Track information, e.g. artist or music style and
the playlists of the USB device are imported into
the vehicle. This process can take some time.
The time required is dependent on the USB
device and on the number of tracks.
During transmission, the tracks can be accessed
via the file directory.
Number of tracks
The data from up to four USB devices or for
approx. 26,000 tracks can be stored in the vehi-
cle. If a fifth device is connected or if more than
26,000 tracks are stored, then the data of exist-
ing tracks may be deleted.
Copy protection
Music tracks with integr ated Digital Rights Man-
agement (DRM) cannot be played.
Audio playback
Starting audio playback
1. "CD/Multimedia"
2. "External devices"
3. Select the or symbol and press the
MINI joystick.
Playback begins with the first track.
Track search
Selection is possible via:
> Playback lists
> Information: music style, artist, album, track.
> Additionally for USB devi ces: file directory,
composer.
Track titles are displayed if they have been
stored in the Latin alphabet.
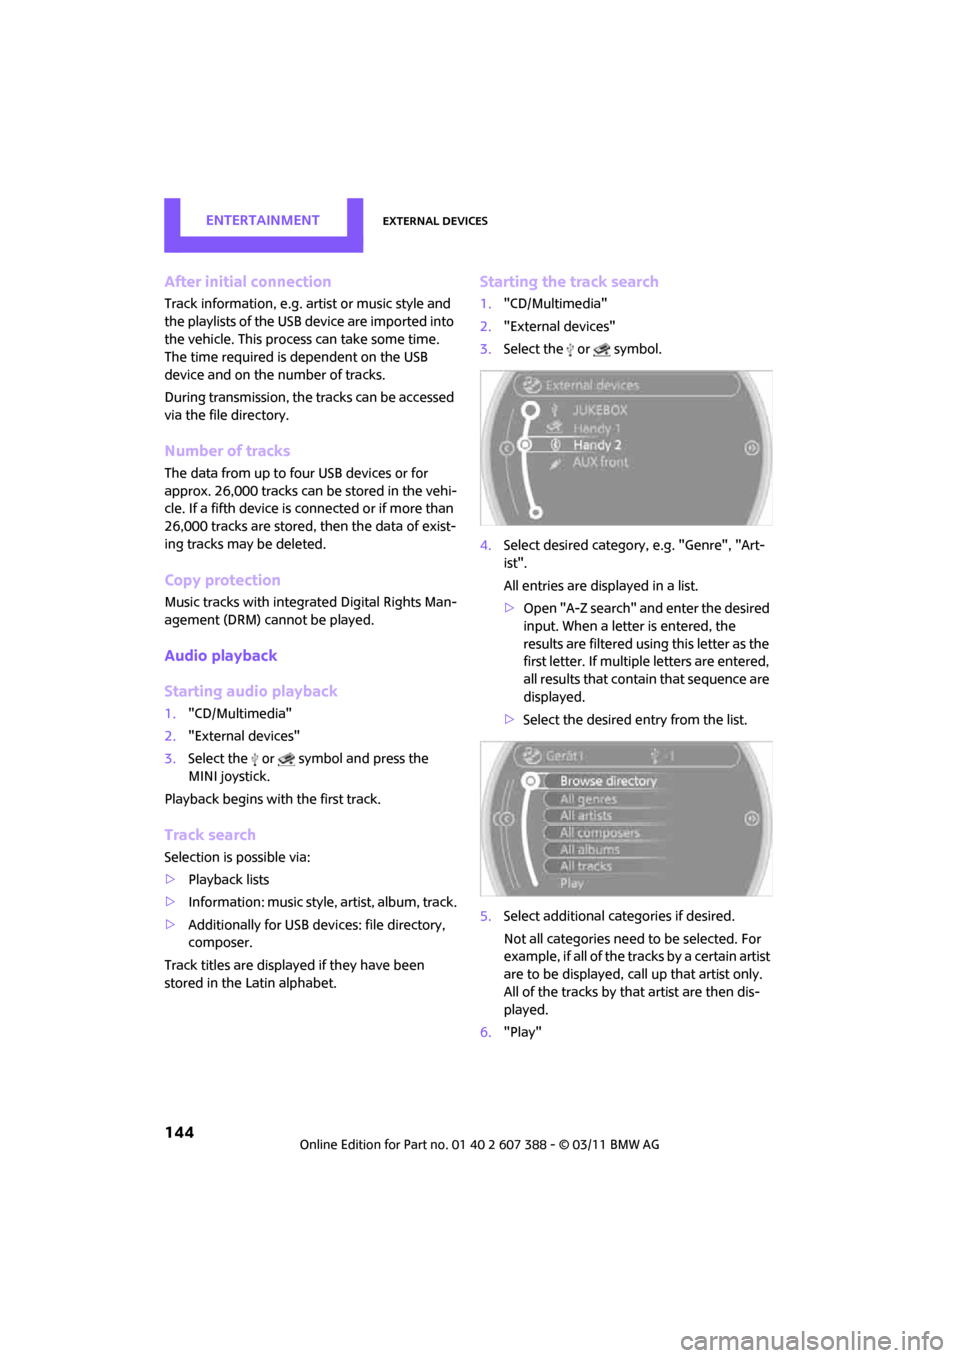
Starting the track search
1. "CD/Multimedia"
2. "External devices"
3. Select the or symbol.
4. Select desired category, e.g. "Genre", "Art-
ist".
All entries are displayed in a list.
>Open "A-Z search" and enter the desired
input. When a letter is entered, the
results are filtered using this letter as the
first letter. If multiple letters are entered,
all results that contai n that sequence are
displayed.
> Select the desired entry from the list.
5. Select additional ca tegories if desired.
Not all categories need to be selected. For
example, if all of the tracks by a certain artist
are to be displayed, call up that artist only.
All of the tracks by that artist are then dis-
played.
6. "Play"
Page 147 of 256
External devicesENTERTAINMENT
145
Restarting a track search
"New search"
Playback lists
To open playback lists.
1."CD/Multimedia"
2. "External devices"
3. Select the or symbol.
4. "Playlists"
Current playback
List of tracks currently being played.
1."CD/Multimedia"
2. "External devices"
3. Select the or symbol.
4. "Current playback"
Random play sequence
The current list of tracks is played in random
sequence.
1."CD/Multimedia"
2. "External devices"
3. Open "Options".
4. "Random"
Fast forward/reverse
Buttons on the steering wheel or CD player:
Press and hold the button for the corre-
sponding direction.
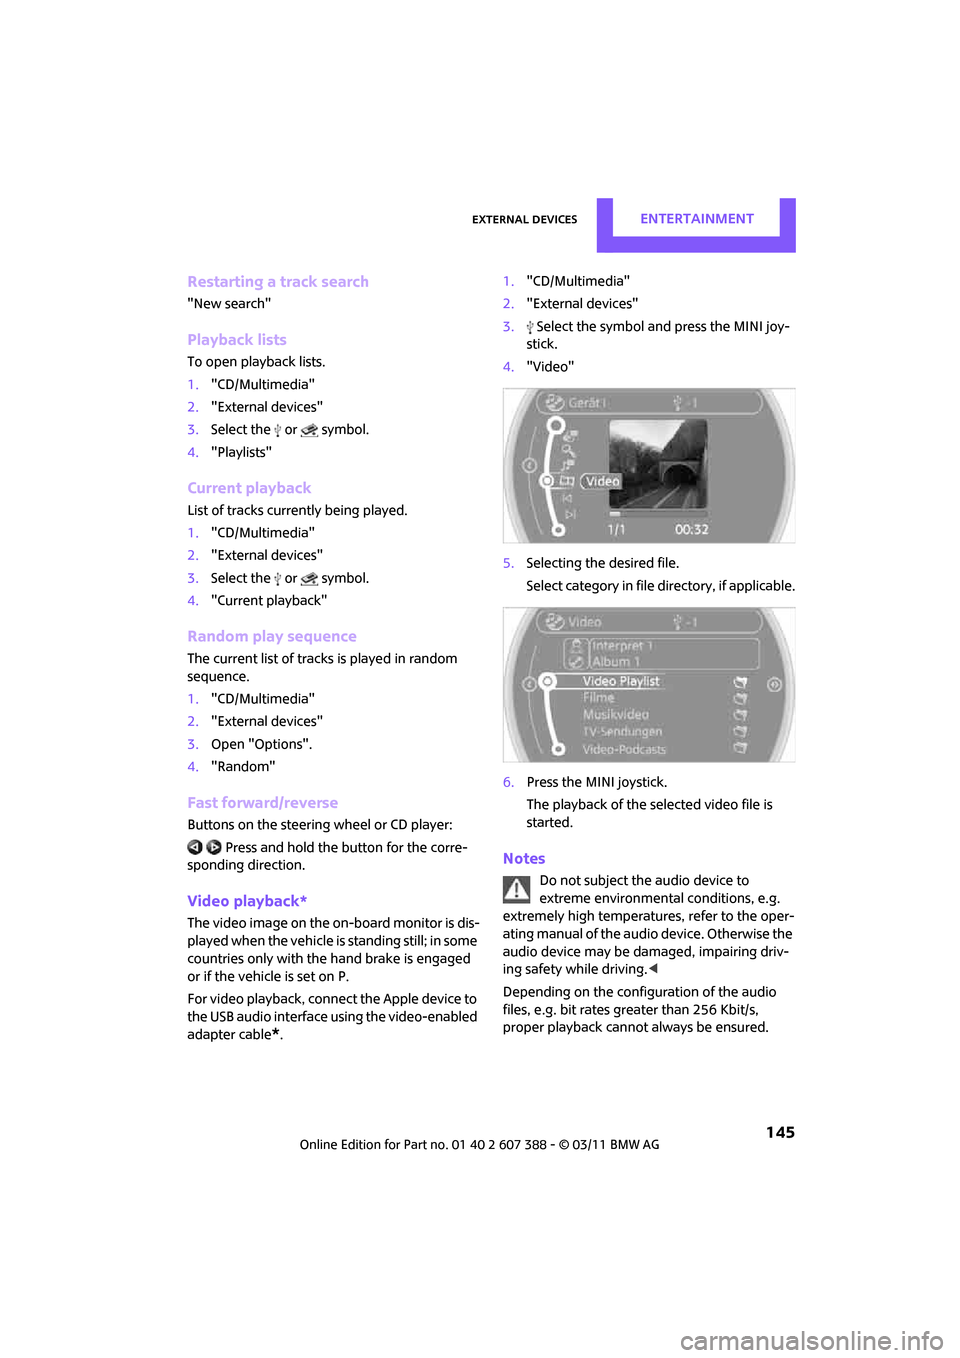
Video playback*
The video image on the on-board monitor is dis-
played when the vehicle is standing still; in some
countries only with the hand brake is engaged
or if the vehicle is set on P.
For video playback, connec t the Apple device to
the USB audio interface using the video-enabled
adapter cable
*. 1.
"CD/Multimedia"
2. "External devices"
3. Select the symbol and press the MINI joy-
stick.
4. "Video"
5. Selecting the desired file.
Select category in file directory, if applicable.
6. Press the MINI joystick.
The playback of the selected video file is
started.
Notes
Do not subject the audio device to
extreme environmental conditions, e.g.
extremely high temperatures, refer to the oper-
ating manual of the audio device. Otherwise the
audio device may be damaged, impairing driv-
ing safety while driving. <
Depending on the configuration of the audio
files, e.g. bit rates greater than 256 Kbit/s,
proper playback cannot always be ensured.
Page 148 of 256
ENTERTAINMENTExternal devices
146
Information on connection
>The connected audio device is supplied with
a max. power of 500 mA if supported by the
device. Therefore, do not connect the device
to the power socket in the vehicle.
> Do not use force when plugging the connec-
tor into the USB interface.
> Do not connect any devi ces, e.g. fans or
lamps, to the USB audio interface.
> Do not connect USB hard drives.
> Do not use the USB audio interface to
recharge external devices.
Bluetooth audio*
Overview
>It is possible to use Bluetooth to play music
files from external devices, e.g. audio
devices or mobile phones.
> Bluetooth® is a regi stered trademark of
Bluetooth® SIG, Inc.
> Sound is output over the vehicle speakers.
> The volume of the sound output depends on
the device. If necessary, change the volume
setting on the device.
> Up to four external devices can be paired
with the vehicle.
Requirements
> Suitable device. Information is available at
www.mini.com/connectivity.
> Device operational.
> Ignition switched on.
> Bluetooth activated in vehicle, refer to
page 165, and in the device.
> Bluetooth presets in the device are required,
e.g. connection not confirmed or visible,
refer to Owner's Manu al for the device.
> A number with at least 4 and at most
16 digits has been established as the Blue-
tooth passkey. Only required once for pair-
ing.
Pairing and connecting
Only pair the device when the vehicle is
stopped; otherwise, inattention may lead
to endangerment of passengers or other road
users. <
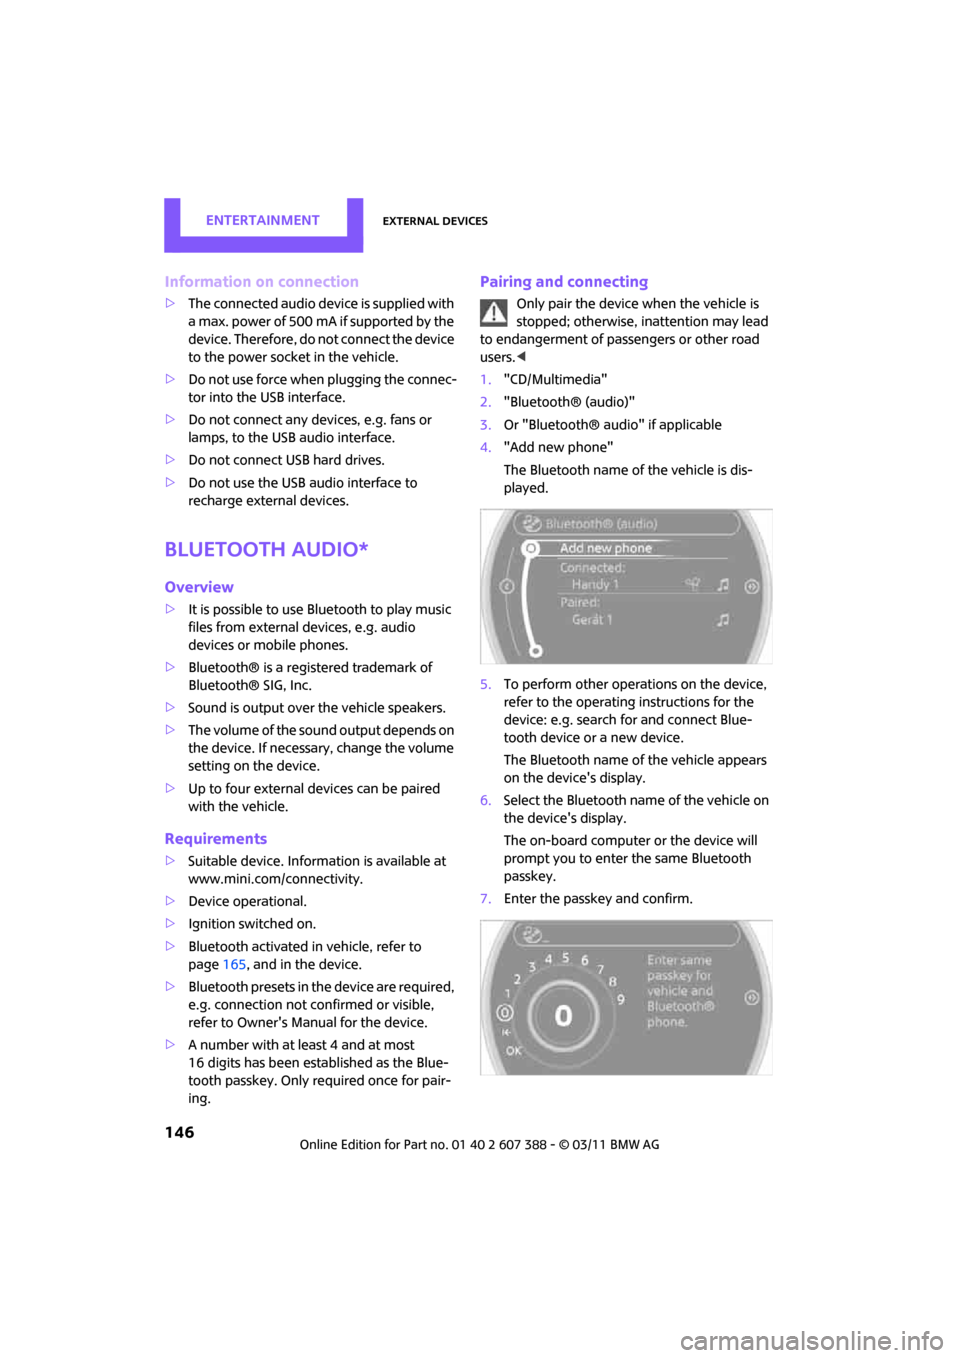
1. "CD/Multimedia"
2. "Bluetooth® (audio)"
3. Or "Bluetooth® audio" if applicable
4. "Add new phone"
The Bluetooth name of the vehicle is dis-
played.
5. To perform other operations on the device,
refer to the operating instructions for the
device: e.g. search for and connect Blue-
tooth device or a new device.
The Bluetooth name of the vehicle appears
on the device's display.
6. Select the Bluetooth name of the vehicle on
the device's display.
The on-board computer or the device will
prompt you to enter the same Bluetooth
passkey.
7. Enter the passkey and confirm.
Page 151 of 256
External devicesENTERTAINMENT
149
Is the mobile phone in power economy
m o d e o r d o e s i t o n l y h av e a s m al l am o u n t o f
battery charge remaining? Charge the
mobile phone in the snap-in adapter or via a
charging cable.
Depending on the mobile phone, it may only
be possible to connect one device to the
vehicle. Unpair the connected device from
the vehicle and only pair and connect one
device.
Is the device no longer responding? Switch
the device off and back on again.
Repeat the pairing procedure.
> No music can be played.
Start the program for playing music files on
the device and if necessary, select a track via
the device.
Activate and deactivate the radio mute on
the radio control panel.
> Music files only play quietly.
Adjust volume settings on the device.
> Videos cannot be play ed or can only be
played with a delayed audio output.
Check the device compatibility. Information
is available at www.mini.com/connectivity.
> Playback is interrupted by the press of a but-
ton or other messages on the device.
Switch off key tones an d other acoustic sig-
nal on the device.
> Playback is interrupted by a phone call or
traffic report and does not automatically
continue.
Activate and deactivate the radio mute on
the radio control panel.
> Playback is not possible when the mobile
phone is connected via Bluetooth audio and
at the same time via the extended connec-
tivity of the music player in the mobile
phone
*. Disconnect one of the two connections, e.g.
the audio connection, refer to page
148,
and start playback again.
If you have gone through all items in the list and
still cannot activate the desired function please
contact the Hotline or your MINI dealer.
Software update*
The vehicle supports various external devices,
depending on the software it is currently using.
A software update can enable the vehicle to
support, for example, new mobile phones or
new external devices.
Software updates and associated, up-to-date
instructions are availa ble on the web page
www.mini.com/connectivity.
Displaying current version
The currently installed software is displayed.
1. "Settings"
2. "Software update"
3. "Show current version"
Select the desired version
* to display additional
information
*.
Updating software
The software update can only be performed
when stopped.
1. Save the file for the software update in the
main directory of a USB data storage device.
2. Connect the USB data storage device to the
USB interface of the USB audio interface in
the center console. It is not possible to per-
form the update using the USB interface in
the glove compartment.
3. "Settings"
4. "Software update"
Page 178 of 256
CommunicationsMobile phone preparation Bluetooth
176
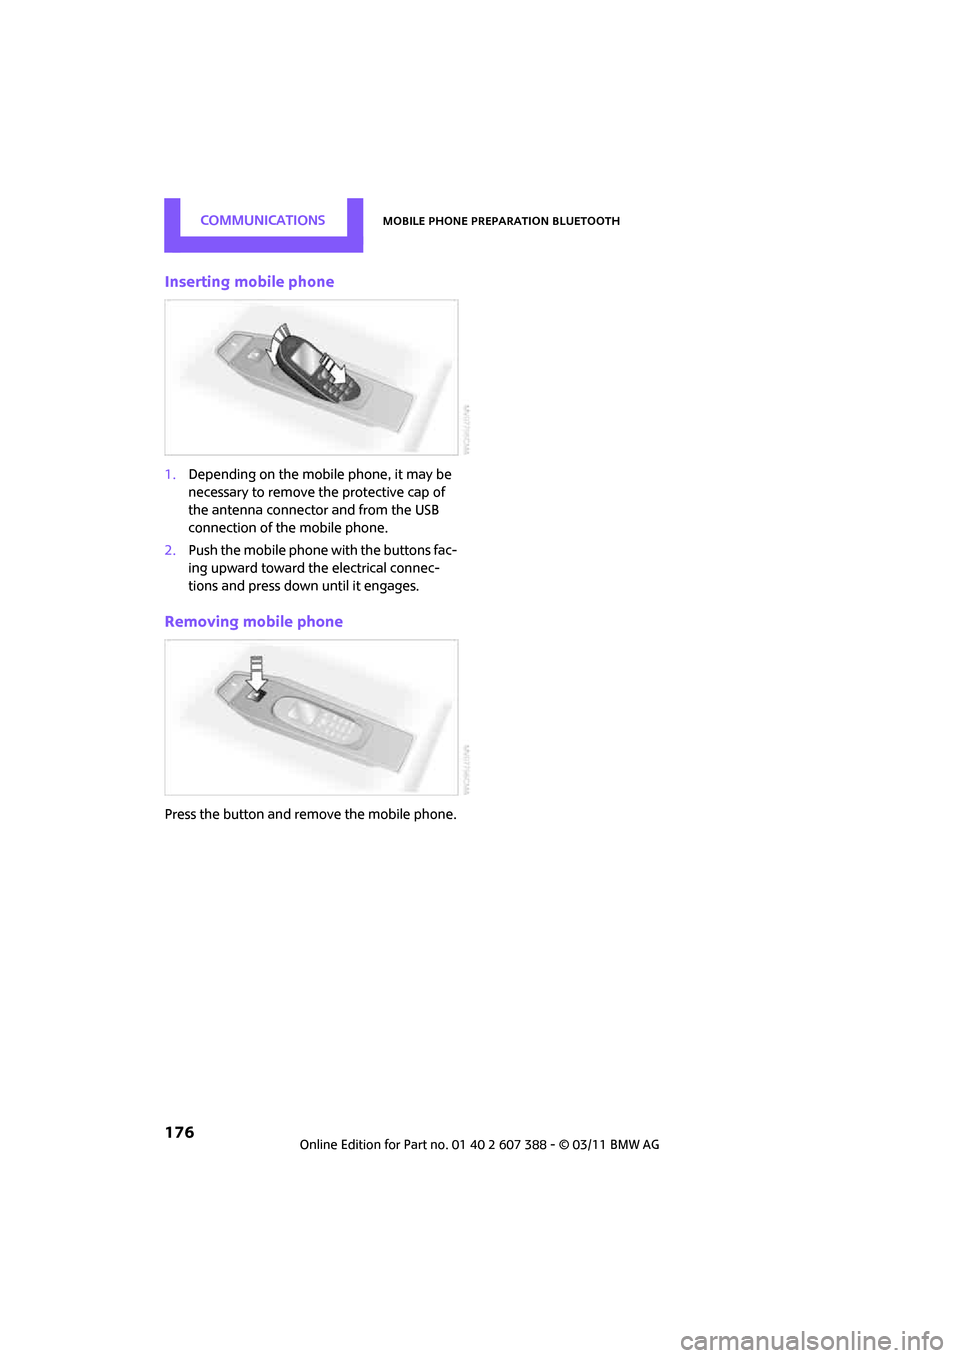
Inserting mobile phone
1.Depending on the mobile phone, it may be
necessary to remove the protective cap of
the antenna connector and from the USB
connection of the mobile phone.
2. Push the mobile phone with the buttons fac-
ing upward toward the electrical connec-
tions and press down until it engages.
Removing mobile phone
Press the button and remove the mobile phone.