MINI Clubman 2011 Owner's Manual
Manufacturer: MINI, Model Year: 2011, Model line: Clubman, Model: MINI Clubman 2011Pages: 196, PDF Size: 3.08 MB
Page 121 of 196
TelephoneCOMMUNICATIONS
119
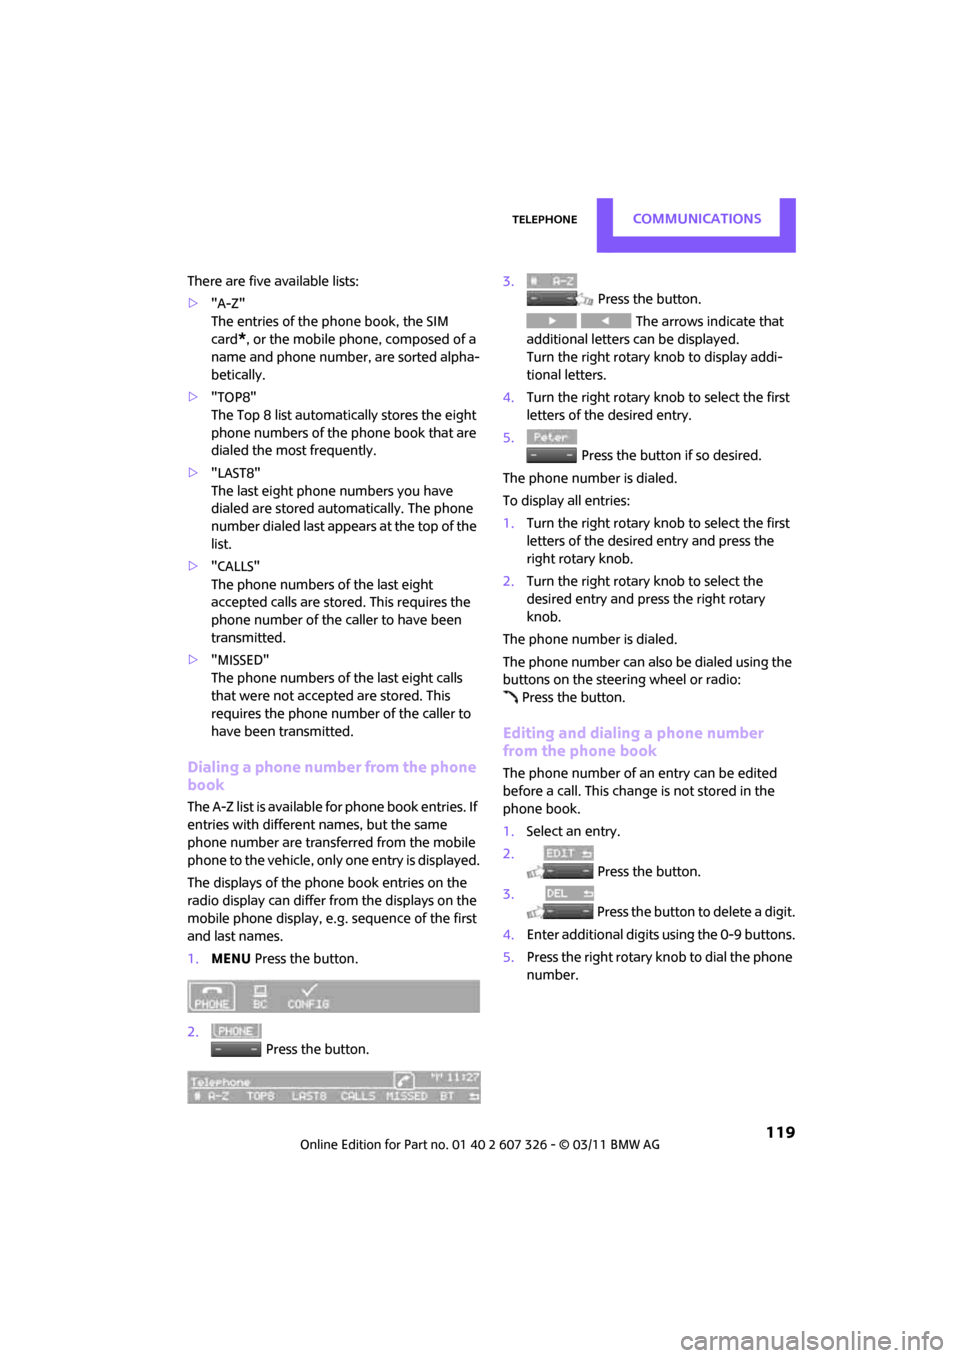
There are five available lists:
>"A-Z"
The entries of the phone book, the SIM
card
*, or the mobile phone, composed of a
name and phone number, are sorted alpha-
betically.
> "TOP8"
The Top 8 list automatically stores the eight
phone numbers of the phone book that are
dialed the most frequently.
> "LAST8"
The last eight phone numbers you have
dialed are stored automatically. The phone
number dialed last appears at the top of the
list.
> "CALLS"
The phone numbers of the last eight
accepted calls are stored. This requires the
phone number of the caller to have been
transmitted.
> "MISSED"
The phone numbers of the last eight calls
that were not accepted are stored. This
requires the phone number of the caller to
have been transmitted.
Dialing a phone number from the phone
book
The A-Z list is available fo r phone book entries. If
entries with different names, but the same
phone number are transferred from the mobile
phone to the vehicle, only one entry is displayed.
The displays of the phone book entries on the
radio display can differ fr om the displays on the
mobile phone display, e.g. sequence of the first
and last names.
1. MENU Press the button.
2. Press the button. 3.
Press the button.
The arrows indicate that
additional letters can be displayed.
Turn the right rotary knob to display addi-
tional letters.
4. Turn the right rotary knob to select the first
letters of the desired entry.
5. Press the button if so desired.
The phone number is dialed.
To display all entries:
1. Turn the right rotary knob to select the first
letters of the desired entry and press the
right rotary knob.
2. Turn the right rotary knob to select the
desired entry and pre ss the right rotary
knob.
The phone number is dialed.
The phone number can also be dialed using the
buttons on the steering wheel or radio: Press the button.
Editing and dialing a phone number
from the phone book
The phone number of an entry can be edited
before a call. This change is not stored in the
phone book.
1. Select an entry.
2. Press the button.
3. Press the button to delete a digit.
4. Enter additional digits using the 0-9 buttons.
5. Press the right rotary knob to dial the phone
number.
Page 122 of 196
COMMUNICATIONSTelephone
120
Dialing a phone number from the phone
book using buttons on the steering
wheel
1. Press and hold the button to display the
telephone menu.
2. Use the arrow buttons on the steering wheel
to scroll through the phone book.
3. Press and hold the button to dial the
phone number.
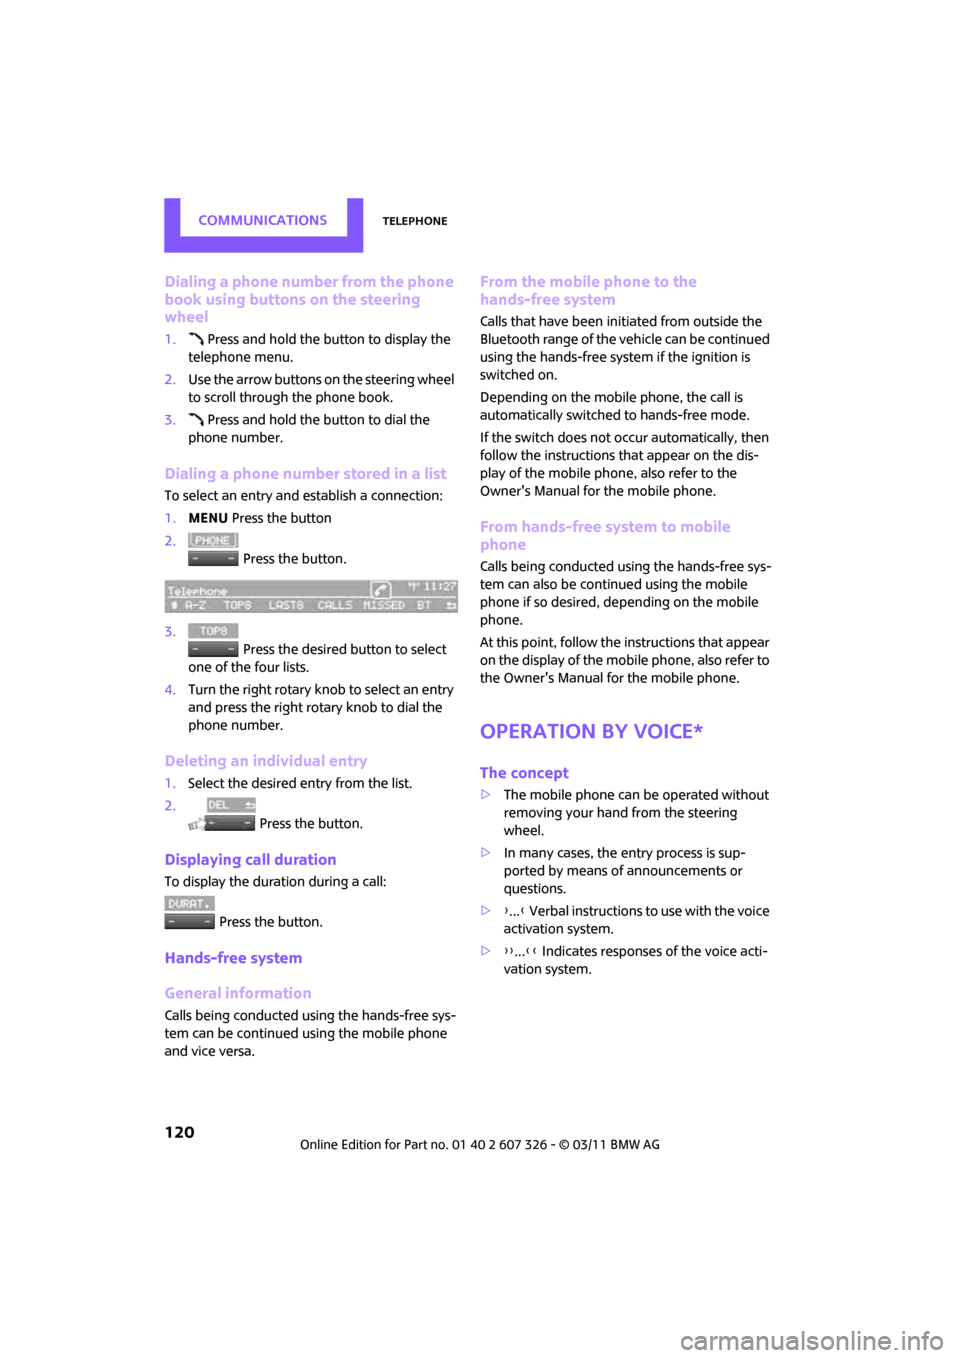
Dialing a phone number stored in a list
To select an entry and establish a connection:
1. MENU Press the button
2. Press the button.
3. Press the desired button to select
one of the four lists.
4. Turn the right rotary knob to select an entry
and press the right rotary knob to dial the
phone number.
Deleting an individual entry
1.Select the desired entry from the list.
2. Press the button.
Displaying call duration
To display the duration during a call:
Press the button.
Hands-free system
General information
Calls being conducted using the hands-free sys-
tem can be continued using the mobile phone
and vice versa.
From the mobile phone to the
hands-free system
Calls that have been initiated from outside the
Bluetooth range of the ve hicle can be continued
using the hands-free system if the ignition is
switched on.
Depending on the mobile phone, the call is
automatically switched to hands-free mode.
If the switch does not occur automatically, then
follow the instructions that appear on the dis-
play of the mobile phone, also refer to the
Owner's Manual for the mobile phone.
From hands-free system to mobile
phone
Calls being conducted using the hands-free sys-
tem can also be continued using the mobile
phone if so desired, de pending on the mobile
phone.
At this point, follow the instructions that appear
on the display of the mobile phone, also refer to
the Owner's Manual for the mobile phone.
Operation by voice*
The concept
> The mobile phone can be operated without
removing your hand from the steering
wheel.
> In many cases, the entry process is sup-
ported by means of announcements or
questions.
> {... } Verbal instructions to use with the voice
activation system.
> {{...}} Indicates responses of the voice acti-
vation system.
Page 123 of 196
TelephoneCOMMUNICATIONS
121
Voice commands
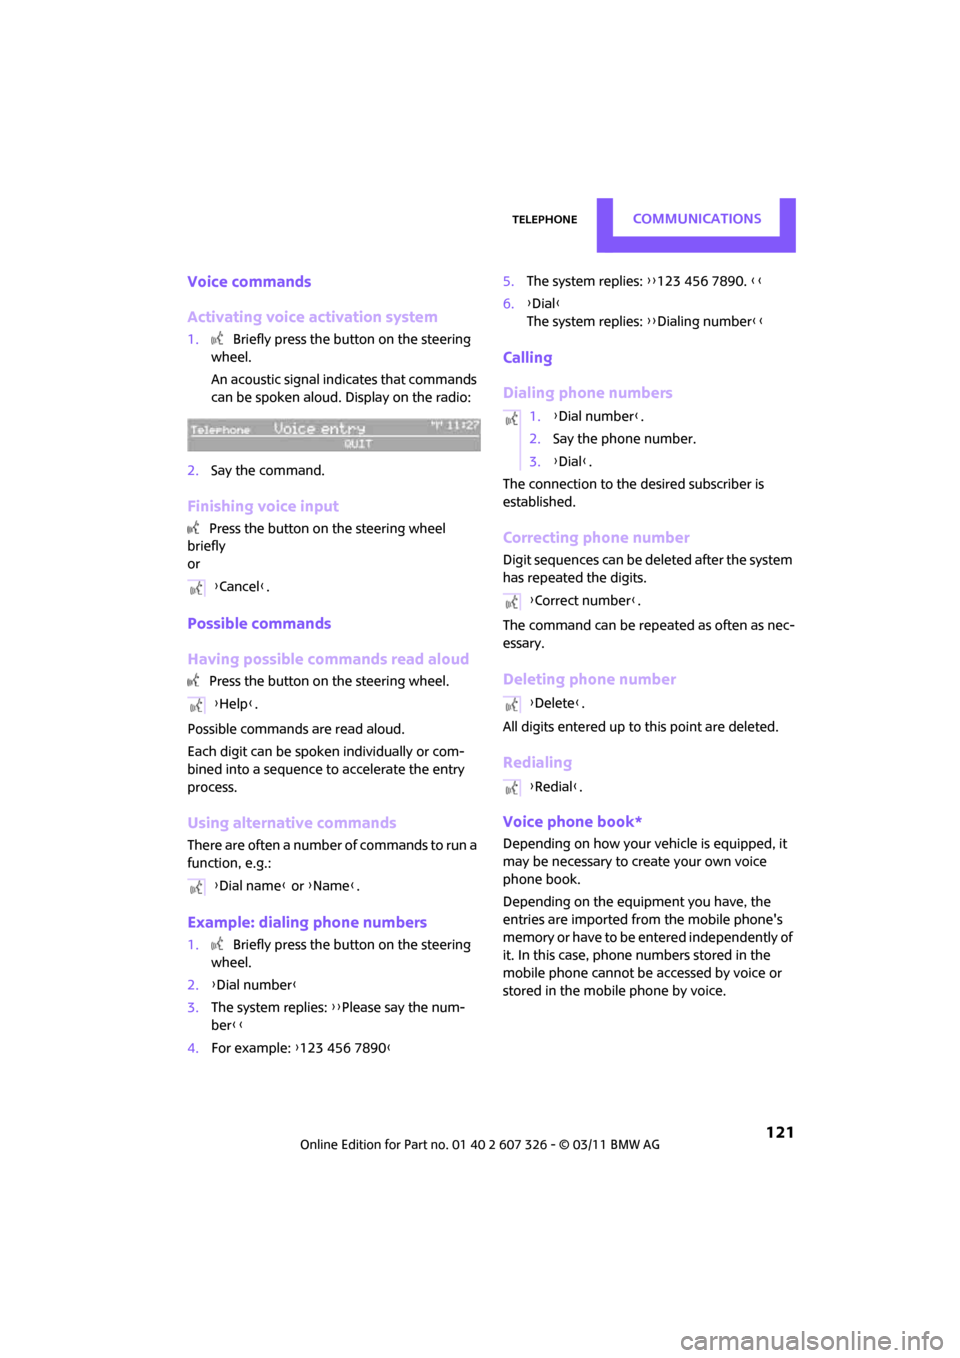
Activating voice activation system
1. Briefly press the button on the steering
wheel.
An acoustic signal in dicates that commands
can be spoken aloud. Display on the radio:
2. Say the command.
Finishing voice input
Press the button on the steering wheel
briefly
or
Possible commands
Having possible commands read aloud
Press the button on the steering wheel.
Possible commands are read aloud.
Each digit can be spoken individually or com-
bined into a sequence to accelerate the entry
process.
Using alternative commands
There are often a number of commands to run a
function, e.g.:
Example: dialing phone numbers
1. Briefly press the button on the steering
wheel.
2. {Dial number }
3. The system replies: {{Please say the num-
ber }}
4. For example: {123 456 7890 } 5.
The system replies: {{123 456 7890. }}
6. {Dial }
The system replies: {{Dialing number}}
Calling
Dialing phone numbers
The connection to the desired subscriber is
established.
Correcting phone number
Digit sequences can be de leted after the system
has repeated the digits.
The command can be repeated as often as nec-
essary.
Deleting phone number
All digits entered up to this point are deleted.
Redialing
Voice phone book*
Depending on how your vehicle is equipped, it
may be necessary to create your own voice
phone book.
Depending on the equipment you have, the
entries are imported from the mobile phone's
memory or have to be entered independently of
it. In this case, phone numbers stored in the
mobile phone cannot be accessed by voice or
stored in the mobile phone by voice.
{
Cancel }.
{ Help }.
{ Dial name } or {Name }.
1.{Dial number }.
2. Say the phone number.
3. {Dial }.
{ Correct number }.
{ Delete }.
{ Redial }.
Page 124 of 196

COMMUNICATIONSTelephone
122
Storing the input
Deleting input
Deleting all inputs
Reading entries and selecting
Selecting an entry
Adjusting volume
Turn knob during announcement.
>The volume remains the same, even if the
volume of other audi o sources is changed.
> The volume is stored for the remote control
currently in use.
Notes
Do not use the voice activation system to initiate
an emergency call. In stressful situations, the
voice and vocal pitch can change. This can
unnecessarily delay the establishment of a tele-
phone connection.
Ambient conditions
> Say the commands, numbers and letters
smoothly and with normal volume, empha-
sis and speed.
> Always say the commands in the language
of the system.
> Keep doors, windows, glass sunroof
*/pan-
oramic sunroof
*, or convertible top* closed
to avoid noise interference.
> Avoid ambient noise in the vehicle while
speaking.
MINI contact*
When the ignition is on, several dealer phone
numbers can be displayed.
>"Road Assist": roadside service
*, if you
require assistance in th e event of a flat tire.
> "Service": MINI dealer, for example if you
need to make a service appointment.
> "Cust Relat": MINI Hotline
* for information
about your vehicle.
Displaying phone numbers
1. MENU Press the button.
2. Press the button.
3. Turn the right rotary knob until the desired
phone number is displayed.
1.
{Save name }.
2. Say the name aloud. Do not exceed a
speaking duration of about 2 seconds.
3. Say the phone number after being
prompted to do so by the system.
4. {Save }.
1. {Delete name }.
2. Say the name when prompted.
3. Confirm the query with {Yes }.
1. {Delete phonebook }.
The dialog for deleting phone book is
opened.
2. Confirm the query with {Yes }.
3. Confirm the query again with {Yes }.
1. {Read phonebook }.
The dialog for reading phone book is
opened.
2. Say {Dial number } when the desired
entry is read.
1. {Dial name }.
2. Say the name when prompted.
3. Confirm the query with {Yes }.
Page 125 of 196
TelephoneCOMMUNICATIONS
123
Snap-in adapter*
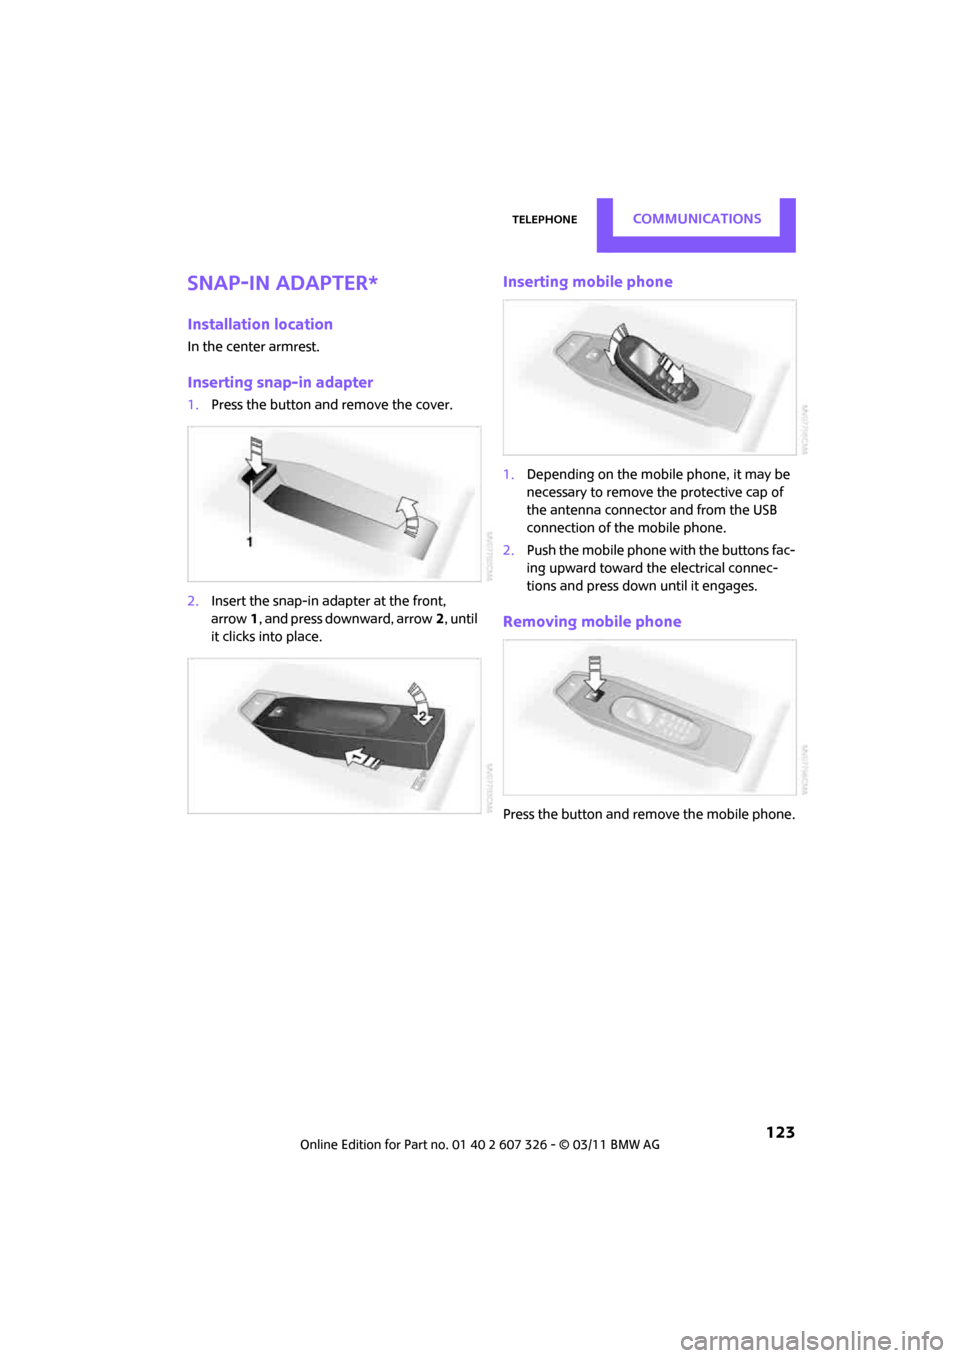
Installation location
In the center armrest.
Inserting snap-in adapter
1.Press the button an d remove the cover.
2. Insert the snap-in adapter at the front,
arrow 1, and press downward, arrow 2, until
it clicks into place.
Inserting mobile phone
1. Depending on the mobile phone, it may be
necessary to remove the protective cap of
the antenna connector and from the USB
connection of the mobile phone.
2. Push the mobile phone with the buttons fac-
ing upward toward the electrical connec-
tions and press down until it engages.
Removing mobile phone
Press the button and remove the mobile phone.
Page 126 of 196
Move Me.
Page 127 of 196
AT A GLANCE
CONTROLS
DRIVING TIPS
ENTERTAINMENT
COMMUNICATIONS
REFERENCE MOBILITY
Page 128 of 196

MOBILITYRefueling
126
Refueling
Switch off the engine before refueling;
otherwise, fuel cannot be added to the
tank and a message will be displayed. <
Take all precautionary measures and
observe all applicable regulations when
handling fuel. Do not carry any spare fuel con-
tainers in your vehicle. They can develop a leak
and cause an explosion or cause a fire in the
event of an accident. <
Fuel filler flap
Opening
1.Open the fuel filler flap.
2. Turn the fuel cap counterclockwise.
3. Place the fuel cap in the bracket attached to
the fuel filler flap.
Closing
Fit the cap and turn it clockwise until you clearly
hear a click.
Do not pinch the band attached to the
cap; otherwise, the cap cannot be closed
properly and fuel vapors can escape. A message
will be displayed if the fuel cap is loose or miss-
ing. <
Manually releasing the fuel filler flap
In the event of an electrical malfunction, you can
manually release the fuel filler flap:
Pull on the green knob with the fuel pump sym-
bol; the fuel filler flap opens.
Observe the following when refueling
Take all precautionary measures and
observe all applicable regulations when
handling fuel; otherwise, there is a danger of
personal injury an d property damage. <
When refueling, insert the filler nozzle com-
pletely into the filler pipe . Avoid lifting the filler
nozzle while filling the tank, as that would lead
to
> Premature pump shutoff
> Reduced efficiency of the fuel-vapor recov-
ery system.
The fuel tank is full when the filler nozzle clicks
off the first time.
Fuel tank capacity
If the range displayed is less than
30 miles/50 km, be sure to refuel; other-
wise, engine functions are not guaranteed and
damage could occur. <
Approx. 13.2 US gal/50 liters, including the
reserve capacity of 2.1 US gal/8 liters.
Page 129 of 196

RefuelingMOBILITY
127
Fuel specifications
Fuels that are labeled at the pump as containing
metal may not be used.
Do not fill the tank with leaded gasoline or
gasoline that contains metal additives,
such as manganese or iron; otherwise, long term
damage to the catalytic converter or other com-
ponents may result.
Do not fill the tank with E85, i.e. fuel containing
85 % ethanol, nor with FlexFuel. Otherwise, the
engine and fuel supply system will be dam-
aged. <
Required fuel
Super premium gasoline/AKI 91
This gasoline is highly recommended.
However, you may also use gasoline with less
AKI. The minimum AKI rating is:
> Cooper S, John Cooper Works: 89
> Cooper: 87
If you use gasoline with this minimum AKI rating,
the engine may produce knocking sounds when
starting at high outsid e temperatures. This has
no effect on the engine life.
Do not use any gasoline below the speci-
fied minimum fuel grade. Otherwise, the
engine could be damaged. <
Use high-quality brands
Field experience has indicated significant differ-
ences in fuel quality: volatility, composition,
additives, etc., among ga solines offered for sale
in the United States and Canada. Fuels contain-
ing up to and including 10 % ethanol or other
oxygenates with up to 2.8 % oxygen by weight,
that is, 15 % MTBE or 3 % methanol plus an
equivalent amount of cosolvent, will not void
the applicable warranties with respect to defects
in materials or workmanship. The use of poor-quality fuels may result in
drivability, starting
and stalling problems
especially under certain environmental condi-
tions such as high am bient temperature and
high altitude.
Should you encounter drivability problems
which you suspect could be related to the fuel
you are using, we recommend that you respond
by switching to a recogn ized high-quality brand
such as gasoline that is advertised as Top Tier
Detergent Gasoline.
Failure to comply with these recommendations
may also result in un scheduled maintenance. <
Page 130 of 196

MOBILITYWheels and tires
128
Wheels and tires
Tire inflation pressures
Information for your safety
It is not merely the tires' service life, but also
driving comfort and, to a great extent, driving
safety that depend on the condition of the tires
and the maintenance of the specified tire pres-
sure.
Checking pressure
Check the tire inflation pressure regularly
and correct it, if necessary: at least twice a
month and before starting long trips. If you fail
to observe this precauti on you may be driving
on tires with incorrect ti re pressures, a condition
that can not only compromise your vehicle's
driving stability, but also l e a d t o t i r e d a m a g e a n d
the risk of an accident. Do not drive with
deflated, i.e. flat tires, except when using run-
flat tires. A flat tire will seriously impair your
vehicle's handling and braking response.
Att empt s to drive o n a flat t ire can lead to lo ss of
control over the vehicle. <
Check the tire inflation pressures only on cold
tires. This means after a maximum of 1.25 miles/
2 km driving or when the vehicle has been
parked for at least 2 hou rs. When tires are warm,
the tire inflation pressure is higher.
After adjusting the tire inflation pressure,
reinitialize the flat tire monitor, page 64,
or reset the Tire Pressure Monitor, page 66.<
Checking the tire inflation pressure of
the compact tire*
To check the inflation pressure, fold up the flat
load floor. Remove the onboard vehicle toolkit
and the space-saver sp are tire, refer to
page 154.
Inflation pressure specifications
The tables below provide all the correct inflation
pressures for the specified tire sizes at ambient
temperature.
The tire inflation pressures apply to the
tire sizes approved and the tire brands
recommended by the manufacturer of your
MINI. Your MINI dealer will be glad to advise
you. <
For correct identification of the right tire infla-
tion pressures, ob serve the following:
> Tire sizes for your vehicle
> Maximum allowable driving speed
Tire inflation pressures for driving up to
100 mph or 160 km/h
For normal driving up to 100 mph or 160 km/h
and to achieve optimum driving comfort, adjust
pressures to the respective tire inflation values
listed on the following pages in the columns for
traveling speeds up to a maximum of 100 mph
or 160 km/h.
These tire inflation pre ssures can also be found
on the driver's side door pillar when the driver's
door is open.
The maximum permitted speed for these
tire inflation pressures is 100 mph or
160 km/h. Do not exceed this speed; otherwise,
tire damage and accidents may occur. <