ESP MINI Clubman 2011 Owner's Guide
[x] Cancel search | Manufacturer: MINI, Model Year: 2011, Model line: Clubman, Model: MINI Clubman 2011Pages: 196, PDF Size: 3.08 MB
Page 77 of 196

LampsCONTROLS
75
High beams/
roadside parking lamps
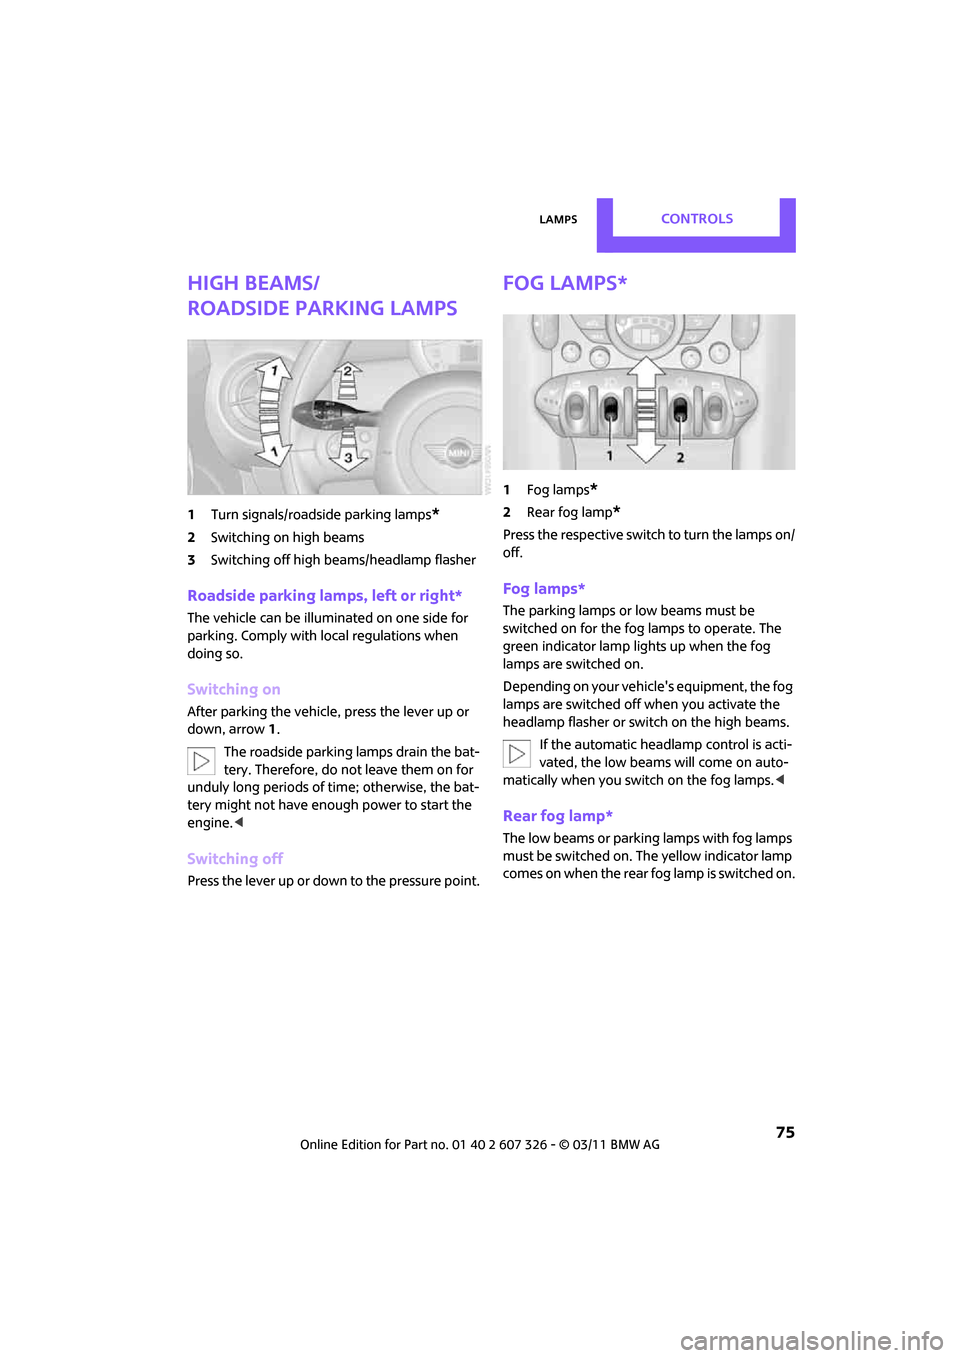
1Turn signals/roadside parking lamps*
2Switching on high beams
3 Switching off high be ams/headlamp flasher
Roadside parking lamps, left or right*
The vehicle can be illumi nated on one side for
parking. Comply with local regulations when
doing so.
Switching on
After parking the vehicle, press the lever up or
down, arrow 1.
The roadside parking lamps drain the bat-
tery. Therefore, do not leave them on for
unduly long periods of time; otherwise, the bat-
tery might not have enough power to start the
engine. <
Switching off
Press the lever up or down to the pressure point.
Fog lamps*
1Fog lamps*
2Rear fog lamp*
Press the respective switch to turn the lamps on/
off.
Fog lamps*
The parking lamps or low beams must be
switched on for the fog lamps to operate. The
green indicator lamp lights up when the fog
lamps are switched on.
Depending on your vehicle's equipment, the fog
lamps are switched off when you activate the
headlamp flasher or switch on the high beams.
If the automatic headlamp control is acti-
vated, the low beams will come on auto-
matically when you switch on the fog lamps. <
Rear fog lamp*
The low beams or parking lamps with fog lamps
must be switched on. The yellow indicator lamp
comes on when the rear fog lamp is switched on.
Page 85 of 196

Practical interior accessoriesCONTROLS
83
Practical interior accessories
Integrated universal
remote control*
The concept
The integrated universal remote control can
replace as many as three hand-held transmitters
for various remote-controlled devices, such as
garage and gate openers and lighting systems.
The integrated universal remote control regis-
ters and stores signals from the original hand-
held transmitters.
The signal of an original hand-held transmitter
can be programmed on one of the three mem-
ory buttons 1. The system in question can then
be operated by means of the programmed
memory button 1. The LED 2 flashes to confirm
transmission of the signal.
If you decide to sell your vehicle one day, in the
interest of your own secu rity, remember to clear
the stored programs before the vehicle leaves
your possession, page 84.
To prevent possible damage or injury,
before programming or using the inte-
grated universal remote control, always inspect
the immediate area to make certain that no
people, animals or objects are within the travel
range of the device. Comply also with the safety
instructions supplied with the original hand-held
transmitter. <
Checking compatibility
If this symbol appears on the package
or in the instructions supplied with the
original hand-held transmitter, you can
assume that the radio re mote control device is
compatible with the inte grated universal remote
control.
For additional information, please contact your
MINI dealer or call: 1-800-355-3515.
You can also obtain info rmation on the Internet
at: www.homelink.com
HomeLink is a registered trademark of Johnson
Controls, Inc.
Programming
1
Memory buttons
2 LED
Fixed-code hand-held transmitters
1.Switch on the ignition, page 41.
2. When starting operation for the first time:
press both outer memory buttons 1 for
approx. 20 seconds until the LED 2 flashes
rapidly. All stored programs are cleared.
3. Hold the original hand-held transmitter at a
distance of approx. 1 in/2.5 cm to 3 in/8 cm
from the memory buttons 1.
The required distance between the
hand-held transmitter and the mem-
ory buttons 1 depends on the system of the
respective original hand-held transmitter
used. <
4. Simultaneously press the transmit key on
the original hand-held transmitter and the
desired memory button 1 on the integrated
universal remote control. The LED 2 flashes
slowly at first. As soon as the LED 2 flashes
rapidly, release both buttons. If the LED 2
does not flash rapidly after approx.
60 seconds, alter the distance and repeat
this step.
Page 86 of 196

CONTROLSPractical interior accessories
84
Canada: if the LED is not flashing rapidly
after 60 seconds, chan ge the distance and
repeat the step or, if the programming was
interrupted by the hand-held transmitter,
press and hold the memory button and
press the button on the hand-held transmit-
ter for 2 seconds and release several times.
5. To program other original hand-held trans-
mitters, repeat steps 3 and 4.
The corresponding memory button1 is now
programmed with the signal of the original
hand-held transmitter.
You can operate the system with the engine
running or with the ignition switched on.
If the system fails to function even after
repeated programming, check whether
the original hand-held transmitter uses an alter-
nating-code system. To do so, either read the
instructions for the orig inal hand-held transmit-
ter or hold down the programmed memory
button 1 of the integrated universal remote con-
trol. If the LED 2 for the integrated universal
remote control quickly flashes for a short period
of time and is then co ntinuously on, then the
original hand-held transm itter is equipped with
an alternating-code system . If it uses an alter-
nating-code system, program the memory
buttons 1 as described under Alternating-code
hand-held transmitters. <
Alternating-code hand-held
transmitters
To program the integrat ed universal remote
control, consult the oper ating instructions for
the device to be set. You will find information
there on the possibilities for synchronization or
programming of additional hand-held transmit-
ters.
When programming hand-held transmitters that
employ an alternating code, please observe the
following supplementary instructions:
Programming will be easier with the aid of
a second person. < 1.
Park your vehicle within the range of the
remote-controlled device.
Do not exceed the 164 ft/50 m range
of the remote-controlled device.
2. Program the integrated universal remote
control as described above in the section
Fixed-code hand-held transmitters.
3. Locate the button on the receiver of the
device to be set, e.g. on the drive unit.
4. Press the button on the receiver of the
device to be set. After Step 4, there remain
approx. 30 seconds for Step 5.
5. Press and hold the programmed memory
button 1 on the integrated universal remote
control for approx. 3 seconds.
If necessary, repeat the step up to three
times.
The corresponding memory button1 is now
programmed with the signal of the original
hand-held transmitter.
Clearing stored programs
Press both outer memory buttons 1 for approx.
20 seconds until the LED 2 flashes: all stored
programs are cleared.
It is not possible to clear individual programs.
Reassigning individual programs
1. Hold the original hand-held transmitter at a
distance of approx. 1in/2.5cm to 3in/8cm
from the memory buttons 1.
The required distance between the
hand-held transmitter and the mem-
ory buttons 1 depends on the system of the
respective original hand-held transmitter
used. <
2. Press the desired memory button 1 of the
integrated universal remote control.
If the LED 2 flashes slowly after approx.
20 seconds, press the transmit key of the
original hand-held transmitter and release
both buttons as soon as the LED 2 flashes
rapidly.
Page 93 of 196

Things to remember when drivingDRIVING TIPS
91
Hydroplaning
When driving on wet or slushy roads,
reduce road speed. If you do not, a wedge
of water can form betw een tires and road sur-
face. This situation, known as hydroplaning, can
cause partial or complete loss of tire contact
with the road surface, so that the car cannot be
steered or braked properly. <
The risk of hydroplaning increases with declining
tread depth on the tires, refer also to Tread
depth on page 133.
Driving through water
Drive through water on the road only if it is
not deeper than 1 ft/30 cm, and then only
at walking speed at the most. Otherwise, the
vehicle's engine, the electrical systems and the
transmission may be damaged. <
Parking brake on inclines
On inclines, do not hold the vehicle with
the clutch; use the parking brake. Other-
wise, greater clutch wear will result. <
For information on drivin g off using Hill Assist,
refer to page 63.
Braking safely
Your MINI is equipped with ABS. If you are in a
situation which requires full braking, it is best to
brake using maximum brake pressure. Since the
vehicle maintains steeri ng responsiveness, you
can still avoid possible obstacles with a mini-
mum of steering effort.
The pulsation of the brake pedal, together with
the sound of hydraulic regulation, indicates that
ABS is functioning properly.
Objects in the move ment range of the
pedals
Keep floor mats, carpet, and other objects
out of the movement range of the pedals;
otherwise, they may inhibit the function of the
pedals during driving.
Do not place additional floor mats onto an exist-
ing one or onto other objects. Only use floor mats that
have been approved for
the vehicle and can be appropriately fastened.
Make sure that the floo r mats are securely fas-
tened again after they have been removed, e.g.
for cleaning. <
Driving in wet conditions
When roads are wet or ther e is heavy rain, briefly
exert gentle pressure on the brake pedal every
few miles. Monitor traffic conditions to ensure
that this maneuver does not endanger other
road users. The heat generated in this process
helps dry the pads and rotors to ensure that
Then full braking force will be immediately avail-
able when it is needed.
Hills
To prevent overheatin g and the resulting
reduced efficiency of the brake system,
drive long or steep downhill gradients in the
gear in which the least braking is required. Even
light but consistent brake pressure can lead to
high temperatures, brake wear and possibly
even brake failure. <
You can increase the engine's braking effect by
shifting down, all the way to first gear if neces-
sary. This strategy helps you avoid placing
excessive loads on the brake system. Downshift-
ing in manual mo de of the automatic transmis-
sion, page 45.
Never drive with the clutch held down,
with the transmission in neutral or with
the engine switched off; otherwise, engine brak-
ing action will not be present or there will be no
power assistance to th e brakes or steering.
Never allow floor mats, carpets or any other
objects to protrude into the area around the
pedals; otherwise, pedal function could be
impaired. <
Corrosion on brake rotors
When the vehicle is driven only occasionally,
during extended periods when the vehicle is not
used at all, and in operating conditions where
brake applications are less frequent, there is an
Page 94 of 196

DRIVING TIPSThings to remember when driving
92
increased tendency for corrosion to form on
rotors, while contaminan ts accumulate on the
brake pads. This occurs because the minimum
pressure which must be exerted by the pads
during brake applications to clean the rotors is
not reached.
Should corrosion form on the brake rotors, the
brakes will tend to respond with a pulsating
effect that even extended application will fail to
cure.
When the vehicle is parked
Condensation forms while the automatic climate
control is in operation, and then exits under the
vehicle. Traces of condensed water under the
vehicle are therefore normal.
In the MINI Cooper S, the coolant pump may
continue to run for some time after the engine is
switched off. This will generate noise in the
engine compartment.
Cargo loading
To avoid loading the tires beyond their
approved carrying ca pacity, never over-
load the vehicle. Overloading can lead to over-
heating and increases the rate at which damage
develops inside the tires. The ultimate result can
assume the form of a sudden blowout. <
Avoid fluid spills in the cargo area as they
could damage the vehicle. <
Luggage compartment roller cover
Do not place heavy or hard objects on the
luggage compartment roller cover. If you
do so, they may already po se a danger to vehicle
occupants during braking or evasive maneuvers.
Do not allow the luggage compartment roll-up
cover to snap back, ot herwise it can be dam-
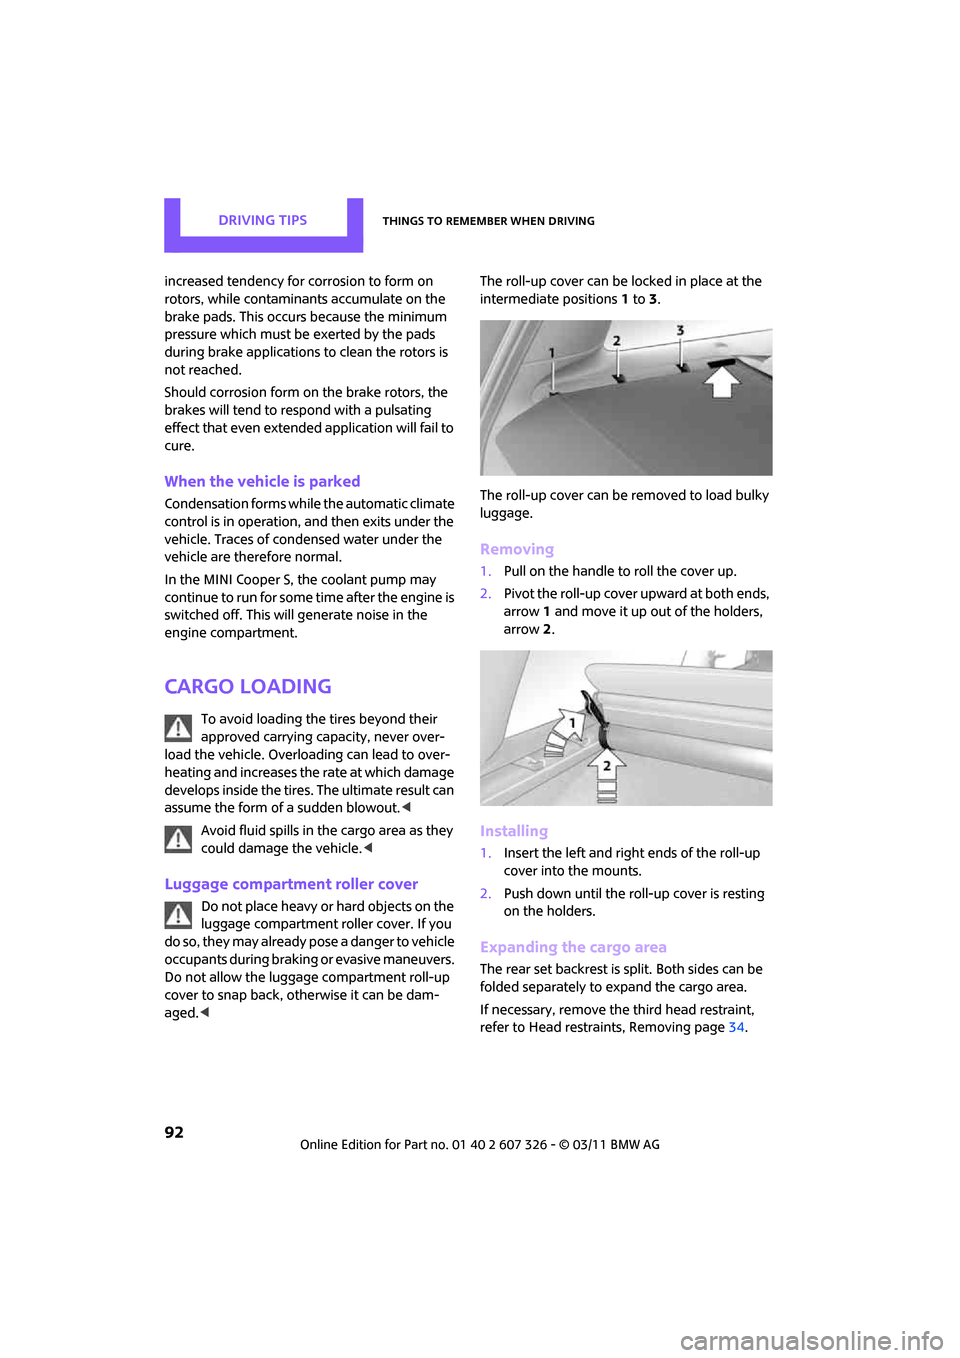
aged. < The roll-up cover can be locked in place at the
intermediate positions
1to 3.
The roll-up cover can be removed to load bulky
luggage.
Removing
1. Pull on the handle to roll the cover up.
2. Pivot the roll-up cover upward at both ends,
arrow 1 and move it up out of the holders,
arrow 2.
Installing
1. Insert the left and right ends of the roll-up
cover into the mounts.
2. Push down until the roll-up cover is resting
on the holders.
Expanding the cargo area
The rear set backrest is split. Both sides can be
folded separately to expand the cargo area.
If necessary, remove th e third head restraint,
refer to Head restraints, Removing page 34.
Page 95 of 196

Things to remember when drivingDRIVING TIPS
93
By way of example, the illustration shows the
cargo compartment in the MINI.
1. Pull the lever.
2. Fold rear seat backrests forward.
When folding the backrest back up, make
sure that the seat's locking mechanisms
engage properly. Otherwise, cargo could be
thrown around in the event of sharp braking or
swerving and endanger the occupants. <
Adjusting rear seat backrest*
Expand the cargo area by raising the rear seat
backrests to a steeper angle.
By way of example, the illustration shows the
cargo compartment in the MINI.
1. Pull the lever, arrow 1, and fold the rear seat
backrest forward.
2. Fold up the lever of the backrest lock until it
audibly engages, arrow 2.
3. Fold back the backrest until it engages.
If the rear seat backrests are positioned at
a steeper angle, do not install child
restraint systems in the rear of the vehicle as
their protective features may be ineffective. <
Cargo net*
Ensure that the cargo net is firmly
attached; otherwise, injuries may occur.<
The cargo net can be mounted in the cargo area
or behind the front seats.
In the cargo area
1. Fold the rear seat backrest forward if neces-
sary, page 93.
2. Insert each cargo net mounting pin all the
way into its respective rear mount in the
headliner, arrow 1, and push it forward.
3. Hang the hooks of the cargo net into the
eyelets on the rear cargo well, arrow 2.
Behind the front seats
1. Fold down the rear seat backrests, refer to
Expanding the cargo area.
2. Insert each cargo net mounting pin all the
way into its respective front mount in the
headliner, arrow 1, and push it forward.
3. Fold up the eyelets on the rear seat and
hook the cargo net into them, arrow 2.
Page 97 of 196

Things to remember when drivingDRIVING TIPS
95
Stowing cargo
>Position heavy objects as low and as far for-
ward as possible, ideally directly behind the
rear seat backrests.
> Cover sharp edges and corners.
> For very heavy cargo when the rear seat is
not occupied, secure each safety belt in the
respective opposite buckle.
> Do not stack higher than the top edge of the
backrests.
> Use the cargo net, refer to page 93. Ensure
that no objects can penetrate through the
net.
Securing cargo
By way of example, the illustration shows the
cargo compartment in the MINI.
> Secure smaller and lighter items using
retaining or draw straps
*.
> Heavy-duty cargo straps
* for securing larger
and heavier objects ar e available at your
MINI dealer. Four lashing eyes are provided
for attaching the cargo straps. Two of them
are located on the forward wall of the cargo
area. Comply with the information enclosed with
the load-securing devices.
Always position and secure the cargo as
described above, so that it cannot endan-
ger the car's occupants, for example if sudden
braking or swerves are necessary.
Do not exceed the approved gross vehicle
weight and axle loads, page 178; otherwise, the
vehicle's operating safety is no longer assured
and the vehicle will not be in compliance with
the construction and use regulations.
Heavy or hard objects should not be carried
loose inside the car, since they could be thrown
around, for example as a re sult of heavy braking,
sudden swerves, etc., and endanger the occu-
pants. Do not secure ca rgo using the fastening
points for the tether strap, page 39; they may
become damaged. <
Roof-mounted luggage
rack*
A special rack system is available as an option for
your MINI. Your MINI dealer will be glad to
advise you. Comply with the installation instruc-
tions supplied with the rack system.
Mounting points
By way of example, the illustration shows the
roof of the MINI.
Remove the cover panel.
Page 98 of 196

DRIVING TIPSThings to remember when driving
96
Loading roof-mounted luggage rack
Because roof racks raise the vehicle's center of
gravity when loaded, they have a major effect
on vehicle handling and steering response.
You should therefore always remember not to
exceed the approved roof load capacity, the
approved gross vehicle weight or the axle loads
when loading the rack.
You can find the applicable data under Weights
on page 178.
The roof load must be distributed uniformly and
should not be too large in area. Heavy items
should always be placed at the bottom.
When loading, make sure that there is sufficient
space for the movement of the glass roof.
Fasten roof-mounted cargo correctly and
securely to prevent it from shifting or falling off
during the trip.
Drive smoothly. Avoid su dden acceleration and
braking maneuvers, and take corners gently.
Saving fuel
Fuel consumption depends on a number of dif-
ferent factors. The implementation of certain
measures, your driving style and regular mainte-
nance can have an influence on fuel consump-
tion and on the environmental impact.
Remove unnecessary cargo
Additional weight incr eases fuel consumption.
Remove attached parts no longer in use
Remove auxiliary mirrors, roof- or rear-mounted
luggage racks whenever you are not using
them.
Attached parts on the ve hicle affect its aerody-
namics and increase fuel consumption.
Check tire inflation pressure regularly
Check and, if necessary, correct tire inflation
pressure at least twice a month and before start-
ing on a long trip. Low inflation pressure increases rolling resis-
tance and thus leads to greater fuel consump-
tion and tire wear.
Drive off immediately
Do not wait for the engine to warm up while the
vehicle remains stationary. Start driving right
away, but at moderate engi
ne speeds. This is the
fastest way for the cold engine to reach its oper-
ating temperature.
Think ahead while driving
Avoid unnecessary acceleration and braking by
maintaining a suitable di stance to the vehicle
driving ahead.
Driving smoothly and an ticipating impending
traffic situations reduces fuel consumption.
Avoid high engine speeds
Use first gear only for driving off. In second and
higher gears, accelerate smoothly to a suitable
engine and road speed. In doing so, avoid high
engine speeds and shift up early.
When you reach your desired traveling speed,
shift to the highest suit able gear and drive at
constant speed.
As a rule: driving at lo w engine speeds lowers
fuel consumption and reduces wear.
Coasting
When approaching a red traffic light, take your
foot off the accelerator and let the vehicle coast
to a halt in the highest suitable gear.
On a downhill gradient, take your foot off the
accelerator and let the vehicle coast in a suitable
gear.
Fuel supply is shut off automatically when the
vehicle is coasting.
Switch off the engine during lengthy
stops
Switch off the engine when stopping for lengthy
periods, e.g. at traffic li ghts, railroad crossings or
in traffic jams.
Page 102 of 196

ENTERTAINMENTRadio MINI Boost CD
100
Radio MINI Boost CD
Radio switching on/off
Press left rotary knob. The radio selects
the last selected audio source:
> Radio
> HD Radio
*
>Satellite radio*
>CD
> Wxternal audio device
> USB audio interface*.
Listening to the radi o with the ignition
off
After turning off the radi o, which was ready for
operation, the radio functions are available for
approx. 20 minutes.
The radio can also be turned on again.
To spare the battery, ensure that the radio
is turned off when leaving the vehicle. <
Adjusting volume
Press left rotary knob. The setting is
saved for the currently used remote
control.
As soon as you make a phone call using
the hands-free device, the radio is auto-
matically muted. <
Setting the volume for the PDC* and bell
You can raise or lower the volume of the audio
signals for the PDC or bell with respect to the vol-
ume of the audio sources.
The audio signals have fixed minimum and max-
imum volumes, which they can not fall below or
exceed. Set the audio source to a high volume
level to be able to better set the volume of
the audio signal. <
1. Press the button.
2. Press the button if necessary.
3. button
or
Press the button.
4. Select the desired volume and press the but-
ton on the right.
Setting the speed-dependent volume
As the speed increases, the speed-dependent
volume controls automatically increase the vol-
ume. You can set different levels for increasing
the volume.
1. Press the button.
2. Press the button if necessary.
3. Press the button.
4. Select the desired volume and press the but-
ton on the right.
Setting the volume for external audio
devices
Your radio has the ability to connect to an exter-
nal audio device, such as an MP3 player, and to
output the sound through your car speakers.
You can adjust the volume using the radio.
To connect an extern al device, refer to
page 108.
Page 103 of 196

Radio MINI Boost CDENTERTAINMENT
101
To adjust the volume of an external audio device
to the radio:
1. MODE Press button.
2. Press the button.
3. Press the button.
4. Select the desired volume and press the but-
ton on the right.
Tone control
You can select between the following settings:
>Bass: bass adjustment.
> Treble: treble adjustment.
> Balance: volume distribution left/right.
> Fader: volume distri bution front/back.
The tone settings are set for all audio sources at
once.
Setting the bass, treble and balance
1. Press the button.
2. Select the desired volume and press the but-
ton on the right.
3. Carry out the desired se ttings and press the
button on the right.
Resetting tone settings
The tone settings are reset to the middle value.
1. Press the button.
2. Press the button.
Time
Setting the time, date and time format
You may set the time, date and the time format,
refer to page 57.
Radio
You radio is designed for the reception of FM
and AM signals.
To listen to the radio
1.Turn on the radio, refer to page 100.
2. MODE If necessary, press the button.
3. Press the button.
4. Press the corresponding button as
often as necessary until the desired wave-
length band is selected.
> AM: AM and AMA
> FM: FM1/FM2 and FMA
Selecting a station
The setting is stored for the remote control in
use.
Next station
… Press the button.
The next available st ation is selected.