MINI Clubman 2013 Repair Manual
Manufacturer: MINI, Model Year: 2013, Model line: Clubman, Model: MINI Clubman 2013Pages: 267, PDF Size: 3.63 MB
Page 61 of 267

CONTROLSControls overview
60
Settings and information
Operating principle
Certain settings and information are only avail-
able when the ignition is switched on, the vehi-
cle is at a standstill and the doors are closed.
1 Button for:
>Selecting display
> Setting values
> Confirming selected display or set values
> Calling up computer information 58
Exiting displays
1.Press the button in the turn signal lever
repeatedly until "HOME" is displayed.
2. Press the button for a longer period.
Current vehicle speed is once again displayed.
Displays are also exited if no entries are made
for approx. 8 seconds.
Next setting or item of information
1. While in a setting or information item, press
the button in the turn signal indicator
repeatedly until "NEXT" is displayed.
2. Press the button for a longer period.
The display changes direct ly to the next setting
or item of information.
Units of measure
To set the units of measure. The settings are
stored for the remote co ntrol currently in use,
refer also to Personal Profile on page 26.
SymbolFunction
Adjusting rain sensor53
Calling up Check
Control 63
Exiting the menu
00320051004F004C00510048000300280047004C0057004C005200510003
Page 62 of 267

Controls overviewCONTROLS
61
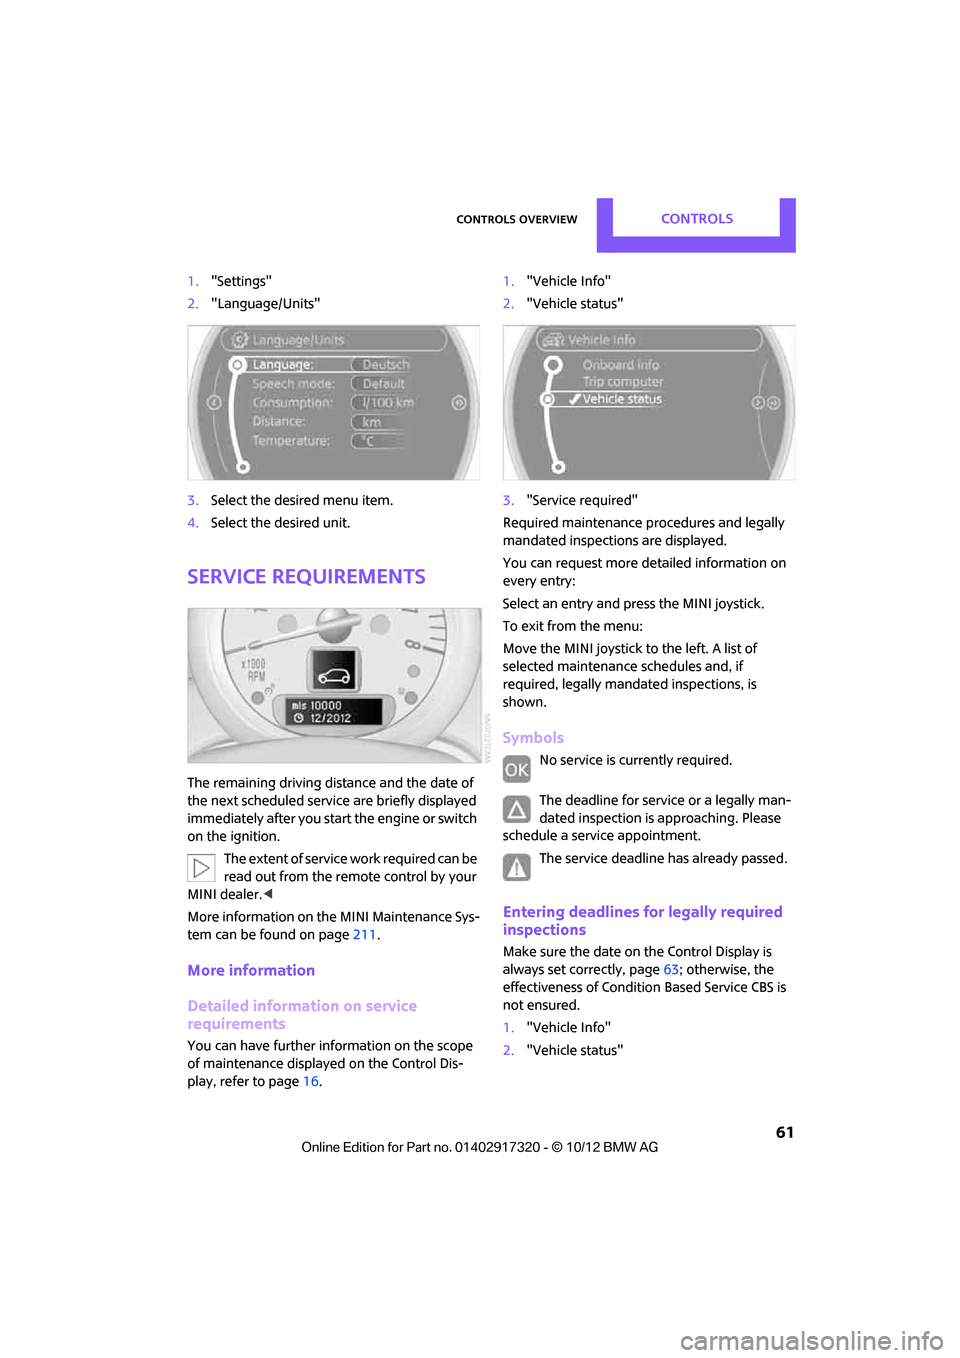
1."Settings"
2. "Language/Units"
3. Select the desired menu item.
4. Select the desired unit.
Service requirements
The remaining driving dist ance and the date of
the next scheduled service are briefly displayed
immediately after you start the engine or switch
on the ignition.
The extent of service work required can be
read out from the remo te control by your
MINI dealer. <
More information on th e MINI Maintenance Sys-
tem can be found on page 211.
More information
Detailed information on service
requirements
You can have further information on the scope
of maintenance displayed on the Control Dis-
play, refer to page 16. 1.
"Vehicle Info"
2. "Vehicle status"
3. "Service required"
Required maintenance procedures and legally
mandated inspections are displayed.
You can request more de tailed information on
every entry:
Select an entry and press the MINI joystick.
To exit from the menu:
Move the MINI joystick to the left. A list of
selected maintenance schedules and, if
required, legally mandated inspections, is
shown.
Symbols
No service is currently required.
The deadline for service or a legally man-
dated inspection is approaching. Please
schedule a service appointment.
The service deadline has already passed.
Entering deadlines for legally required
inspections
Make sure the date on the Control Display is
always set correctly, page 63; otherwise, the
effectiveness of Condition Based Service CBS is
not ensured.
1. "Vehicle Info"
2. "Vehicle status"
00320051004F004C00510048000300280047004C0057004C005200510003
Page 63 of 267

CONTROLSControls overview
62
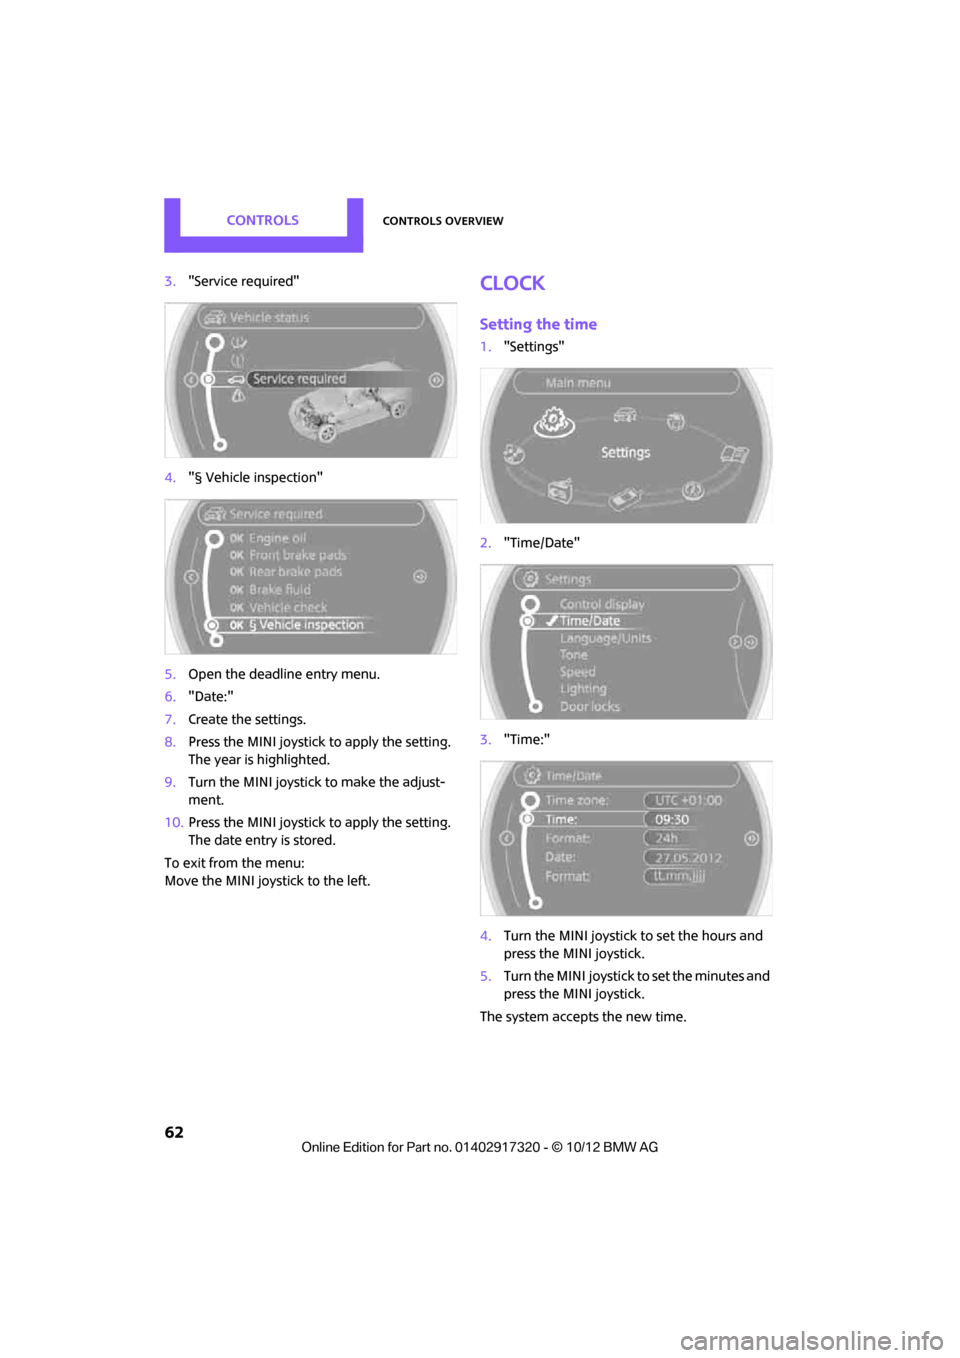
3."Service required"
4. "§ Vehicle inspection"
5. Open the deadline entry menu.
6. "Date:"
7. Create the settings.
8. Press the MINI joystick to apply the setting.
The year is highlighted.
9. Turn the MINI joystick to make the adjust-
ment.
10. Press the MINI joystick to apply the setting.
The date entry is stored.
To exit from the menu:
Move the MINI joystick to the left.Clock
Setting the time
1. "Settings"
2. "Time/Date"
3. "Time:"
4. Turn the MINI joystick to set the hours and
press the MINI joystick.
5. Turn the MINI joystick to set the minutes and
press the MINI joystick.
The system accepts the new time.
00320051004F004C00510048000300280047004C0057004C005200510003
Page 64 of 267

Controls overviewCONTROLS
63
Setting the time format
The settings are stored for the remote control
currently in use, refer also to Personal Profile on
page 26.
1. "Settings"
2. "Time/Date"
3. "Format:"
4. Select the desired format and press the MINI
joystick.
The time format is stored.
Setting time zone
1. "Settings"
2. "Time/Date"
3. "Time zone:"
4. Turn MINI joystick until the desired time
zone is set and press the MINI joystick.
The time zone is stored.
Date
Setting date
1."Settings"
2. "Time/Date"
3. "Date:"
4. Turn MINI joystick until the desired day is
displayed and press the MINI joystick.
5. Create the necessary settings for the month
and year.
The date is stored.
Setting the date format
1. "Settings"
2. "Time/Date" 3.
"Format:"
4. Select the desired format.
The settings are stored for the remote control
currently in use, refer also to Personal Profile on
page 26.
Check Control
The concept
The Check Control monitors vehicle functions
and alerts you to any malfunctions in the sys-
tems monitored. Check Control messages
involve indicator and warning lamps in the dis-
play and, in some circ umstances, an acoustic
signal as well as text messages at the bottom of
the Control Display.
Indicator and warning lamps
Indicator and warning lamps can light up in var-
ious combinations and colors in the indicator
areas 1 and 2.
00320051004F004C00510048000300280047004C0057004C005200510003
Page 65 of 267

CONTROLSControls overview
64
Text messages
Text messages at the upper edge of the Control
Display explain the mean ing of the displayed
indicator and warning lamps.
Supplemental text messages
For most Check Control messages, you can view
more information later, e.g. regarding the cause
of a malfunction and how to respond, refer to
page 65.
In urgent cases, this information will be shown
as soon as the corresponding lamp comes on.
Exit display:
"OK"
Hiding Check Control messages
Press the button in th e turn signal lever.
> Some Check Control me ssages are displayed
until the malfunctions have been rectified.
They cannot be hidden. If several malfunc-
tions occur at the same time, they are dis-
played in succession.
>They are marked with the symbol
shown here. >
Other Check Control messages are automat-
ically hidden after approx. 20 seconds, but
remain stored.
>They are marked with the symbol
shown here.
The symbol indicates that Check Control mes-
sages have been stor ed. Check Control mes-
sages can be viewed whenever it is convenient.
Viewing stored Check Control messages
Stored Check Control me ssages can only be dis-
played if the driver's door is closed.
1. Press the button in the turn signal indicator
as often as necessary until "SET/INFO" is dis-
played.
2. Press and hold the button until the display
changes.
00320051004F004C00510048000300280047004C0057004C005200510003
Page 66 of 267

Controls overviewCONTROLS
65
3.Press the button repeatedly until the corre-
sponding symbol and "CHECK INFO" appear
in the display.
4. Press and hold the button.
If there are no Check Control messages, then
"CHECK OK" is displayed.
If a Check Control messa ge has been stored,
the corresponding message is displayed. In
addition, the text message appears on the
Control Display.
5. Press the button to check for other mes-
sages.
Displaying on the onboard computer
1."Vehicle Info"
2. "Vehicle status"
3. "Check Control"
4. Select the text message.
5. Select a text message.
Speed limit
Enter a speed, and a Check Control message will
indicate when you reach this speed. This enables
you, for example, to receive warnings if you
exceed a speed limit in an urban area.
You are only warned of reaching this speed a
second time if your vehicle speed falls below it
again by at least 3 mph or 5 km/h.
Displaying, setting or changing the limit
1. "Settings"
2. "Speed"
3. "Warning at:"
4. Turn the MINI joystick to set the limit.
5. Press the MINI joystick to apply the setting.
The limit is stored.
Applying your current speed as limit
1. "Settings"
2. "Speed"
3. "Select current speed"
4. Press the MINI joystick.
The system adopts your current speed as the
limit.
00320051004F004C00510048000300280047004C0057004C005200510003
Page 67 of 267

CONTROLSControls overview
66
Activating/deactivating the limit
1."Settings"
2. "Speed"
3. "Warning"
4. Press the MINI joystick.
Altering settings
Language on the Control Display
You can set the language on the Control Display.
1."Settings"
2. "Language/Units"
3. "Language:" 4.
Select the desired language.
The setting is stored fo r the remote control cur-
rently in use.
Setting the voice dialog
Switch between a standa rd dialog and a short
dialog.
1. "Settings"
2. "Language/Units"
3. "Speech mode:"
4. Select the desired dialog.
The setting is stored fo r the remote control cur-
rently in use.
Brightness of the Control Display
The brightness is automa tically adapted to the
ambient lighting conditions. Note, however,
that you can change the basic setting while the
low beams are switched on. The setting is stored
for the remote control currently in use.
1. "Settings"
2. "Control display"
3. "Brightness"
00320051004F004C00510048000300280047004C0057004C005200510003
Page 68 of 267

Controls overviewCONTROLS
67
4.Turn the MINI joystick until the desired set-
ting is reached.
5. Press the MINI joystick.
The setting is stored for the remote control cur-
rently in use. In bright conditions, for example,
the brightness control may not be clearly visible.
00320051004F004C00510048000300280047004C0057004C005200510003
Page 69 of 267

CONTROLSTechnology for driving comfort and safety
68
Technology for driving comfort and
safety
Vehicle equipment
In this chapter, all production, country, and
optional equipment that is offered in the model
range is described. Equipment is also described
that is not available because of, for example,
selected options or coun try version. This also
applies to safety relate d functions and systems.
Park Distance Control
PDC
The concept
PDC assists you with parking in reverse. Acoustic
signals and a visual indi cator warn you of the
presence of an object behind the vehicle. To
measure the distance, there are four ultrasonic
sensors in either bumper.
These sensors have a range of approx.
6.5 ft/2 m. However, an acoustic warning
does not sound until an object is approx. 24 in/
60 cm from the rear corner sensors, or approx.
5 ft/1.50 m from the rear center sensors.PDC is a
parking aid that can indicate objects when they
are approached slowly, as is usually the case
when parking. Avoid appr oaching an object at
high speed; otherwise, physical circumstances
may lead to the system warning being issued
too late. <
Automatic mode
With the engine running or the ignition switched
on, the system is activated automatically after
approx. 1 second when you engage reverse
gear or move the automatic transmission selec-
tor lever to position R. Wait this short period
before driving.
Acoustic signals
As the distance between vehicle and object
decreases, the intervals between the tones
become shorter. If the distance to the nearest
object falls to below roughly 1 ft/30 cm, then a
continuous tone sounds.
If the distance remains co nstant, e.g. when driv-
ing parallel to a wall, the acoustic signal stops
after approx. 3 seconds.
Malfunction
Indicator lamp lights up. PDC has failed.
A message appears on the Control Dis-
play. Have the system checked.
To avoid this problem, keep the sensors clean
and free of ice or snow in order to ensure that
they will continue to operate effectively. When
using a high-pressure cleaner, do not direct the
jet toward the sensors for lengthy periods and
only spray from a distance of at least 4 in/10 cm.
PDC with visual warning
To have the system show distances to objects on
the Control Display. The contours of distant
objects are shown on the Control Display even
before the acoustic sign al sounds. The display
appears on the Control Display as soon as the
transmission is shifted into reverse or the selec-
tor lever is moved into the R position.
System limitations
Even with PDC, final responsibility for esti-
mating the distance between the vehicle
and any obstructions always remains with the
driver. Sensors, too, have blind spots in which
objects cannot be dete cted. Moreover, ultra-
sonic detection can reach its physical limits with
objects such as trailer tow bars and couplings,
thin and wedge-shaped objects, etc. Low
objects already indicated, such as curbs, may
00320051004F004C00510048000300280047004C0057004C005200510003
Page 70 of 267

Technology for driving comfort and safetyCONTROLS
69
enter the sensors' blind spots before or after a
continuous audible signal is given. Higher, pro-
truding objects, such as wall ledges, may not be
detectable. Therefore, always drive cautiously;
otherwise, there is a risk of personal injury or
property damage. Loud sound sources outside
or inside the car can drown out the PDC signal. <
Driving stability control
systems
Your MINI has a number of systems that help to
maintain the vehicle's st ability even in adverse
driving conditions.
The laws of physics cannot be repealed,
even with driving stability control systems.
An appropriate driving style always remains the
responsibility of the driver. Therefore do not
reduce the additional safety margin by engaging
in hazardous driving thereby running the risk of
an accident. <
Antilock Brake System ABS
ABS prevents locking of the wheels during brak-
ing. Safe steering respon se is maintained even
during full braking. Act ive safety is thus
increased.
Braking safely, refer to page 101.
ABS is operational every time you start the
engine.
Cornering Brake Control CBC
Driving stability and steering characteristics are
further enhanced while braking in turns or dur-
ing a lane change.
Electronic brake-forc e distribution EBV
The system controls the brake pressure in the
rear wheels to ensure stable braking behavior.
Brake Assist
Rapidly depressing the brake causes this system
to automatically develop maximum braking force. Thus, the system helps keep braking dis-
tance to a minimum. At the same time, all the
benefits provided by ABS are exploited.
Do not reduce the pressure on the brake for the
duration of the full braking application.
Dynamic Stability Control DSC
The concept
DSC prevents the driving wheels from losing
traction when you pull away from rest or accel-
erate.
DSC also detects unstable driving conditions
such as when the vehicle'
s rear end fishtails or
the vehicle is sliding on its front wheels. In these
cases, DSC helps the vehicle maintain a safe
course within physical limits by reducing engine
output and through brakin g actions at the indi-
vidual wheels.
Every time that the engine is started, DSC is
ready to operate.
Deactivating DSC
Press the button until the DSC OFF indicator
lamp on the speedometer is on and DSC OFF is
displayed on the tachometer. DSC is deacti-
vated. Stabilizing and propulsion promoting
actions are no longer executed.
When driving with snow chains or to 'rock free'
in snow, it can be helpfu l to switch off DSC for a
brief period.
To increase vehicle stability, activate DSC again
as soon as possible.
00320051004F004C00510048000300280047004C0057004C005200510003