brake sensor MINI Clubman 2013 Owner's Manual
[x] Cancel search | Manufacturer: MINI, Model Year: 2013, Model line: Clubman, Model: MINI Clubman 2013Pages: 267, PDF Size: 3.63 MB
Page 53 of 267

CONTROLSDriving
52
5.Move the selector lever into the desired
position by pressing the button on the front
of the selector lever.
Before manually unlo cking the selector
lever lock, firmly set the parking brake to
prevent the vehicle from rolling away. <
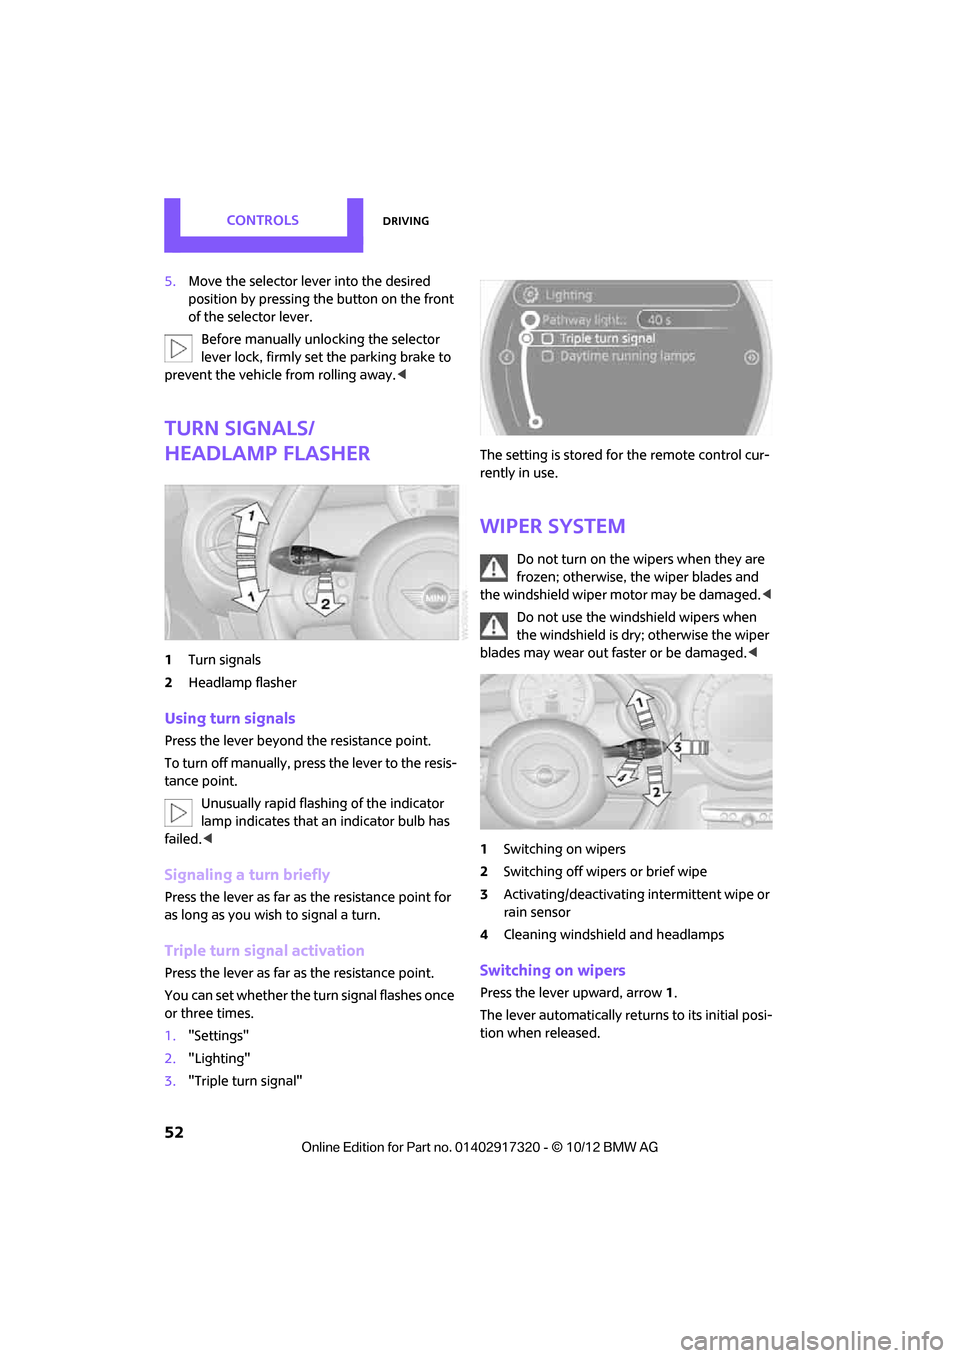
Turn signals/
headlamp flasher
1Turn signals
2 Headlamp flasher
Using turn signals
Press the lever beyond the resistance point.
To turn off manually, press the lever to the resis-
tance point. Unusually rapid flashing of the indicator
lamp indicates that an indicator bulb has
failed. <
Signaling a turn briefly
Press the lever as far as the resistance point for
as long as you wish to signal a turn.
Triple turn signal activation
Press the lever as far as the resistance point.
You can set whether the turn signal flashes once
or three times.
1."Settings"
2. "Lighting"
3. "Triple turn signal" The setting is stored fo
r the remote control cur-
rently in use.
Wiper system
Do not turn on the wipers when they are
frozen; otherwise, th e wiper blades and
the windshield wiper motor may be damaged. <
Do not use the windshield wipers when
the windshield is dry; otherwise the wiper
blades may wear out faster or be damaged.<
1 Switching on wipers
2 Switching off wipers or brief wipe
3 Activating/deactivating intermittent wipe or
rain sensor
4 Cleaning windshield and headlamps
Switching on wipers
Press the lever upward, arrow 1.
The lever automatically returns to its initial posi-
tion when released.
00320051004F004C00510048000300280047004C0057004C005200510003
Page 70 of 267

Technology for driving comfort and safetyCONTROLS
69
enter the sensors' blind spots before or after a
continuous audible signal is given. Higher, pro-
truding objects, such as wall ledges, may not be
detectable. Therefore, always drive cautiously;
otherwise, there is a risk of personal injury or
property damage. Loud sound sources outside
or inside the car can drown out the PDC signal. <
Driving stability control
systems
Your MINI has a number of systems that help to
maintain the vehicle's st ability even in adverse
driving conditions.
The laws of physics cannot be repealed,
even with driving stability control systems.
An appropriate driving style always remains the
responsibility of the driver. Therefore do not
reduce the additional safety margin by engaging
in hazardous driving thereby running the risk of
an accident. <
Antilock Brake System ABS
ABS prevents locking of the wheels during brak-
ing. Safe steering respon se is maintained even
during full braking. Act ive safety is thus
increased.
Braking safely, refer to page 101.
ABS is operational every time you start the
engine.
Cornering Brake Control CBC
Driving stability and steering characteristics are
further enhanced while braking in turns or dur-
ing a lane change.
Electronic brake-forc e distribution EBV
The system controls the brake pressure in the
rear wheels to ensure stable braking behavior.
Brake Assist
Rapidly depressing the brake causes this system
to automatically develop maximum braking force. Thus, the system helps keep braking dis-
tance to a minimum. At the same time, all the
benefits provided by ABS are exploited.
Do not reduce the pressure on the brake for the
duration of the full braking application.
Dynamic Stability Control DSC
The concept
DSC prevents the driving wheels from losing
traction when you pull away from rest or accel-
erate.
DSC also detects unstable driving conditions
such as when the vehicle'
s rear end fishtails or
the vehicle is sliding on its front wheels. In these
cases, DSC helps the vehicle maintain a safe
course within physical limits by reducing engine
output and through brakin g actions at the indi-
vidual wheels.
Every time that the engine is started, DSC is
ready to operate.
Deactivating DSC
Press the button until the DSC OFF indicator
lamp on the speedometer is on and DSC OFF is
displayed on the tachometer. DSC is deacti-
vated. Stabilizing and propulsion promoting
actions are no longer executed.
When driving with snow chains or to 'rock free'
in snow, it can be helpfu l to switch off DSC for a
brief period.
To increase vehicle stability, activate DSC again
as soon as possible.
00320051004F004C00510048000300280047004C0057004C005200510003
Page 214 of 267

CareMOBILITY
213
Care
Vehicle equipment
In this chapter, all production, country, and
optional equipment that is offered in the model
range is described. Equipment is also described
that is not available because of, for example,
selected options or count ry version. This also
applies to safety related functions and systems.
Car-care products
Regular cleaning and care helps to maintain the
value of your MINI.
The manufacturer of your MINI recommends
using manufacturer-approved products to clean
and care for your vehicle.
Your MINI dealer would be pleased to advise
you on cleaning and care products and services
for your MINI.
The ingredients of original MINI Care Prod-
ucts have been tested, and the products
have been tested in the laboratory and in prac-
tice. They offer optimum care and protection for
your vehicle.<
Do not use any cleansers containing alco-
hol or solvents as these may cause dam-
age. <
Cleaning agents may contain hazardous
or health-damaging substances. Follow
the warning and hazard instructions on the
packaging. For interior cleaning, always open
the doors or windows of the vehicle.
Do not use any products that are not intended
for cleaning the vehicle. <
External care
Washing your vehicle
Especially during the winter months the
vehicle should be frequently washed. Dirt
and road salt can damage the vehicle.<
After washing the vehicle, apply the
brakes briefly to dry them; otherwise,
water can reduce braking efficiency over the
short term and the brake rotors can corrode. <
Regularly open the hood and clear out any
debris such as leaves th at may have collected in
the region of the windshield.
Car washes
Preference should be given to cloth car washes.
Do not use automatic high-pressure car
washes; otherwise, water may drip into
the vehicle around the windows. <
Before driving into the car wash, check if the sys-
tem is suitable for your MINI. Observe the fol-
lowing points:
> Vehicle dimensions, page 239.
> If necessary: fold in the outside mirrors,
page 42.
> Maximum permissible tire width.
Avoid car washes with tracks higher than
4 in/10 cm; otherwise, the chassis could
be damaged. <
Preparations for driving into the car wash:
> Unscrew the rod antenna.
> Deactivate the rain sensor to prevent unin-
tentional wiping.
> Deactivate rear window wiper and protect it
from damage. Ask the car wash operator
about measures that can be taken to protect
the wipers.
00320051004F004C00510048000300280047004C0057004C005200510003
Page 215 of 267

MOBILITYCare
214
>Remove additional atta chments, e.g. spoil-
ers or telephone antennas, if there is a pos-
sibility that they could be damaged.
> Insert the remote control into the ignition
lock.
Automatic transmission
Before driving into the car wash, make sure that
the vehicle can roll:
1.Place the remote control, even with Comfort
Access, in the ignition lock.
2. Move the selector lever to position N.
3. Release the parking brake.
4. Switch off the engine.
5. Insert the remote control in the ignition lock
so that the vehicle can roll.
Steam jets/high-pressure washers
When using steam jets or high-pressure
washers, make sure th at you maintain suf-
ficient distance from the vehicle and do not
exceed a maximum temperature of 140 7/
60 6 .
If the distance is too close, the pressure too high,
or the temperature too high, parts of the vehicle
can be damaged, or water can penetrate.
Observe the operating instructions for high-
pressure washers. <
Do not spray sensors such as Park Dis-
tance Control with high-pressure washers
for a long time or at a di stance of less than 1 ft/
30 cm. <
Manual washing
Use a great deal of water and, if necessary, car
shampoo when washing your car by hand. Clean
the vehicle with a sponge or a washing brush
applying a slight amount of pressure.
Before cleaning the windshield, deacti-
vate the rain sensor or turn off the ignition
to prevent unintentional wiping. <
Observe local regulations regarding wash-
ing vehicles by hand. <
Headlamps
Do not wipe dry and do not use abrasive or cor-
rosive cleaning agents. Remove dirt and con-
tamination, such as inse cts, by soaking with
shampoo and then washing with plenty of
water.
Do not remove accumulated ice and snow with
an ice scraper; use window deicers instead.
Windows
Clean the outside and inside of the windows and
mirrors with a window cleaner.
Do not clean the mirrors with cleaners
containing quartz. <
Wiper blades
Clean with soapy water and change regularly to
prevent the formation of streaks.
Wax, preservatives and dirt on the win-
dows cause streaks wh en the windshield
wipers are on, and can cause premature wear of
the wiper blades and interfere with the rain sen-
sor. <
Paintwork, care
Regular care helps your vehicle retain its value
and protects the paint from the long-term
effects of aggressive substances.
Environmental influences in areas with
increased air pollution or natural contaminants,
such as tree sap or pollen, can affect the vehicle
paintwork. It is therefore important to adjust the
frequency and extent of vehicle care corre-
spondingly.
Immediately remove any pa rticularly aggressive
substances, such as fuel that has overflowed, oil,
grease, brake fluid, or bird droppings; otherwise,
paint damage can be caused.
Removing paintwork damage
Depending on the severity of the damage,
immediately repair stone damage or
scratches to prevent rusting. <
00320051004F004C00510048000300280047004C0057004C005200510003
Page 216 of 267

CareMOBILITY
215
The manufacturer of the MINI recommends
repairing paint damage professionally according
to factory specifications with original MINI
paints.
Preservation
Preservation is necessary when water no longer
beads on the clean paint surface. To preserve
the paint, only use preservatives that contain
carnauba or synthetic waxes.
Rubber seals
Only treat with water or rubber care products.
Do not use silicon sprays or other silicon-
containing care products on rubber seals;
otherwise, noise and damage could occur. <
Chrome parts
Carefully clean vehicle parts such as the radiator
grill and door handles with copious quantities of
water and, if necessary, a shampoo additive,
especially when contaminated with road salt.
For additional treatment, use chrome polish.
Light alloy wheels
The system produces brake dust that collects on
the light alloy wheels. Clean them regularly with
acid-free wheel cleaner.
Do not use aggressive , acid-containing,
highly alkaline, or abrasive cleansers or
steam jets hotter than 140 7/60 6 as they may
cause damage. <
External sensors
Keep the outside sensors on the vehicle
such as the Park Di stance Control clean
and ice-free to ensure that they function prop-
erly. <
Internal care
Upholstery/fabrics
Regularly use a vacuum cleaner to remove sur-
face dirt.
In case of serious spots such as liquid stains, use
a soft sponge or lint-free microfiber cloth and
suitable interior cleane rs. Observe the instruc-
tions on the packaging.
Clean upholstery up to the seams. Do not
rub forcefully. <
Velcro fasteners on pants or other items of
clothing can damage seat covers. Make
sure that all Velcro fasteners are closed. <
Leather/leather coverings
The leather processed by the manufac-
turer of your MINI is a high-quality natural
product. Light variations in the grain is one of
the typical properties of natural leather. <
Dust and road grit in the pores and folds of the
leather have an abrasive effect, leading to
increased wear and causing the leather surface
to become brittle prematurely. Use a cloth or
vacuum cleaner to remove dust on a regular
basis.
Especially when the leather has a light color, it
should be cleaned regularl y since it tends to get
heavily soiled.
Treat the leather twice a year using a leather
lotion since dirt and grease will gradually attack
the leather's protective layer.
Carpets/floor mats
Keep floor mats, carp et, and other objects
out of the movement range of the pedals;
otherwise, they may inhi bit the function of the
pedals during driving.
Do not place additional floor mats onto an exist-
ing one or onto other objects.
Only use floor mats that have been approved for
the vehicle and can be appropriately fastened.
Make sure that the floo r mats are securely fas-
00320051004F004C00510048000300280047004C0057004C005200510003
Page 261 of 267

REFERENCEEverything from A to Z
260
P
Paintwork, care214
Park Distance Control PDC 68
Parking
– vehicle 48
Parking aid, refer to Park
Distance Control PDC 68
Parking brake 49
– indicator lamp 13
Parking lamps, replacing bulb 220
Parking lamps/low beams 81
Parts and accessories, see Vehicle equipment 4
Pathway lighting 82
Personal Profile 26
Phone numbers
– dialing 160,172
Pinch protection system
– windows 37
Plastic parts, care 216
Pollen
– refer to Microfilter/activated- charcoal filter for automatic
climate control 89
– refer to Microfilter for air conditioner 87
Power failure 230
Power windows 36
Power windows, refer to Windows 36
Pressure, tires 195
Pressure moni toring, tires71
– Flat Tire Monitor 71
Pressure monitoring of tires,
refer to Tire Pressure Monitor
TPM 74
Protective function, refer to
Pinch protection system
– windows 37
Puncture
– Flat Tire Monitor 71
R
Radio
– controls132
– HD Radio 136
– satellite radio 137
– select waveband 135
– storing stations 136
– tone control 133
– volume 133
Radio key, refer to Integrated key/remote control 26
Radio position, refer to Radio
readiness 47
Radio readiness 47
– switched off 48
– switched on 47
Rain sensor 53
Random play sequence
– external devices 148
Range, refer to Cruising range 58
Reading aloud 185
Reading lamps 84
Rear door, re fer to Club
Door 30
Rear doors, refer to Split Rear Barn Doors 31
Rear double doors, refer to Split Rear Barn Doors 31
Rear fog lamp 83
– indicator lamp 13
– replacing bulb 223
Rear lamps
– bulb replacement 222,223
Rear lamps, refer to Tail
lamps 222
Rear seat back rest, folding103
Rear seats
– folding down the backrests 103
Rearview mirror
– compass 92
Rearview mirror, refer to Mirrors 42
Rear window defroster 87,89 Reception
– quality
136
– radio station 136
Recirculated-air mode 86,88
Recirculation of air, refer to Recirculated-air
mode 86,88
Reclining seat , refer to
Backrest 39
Refueling 192
Rejecting a call 160,172
Rele asing
– hood 208
Reminders 184
Remote con
trol26
– battery renewal 35
– Comfort Access 33
– garage door opener 90
– malfunctions 29,35
– service data 211
– Split Rear Barn Doors 28
Replacement remote
control 26
Replacing bulbs, refer to Lamps and bulbs 219
Replacing tires, refer to New
wheels and tires 205
Reporting safety defects 7
Reserve warning, refer to Fuel gauge 57
Reservoir for washer systems 55
Reset, refer to Resetting tone
settings 134
Restraint systems
– for children 44
– refer to Safety belts 41
Reverse
– CD player 144
Reverse gear
– automatic transmission with Steptronic 50
– manual transmission 49
Road map 123
Roadside Assistance 231
Roadside parking lamps 83
– replacing bulb 220
00320051004F004C00510048000300280047004C0057004C005200510003