clock setting MINI Clubman 2014 Owner's Manual (Mini Connected)
[x] Cancel search | Manufacturer: MINI, Model Year: 2014, Model line: Clubman, Model: MINI Clubman 2014Pages: 276, PDF Size: 6.44 MB
Page 23 of 276
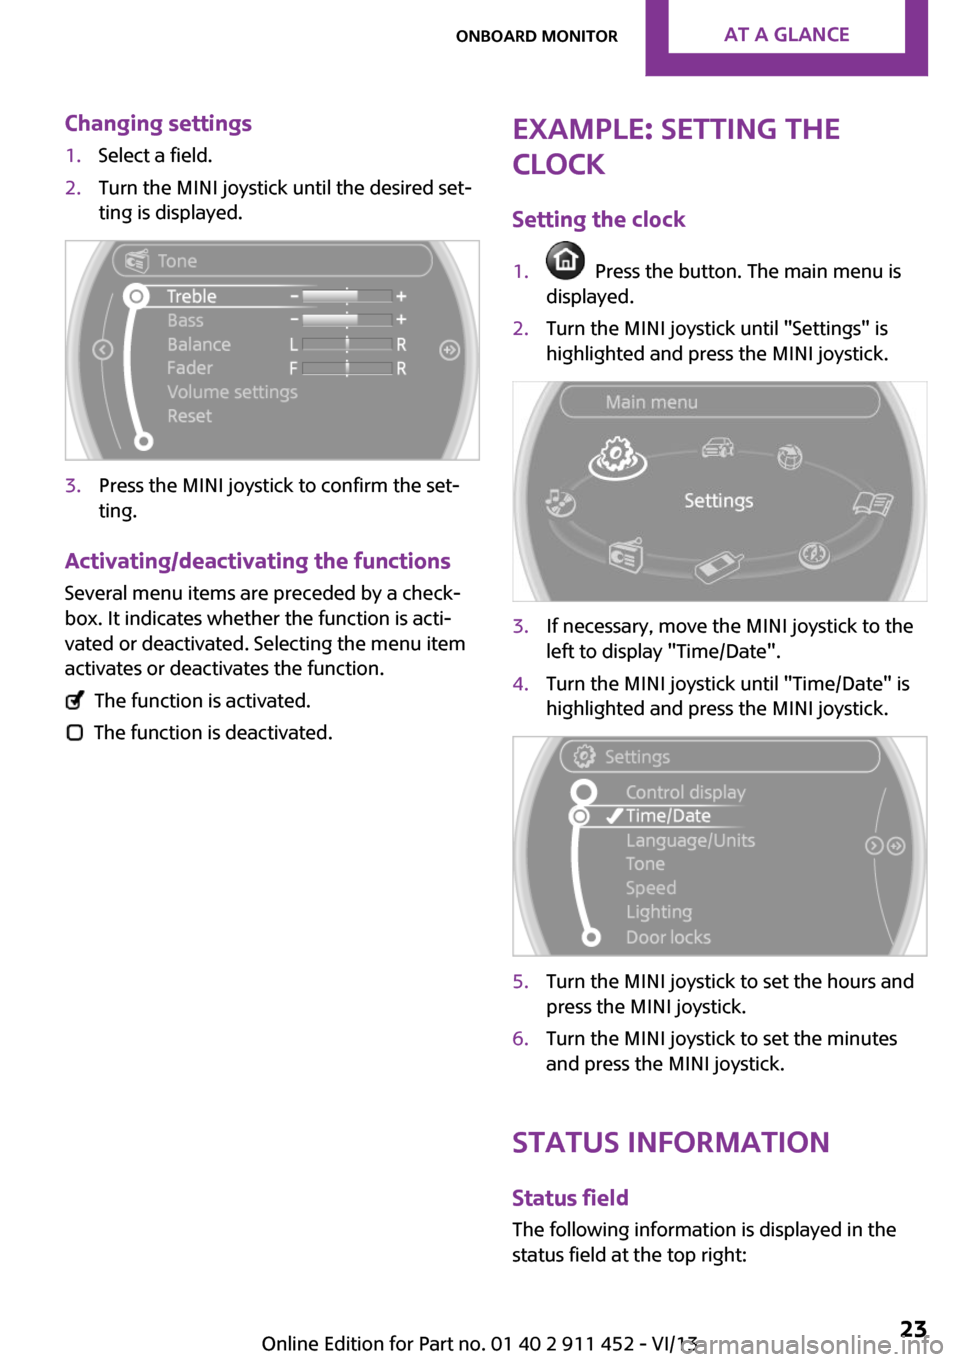
Changing settings1.Select a field.2.Turn the MINI joystick until the desired set‐
ting is displayed.3.Press the MINI joystick to confirm the set‐
ting.
Activating/deactivating the functions
Several menu items are preceded by a check‐box. It indicates whether the function is acti‐
vated or deactivated. Selecting the menu item
activates or deactivates the function.
The function is activated.
The function is deactivated.
Example: setting the
clock
Setting the clock1. Press the button. The main menu is
displayed.2.Turn the MINI joystick until "Settings" is
highlighted and press the MINI joystick.3.If necessary, move the MINI joystick to the
left to display "Time/Date".4.Turn the MINI joystick until "Time/Date" is
highlighted and press the MINI joystick.5.Turn the MINI joystick to set the hours and
press the MINI joystick.6.Turn the MINI joystick to set the minutes
and press the MINI joystick.
Status information
Status fieldThe following information is displayed in the
status field at the top right:
Seite 23Onboard monitorAt a glance23
Online Edition for Part no. 01 40 2 911 452 - VI/13
Page 33 of 276
stored with it are called up and imple‐
mented.▷Your personal settings will be recognized
and called up again even if the vehicle has
been used in the meantime by someone
else with another remote control.▷The individual settings are stored for no
more than three remote controls.
Personal Profile settings
The following functions and settings can be
stored in a profile.
More information on the settings can be found
under:
▷Response of the central locking system
when the car is being unlocked, refer to
page 34.▷Automatic locking of the vehicle, refer to
page 36.▷Triple turn signal activation, refer to
page 57.▷Settings for the displays on the onboard
monitor, in the speedometer, and in the
tachometer:▷12h/24h clock format, refer to
page 68.▷Date format, refer to page 69.▷Brightness of the Control Display, refer
to page 70.▷Language on the Control Display, refer
to page 69.▷Units of measure for fuel consumption,
distance covered/remaining distances,
and temperature, refer to page 68.▷Light settings:▷Headlamp courtesy delay feature, refer
to page 75.▷Daytime running lights, refer to
page 75.▷Automatic climate control, refer to
page 96: AUTO program, activating/deac‐
tivating the cooling function, setting thetemperature, air volume, and air distribu‐
tion.▷Entertainment:▷Tone settings, refer to page 146.▷Volume, refer to page 146.
Central locking system
The concept
The central locking system becomes active
when the driver's door is closed.
The system simultaneously engages and re‐
leases the locks on the following:
▷Doors.▷MINI: tailgate.▷MINI Clubman: split door.▷Fuel filler flap.
Operating from the outside
▷Via the remote control.▷Via the door lock.▷In cars with Comfort Access, via the door
handles on the driver's and front passenger
sides.
The following takes place simultaneously when
locking/unlocking the vehicle via the remote
control:
▷Depending on the vehicle equipment, the
anti-theft protection is switched on and off
as well. The anti-theft protection makes it
impossible to unlock the doors using the
lock buttons or door handles.▷The welcome lamps, interior lamps, and
ambient lighting are switched on and off.▷The alarm system is armed or disarmed, re‐
fer to page 41.
Operating from the inside
Via the button for the central locking system,
refer to page 36.
Seite 33Opening and closingControls33
Online Edition for Part no. 01 40 2 911 452 - VI/13
Page 64 of 276
DisplaysVehicle equipment
This chapter describes all series equipment as
well as country-specific and special equipment
offered for this model series.Therefore, it also
describes equipment that may not be found in
your vehicle, for instance due to the selected
special equipment or the country version. This
also applies to safety-related functions and sys‐
tems.
Odometer, external tem‐
perature display, clock
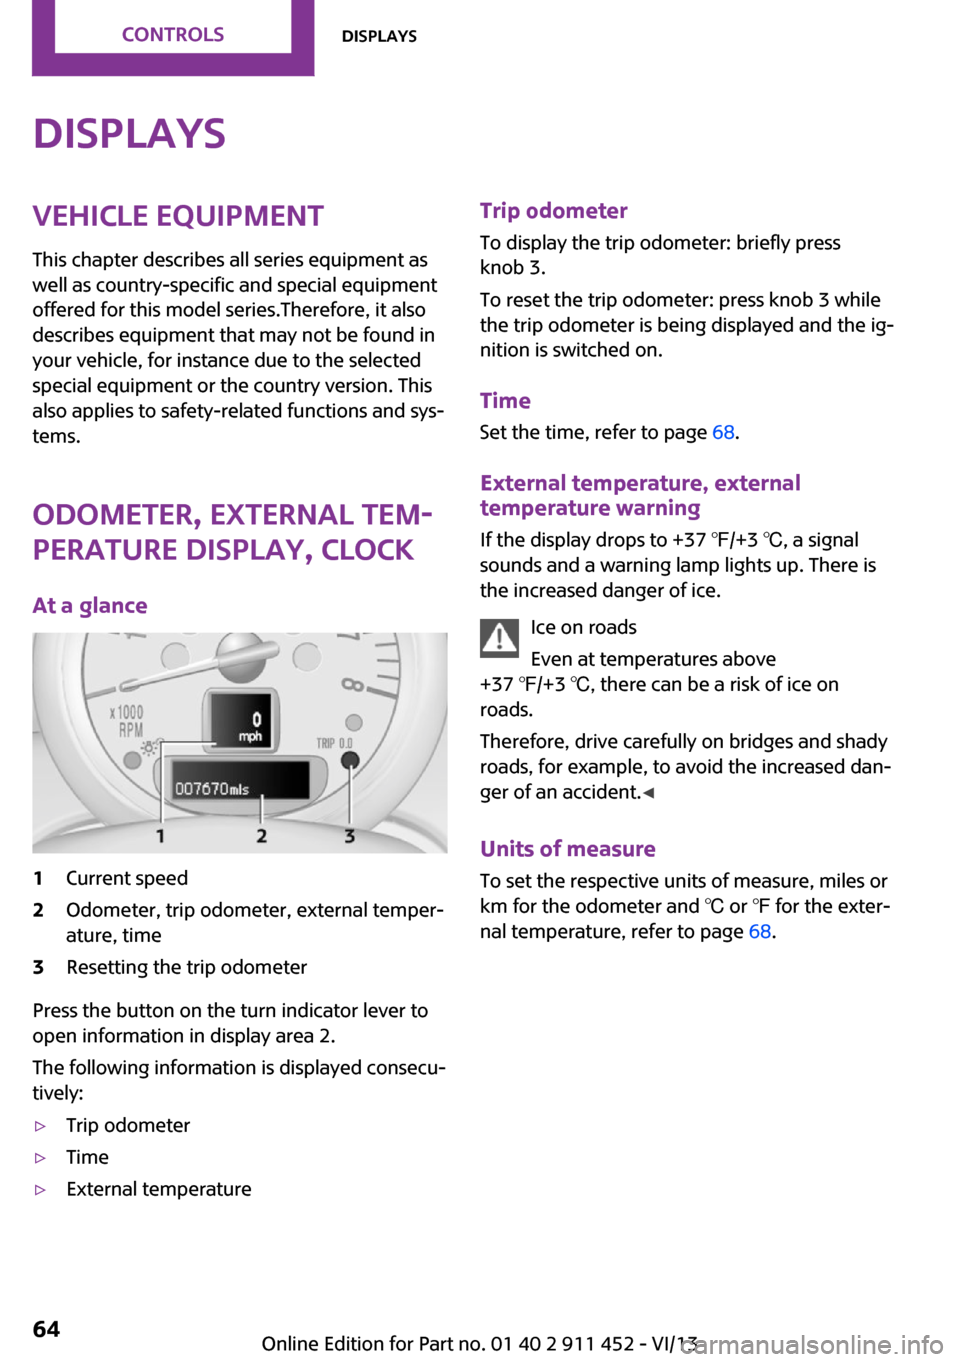
At a glance1Current speed2Odometer, trip odometer, external temper‐
ature, time3Resetting the trip odometer
Press the button on the turn indicator lever to
open information in display area 2.
The following information is displayed consecu‐
tively:
▷Trip odometer▷Time▷External temperatureTrip odometer
To display the trip odometer: briefly press
knob 3.
To reset the trip odometer: press knob 3 while
the trip odometer is being displayed and the ig‐
nition is switched on.
Time Set the time, refer to page 68.
External temperature, external temperature warning
If the display drops to +37 ℉/+3 ℃, a signal
sounds and a warning lamp lights up. There is
the increased danger of ice.
Ice on roads
Even at temperatures above
+37 ℉/+3 ℃, there can be a risk of ice on
roads.
Therefore, drive carefully on bridges and shady
roads, for example, to avoid the increased dan‐
ger of an accident. ◀
Units of measure
To set the respective units of measure, miles or
km for the odometer and ℃ or ℉ for the exter‐
nal temperature, refer to page 68.Seite 64ControlsDisplays64
Online Edition for Part no. 01 40 2 911 452 - VI/13
Page 68 of 276
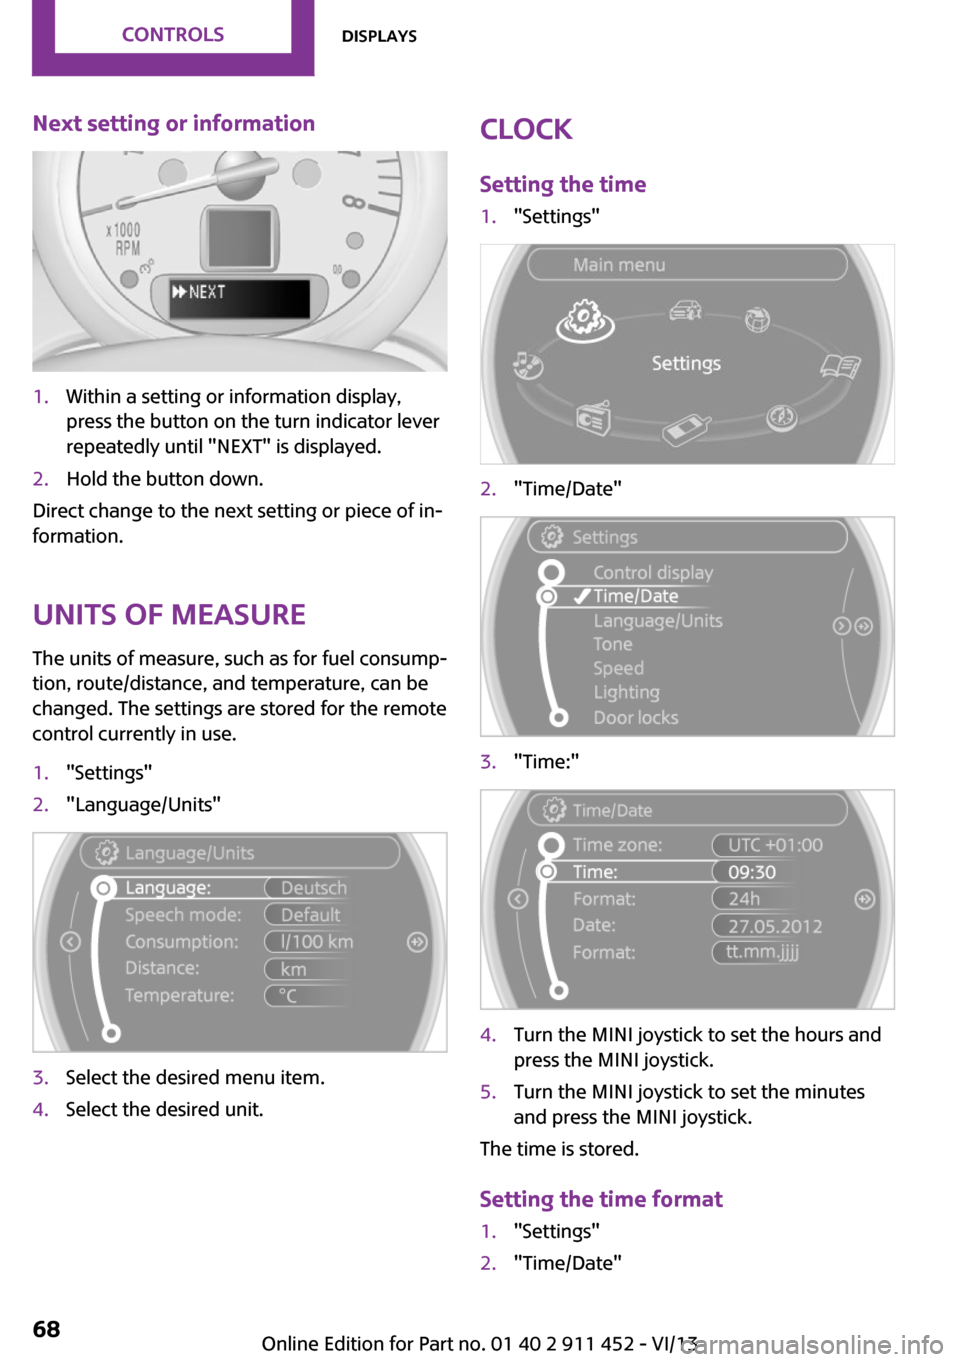
Next setting or information1.Within a setting or information display,
press the button on the turn indicator lever
repeatedly until "NEXT" is displayed.2.Hold the button down.
Direct change to the next setting or piece of in‐
formation.
Units of measure
The units of measure, such as for fuel consump‐
tion, route/distance, and temperature, can be
changed. The settings are stored for the remote
control currently in use.
1."Settings"2."Language/Units"3.Select the desired menu item.4.Select the desired unit.Clock
Setting the time1."Settings"2."Time/Date"3."Time:"4.Turn the MINI joystick to set the hours and
press the MINI joystick.5.Turn the MINI joystick to set the minutes
and press the MINI joystick.
The time is stored.
Setting the time format
1."Settings"2."Time/Date"Seite 68ControlsDisplays68
Online Edition for Part no. 01 40 2 911 452 - VI/13
Page 265 of 276

Brake fluid, refer to Service re‐quirements 70
Brake force distribution, elec‐ tronic 88
Brake pads, breaking in 112
Brakes– Handbrake 56
Brakes, MINI maintenance
system 228
Brakes, service require‐ ments 70
Brake system, MINI mainte‐ nance system 228
Braking, notes 114
Breakdown assistance, Road‐ side Assistance 244
Breaking in 112
Brightness on the Control Dis‐ play 70
Button for starting the engine, refer to Start/Stop button 54
C
Calendar 196
California Proposition 65 Warning 7
Car battery, refer to Vehicle battery 240
Car care products 249
Care, displays 251
Care, vehicle 249
Cargo area
– Comfort Access 39– Doors, refer to Split door 37– Opening from the out‐
side 37– Tailgate, refer to Split
door 37
Cargo area doors, refer to Split
door 37
Cargo area lamp, refer to Inte‐ rior lamps 77
Cargo area tailgate, refer to Tailgate 37
Car horn, refer to Horn 14
Carpet, care 251
Car phone, refer to Tele‐
phone 170, 180
Car wash 248
CBC, Cornering Brake Con‐ trol 88
CBS Condition Based Serv‐ ice 228
CD 156
CD/DVD drives, care 251
CD player 156
Center console, refer to Around the center con‐
sole 18
Central locking– Comfort Access 38– From the inside 36– From the outside 34
Central locking system
– Concept 33– From the outside 33
Central screen, see Control
Display 20
Changes, technical, refer to
Safety 7
Changing wheels/tires 217
Check Control 71
Children, transporting 50
Child restraint fixing system LATCH 51
Child restraint fixing sys‐ tems 50
Child restraint fixing systems, mounting 50
Child seat, mounting 50
Child seats, refer to Transport‐ ing children safely 50
Chrome parts, care 251
Circulation of air, refer to Re‐ circulated air mode 95, 97
Cleaning, displays 251
Cleaning, refer to Care 248
Climate 94
Climate mode
– Ventilation 98
Clock 64
Clock– 12h/24h format 68– Setting the time and date 68
Closing
– From the inside 36– From the outside 34
Clubdoor 37
Clutch, breaking in 112
Cockpit 14
Cold start, refer to Starting the engine 55
Combination instrument, refer
to Displays 16
Combination switch, refer to Turn signal/high beams/
headlamp flasher 57
Combination switch, refer to Washer/wiper system 57
Comfort Access
– In the car wash 40– Replacing the battery 40
Comfort area, refer to Around
the center console 18
Compact wheel, inflation pres‐ sure 211
Compartment for remote con‐ trol, refer to Ignition lock 54
Compass, digital 101
Computer 65
Computer, displaying informa‐ tion 65
Condition Based Service CBS 228
Confirmation signals for vehi‐ cle locking/unlocking 35
Connecting, mobile phone, re‐ fer to Pairing the mobile
phone 170, 181
Consumption, refer to Aver‐ age fuel consumption 66
Contacts 177, 193
Control Display 20
Control Display, care 251
Control Display, settings 69
Controls and displays 14
Control systems, driving stabil‐ ity 88
Seite 265Everything from A to ZReference265
Online Edition for Part no. 01 40 2 911 452 - VI/13
Page 272 of 276
Setting the clock, 12h/24h for‐mat 68
Shifting– Automatic transmission with
Steptronic 62
Shifting, manual transmis‐
sion 60
Shift lever
– Automatic transmission with
Steptronic 61
Shift paddles on the steering
wheel 62
Short commands, voice acti‐ vation 258
Side airbags 78
Side door, rear, refer to Club‐ door 37
Side windows, refer to Win‐ dows 42
Sliding/tilting sunroof
– Refer to Glass sunroof, elec‐
trical 41
Slot for remote control 54
Snap-in adapter, mobile phone 190
Socket, OBD Onboard Diagno‐ sis 229
Software applications, iPhone 200
Software part num‐ ber 170, 180
Software update 166
Special destinations, naviga‐ tion 130
Special equipment, series equipment 6
Speed, average 66
Speed limit 87
Speed limit
– Setting 87
Speedometer 16
Speed, with winter tires 218
Split door– Opening/closing 37– Opening from the out‐
side 37– Unlocking with remote con‐
trol 35
Spoken instructions, naviga‐
tion 137
Sport button 90
Sport program, automatic transmission with Step‐
tronic 62
Stability control systems 88
Start/Stop button 54
Start/Stop button, starting the engine 55
Start/Stop button, switching off the engine 56
Starting the engine 55
Start problems, refer to Jump- starting 244
State/province, selecting for navigation 126
Stations, stored 154
Station, storing 149
Status information, onboard monitor 23
Steering wheel 49
Steering wheel
– Shift paddles 62
Steering wheel, adjusting 49
Steering wheel lock 54
Stopping, engine 56
Storage, tires 218
Storing the vehicle 251
Street, entering for naviga‐ tion 127
Summer tires, refer to Wheels and tires 210
Summer tires, tread 216
Swing doors, refer to Split door 37
Switches, refer to Cockpit 14
Switching off, engine 56
Switching off, vehicle 56
Symbols 6
T
Tachometer 65
Tailgate 37
Tailgate– Comfort Access 39
Tailgate, see Split door 35
Tail lamps 235
Tank gauge, refer to Fuel gauge 65
Tasks 197
Technical changes, refer to Safety 7
Technical data 254
Telephone 170, 180
Telephone, adjusting the vol‐ ume 173, 185
Temperature
– Air conditioner 95– Automatic climate con‐
trol 97– Changing the unit of meas‐
ure 68
Temperature, coolant, refer to
Coolant temperature 65
Temperature display
– External temperature 64– External temperature warn‐
ing 64– Setting the unit 68
Temperature warning 64
Text messages 195
Theft alarm system, refer to Alarm system 41
Time
– Setting the time 68– Setting the time zone 69
Tire age 217
Tire identification marks 215
Tire inflation pressure 210
Tire inflation pressure
– Pressure loss 82, 83
Tire pressure monitor, refer to
Flat Tire Monitor 80
Tire Pressure Monitor TPM
– System limits 83– System reset 84– Warning lamp 84Seite 272ReferenceEverything from A to Z272
Online Edition for Part no. 01 40 2 911 452 - VI/13