Symbol MINI Clubman 2014 User Guide
[x] Cancel search | Manufacturer: MINI, Model Year: 2014, Model line: Clubman, Model: MINI Clubman 2014Pages: 210, PDF Size: 5.12 MB
Page 73 of 210
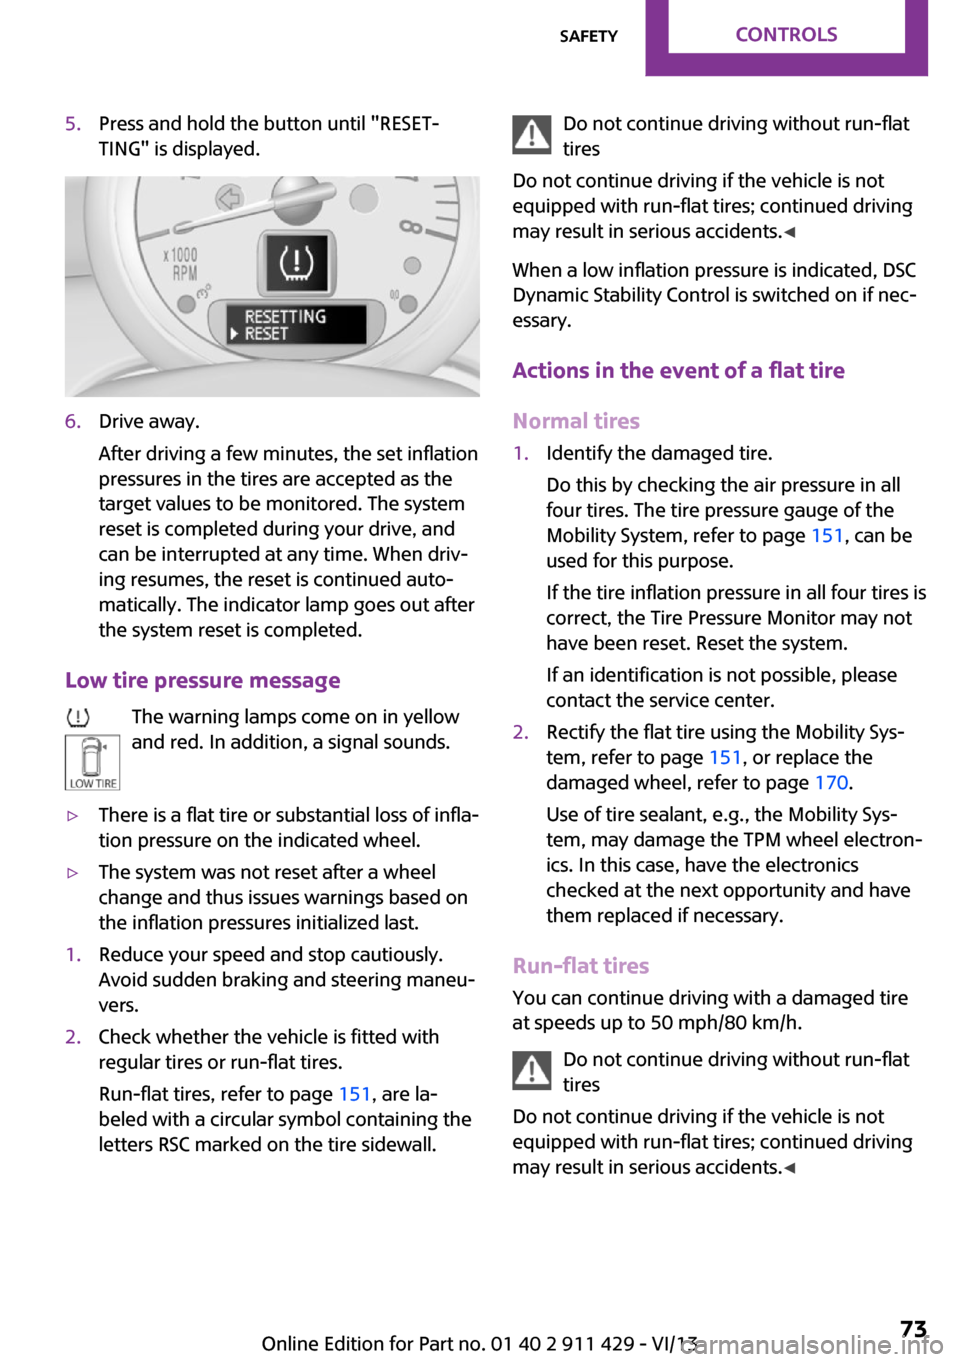
5.Press and hold the button until "RESET‐
TING" is displayed.6.Drive away.
After driving a few minutes, the set inflation
pressures in the tires are accepted as the
target values to be monitored. The system
reset is completed during your drive, and
can be interrupted at any time. When driv‐
ing resumes, the reset is continued auto‐
matically. The indicator lamp goes out after
the system reset is completed.
Low tire pressure message
The warning lamps come on in yellow
and red. In addition, a signal sounds.
▷There is a flat tire or substantial loss of infla‐
tion pressure on the indicated wheel.▷The system was not reset after a wheel
change and thus issues warnings based on
the inflation pressures initialized last.1.Reduce your speed and stop cautiously.
Avoid sudden braking and steering maneu‐
vers.2.Check whether the vehicle is fitted with
regular tires or run-flat tires.
Run-flat tires, refer to page 151, are la‐
beled with a circular symbol containing the
letters RSC marked on the tire sidewall.Do not continue driving without run-flat
tires
Do not continue driving if the vehicle is not
equipped with run-flat tires; continued driving
may result in serious accidents. ◀
When a low inflation pressure is indicated, DSC
Dynamic Stability Control is switched on if nec‐
essary.
Actions in the event of a flat tire Normal tires1.Identify the damaged tire.
Do this by checking the air pressure in all
four tires. The tire pressure gauge of the
Mobility System, refer to page 151, can be
used for this purpose.
If the tire inflation pressure in all four tires is
correct, the Tire Pressure Monitor may not
have been reset. Reset the system.
If an identification is not possible, please
contact the service center.2.Rectify the flat tire using the Mobility Sys‐
tem, refer to page 151, or replace the
damaged wheel, refer to page 170.
Use of tire sealant, e.g., the Mobility Sys‐
tem, may damage the TPM wheel electron‐
ics. In this case, have the electronics
checked at the next opportunity and have
them replaced if necessary.
Run-flat tires
You can continue driving with a damaged tire
at speeds up to 50 mph/80 km/h.
Do not continue driving without run-flat
tires
Do not continue driving if the vehicle is not
equipped with run-flat tires; continued driving
may result in serious accidents. ◀
Seite 73SafetyControls73
Online Edition for Part no. 01 40 2 911 429 - VI/13
Page 87 of 210
Interior equipmentVehicle equipmentThis chapter describes all series equipment as
well as country-specific and special equipment
offered for this model series.Therefore, it also
describes equipment that may not be found in
your vehicle, for instance due to the selected
special equipment or the country version. This
also applies to safety-related functions and sys‐
tems.
Universal garage door
opener
The concept
The universal garage door opener can be used
to operate up to 3 functions in remote-control‐
led systems, such as garage door drives or
lighting systems. The universal garage door
opener replaces up to 3 different hand-held
transmitters. To operate it, the buttons on the
interior rearview mirror must be programmed
for the desired functions. The hand-held trans‐
mitter for the system is needed for the pro‐
gramming procedure.
During programming
During programming and before activat‐
ing a device using the Universal Garage Door
Opener, ensure that there are no people, ani‐
mals, or objects in the range of movement of
the remote-controlled device; otherwise, there
is a risk of injury or damage.
Also follow the safety instructions of the hand-
held transmitter. ◀
Before selling the vehicle, delete the stored
functions for security reasons.Compatibility
If this symbol is printed on the packag‐
ing or in the operating instructions of
the system being operated, the system
is generally compatible with the universal ga‐
rage door opener.
If you have any questions, please contact:▷Your service center.▷www.homelink.com on the Internet.
HomeLink is a registered trademark of Johnson
Controls, Inc.
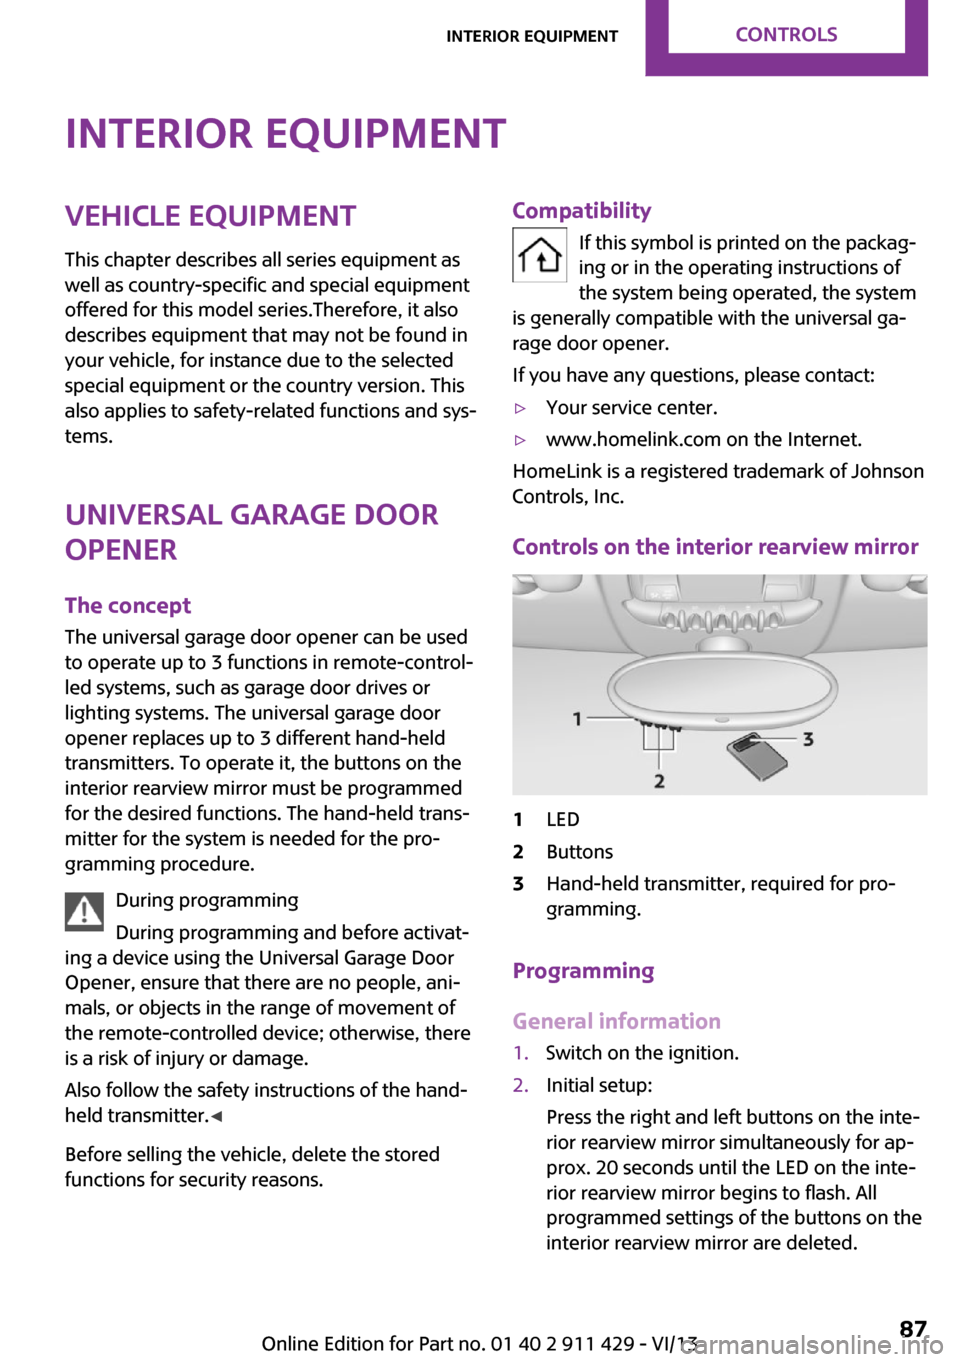
Controls on the interior rearview mirror
1LED2Buttons3Hand-held transmitter, required for pro‐
gramming.
Programming
General information
1.Switch on the ignition.2.Initial setup:
Press the right and left buttons on the inte‐
rior rearview mirror simultaneously for ap‐
prox. 20 seconds until the LED on the inte‐
rior rearview mirror begins to flash. All
programmed settings of the buttons on the
interior rearview mirror are deleted.Seite 87Interior equipmentControls87
Online Edition for Part no. 01 40 2 911 429 - VI/13
Page 113 of 210
11CD slot.12Eject the CD.Representation in the Owner's Manual
"…" Identifies radio display texts used to select individual functions.
Menu navigation Radio and telephone functions can be opened
using buttons on the radio and menus.
Opening menu items
To display the menu items:▷ Press the button for the audio
sources menu.▷ Press the button for the main
menu.
Selecting menu items
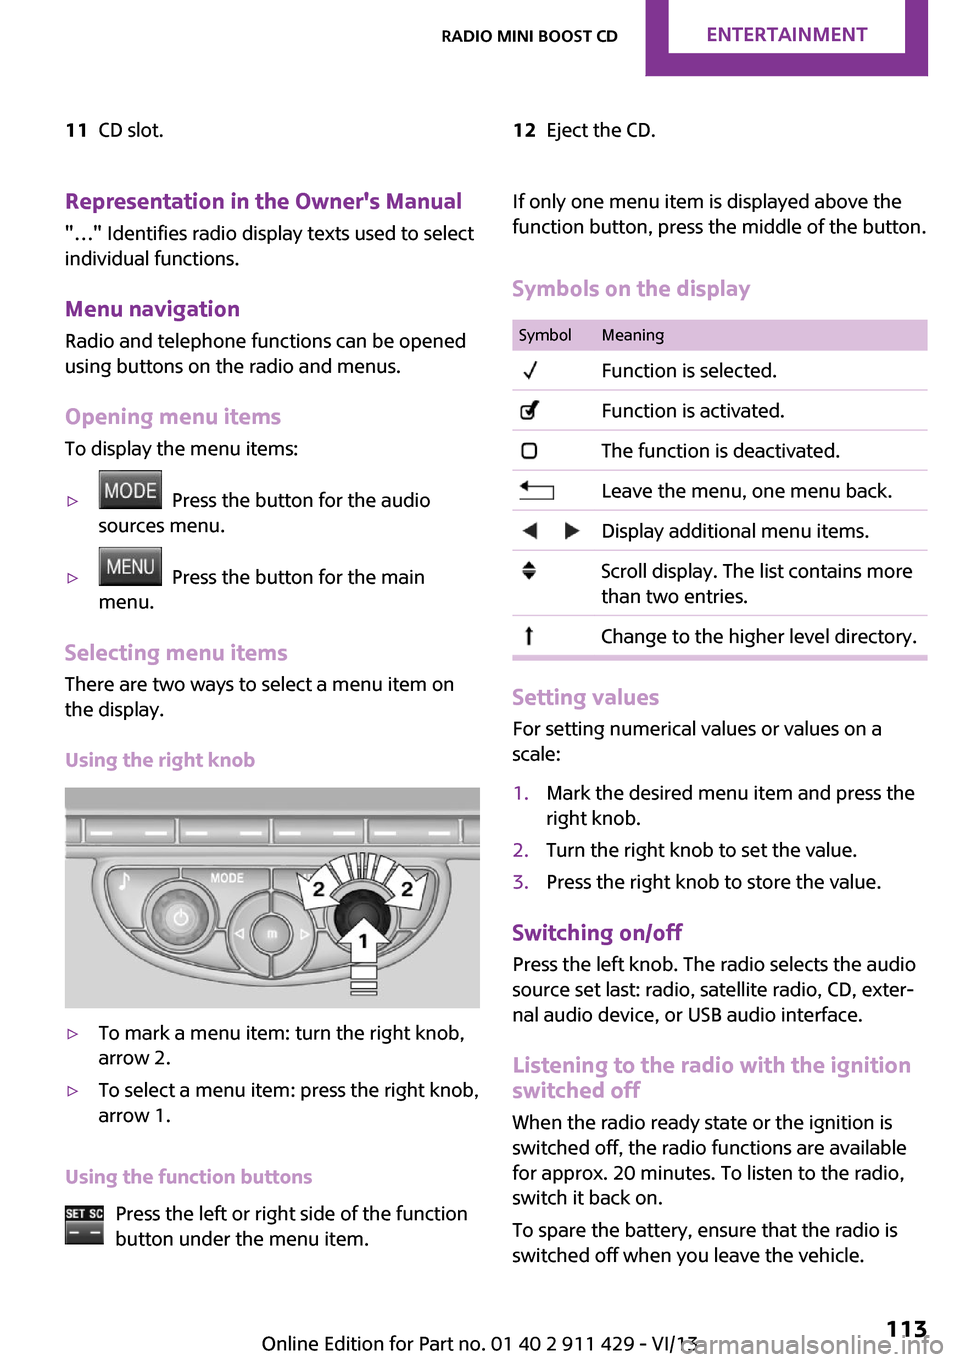
There are two ways to select a menu item on
the display.
Using the right knob
▷To mark a menu item: turn the right knob,
arrow 2.▷To select a menu item: press the right knob,
arrow 1.
Using the function buttons
Press the left or right side of the function
button under the menu item.
If only one menu item is displayed above the
function button, press the middle of the button.
Symbols on the displaySymbolMeaning Function is selected. Function is activated. The function is deactivated. Leave the menu, one menu back. Display additional menu items. Scroll display. The list contains more
than two entries. Change to the higher level directory.
Setting values
For setting numerical values or values on a
scale:
1.Mark the desired menu item and press the
right knob.2.Turn the right knob to set the value.3.Press the right knob to store the value.
Switching on/off
Press the left knob. The radio selects the audio
source set last: radio, satellite radio, CD, exter‐
nal audio device, or USB audio interface.
Listening to the radio with the ignition
switched off
When the radio ready state or the ignition is
switched off, the radio functions are available for approx. 20 minutes. To listen to the radio,
switch it back on.
To spare the battery, ensure that the radio is
switched off when you leave the vehicle.
Seite 113Radio MINI Boost CDEntertainment113
Online Edition for Part no. 01 40 2 911 429 - VI/13
Page 114 of 210

Adjusting the volumeTurn the left knob. The setting is stored for the
remote control currently in use.
When a call is placed using the hands-free sys‐
tem, the audio sources are muted.
Speed-dependent volume and volumes
of PDC signal tone and gong▷"PDC": volume of the PDC signal tone com‐
pared to the audio sources.▷"GONG": volume of the gong compared to
the audio sources.▷"S-VOL": speed-dependent volume control.
Set the audio sources to a high volume to be
able to adjust the volume of the signal tones
more easily.
1. Press the button.2. Select the symbol if necessary.3.Select the desired volume setting.4.Set the desired volume and press the right
knob.
Volume of external audio devices
An external audio device such as an MP3 player
can be connected via the AUX-IN port in the
center console and the audio tracks can be
played over the car's loudspeaker system.
The volume of the external audio device can be
adjusted to the car radio.
1. Press the button.2."AUX"3."Vol-AUX"4.Set the desired volume and press the right
knob.
Tone settings
▷"BASS": depth adjustment.▷"TREBLE": treble adjustment.▷"FADER": front/rear volume distribution.▷"BAL": left/right volume distribution.
The sound settings are set globally for all audio
sources.
Setting the treble, bass, and volume distribution
1. Press the button.2.Highlight the desired tone setting and press
the right knob.3.Create the desired setting and press the
right knob.
Resetting the tone settings
The tone settings are reset to medium values.
1. Press the button.2."RESET"
Time
Setting the time, date, and time format
1.Switch on the radio ready state or the igni‐
tion.2. Press the button.3."CONFIG"4."TIME"5.Select the desired category.6.Create the settings and press the right
knob.
Setting the units of measure of the
computer and the language
1.Switch on the radio ready state or the igni‐
tion.2. Press the button.3."CONFIG"4.▷"DIST": change the unit of measure for
the range.Seite 114EntertainmentRadio MINI Boost CD114
Online Edition for Part no. 01 40 2 911 429 - VI/13
Page 117 of 210
HD Radio Technology manufactured under li‐
cense from iBiquity Digital Corporation. U.S.
and Foreign Patents. HD Radio™ and the HD,
HD Radio, and Arc logos are proprietary trade‐
marks of iBiquity Digital Corp.
Activating/deactivating digital radio
reception1. Press the button.2."TUNER"3."SET"4."HD"
Displays
▷"HD": a station is received digitally.▷"(HD)": a station broadcasts digital signals
but digital radio reception is switched off.
In areas in which the selected station is not
continuously received in digital mode, playback
switches between analog and digital reception.
In this case, switch off digital radio reception.
Selecting the programs of a digital
station
Some stations broadcast multiple programs. To
select one of these programs:
1. Press the button repeatedly
until the desired digital station is displayed.
If a station broadcasts multiple programs,
the following display appears, for example:
"HD1"2."LIST"3."HD1" ... "HD8" Select the desired pro‐
gram. Up to eight programs can be se‐
lected per station.
Displaying additional information
For digital stations, additional information can
be displayed on the current track, such as the
name of the artist.
"INFO"
Operational displays▷"acquiring": the system is looking for digital
stations.▷"No Signal": no digital stations are being re‐
ceived.
Satellite radio
Over 100 different channels with high fidelity
can be received. The channels are offered in
fixed packages and must be activated.
You may experience signal drops and muting
events related to this new technology.
Activating or deactivated channels
1. Press the button.2."SAT"3."CAT"4.Select the desired category.
The channels are displayed.
This symbol identifies the current chan‐
nel.
Activating
1.Turn the right knob to select a channel that
is not yet activated.2.Press the right knob to confirm a channel.
A phone number and the electronic serial
number, ESN, are displayed. The electronic
serial number is required for activation.3.To have the channels activated, call the
phone number.
Deactivating
1. Press the button.2."SAT"3."SAT"
Hold the button down.Seite 117Radio MINI Boost CDEntertainment117
Online Edition for Part no. 01 40 2 911 429 - VI/13
Page 118 of 210

A phone number and the electronic serial
number, ESN, are displayed. The electronic
serial number is required for deactivation.4.To have the channels deactivated, call the
phone number.
Selecting and storing a channel
1. Press the button.2."SAT"3."CAT"4.Select the desired category.5.Select the desired channel.
To display all channels:
"ALL"
To store a channel:
1. Select the symbol.2."SAT"
Press the button repeatedly until the de‐
sired memory level, SAT 1 or SAT 2, is
reached.3."1" ... "6"
Press and hold the function button under
the desired memory location until the
channel is audible again after a brief inter‐
ruption.
Changing to the current channel
"CURR"
Additional information
The name of the channel and additional infor‐
mation on the current track are displayed, such
as the name of the artist.
1.Select the desired channel.2."INFO"Changing the channel using the buttons
Press the button for the corre‐
sponding direction. The next enabled channel
is opened.
Search
1. Press and hold the button for
the corresponding direction. The activated
channels appear on the display one after
the other.2.Release the button to select the displayed
channel.
Notes
When there is a signal blockage or the trans‐
mission is suspended momentarily for more
than 4 seconds, a message will appear on the
display.
Service may be interrupted or unavailable for
specific reasons such as environmental or topo‐
graphic conditions and others that Satellite
Radio cannot directly control. Signal may not be
available under tunnels, in parking garages,
next to tall buildings, nearby trees with dense
foliage, nearby mountains or other possible
strong sources of radio interference. Service
should resume normally after the source of sig‐
nal unavailability has been cleared.
CD player
Loading the CD player Insert the CD into the CD drive with the printed
side up.
Playback begins automatically.
Reading can take a few minutes with com‐
pressed audio files.
Seite 118EntertainmentRadio MINI Boost CD118
Online Edition for Part no. 01 40 2 911 429 - VI/13
Page 127 of 210
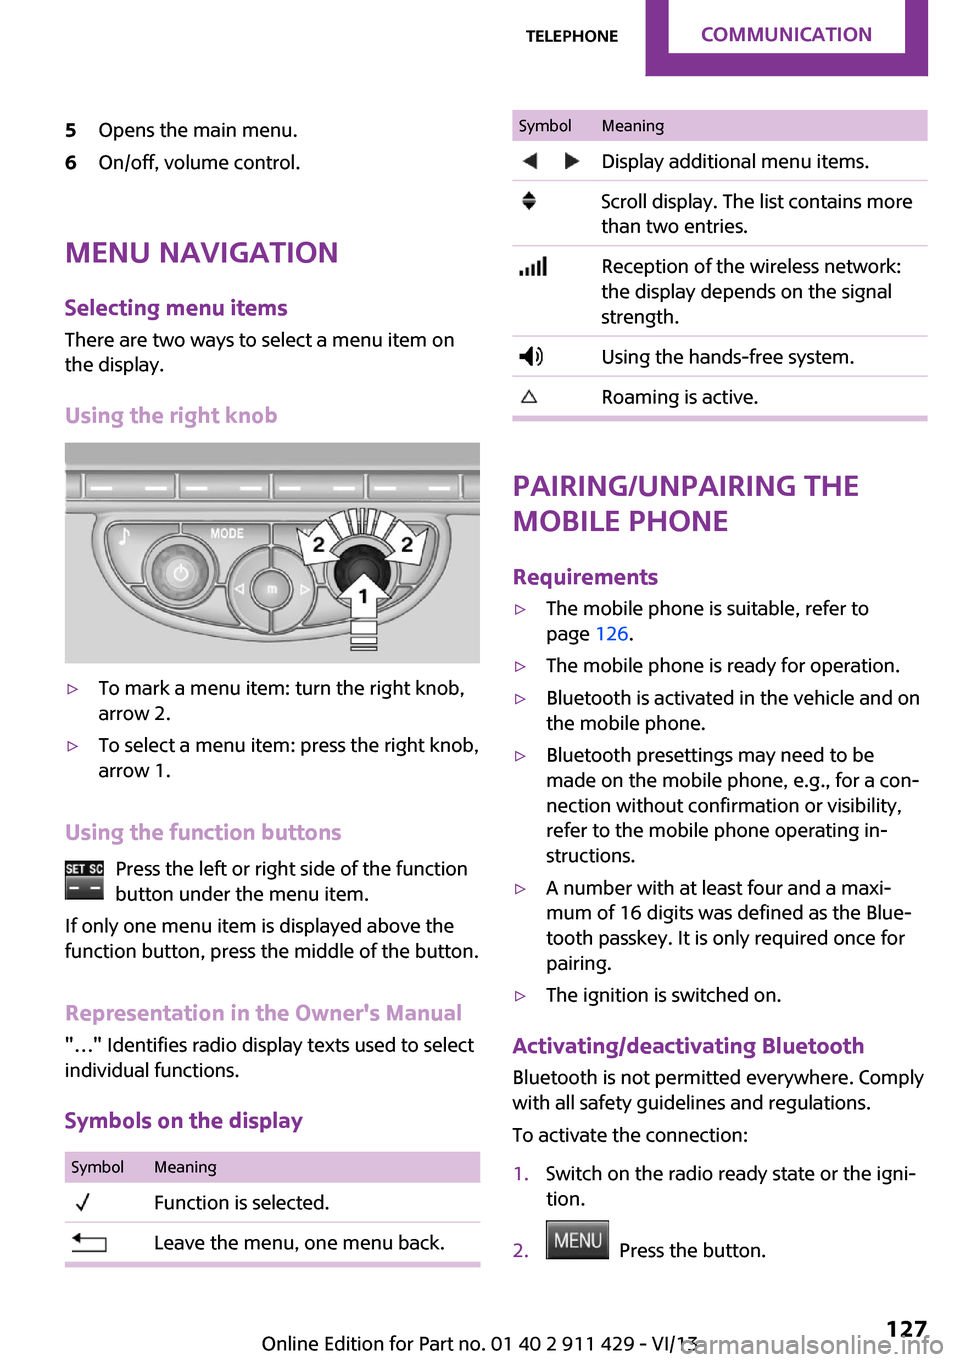
5Opens the main menu.6On/off, volume control.
Menu navigationSelecting menu items
There are two ways to select a menu item on
the display.
Using the right knob
▷To mark a menu item: turn the right knob,
arrow 2.▷To select a menu item: press the right knob,
arrow 1.
Using the function buttons
Press the left or right side of the functionbutton under the menu item.
If only one menu item is displayed above the
function button, press the middle of the button.
Representation in the Owner's Manual
"…" Identifies radio display texts used to select
individual functions.
Symbols on the display
SymbolMeaning Function is selected. Leave the menu, one menu back.SymbolMeaning Display additional menu items. Scroll display. The list contains more
than two entries. Reception of the wireless network:
the display depends on the signal
strength. Using the hands-free system. Roaming is active.
Pairing/unpairing the
mobile phone
Requirements
▷The mobile phone is suitable, refer to
page 126.▷The mobile phone is ready for operation.▷Bluetooth is activated in the vehicle and on
the mobile phone.▷Bluetooth presettings may need to be
made on the mobile phone, e.g., for a con‐
nection without confirmation or visibility,
refer to the mobile phone operating in‐
structions.▷A number with at least four and a maxi‐
mum of 16 digits was defined as the Blue‐
tooth passkey. It is only required once for
pairing.▷The ignition is switched on.
Activating/deactivating Bluetooth
Bluetooth is not permitted everywhere. Comply
with all safety guidelines and regulations.
To activate the connection:
1.Switch on the radio ready state or the igni‐
tion.2. Press the button.
Seite 127TelephoneCommunication127
Online Edition for Part no. 01 40 2 911 429 - VI/13
Page 139 of 210
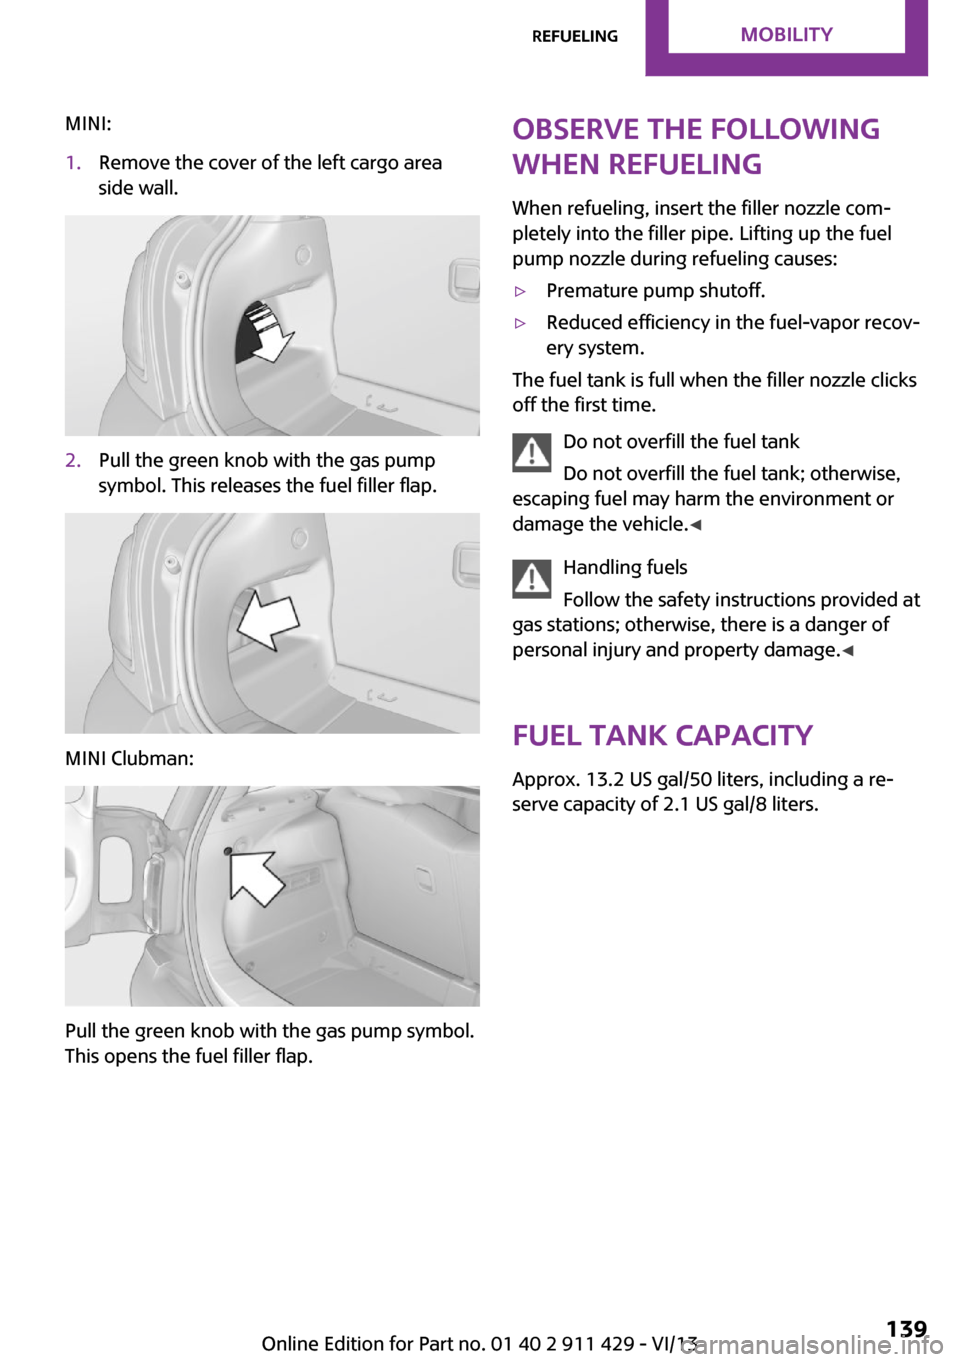
MINI:1.Remove the cover of the left cargo area
side wall.2.Pull the green knob with the gas pump
symbol. This releases the fuel filler flap.
MINI Clubman:
Pull the green knob with the gas pump symbol.
This opens the fuel filler flap.
Observe the following
when refueling
When refueling, insert the filler nozzle com‐
pletely into the filler pipe. Lifting up the fuel
pump nozzle during refueling causes:▷Premature pump shutoff.▷Reduced efficiency in the fuel-vapor recov‐
ery system.
The fuel tank is full when the filler nozzle clicks
off the first time.
Do not overfill the fuel tank
Do not overfill the fuel tank; otherwise,
escaping fuel may harm the environment or
damage the vehicle. ◀
Handling fuels
Follow the safety instructions provided at
gas stations; otherwise, there is a danger of
personal injury and property damage. ◀
Fuel tank capacity Approx. 13.2 US gal/50 liters, including a re‐
serve capacity of 2.1 US gal/8 liters.
Seite 139RefuelingMobility139
Online Edition for Part no. 01 40 2 911 429 - VI/13
Page 148 of 210

Temperature
The temperature grades are A, the highest, B,
and C, representing the tire’s resistance to the
generation of heat and its ability to dissipate
heat when tested under controlled conditions
on a specified indoor laboratory test wheel.
Sustained high temperature can cause the ma‐
terial of the tire to degenerate and reduce tire
life, and excessive temperature can lead to
sudden tire failure. The grade C corresponds to
a level of performance which all passenger car
tires must meet under the Federal Motor Vehi‐
cle Safety Standard No. 109. Grades B and A
represent higher levels of performance on the
laboratory test wheel than the minimum re‐
quired by law.
Temperature grade for this tire
The temperature grade for this tire is es‐
tablished for a tire that is properly inflated and
not overloaded. Excessive speed, underinfla‐
tion, or excessive loading, either separately or
in combination, can cause heat buildup and
possible tire failure. ◀
RSC – Run-flat tires
The symbol identifying run-flat tires is a circle
with the letters RSC on the sidewall, refer to
page 151.
M+S
Winter and all-season tires.
These have better winter properties than
summer tires.
XL Designation for specially reinforced tires.
Tire treadSummer tires
The tread depth should not be less than
0.12 in/3 mm, although European legislation,for example, requires a minimum tread depth
of only 0.063 in/1.6 mm. At tread depths less
than 0.12 in/3 mm, there is a great danger of
hydroplaning even in low water depths and at
raised speeds.
Winter tires The suitability of winter tires for winter driving
is reduced noticeably when their tread depth
becomes less than 0.16 in/4 mm.
Minimum tread depth
Wear indicators in the tread base are distrib‐
uted around the circumference of the tire and
are marked on the tire sidewall with TWI, Tread
Wear Indicator. When the tire tread has been
worn down to the wear indicators, a tread has
reached a depth of 0.063 in/1.6 mm.
Tire damage
General information Inspect your tires often for damage, foreign ob‐
jects lodged in the tread, and tread wear.
Notes
Driving over rough or damaged road surfaces,
as well as debris, curbs and other obstacles can
cause serious damage to wheels, tires and sus‐
pension parts. This is more likely to occur with
low-profile tires, which provide less cushioning
between the wheel and the road. Be careful to
avoid road hazards and reduce your speed, es‐
Seite 148MobilityWheels and tires148
Online Edition for Part no. 01 40 2 911 429 - VI/13
Page 151 of 210
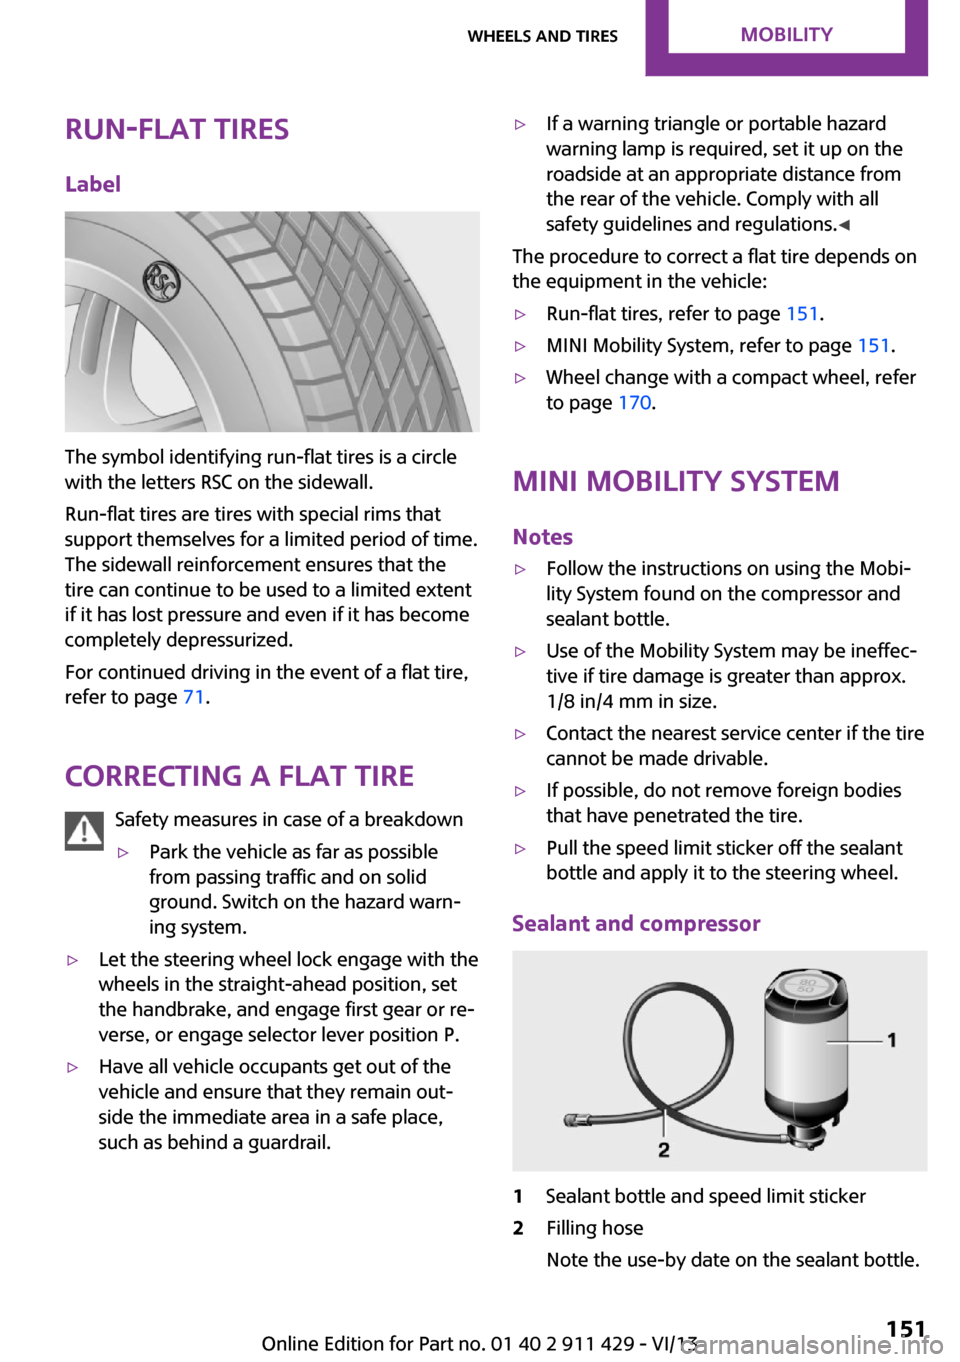
Run-flat tiresLabel
The symbol identifying run-flat tires is a circle
with the letters RSC on the sidewall.
Run-flat tires are tires with special rims that
support themselves for a limited period of time.
The sidewall reinforcement ensures that the
tire can continue to be used to a limited extent
if it has lost pressure and even if it has become
completely depressurized.
For continued driving in the event of a flat tire,
refer to page 71.
Correcting a flat tire Safety measures in case of a breakdown
▷Park the vehicle as far as possible
from passing traffic and on solid
ground. Switch on the hazard warn‐
ing system.▷Let the steering wheel lock engage with the
wheels in the straight-ahead position, set
the handbrake, and engage first gear or re‐
verse, or engage selector lever position P.▷Have all vehicle occupants get out of the
vehicle and ensure that they remain out‐
side the immediate area in a safe place,
such as behind a guardrail.▷If a warning triangle or portable hazard
warning lamp is required, set it up on the
roadside at an appropriate distance from
the rear of the vehicle. Comply with all
safety guidelines and regulations. ◀
The procedure to correct a flat tire depends on
the equipment in the vehicle:
▷Run-flat tires, refer to page 151.▷MINI Mobility System, refer to page 151.▷Wheel change with a compact wheel, refer
to page 170.
MINI Mobility System
Notes
▷Follow the instructions on using the Mobi‐
lity System found on the compressor and
sealant bottle.▷Use of the Mobility System may be ineffec‐
tive if tire damage is greater than approx.
1/8 in/4 mm in size.▷Contact the nearest service center if the tire
cannot be made drivable.▷If possible, do not remove foreign bodies
that have penetrated the tire.▷Pull the speed limit sticker off the sealant
bottle and apply it to the steering wheel.
Sealant and compressor
1Sealant bottle and speed limit sticker2Filling hose
Note the use-by date on the sealant bottle.Seite 151Wheels and tiresMobility151
Online Edition for Part no. 01 40 2 911 429 - VI/13