MINI Clubman 2016 (Mini Connected) User Guide
Clubman 2016
MINI
MINI
https://www.carmanualsonline.info/img/30/9353/w960_9353-0.png
MINI Clubman 2016 (Mini Connected) User Guide
Trending: fuse, washer fluid, tire pressure, seats, navigation system, manual radio set, tow
Page 11 of 246
Seite 11Information11
Online Edition for Part no. 01 40 2 964 571 - X/15
Page 12 of 246
WATCH ME.
Online Edition for Part no. 01 40 2 964 571 - X/15
Page 13 of 246
AT A GLANCE
CONTROLSDRIVING TIPSMOBILITYREFERENCE
Online Edition for Part no. 01 40 2 964 571 - X/15
Page 14 of 246
CockpitVehicle features and op‐
tions
This chapter describes all standard, country-
specific and optional features offered with the
series. It also describes features that are not
necessarily available in your car, e. g., due to
the selected options or country versions. This
also applies to safety-related functions and sys‐
tems. The respectively applicable country provi‐
sions must be observed when using the respec‐
tive features and systems.
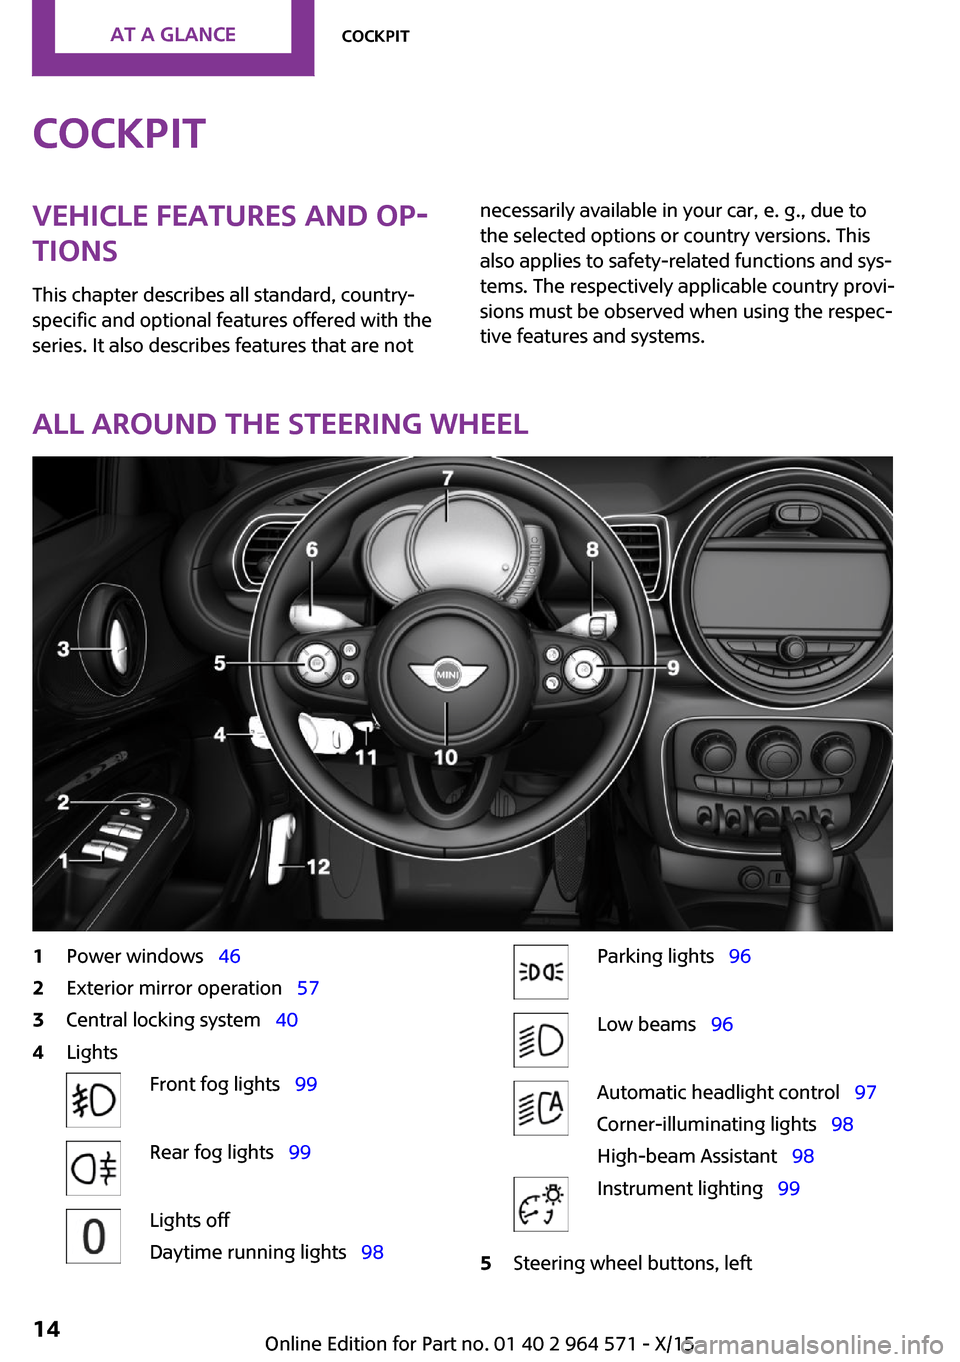
All around the steering wheel
1Power windows 462Exterior mirror operation 573Central locking system 404LightsFront fog lights 99Rear fog lights 99Lights off
Daytime running lights 98
Parking lights 96Low beams 96Automatic headlight control 97
Corner-illuminating lights 98
High-beam Assistant 98
Instrument lighting 995Steering wheel buttons, leftSeite 14AT A GLANCECockpit14
Online Edition for Part no. 01 40 2 964 571 - X/15
Page 15 of 246
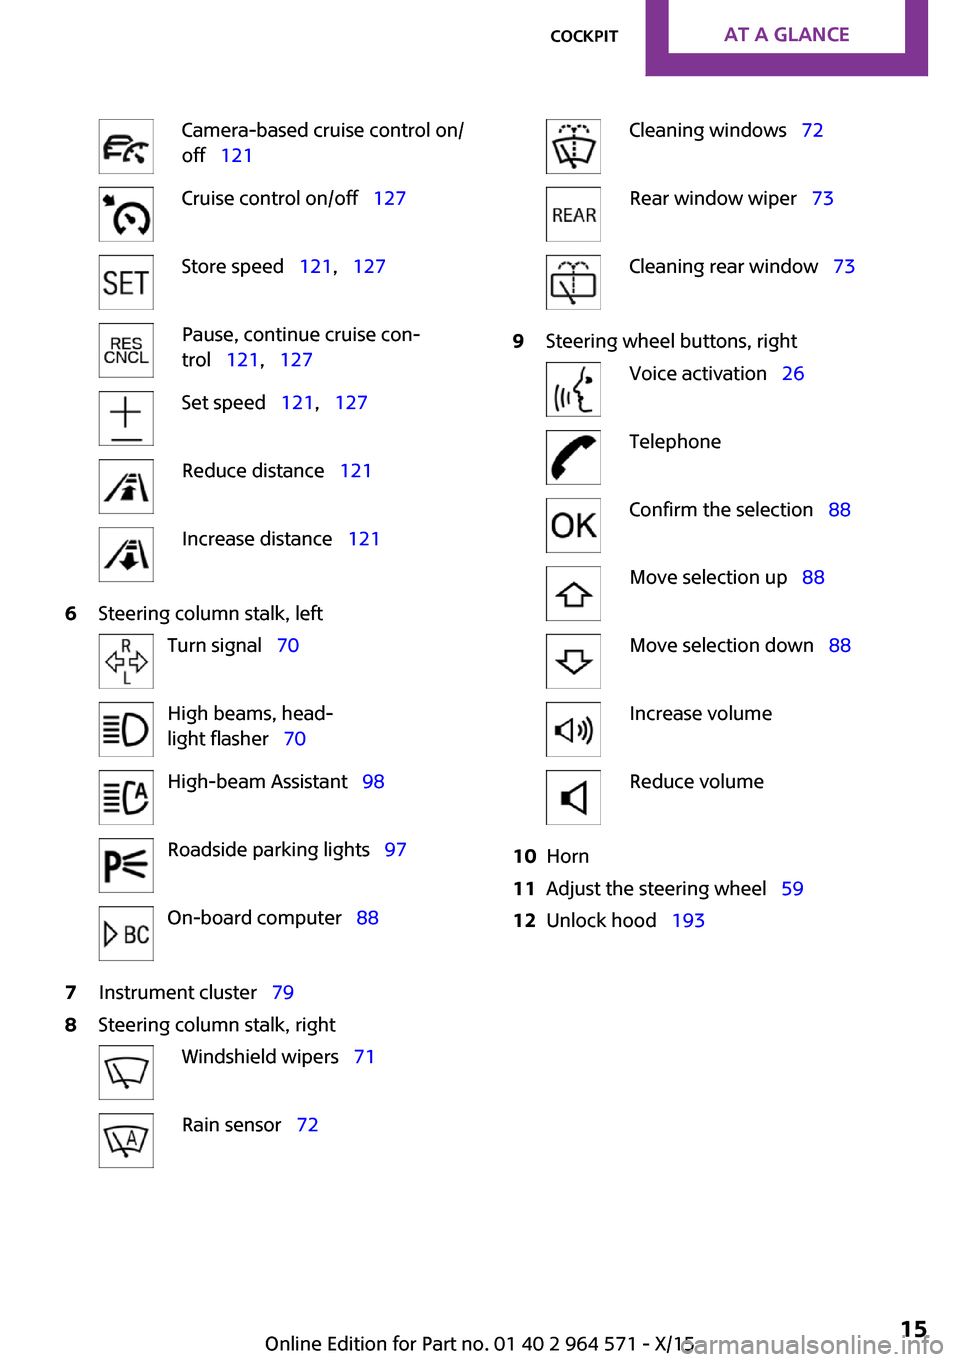
Camera-based cruise control on/
off 121
Cruise control on/off 127Store speed 121, 127Pause, continue cruise con‐
trol 121, 127
Set speed 121, 127Reduce distance 121Increase distance 1216Steering column stalk, leftTurn signal 70High beams, head‐
light flasher 70
High-beam Assistant 98Roadside parking lights 97On-board computer 887Instrument cluster 798Steering column stalk, rightWindshield wipers 71Rain sensor 72Cleaning windows 72Rear window wiper 73Cleaning rear window 739Steering wheel buttons, rightVoice activation 26TelephoneConfirm the selection 88Move selection up 88Move selection down 88Increase volumeReduce volume10Horn11Adjust the steering wheel 5912Unlock hood 193Seite 15CockpitAT A GLANCE15
Online Edition for Part no. 01 40 2 964 571 - X/15
Page 16 of 246
All around the center console1Hazard warning system 216Intelligent Safety 1102Control Display 183Radio/Multimedia4Glove compartment 1555Climate control 1396PDC Park Distance Control 129
Rearview camera 132
Parking assistant 134
Auto Start/Stop function 66Start/stop the engine and switch
the ignition on/off 64
DSC Dynamic Stability Con‐
trol 132
Head-up Display 937Steptronic transmission selector lever 75
Manual transmission selector lever 74
8Controller with buttons 199Parking brake 6810Driving Dynamics Control 119Seite 16AT A GLANCECockpit16
Online Edition for Part no. 01 40 2 964 571 - X/15
Page 17 of 246
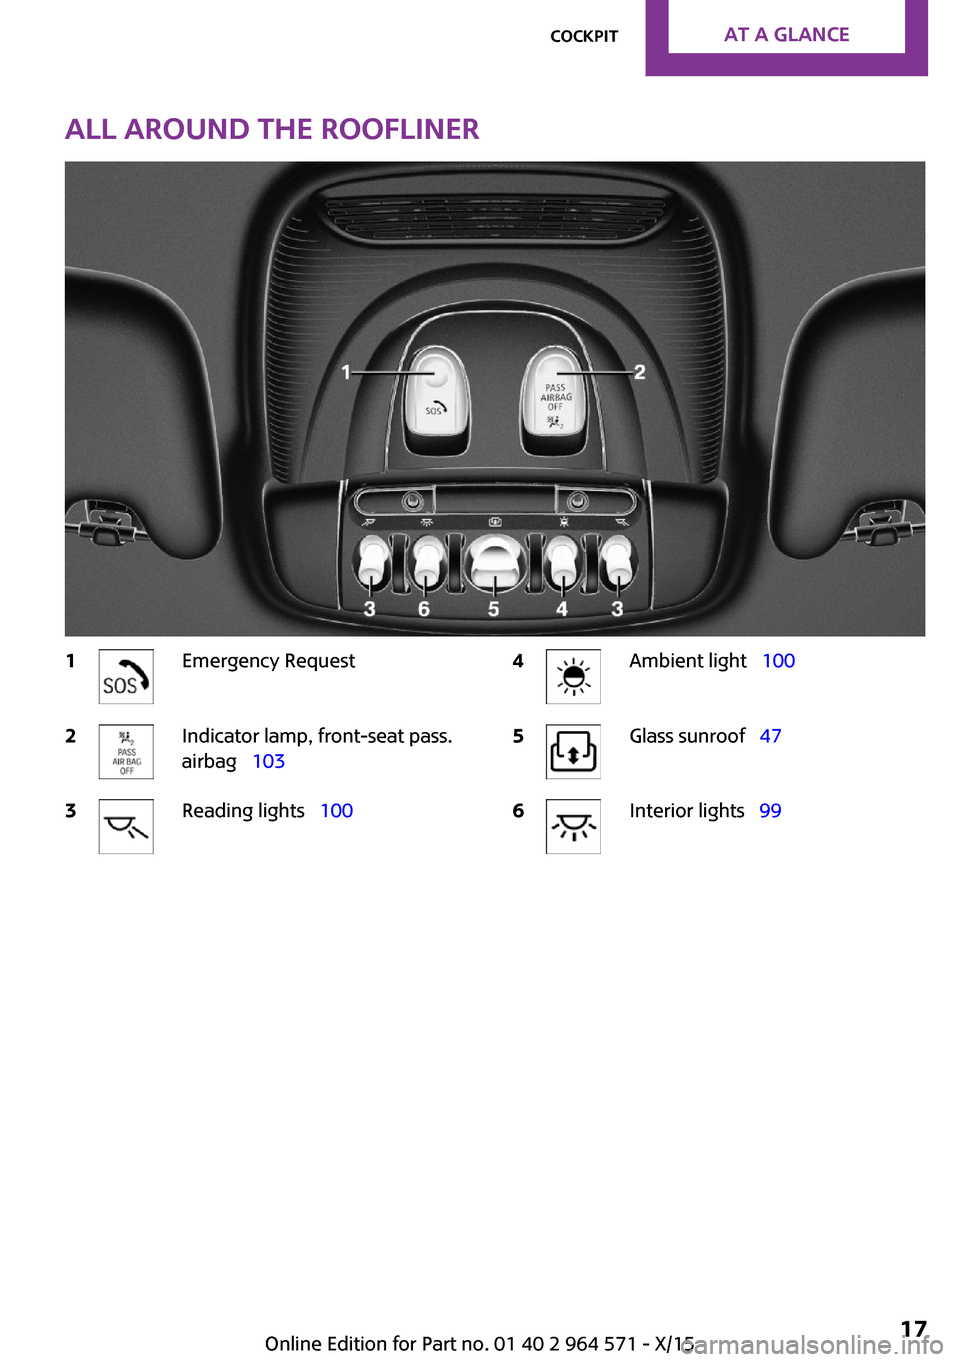
All around the roofliner1Emergency Request2Indicator lamp, front-seat pass.
airbag 103
3Reading lights 1004Ambient light 1005Glass sunroof 476Interior lights 99Seite 17CockpitAT A GLANCE17
Online Edition for Part no. 01 40 2 964 571 - X/15
Page 18 of 246

Onboard monitorVehicle features and op‐
tions
This chapter describes all standard, country-
specific and optional features offered with the
series. It also describes features that are not
necessarily available in your car, e. g., due to
the selected options or country versions. This
also applies to safety-related functions and sys‐
tems. The respectively applicable country provi‐
sions must be observed when using the respec‐
tive features and systems.
The concept
The onboard monitor combines the functions
of a multitude of switches. Thus, these func‐
tions can be operated from a central location.
WARNING
Operating the integrated information sys‐
tem and communication devices while driving
can distract from traffic. It is possible to lose
control of the vehicle. There is risk of an acci‐
dent. Only use the systems or devices when the
traffic situation allows. If necessary stop and
use the systems and devices while the vehicle is
stationary.◀
Overview of control ele‐
ments
Control elements
1Control Display2Controller with buttons and, depending on
the equipment version, with touchpad
Control Display
Information
▷To clean the Control Display, follow the care
instructions.
▷Do not place objects close to the Control
Display; otherwise, the Control Display can
be damaged.
▷In the case of very high temperatures on
the Control Display, e.g. due to intense so‐
lar radiation, the brightness may be re‐
duced down to complete deactivation.
Once the temperature is reduced, e.g.
through shadow or climate control system,
the normal functions are re-established.
Switching on
1.Switch on the ignition.2.Press the controller.Seite 18AT A GLANCEOnboard monitor18
Online Edition for Part no. 01 40 2 964 571 - X/15
Page 19 of 246
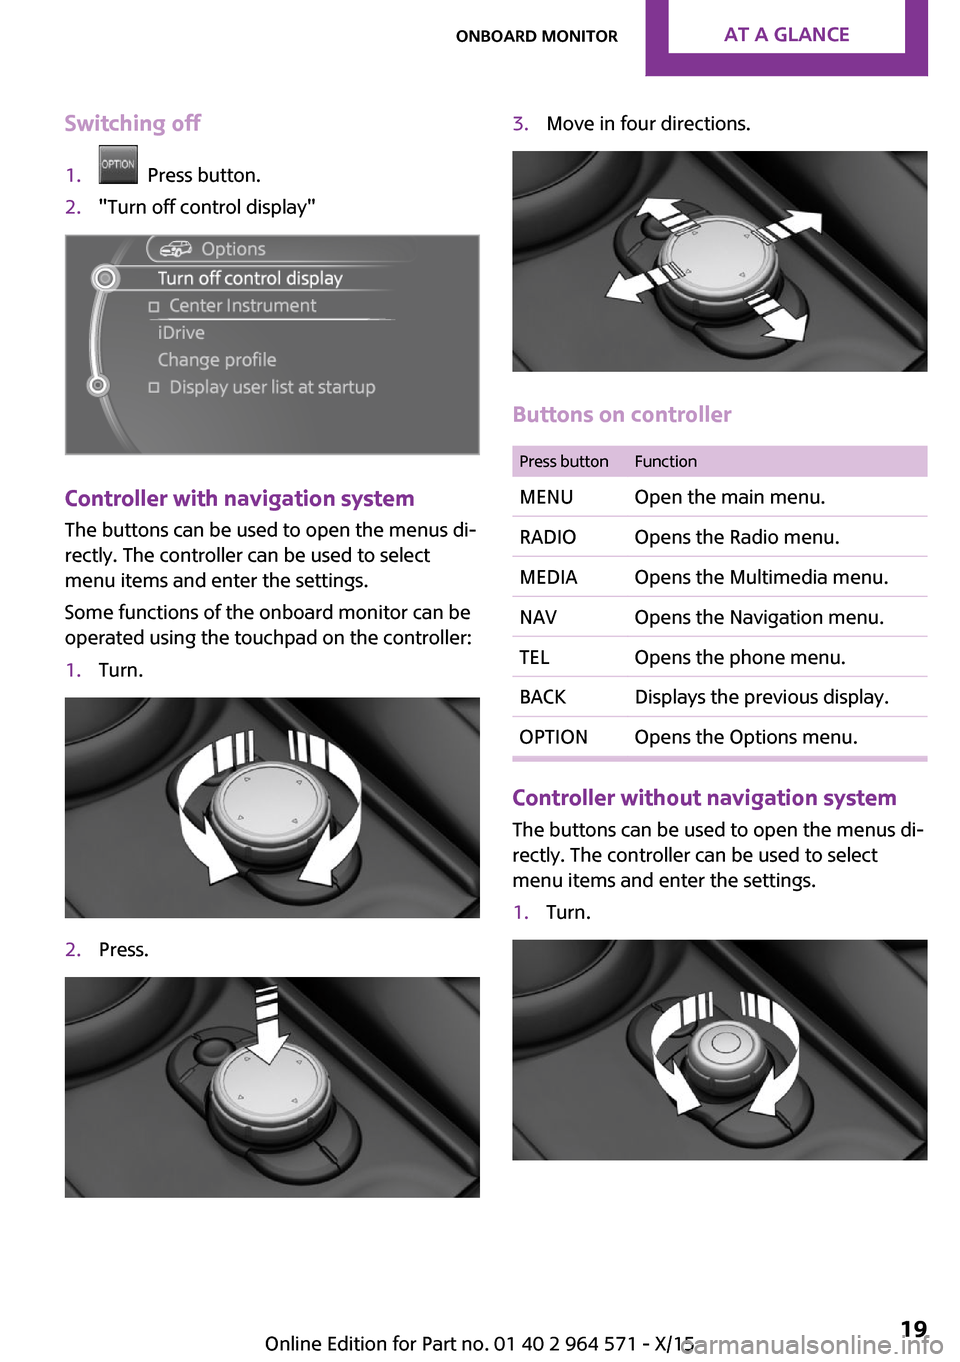
Switching off1. Press button.2."Turn off control display"
Controller with navigation system
The buttons can be used to open the menus di‐
rectly. The controller can be used to select
menu items and enter the settings.
Some functions of the onboard monitor can be
operated using the touchpad on the controller:
1.Turn.2.Press.3.Move in four directions.
Buttons on controller
Press buttonFunctionMENUOpen the main menu.RADIOOpens the Radio menu.MEDIAOpens the Multimedia menu.NAVOpens the Navigation menu.TELOpens the phone menu.BACKDisplays the previous display.OPTIONOpens the Options menu.
Controller without navigation system
The buttons can be used to open the menus di‐
rectly. The controller can be used to select
menu items and enter the settings.
1.Turn.Seite 19Onboard monitorAT A GLANCE19
Online Edition for Part no. 01 40 2 964 571 - X/15
Page 20 of 246
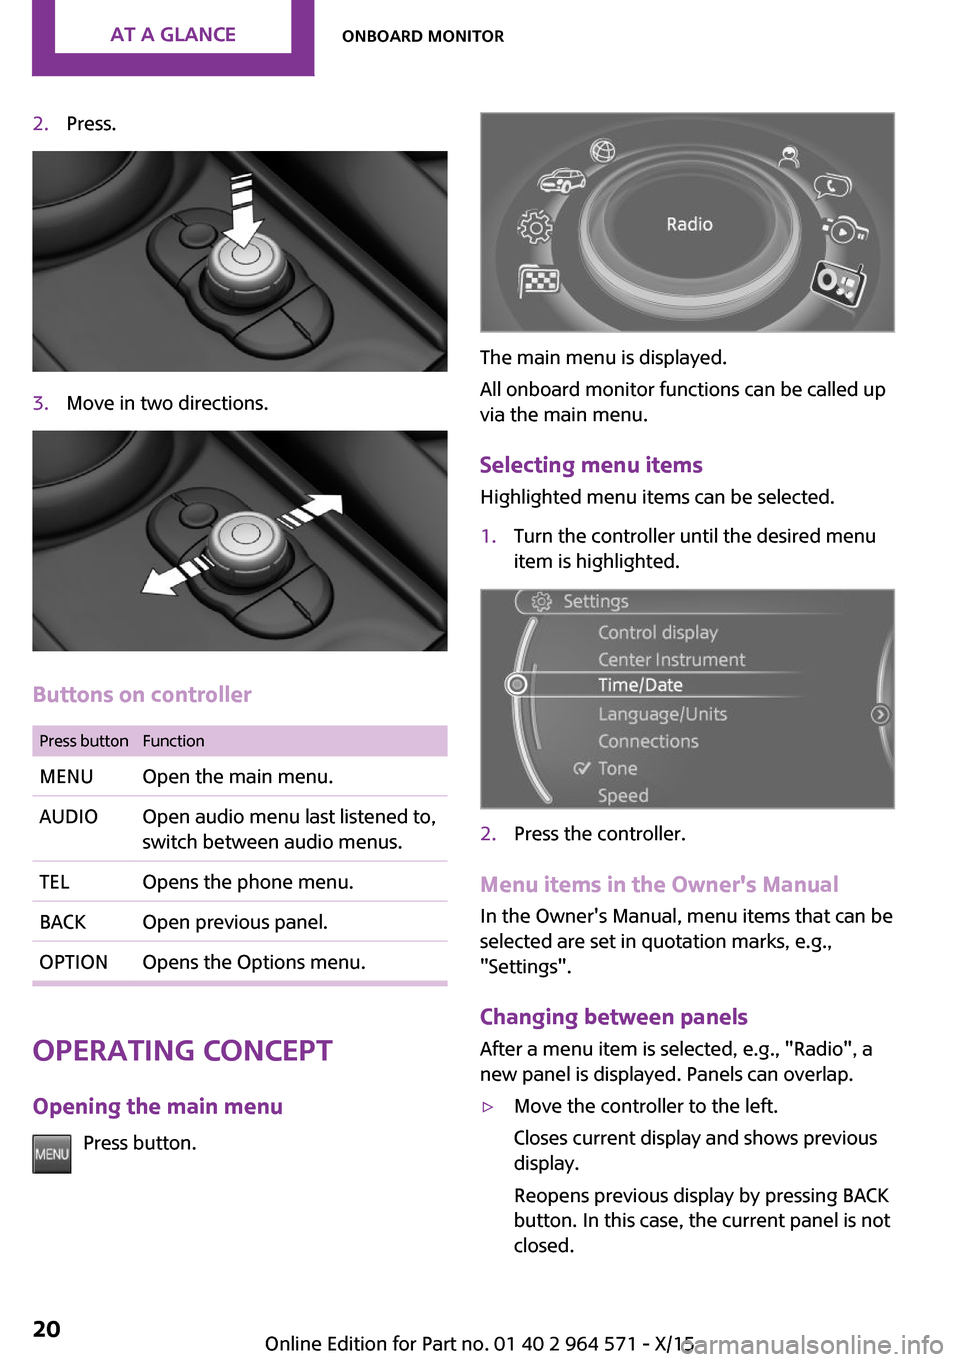
2.Press.3.Move in two directions.
Buttons on controller
Press buttonFunctionMENUOpen the main menu.AUDIOOpen audio menu last listened to,
switch between audio menus.
TELOpens the phone menu.BACKOpen previous panel.OPTIONOpens the Options menu.
Operating concept
Opening the main menu
Press button.
The main menu is displayed.
All onboard monitor functions can be called up
via the main menu.
Selecting menu items
Highlighted menu items can be selected.
1.Turn the controller until the desired menu
item is highlighted.
2.Press the controller.
Menu items in the Owner's Manual
In the Owner's Manual, menu items that can be
selected are set in quotation marks, e.g.,
"Settings".
Changing between panels
After a menu item is selected, e.g., "Radio", a
new panel is displayed. Panels can overlap.
▷Move the controller to the left.
Closes current display and shows previous
display.
Reopens previous display by pressing BACK
button. In this case, the current panel is not
closed.
Seite 20AT A GLANCEOnboard monitor20
Online Edition for Part no. 01 40 2 964 571 - X/15
Trending: brake fluid, jacking, technical data, maintenance reset, load capacity, ECO mode, coolant temperature


