length MINI Convertible 2010 Owner's Manual
[x] Cancel search | Manufacturer: MINI, Model Year: 2010, Model line: Convertible, Model: MINI Convertible 2010Pages: 174, PDF Size: 3.05 MB
Page 46 of 174

Driving
44
Driving
Ignition lock
Inserting the key into the ignition lock
Insert the key all the way into the ignition lock.
Radio readiness
Individual electrical consumers can operate.
Removing the key from the ignition lock
Press in the key briefly. It is ejected slightly.
At the same time:
>The ignition is switched off if it was on
beforehand.
Automatic transmission
You cannot take out the key unless the selector
lever is in the P position: interlock.
Start/stop button
Press the start/stop button to switch radio readi-
ness or the ignition on and off. Do not depress
the brake or clutch while doing so.When you press the start/stop button and
depress the clutch if the car has manual
transmission or the brake if the car has auto-
matic transmission, the engine starts.<
Radio readiness
Individual electrical consumers can operate. The
time and outside temperature are displayed in
the tachometer.
Radio readiness is switched off automatically:
>When the key is removed from the ignition
lock
>When using Comfort Access
* by pushing
the button on the door handle or the
button on the remote control, refer
to Locking on page27
>after a certain has elapsed
Ignition on
Most indicator and warning lamps in indicator
area 1, page13, light up for varying lengths of
time.
When the engine is off, switch off the igni-
tion and any unnecessary electrical con-
sumers in order to preserve the battery.<
Radio readiness and ignition off
All indicator and warning lamps in the displays
go out.
The ignition automatically turns off
* when the
driver's door is opened. Pressing the start/stop
button again switches the ignition back on.
The ignition is not switched off in situations such
as the following:
>The clutch or brake is depressed
>The low beams are switched on
Page 65 of 174

REFERENCEAT A GLANCE CONTROLS DRIVING TIPS MOBILITY
63
Technology for driving comfort and
safety
Park Distance Control
PDC*
The concept
PDC assists you with parking backwards. Acous-
tic signals warn you of the presence of an object
behind the vehicle. To measure the distance,
there are four ultrasonic sensors in either
bumper.
However, an acoustic warning does not sound
until an object is approx. 24 in/60 cm from the
corner sensors, or approx. 5 ft/1.50 m from the
center sensors.
PDC is a parking aid that can indicate
objects when they are approached slowly,
as is usually the case when parking. Avoid
approaching an object at high speed; otherwise,
physical circumstances may lead to the system
warning being issued too late.<
Automatic mode
With the engine running or the ignition switched
on, the system is activated automatically after
approx. 1 second when you engage reverse gear
or move the automatic transmission selector
lever to position R. Wait this short period before
driving.
Acoustic signals
As the distance between vehicle and object
decreases, the intervals between the tones
become shorter. If the distance to the nearest
object falls to below roughly 1 ft/30 cm, then a
continuous tone sounds.
If the distance remains constant, e.g. when driv-
ing parallel to a wall, the acoustic signal stops
after approx. 3 seconds.
Adjustments
The volume of the acoustic signals can be
adjusted, refer to the Owner's Manual for Radio.
Malfunction
Indicator lamp comes on: PDC has
failed. Have the system checked.
To avoid this problem, keep the sensors
clean and free of ice or snow in order to ensure
that they will continue to operate effectively.
When using a high-pressure cleaner, do not
direct the jet toward the sensors for lengthy
periods and only spray from a distance of at least
4in/10cm.
System limitations
Even with PDC, final responsibility for esti-
mating the distance between the vehicle
and any obstructions always remains with the
driver. Sensors, too, have blind spots in which
objects cannot be detected. Moreover, ultra-
sonic detection can reach its physical limits with
objects such as trailer tow bars and couplings,
thin and wedge-shaped objects, etc. Low
objects already indicated, such as curbs, may
enter the sensors' blind spots before or after a
continuous audible signal is given. Higher, pro-
truding objects, such as wall ledges, may not be
detectable. Therefore, always drive cautiously;
otherwise, there is a risk of personal injury or
property damage. Loud sound sources outside
or inside the car can drown out the PDC signal.<
Driving stability control
systems
Your MINI has a number of systems that help to
maintain the vehicle's stability even in adverse
driving conditions.
The laws of physics cannot be repealed,
even with driving stability control systems.
An appropriate driving style always remains the
responsibility of the driver. Therefore do not
reduce the additional safety margin by engaging
in hazardous driving thereby running the risk of
an accident.<
Page 68 of 174

Technology for driving comfort and safety
66
Activating the system
Press the SPORT button.
The LED lights up.
SPORT is briefly displayed in the tachometer.
Deactivating the system
>Press the SPORT button again.
>Switch off the engine.
Flat Tire Monitor FTM*
The concept
The Flat Tire Monitor detects pressure loss in a
tire by comparing the rotating speeds of the
individual tires while moving.
If a tire loses pressure, its rolling circumference
changes, and this in turn alters the speed of
rotation. This change is detected and is reported
as a flat tire.
Functional requirement
In order to assure the reliable reporting of a flat
tire, the system must be initialized for the cor-
rect tire inflation pressure.
Each time you correct the pressure in a
tire, or change a wheel or tire, the system
must be reinitialized.<
System limitations
The Flat Tire Monitor is unable to warn the driver
of sudden, severe tire damage caused by exter-
nal factors, nor can it identify the gradual loss of
pressure that will inevitably occur in all four tires
over a lengthy period of time.In the following situations, the system could be
delayed or malfunction:
>System has not been initialized
>Driving on snowy or slippery road surface
>Performance-oriented style of driving: slip in
the drive wheels, high lateral acceleration
>Snow chains are attached
When the vehicle is driven with a space-saver
spare tire
*, page133, the Flat Tire Monitor can-
not function.
Initializing the system
The initialization is completed during driv-
ing, which can be interrupted at any time.
When driving resumes, the initialization is con-
tinued automatically.
Do not initialize the system if you are driving
with snow chains or a space-saver spare tire
*.<
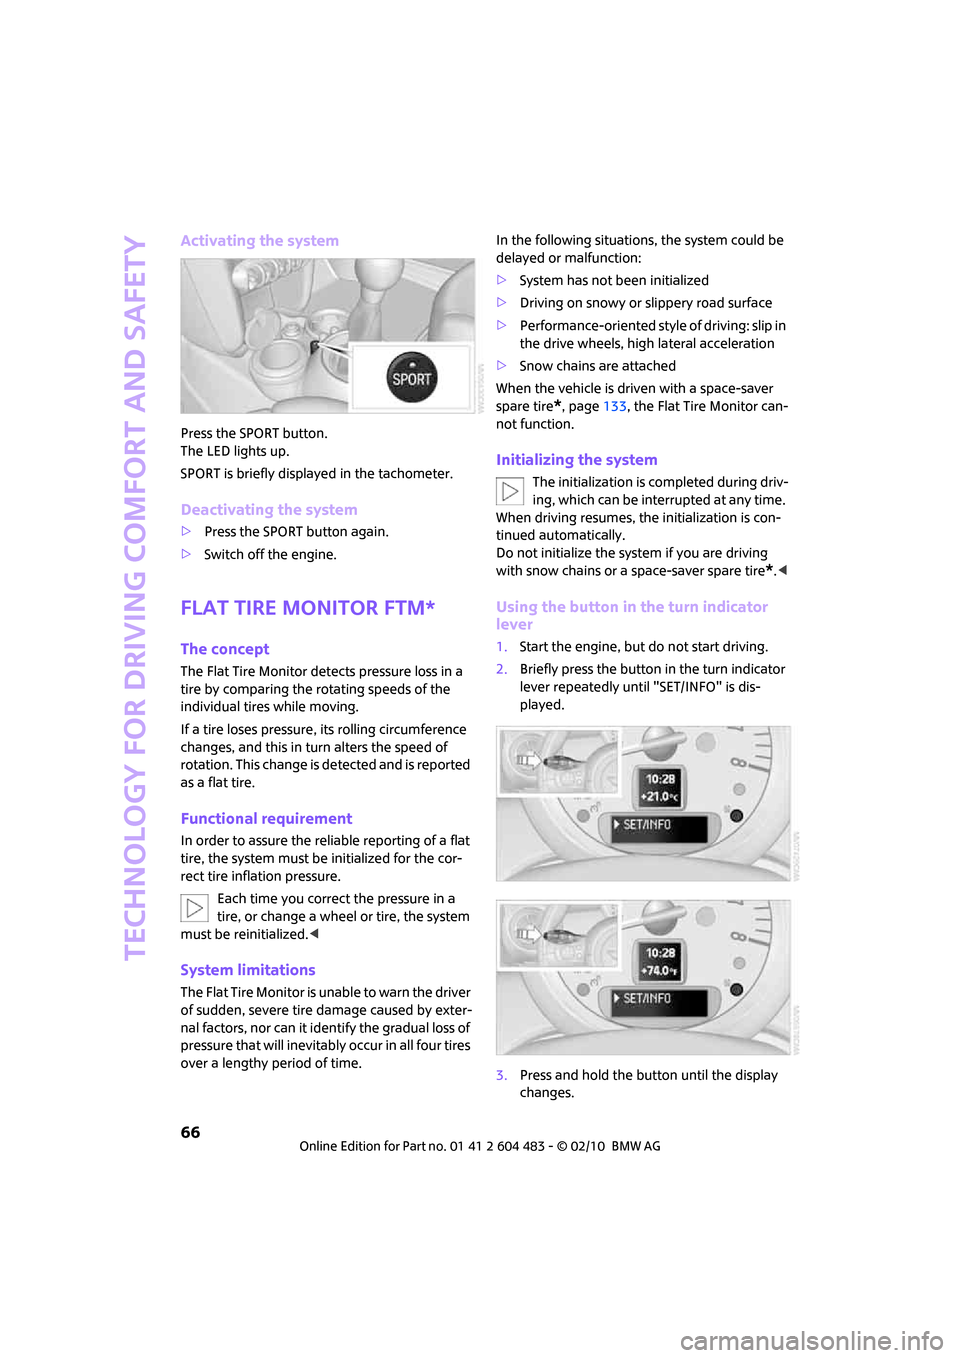
Using the button in the turn indicator
lever
1.Start the engine, but do not start driving.
2.Briefly press the button in the turn indicator
lever repeatedly until "SET/INFO" is dis-
played.
3.Press and hold the button until the display
changes.
Page 100 of 174

Things to remember when driving
98
Saving fuel
Fuel consumption depends on a number of dif-
ferent factors. The implementation of certain
measures, your driving style and regular mainte-
nance can have an influence on fuel consump-
tion and on the environmental impact.
Remove unnecessary cargo
Additional weight increases fuel consumption.
Remove attached parts no longer in use
Remove auxiliary mirrors, roof- or rear-mounted
luggage racks whenever you are not using
them.
Attached parts on the vehicle affect its aerody-
namics and increase fuel consumption.
Check tire inflation pressure regularly
Check and, if necessary, correct tire inflation
pressure at least twice a month and before start-
ing on a long trip.
Low inflation pressure increases rolling resis-
tance and thus leads to greater fuel consump-
tion and tire wear.
Drive off immediately
Do no t wa it for t he eng ine to warm u p wh ile the
vehicle remains stationary. Start driving right
away, but at moderate engine speeds. This is the
fastest way for the cold engine to reach its oper-
ating temperature.
Think ahead while driving
Avoid unnecessary acceleration and braking by
maintaining a suitable distance to the vehicle
driving ahead.
Driving smoothly and anticipating impending
traffic situations reduces fuel consumption.
Avoid high engine speeds
Use first gear only for driving off. In second and
higher gears, accelerate smoothly to a suitable
engine and road speed. In doing so, avoid high
engine speeds and shift up early.When you reach your desired traveling speed,
shift to the highest suitable gear and drive at
constant speed.
As a rule: driving at low engine speeds lowers
fuel consumption and reduces wear.
Coasting
When approaching a red traffic light, take your
foot off the accelerator and let the vehicle coast
to a halt in the highest suitable gear.
On a downhill gradient, take your foot off the
accelerator and let the vehicle coast in a suitable
gear.
Fuel supply is shut off automatically when the
vehicle is coasting.
Switch off the engine during lengthy
stops
Switch off the engine when stopping for lengthy
periods, e.g. at traffic lights, railroad crossings or
in traffic jams.
Have the vehicle serviced
Have your vehicle serviced regularly to achieve
good economy and a long vehicle life. The man-
ufacturer of your MINI recommends having the
vehicle serviced by a MINI dealer. Also note the
MINI Maintenance System, page119.
Page 166 of 174

Everything from A to Z
164
Gross vehicle weight, refer to
Weights157
H
Halogen lamps
– replacing bulb126
Handbrake, refer to Parking
brake45
Hands-free system14
Hazard warning flashers14
Head airbags71
Head restraints37
– sitting safely35
Headlamp control,
automatic74
Headlamp flasher48
– indicator lamp11,140
Headlamps
– replacing bulb126
Headlamps, care122
Headlight glass lens126
Heated
– mirrors39
– rear window80,82
– seats38
Heating79
– mirrors39
– rear window80,82
– seats38
Heavy loads, refer to Stowing
cargo96
Height adjustment
– seats36
– steering wheel40
Height, refer to
Dimensions155
High beams76
– headlamp flasher76
– indicator lamp140
– replacing bulb126
High water, refer to Driving
through water93
Hill Assist65
Hills93
Holders for cups88
Homepage4Hood116
Horn10
Hot exhaust system92
Hydroplaning92I
Ice warning53
Ignition44
– switched off44
– switched on44
Ignition key position 1, refer to
Radio readiness44
Ignition key position 2, refer to
Ignition on44
Ignition key, refer to
Integrated key/remote
control18
Ignition lock44
Imprint2
Indicator and warning
lamps13,140
– Tire Pressure Monitor TPM69
Indicator lighting, refer to
Instrument lighting77
Individual air distribution81
Individual settings, refer to
Personal Profile18
Inflation pressure monitoring,
refer to Tire Pressure Monitor
TPM68
Initializing
– Flat Tire Monitor FTM66
– glass sunroof, electric29
Instrument cluster, refer to
Displays12
Instrument lighting77
Instrument panel, refer to
Cockpit10
Instrument panel, refer to
Displays12
Integrated key18
Integrated universal remote
control84
Interior lamps77
– remote control21Interior rearview mirror39
– automatic dimming
feature40
Interlock46
Intermittent mode of the
wipers49
Internet page4
J
Jacking points134
Jets, refer to Window washer
nozzles51
Jumpering, refer to Jump-
starting136
Jump-starting136
K
Key Memory, refer to Personal
Profile18
Key, refer to Keys/remote
controls18
Keyless opening and closing,
refer to Comfort Access26
Keyless-Go, refer to Comfort
Access26
Kickdown47
– automatic transmission with
Steptronic47
Knock control103
L
Lamps and bulbs, replacing
bulbs125
Lamps, refer to Parking lamps/
Low beams74
Lashing eyes, refer to Securing
cargo96
LATCH child-restraint fixing
system42
Leather care123
LEDs light-emitting diodes126
Length, refer to
Dimensions155
License plate lamp
– bulb replacement129