wheel MINI Convertible 2010 Owner's Manual
[x] Cancel search | Manufacturer: MINI, Model Year: 2010, Model line: Convertible, Model: MINI Convertible 2010Pages: 174, PDF Size: 3.05 MB
Page 5 of 174

REFERENCEAT A GLANCE CONTROLS DRIVING TIPS MOBILITY
3
CONTENTS
The fastest way to find information on a particu-
lar topic or item is by using the index, refer to
page160.
Using this Owner's Manual
4Notes
6Reporting safety defects
AT A GLANCE
10Cockpit
CONTROLS
18Opening and closing
35Adjustments
41Transporting children safely
44Driving
53Controls overview
63Technology for driving comfort and safety
74Lamps
79Climate
84Practical interior accessories
DRIVING TIPS
92Things to remember when driving
MOBILITY
102Refueling
104Wheels and tires
116Under the hood
119Maintenance
121Care
125Replacing components
136Giving and receiving assistance
140Indicator and warning lamps
REFERENCE
154Technical data
160Everything from A to Z
Page 7 of 174

REFERENCEAT A GLANCE CONTROLS DRIVING TIPS MOBILITY
5
For your safety
Maintenance and repair
Advanced technology, e.g. the use of
modern materials and powerful electron-
ics, requires specially adapted maintenance and
repair methods. Therefore, have the necessary
work on your MINI only carried out by a MINI
dealer or a workshop that has specially trained
personnel working in accordance with the spec-
ifications of the MINI manufacturer. If this work
is not carried out properly, there is a danger of
subsequent damage and related safety haz-
ards.<
Parts and accessories
For your own safety, use genuine parts
and accessories approved by the manu-
facturer of the MINI.
When you purchase accessories tested
and approved by the manufacturer of the MINI
and Original MINI Parts, you simultaneously
acquire the assurance that they have been thor-
oughly tested by the manufacturer of the MINI
to ensure optimum performance when installed
on your vehicle.
The manufacturer of the MINI warrants these
parts to be free from defects in material and
workmanship.
The manufacturer of the MINI will not accept any
liability for damage resulting from installation of
parts and accessories not approved by the man-
ufacturer of the MINI.
The manufacturer of the MINI cannot test every
product made by other manufacturers to verify
i f i t c a n b e u s e d o n a M I N I s a f e l y a n d w i t h o u t r i s k
to either the vehicle, its operation, or its occu-
pants.
Original MINI Parts, MINI Accessories and other
products approved by the manufacturer of the
MINI, together with professional advice on using
these items, are available from all MINI dealers.
Installation and operation of accessories that
have not been approved by the manufacturer of
your MINI, such as alarms, radios, amplifiers,
radar detectors, wheels, suspension compo-nents, brake dust shields, telephones, including
operation of any mobile phone from within the
vehicle without using an externally mounted
antenna, or transceiver equipment, for instance,
CBs, walkie-talkies, ham radios or similar acces-
sories, may cause extensive damage to the vehi-
cle, compromise its safety, interfere with the
vehicle's electrical system or affect the validity of
the MINI Limited Warranty. See your MINI dealer
for additional information.<
Maintenance, replacement, or repair of
the emission control devices and systems
may be performed by any automotive repair
establishment or individual using any certified
automotive part.
warning:
Engine exhaust and a wide variety of
automobile components and parts,
including components found in the interior fur-
nishings in a vehicle, contain or emit chemicals
known to the State of California to cause cancer
and birth defects and reproductive harm. In
addition, certain fluids contained in vehicles and
certain products of component wear contain or
emit chemicals known to the State of California
to cause cancer and birth defects or other repro-
ductive harm.
Battery posts, terminals and related accessories
contain lead and lead compounds. Wash your
hands after handling.
Used engine oil contains chemicals that have
caused cancer in laboratory animals. Always
protect your skin by washing thoroughly with
soap and water.<
Service and warranty
We recommend that you read this publication
thoroughly.
Your MINI is covered by the following warran-
ties:
>New Vehicle Limited Warranty
>Rust Perforation Limited Warranty
Page 12 of 174

Cockpit
10
Cockpit
Around the steering wheel: Controls and displays
1Adjusting the exterior mirrors, folding them
in and out
*39
2
Parking lamps74
Low beams74
Automatic
headlamp control
*74
Turn signals48
High beams76
Headlamp flasher48
Roadside parking lamps
*76
Computer
*54
Page 13 of 174

REFERENCE
AT A GLANCE CONTROLS DRIVING TIPS MOBILITY
11
3Always Open Timer55
7Ignition lock44
8Buttons
* on steering wheel
9Horn: the entire surface
10Adjusting the steering wheel40
11Releasing the hood116 4Tachometer12
Instrument lighting77
Resetting the trip odometer53
5
Wiper system49
6Switching the ignition on/off and
starting/stopping the engine44
Continuing cruise control
*51
Right:
Storing speed and accelerating or
decelerating
Left:
Increase or reduce volume
Activating/deactivating cruise
control
*52
Telephone
*:
Accepting and ending a call, start-
ing dialing
* of selected phone
number and redialing if no phone
number is selected
Activating/deactivating voice acti-
vation system
*
Changing radio station
Selecting music track
Scrolling through phone book and
lists with stored phone numbers
Page 27 of 174

REFERENCEAT A GLANCE CONTROLS DRIVING TIPS MOBILITY
25
The handle recesses on the interior trim panel of
the liftgate make it easier to pull it down.
Alarm system*
The concept
The alarm system, when activated, reacts if:
>A door, the engine compartment lid or the
liftgate is opened
>There is movement inside the car
>The car's inclination changes, for instance if
an attempt is made to jack it up and steal the
wheels or to raise it prior to towing away
>There is an interruption in the power supply
from the battery
The alarm system briefly indicates unauthorized
entry or tampering by means of:
>An acoustic alarm
>Switching on the hazard warning flashers
Arming and disarming
Whenever the car is locked or unlocked, the
alarm system is armed or disarmed.
Even when the alarm system is armed, you can
open the liftgate by means of the button
on the remote control.
When you subsequently close the liftgate it is
again locked and monitored.
In certain market-specific versions,
unlocking via the door lock triggers the
alarm.<
Panic mode*
You can activate the alarm system if you find
yourself in a dangerous situation.
Press the button for at least two seconds.
Switching off the alarm:
Press any button.
Switching off an alarm
>Unlock the car with the remote control.
>Insert the key fully into the ignition lock.
>In cars with Comfort Access
*, press the but-
ton on the door lock.
Display on the revolution counter
When the system is armed, all LEDs pulse. After
approx. 16 minutes one LED flashes.
>LEDs pulse or LED flashes: system is armed.
>One LED flashes at short intervals:
A door, the hood or the liftgate is not prop-
erly closed. Even if these are not closed fully,
the remaining items are deadlocked and the
LEDs pulse after approx. 10 seconds for
approx. 16 minutes. Afterwards, one LED
flashes.
The interior movement detector is not acti-
vated.
>LEDs go out after the vehicle is unlocked:
No attempt was made to tamper with the
car.
>LEDs flash after unlocking until the key is
inserted in the ignition, but for no longer
than approx. 5 minutes: an attempt was
made to tamper with the car.
Page 28 of 174

Opening and closing
26
Tilt alarm sensor
The vehicle's inclination is monitored. The alarm
is triggered, for instance, if an attempt is made
to steal the car's wheels or tow it away.
Interior movement detector
Before the interior movement detector can
operate correctly, the windows and glass roof
must be closed.
MINI Convertible
The passenger compartment is monitored up to
the height of the seat's surface. This way, the
anti-theft alarm system including the interior
motion sensor are armed, even if the convertible
top is open. Falling objects, e.g. tree leaves, may
trigger a false alarm, refer to Avoiding false
alarms.
Avoiding false alarms
The tilt alarm sensor and the interior movement
detector can be switched off together.
This prevents false alarms, e.g. in the following
situations:
>In duplex garages
>When being transported on car-carrying
trains, ferries or trailers
>If pets are to remain inside the car
Switching off the tilt alarm sensor and
interior movement detector
>Press the button on the remote con-
trol twice in succession.
>Lock the vehicle twice with the integrated
key.
LEDs flash in short succession for approx.
2seconds.
The tilt alarm sensor and the interior movement
detector are switched off until the car is next
unlocked and locked.
Comfort Access*
Comfort Access enables you to enter your vehi-
cle without having to hold the remote control in your hand. All you need to do is wear the remote
control close to your body, e.g. in your jacket
pocket. The vehicle automatically detects the
remote control within the immediate vicinity or
in the passenger compartment.
Functional requirements
>The vehicle or the liftgate can only be locked
when the vehicle detects that the remote
control currently in use is outside of the
vehicle.
>The vehicle cannot be locked or unlocked
again until after approx. 2 seconds.
>The engine can only be started when the
vehicle detects that the remote control is
inside the vehicle.
>The doors and liftgate must be closed to be
able to operate the windows and glass sun-
roof
*.
Comfort Access supports the following func-
tions:
>Unlocking/locking the vehicle
>Unlocking the liftgate by itself
>Starting the engine
>MINI Convertible: convenience closing and
soft-top control with the remote control for
Comfort Access
Comparison to standard remote controls
Essentially, it makes no difference whether you
control the above-mentioned functions using
Comfort Access or by pressing the buttons on
the remote control for Comfort Access.
Instructions on opening and closing are found
starting on page18.
Special features regarding the use of Comfort
Access are described below.
If you notice a brief delay while opening or
closing the windows, the glass sunroof or
the convertible top, the system is checking
whether a remote control is inside the vehicle.
Repeat the opening or closing procedure, if nec-
essary.<
Page 37 of 174

REFERENCEAT A GLANCE CONTROLS DRIVING TIPS MOBILITY
35
Adjustments
Sitting safely
The ideal sitting position can make a vital contri-
bution to relaxed, fatigue-free driving. In con-
junction with the safety belts, the head restraints
and the airbags, the seated position has a major
influence on your safety in the event of an acci-
dent. To ensure that the safety systems operate
with optimal efficiency, we strongly urge you to
observe the instructions contained in the follow-
ing section.
For additional information on transporting chil-
dren safely, refer to page41.
Airbags
Always maintain an adequate distance
between yourself and the airbags. Always
grip the steering wheel on the rim, with your
hands in the 3 o'clock and 9 o'clock positions, to
minimize the risk of injury to the hands or arms
in the event of the airbag being triggered off.
No one and nothing should come between the
airbags and the seat occupant.
Do not use the cover of the front airbag on the
front passenger side as a storage area. Ensure
that the front passenger is correctly seated, e.g.
that no feet or legs are propped against the
dashboard. Otherwise, leg injury could result if
the front airbag suddenly deployed.
Make sure that occupants keep their heads
away from the side airbag and do not lean
against the head-level airbag in the MINI; other-
wise injuries can occur when the airbag is trig-
gered.<
Even if you follow all the instructions, injuries
resulting from contact with airbags cannot be
fully excluded, depending on the circumstances.
The ignition and inflation noise may provoke a
mild hearing loss in extremely sensitive individ-
uals. This effect is usually only temporary.
For airbag locations and additional information
on airbags, refer to page71.
Head restraint
A correctly adjusted head restraint reduces the
risk of neck injury in the event of an accident.
Adjust the head restraint in such a way
that its center is at approx. ear level. Oth-
erwise, there is an increased risk of injury in the
event of an accident.<
Head restraints, refer to page37.
Safety belt
Before every drive, make sure that all occupants
wear their safety belts. Airbags complement the
safety belt as an additional safety device, but
they do not represent a substitute.
Number of safety belts
Never allow more than one person to
wear a single safety belt. Never allow
infants or small children to ride in a passenger's
lap.
Make sure that the belt in the lap area sits low
across the hips and does not press against the
abdomen. The safety belt must not rest against
the throat, run across sharp edges, pass over
hard or fragile objects or be pinched. Fasten the
safety belt so that it is pulled taut across the lap
and shoulder, fitting the body snugly without
any twists. Otherwise, the belt could slide over
the hips in the event of a frontal collision and
injure the abdomen. Avoid wearing bulky cloth-
ing and regularly pull the belt in the upper-body
area taut; otherwise, its restraining effect could
be impaired.<
Safety belts, refer to page38.
Seats
Note before adjusting
Never attempt to adjust your seat while
the vehicle is moving. The seat could
respond with unexpected movement, and the
ensuing loss of vehicle control could lead to an
accident.
Page 38 of 174

Adjustments
36
On the front passenger seat as well, do not
incline the backrest too far to the rear while the
vehicle is being driven; otherwise, there is a dan-
ger in the event of an accident of sliding under
the safety belt, eliminating the protection nor-
mally provided by the belt.<
Comply with the instructions on head restraint
height on page37 and on damaged safety belts
on page39.
Seat adjustment
Observe the instructions on page35 to
ensure the best possible personal protec-
tion.<
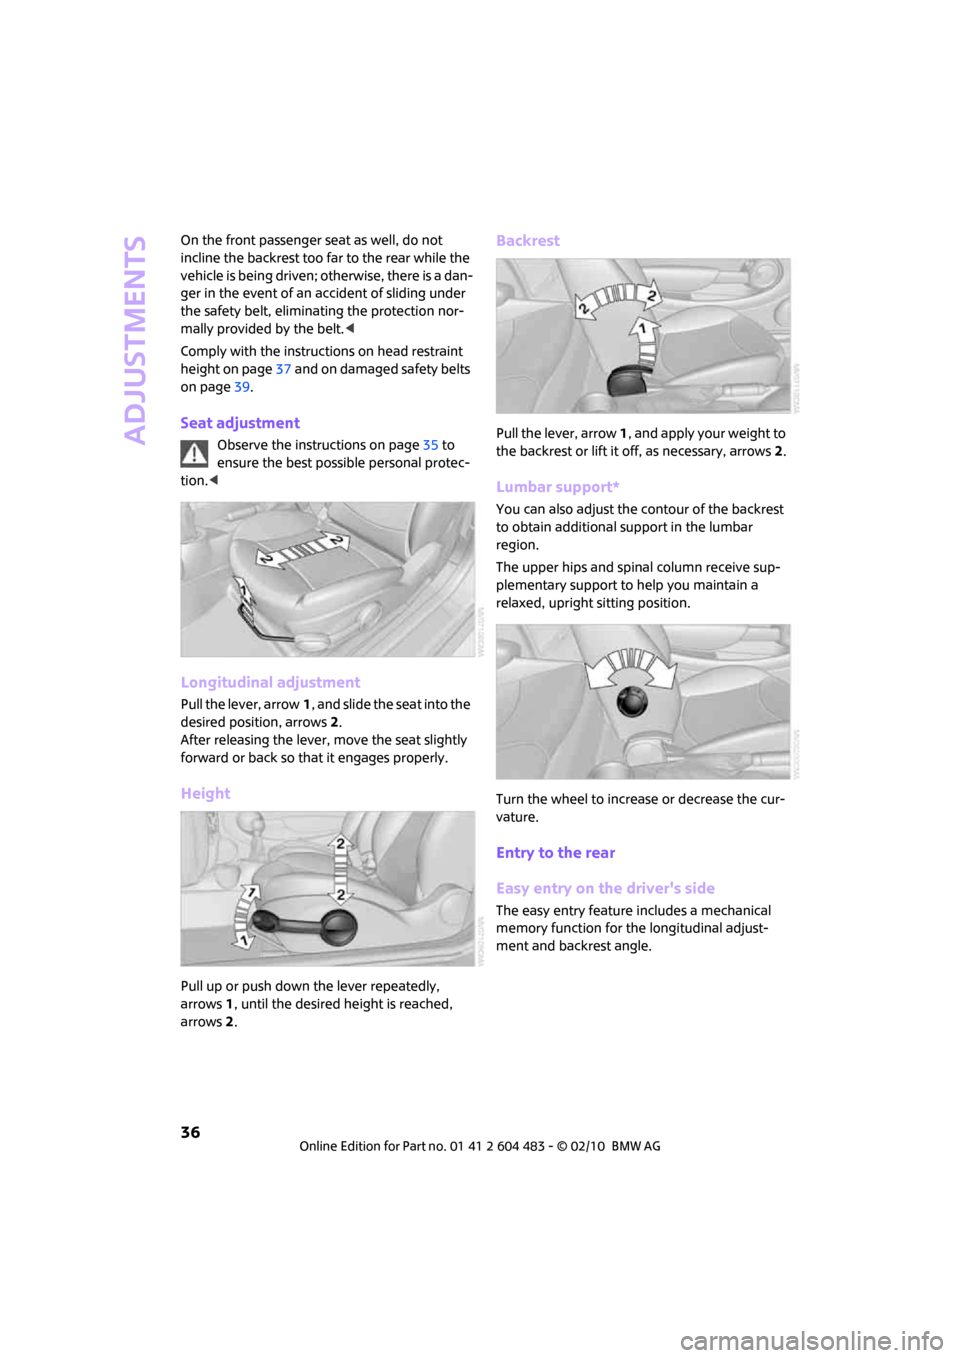
Longitudinal adjustment
Pull the lever, arrow1, and slide the seat into the
desired position, arrows2.
After releasing the lever, move the seat slightly
forward or back so that it engages properly.
Height
Pull up or push down the lever repeatedly,
arrows 1, until the desired height is reached,
arrows 2.
Backrest
Pull the lever, arrow 1, and apply your weight to
the backrest or lift it off, as necessary, arrows 2.
Lumbar support*
You can also adjust the contour of the backrest
to obtain additional support in the lumbar
region.
The upper hips and spinal column receive sup-
plementary support to help you maintain a
relaxed, upright sitting position.
Turn the wheel to increase or decrease the cur-
vature.
Entry to the rear
Easy entry on the driver's side
The easy entry feature includes a mechanical
memory function for the longitudinal adjust-
ment and backrest angle.
Page 42 of 174

Adjustments
40
Interior mirror, automatic dimming*
The automatic dimming feature of the interior
rearview mirror
* is controlled by two photo cells
in the mirror. One photo cell is in the mirror
frame, arrow; the other is on the back of the mir-
ror.
In order to ensure that the system functions cor-
rectly, keep the photo cells clean, do not cover
the area between the interior rearview mirror
and windshield, and do not affix adhesive labels
or stickers of any kind to the windshield directly
in front of the mirror.
Steering wheel
Adjustments
Do not adjust the steering wheel position
while the car is in motion; otherwise, there
is a risk of accident due to an unexpected move-
ment.<
1.Fold the lever down.
2.Move the steering wheel to the preferred
distance and angle to suit your seated posi-
tion.
3.Swing the lever back up.Do not use force to swing the lever
back up; otherwise, the mechanism
will be damaged.<
Page 47 of 174

REFERENCEAT A GLANCE CONTROLS DRIVING TIPS MOBILITY
45
Starting the engine
Do not allow the engine to run in enclosed
areas; otherwise, inhalation of the noxious
exhaust gases can lead to loss of consciousness
and death. Exhaust gases contain carbon mon-
oxide, an odorless and colorless, but highly toxic
gas. Never leave an unattended vehicle with the
engine running; otherwise, such a vehicle repre-
sents a potential safety hazard.
Before leaving the car while the engine is run-
ning, place the transmission in neutral or move
the selector lever to position P and forcefully
apply the parking brake to prevent the car from
moving.<
Avoid frequent starting in quick succes-
sion or repeated start attempts in which
the engine does not start. Otherwise, the fuel is
not burned or inadequately burned and there is
a danger of overheating and damaging the cat-
alytic converter.<
Do not let the engine warm up with the vehicle
at a standstill. Move off immediately at a moder-
ate engine speed.
When starting the engine, do not depress the
accelerator pedal.
Manual transmission
Key in ignition lock or inside vehicle with Com-
fort Access, refer to page26.
1.Depress the brake.
2.Depress the clutch.
3.Press the start/stop button.
Automatic transmission
Key in ignition lock or inside vehicle with Com-
fort Access, refer to page26.1.Depress the brake.
2.Shift the selector lever into position P or N.
3.Press the start/stop button.
The starter operates automatically for a certain
time, and stops automatically as soon as the
engine has started.
Switching off the engine
Always take the key with you when you
leave the vehicle.
When parking, apply the parking brake force-
fully; otherwise, the vehicle could begin to roll.<
Manual transmission
1.With the car at a standstill, press the start/
stop button.
2.Shift into first gear or reverse.
3.Forcefully apply the parking brake.
Automatic transmission
1.With the car at a standstill, move the selector
lever to position P.
2.Press the start/stop button.
3.Forcefully apply the parking brake.
Before driving into a car wash
By following these steps, the vehicle is able to
roll:
1.Place the remote control, even with Comfort
Access, in the ignition lock.
2.Depress the brake.
3.Move the selector lever to position N.
4.Switch off the engine.
Parking brake
The parking brake is primarily intended to pre-
vent the vehicle from rolling while parked; it
brakes the rear wheels.
Applying
The lever locks in position automatically.