key MINI COOPER 2003 User Guide
[x] Cancel search | Manufacturer: MINI, Model Year: 2003, Model line: COOPER, Model: MINI COOPER 2003Pages: 148, PDF Size: 3.17 MB
Page 38 of 148

36
ENTRY TO THE REAR HEATED SEATS
*
2. Fold the backrest back to the home posi-
tion to lock the seat.
When returning the seat to the rear
position, ensure that no one is
injured and that no objects are damaged.
Engage and lock both seats and backrests
into position prior to driving, otherwise
unexpected movement could increase the
risk of accident.<
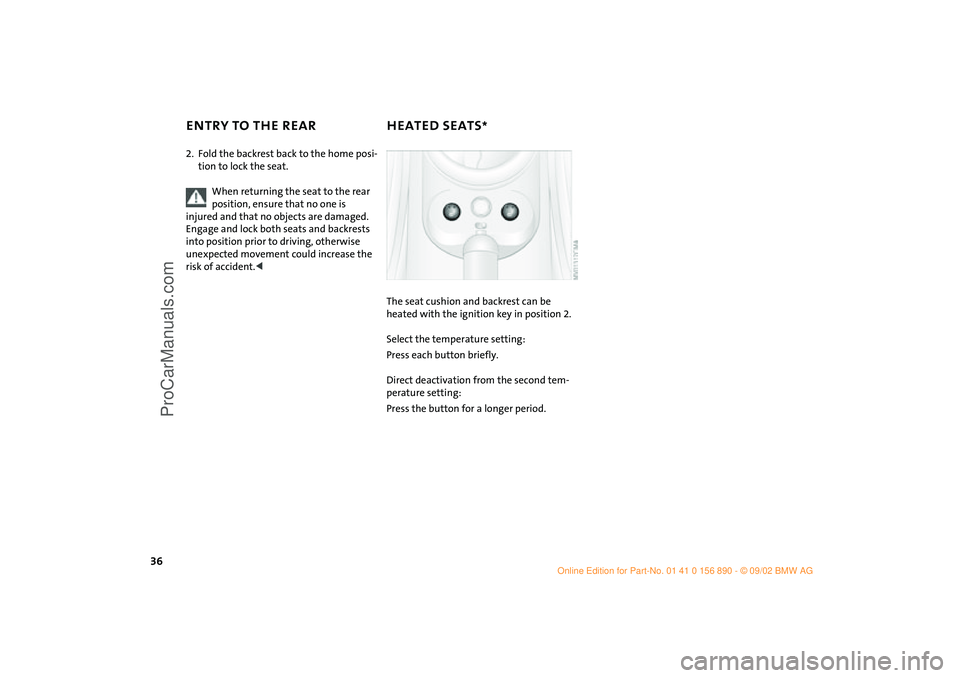
The seat cushion and backrest can be
heated with the ignition key in position 2.
Select the temperature setting:
Press each button briefly.
Direct deactivation from the second tem-
perature setting:
Press the button for a longer period.
ba.book Seite 36 Montag, 5. August 2002 8:09 20
ProCarManuals.com
Page 41 of 148

39
OVERVIEW REPAIRS OPERATIONCONTROLS DATA INDEX
MIRRORS Adjusting exterior mirrors1Switch for choosing between the left and
right mirror
2Switch for 4-way adjustmentManual adjustmentThe mirrors can also be adjusted manually:
Press the edge of the lens.Electric heating*Both mirrors are heated automatically
when the ignition key is in position 2.
Interior rearview mirror To reduce glare from vehicles behind you
when you are driving at night:
Tilt the lever forward.Illuminated vanity mirrorFrom ignition key position 1:
1. Fold down the sun visor
2. Fold the cover panel upwards.Sun visorsCan be swung sideways.
Interior mirror, automatic dimming* This mirror dims automatically as required.
The mirror becomes clear again when you
engage reverse gear or select position R on
the selector lever.
Keep the photocells free and clean to
ensure that the mirror functions perfectly.
There is one photocell in the mirror frame;
the other is on the back of the mirror.
Do not cover the area between the
inside rearview mirror and the wind-
shield, and do not place stickers or toll tags
on the windshield in front of the mirror.<
ba.book Seite 39 Montag, 5. August 2002 8:09 20
ProCarManuals.com
Page 43 of 148

41
OVERVIEW REPAIRS OPERATIONCONTROLS DATA INDEX
AIRBAGS TRANSPORTING CHILDREN SAFELYIndicator lamp
The indicator lamp on the instru-
ment panel shows the airbag sys-
tem status starting from ignition
key position 1.
System operational:
>The indicator lamp comes on briefly.
System malfunction:
>The indicator lamp does not come on
>The indicator lamp fails to go out after
the engine has been started, or it comes
on during normal driving.
A system defect could prevent the airbags
from deploying in response to a severe
impact occurring within the system's nor-
mal triggering range.
Have the airbag system checked as soon as
possible by your MINI Dealer.
Children younger than 12 years of age or
smaller than 5 ft / 150 cm must be trans-
ported in suitable child-restraint system.
Otherwise there is an increased risk of
injury in the event of an accident.
Commercially-available child-restraint sys-
tems are designed to be secured with a lap
belt or with the lap belt portion of a combi-
nation lap/shoulder belt. Improperly or
inadequately installed restraint systems
can increase the risk of injury to children.
Always read and follow the instructions
that come with the system.
If you use a child-restraint system with a
tether strap:
Your vehicle has one of two different types
of child-restraint anchor fittings on the
back of the rear seats, see arrows 1 or 2.
Depending on the location selected for
seating in the rear passenger area, attach
the tether strap to the corresponding
anchorage point to secure the child-
restraint system.
Adjust the tether strap according to the
child-restraint manufacturer's instructions.
Anchor fitting 1 is shown above.
Anchor fitting 2 is shown in the next
column.<
ba.book Seite 41 Montag, 5. August 2002 8:09 20
ProCarManuals.com
Page 46 of 148

44
VEHICLE MEMORY How the system functionsNo doubt you have often reflected on how
great it would be if you could configure
your vehicle's various adjustment settings
to meet your own personal requirements.
In developing this vehicle, the manufac-
turer of the MINI has incorporated a num-
ber of options that your MINI Dealer can
program to reflect your individual prefer-
ences.
What the system can doYour MINI Dealer can provide you with
details on the capabilities of the Vehicle
Memory system.
Examples for Vehicle Memory:
>Automatic locking after starting to drive,
see page 26
>Selective central locking system, see
pages 24, 25
>Automatically opening the sliding/tilt
sunroof, see page 29
>Convenience opening, see pages 24,
25, 26
>Delayed lighting shut off, "Follow-me-
home" lamps, see page 52
>Daytime driving lamps, see page 52
>Speed-dependent windshield wipers, see
page 55
>Acoustic ignition key warning,
see page 45
>Fuel consumption display, see page 61
>Temperature display, see page 61
>Volume control PDC, see page 66
>Acoustic alarm for starting PDC
activation, see page 66This symbol alerts you to Vehicle
Memory functions in the Owner's
Manual<
ba.book Seite 44 Montag, 5. August 2002 8:09 20
ProCarManuals.com
Page 47 of 148

45
OVERVIEW REPAIRS OPERATIONCONTROLS DATA INDEX
IGNITION LOCK 0Steering locked
1Steering unlocked
2Ignition switched on
3Starting the engine0Steering locked The key can be inserted or removed in this
position only.
To lock the steering:
1. Remove the key
2. Turn the steering wheel slightly to the
left or right until the lock engages.
A sound alarm goes off if the key
remains in the ignition after opening
the driver's door.<
You can have this function activated/
deactivated by your MINI Dealer.<
Vehicles with Continuously Variable
automatic Transmission (CVT):
Do not move the selector lever from
position P until the engine is running.
Your vehicle is equipped with an interlock.
Therefore, the ignition key cannot be
turned to position 0 and removed until the
selector lever is in position P – Interlock.<
1Steering unlocked Individual electrical accessories are ready
for operation.
You will find that it is often easier to turn
the ignition key from position 0 to
position 1 when you move the steering
wheel slightly to help disengage the lock.2Ignition switched onAll electrical accessories are ready for oper-
ation.3Starting the engine
Vehicles with manual transmission:
Step on the clutch when starting the
vehicle. A lockout prevents the engine from
starting if the clutch is not depressed.<
ba.book Seite 45 Montag, 5. August 2002 8:09 20
ProCarManuals.com
Page 48 of 148

46
STARTING THE ENGINE Do not allow the engine to warm up with
the vehicle at a standstill. Move off imme-
diately at a moderate engine speed.
Do not allow the engine to run in
enclosed spaces. The exhaust gases
contain carbon monoxide, an odorless and
colorless, but highly toxic gas. Breathing
the exhaust gases poses an extreme health
risk, and can lead to unconsciousness and
death.
Do not leave the vehicle unattended with
the engine running. This is a safety hazard.
When driving, standing at idle or parking
the vehicle, take care to avoid contact
between the hot exhaust system and flam-
mable materials – e.g. hay, leaves, grass,
etc. Such contact could lead to a fire, result-
ing in serious personal injury and property
damage.<
StartingWhen starting the engine, do not press the
accelerator pedal.
Do not actuate the starter for too
short a time. Do not turn it for more
than approx. 20 seconds. Release the igni-
tion key immediately when the engine
starts.
Extended starting attempts, characterized
by excessively frequent or long periods
with the starter engaged, can lead to dam-
age in the catalytic converter.<
If the engine does not start on the first
attempt, for instance if the engine is very
hot or cold:
>When starting the engine, press the gas
pedal down halfway.
When first starting the engine at very low
temperatures – from +5 7 / –15 6:
>When starting the engine, press the gas
pedal down halfway
>For the initial start attempt, allow the
starter to remain engaged somewhat
longer, approx. 10 seconds.
Manual transmission1. Engage the parking brake
2. Put the manual gearshift lever in neutral
3. Press the clutch pedal
4. Start the engine.Continuously Variable automatic
Transmission (CVT)*1. Press the footbrake
2. Put the selector lever in position P or N
3. Start the engine.
Move the selector lever to position P
and engage the parking brake before
leaving your vehicle with the engine run-
ning.
Do not leave the vehicle unattended with
the engine running. This is a safety haz-
ard.<
ba.book Seite 46 Montag, 5. August 2002 8:09 20
ProCarManuals.com
Page 49 of 148

47
OVERVIEW REPAIRS OPERATIONCONTROLS DATA INDEX
SWITCHING OFF THE ENGINE PARKING BRAKE
You should never remove the ignition
key when the vehicle is in motion, as
the steering lock could engage.
When you leave the vehicle, always remove
the ignition key and engage the steering
lock.
When you park on downward slopes,
engage the parking brake.<
Manual transmissionTurn the ignition key to position 1 or 0.Continuously Variable automatic
Transmission (CVT)*Engage selector lever position P, turn the
ignition key to position 1 or 0.
The parking brake is designed primarily to
prevent the vehicle from rolling when it is
parked. It operates against the rear wheels.To engageLever automatically locks in position.
The warning lamp in the instrument cluster
comes on when the ignition key is in
position 2, see page 16.To release1. Pull up slightly
2. Press the button
3. Push the lever downwards.
If, in exceptional circumstances, it
should be necessary to engage the
parking brake while the vehicle is in
motion, do not pull the lever with excessive
pressure. Keep your thumb pressed against
the release button while carefully pulling
the lever up to apply moderate pressure.
Excessive pressure can lead to overbraking
and loss of traction, i.e. fishtailing, at the
rear axle.
The brake lamps do not come on when the
parking brake is engaged.
Vehicles with manual transmission:
Always engage the parking brake when
parking on hills and inclined surfaces, as
first gear or reverse may not provide ade-
quate resistance to rolling.
Vehicles with CVT:
Place the selector lever in P.<
ba.book Seite 47 Montag, 5. August 2002 8:09 20
ProCarManuals.com
Page 50 of 148

48
MANUAL TRANSMISSION The manual gearshift lever neutral plane
lies in the gear plane of the 3rd / 4th gear.
When shifting from each gear into Neutral,
the manual gearshift lever springs back
automatically into the gearshift lever neu-
tral plane.6-speed transmission*
When changing gear in the 5th/6th
gear plane, press the gearshift lever
to the right to prevent inadvertently shift-
ing to a gear of the 3rd/4th gear plane.<
Reverse Before selecting reverse gear, ensure the
vehicle is stationary; then, fully depress the
clutch pedal and pause briefly before mov-
ing the gearshift lever into position.
5-speed transmission:
Press the gearshift lever to the right and to
the back.
6-speed transmission:
Press the gearshift lever towards the left.
Thereby overcome the slight resistance and
press forward.
As you do this, the backup lamps will turn
on automatically when the ignition key is
in position 2.Do not hold the vehicle in place on
slopes by slipping or "riding" the
clutch. Use the parking brake instead.
Riding the clutch causes the clutch assem-
bly to wear out sooner.<
ba.book Seite 48 Montag, 5. August 2002 8:09 20
ProCarManuals.com
Page 54 of 148

52
PARKING LAMPS/LOW BEAMS SIGNAL/HEADLAMP FLASHER Switching on the parking lampsTurn to the first position. The front, rear
and side vehicle lighting is switched on.
Parking light on one side, see following
column.Switching on the low beamsTurn to the second position. With the low
beams on and with the ignition switched
off, only the parking lamps will remain on."Follow me home" lampsIf you switch off the engine with the low
beams on, and then switch off the low
beams, they remain lit for a set length of
time.
You can have this function set by
your MINI Dealer.<
Switching on the standing lampsFor parking, you can activate lights on one
side of the vehicle. Observe local laws.
In ignition key position 0:
Move the lever into the relevant turn signal
indicator position."Lights on" warningIf the lights have not been switched off and
the ignition key is in position 0, an acoustic
signal sounds for a few seconds when you
open the driver's door to remind you that
the lights have not been switched off.Daytime driving lamps*If you desire, the light switch can be left in
the second position:
When the ignition is switched off, the
external lighting is also switched off.
You can have this function set by
your MINI Dealer.<
1Turn signal indicator – green indicator
lamps and periodic clicking sound from
the relay
2High beams/Headlamp flasher – blue
indicator lampTo signal brieflyPress the lever up to but not beyond the
point of resistance.
If the blinking of the indicator lamp
and the clicking from the relay are
both faster than normal: one of the turn
signal indicators has failed.<
ba.book Seite 52 Montag, 5. August 2002 8:09 20
ProCarManuals.com
Page 56 of 148

54
LIGHT-EMITTING DIODES WASHER/WIPER SYSTEM Light-emitting diodes (LEDs) installed
behind translucent lenses serve as the light
source for many of the controls and dis-
plays in your vehicle. These light-emitting
diodes are related to conventional lasers,
and legislation defines them as light-emit-
ting diodes, Class 1.
Do not remove the protective lens
and avoid staring directly at the unfil-
tered beam for several hours, as inflamma-
tion of the iris could result.<
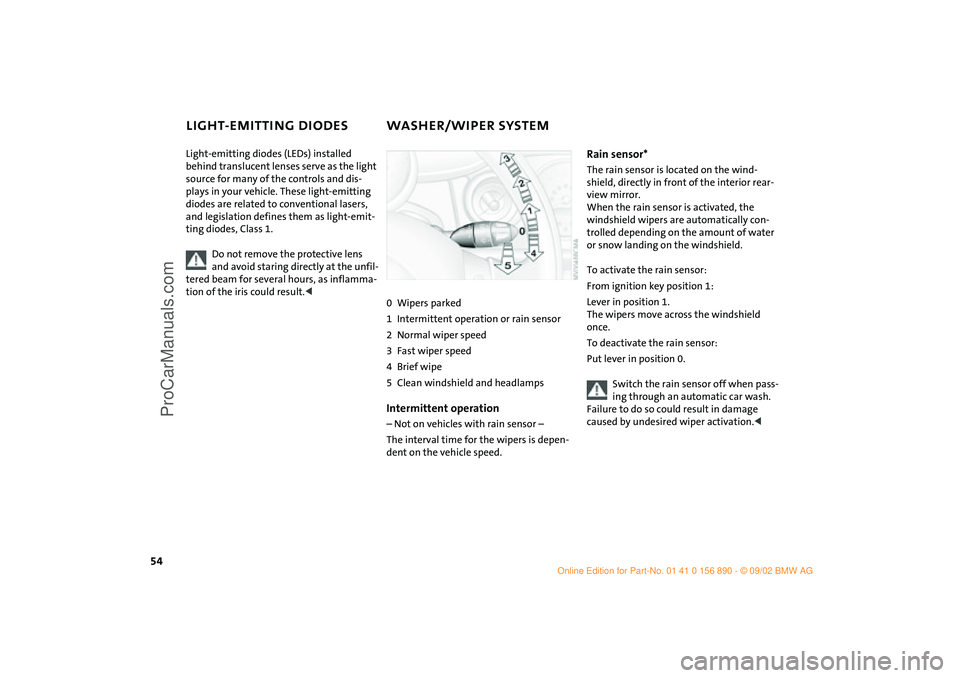
0Wipers parked
1Intermittent operation or rain sensor
2Normal wiper speed
3Fast wiper speed
4Brief wipe
5Clean windshield and headlampsIntermittent operation – Not on vehicles with rain sensor –
The interval time for the wipers is depen-
dent on the vehicle speed.
Rain sensor*The rain sensor is located on the wind-
shield, directly in front of the interior rear-
view mirror.
When the rain sensor is activated, the
windshield wipers are automatically con-
trolled depending on the amount of water
or snow landing on the windshield.
To activate the rain sensor:
From ignition key position 1:
Lever in position 1.
The wipers move across the windshield
once.
To deactivate the rain sensor:
Put lever in position 0.
Switch the rain sensor off when pass-
ing through an automatic car wash.
Failure to do so could result in damage
caused by undesired wiper activation.<
ba.book Seite 54 Montag, 5. August 2002 8:09 20
ProCarManuals.com