change wheel MINI COOPER 2011 Owners Manual
[x] Cancel search | Manufacturer: MINI, Model Year: 2011, Model line: COOPER, Model: MINI COOPER 2011Pages: 210, PDF Size: 3.19 MB
Page 29 of 210
Opening and closingCONTROLS
27
Closing
Make sure that the closing path of the lift-
gate is clear; otherwise, injuries may
occur. <
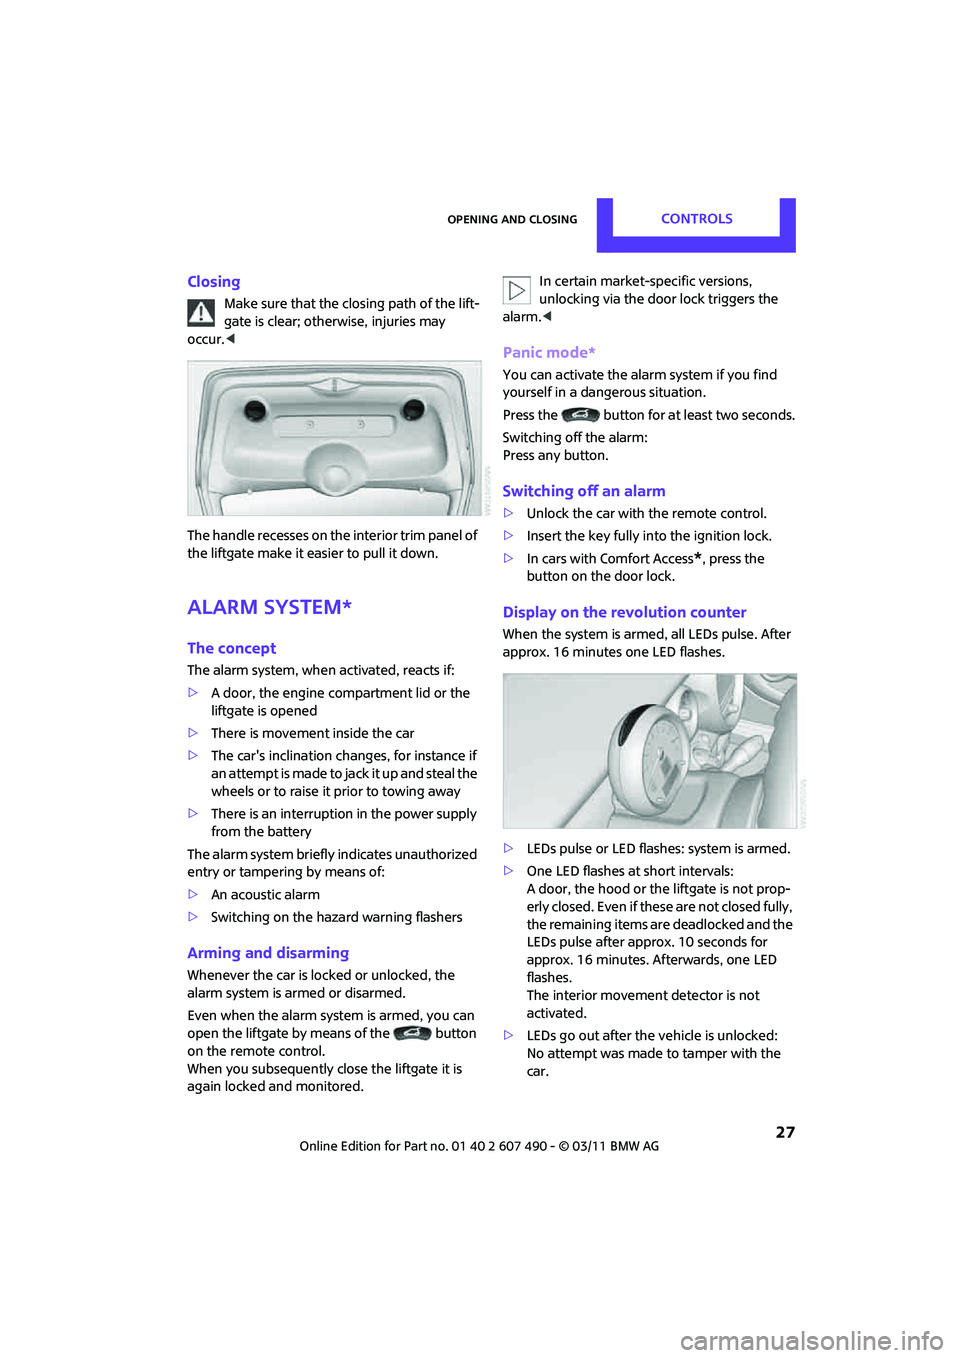
The handle recesses on the interior trim panel of
the liftgate make it easier to pull it down.
Alarm system*
The concept
The alarm system, when activated, reacts if:
> A door, the engine compartment lid or the
liftgate is opened
> There is movement inside the car
> The car's inclination changes, for instance if
an attempt is made to jack it up and steal the
wheels or to raise it prior to towing away
> There is an interruption in the power supply
from the battery
The alarm system briefly indicates unauthorized
entry or tampering by means of:
> An acoustic alarm
> Switching on the hazard warning flashers
Arming and disarming
Whenever the car is locked or unlocked, the
alarm system is armed or disarmed.
Even when the alarm syst em is armed, you can
open the liftgate by means of the button
on the remote control.
When you subsequently close the liftgate it is
again locked and monitored. In certain market-specific versions,
unlocking via the door lock triggers the
alarm. <
Panic mode*
You can activate the alarm system if you find
yourself in a dangerous situation.
Press the button for at least two seconds.
Switching off the alarm:
Press any button.
Switching off an alarm
>Unlock the car with the remote control.
> Insert the key fully into the ignition lock.
> In cars with Comfort Access
*, press the
button on the door lock.
Display on the revolution counter
When the system is armed, all LEDs pulse. After
approx. 16 minutes one LED flashes.
> LEDs pulse or LED flashes: system is armed.
> One LED flashes at short intervals:
A door, the hood or the liftgate is not prop-
erly closed. Even if these are not closed fully,
the remaining items are deadlocked and the
LEDs pulse after approx. 10 seconds for
approx. 16 minutes. Afterwards, one LED
flashes.
The interior movement detector is not
activated.
> LEDs go out after the vehicle is unlocked:
No attempt was made to tamper with the
car.
Page 69 of 210

Technology for driving comfort and safetyCONTROLS
67
Driving stability control
systems
Your MINI has a number of systems that help to
maintain the vehicle's st ability even in adverse
driving conditions.
The laws of physics cannot be repealed,
even with driving stab ility control systems.
An appropriate driving style always remains the
responsibility of the driver. Therefore do not
reduce the additional safety margin by engaging
in hazardous driving thereby running the risk of
an accident. <
Antilock Brake System ABS
ABS prevents locking of the wheels during
braking. Safe steering response is maintained
even during full braking. Active safety is thus
increased.
Braking safely, refer to page 97.
ABS is operational every time you start the
engine.
Cornering Brake Control CBC
Driving stability and steering characteristics are
further enhanced while braking in turns or
during a lane change.
Electronic brake-forc e distribution EBV
The system controls the brake pressure in the
rear wheels to ensure stable braking behavior.
Brake Assist
Rapidly depressing the brake causes this system
to automatically develop maximum braking
force. Thus, the system helps keep braking
distance to a minimum. At the same time, all the
benefits provided by ABS are exploited.
Do not reduce the pressure on the brake for the
duration of the full braking application.
Dynamic Stability Control DSC
The concept
DSC prevents the driving wheels from losing
traction when you pull away from rest or
accelerate.
DSC also detects unstable driving conditions
such as when the vehicle' s rear end fishtails or
the vehicle is sliding on its front wheels. In these
cases, DSC helps the vehicle maintain a safe
course within physical limits by reducing engine
output and through br aking actions at the
individual wheels.
Every time that the engine is started, the DSC is
ready to operate.
Deactivating DSC
Press the button until the DSC OFF indicator light
on the speedometer is on and DSC OFF is dis-
played on the tachometer. DSC is deactivated.
Stabilizing and pr opulsion promoting actions are
no longer executed.
When driving with snow chains or to 'rock free'
in snow, it can be helpfu l to switch off DSC for a
brief period.
To increase vehicle stability, activate DSC again
as soon as possible.
Activating DSC
Press the button again: the DSC indicator lamps
in the display elements go out.
Page 72 of 210
CONTROLSTechnology for driving comfort and safety
70
Functional requirement
The system must have been initialized while the
tire inflation pressure was correct; otherwise,
reliable signaling of a fl at tire is not ensured.
Initialize the system afte r every correction of the
tire inflation pressure and after every tire or
wheel change.
System limitations
Sudden serious tire damage caused by
external influences cannot be indicated in
advance. <
A natural, even pressure loss in all four tires
cannot be detected. Therefore, check the tire
inflation pressure regularly.
In the following situatio ns, the system could be
delayed or malfunction:
> System has not been initialized
> Driving on snowy or sl ippery road surface
> Performance-oriented style of driving: slip in
the drive wheels, high lateral acceleration
> Snow chains are attached
When the vehicle is driven with a space-saver
spare tire
*, page 166, the Flat Tire Monitor
cannot function.
Initializing the system
The initialization process adopts the set inflation
tire pressures as refere nce values for the detec-
tion of a flat tire. Init ialization is started by
confirming the in flation pressures.
Do not initialize the system when driving with
snow chains.
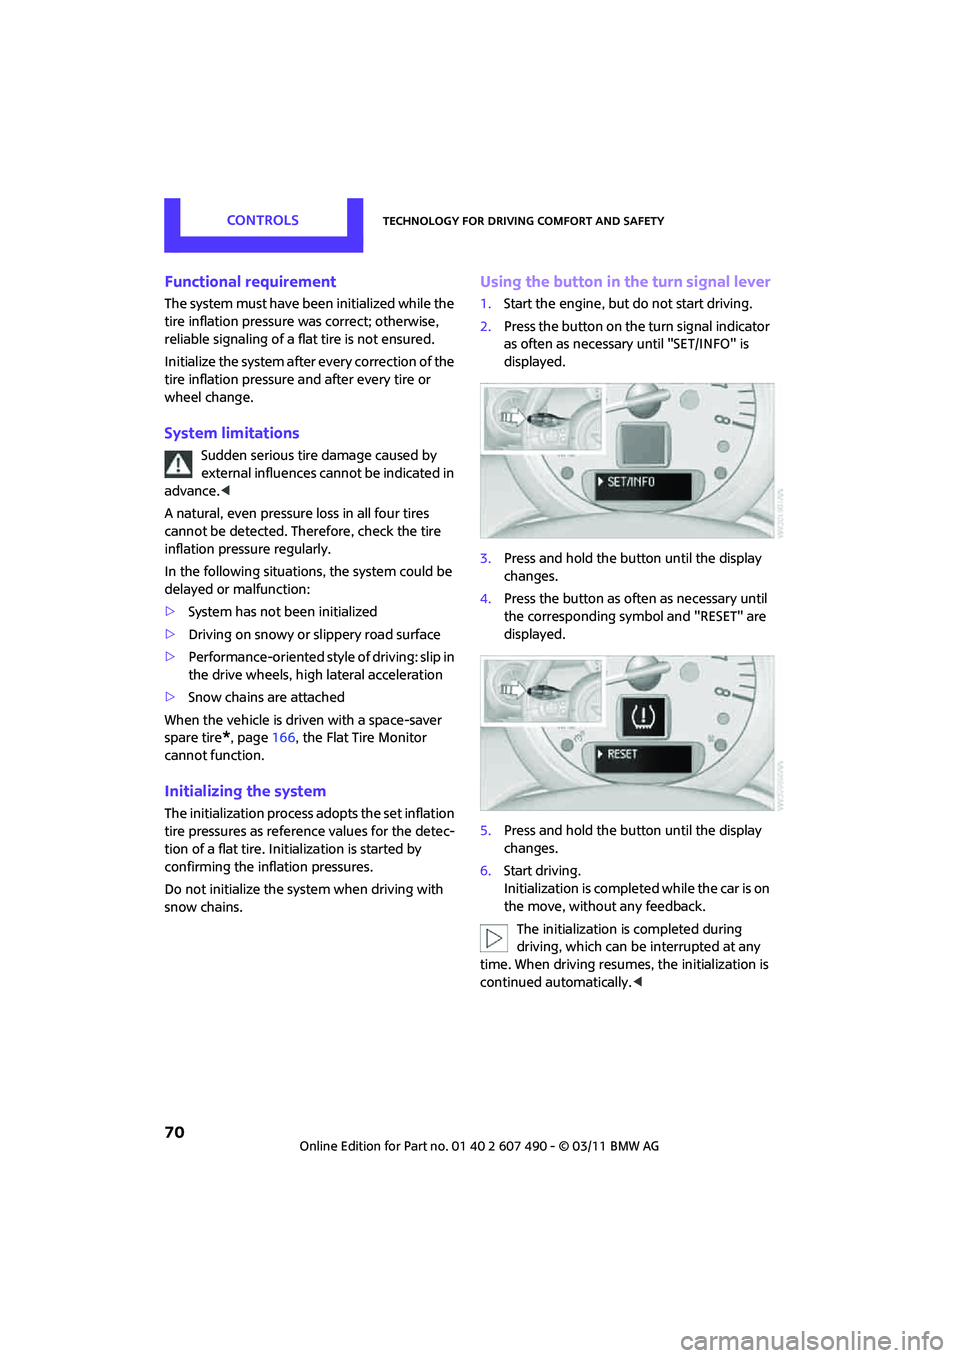
Using the button in the turn signal lever
1. Start the engine, but do not start driving.
2. Press the button on the turn signal indicator
as often as necessary until "SET/INFO" is
displayed.
3. Press and hold the button until the display
changes.
4. Press the button as often as necessary until
the corresponding symbol and "RESET" are
displayed.
5. Press and hold the button until the display
changes.
6. Start driving.
Initialization is completed while the car is on
the move, without any feedback.
The initialization is completed during
driving, which can be interrupted at any
time. When driving resumes, the initialization is
continued automatically. <
Page 73 of 210

Technology for driving comfort and safetyCONTROLS
71
Indication of a flat tire
The warning lamps come on in yellow
and red. An acoustic signal also sounds.
There is a flat tire or a major loss in tire
inflation pressure.
1. Reduce speed and stop the vehicle with
caution. Avoid sudden braking and steering
maneuvers.
2. Check whether the vehicle is equipped with
normal tires or with run-flat tires
*.
Run-flat tires, refer to page 144, are identi-
fied by a circular symbol containing the
letters RSC on the tire sidewall.
If the vehicle is not equipped with run-flat
tires, do not continue driving; continuing
to drive can result in serious accidents. <
When a flat tire is repo rted, the Dynamic Stability
Control DSC is activated.
Actions in the event of a flat tire
Normal tires
1. Identify the damaged tire.
To do so, check the inflation pressure in all
four tires.
The inflation pressure di splay of the Mobility
System, page 163, can be used for this
purpose.
If the inflation pressure in all four tires is
correct, the Flat Tire Monitor might not have
been initialized. The system must then be
initialized.
If it is not possible to identify the damaged
tire, contact your MINI dealer.
2. Use the Mobility System to remedy the flat
tire on the damage d wheel, refer to
page 163, or to replace the damaged wheel,
refer to page 165.
Run-flat tires*
You can continue driving with a damaged tire at
speeds up to 50 mph or 80 km/h.
Continued driving with a flat tire
When driving with a damaged tire:
1.Avoid sudden braking and steering
maneuvers.
2. Do not exceed a speed of 50 mph or 80 km/h.
3. At the next opportunity, check the air
pressure in all four tires.
If the inflation pressure in all four tires is
correct, the Flat Tire Monitor might not have
been initialized. The system must then be
initialized.
Possible driving distance with complete loss of
tire inflation pressure:
The distance it is possible to drive with a flat tire
depends on the load and the stress on the
vehicle while driving.
With an average load, it may be possible to drive
for approx. 50 miles/80 km.
When driving with damage d tires, the handling
characteristics change, e.g. the vehicle will skid
sooner when braking, braking distances will be
longer, or self-steering response will change.
Adapt your driving style accordingly. Avoid
turning abruptly and driv ing over obstacles such
as curbs, potholes, etc.
Since the possible driving distance depends to a
considerable degree on the strain exerted on
the vehicle while driving, it can be shorter or,
with a gentle dr iving style, can also be longer,
depending on the speed, road condition,
external temperature, vehicle load, etc.
Drive cautiously and do not exceed a
speed of 50 mph/80 km/h.
A loss of tire inflation pressure results in a
change in the handling characteristics, e.g.
reduced lane stability during braking, a longer
braking distance and altered self-steering
properties. <
Vibrations or loud noises while driving can
indicate final failure of the tire. Reduce
your speed and bring the vehicle to a stop;
otherwise, pieces of tire may come off, which
could result in an accident. Do not continue
driving and contact your MINI dealer.<
Page 74 of 210
CONTROLSTechnology for driving comfort and safety
72
Tire Pressure Monitor
TPM*
The concept
Measuring the inflation pressure in the four
mounted tires. The system notifies you if there is
a significant loss of pressu re in one or more tires.
Functional requirement
The system must have been reset while the
inflation pressure was correct; otherwise, reli-
able signaling of a flat tire is not ensured.
Always use wheels with TPM electronics to
ensure that the system will operate properly.
Reset the system again af ter each correction of
the tire inflation pressure and after every tire or
wheel change.
System limitations
Sudden, serious tire damage caused by
external influences cannot be indicated in
advance. <
The system does not operate correctly if it has
not been reset. For exampl e, a flat tire may be
indicated despite correct tire inflation pressures.
The system is inactive an d cannot indicate a flat
tire:
> If a wheel without TPM electronics, e.g. a
compact spare wheel
*, is mounted.
> Interference with TPM by other systems or
devices with the sa me transmission
frequency.
Resetting the system
Reset the system again af ter each correction of
the tire inflation pressure and after every tire or
wheel change.
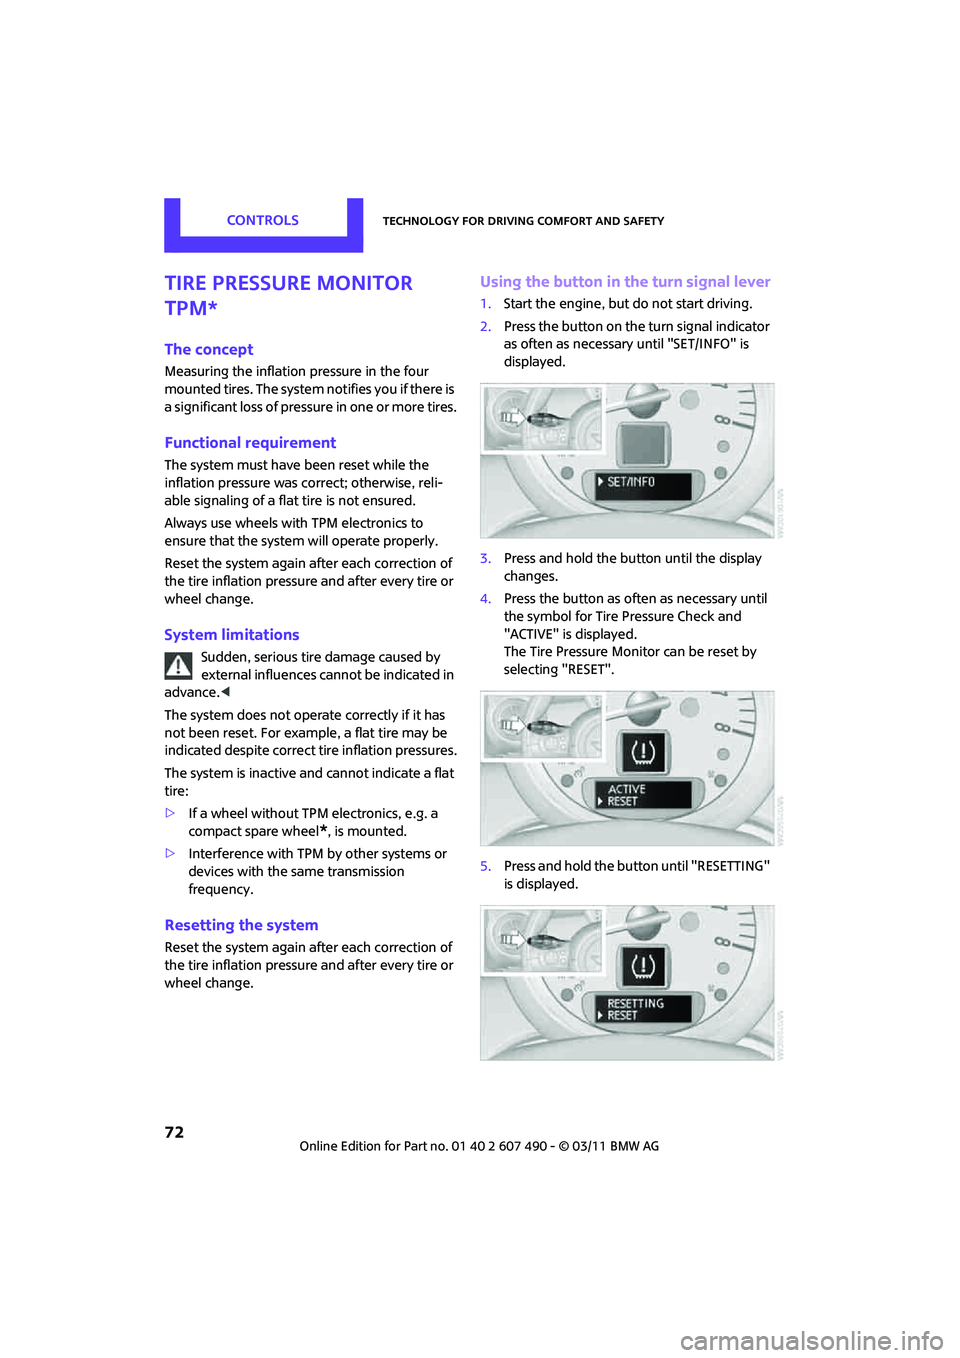
Using the button in the turn signal lever
1. Start the engine, but do not start driving.
2. Press the button on the turn signal indicator
as often as necessary until "SET/INFO" is
displayed.
3. Press and hold the button until the display
changes.
4. Press the button as often as necessary until
the symbol for Tire Pressure Check and
"ACTIVE" is displayed.
The Tire Pressure Monitor can be reset by
selecting "RESET".
5. Press and hold the button until "RESETTING"
is displayed.
Page 75 of 210

Technology for driving comfort and safetyCONTROLS
73
6.Start driving.
After driving a few minu tes, the set inflation
pressures in the tires are accepted as the
target values to be monitored. The system
reset is completed during your drive, and
can be interrupted at any time. When driving
resumes, the reset is continued automati-
cally. The indicator lamp goes out after the
system reset is completed.
Message for low tire inflation pressure
The warning lamps come on in yellow
and red. An acoustic signal also sounds.
The position of the faulty tire is
displayed.
> There is a flat tire or substantial loss of tire
pressure.
> The system was not reset after a wheel
change and thus issues a warning based on
the inflation pressures initialized last.
1. Reduce speed and stop the vehicle with
caution. Avoid sudden braking and steering
maneuvers.
2. Check whether the vehicle is equipped with
normal tires or with run-flat tires
*.
Run-flat tires, refer to page 144, are identi-
fied by a circular symbol containing the
letters RSC on the tire sidewall.
When a low inflation pressure is reported, the
Dynamic Stability Control DSC is activated.
Actions in the event of a flat tire
Normal tires
1. Identify the damaged tire.
To do so, check the inflation pressure in all
four tires. The inflation pressure display of
the Mobility System, refer to page 163, can
be used for this.
If the inflation pressure is correct in all four
tires, then the Tire Pressure Monitor may not
have been reset. The system must then be
reset.
If it is not possible to identify the damaged
tire, contact your MINI dealer. 2.
Use the Mobility System to remedy the flat
tire on the damaged wheel, refer to
page 163, or to replace the damaged wheel,
refer to page. 165.
The use of tire sealant, e.g. Mobility System,
can damage the TPM wheel electronics. In
this case, have the electronics checked and
replaced if necessary at your earliest
opportunity.
Run-flat tires*
You can continue driving with a damaged tire at
speeds up to 50 mph/80 km/h. If the vehicle is not equipped with run-flat
tires, do not continue driving; continuing
to drive can result in serious accidents. <
Continued driving with a flat tire
When driving with a damaged tire:
1.Avoid sudden braking and steering
maneuvers.
2. Do not exceed a speed of 50 mph/80 km/h.
3. At the next opportunity, check the air
pressure in all four tires.
If the inflation pressure is correct in all four
tires, then the Tire Pressure Monitor may not
have been reset. The system must then be
reset.
Possible driving distance with complete loss of
tire inflation pressure:
The distance it is possible to drive with a flat tire
depends on the load and the stress on the
vehicle while driving.
With an average load, it may be possible to drive
for approx. 50 miles/80 km.
When driving with damage d tires, the handling
characteristics change, e.g. the vehicle will skid
sooner when braking, braking distances will be
longer, or self-steering response will change.
Adapt your driving style accordingly. Avoid
turning abruptly and dr iving over obstacles
such as curbs, potholes, etc.
Page 76 of 210
CONTROLSTechnology for driving comfort and safety
74
Since the possible driving distance depends to a
considerable degree on the strain exerted on
the vehicle while driving, it can be shorter or,
with a gentle driving style, can also be longer,
depending on the speed, road condition, exter-
nal temperature, vehicle load, etc.
Drive cautiously and do not exceed a
speed of 50 mph/80 km/h.
A loss of tire inflation pressure results in a
change in the handling characteristics, e.g.
reduced lane stability during braking, a longer
braking distance and altered self-steering
properties. <
Vibrations or loud no ises while driving can
indicate complete failure of the tire.
Reduce your speed and bring the vehicle to a
stop; otherwise, pieces of tire may come off,
which could result in an accident. Do not con-
tinue driving and contac t your MINI dealer.<
Malfunction
The small warning lamp flashes in yel-
low and then lights up continuously; the
larger warning lamp lights up in yellow.
No flat tire can be detected.
Display in the following situations:
> Wheel without TPM electronics is mounted:
If need be, have it checked by your MINI
dealer.
> Malfunction:
Have the system checked.
> TPM was unable to complete the resetting
procedure; reset the system again.
The small warning lamp flashes in
yellow and then lights up continuously;
the larger warning lamp lights up in
yellow. No punctures can be detected.
Display in the following situation:
> Malfunction because of other equipment or
devices, same radio frequency:
After leaving the interference area, the
system is again active automatically.
Declaration according to NHTSA/
FMVSS 138 Tire Pressure Monitoring
Systems
Each tire, including the spare, should be
checked monthly when cold and inflated to the
inflation pressure recommended by the vehicle
manufacturer on the vehicle placard or tire infla-
tion pressure label. If yo ur vehicle has tires of a
different size than the size indicated on the vehi-
cle placard or tire inflation pressure label, you
should determine the proper tire inflation pres-
sure for those tires. As an added safety feature,
your vehicle has been equipped with a tire pres-
sure monitoring system TPMS that illuminates a
low tire pressure telltal e when one or more of
your tires are significantly underinflated.
Accordingly, when the low tire pressure telltale
illuminates, you should st op and check your tires
as soon as possible, and inflate them to the
proper pressure. Driving on a significantly
underinflated tire causes the tire to overheat
and can lead to tire failure. Underinflation also
reduces fuel efficiency and tire tread life, and
may affect the vehicle's handling and stopping
ability. Please note that the TPMS is not a substi-
tute for proper tire maintenance, and it is the
driver's responsibility to maintain correct tire
pressure, even if underi nflation has not reached
the level at which the TPMS low tire pressure
telltale illuminates.
The TPMS malfunction indicator is combined
with the low tire pressure telltale. When the
system detects a malfunct ion, the telltale will
flash for approximately one minute and then
remain continuously lit. This sequence will con-
tinue upon subsequent vehicle startups as long
as the malfunction exists. When the malfunction
indicator is illuminated, the system may not be
able to detect or signal low tire pressure as
intended. TPMS malfunctions may occur for a
variety of reasons, includ ing the installation of
replacement or alternate tires or wheels on the
vehicle that prevent the TPMS from functioning
properly. Always check the TPMS malfunction
Page 128 of 210

COMMUNICATIONSTelephone
126
The phone number is dialed.
The phone number can also be dialed using the
buttons on the steering wheel or radio: Press the button.
Editing and dialing a phone number
from the phone book
The phone number of an entry can be edited
before a call. This change is not stored in the
phone book.
1. Select an entry.
2. Press the button.
3. Press the button to delete a digit.
4. Enter additional digits using the 0-9 buttons.
5. Press the right rotary knob to dial the phone
number.
Dialing a phone number from the phone
book using buttons on the steering
wheel
1. Press and hold the button to display the
telephone menu.
2. Use the arrow buttons on the steering wheel
to scroll through the phone book.
3. Press and hold the button to dial the
phone number.
Dialing a phone number stored in a list
To select an entry and establish a connection:
1. MENU Press the button
2. Press the button.
3. Press the desired button to select
one of the four lists.
4. Turn the right rotary knob to select an entry
and press the right rotary knob to dial the
phone number.
Deleting an individual entry
1.Select the desired entry from the list.
2. Press the button.
Displaying call duration
To display the duration during a call:
Press the button.
Hands-free system
General information
Calls being conducted using the hands-free
system can be continued using the mobile
phone and vice versa.
From the mobile phone to the hands-
free system
Calls that have been initiated from outside the
Bluetooth range of the ve hicle can be continued
using the hands-free system if the ignition is
switched on.
Depending on the mobile phone, the call is
automatically switched to hands-free mode.
If the switch does not occur automatically, then
follow the instructions that appear on the
display of the mobile phone, also refer to the
Owner's Manual for the mobile phone.
From hands-free system to mobile
phone
Calls being conducted using the hands-free
system can also be cont inued using the mobile
phone if so desired, de pending on the mobile
phone.
At this point, follow the instructions that appear
on the display of the mobile phone, also refer to
the Owner's Manual for the mobile phone.
Page 147 of 210
Wheels and tiresMOBILITY
145
Recommended tire brands
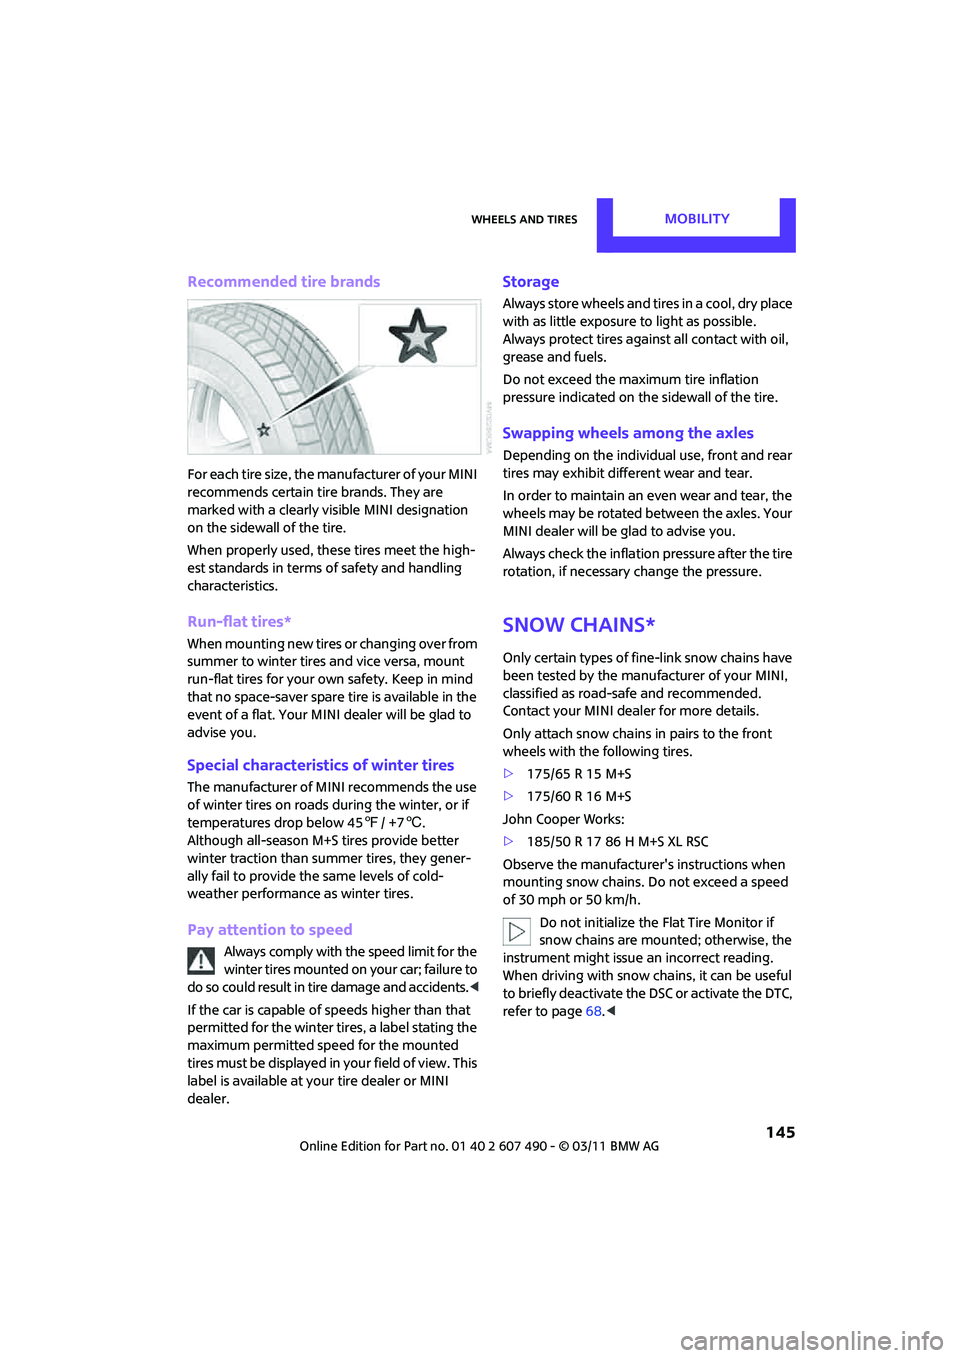
For each tire size, the manufacturer of your MINI
recommends certain tire brands. They are
marked with a clearly visible MINI designation
on the sidewall of the tire.
When properly used, these tires meet the high-
est standards in terms of safety and handling
characteristics.
Run-flat tires*
When mounting new tires or changing over from
summer to winter tires and vice versa, mount
run-flat tires for your own safety. Keep in mind
that no space-saver spare tire is available in the
event of a flat. Your MINI dealer will be glad to
advise you.
Special characteristics of winter tires
The manufacturer of MINI recommends the use
of winter tires on roads during the winter, or if
temperatures drop below 45 7/ +7 6.
Although all-season M+S tires provide better
winter traction than summer tires, they gener-
ally fail to provide the same levels of cold-
weather performance as winter tires.
Pay attention to speed
Always comply with the speed limit for the
winter tires mounted on your car; failure to
do so could result in tire damage and accidents. <
If the car is capable of speeds higher than that
permitted for the winter ti res, a label stating the
maximum permitted speed for the mounted
tires must be displayed in your field of view. This
label is available at your tire dealer or MINI
dealer.
Storage
Always store wheels and tires in a cool, dry place
with as little exposure to light as possible.
Always protect tires agains t all contact with oil,
grease and fuels.
Do not exceed the maximum tire inflation
pressure indicated on the sidewall of the tire.
Swapping wheels among the axles
Depending on the individual use, front and rear
tires may exhibit diff erent wear and tear.
In order to maintain an even wear and tear, the
wheels may be rotated between the axles. Your
MINI dealer will be glad to advise you.
Always check the inflation pressure after the tire
rotation, if necessary change the pressure.
Snow chains*
Only certain types of fi ne-link snow chains have
been tested by the manufacturer of your MINI,
classified as road-s afe and recommended.
Contact your MINI dealer for more details.
Only attach snow chains in pairs to the front
wheels with the following tires.
> 175/65 R 15 M+S
> 175/60 R 16 M+S
John Cooper Works:
> 185/50 R 17 86 H M+S XL RSC
Observe the manufacturer's instructions when
mounting snow chains. Do not exceed a speed
of 30 mph or 50 km/h. Do not initialize the Flat Tire Monitor if
snow chains are mounted; otherwise, the
instrument might issue an incorrect reading.
When driving with snow chains, it can be useful
to briefly deactivate the DSC or activate the DTC,
refer to page 68.<
Page 165 of 210
Replacing componentsMOBILITY
163
Center brake lamp
This lamp uses LED technology for operation. In
the event of a malfunction, contact your MINI
dealer or a workshop that has specially trained
personnel working in accordance with the
specifications of your MINI manufacturer.
Repairing a flat tire
Safety measures in the event of a break-
down:
Park the vehicle as far as possible from moving
traffic and switch on th e hazard warning flash-
ers.
Turn the steering wheel until the front wheels
are in the straight-ahead position and engage
the steering wheel lock. Engage the parking
brake and shift into 1st or reverse gear or place
the selector lever in position P.
All passengers should be outside the vehicle and
in a safe place, e.g. behind a guardrail.
Erect a warning triangle or warning flasher at the
appropriate distance if necessary. Comply with
all safety guidelines and regulations. <
In the event of a flat tire, different procedures
should be followed depending on the equip-
ment included in your vehicle:
> MINI Mobility System, refer to the following
section
> Run-flat tires, page 165
> Tire change with space-saver spare tire,
page 165
MINI Mobility System*
Preparations
Use of the MINI Mobility System may be ineffec-
tive if the tire puncture measures approx. 1/8 in/
4 mm or more. Contact the nearest MINI dealer
if the tire cannot be made drivable with the
Mobility System. Do not remove foreign bodies which have
penetrated the tire if possible.
Follow the instructions on using the Mobil-
ity System found on the compressor and
the sealant bottle. <
Remove the adhesive label for the speed limit
from the sealant bottle and affix it to the
steering wheel.
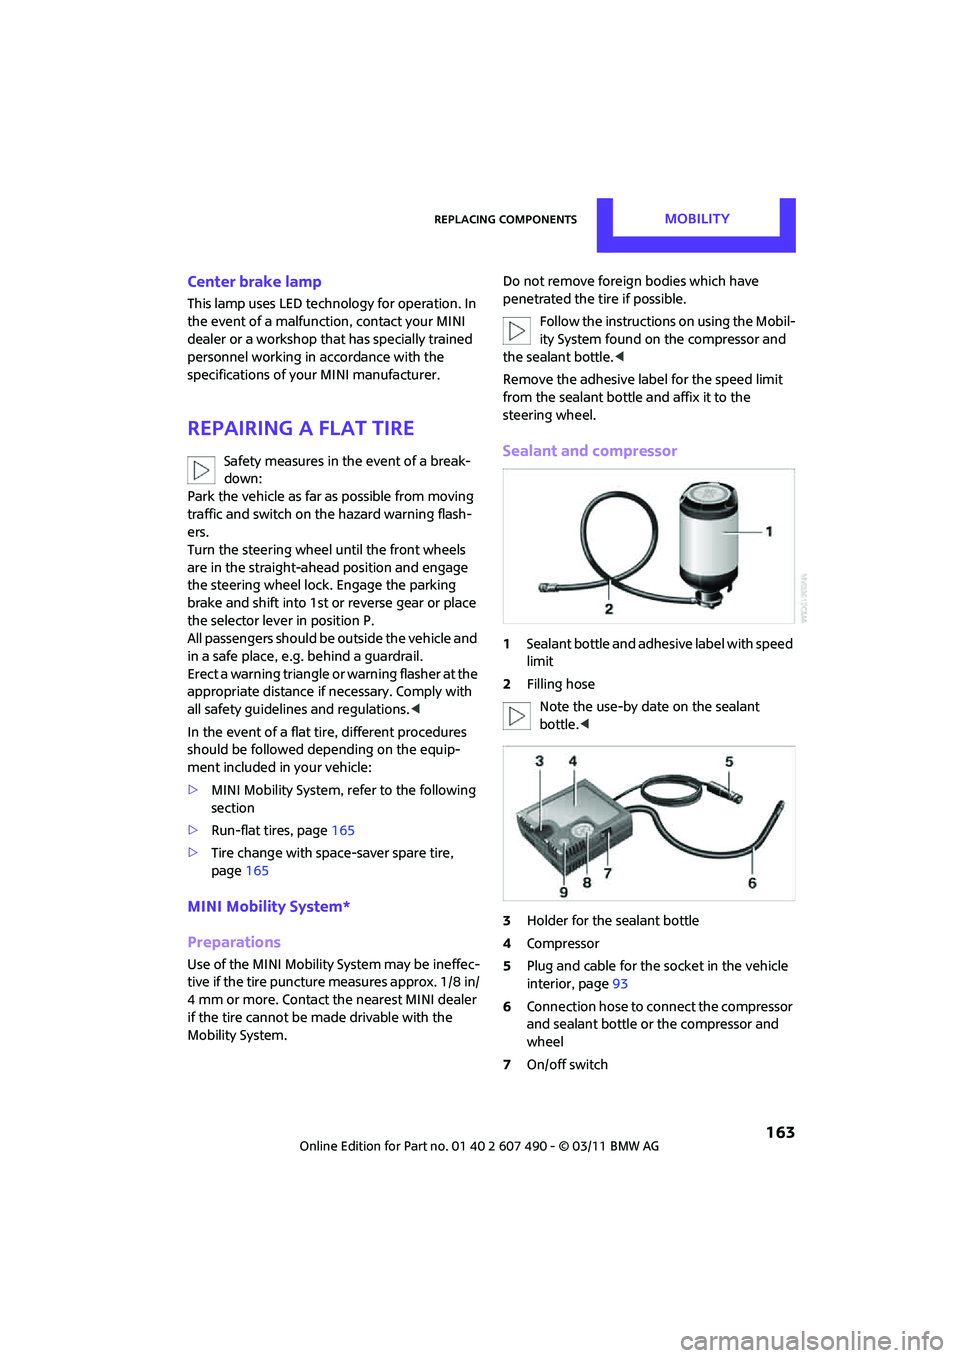
Sealant and compressor
1 Sealant bottle and adhesi ve label with speed
limit
2 Filling hose
Note the use-by date on the sealant
bottle. <
3 Holder for the sealant bottle
4 Compressor
5 Plug and cable for the socket in the vehicle
interior, page 93
6 Connection hose to connect the compressor
and sealant bottle or the compressor and
wheel
7 On/off switch