turn signal MINI COOPER 2014 User Guide
[x] Cancel search | Manufacturer: MINI, Model Year: 2014, Model line: COOPER, Model: MINI COOPER 2014Pages: 230, PDF Size: 11.58 MB
Page 153 of 230
Securing
Follow the installation instructions of the roof
rack.
Loading Be sure that adequate clearance is maintained
for tilting and opening the glass sunroof.
Because roof racks raise the vehicle's center of
gravity when loaded, they have a major effect
on vehicle handling and steering response.
Therefore, note the following when loading and
driving:▷Do not exceed the approved roof/axle
loads and the approved gross vehicle
weight.▷Distribute the roof load uniformly.▷The roof load should not be too large in
area.▷Always place the heaviest pieces on the
bottom.▷Secure the roof luggage firmly, e.g., tie with
ratchet straps.▷Do not let objects project into the opening
path of the tailgate.▷Drive cautiously and avoid sudden acceler‐
ation and braking maneuvers. Take corners
gently.
Rear luggage rack
General information Installation only possible with rear luggage rack
preparation.
Rear racks are available as special accessories.
Note Follow the installation instructions of the rear
luggage rack.
Drive cautiously and avoid sudden acceleration
and braking maneuvers. Take corners gently.
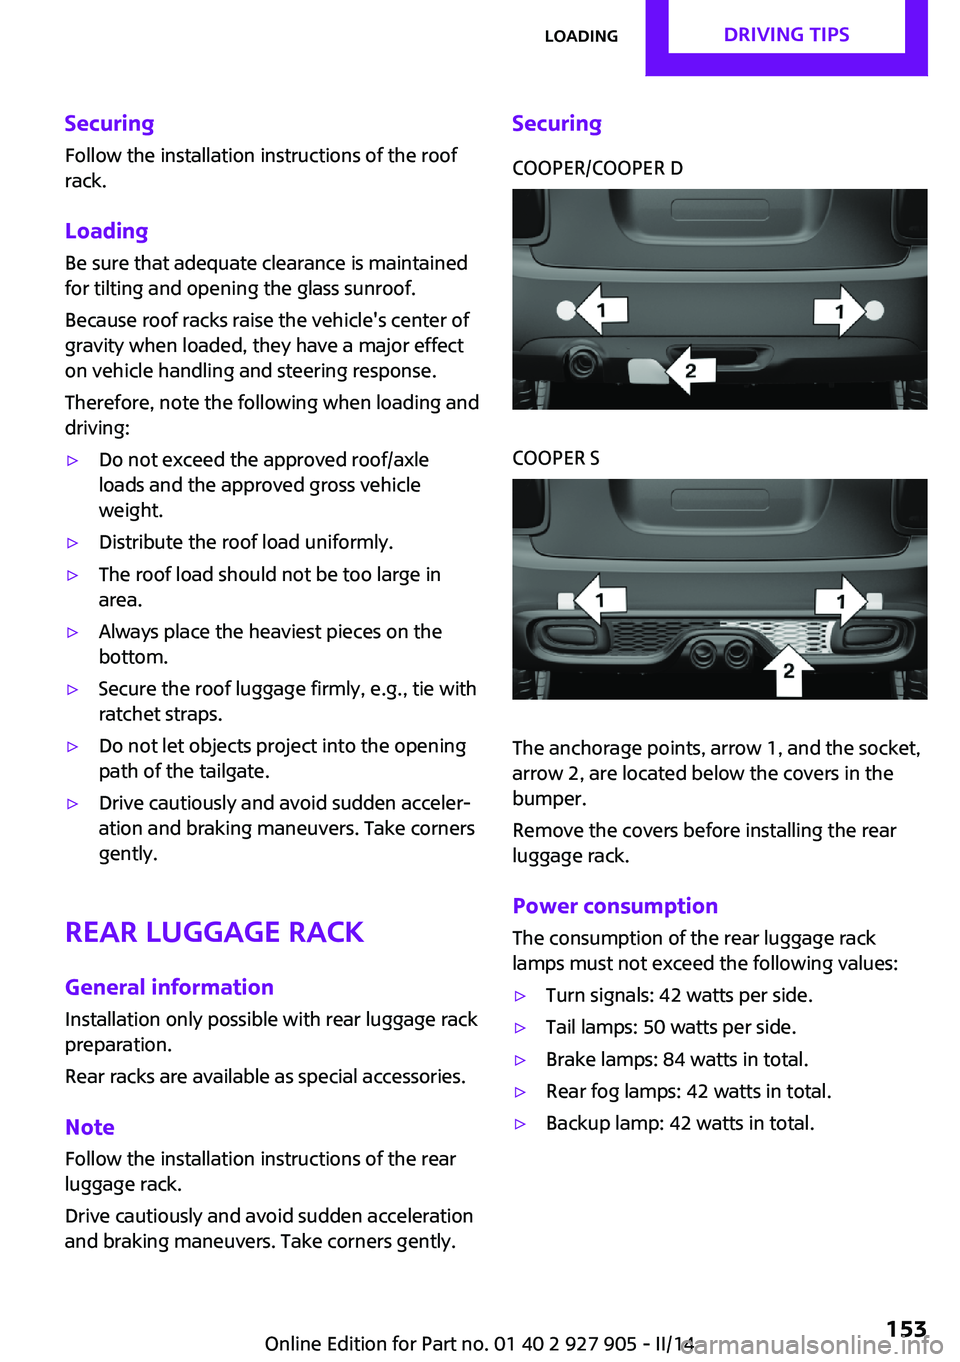
SecuringCOOPER/COOPER DCOOPER S
The anchorage points, arrow 1, and the socket,
arrow 2, are located below the covers in the
bumper.
Remove the covers before installing the rear
luggage rack.
Power consumption
The consumption of the rear luggage rack
lamps must not exceed the following values:
▷Turn signals: 42 watts per side.▷Tail lamps: 50 watts per side.▷Brake lamps: 84 watts in total.▷Rear fog lamps: 42 watts in total.▷Backup lamp: 42 watts in total.Seite 153LoadingDRIVING TIPS153
Online Edition for Part no. 01 40 2 927 905 - II/14
Page 190 of 230

Front lamps, bulb replacement
At a glance
Halogen headlamps1Low beams/high beams2Turn signal
LED headlamps
1Daytime running lights2Low beams/high beams3Turn signalBug light1Parking lamps2Daytime running lights3Fog lamps
LED bug light
1Parking lamps2Fog lamps
Low beams/high beams Follow the general instructions on Lamps and
bulbs, refer to page 189.
Seite 190MOBILITYReplacing components190
Online Edition for Part no. 01 40 2 927 905 - II/14
Page 191 of 230

Bulbs: H41.Open the hood, refer to page 181.2.Turn the lid counterclockwise, arrow 1, and
remove.3.Pull off the connector.4.Unclip spring clip, arrow 1, and fold down.5.Remove the bulb from the headlamp hous‐
ing.6.Insert the new bulb and install the cover in
the reverse order.
Turn signal
Follow the general instructions on Lamps and
bulbs, refer to page 189.
Bulbs: PW24W
With white turn signal lamps: PWY24W1.Turn the steering wheel.2.Turn the lid counterclockwise, arrow 1, and
remove.3.Unscrew the inner cap counterclockwise,
and remove it.4.Pull bulb socket out of the bulb housing; if
necessary, loosen it with small tilting move‐
ments if possible.5.Pull the bulb out of the fixture.6.Insert the new bulb and install the cover in
the reverse order.Seite 191Replacing componentsMOBILITY191
Online Edition for Part no. 01 40 2 927 905 - II/14
Page 193 of 230

Vehicle with two rear fog lamps1Side tail lamps2Rear fog lamps3License plate lamp4High brake lights
Side tail lamps
1Brake lights/tail lights2Turn signal3Reversing lightsSide LED tail lamps1Brake lights/tail lights2Turn signal3Reversing lights
Side tail lampsFollow the general instructions on lamps and
bulbs, refer to page 189.
Bulbs: P21W
1.Open the tailgate., refer to page 392.Remove left or right cover.3.Through the opening, loosen the plug con‐
nector, arrow 2 on the bulb holder.Seite 193Replacing componentsMOBILITY193
Online Edition for Part no. 01 40 2 927 905 - II/14
Page 194 of 230

Push apart the latches, arrows 1, and re‐
move the bulb holder.4.Remove the bulb holder from the opening.5.Press the defective bulb gently into the
socket, turn clockwise and remove.▷Arrow 1: brake lights/tail lights▷Arrow 2: turn signal▷Arrow 3: reversing light6.Proceed in the reverse order to insert the
new bulb and attach the bulb holder. Make
sure that the bulb holder engages in all fas‐
teners.
Central brake lamp and license plate
lamp
Follow the general instructions on lamps and
bulbs, refer to page 189.
The lamps feature LED technology. Contact your service center in the event of a malfunc‐
tion.
Vehicles with a rear fog lamp
Follow the general instructions on Lamps and
bulbs, refer to page 189.
Bulbs: W16W1.On vehicles with heat shield:
Loosen 3 screws, arrow.2.Push the heat shield forward and the
bumper back in order to be able to reach
the fog lamp.3.Turn the bulb socket counterclockwise and
remove.
The wire is long enough to guide the socket
down and through between any heat shield
that may be installed and the bumper.4.Replace defective bulb.5.To install the new bulb, proceed in reverse
order of removal.
Vehicle with two rear fog lamps
Follow the general instructions on Lamps and
bulbs, refer to page 189.
Bulbs: W16W
Left rear fog lamp:
1.On vehicles with heat shield:Seite 194MOBILITYReplacing components194
Online Edition for Part no. 01 40 2 927 905 - II/14
Page 195 of 230

Loosen 3 screws, arrow.2.Push the heat shield forward and the
bumper back in order to be able to reach
the fog lamp.3.Turn the bulb socket counterclockwise and
remove.
The wire is long enough to guide the socket
down and through between any heat shield
that may be installed and the bumper.4.Replace defective bulb.5.To install the new bulb, proceed in reverse
order of removal.
Right fog lamp:
1.Turn the bulb socket counterclockwise and
remove.The wire is long enough to guide the socket
down and through between any heat shield
that may be installed and the bumper.2.Replace defective bulb.3.To install the new bulb, proceed in reverse
order of removal.
Side turn signal, bulb replacement
Follow the general instructions on Lamps and
bulbs, refer to page 189.
Bulbs:
▷With orange lens: W5WSeite 195Replacing componentsMOBILITY195
Online Edition for Part no. 01 40 2 927 905 - II/14
Page 196 of 230

▷With white lens: WY5W diadem1.Push turn signal housing up and pull out at
the bottom.2.Turn the bulb socket counterclockwise and
remove.3.Replace the bulb.4.Proceed in the reverse order to insert the
new bulb and install the turn signal hous‐
ing.
First hook the turn signal housing to the
bottom, then at the top press it into the
latch.
Changing wheels
Hints
The vehicle equipment does not include a
spare tire.
When using run-flat tires or tire sealants, a tire
does not need to be changed immediately in
the event of pressure loss due to a flat tire.
The tools for changing wheels are available as
accessories from your service center.
Jacking points for the vehicle jack
The jacking points for the vehicle jack are lo‐
cated at the positions shown.
Compact wheel
Hints Safety measures in case of a breakdown
or a wheel change
▷Park the vehicle as far away as possible
from passing traffic and on solid ground.
Switch on the hazard warning system.▷Set the parking brake, and engage first gear
or transmission position P.▷Have all vehicle occupants get out of the
vehicle and ensure that they remain out‐
side the immediate area in a safe place,
such as behind a guardrail.▷If necessary, set up a warning triangle or
portable hazard warning lamp at an appro‐
priate distance. Comply with all safety
guidelines and regulations.▷Perform wheel change only on a flat, solid
and slip-resistant surface. On soft or slip‐
pery ground, e.g., snow, ice, tiles, etc., the
vehicle or vehicle jack can slip away to the
side.▷Do not place wood blocks or similar items
under the vehicle jack; otherwise, it cannot
reach its carrying capacity because of the
restricted height.▷If the vehicle is raised, do not lie under the
vehicle and do not start the engine; other‐
wise, a mortal hazard exists. ◀Seite 196MOBILITYReplacing components196
Online Edition for Part no. 01 40 2 927 905 - II/14
Page 204 of 230

contact a service center in the event of a break‐
down.
Tow the vehicle only with the front axle
raised
Have the vehicle towed only with the front axle
raised or transported on a loading platform;
otherwise, damage may occur. ◀
Tow truck
Have your vehicle transported with a tow truck
with a so-called lift bar or on a flat bed.
Do not lift the vehicle
Do not lift the vehicle by the tow fitting or
body and chassis parts; otherwise, damage
may result. ◀
Use the tow fitting screwed in at the front for
maneuvering the vehicle only.
Manual transmission
Observe before towing your vehicle Gearshift lever in neutral position.
Towing When the parking brake is blocked
The parking brake cannot be released
manually.
Do not tow the vehicle with the parking brake
blocked, or the vehicle can be damaged.
Contact your service center. ◀
Follow the towing instructions
Follow all towing instructions; otherwise,
vehicle damage or accidents may occur. ◀▷Make sure that the ignition is switched on;
otherwise, the low beams, tail lamps, turn
signals, and windshield wipers may be un‐
available.▷Do not tow the vehicle with the rear axle
tilted, as the front wheels could turn.▷When the engine is stopped, there is no
power assist. Consequently, more force
needs to be applied when braking and
steering.▷Larger steering wheel movements are re‐
quired.▷The towing vehicle must not be lighter than
the vehicle being towed; otherwise, it will
not be possible to control the vehicle re‐
sponse.
Tow truck
Have your vehicle transported with a tow truck
with a so-called lift bar or on a flat bed.
Do not lift the vehicle
Do not lift the vehicle by the tow fitting or
body and chassis parts; otherwise, damage
may result. ◀
Seite 204MOBILITYBreakdown assistance204
Online Edition for Part no. 01 40 2 927 905 - II/14
Page 221 of 230

C
California Proposition 65 Warning 7
Camera-based cruise control, ACC 110
Camera, care 210
Camera, rearview cam‐ era 120
Can holder, refer to Cu‐ pholder 142
Car battery 198
Car care products 208
Care, displays 210
Care, vehicle 208
Cargo 151
Cargo area 138
Cargo area, adapting size 143
Cargo area, enlarging 139
Cargo area lid 39
Cargo area, storage compart‐ ments 143
Cargo cover 138
Cargo, securing 152
Cargo straps, securing cargo 152
Car key, refer to Remote con‐ trol 34
Carpet, care 210
Car wash 207
Catalytic converter, refer to Hot exhaust system 149
CBS Condition Based Serv‐ ice 186
Center armrest 142
Center console 16
Central screen, refer to Control Display 18
Changes, technical, refer to Safety 7
Changing parts 188
Changing wheels 196
Changing wheels/tires 173
Check Control 72
Children, seating position 55 Children, transporting
safely 55
Child restraint fixing sys‐ tem 55
Child restraint fixing system LATCH 56
Child restraint fixing systems, mounting 55
Child seat, mounting 55
Child seats 55
Chrome parts, care 209
Cigarette lighter 138
Cleaning, displays 210
Climate control 127, 129
Clock 75
Closing/opening via door lock 38
Closing/opening with remote control 37
Clothes hooks 143
Coasting 159
Coasting with engine decou‐ pled, coasting 159
Coasting with idling en‐ gine 159
Cold starting, refer to Starting the engine 60
Collision warning with City Braking function 100
Combination switch, refer to Turn signals 64
Combination switch, refer to Wiper system 64
Comfort Access 40
Compact wheel 196
Compartments in the doors 142
Compass 135
Compressor 175
Computer 79
Condensation on win‐ dows 131
Condensation under the vehi‐ cle 150
Condition Based Service CBS 186 Configuring drive pro‐
gram 109
Confirmation signal 42
Control Display 18
Control Display, settings 81
Controller 18, 19
Control systems, driving stabil‐ ity 106
Convenient opening 37
Coolant 185
Coolant temperature 74
Cooling function 128, 131
Cooling, maximum 130
Cooling system 185
Cornering lamp 87
Corrosion on brake discs 150
Cruise control 116
Cruise control, active 110
Cruise control, refer to cam‐ era-based cruise control 110
Cruising range 75
Cupholder 142
Current fuel consumption 75
D
Damage, tires 173
Damping control, dy‐ namic 107
Data, technical 214
Date 75
Daytime running lights 87
Defrosting, refer to defrosting the windows 128
Defrosting, refer to Windows, defrosting 131
Defrosting the windows 128
Dehumidifying, air 128, 131
Destination distance 80
Diesel particulate filter 149
Digital clock 75
Digital compass 135
Dimensions 214
Dimmable exterior mirrors 53
Dimmable interior rearview mirror 53 Seite 221Everything from A to ZREFERENCE221
Online Edition for Part no. 01 40 2 927 905 - II/14
Page 222 of 230

Direction indicator, refer toTurn signals 64
Display, electronic, instrument cluster 72
Display lighting, refer to In‐ strument lighting 89
Displays 71
Displays, cleaning 210
Disposal, coolant 185
Disposal, vehicle battery 199
Distance control, refer to PDC 118
Distance to destination 80
Divided screen view, split screen 23
Door lock, refer to Remote control 34
Drive mode, GREEN mode 156
Drive-off assistant 109
Drive-off assistant, refer to DSC 106
Driving Dynamics Control 108
Driving Excitement, SPORT 80
Driving instruction, GREEN mode 158
Driving instructions, breaking in 148
Driving mode 108
Driving notes, general 148
Driving stability control sys‐ tems 106
Driving style analysis 160
Driving tips 148
DSC Dynamic Stability Con‐ trol 106
DTC Dynamic Traction Con‐ trol 107
Dynamic Damping Con‐ trol 107
Dynamic Stability Control DSC 106
Dynamic Traction Control DTC 107 E
Electronic displays, instrument cluster 72
Electronic Stability Program ESP, refer to DSC 106
Emergency detection, remote control 35
Emergency release, fuel filler flap 164
Emergency Request 201
Emergency service, refer to Roadside Assistance 202
Emergency start function, en‐ gine start 35
Emergency unlocking, door lock 39
Energy Control 75
Engine, automatic Start/Stop function 61
Engine, automatic switch- off 61
Engine compartment 180
Engine compartment, working in 180
Engine coolant 185
Engine idling when driving, coasting 159
Engine oil 182
Engine oil, adding 183
Engine oil additives 183
Engine oil change 184
Engine oil filler neck 183
Engine oil temperature 74
Engine oil types, alterna‐ tive 184
Engine oil types, ap‐ proved 184
Engine start during malfunc‐ tion 35
Engine start, jump-start‐ ing 202
Engine start, refer to Starting the engine 60
Engine stop 60
Engine temperature 74 Entering a car wash 207
Equipment, interior 133
ESP Electronic Stability Pro‐ gram, refer to DSC 106
Exchanging wheels/tires 173
Exhaust system 149
Exterior mirror, automatic dimming feature 53
Exterior mirrors 52
External start 202
External temperature dis‐ play 75
External temperature warn‐ ing 75
Eyes for securing cargo 152
F
Failure message, refer to Check Control 72
False alarm, refer to Uninten‐ tional alarm 43
Fan, refer to Air flow 128, 130
Fault displays, refer to Check Control 72
Favorites buttons, onboard monitor 24
Filler neck for engine oil 183
Fine wood, care 209
First aid kit 202
Fitting for towing, refer to Tow fitting 205
Flat tire, changing wheels 196
Flat Tire Monitor FTM 97
Flat tire, repairing 175
Flat tire, Tire Pressure Monitor TPM 94
Flat tire, warning lamp 95, 98
Flooding 149
Floor carpet, care 210
Floor mats, care 210
Fogged up windows 128
Fold-out position, windshield wipers 66
Foot brake 149
Front airbags 91 Seite 222REFERENCEEverything from A to Z222
Online Edition for Part no. 01 40 2 927 905 - II/14