key MINI COOPER 2014 Owners Manual
[x] Cancel search | Manufacturer: MINI, Model Year: 2014, Model line: COOPER, Model: MINI COOPER 2014Pages: 230, PDF Size: 11.58 MB
Page 24 of 230

4.Press the controller or select "Split screen
content".5.Select the desired menu item.
Programmable memory
buttons
General information
The onboard monitor functions can be stored
on the programmable memory buttons and
called up directly, e.g., radio stations, naviga‐
tion destinations, phone numbers and entry
points into the menu.
The settings are stored for the remote control
currently in use.
Saving a function
1.Highlight function via the onboard monitor.2. Press the desired button for more
than 2 seconds.
Running a function
Press the button.
The function will run immediately. This
means, for example, that the number is dialed
when a phone number is selected.
Displaying the button assignment Use a finger to touch the buttons. Do not wear
gloves or use objects.
The key assignment is displayed at the top
edge of the screen.▷To display short information: touch the but‐
ton.▷To display detailed information: touch the
button for an extended period.
Deleting the button assignments
1.Press buttons 1 and 6 simultaneously for
approx. five seconds.2."OK"
Entering letters and
numbers
General information
1.Turn the controller: select letters or num‐
bers.2.Select additional letters or numbers if
needed.3."OK": confirm the entry.SymbolFunction Press the controller: delete the letter
or number. Press the controller for an extended
period: delete all letters or numbers.Seite 24AT A GLANCEOnboard monitor24
Online Edition for Part no. 01 40 2 927 905 - II/14
Page 34 of 230
Opening and closingVehicle equipmentAll standard, country-specific and optional
equipment that is offered in the model series is
described in this chapter. Therefore, equipment
is also described that is not available in a vehi‐
cle, e. g., because of the selected optional
equipment or country variant. This also applies
for safety-related functions and systems.
Remote control/key General information
The vehicle is supplied with two remote con‐
trols with integrated keys.
Every remote control contains a replaceable
battery.
Depending on the equipment package and
country-specific variant, the functions of the
keys can be set. Settings, refer to page 42.
For every remote control, personal settings are
stored in the vehicle. Personal Profile, refer to
page 35.
Information on the required maintenance is
stored in the remote controls. Service data in
the remote control, refer to page 186
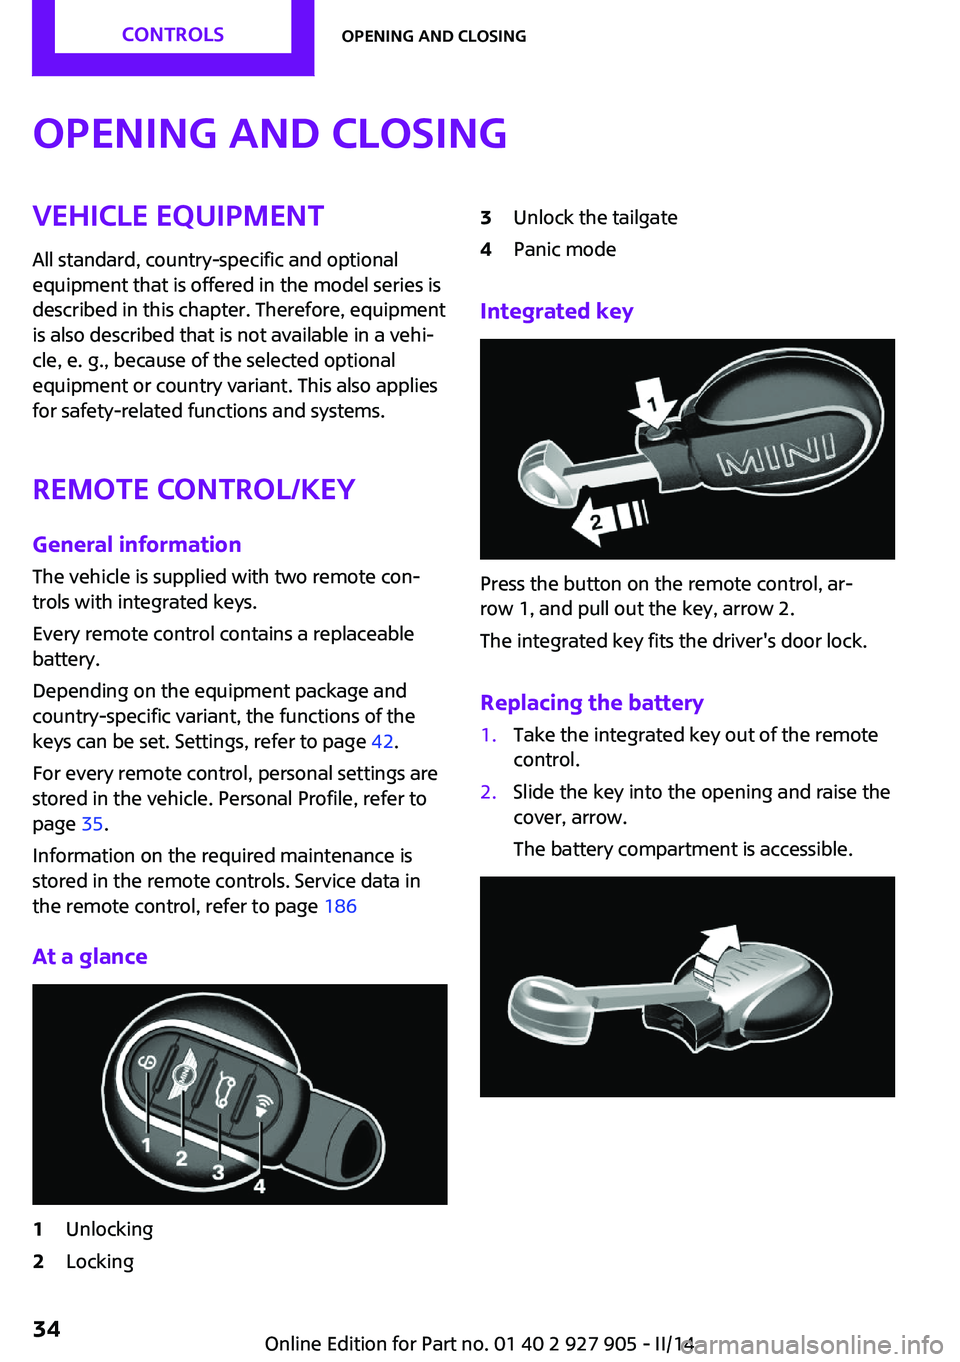
At a glance1Unlocking2Locking3Unlock the tailgate4Panic mode
Integrated key
Press the button on the remote control, ar‐
row 1, and pull out the key, arrow 2.
The integrated key fits the driver's door lock.
Replacing the battery
1.Take the integrated key out of the remote
control.2.Slide the key into the opening and raise the
cover, arrow.
The battery compartment is accessible.Seite 34CONTROLSOpening and closing34
Online Edition for Part no. 01 40 2 927 905 - II/14
Page 35 of 230
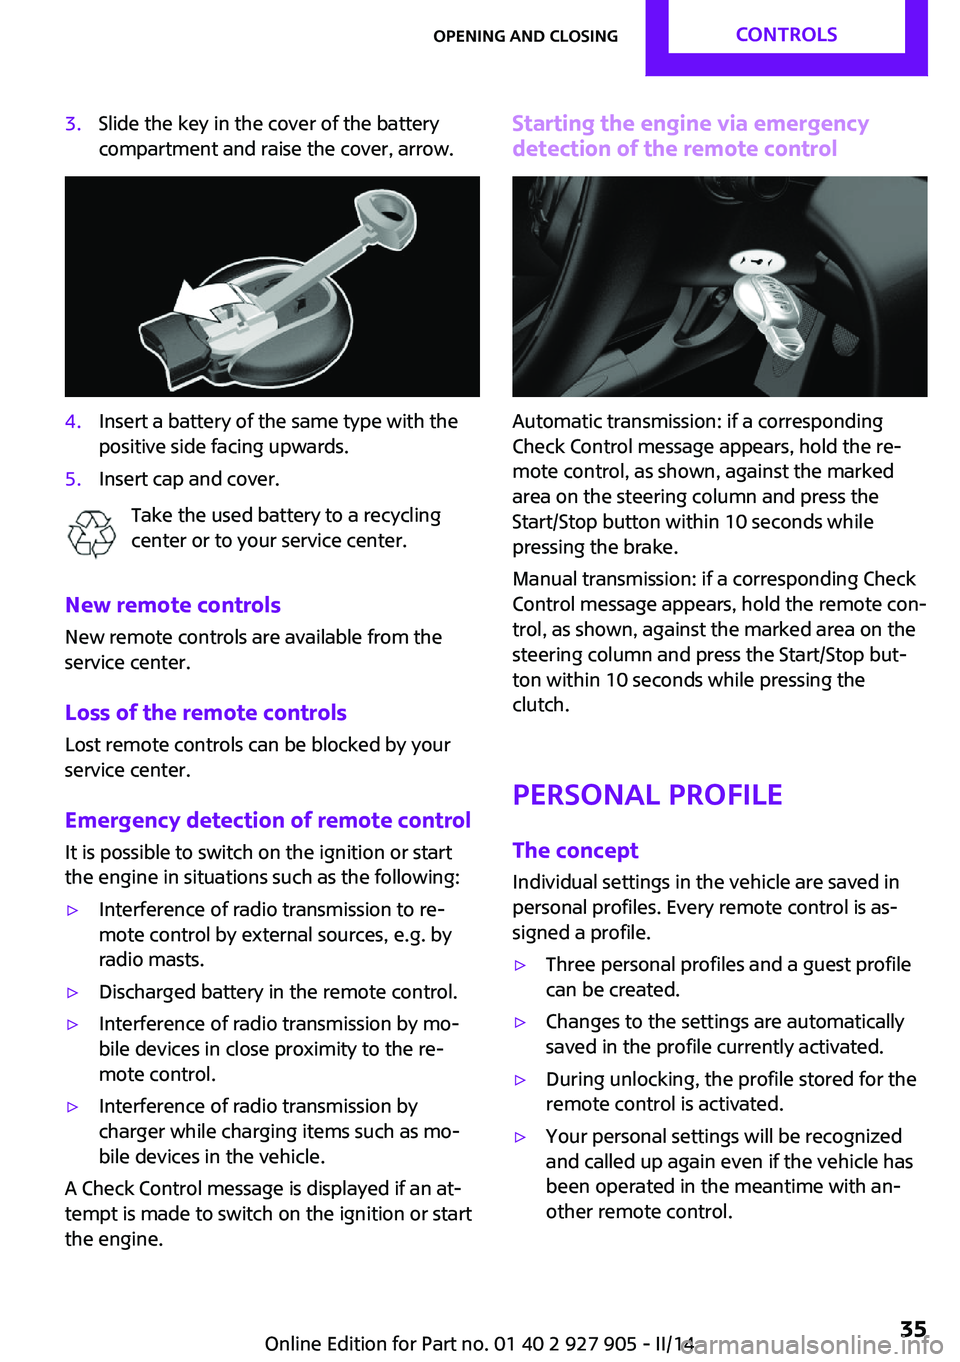
3.Slide the key in the cover of the battery
compartment and raise the cover, arrow.4.Insert a battery of the same type with the
positive side facing upwards.5.Insert cap and cover.
Take the used battery to a recycling
center or to your service center.
New remote controls
New remote controls are available from the
service center.
Loss of the remote controls Lost remote controls can be blocked by your
service center.
Emergency detection of remote control
It is possible to switch on the ignition or start
the engine in situations such as the following:
▷Interference of radio transmission to re‐
mote control by external sources, e.g. by
radio masts.▷Discharged battery in the remote control.▷Interference of radio transmission by mo‐
bile devices in close proximity to the re‐
mote control.▷Interference of radio transmission by
charger while charging items such as mo‐
bile devices in the vehicle.
A Check Control message is displayed if an at‐
tempt is made to switch on the ignition or start
the engine.
Starting the engine via emergency detection of the remote control
Automatic transmission: if a corresponding
Check Control message appears, hold the re‐
mote control, as shown, against the marked
area on the steering column and press the
Start/Stop button within 10 seconds while
pressing the brake.
Manual transmission: if a corresponding Check
Control message appears, hold the remote con‐
trol, as shown, against the marked area on the
steering column and press the Start/Stop but‐
ton within 10 seconds while pressing the
clutch.
Personal Profile The concept
Individual settings in the vehicle are saved in
personal profiles. Every remote control is as‐
signed a profile.
▷Three personal profiles and a guest profile
can be created.▷Changes to the settings are automatically
saved in the profile currently activated.▷During unlocking, the profile stored for the
remote control is activated.▷Your personal settings will be recognized
and called up again even if the vehicle has
been operated in the meantime with an‐
other remote control.Seite 35Opening and closingCONTROLS35
Online Edition for Part no. 01 40 2 927 905 - II/14
Page 38 of 230

If the button is pressed within 10 seconds of
when the vehicle was locked Interior motion
sensor and tilt alarm sensor of the anti-theft
warning system, refer to page 43, are
switched off. After locking, wait 10 seconds be‐
fore pressing the button again.
Panic mode
You can trigger the alarm system if you find
yourself in a dangerous situation.
Press the button on the remote control
for at least 3 seconds.
To switch off the alarm: press any button.
Unlock the tailgate Press the button on the remote control
for approx. 1 second.
The tailgate opens a little, regardless of whether it was previously locked or unlocked.
Depending on the version and the country var‐
iant, it is possible to set whether the doors are
also unlocked. Settings, refer to page 42.
Do not place the remote control in the
cargo area
Take the remote control with you and do not
leave it in the cargo area; otherwise, the re‐
mote control is locked inside the vehicle when
the tailgate is closed. ◀
The tailgate is locked again as soon as it is
pushed closed.
Provide edge protection
Sharp or angular objects can hit the rear
window while driving and damage the heating
wires of the rear window. Provide edge protec‐
tion. ◀
Malfunction If the vehicle can no longer be locked or un‐
locked with the remote control, the battery
may be discharged or there may be interfer‐
ence from external sources such as mobilephones, metal objects, overhead power lines,
transmission towers, etc.
If this occurs, lock or unlock the driver's door at
the door lock using the integrated key.
For US owners only
The transmitter and receiver units comply with
part 15 of the FCC/Federal Communication
Commission regulations. Operation is governed
by the following:
FCC ID:▷LX8766S.▷LX8766E.▷LX8CAS.▷LX8CAS2.▷MYTCAS4.
Compliance statement:
This device complies with part 15 of the FCC
Rules. Operation is subject to the following two
conditions:
▷This device may not cause harmful interfer‐
ence, and▷this device must accept any interference re‐
ceived, including interference that may
cause undesired operation.
Any unauthorized modifications or changes to
these devices could void the user's authority to
operate this equipment.
Without remote control
From the outside Locking from the outside
Do not lock the vehicle from the outside if
there are people in it, as the vehicle cannot be
unlocked from inside without special knowl‐
edge. ◀
Seite 38CONTROLSOpening and closing38
Online Edition for Part no. 01 40 2 927 905 - II/14
Page 39 of 230
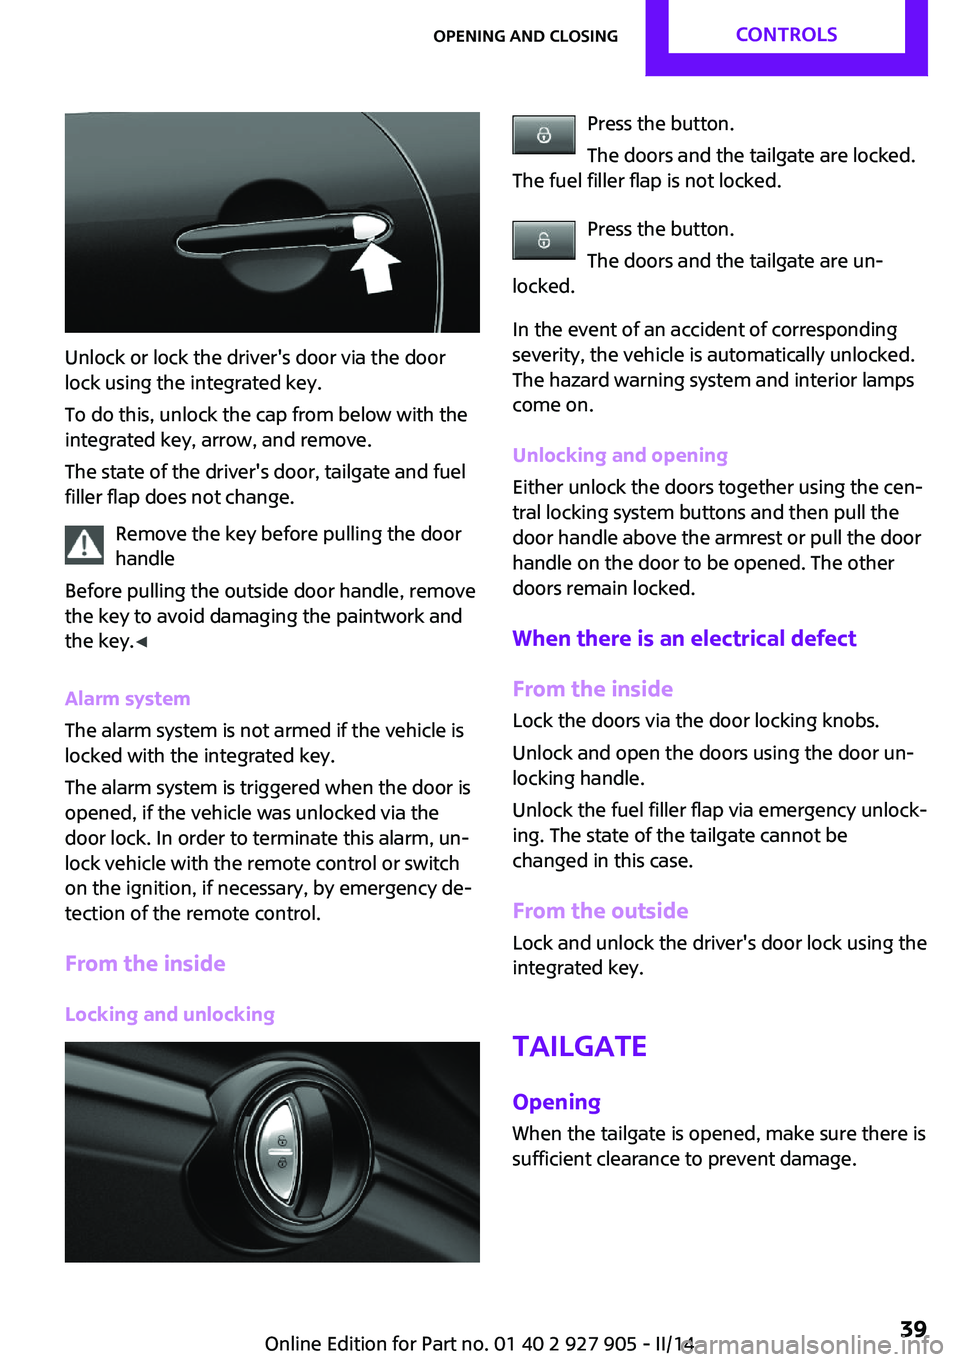
Unlock or lock the driver's door via the door
lock using the integrated key.
To do this, unlock the cap from below with the
integrated key, arrow, and remove.
The state of the driver's door, tailgate and fuel
filler flap does not change.
Remove the key before pulling the door
handle
Before pulling the outside door handle, remove
the key to avoid damaging the paintwork and
the key. ◀
Alarm system
The alarm system is not armed if the vehicle is
locked with the integrated key.
The alarm system is triggered when the door is
opened, if the vehicle was unlocked via the
door lock. In order to terminate this alarm, un‐
lock vehicle with the remote control or switch
on the ignition, if necessary, by emergency de‐
tection of the remote control.
From the inside Locking and unlocking
Press the button.
The doors and the tailgate are locked.
The fuel filler flap is not locked.
Press the button.
The doors and the tailgate are un‐
locked.
In the event of an accident of corresponding
severity, the vehicle is automatically unlocked.
The hazard warning system and interior lamps
come on.
Unlocking and opening
Either unlock the doors together using the cen‐
tral locking system buttons and then pull the
door handle above the armrest or pull the door
handle on the door to be opened. The other
doors remain locked.
When there is an electrical defect From the inside Lock the doors via the door locking knobs.
Unlock and open the doors using the door un‐
locking handle.
Unlock the fuel filler flap via emergency unlock‐
ing. The state of the tailgate cannot be
changed in this case.
From the outside
Lock and unlock the driver's door lock using the
integrated key.
Tailgate
Opening When the tailgate is opened, make sure there is
sufficient clearance to prevent damage.Seite 39Opening and closingCONTROLS39
Online Edition for Part no. 01 40 2 927 905 - II/14
Page 41 of 230
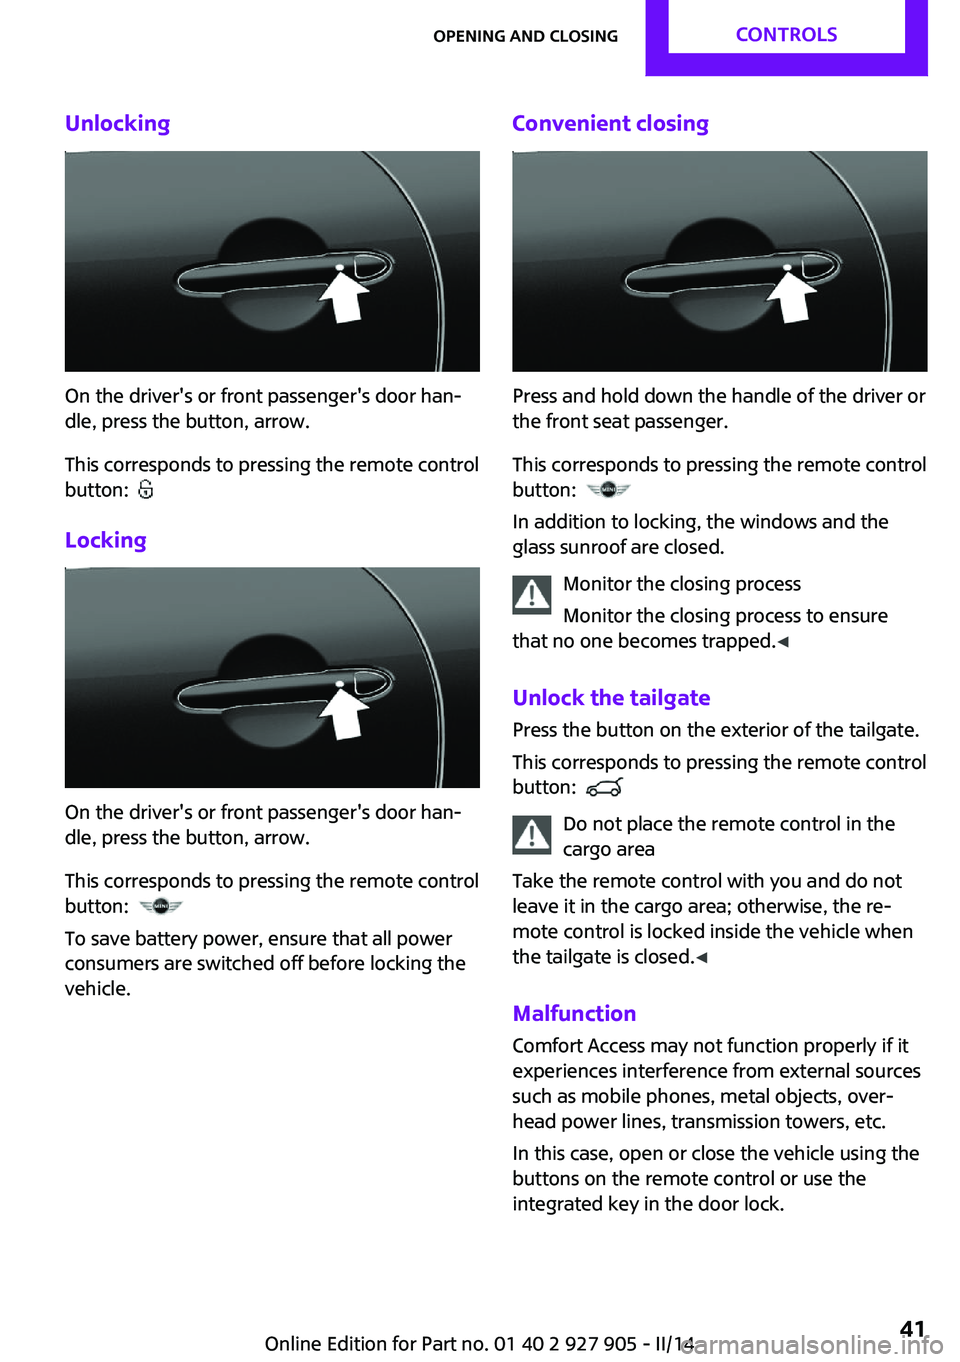
Unlocking
On the driver's or front passenger's door han‐
dle, press the button, arrow.
This corresponds to pressing the remote control
button:
Locking
On the driver's or front passenger's door han‐
dle, press the button, arrow.
This corresponds to pressing the remote control
button:
To save battery power, ensure that all power
consumers are switched off before locking the
vehicle.
Convenient closing
Press and hold down the handle of the driver or
the front seat passenger.
This corresponds to pressing the remote control
button:
In addition to locking, the windows and the
glass sunroof are closed.
Monitor the closing process
Monitor the closing process to ensure
that no one becomes trapped. ◀
Unlock the tailgate Press the button on the exterior of the tailgate.
This corresponds to pressing the remote control
button:
Do not place the remote control in the
cargo area
Take the remote control with you and do not
leave it in the cargo area; otherwise, the re‐
mote control is locked inside the vehicle when
the tailgate is closed. ◀
Malfunction Comfort Access may not function properly if it
experiences interference from external sources
such as mobile phones, metal objects, over‐
head power lines, transmission towers, etc.
In this case, open or close the vehicle using the
buttons on the remote control or use the
integrated key in the door lock.
Seite 41Opening and closingCONTROLS41
Online Edition for Part no. 01 40 2 927 905 - II/14
Page 42 of 230
AdjustingUnlocking The settings are saved in the active profile. Per‐
sonal Profile, refer to page 35.
Doors1. "Settings"2."Doors/key"3. Select the symbol.4.Select the desired function.▷"Driver's door only"
Only the driver's door and the fuel filler
flap are unlocked. Pressing again un‐
locks the entire vehicle.▷"All doors"
The entire vehicle is unlocked.▷"Comfort access"
The entire vehicle is unlocked. Pressing
again lowers the window when the
door is subsequently opened.
Tailgate
Depending on the equipment version and
country variant, this setting is not offered in
some cases.
1. "Settings"2."Doors/key"3. Select the symbol.4.Select the desired function.▷"Tailgate"
Only the tailgate is unlocked.▷"Tailgate + door(s)"
The tailgate and the doors are un‐
locked.Locking
The settings are saved in the active profile. Per‐
sonal Profile, refer to page 35.1. "Settings"2."Doors/key"3.Select the desired setting.▷"Lock if no door is opened"
The vehicle locks automatically after a
short period of time if a door is not
opened.▷"Lock after start driving"
The vehicle locks automatically after
you drive away.
Confirmation signals from the vehicle
1."Settings"2."Doors/key"3.Select the desired setting.▷"Acoustic sig. lock/unlock"
The unlocking is acknowledged by one
honk of the horn.▷"Flash when lock/unlock"
The unlocking is acknowledged by two
flashes, the locking by one.
Alarm system
The concept
When the vehicle is locked, the vehicle alarm
system responds to:
▷Opening of a door, the hood or the tailgate.▷Movements in the vehicle.▷Changes in the vehicle tilt, e.g., during at‐
tempts to steal a wheel or when towing the
car.▷Interruptions in battery voltage.
The alarm system briefly indicates tampering:
▷Acoustic alarm.Seite 42CONTROLSOpening and closing42
Online Edition for Part no. 01 40 2 927 905 - II/14
Page 133 of 230
Interior equipmentVehicle equipmentAll standard, country-specific and optional
equipment that is offered in the model series is
described in this chapter. Therefore, equipment
is also described that is not available in a vehi‐
cle, e. g., because of the selected optional
equipment or country variant. This also applies
for safety-related functions and systems.
Universal garage dooropener
The concept
The universal garage door opener can operate
up to 3 functions of remote-controlled systems
such as garage door drives or lighting systems.
The universal garage door opener replaces up
to 3 different hand-held transmitters. To oper‐
ate the remote control, the buttons on the inte‐
rior rearview mirror must be programmed with
the desired functions. The hand-held transmit‐
ter for the particular system is required in order
to program the remote control.
During programming
During programming and before activat‐
ing a device using the integrated universal re‐
mote control, ensure that there are no people,
animals, or objects in the range of movement
of the remote-controlled device; otherwise,
there is a risk of injury or damage.
Also follow the safety instructions of the hand-
held transmitter. ◀
Before selling the vehicle, delete the stored
functions for the sake of security.Compatibility
If this symbol is printed on the packag‐
ing or in the instructions of the system
to be controlled, the system is generally
compatible with the universal garage door
opener.
If you have any questions, please contact:▷Your service center.▷www.homelink.com on the Internet.
HomeLink is a registered trademark of Johnson
Controls, Inc.
At a glance
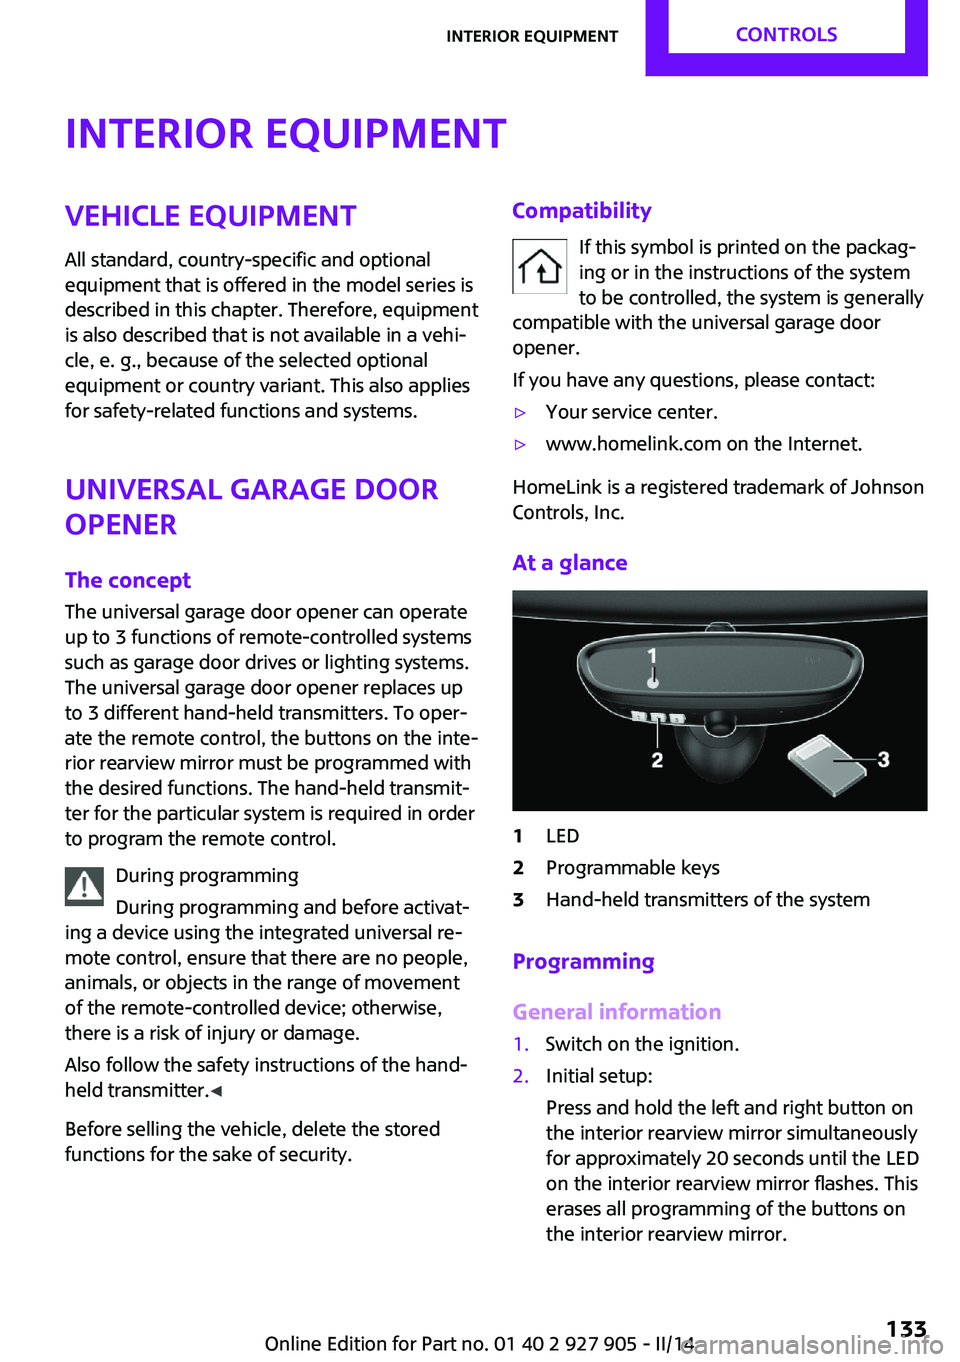
1LED2Programmable keys3Hand-held transmitters of the system
Programming
General information
1.Switch on the ignition.2.Initial setup:
Press and hold the left and right button on
the interior rearview mirror simultaneously
for approximately 20 seconds until the LED
on the interior rearview mirror flashes. This
erases all programming of the buttons on
the interior rearview mirror.Seite 133Interior equipmentCONTROLS133
Online Edition for Part no. 01 40 2 927 905 - II/14
Page 221 of 230
C
California Proposition 65 Warning 7
Camera-based cruise control, ACC 110
Camera, care 210
Camera, rearview cam‐ era 120
Can holder, refer to Cu‐ pholder 142
Car battery 198
Car care products 208
Care, displays 210
Care, vehicle 208
Cargo 151
Cargo area 138
Cargo area, adapting size 143
Cargo area, enlarging 139
Cargo area lid 39
Cargo area, storage compart‐ ments 143
Cargo cover 138
Cargo, securing 152
Cargo straps, securing cargo 152
Car key, refer to Remote con‐ trol 34
Carpet, care 210
Car wash 207
Catalytic converter, refer to Hot exhaust system 149
CBS Condition Based Serv‐ ice 186
Center armrest 142
Center console 16
Central screen, refer to Control Display 18
Changes, technical, refer to Safety 7
Changing parts 188
Changing wheels 196
Changing wheels/tires 173
Check Control 72
Children, seating position 55 Children, transporting
safely 55
Child restraint fixing sys‐ tem 55
Child restraint fixing system LATCH 56
Child restraint fixing systems, mounting 55
Child seat, mounting 55
Child seats 55
Chrome parts, care 209
Cigarette lighter 138
Cleaning, displays 210
Climate control 127, 129
Clock 75
Closing/opening via door lock 38
Closing/opening with remote control 37
Clothes hooks 143
Coasting 159
Coasting with engine decou‐ pled, coasting 159
Coasting with idling en‐ gine 159
Cold starting, refer to Starting the engine 60
Collision warning with City Braking function 100
Combination switch, refer to Turn signals 64
Combination switch, refer to Wiper system 64
Comfort Access 40
Compact wheel 196
Compartments in the doors 142
Compass 135
Compressor 175
Computer 79
Condensation on win‐ dows 131
Condensation under the vehi‐ cle 150
Condition Based Service CBS 186 Configuring drive pro‐
gram 109
Confirmation signal 42
Control Display 18
Control Display, settings 81
Controller 18, 19
Control systems, driving stabil‐ ity 106
Convenient opening 37
Coolant 185
Coolant temperature 74
Cooling function 128, 131
Cooling, maximum 130
Cooling system 185
Cornering lamp 87
Corrosion on brake discs 150
Cruise control 116
Cruise control, active 110
Cruise control, refer to cam‐ era-based cruise control 110
Cruising range 75
Cupholder 142
Current fuel consumption 75
D
Damage, tires 173
Damping control, dy‐ namic 107
Data, technical 214
Date 75
Daytime running lights 87
Defrosting, refer to defrosting the windows 128
Defrosting, refer to Windows, defrosting 131
Defrosting the windows 128
Dehumidifying, air 128, 131
Destination distance 80
Diesel particulate filter 149
Digital clock 75
Digital compass 135
Dimensions 214
Dimmable exterior mirrors 53
Dimmable interior rearview mirror 53 Seite 221Everything from A to ZREFERENCE221
Online Edition for Part no. 01 40 2 927 905 - II/14
Page 223 of 230

Front fog lamps 89
Front passenger airbags, auto‐ matic deactivation 93
Front passenger airbags, indi‐ cator lamp 93
FTM Flat Tire Monitor 97
Fuel 166
Fuel cap 164
Fuel consumption, current 75
Fuel consumption, refer to Average fuel consump‐
tion 79
Fuel filler flap 164
Fuel gauge 74
Fuel quality 166
Fuel recommendation 166
Fuel, tank capacity 215
Fuse 199
G Garage door opener, refer to Universal garage door
opener 133
Gasoline 166
Gear change, automatic trans‐ mission 68
Gear shift indicator 76
General driving notes 148
Glass sunroof, refer to Panor‐ amic glass sunroof 45
Glove compartment 141
GREEN mode 156
GREEN mode, bonus range 158
GREEN mode driving style analysis 160
GREEN mode indicator 156
GREEN - program, driving dy‐ namics 108
GREEN tip 158
Gross vehicle weight, ap‐ proved 214
Ground clearance 150 H
Halogen headlamps 190
Handbrake, refer to parking brake 63
Hand-held transmitter, alter‐ nating code 134
Hazard warning flashers 201
Head airbags 91
Headlamp control, auto‐ matic 87
Headlamp courtesy delay fea‐ ture 87
Headlamp flasher 64
Headlamp glass 189
Headlamps, care 208
Headlamp washer system 64
Headliner 17
Head restraints 47
Head restraints, front 50
Head restraints, rear 51
Head-up Display 83
Head-up Display, standard view 84
Heavy cargo, stowing 152
High-beam Assistant 88
High beams 64
High beams/low beams, refer to High-beam Assistant 88
Hills 150
Hill start assistant, refer to Drive-off assistant 109
Hints 6
Holder for beverages 142
Homepage 6
Hood 180
Horn 14
Hot exhaust system 149
HUD Head-up Display 83
Hydroplaning 149
I
Ice warning, see External tem‐ perature warning 75 Icy roads, see External tem‐
perature warning 75
Identification marks, tires 171
Identification number, refer to Important features in the en‐
gine compartment 180
Ignition key, refer to Remote control 34
Ignition off 59
Ignition on 59
Illuminated ring, central in‐ strument cluster 82
Indication of a flat tire 95, 98
Individual air distribu‐ tion 128, 130
Individual settings, refer to Personal Profile 35
Inflation pressure, tires 168
Inflation pressure warning, tires 97
Info display, refer to Com‐ puter 79
Initialize, Tire Pressure Moni‐ tor TPM 95
Initializing, Flat Tire Monitor FTM 98
Instrument cluster 71
Instrument cluster, electronic displays 72
Instrument lighting 89
Integrated key 34
Intelligent Emergency Re‐ quest 201
Intelligent Safety 99
Intensity, AUTO program 130
Interior equipment 133
Interior lamps 89
Interior lamps via remote con‐ trol 37
Interior motion sensor 43
Interior rearview mirror, auto‐ matic dimming feature 53
Interior rearview mirror, com‐ pass 135
Interior rearview mirror, man‐ ually dimmable 53 Seite 223Everything from A to ZREFERENCE223
Online Edition for Part no. 01 40 2 927 905 - II/14