low beam MINI COOPER 2014 Owners Manual
[x] Cancel search | Manufacturer: MINI, Model Year: 2014, Model line: COOPER, Model: MINI COOPER 2014Pages: 230, PDF Size: 11.58 MB
Page 14 of 230
CockpitVehicle equipment
All standard, country-specific and optional
equipment that is offered in the model series is
described in this chapter. Therefore, equipmentis also described that is not available in a vehi‐
cle, e. g., because of the selected optional
equipment or country variant. This also applies
for safety-related functions and systems.
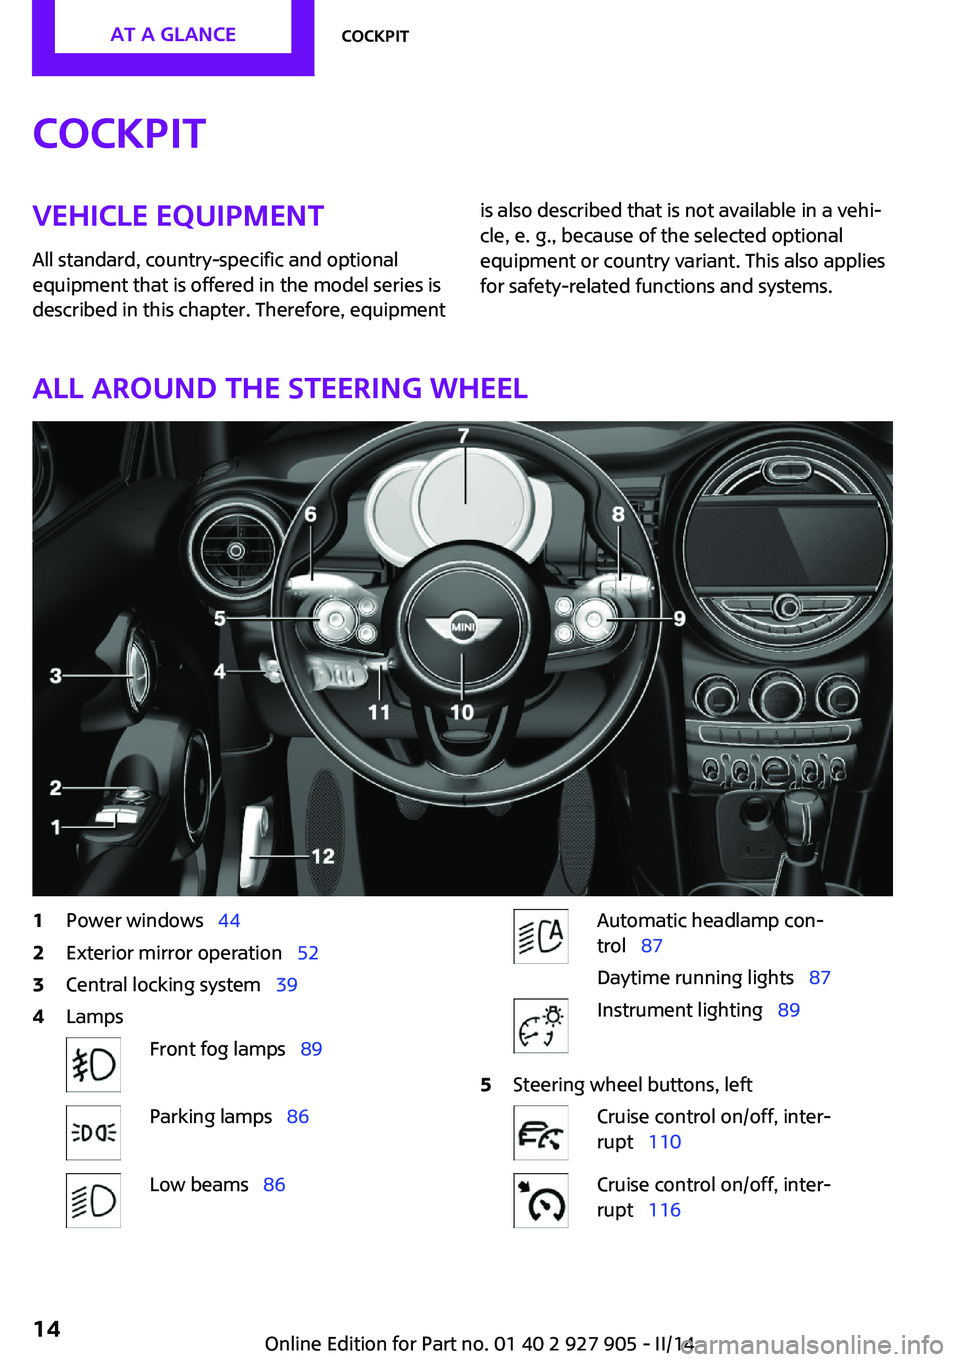
All around the steering wheel
1Power windows 442Exterior mirror operation 523Central locking system 394LampsFront fog lamps 89Parking lamps 86Low beams 86Automatic headlamp con‐
trol 87
Daytime running lights 87Instrument lighting 895Steering wheel buttons, leftCruise control on/off, inter‐
rupt 110Cruise control on/off, inter‐
rupt 116Seite 14AT A GLANCECockpit14
Online Edition for Part no. 01 40 2 927 905 - II/14
Page 59 of 230
DrivingVehicle equipmentAll standard, country-specific and optional
equipment that is offered in the model series is
described in this chapter. Therefore, equipment
is also described that is not available in a vehi‐
cle, e. g., because of the selected optional
equipment or country variant. This also applies
for safety-related functions and systems.
Start/Stop button
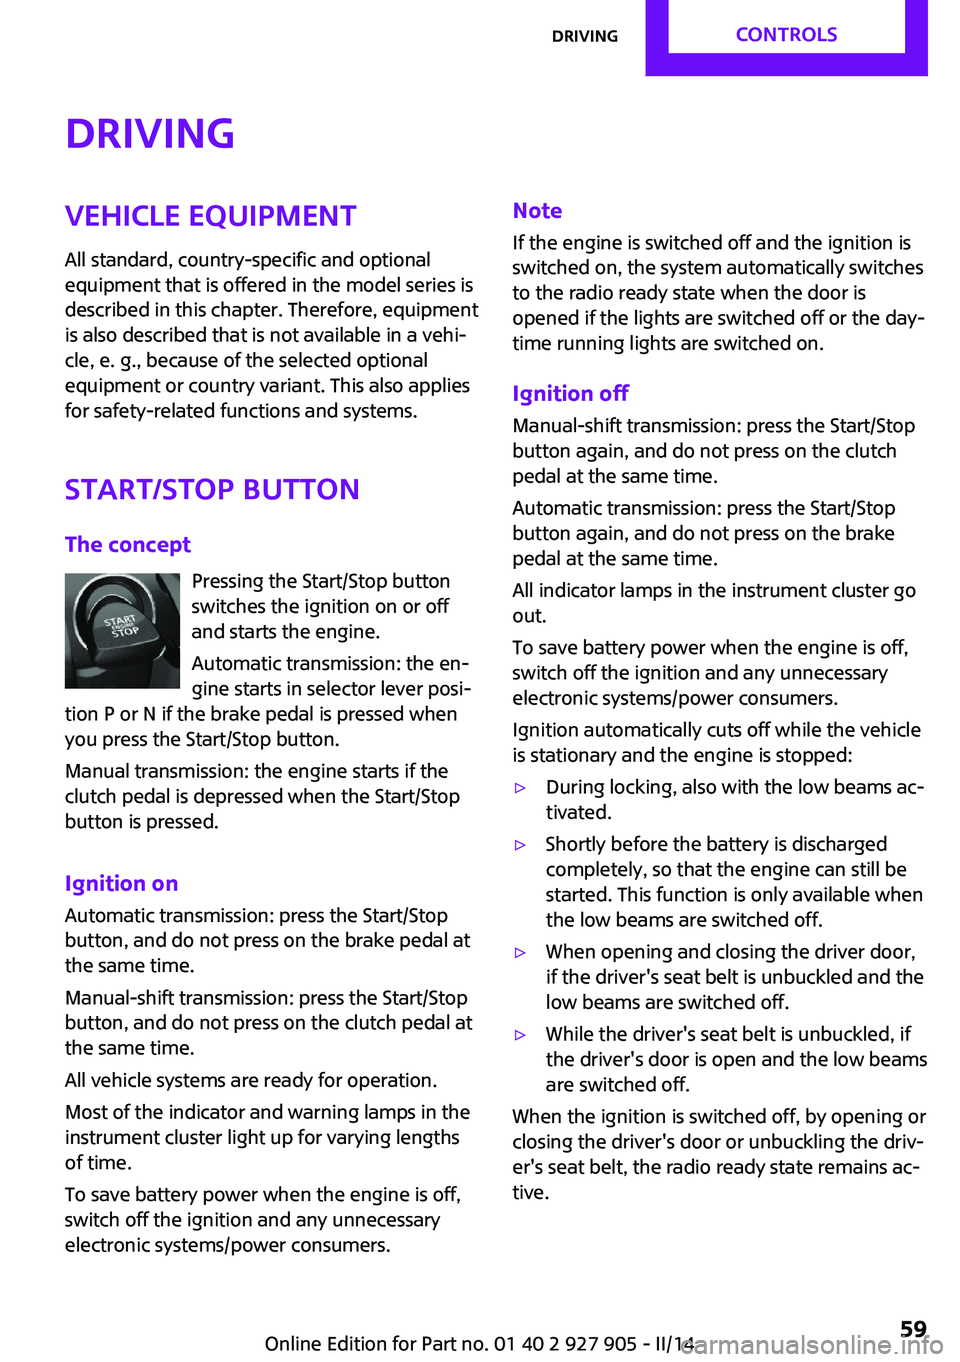
The concept Pressing the Start/Stop button
switches the ignition on or off
and starts the engine.
Automatic transmission: the en‐
gine starts in selector lever posi‐
tion P or N if the brake pedal is pressed when
you press the Start/Stop button.
Manual transmission: the engine starts if the
clutch pedal is depressed when the Start/Stop
button is pressed.
Ignition on Automatic transmission: press the Start/Stop
button, and do not press on the brake pedal at
the same time.
Manual-shift transmission: press the Start/Stop
button, and do not press on the clutch pedal at
the same time.
All vehicle systems are ready for operation.
Most of the indicator and warning lamps in the
instrument cluster light up for varying lengths
of time.
To save battery power when the engine is off,
switch off the ignition and any unnecessary
electronic systems/power consumers.Note
If the engine is switched off and the ignition is
switched on, the system automatically switches
to the radio ready state when the door is
opened if the lights are switched off or the day‐
time running lights are switched on.
Ignition off
Manual-shift transmission: press the Start/Stop
button again, and do not press on the clutch
pedal at the same time.
Automatic transmission: press the Start/Stop
button again, and do not press on the brake
pedal at the same time.
All indicator lamps in the instrument cluster go
out.
To save battery power when the engine is off,
switch off the ignition and any unnecessary
electronic systems/power consumers.
Ignition automatically cuts off while the vehicle
is stationary and the engine is stopped:▷During locking, also with the low beams ac‐
tivated.▷Shortly before the battery is discharged
completely, so that the engine can still be
started. This function is only available when
the low beams are switched off.▷When opening and closing the driver door,
if the driver's seat belt is unbuckled and the
low beams are switched off.▷While the driver's seat belt is unbuckled, if
the driver's door is open and the low beams
are switched off.
When the ignition is switched off, by opening or
closing the driver's door or unbuckling the driv‐
er's seat belt, the radio ready state remains ac‐
tive.
Seite 59DrivingCONTROLS59
Online Edition for Part no. 01 40 2 927 905 - II/14
Page 73 of 230
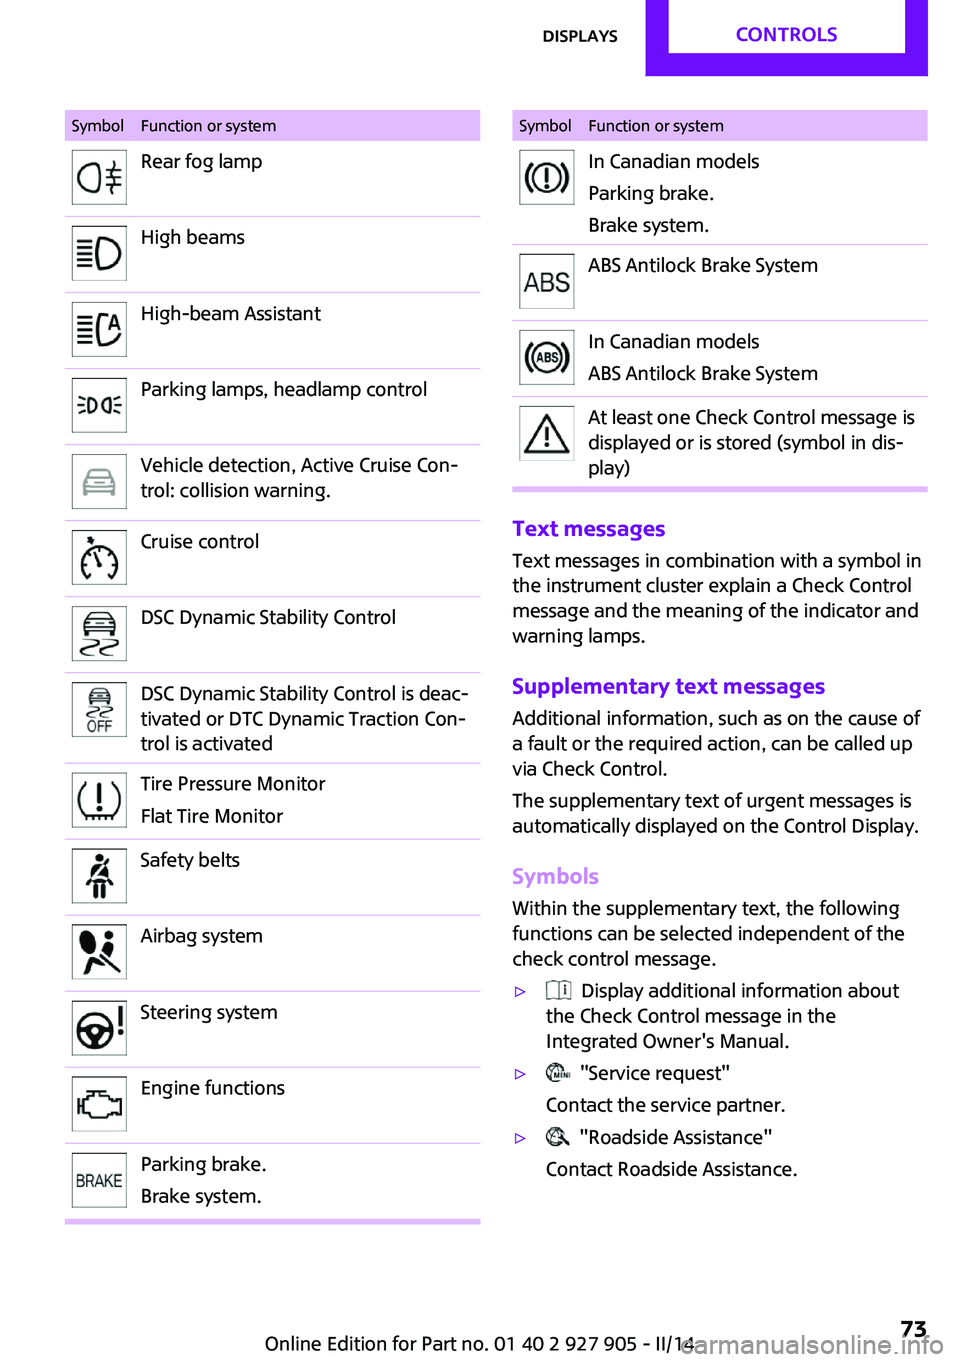
SymbolFunction or systemRear fog lampHigh beamsHigh-beam AssistantParking lamps, headlamp controlVehicle detection, Active Cruise Con‐
trol: collision warning.Cruise controlDSC Dynamic Stability ControlDSC Dynamic Stability Control is deac‐
tivated or DTC Dynamic Traction Con‐
trol is activatedTire Pressure Monitor
Flat Tire MonitorSafety beltsAirbag systemSteering systemEngine functionsParking brake.
Brake system.SymbolFunction or systemIn Canadian models
Parking brake.
Brake system.ABS Antilock Brake SystemIn Canadian models
ABS Antilock Brake SystemAt least one Check Control message is
displayed or is stored (symbol in dis‐
play)
Text messages
Text messages in combination with a symbol in
the instrument cluster explain a Check Control
message and the meaning of the indicator and
warning lamps.
Supplementary text messages Additional information, such as on the cause of
a fault or the required action, can be called up
via Check Control.
The supplementary text of urgent messages is
automatically displayed on the Control Display.
Symbols Within the supplementary text, the following
functions can be selected independent of the
check control message.
▷ Display additional information about
the Check Control message in the
Integrated Owner's Manual.▷ "Service request"
Contact the service partner.▷ "Roadside Assistance"
Contact Roadside Assistance.Seite 73DisplaysCONTROLS73
Online Edition for Part no. 01 40 2 927 905 - II/14
Page 84 of 230

or insert them in the system, or else the system
can be damaged. ◀
Follow the instructions for cleaning the Head-
up Display, refer to page 210.
Display visibility
The visibility of the displays in the Head-up Dis‐
play is influenced by the following factors:▷Certain sitting positions.▷Objects on the cover of the Head-up Dis‐
play.▷Sunglasses with certain polarization filters.▷Wet roads.▷Unfavorable light conditions.
Switching on/off
When switching on, the projection lens of the
Head-up Display is extended. When switching
off, the projection lens of the Head-up Display
is retracted again.
Press the button.
Display
Overview
▷Speed.▷Navigation system.▷Check Control messages.▷Selection list from the instrument cluster.▷Speed limit detection.▷Driver assistance systems.Some of this information is only displayed
briefly as needed.
Selecting displays in the Head-up
Display1. "Settings"2."Head-Up Display"3."Displayed information"4.Select the desired displays in the Head-up
Display.
The settings are stored for the remote control
currently in use.
Setting the brightness The brightness is automatically adjusted to the
ambient light.
The basic setting can be adjusted manually.
1. "Settings"2."Head-Up Display"3."Brightness"4.Turn the controller.
When the low beams are switched on, the
brightness of the Head-up Display can be addi‐
tionally influenced using the instrument light‐
ing, refer to page 89.
The setting is stored for the remote control cur‐
rently in use.
Adjusting the height
1. "Settings"2."Head-Up Display"3."Height"4.Turn the controller.
The setting is stored for the remote control cur‐
rently in use.
Setting the rotation
1. "Settings"2."Head-Up Display"Seite 84CONTROLSDisplays84
Online Edition for Part no. 01 40 2 927 905 - II/14
Page 86 of 230
LampsVehicle equipmentAll standard, country-specific and optional
equipment that is offered in the model series is
described in this chapter. Therefore, equipment
is also described that is not available in a vehi‐
cle, e. g., because of the selected optional
equipment or country variant. This also applies
for safety-related functions and systems.
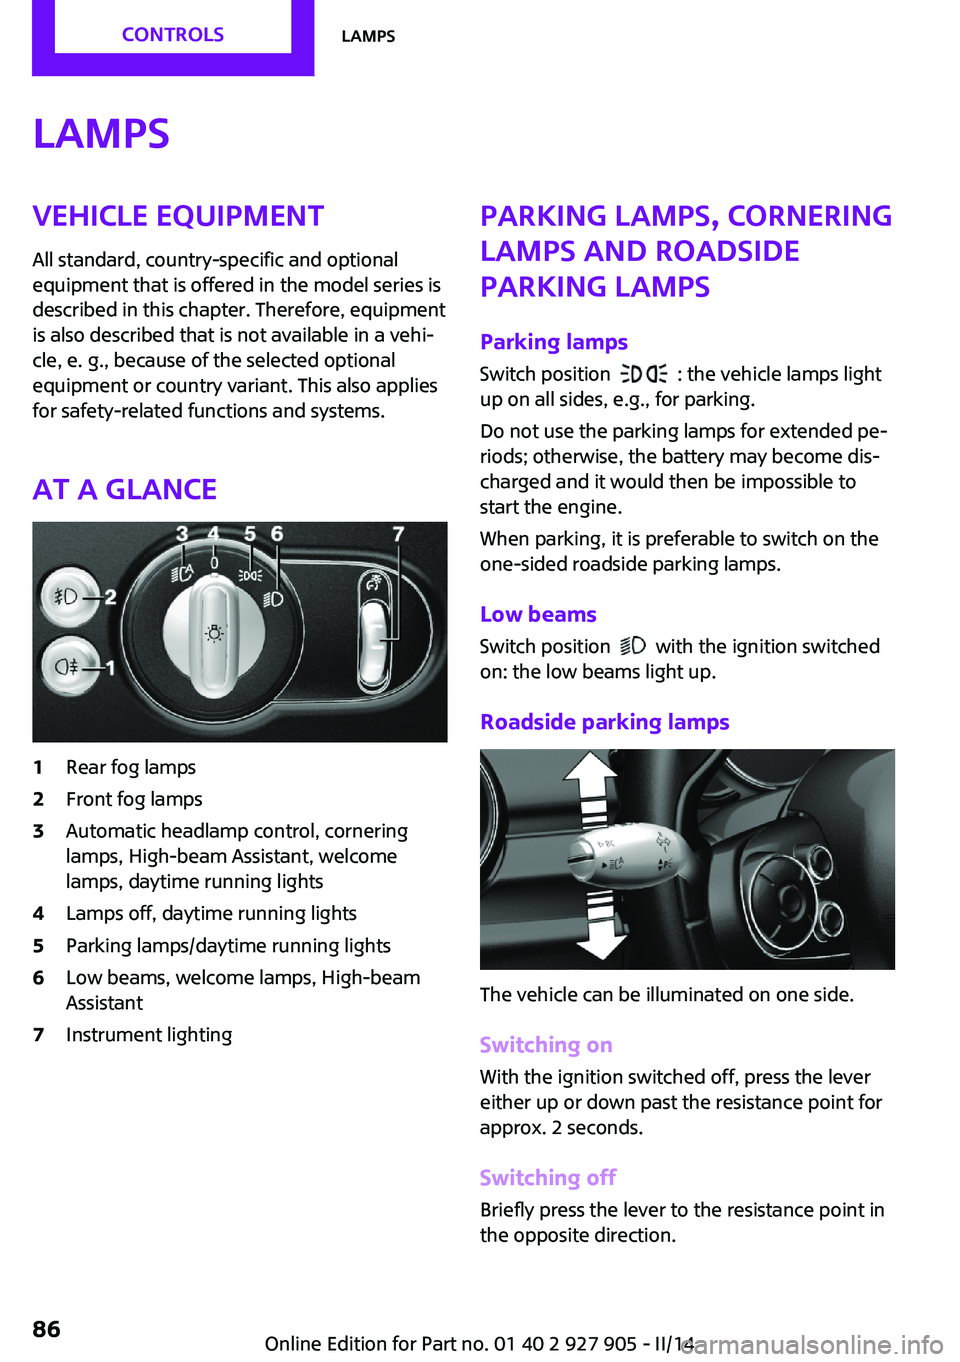
At a glance1Rear fog lamps2Front fog lamps3Automatic headlamp control, cornering
lamps, High-beam Assistant, welcome
lamps, daytime running lights4Lamps off, daytime running lights5Parking lamps/daytime running lights6Low beams, welcome lamps, High-beam
Assistant7Instrument lightingParking lamps, cornering
lamps and roadside
parking lamps
Parking lamps Switch position
: the vehicle lamps light
up on all sides, e.g., for parking.
Do not use the parking lamps for extended pe‐
riods; otherwise, the battery may become dis‐
charged and it would then be impossible to
start the engine.
When parking, it is preferable to switch on the
one-sided roadside parking lamps.
Low beams
Switch position
with the ignition switched
on: the low beams light up.
Roadside parking lamps
The vehicle can be illuminated on one side.
Switching on With the ignition switched off, press the lever
either up or down past the resistance point for
approx. 2 seconds.
Switching off Briefly press the lever to the resistance point in
the opposite direction.
Seite 86CONTROLSLamps86
Online Edition for Part no. 01 40 2 927 905 - II/14
Page 87 of 230

Welcome lamps and
headlamp courtesy de‐
lay feature
Welcome lamps
When the vehicle is parked, leave the switch in
position
or : parking and interior lamps
come on briefly when the vehicle is unlocked
depending on the ambient light.
Activating/deactivating
1. "Settings"2."Lighting"3."Welcome lights"
The setting is stored for the remote control cur‐
rently in use.
Headlamp courtesy delay feature The low beams stay lit for a short while if the
headlamp flasher is switched on after the lights
and ignition are switched off.
Setting the duration
1. "Settings"2."Lighting"3."Pathway lighting:"4.Set the duration.
The setting is stored for the remote control cur‐
rently in use.
Automatic headlamp
control
Switch position
: the low beams are
switched on and off automatically, e.g., in tun‐
nels, in twilight or if there is precipitation. The
indicator lamp in the instrument cluster lights
up.
A blue sky with the sun low on the horizon can
cause the lights to be switched on.
The low beams always stay on when the fog
lamps are switched on.
Personal responsibility
The automatic headlamp control cannot
serve as a substitute for your personal judg‐
ment in determining when the lamps should be
switched on in response to ambient lighting
conditions.
For example, the sensors are unable to detect
fog or hazy weather. To avoid safety risks, you
should always switch on the lamps manually
under these conditions. ◀
Daytime running lights
With the ignition switched on, the daytime run‐
ning lights light up in position 0,
or .
After the ignition is switched off, the parking
lamps light up in position
.
Activating/deactivating
In some countries, daytime running lights are
compulsory, so it may not be possible to deacti‐
vate the daytime running lights.
1. "Settings"2."Lighting"3."Daytime running lamps"
The setting is stored for the remote control cur‐
rently in use.
Cornering lamp
Switch position
: during cornering, the cor‐
nering lamp also lights the interior area of the
curve. Below a speed of approx.
25 mph/40 km/h when the flasher is switched
on and the steering angle is detected, there is
automatic activation.
Malfunction
A Check Control message is displayed.
Seite 87LampsCONTROLS87
Online Edition for Part no. 01 40 2 927 905 - II/14
Page 88 of 230

Cornering light is disrupted or failed. Have the
system checked as soon as possible.
High-beam Assistant The concept
When the low beams are switched on, this sys‐
tem automatically switches the high beams on
and off. The procedure is controlled by a sensor
on the front of the interior rearview mirror. The
assistant ensures that the high beams are
switched on whenever the traffic situation al‐
lows. The driver can intervene at any time and
switch the high beams on and off as usual.
Activating
The High-beam Assistant can be activated
when the low beams are switched on.
1.Turn the light switch to or .2.Press the button on the turn signal lever,
arrow.
The indicator lamp in the instrument
cluster lights up.
When the low beams are on, the lights are au‐
tomatically brightened or dimmed.
The system responds to light from oncoming
traffic and traffic driving ahead of you, and to
adequate illumination, e.g., in towns and cities.
The blue indicator lamp in the instru‐
ment cluster lights up when the system
switches on the high beams.
Switching the high beams on and off
manually▷High beams on, arrow 1.▷High beams off/headlamp flasher, arrow 2.
The High-beam Assistant can be switched off
when manually adjusting the light. To reacti‐
vate the High-beam Assistant, press the button
on the turn signal lever.
System limits Personal responsibility
The high-beam assistant cannot serve as
a substitute for the driver's personal judgment
of when to use the high beams. Therefore,
manually switch off the high beams in situa‐
tions where this is required to avoid a safety
risk. ◀
The system is not fully functional in situations
such as the following, and driver intervention
may be necessary:
▷In very unfavorable weather conditions,
such as fog or heavy precipitation.▷In detecting poorly-lit road users, such as
pedestrians, cyclists, horseback riders and
wagons; when driving close to train or ship
traffic; and at animal crossings.▷In tight curves, on hilltops or in depressions,
in cross traffic or half-obscured oncoming
traffic on freeways.▷In poorly-lit towns and cities and in the
presence of highly reflective signs.▷At low speeds.Seite 88CONTROLSLamps88
Online Edition for Part no. 01 40 2 927 905 - II/14
Page 89 of 230
▷When the windshield behind the interior
rearview mirror is fogged over, dirty or cov‐
ered with stickers, etc.
Camera
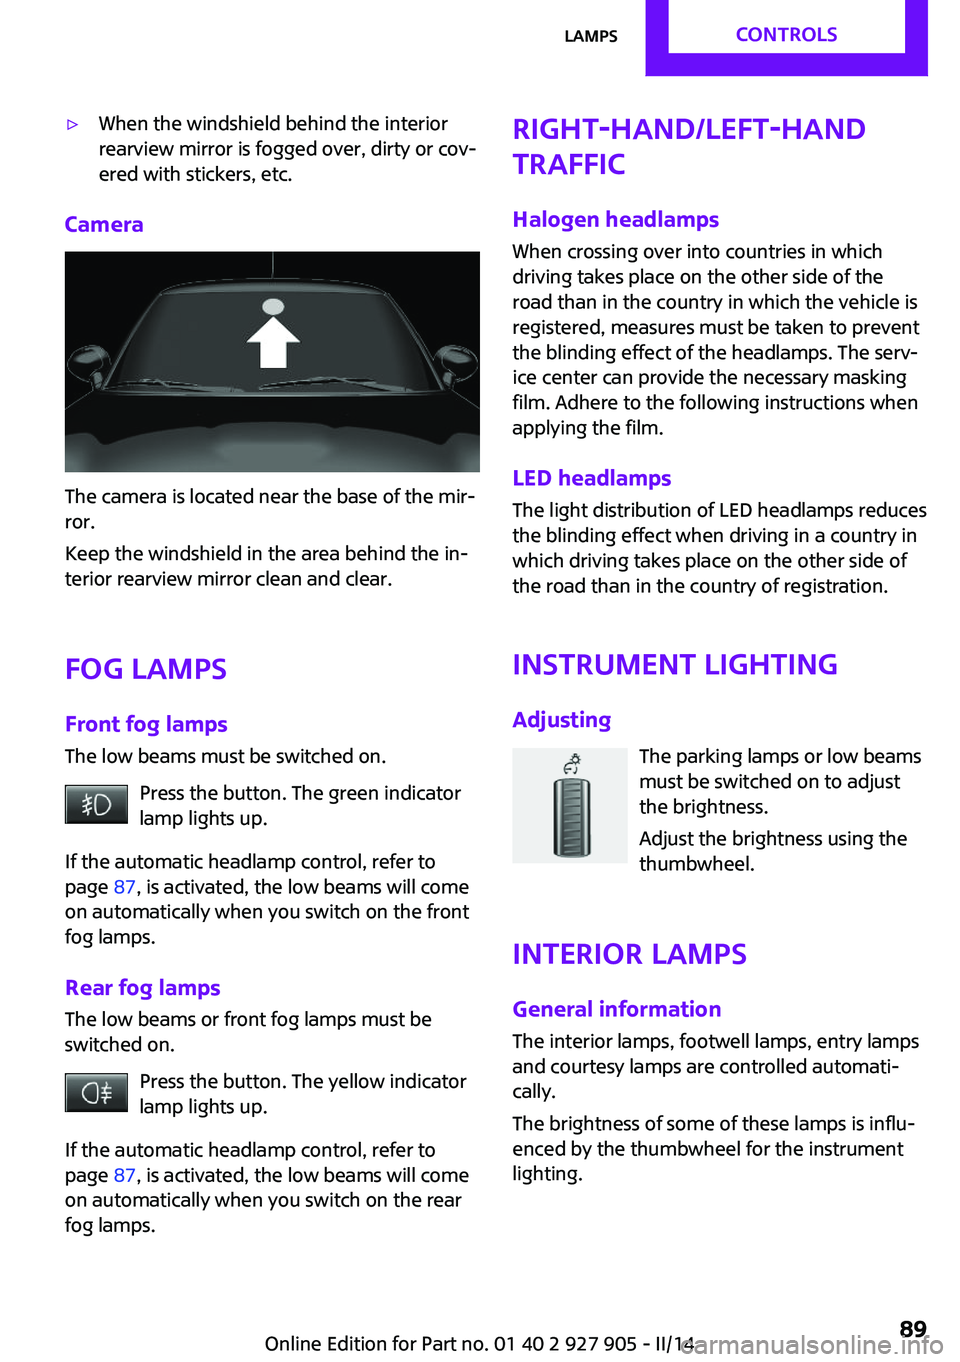
The camera is located near the base of the mir‐
ror.
Keep the windshield in the area behind the in‐
terior rearview mirror clean and clear.
Fog lamps Front fog lamps
The low beams must be switched on.
Press the button. The green indicator
lamp lights up.
If the automatic headlamp control, refer to
page 87, is activated, the low beams will come
on automatically when you switch on the front
fog lamps.
Rear fog lamps The low beams or front fog lamps must be
switched on.
Press the button. The yellow indicator
lamp lights up.
If the automatic headlamp control, refer to
page 87, is activated, the low beams will come
on automatically when you switch on the rear
fog lamps.
Right-hand/left-hand
traffic
Halogen headlamps When crossing over into countries in which
driving takes place on the other side of the
road than in the country in which the vehicle is
registered, measures must be taken to prevent
the blinding effect of the headlamps. The serv‐
ice center can provide the necessary masking
film. Adhere to the following instructions when
applying the film.
LED headlamps
The light distribution of LED headlamps reduces
the blinding effect when driving in a country in
which driving takes place on the other side of
the road than in the country of registration.
Instrument lightingAdjusting The parking lamps or low beams
must be switched on to adjust
the brightness.
Adjust the brightness using the
thumbwheel.
Interior lamps
General information The interior lamps, footwell lamps, entry lamps
and courtesy lamps are controlled automati‐
cally.
The brightness of some of these lamps is influ‐
enced by the thumbwheel for the instrument
lighting.Seite 89LampsCONTROLS89
Online Edition for Part no. 01 40 2 927 905 - II/14
Page 190 of 230
Front lamps, bulb replacement
At a glance
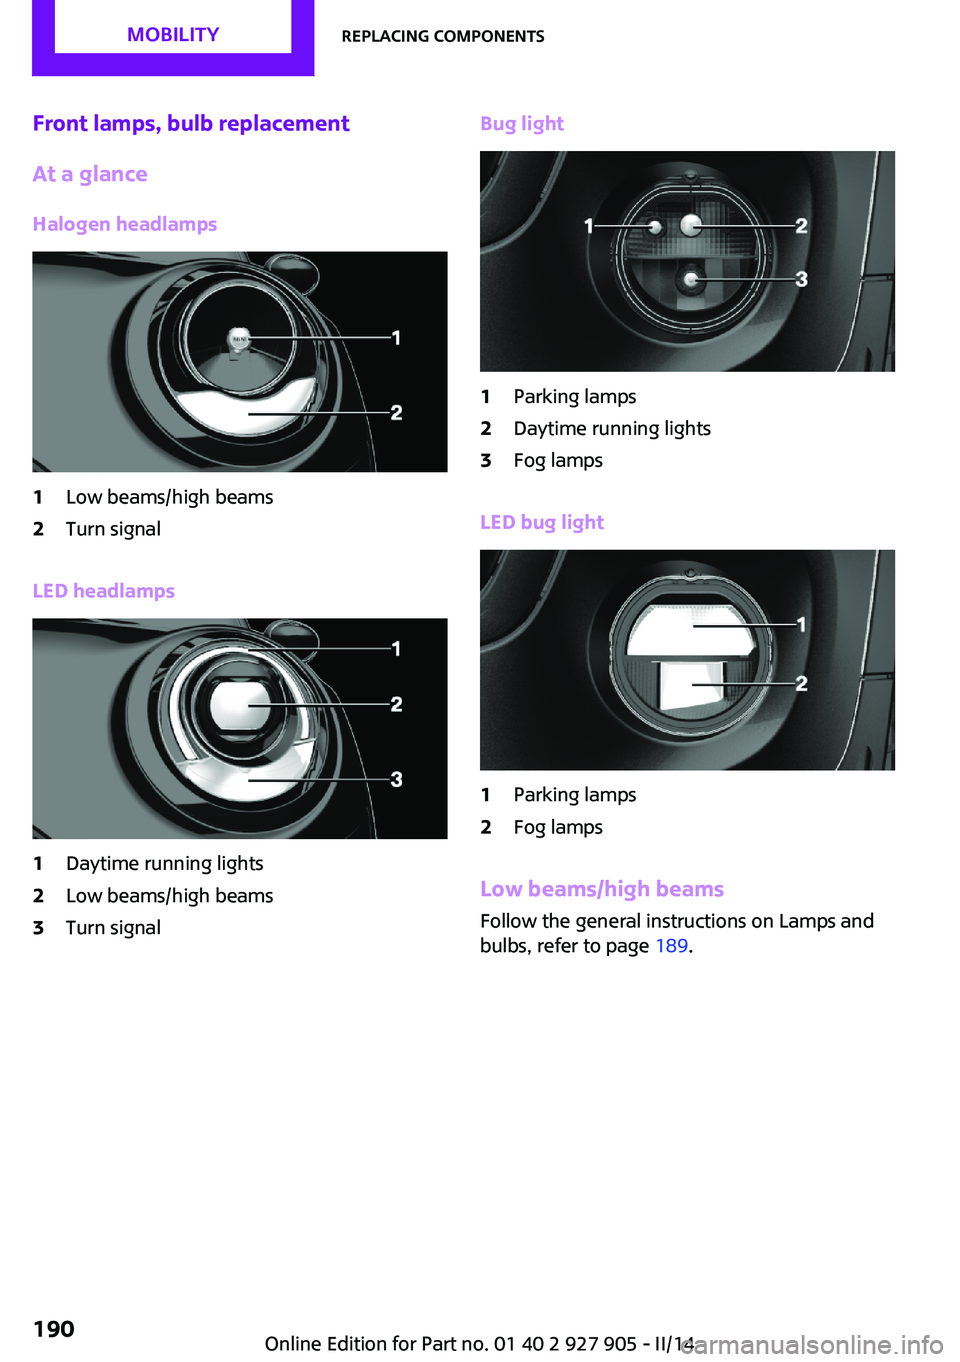
Halogen headlamps1Low beams/high beams2Turn signal
LED headlamps
1Daytime running lights2Low beams/high beams3Turn signalBug light1Parking lamps2Daytime running lights3Fog lamps
LED bug light
1Parking lamps2Fog lamps
Low beams/high beams Follow the general instructions on Lamps and
bulbs, refer to page 189.
Seite 190MOBILITYReplacing components190
Online Edition for Part no. 01 40 2 927 905 - II/14
Page 204 of 230
contact a service center in the event of a break‐
down.
Tow the vehicle only with the front axle
raised
Have the vehicle towed only with the front axle
raised or transported on a loading platform;
otherwise, damage may occur. ◀
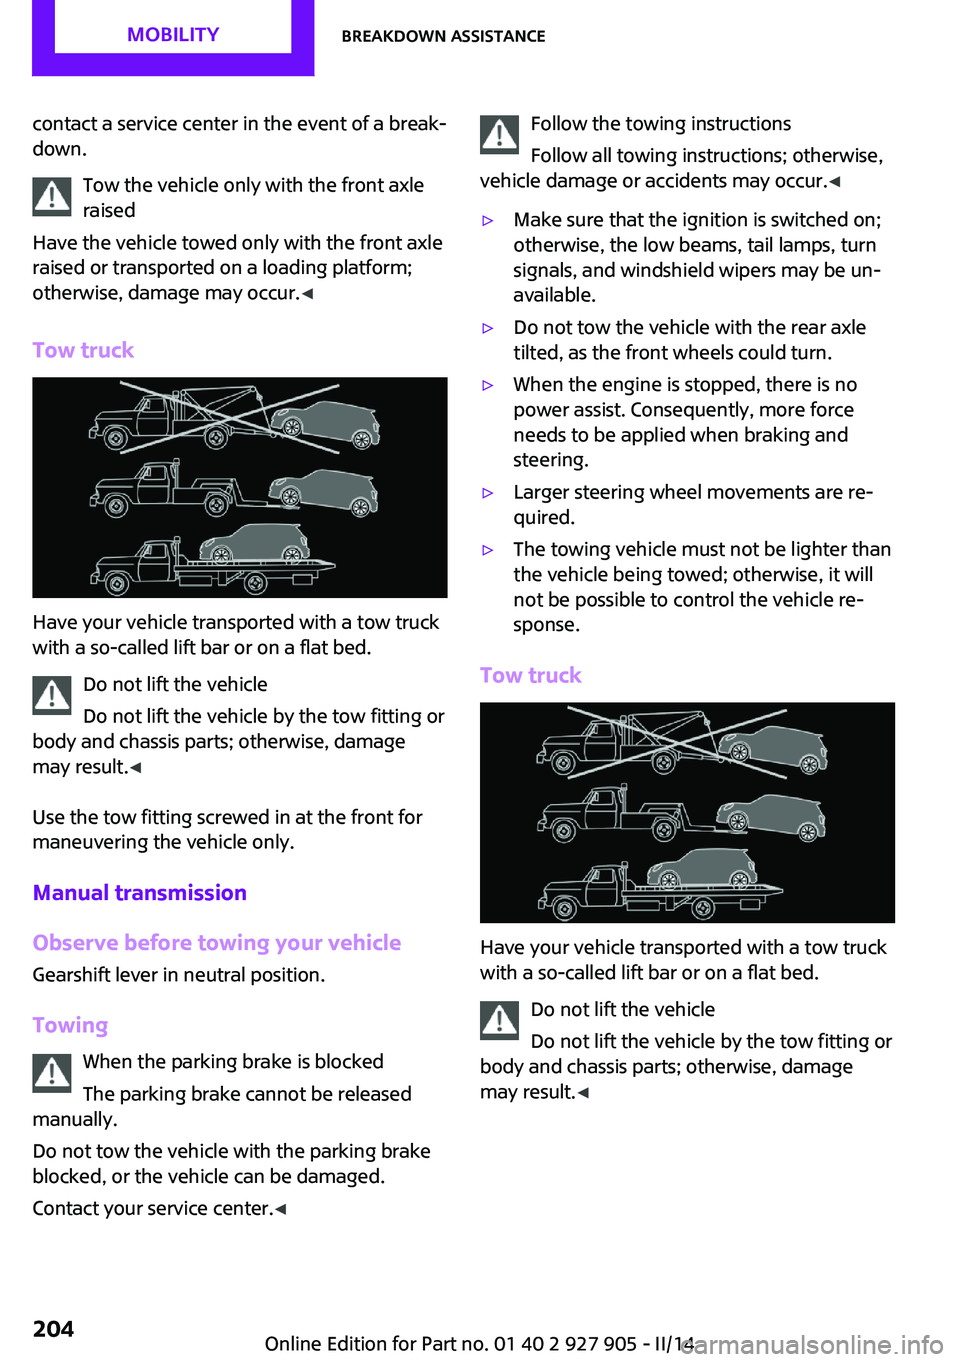
Tow truck
Have your vehicle transported with a tow truck
with a so-called lift bar or on a flat bed.
Do not lift the vehicle
Do not lift the vehicle by the tow fitting or
body and chassis parts; otherwise, damage
may result. ◀
Use the tow fitting screwed in at the front for
maneuvering the vehicle only.
Manual transmission
Observe before towing your vehicle Gearshift lever in neutral position.
Towing When the parking brake is blocked
The parking brake cannot be released
manually.
Do not tow the vehicle with the parking brake
blocked, or the vehicle can be damaged.
Contact your service center. ◀
Follow the towing instructions
Follow all towing instructions; otherwise,
vehicle damage or accidents may occur. ◀▷Make sure that the ignition is switched on;
otherwise, the low beams, tail lamps, turn
signals, and windshield wipers may be un‐
available.▷Do not tow the vehicle with the rear axle
tilted, as the front wheels could turn.▷When the engine is stopped, there is no
power assist. Consequently, more force
needs to be applied when braking and
steering.▷Larger steering wheel movements are re‐
quired.▷The towing vehicle must not be lighter than
the vehicle being towed; otherwise, it will
not be possible to control the vehicle re‐
sponse.
Tow truck
Have your vehicle transported with a tow truck
with a so-called lift bar or on a flat bed.
Do not lift the vehicle
Do not lift the vehicle by the tow fitting or
body and chassis parts; otherwise, damage
may result. ◀
Seite 204MOBILITYBreakdown assistance204
Online Edition for Part no. 01 40 2 927 905 - II/14