top up MINI COOPER 2015 Owners Manual
[x] Cancel search | Manufacturer: MINI, Model Year: 2015, Model line: COOPER, Model: MINI COOPER 2015Pages: 248, PDF Size: 5.43 MB
Page 5 of 248
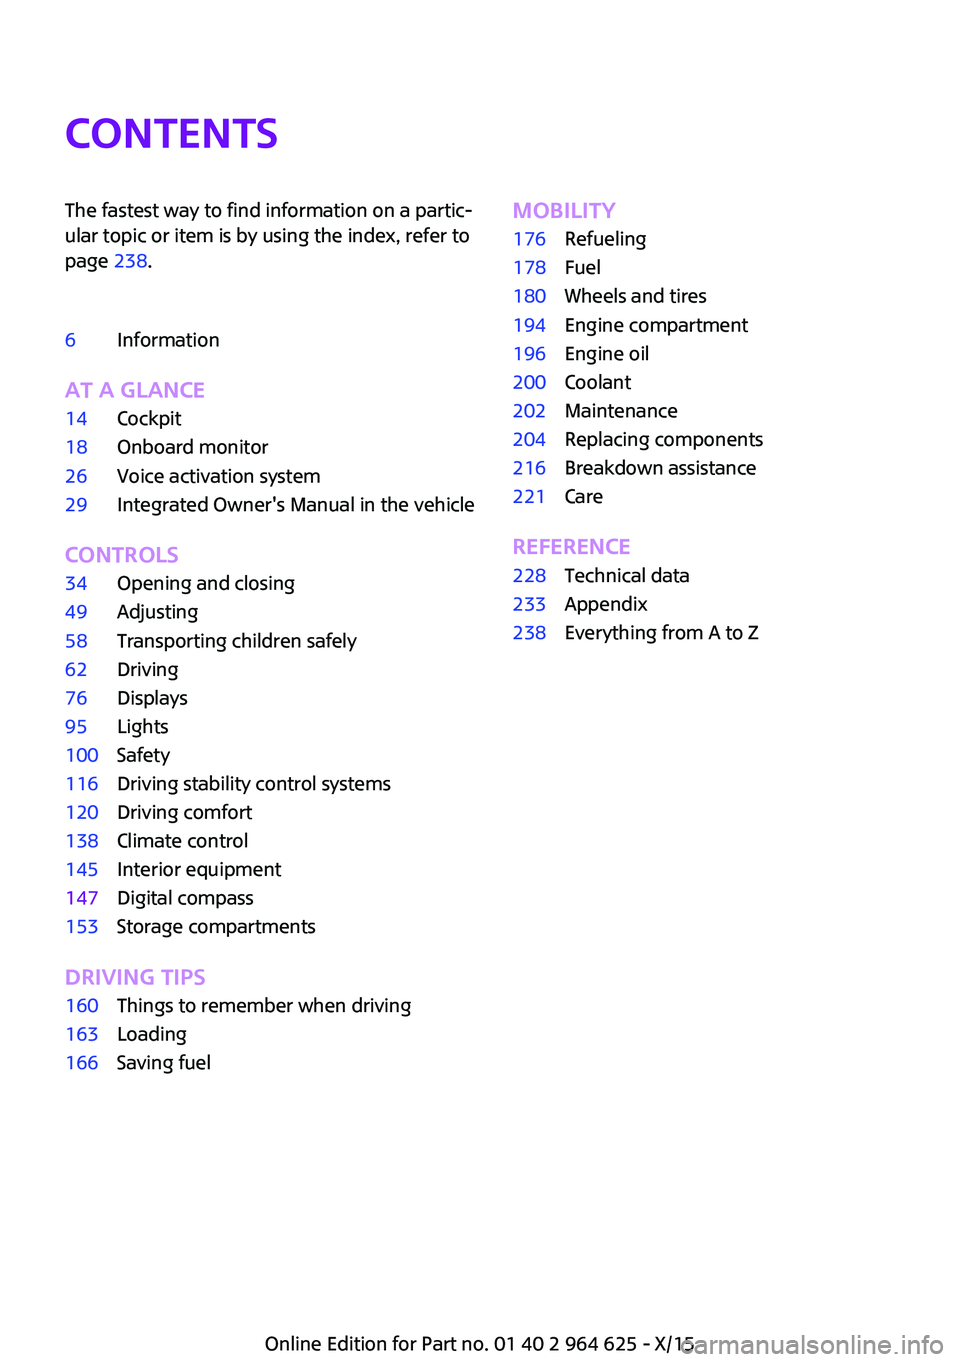
ContentsThe fastest way to find information on a partic‐
ular topic or item is by using the index, refer to
page 238.6Information
AT A GLANCE
14Cockpit18Onboard monitor26Voice activation system29Integrated Owner's Manual in the vehicle
CONTROLS
34Opening and closing49Adjusting58Transporting children safely62Driving76Displays95Lights100Safety116Driving stability control systems120Driving comfort138Climate control145Interior equipment147Digital compass153Storage compartments
DRIVING TIPS
160Things to remember when driving163Loading166Saving fuelMOBILITY176Refueling178Fuel180Wheels and tires194Engine compartment196Engine oil200Coolant202Maintenance204Replacing components216Breakdown assistance221Care
REFERENCE
228Technical data233Appendix238Everything from A to Z
Online Edition for Part no. 01 40 2 964 625 - X/15
Page 6 of 248
InformationUsing this Owner's
Manual
The fastest way to find information on a partic‐
ular topic is by using the index.
An initial overview of the vehicle is provided in
the first chapter.
Updates made after the editorial
deadline
Updates made after the editorial deadline can
lead to differences between the printed Own‐
er's Manual and the following Owner's Man‐
uals:▷Integrated Owner's Manual in the vehicle.▷Online Owner's Manual.▷MINI Motorer’s Guide App.
Information to updates made after the editorial
deadline can be found in the appendix of the
printed Owner's Manual for the vehicle.
User's manual for Navigation,
Entertainment, Communication
Owner's Manual for Navigation, Entertainment,
and Communication can be obtained as printed
book from the service center.
The topics of Navigation, Entertainment, and
Communication can also be called up via the
following media:
▷Integrated Owner's Manual on the Control
Display.▷MINI Motorer’s Guide App.
Additional sources of in‐
formation
A dealer’s service center will be glad to answer
additional questions at any time.
Internet
Information about MINI, e.g., on technology, is
available on the Internet: www.miniusa.com
MINI Motorer’s Guide app The Owner's Manual is available in many coun‐
tries as an app for iOS or Android in the respec‐
tive Store.
Symbols and displays
Symbols in the Owner's Manual
Indicates precautions that must be followed
precisely in order to avoid the possibility of
personal injury and serious damage to the
vehicle.
◄ Marks the end of a specific item of
information.
"..." Identifies Control Display texts used to
select individual functions.
›...‹ Verbal instructions to use with the voice
activation system..
››...‹‹ Identifies the answers generated by the
voice activation system.
Refers to measures that can be taken to
help protect the environment.
Action steps
Action steps to be carried out are presented as
numbered list. The steps must be carried out in
the defined order.
1.First action step.2.Second action step.
Enumerations
Enumerations without mandatory order or al‐
ternative possibilities are presented as list with
bullet points.
Seite 6Information6
Online Edition for Part no. 01 40 2 964 625 - X/15
Page 16 of 248

All around the center console1Hazard warning system 216Intelligent Safety 1092Control Display 183Radio/Multimedia4Glove compartment 1535Climate control 1386PDC Park Distance Control 128
Rearview camera 131
Parking assistant 133Auto Start/Stop function 64Start/stop the engine and switch
the ignition on/off 62DSC Dynamic Stability Con‐
trol 116Head-up Display 907Steptronic transmission selector lever 72
Manual transmission selector lever 718Controller with buttons 199Parking brake 6610Driving Dynamics Control 118Seite 16AT A GLANCECockpit16
Online Edition for Part no. 01 40 2 964 625 - X/15
Page 18 of 248

Onboard monitorVehicle features and op‐
tions
This chapter describes all standard, country-
specific and optional features offered with the
series. It also describes features that are not
necessarily available in your car, e. g., due to
the selected options or country versions. This
also applies to safety-related functions and sys‐
tems. The respectively applicable country provi‐
sions must be observed when using the respec‐
tive features and systems.
The concept The onboard monitor combines the functions
of a multitude of switches. Thus, these func‐
tions can be operated from a central location.
WARNING
Operating the integrated information sys‐
tem and communication devices while driving
can distract from traffic. It is possible to lose
control of the vehicle. There is risk of an acci‐
dent. Only use the systems or devices when the
traffic situation allows. If necessary stop and
use the systems and devices while the vehicle is
stationary. ◀Overview of control ele‐
ments
Control elements1Control Display2Controller with buttons and, depending on
the equipment version, with touchpad
Control Display
Information
▷To clean the Control Display, follow the care
instructions.▷Do not place objects close to the Control
Display; otherwise, the Control Display can
be damaged.▷In the case of very high temperatures on
the Control Display, e.g. due to intense so‐
lar radiation, the brightness may be re‐
duced down to complete deactivation.
Once the temperature is reduced, e.g.
through shadow or climate control system,
the normal functions are re-established.
Switching on
1.Switch on the ignition.2.Press the controller.Seite 18AT A GLANCEOnboard monitor18
Online Edition for Part no. 01 40 2 964 625 - X/15
Page 21 of 248
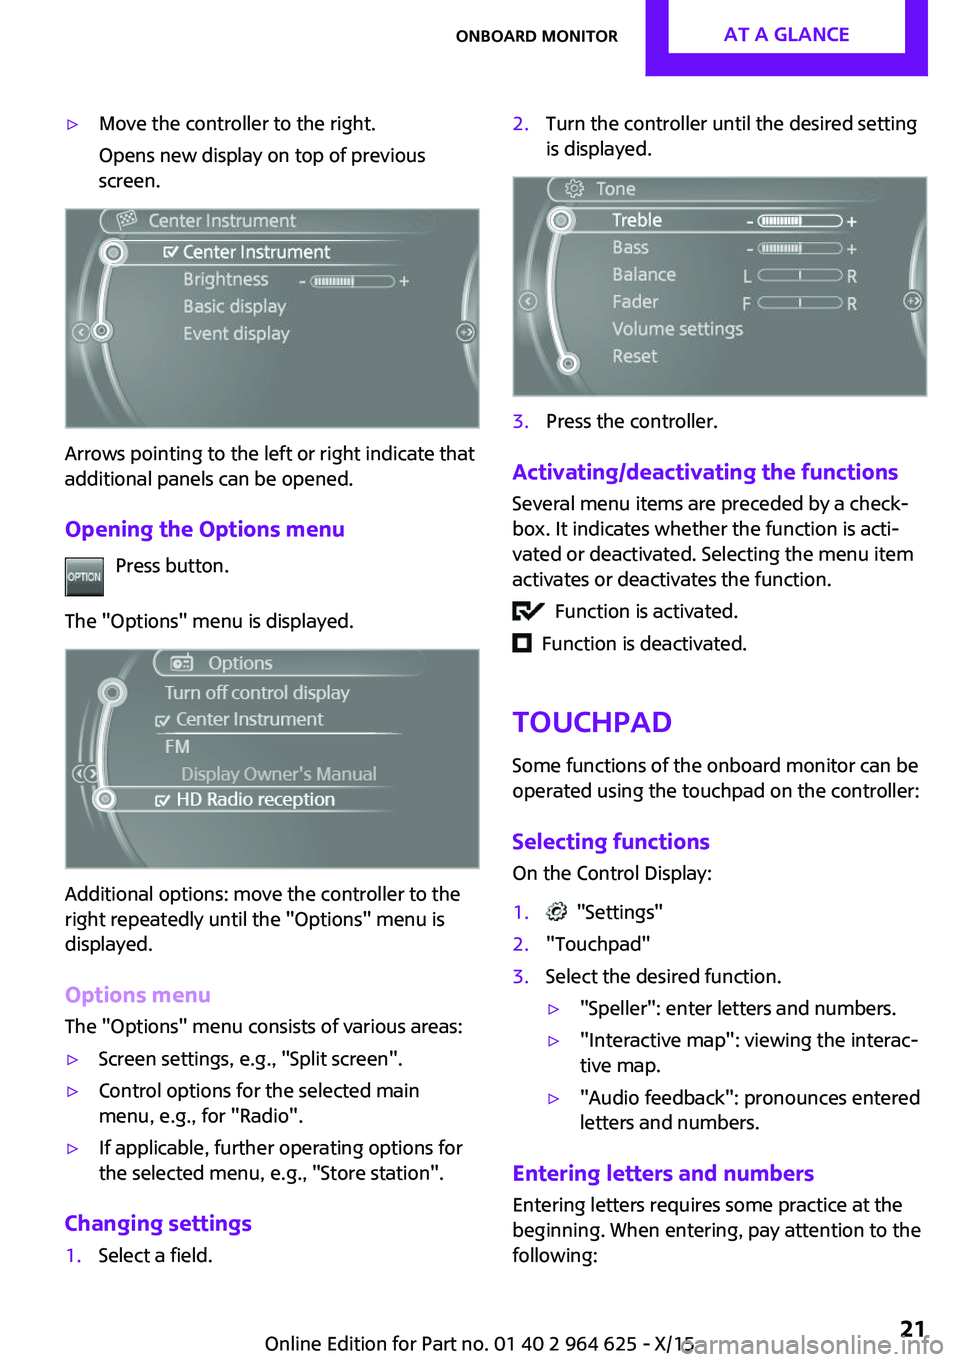
▷Move the controller to the right.
Opens new display on top of previous
screen.
Arrows pointing to the left or right indicate that
additional panels can be opened.
Opening the Options menu Press button.
The "Options" menu is displayed.
Additional options: move the controller to the
right repeatedly until the "Options" menu is
displayed.
Options menu The "Options" menu consists of various areas:
▷Screen settings, e.g., "Split screen".▷Control options for the selected main
menu, e.g., for "Radio".▷If applicable, further operating options for
the selected menu, e.g., "Store station".
Changing settings
1.Select a field.2.Turn the controller until the desired setting
is displayed.3.Press the controller.
Activating/deactivating the functions
Several menu items are preceded by a check‐box. It indicates whether the function is acti‐
vated or deactivated. Selecting the menu item
activates or deactivates the function.
Function is activated.
Function is deactivated.
Touchpad
Some functions of the onboard monitor can be
operated using the touchpad on the controller:
Selecting functions
On the Control Display:
1. "Settings"2."Touchpad"3.Select the desired function.▷"Speller": enter letters and numbers.▷"Interactive map": viewing the interac‐
tive map.▷"Audio feedback": pronounces entered
letters and numbers.
Entering letters and numbers
Entering letters requires some practice at the
beginning. When entering, pay attention to the
following:
Seite 21Onboard monitorAT A GLANCE21
Online Edition for Part no. 01 40 2 964 625 - X/15
Page 23 of 248
Status informationStatus fieldThe following information is displayed in the
status field at the top right:▷Time.▷Current entertainment source.▷Sound output, on/off.▷Wireless network reception strength.▷Phone status.▷Traffic bulletin reception.
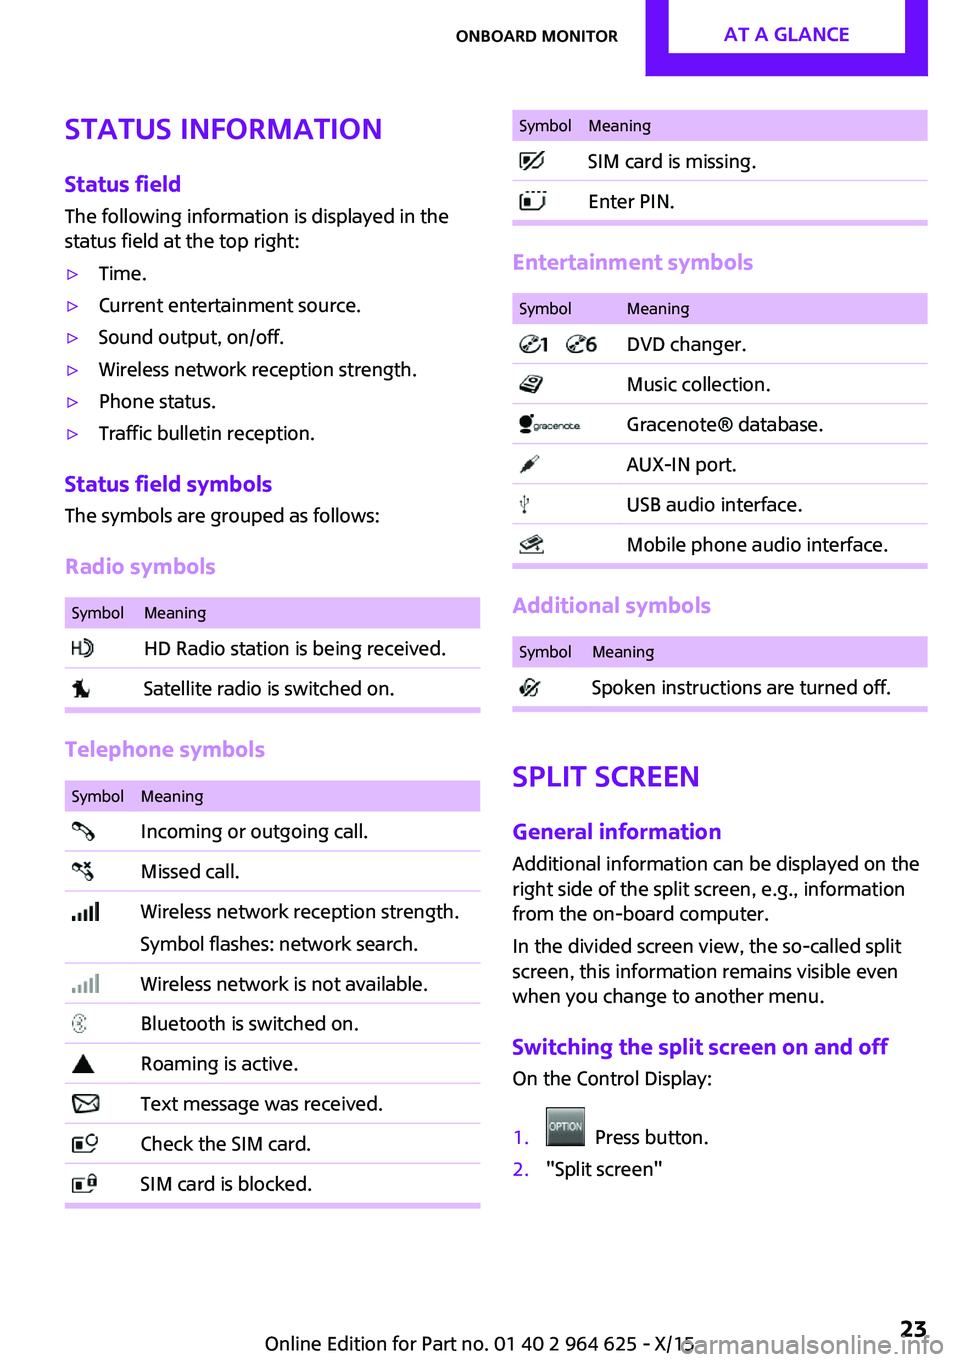
Status field symbols
The symbols are grouped as follows:
Radio symbols
SymbolMeaning HD Radio station is being received. Satellite radio is switched on.
Telephone symbols
SymbolMeaning Incoming or outgoing call. Missed call. Wireless network reception strength.
Symbol flashes: network search. Wireless network is not available. Bluetooth is switched on. Roaming is active. Text message was received. Check the SIM card. SIM card is blocked.SymbolMeaning SIM card is missing. Enter PIN.
Entertainment symbols
SymbolMeaning DVD changer. Music collection. Gracenote® database. AUX-IN port. USB audio interface. Mobile phone audio interface.
Additional symbols
SymbolMeaning Spoken instructions are turned off.
Split screen
General information
Additional information can be displayed on the
right side of the split screen, e.g., information
from the on-board computer.
In the divided screen view, the so-called split
screen, this information remains visible even
when you change to another menu.
Switching the split screen on and off On the Control Display:
1. Press button.2."Split screen"Seite 23Onboard monitorAT A GLANCE23
Online Edition for Part no. 01 40 2 964 625 - X/15
Page 24 of 248
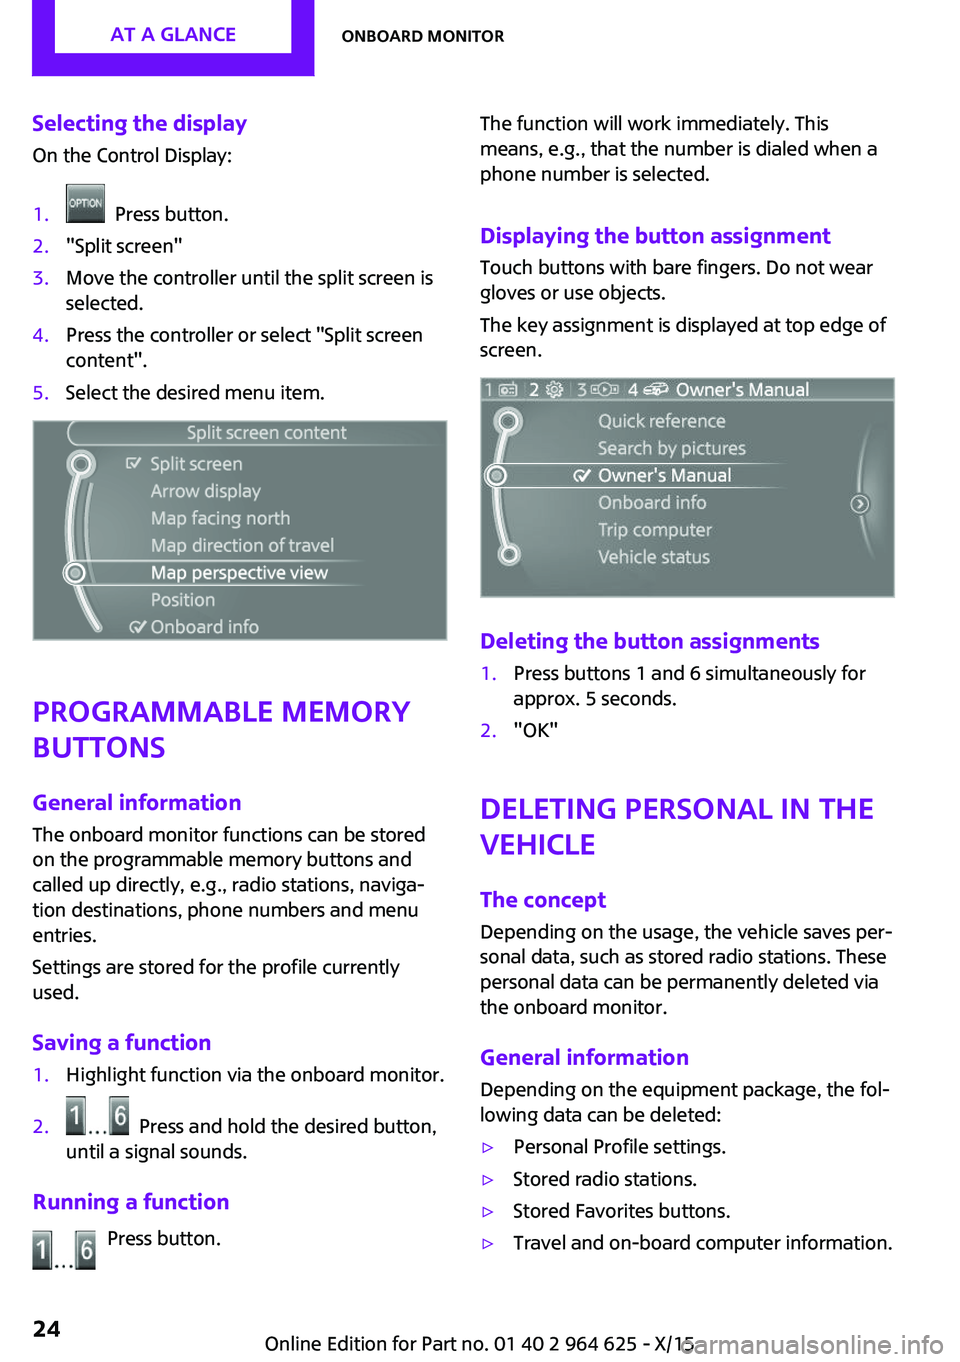
Selecting the displayOn the Control Display:1. Press button.2."Split screen"3.Move the controller until the split screen is
selected.4.Press the controller or select "Split screen
content".5.Select the desired menu item.
Programmable memory
buttons
General information
The onboard monitor functions can be stored
on the programmable memory buttons and
called up directly, e.g., radio stations, naviga‐
tion destinations, phone numbers and menu
entries.
Settings are stored for the profile currently
used.
Saving a function
1.Highlight function via the onboard monitor.2. Press and hold the desired button,
until a signal sounds.
Running a function
Press button.
The function will work immediately. This
means, e.g., that the number is dialed when a
phone number is selected.
Displaying the button assignmentTouch buttons with bare fingers. Do not wear
gloves or use objects.
The key assignment is displayed at top edge of
screen.
Deleting the button assignments
1.Press buttons 1 and 6 simultaneously for
approx. 5 seconds.2."OK"
Deleting personal in the
vehicle
The concept
Depending on the usage, the vehicle saves per‐
sonal data, such as stored radio stations. These
personal data can be permanently deleted via
the onboard monitor.
General information Depending on the equipment package, the fol‐
lowing data can be deleted:
▷Personal Profile settings.▷Stored radio stations.▷Stored Favorites buttons.▷Travel and on-board computer information.Seite 24AT A GLANCEOnboard monitor24
Online Edition for Part no. 01 40 2 964 625 - X/15
Page 35 of 248

The battery compartment is accessible.3.Slide the key in the cover of the battery
compartment and raise the cover.4.Insert a battery of the same type with the
positive side facing up.5.Insert lid and cover.6.Push key into the remote control until it en‐
gages.
Have old batteries disposed of by a
dealer’s service center or another quali‐
fied service center or repair shop or
take them to a collection point.
New remote controls
New remote controls are available from a
dealer’s service center or another qualified
service center or repair shop.
Loss of the remote controls The lost remote control can be blocked by a
dealer’s service center or another qualified
service center or repair shop.
Emergency detection of remote control
It is possible to switch on the ignition or start
the engine in situations such as the following:▷Interference of radio transmission to re‐
mote control by external sources e.g., by
radio masts.▷Empty battery in remote control.▷Interference from radio transmissions
through mobile devices in close proximity
to remote control.▷Interference of radio transmission by a
charging process of a mobile device, for ex‐
ample charging of a mobile phone.
A Check Control message is displayed if an at‐
tempt is made to switch on the ignition or start
the engine.
Starting the engine via emergencydetection of the remote control
Steptronic transmission: if a corresponding
Check Control message appears, hold the re‐
mote control, as shown, against the marked
area on the steering column and press the
Start/Stop button within 10 seconds while
pressing the brake.
Manual transmission: if a corresponding Check
Control message appears, hold the remote con‐
trol, as shown, against the marked area on the
steering column and press the Start/Stop but‐
ton within 10 seconds while pressing the
clutch.
Seite 35Opening and closingCONTROLS35
Online Edition for Part no. 01 40 2 964 625 - X/15
Page 38 of 248

switched on. This function is not available, if
the interior lamps were switched off man‐
ually.▷The welcome lamps are switched on, if this
function was activated.
On 3-door models:
Press button on the remote control
twice in direct succession.
When the door is opened, the window is low‐
ered more to make it easier to enter the vehi‐
cle.
You can set how the vehicle is to be unlocked.
Create the settings, refer to page 43.
The alarm system, refer to page 43, is
switched off.
Convenient opening Press and hold this button on the re‐
mote control after unlocking.
The windows and the glass sunroof are opened,
as long as the button on the remote control is
pressed.
Locking WARNING
Unlocking from the inside is only possible
with special knowledge.
If people must spend a longer time in the vehi‐
cle while it is very hot or cold outside, there is
risk of injuries or danger to life. Do not lock the
vehicle from the outside when there are people
in it. ◀
The driver's door must be closed. Press button on the remote control.
The alarm system, refer to page 43, is
switched on.
If the vehicle horn honks twice when you lock
the car, this means that the engine or ignition is
still switched on. In this case, the engine or ig‐
nition must be switched off by means of the
Start/Stop button.
Switching on interior lights and
courtesy lights
Press button on the remote control
with the vehicle locked.
The courtesy lamps are only switched on when
it is dark outside. This function is not available,
if the interior lamps were switched off man‐ ually.
If the button is pressed within 10 seconds of
when the vehicle was locked Interior motion
sensor and tilt alarm sensor of the anti-theft
warning system, refer to page 45, are turned
off. After locking, wait 10 seconds before press‐
ing the button again.
Panic mode
You can trigger the alarm system if you find yourself in a dangerous situation.
Press button on the remote control for
at least 3 seconds.
To switch off the alarm: press any button.
Unlocking the tailgate Press button on the remote control for
approx. 1 second.
The tailgate opens slightly, regardless of
whether the vehicle was previously locked or
unlocked.
To avoid locking it into the vehicle, do not place
the remote control in the cargo area.
Depending on the features and the country
version, it is also possible to have door un‐
locked. Create the settings, refer to page 43.
If the doors were not unlocked, the tailgate is
locked again as soon as it closes.Seite 38CONTROLSOpening and closing38
Online Edition for Part no. 01 40 2 964 625 - X/15
Page 45 of 248

Avoiding unintentional alarms
The tilt alarm sensor and interior motion sensor
can be switched off together, such as in the fol‐
lowing situations:▷In automatic car washes.▷In duplex garages.▷During transport on trains carrying vehicles,
at sea or on a trailer.▷With animals in the vehicle.
Switching off the tilt alarm sensor and
interior motion sensor
Press the remote control button again
within 10 seconds as soon as the vehi‐
cle is locked.
The indicator lamp lights up for approx. 2 sec‐
onds and then continues to flash.
The tilt alarm sensor and interior motion sensor
are turned off until the vehicle is locked again.
Switching off the alarm
▷Unlock vehicle with the remote control or
switch on the ignition, if needed through
emergency detection of remote control, re‐
fer to page 35.▷For Comfort Access: If you have the remote
control with you, unlock vehicle using the
button on the driver's side or passenger
side door.
Power windows
Information WARNING
Unattended children or animals can move
the vehicle and endanger themselves and traf‐
fic, for example with the following actions:
▷Pressing the Start/Stop button.▷Releasing the parking brake.▷Opening and closing of doors or windows.▷Engaging selector lever position N.▷Using vehicle equipment.
There is risk of accidents or injuries. Do not
leave children or animals unattended in the ve‐
hicle. Carry remote control along when exiting
and lock the vehicle. ◀
Overview
On 5-door models
On 3-door models
Opening
▷ Press the button to the resistance
point.
The window opens while the switch is held.▷ Press the switch beyond the resist‐
ance point.
The window opens automatically. Pressing
again stops the motion.
See also: Convenient opening, refer to page 38,
via remote control.
Seite 45Opening and closingCONTROLS45
Online Edition for Part no. 01 40 2 964 625 - X/15