radio MINI COOPER CONVERTIBLE 2007 Owners Manual
[x] Cancel search | Manufacturer: MINI, Model Year: 2007, Model line: COOPER CONVERTIBLE, Model: MINI COOPER CONVERTIBLE 2007Pages: 172, PDF Size: 1.9 MB
Page 10 of 172

8
NOTESParts and accessories:
For your own safety, use genuine
parts and accessories approved by
the manufacturer of the MINI.
When you purchase accessories tested
and approved by the manufacturer of the
MINI and Original MINI Parts, you simulta-
neously acquire the assurance that they
have been thoroughly tested by the manu-
facturer of the MINI to ensure optimum
performance when installed on your vehi-
cle.
The manufacturer of the MINI warrants
these parts to be free from defects in mate-
rial and workmanship.
The manufacturer of the MINI will not
accept any liability for damages resulting
from installation of parts and accessories
not approved by the manufacturer
of the MINI.
The manufacturer of the MINI cannot test
every product from other manufacturers to
verify if it can be used on a MINI safely and
without risk to either the vehicle, its opera-
tion, or its occupants.
Original MINI Parts, MINI Accessories and
other products approved by the manufac-
turer of the MINI, together with profes-
sional advice on using these items, are
available from all MINI Dealers.
Installation and operation of non-MINI
approved accessories such as alarms,
radios, amplifiers, radar detectors, wheels,
suspension components, brake dust
shields, telephones, including operation of
any portable cellular phone from within
the vehicle without using an externally
mounted antenna, or transceiver equip-
ment, e.g. CB, walkie-talkie, ham radio or
similar, may cause extensive damage to the
vehicle, compromise its safety, interfere
with the vehicle's electrical system or affect
the validity of the MINI Limited Warranty.
See your MINI Dealer for additional infor-
mation.<
Maintenance, replacement, or repair
of the emission control devices and
systems must be performed by an autho-
rized MINI Dealership or individual using
certified MINI parts.
relevant section of this Owner's Man-
ual for information on a particular part or
assembly.
Service and warrantyThis manual is supplemented by a Service
and Warranty Information Booklet for US
models or a Warranty and Service Guide
Booklet for Canadian models.
We recommend that you read this publica-
tion thoroughly.
Your MINI is covered by the following war-
ranties:
>New Vehicle Limited Warranty
>Rust Perforation Limited Warranty
>Federal Emissions System Defect War-
ranty
>Federal Emissions Performance War-
ranty
>California Emission Control System Lim-
ited Warranty.
Detailed information about these warran-
ties is listed in the Service and Warranty
Information Booklet for US models or in the
Warranty and Service Guide Booklet for
Canadian models.
Page 22 of 172

20
MULTIFUNCTION STEERING WHEEL
*
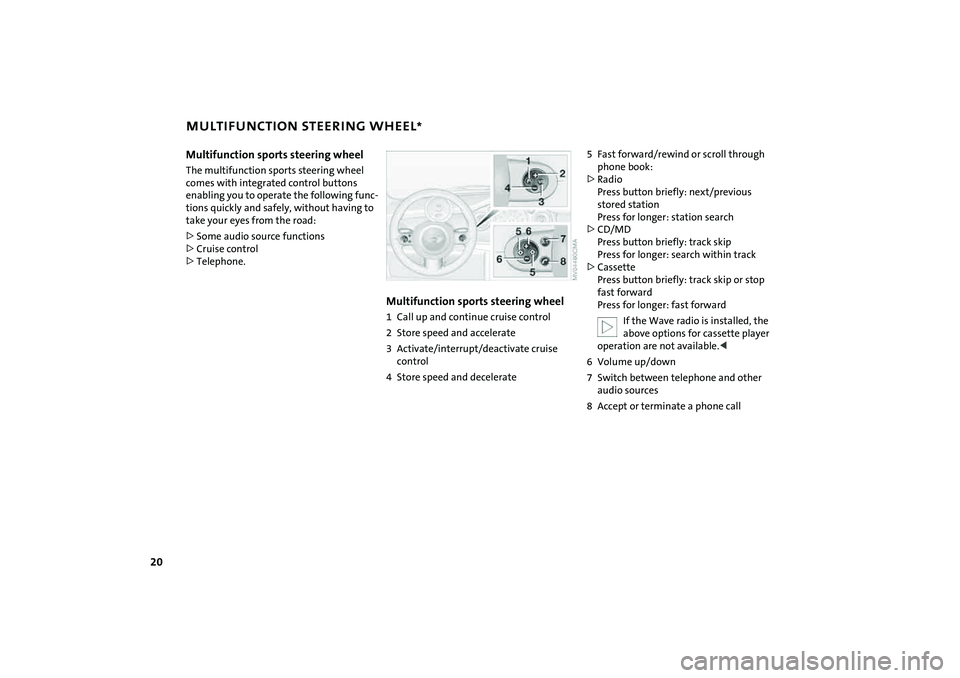
Multifunction sports steering wheel
The multifunction sports steering wheel
comes with integrated control buttons
enabling you to operate the following func-
tions quickly and safely, without having to
take your eyes from the road:
>Some audio source functions
>Cruise control
>Telephone.
Multifunction sports steering wheel1 Call up and continue cruise control
2 Store speed and accelerate
3 Activate/interrupt/deactivate cruise
control
4 Store speed and decelerate
5 Fast forward/rewind or scroll through
phone book:
>Radio
Press button briefly: next/previous
stored station
Press for longer: station search
>CD/MD
Press button briefly: track skip
Press for longer: search within track
>Cassette
Press button briefly: track skip or stop
fast forward
Press for longer: fast forward
If the Wave radio is installed, the
above options for cassette player
operation are not available.<
6 Volume up/down
7 Switch between telephone and other
audio sources
8 Accept or terminate a phone call
Page 29 of 172

27
OVERVIEW REPAIRS OPERATIONCONTROLS DATA INDEX
OPENING AND CLOSING: FROM OUTSIDEMalfunctionLocal radio waves can interfere with func-
tions of the remote control.
If this occurs, lock and unlock the vehicle
via a door lock.
In the event of a system malfunction,
please contact your MINI Dealer. You can
also obtain replacement keys there.
If it is no longer possible to lock the
vehicle with the remote control, then
the battery is discharged. Use the corre-
sponding key for a longer journey so that
its battery can be recharged.<
Via the door lock1. Turn the key.
The driver's door is unlocked.
2. Turn the key again.
All other doors, the tailgate and the fuel
filler door are unlocked.
You can have this function activated/
deactivated.<
When the vehicle is locked, the hazard
warning flashers flash once.
When the vehicle is unlocked, the hazard
warning flashers flash twice
*.
Manual operationIn the event of an electrical malfunction,
the driver's door can be unlocked or locked
by turning the key in the door lock to the
end positions.Convenience closing via the door lockYou can also close the power windows,
glass sunroof or the convertible top via the
door lock.
With the door closed, hold the key in the
locking position.
In the MINI Convertible, the convertible top
is closed first and then the side windows.
You can have the closing of the win-
dows and glass sunroof via the door
lock activated/deactivated.<
Page 87 of 172

85
OVERVIEW REPAIRS OPERATIONCONTROLS DATA INDEX
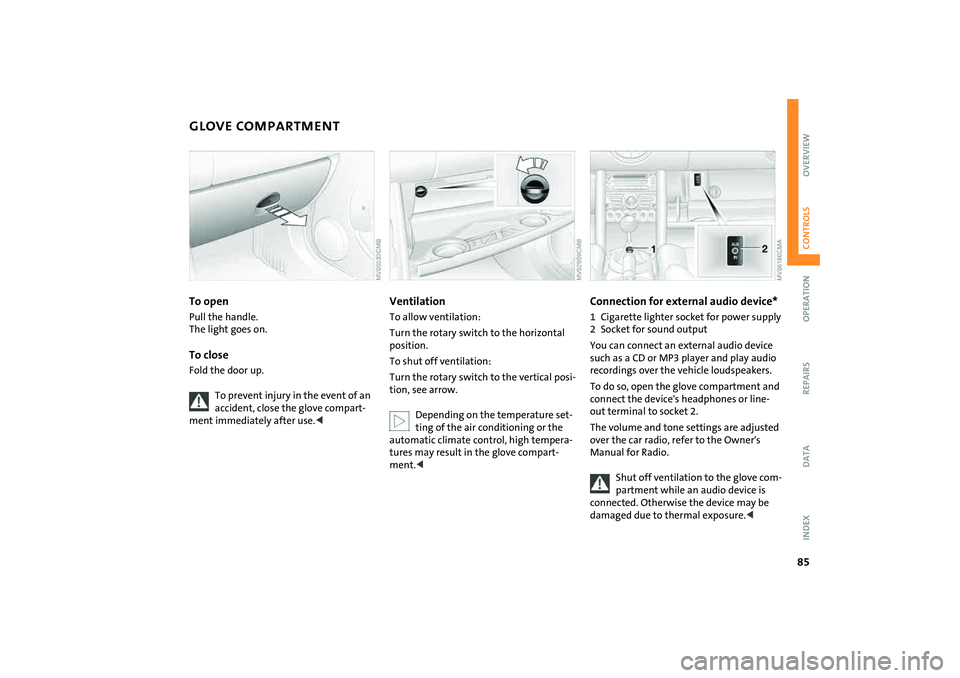
GLOVE COMPARTMENT To openPull the handle.
The light goes on.To closeFold the door up.
To prevent injury in the event of an
accident, close the glove compart-
ment immediately after use.<
VentilationTo allow ventilation:
Turn the rotary switch to the horizontal
position.
To shut off ventilation:
Turn the rotary switch to the vertical posi-
tion, see arrow.
Depending on the temperature set-
ting of the air conditioning or the
automatic climate control, high tempera-
tures may result in the glove compart-
ment.<
Connection for external audio device*1 Cigarette lighter socket for power supply
2 Socket for sound output
You can connect an external audio device
such as a CD or MP3 player and play audio
recordings over the vehicle loudspeakers.
To do so, open the glove compartment and
connect the device's headphones or line-
out terminal to socket 2.
The volume and tone settings are adjusted
over the car radio, refer to the Owner's
Manual for Radio.
Shut off ventilation to the glove com-
partment while an audio device is
connected. Otherwise the device may be
damaged due to thermal exposure.<
Page 90 of 172

88
INTEGRATED UNIVERSAL REMOTE CONTROL
*
The concept
The integrated universal remote control
takes the place of up to three different con-
trol devices for different radio-remote-con-
trolled systems such as gate openers and
household alarm systems. The integrated
universal remote control detects and learns
the signal transmitted by the original con-
trol device.
The signal of an original control device can
be programmed onto one of the three
memory buttons 1. The system in question
can then be operated by means of the pro-
grammed memory button 1. Signal trans-
mission is indicated by LED 2.
If you decide to sell your vehicle one day, in
the interest of your own security, remem-
ber to delete the programs before the vehi-
cle leaves your possession, refer to page89.
While programming is in progress
and before operating any pro-
grammed system by remote control using
the integrated universal remote control,
make sure that the movement area of the
system in question is clear of people, ani-
mals and inanimate obstructions, in order
to avoid possible injury or damage. Also
comply with the safety precautions issued
for the original control device.<
Checking compatibility
If this symbol is shown on the pack-
aging or in the operating instruc-
tions of the original control device,
it is safe to assume that the remote-con-
trolled system is compatible with the inte-
grated universal remote control.
If you have any additional question,
please contact your MINI Dealer or
call: 1-800-355-3515.
You can find more information on the
Internet at:
www.miniusa.com or
www.homelink.com.
HomeLink is a registered trademark of
Johnson Controls, Inc.<
Programming1 Memory buttons
2LEDFixed-code control device1. Switch on the ignition
2. For first-time start-up: press both outer
buttons 1 for approx. 20 seconds until
LED 2 flashes. This clears all three mem-
ory buttons 1
3. Hold the original control device approx.
2 to 8 in/5 to 20 cm away from memory
buttons 1.
The required distance between the
control device and memory
buttons 1 may vary, depending on the
system of the original control device in
question.<
Page 91 of 172

89
OVERVIEW REPAIRS OPERATIONCONTROLS DATA INDEX
INTEGRATED UNIVERSAL REMOTE CONTROL
*
4. Simultaneously press the command but-
ton of the original control device and the
desired memory button 1 on the inte-
grated universal remote control. The LED
2 begins to flash slowly. Release both
buttons when LED 2 starts flashing rap-
idly. If LED 2 does not start to flash rap-
idly after approx. 15 seconds, change the
distance between the two devices
5. Repeat steps 3 and 4 to program other
original control devices.
The corresponding memory button 1 is
now programmed with the signal of the
original control device.
You can operate the system with the igni-
tion key in position 2 or 3.
If the system cannot be operated
after repeated attempts at program-
ming, check whether the original control
device is equipped with an alternating-
code system. You can either check the oper-
ating instructions of the original control
device for this information, or you can
press and hold down the programmed
memory button 1 of the integrated univer-
sal remote control. If LED 2 of the inte-
grated universal remote control flashes
rapidly for a brief period and then remains
on for approx. two seconds, the original
control device is equipped with an alternat-
ing-code system. In this case, the memory
buttons 1 are programmed as described for
an alternating-code control device.
order to program the integrated universal
remote control. Read through the operat-
ing instructions for information on syn-
chronization.
Observe the following additional instruc-
tions when you program an alternating-
code control device:
You will find programming easier if
you have the assistance of a second
person.<
1. Park your vehicle within range of the
radio-remote-controlled device
2. Program the integrated universal
remote control as described above in the
section on fixed-code programming
3. Locate the button on the receiver of the
target device, for example on the upper
part of the drive
4. Press the button on the receiver of the
target device. Once you have completed
step 4, you have approx. 30 seconds to
complete step 5
5. Press the programmed memory
button 1 of the integrated universal
remote control three times.
The corresponding memory button 1 is
now programmed with the signal of the
original control device.
Consult your MINI Dealer if you have
any questions.<
Deleting memory buttonsPress both outer buttons 1 for approx.
20 seconds until LED 2 flashes: all memory
buttons are cleared.
It is not possible to delete individual mem-
ory buttons 1.
Page 142 of 172

140
VEHICLE BATTERYStorage locationMINI COOPER and MINI COOPER Convert-
ible:
The battery is located in the engine com-
partment, refer to page115.
MINI COOPER S and MINI COOPER S Con-
vertible:
The battery is located in the luggage com-
partment under the floor mat.Battery careThe battery is absolutely maintenance-free,
that is, the original electrolyte will normally
last for the service life of the battery under
moderate climatic conditions. Your MINI
Dealer will be glad to advise you if you have
any questions regarding the battery.Charging the batteryOnly charge the battery in the vehicle via
the terminals in the engine compartment
with the engine switched off, refer to
'Jump-starting', page142.
Disposal
After replacing old batteries, return
the used batteries to your MINI
Dealer or to a recycling point. Maintain the
battery in an upright position for transport
and storage. Secure the battery to prevent
it from tilting during transport.<
Power failureAfter a temporary power failure, e.g. due to
a discharged battery, some of your vehicle's
equipment will function only to a limited
extent and must be reinitialized or read-
justed. Individual settings are also lost and
must be reprogrammed:
>The clock must be reset, refer to page67
>The power windows must be reinitial-
ized, refer to page32
>Radio
*:
The stations must be reset, refer to the
Owner's Manual for Radio
>Navigation system
*:
It may take some time for its operability
to be restored, refer to the Owner's Man-
ual for Navigation System.
Page 159 of 172

EVERYTHING FROM A TO Z
157
OVERVIEW REPAIRS OPERATION CONTROLS DATA INDEX
Brake pads99
break-in procedures98
warning lamp18
Brake system120
brake fluid120
brake pads99
break-in procedures98
disc brakes99
warning lamp17
Brake wear warning
brake pads99
warning lamp18
Brakes120
ABS72
brake fluid120
brake pads99
break-in procedures98
CBC72
indicator/warning
lamps16,17,18
parking brake54
Breaking in98
Bulb replacement, refer to
Lamps and bulbs129
Buttons on multifunction
steering wheel20
automatic transmission with
Steptronic58 C
California Proposition 65
warning7
Capacities153
Car care, refer to Caring for your
vehicle122
Car keys, refer to Keys24
Car radio, refer to separate
Owner's Manual
Car telephone, refer to separate
Owner's Manual
Car vacuum cleaner,
connecting, refer to Cigarette
lighter socket
87
Car wash122
Car wash, refer to Washing
your vehicle122
Car-care products122
Care of plastics123
Care of synthetic leather123
Care, vehicle122
Cargo area
opening from the outside29
opening with the remote
control26
volume151,152
Cargo area cover, refer to
Luggage compartment
cover90
Cargo area, refer to Luggage
compartment in the MINI90 Carpet care124
Cassette operation, refer to
Owner's Manual for Radio
Catalytic converter, refer to
Hot exhaust system100
CBC Cornering Brake Control72
CD changer, refer to Owner's
Manual for Radio
CD operation, refer to
Owner's Manual for Radio
Center armrest86
Central locking system24
interior28
Changing bulbs129
Changing the wiper
blades128,129
Changing tires135
space-saver spare tire133
Charge-current indicator
light16
Child seat, refer to Installing
child-restraint systems50
Children, transporting50
Child-restraint fixing system,
LATCH52
Child-restraint systems50
Chock, folding
space-saver spare tire133
Chrome parts, refer to Caring
for your vehicle123
Chrome-plated parts, care123 Cigarette lighter87
Cigarette lighter socket87
Cigarette tray, refer to
Ashtray86
Circulation of air, refer to
Recirculated air mode80,83
Cleaning the rear window64
Cleaning the vehicle, refer to
Caring for your vehicle122
Clock67
12-hour/24-hour mode67
changing the time67
Closing
from inside28
from outside25
Clothes hooks100
Clutch53
break-in procedures98
Cockpit12
Coding, tires108
Cold start, refer to Starting the
engine53
Compact disk operation, refer
to Owner's Manual for Radio
Compartments, refer to
Storage compartments85
Computer, refer to Onboard
computer70
Condensed water, refer to Air
conditioning80,83
Page 164 of 172

EVERYTHING FROM A TO Z
162
Luggage compartment
cover90
emergency operation, refer
to Manual release30
expanding90
lid, refer to Tailgate29
opening from the outside29
opening with the remote
control26
opening/closing, refer to
Tailgate29
volume151,152
Luggage compartment in the
MINI90
Luggage compartment lid
emergency operation, refer
to Manual release30
opening with the remote
control26
Luggage compartment lid, refer
to Tailgate29
Luggage compartment net94
Luggage rack, refer to Roof-
mounted luggage rack95
Lumbar support44
M
M+S tires, refer to Winter
tires113
Maintenance system121 Maintenance, refer to Service
and Warranty Information
Booklet for US models,
Warranty and Service Guide
Booklet for Canadian
models121
Malfunction
automatic transmission with
Steptronic58
convertible top38
door lock27
fuel filler door102,103
glass sunroof, electric34
tailgate30
tire112
Manual air distribution80
Manual operation
door lock27
driver's door27
fuel filler door102,103
glass sunroof, electric34
power convertible top38
tailgate30
transmission lock, automatic
transmission with
Steptronic56
Manual transmission55
Master keys with remote
control24
Maximum cooling83 Maximum speed, with winter
tires113
MC operation, refer to
Owner's Manual for Radio
Mechanical keys, refer to
Master keys24
Memory, refer to Vehicle
Memory49
Microfilter
air conditioning system81
automatic climate control84
MINI homepage6
MINI Maintenance System121
MINI manufacturer6
MINI Mobility System137
compressor138
liquid sealant138
Mirrors48
exterior48
heating48
interior rearview48
Mobile telephone, refer to
separate Owner's Manual
Mobility System137
Modifications, technical, refer
to For your own safety7
Multifunction steering
wheel20 Multifunction switch
turn signal indicator/
headlamp flasher61
washer/wiper system63
N
Navigation system, refer to
separate Owner's Manual
Neck restraints, refer to Head
restraints44
New tires112
Non-smoker's equipment
package, refer to Cigarette
lighter socket87
Nylon rope, refer to Towing and
tow-starting144
O
OBD interface socket122
Octane number, refer to Fuel
quality101
Odometer67
Oil
additives, refer to Adding
engine oil118
dipstick117
Oil change intervals, refer to
Service and Warranty
Information Booklet for US
Page 165 of 172

EVERYTHING FROM A TO Z
163
OVERVIEW REPAIRS OPERATION CONTROLS DATA INDEX
models, Warranty and
Service Guide Booklet for
Canadian models
Oil consumption117
Oil level117
indicator lamp16
Oil pressure, indicator lamp16
Oil service69
Onboard computer70
Onboard tool kit128
MINI Mobility System137
Run-Flat Tires128
space-saver spare tire133
Opening and closing
from inside28
from outside25
via remote control26
via the door lock27
Outlets, refer to
Ventilation79,82
Outside air80
air conditioning system80
Outside air mode, automatic
climate control83
Outside temperature
display70
changing units70
in the onboard computer70
Outside temperature
warning70 Overriding the selector lever
lock59
P
Paintwork care, refer to Vehicle
paintwork123
Park Distance Control (PDC)78
Parking
the vehicle100
Parking aid, refer to Park
Distance Control (PDC)78
Parking brake54
warning lamp
17
Parking lamps60
bulb replacement130
Parking lamps/Low beams60
Parking lock, refer to
PParking56
Parts and accessories, refer to
Your individual vehicle6
Pathway lighting60
PDC Park Distance Control78
Pinch protection system,
glass sunroof, electric34
Plastic123
Pollen, refer to
Microfilter81
Microfilter/Activated-
charcoal filter84
Power convertible top35
Power failure140 Power output, refer to Engine
data148
Power supply, refer to Cigarette
lighter socket87
Power windows31
Pressure, tires104
reinflation using MINI
Mobility System138
Protective function, electric
glass sunroof34
Pumping in liquid sealant138
Q
Quality grades, refer to
Uniform Tire Quality
Grading108
R
Radiator, refer to Coolant118
Radio, refer to separate
Owner's Manual
Rain sensor63
Range70
Reading lamps63
Rear backrest, foldable90,91
Rear fog lamp62
bulb replacement132
indicator lamp62
Rear lamps, bulb
replacement131 Rear lamps, refer to Tail
lamps131
Rear seats, adjusting head
restraints44
Rear shelf, refer to Luggage
compartment cover90
Rear turn signal indicators, bulb
replacement131
Rear window wiper64,65
replacement129
Rearview mirror48
Recirculated air mode
air conditioning system80
automatic climate control83
Reclining seat, refer to Backrest
tilt44
Refueling101
fuel filler door101
Remaining distance for
service69
Remaining distance, refer to
Range70
Remote control25,26
garage door opener88
malfunction27
Remote control key, refer to
Master keys with remote
control24
Replacement key24