display MINI COOPER CONVERTIBLE 2011 Owner's Guide
[x] Cancel search | Manufacturer: MINI, Model Year: 2011, Model line: COOPER CONVERTIBLE, Model: MINI COOPER CONVERTIBLE 2011Pages: 186, PDF Size: 3.25 MB
Page 76 of 186

Lamps
74
Setting the duration or deactivating the
function
1.Switch on the ignition, refer to page44.
2.Briefly press the button in the turn signal
lever repeatedly until "SET/INFO" is dis-
played.
3.Press and hold the button until the display
changes.
4.Briefly press the button repeatedly until the
symbol and "SET" are displayed.
5.Press and hold the button until the display
changes.
6.Briefly press the button repeatedly until the
display shows the illustrated symbol.
7.Press and hold the button until the display
changes.8.Briefly press the button to select:
>
The function is deactivated.
> ...
Select the appropriate duration, e.g.
40 seconds.
9.Press the button for a longer period.
The setting is stored.
Daytime running lights*
The light switch can remain in the lamps off,
parking lamps or automatic headlamp control
*
position.
In the lamps off position, the exterior lighting is
automatically switched off after the vehicle is
parked. In the parking lamps position, the park-
ing lamps will stay on after the ignition is
switched off.
Switch on the parking lamps separately if
needed.
Activating/deactivating daytime
running lights
The setting is stored for the remote control in
use, refer to Personal Profile, page18.
1.Switch on the ignition, refer to page44.
2.Briefly press the button in the turn signal
lever repeatedly until "SET/INFO" is dis-
played.
3.Press and hold the button until the display
changes.
Page 77 of 186

75
AT A GLANCE REFERENCE MOBILITYCONTROLS DRIVING TIPS COMMUNICATIONS
4.Briefly press the button repeatedly until the
symbol and "SET" are displayed.
5.Press and hold the button until the display
changes.
6.Briefly press the button repeatedly until the
display shows the illustrated symbol, arrow.
7.Press and hold the button until the display
changes.
8.Briefly press the button to select:
>
Daytime running lights activated.
>
Daytime running lights deactivated.
9.Press the button for a longer period.
The setting is stored.
Adaptive Light Control*
The concept
Adaptive Light Control is a variable headlamp
control system that enables better illumination
of the road surface. Depending on the steering
angle and other parameters, the light from the
headlamp follows the course of the road.
Activating Adaptive Light Control
With the ignition switched on, turn the light
switch to position 3, refer to page73.
Standstill function
*: to avoid blinding oncoming
traffic, the Adaptive Light Control directs light
toward the front passenger side when the vehi-
cle is at a standstill.
In reverse, the Adaptive Light Control is not acti-
vated.
Malfunction
A message is displayed.
The Adaptive Light Control is malfunctioning or
failed. Have the system checked as soon as pos-
sible.
High beams/
roadside parking lamps
1Turn signals/roadside parking lamps*
2Switching on high beams
3Switching off high beams/headlamp flasher
Roadside parking lamps, left or right*
The vehicle can be illuminated on one side for
parking. Comply with local regulations when
doing so.
Switching on
After parking the vehicle, press the lever up or
down, arrow 1.
The roadside parking lamps drain the bat-
tery. Therefore, do not leave them on for
unduly long periods of time; otherwise, the bat-
Page 83 of 186

81
AT A GLANCE REFERENCE MOBILITYCONTROLS DRIVING TIPS COMMUNICATIONS
Comfortable interior climate
AUTO program2 offers the ideal air distribution
and air flow rate for almost all conditions, refer
to AUTO program below. All you need to do is
select an interior temperature which is comfort-
able for you.
The following sections inform you in detail about
how to adjust the settings.
Most settings are stored for the remote control
currently in use, refer also to Personal Profile set-
tings on page19.
Air flow rate, manual
Press the – button to reduce air flow. Press
the + button to increase it.
You can reactivate the automatic mode
for the air flow rate with the AUTO button.
The air flow rate is lowered or switched off
entirely to reduce the drain on the battery. The
display remains the same.
Switching the system on/off
Reduce the air flow by pressing the – button
repeatedly until the system is switched off. All
indicators go out.
Press the AUTO button to switch the automatic
climate control back on.
AUTO program
The AUTO program adjusts the air
distribution to the windshield and
side windows, toward the upper body area and
into the footwell for you. The air flow rate and
your temperature specifications will be adapted
to outside influences in accordance with sea-
sonal changes, e.g. sunlight.
The cooling function is automatically switched
on along with the AUTO program.
Convertible Program
If the soft top is open, the Convertible Program is
activated. During the Convertible Program, the
automatic climate control is optimized for driv-
ing with the soft top down. Furthermore, with
increasing vehicle speed, the airflow is also
increased.If attaching the wind reflector, the perfor-
mance of the Convertible Program can be
significantly improved.<
Recirculated-air mode
Recirculated-air mode: the supply
of outside air is permanently shut
off. The system then recirculates
the air currently within the vehicle.
If condensation starts to form on the
inside window surfaces, press the AUTO
button or switch off the recirculated-air mode
and, if necessary, increase the air flow rate.
The recirculated-air mode should not be used
over an extended period of time; otherwise, the
air quality in the passenger compartment will
deteriorate continuously.<
Maximum cooling
At outside temperatures above
327/06 and when the engine is
running, you obtain a maximum
cooling effect as soon as possible.
The automatic climate control goes into recircu-
lated-air mode at the lowest temperature. Air
flows at maximum rate from the vents for the
upper body area. You should therefore open
them for maximum cooling.
Air distribution, manual
The flow of air is directed to the
windows, to the upper body area or
to the footwell as selected.
You can switch the automatic air
distribution back on by pressing the AUTO but-
ton.
Temperature
Set the desired temperature individually.
The automatic climate control achieves
this temperature as quickly as possible
regardless of the season, using maximum
cooling or heating power if necessary, and then
maintains it.
If you switch between different tempera-
ture settings in quick succession, the auto-
Page 84 of 186
Climate
82
matic climate control does not have enough
time to achieve the set temperature.<
Rear window defroster
The defroster is switched off auto-
matically after a certain time.
Depending on your vehicle's equip-
ment, the upper wires serve as an
antenna and are not part of the rear window
defroster.
Defrosting windows and removing
condensation
Quickly removes ice and condensa-
tion from the windshield and front
side windows.
For this purpose, also switch on the
cooling function.
The windshield heating
* is switched on auto-
matically.
Windshield heating*
The windshield heating is switched
off automatically after a certain
time.
Cooling function
The passenger compartment can only be cooled
while the engine is running.
When the cooling function is on,
the air is cooled, dried, then
reheated according to the temper-
ature setting.
The cooling function helps prevent condensa-
tion on the windows or removes it quickly.
Depending on the weather, the windshield may
fog over briefly when the engine is started. The
recirculated-air mode may be switched on auto-
matically.
When the AUTO button is pressed, the cooling
function switches on automatically.
Microfilter/activated-charcoal filter
The microfilter captures dust and pollen. The
activated-charcoal filter provides additional pro-
tection by filtering gaseous pollutants from the
outside air. Your MINI dealer replaces this com-
bined filter as a standard part of your scheduled
maintenance.
You can call up further information in the service
requirements display, page58.
Ventilation
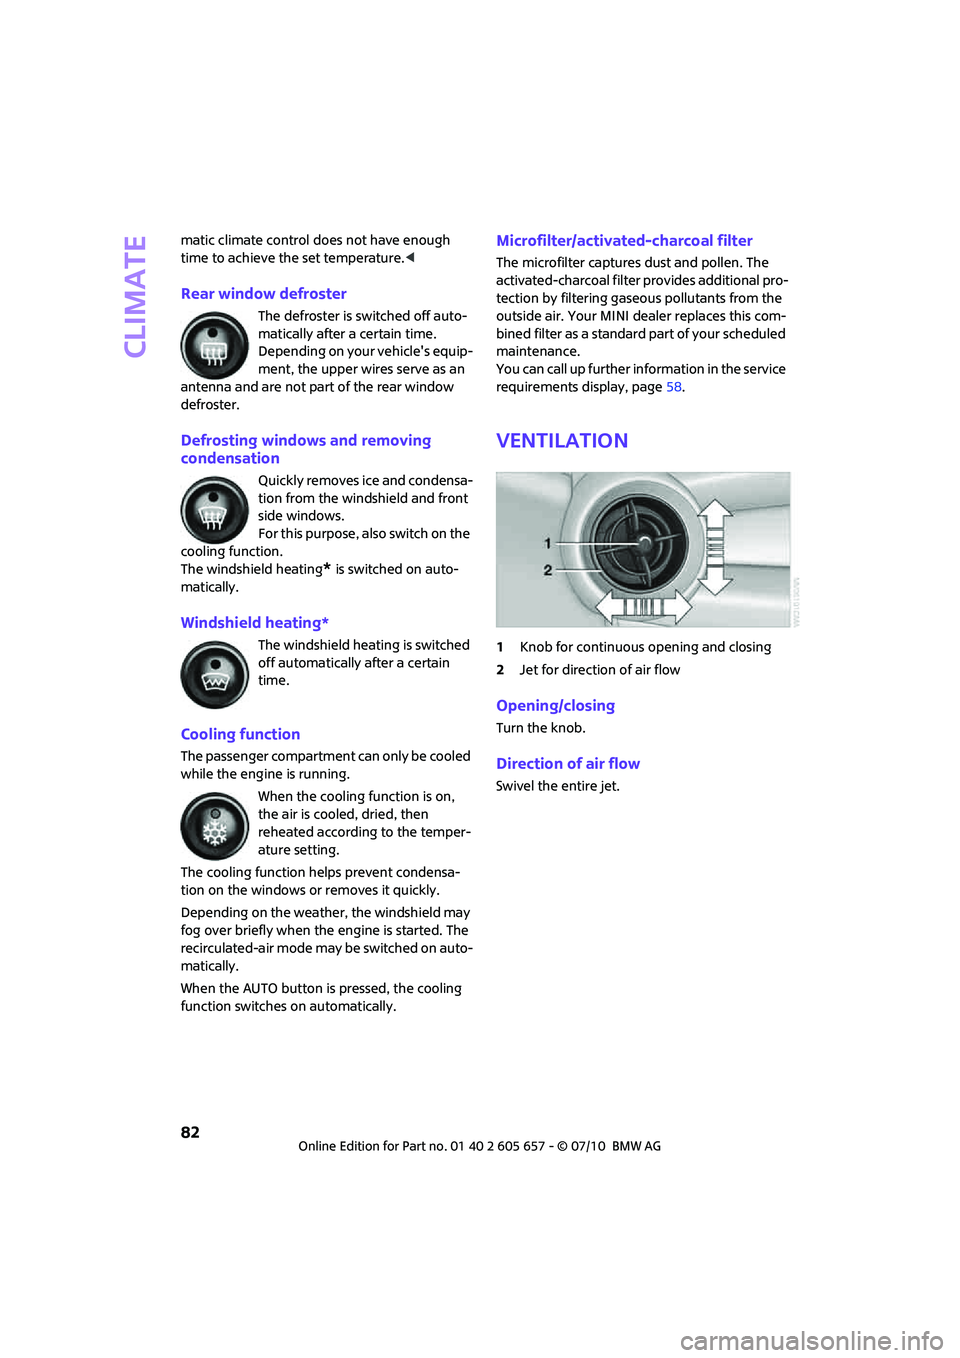
1Knob for continuous opening and closing
2Jet for direction of air flow
Opening/closing
Turn the knob.
Direction of air flow
Swivel the entire jet.
Page 105 of 186
103
AT A GLANCE REFERENCE MOBILITYCONTROLS DRIVING TIPS COMMUNICATIONS
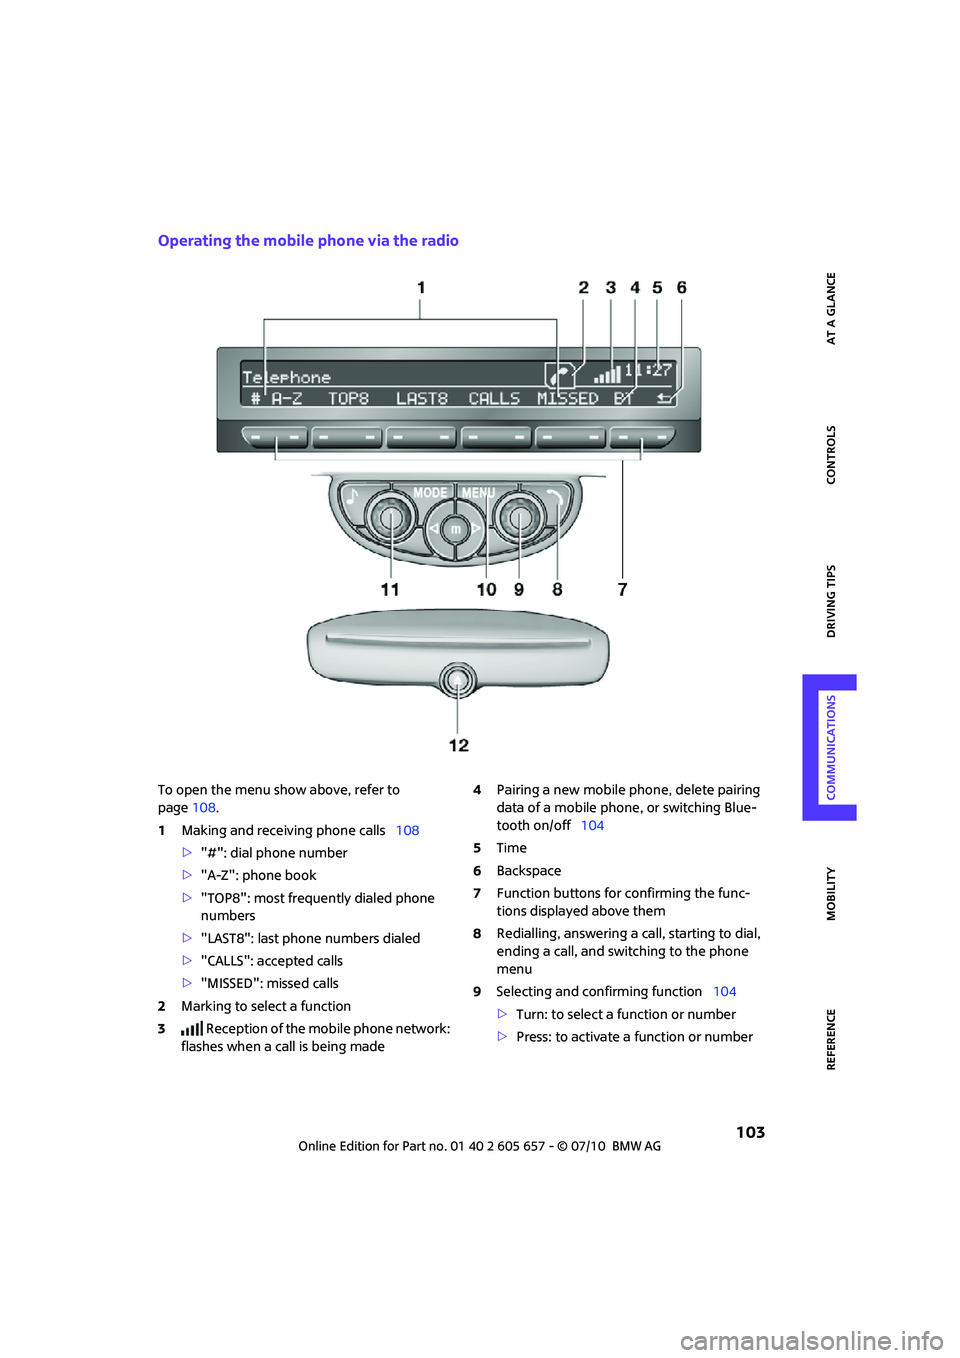
Operating the mobile phone via the radio
To open the menu show above, refer to
page108.
1Making and receiving phone calls108
>"#": dial phone number
>"A-Z": phone book
>"TOP8": most frequently dialed phone
numbers
>"LAST8": last phone numbers dialed
>"CALLS": accepted calls
>"MISSED": missed calls
2Marking to select a function
3 Reception of the mobile phone network:
flashes when a call is being made4Pairing a new mobile phone, delete pairing
data of a mobile phone, or switching Blue-
tooth on/off104
5Time
6Backspace
7Function buttons for confirming the func-
tions displayed above them
8Redialling, answering a call, starting to dial,
ending a call, and switching to the phone
menu
9Selecting and confirming function104
>Turn: to select a function or number
>Press: to activate a function or number
Page 106 of 186
Telephone
104
10Switching displays108
>"PHONE": telephone
>"COMP": computer
>"CONFIG": adjusting
11Radio on/off, volume
>Press: to switch radio on/off
>Turn: adjusting volume108
12Ejecting CD, refer to owner's manual for the
radio
This symbol appears on the radio display
when a phone call is being made with the
hands-free system.
Menu navigation
Selecting and confirming function
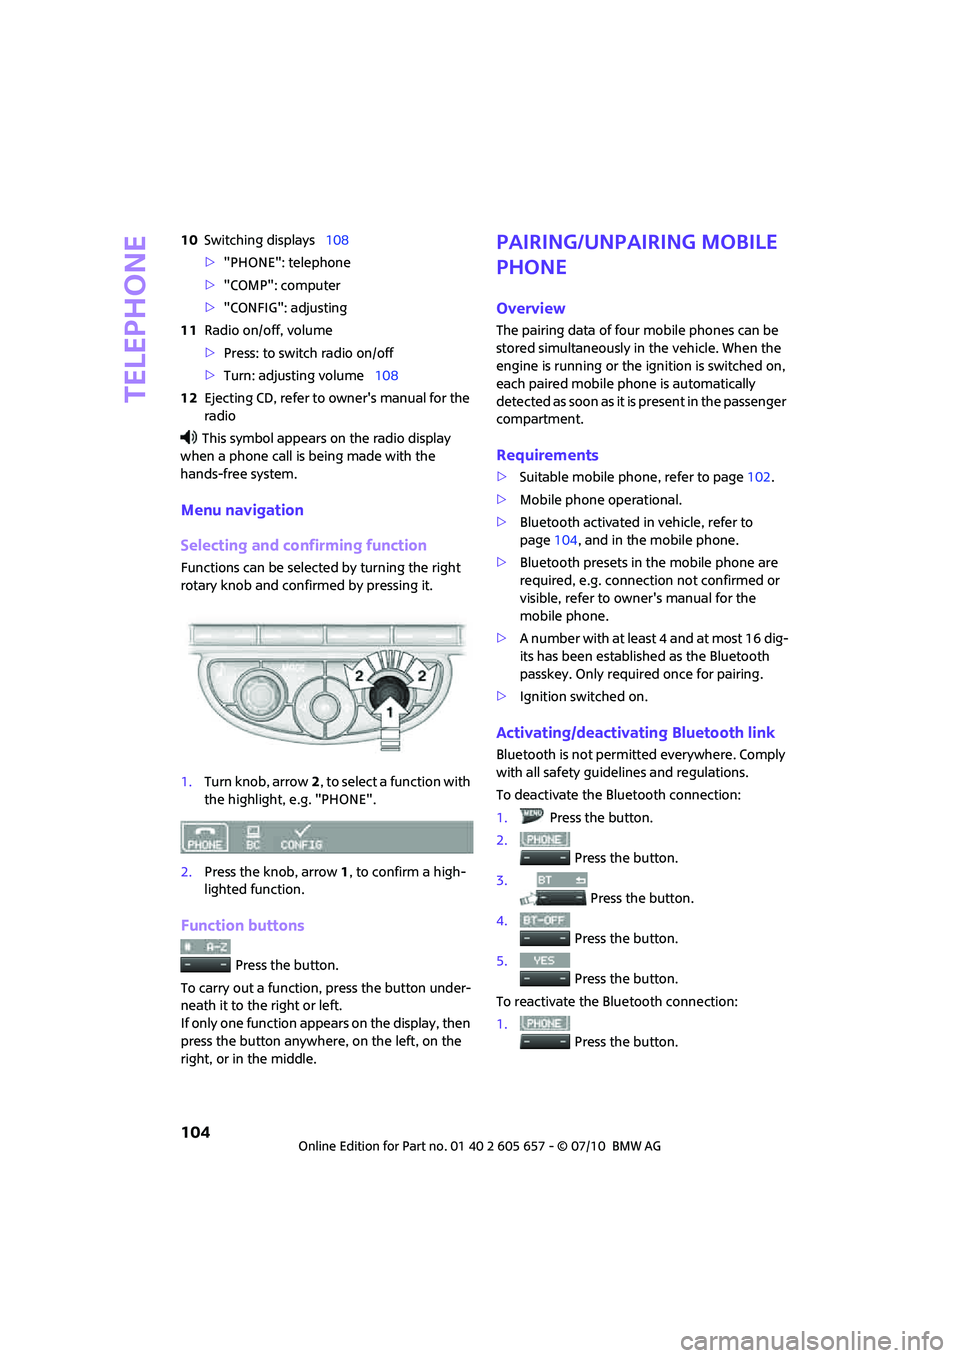
Functions can be selected by turning the right
rotary knob and confirmed by pressing it.
1.Turn knob, arrow2, to select a function with
the highlight, e.g. "PHONE".
2.Press the knob, arrow1, to confirm a high-
lighted function.
Function buttons
Press the button.
To carry out a function, press the button under-
neath it to the right or left.
If only one function appears on the display, then
press the button anywhere, on the left, on the
right, or in the middle.
Pairing/unpairing mobile
phone
Overview
The pairing data of four mobile phones can be
stored simultaneously in the vehicle. When the
engine is running or the ignition is switched on,
each paired mobile phone is automatically
detected as soon as it is present in the passenger
compartment.
Requirements
>Suitable mobile phone, refer to page102.
>Mobile phone operational.
>Bluetooth activated in vehicle, refer to
page104, and in the mobile phone.
>Bluetooth presets in the mobile phone are
required, e.g. connection not confirmed or
visible, refer to owner's manual for the
mobile phone.
>A number with at least 4 and at most 16 dig-
its has been established as the Bluetooth
passkey. Only required once for pairing.
>Ignition switched on.
Activating/deactivating Bluetooth link
Bluetooth is not permitted everywhere. Comply
with all safety guidelines and regulations.
To deactivate the Bluetooth connection:
1.Press the button.
2.
Press the button.
3.
Press the button.
4.
Press the button.
5.
Press the button.
To reactivate the Bluetooth connection:
1.
Press the button.
Page 107 of 186

105
AT A GLANCE REFERENCE MOBILITYCONTROLS DRIVING TIPS COMMUNICATIONS
2.
Press the button.
Pairing and connecting
Only pair the mobile phone when the
vehicle is stopped; otherwise, inattention
may lead to endangerment of passengers or
other road users.<
Switching on ignition
1.Insert the remote control as far as possible
into the ignition lock.
2.Switch on the ignition; to do so, press the
start/stop button without stepping on the
brake or clutch pedal.
Preparation on the radio display
3.Press the button.
4.
Press the button.
5.
Press the button.
6.
Press the button.
Press the right rotary knob to display the Blue-
tooth name of your vehicle on the display.
Preparation with mobile phone
7.Other operations must be performed on the
mobile phone and differ depending on the
type of mobile phone, refer to owner's man-
ual of the mobile phone, e.g. under Con-necting or coupling Bluetooth device. The
Bluetooth name of the vehicle appears on
the mobile phone display.
8.Select the Bluetooth name of the vehicle on
the mobile phone display.
Pairing
The mobile phone or the radio display will
prompt you to enter the same Bluetooth pass-
key.
Depending on the mobile phone, you have
approx. 30 seconds to enter the Bluetooth pass-
key using the mobile phone and the radio dis-
play.
If the Bluetooth passkey can be entered using
the radio, then the following appears on the dis-
play:
:
9.Enter the Bluetooth passkey using the num-
ber buttons of the mobile phone.
10.
Press the button to enter the Blue-
tooth passkey using the radio.
11.Using the function buttons 0-9, enter the
same Bluetooth passkey that was entered
into the mobile phone.
To delete the last digit:
Press the button.
12.
Press the button to confirm the
Bluetooth passkey.
The following display will appear after a few
seconds:
Page 108 of 186
Telephone
106
13.
Press the button if necessary.
The following display will appear after the
mobile phone is paired:
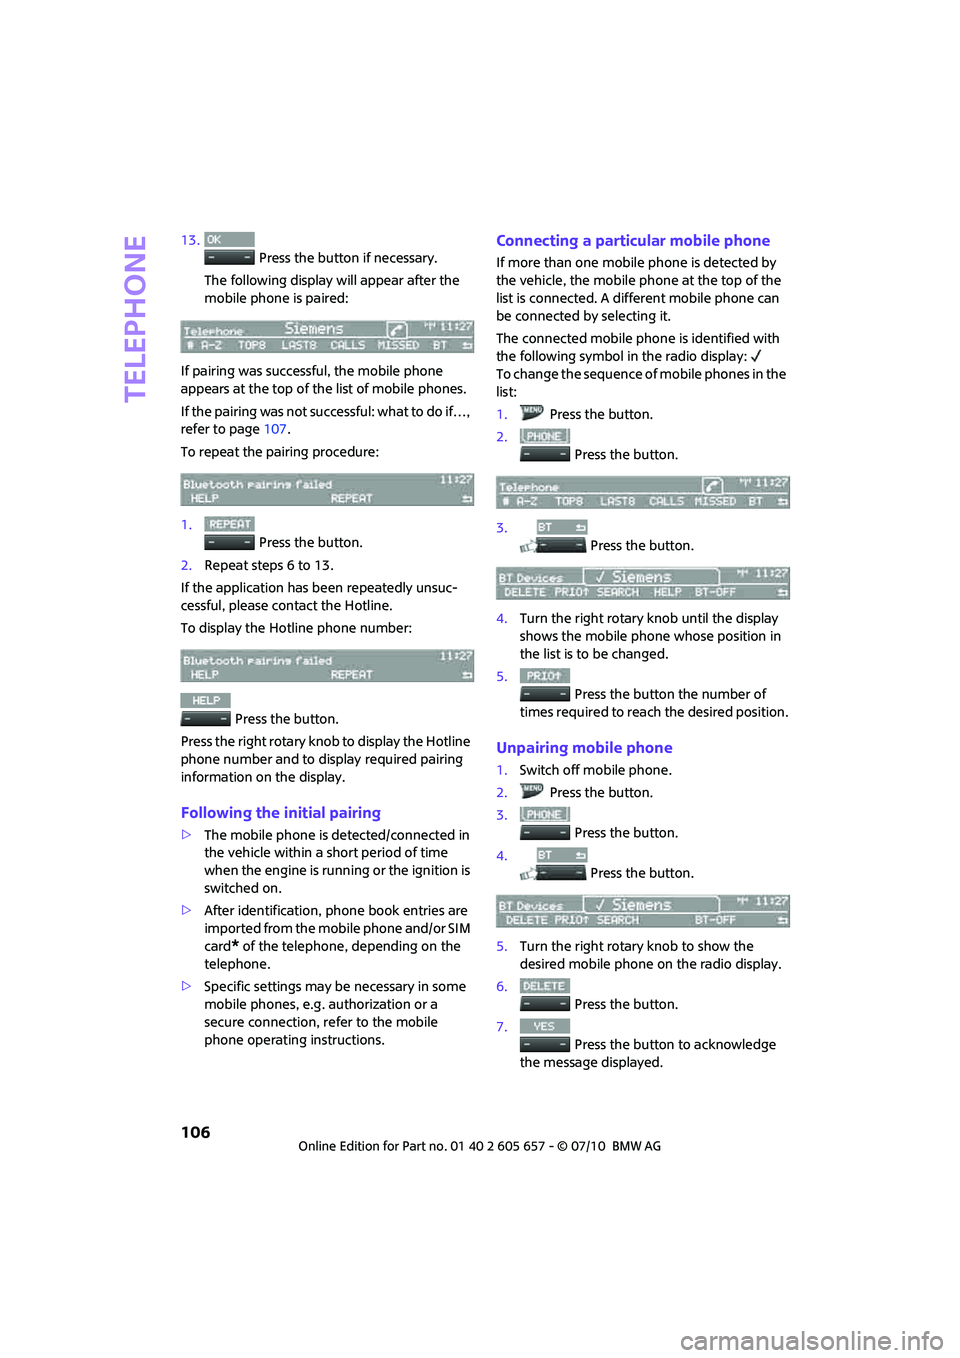
If pairing was successful, the mobile phone
appears at the top of the list of mobile phones.
If the pairing was not successful: what to do if…,
refer to page107.
To repeat the pairing procedure:
1.
Press the button.
2.Repeat steps 6 to 13.
If the application has been repeatedly unsuc-
cessful, please contact the Hotline.
To display the Hotline phone number:
Press the button.
Press the right rotary knob to display the Hotline
phone number and to display required pairing
information on the display.
Following the initial pairing
>The mobile phone is detected/connected in
the vehicle within a short period of time
when the engine is running or the ignition is
switched on.
>After identification, phone book entries are
imported from the mobile phone and/or SIM
card
* of the telephone, depending on the
telephone.
>Specific settings may be necessary in some
mobile phones, e.g. authorization or a
secure connection, refer to the mobile
phone operating instructions.
Connecting a particular mobile phone
If more than one mobile phone is detected by
the vehicle, the mobile phone at the top of the
list is connected. A different mobile phone can
be connected by selecting it.
The connected mobile phone is identified with
the following symbol in the radio display:
To change the sequence of mobile phones in the
list:
1.Press the button.
2.
Press the button.
3.
Press the button.
4.Turn the right rotary knob until the display
shows the mobile phone whose position in
the list is to be changed.
5.
Press the button the number of
times required to reach the desired position.
Unpairing mobile phone
1.Switch off mobile phone.
2.Press the button.
3.
Press the button.
4.
Press the button.
5.Turn the right rotary knob to show the
desired mobile phone on the radio display.
6.
Press the button.
7.
Press the button to acknowledge
the message displayed.
Page 109 of 186
107
AT A GLANCE REFERENCE MOBILITYCONTROLS DRIVING TIPS COMMUNICATIONS
What to do if…
For information on suitable mobile phones, refer
to page102.
The mobile phone could not be paired or con-
nected.
>Is Bluetooth activated in the vehicle and in
the mobile phone? Activate Bluetooth in the
vehicle and in the mobile phone.
>Do the Bluetooth passkeys on the mobile
phone and the vehicle match? Enter the
same passkey on the mobile phone and via
the radio.
>Is the passkey input taking longer than 30
seconds? Repeat the pairing procedure.
>Are too many Bluetooth devices connected
to the mobile phone? If so, delete the con-
nections with other devices on the mobile
phone.
>Is the mobile phone in power economy
m o d e o r d o e s i t o n l y h a v e a s m a l l a m o u n t o f
battery charge remaining? Charge the
mobile phone in the snap-in adapter
* or via
a charging cable.
>Depending on the mobile phone, it may only
be possible to connect one device to the
vehicle. Unpair the connected device from
the vehicle and only pair and connect one
device.
>Is the mobile phone no longer responding?
Switch the mobile phone off and back on
again. Repeat the pairing procedure.
Phone book entries are not displayed, not all of
them are displayed, or they are displayed
incompletely.
>The transfer of phone book entries has not
yet completed.
>It is possible that only the phone book
entries of the mobile phone or the SIM card
*
are transferred.
>It may not be possible to display phone book
entries with special characters.
>The number of phone book entries to be
stored is too high.
>The data volume of the phone book entry is
too great, e.g. due to additionally stored information such as notes? Reduce the data
volume.
The telephone connection quality is low.
>Depending on the mobile phone, it is possi-
ble to adjust the strength of the Bluetooth
signal.
>Insert the mobile phone into the snap-in
adapter
* o r p la ce it in t h e v ic in it y o f t h e ce n -
ter console.
>Adjust the volume of the microphone and
speaker separately.
If you have gone through all items in the list and
still cannot activate the desired function please
contact the Hotline or your MINI center.
Operation
Overview
The following functions can be operated using
the radio:
>Accepting/refusing a call
>Dialing phone numbers
>Dialing a phone number from the phone
book
>Dialing a stored phone number, e.g. from
the list of accepted calls
>Ending a call
When the ignition is switched off and in radio-
ready mode, e.g. after removal of the infrared
remote control, an ongoing conversation can be
continued for a maximum of 25 minutes using
the hands-free system.
Page 110 of 186
Telephone
108
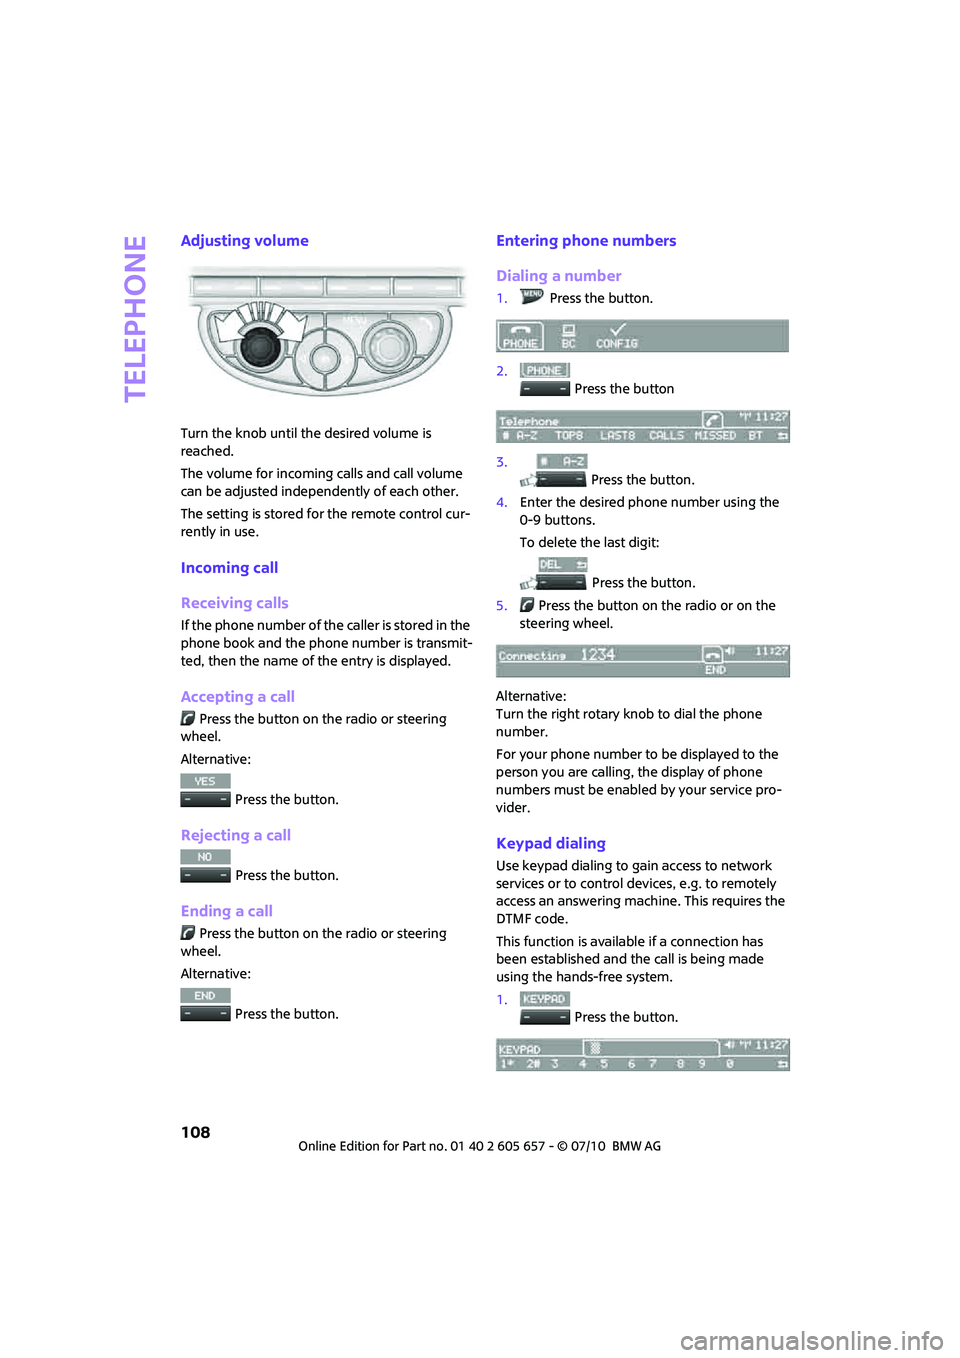
Adjusting volume
Turn the knob until the desired volume is
reached.
The volume for incoming calls and call volume
can be adjusted independently of each other.
The setting is stored for the remote control cur-
rently in use.
Incoming call
Receiving calls
If the phone number of the caller is stored in the
phone book and the phone number is transmit-
ted, then the name of the entry is displayed.
Accepting a call
Press the button on the radio or steering
wheel.
Alternative:
Press the button.
Rejecting a call
Press the button.
Ending a call
Press the button on the radio or steering
wheel.
Alternative:
Press the button.
Entering phone numbers
Dialing a number
1.Press the button.
2.
Press the button
3.
Press the button.
4.Enter the desired phone number using the
0-9 buttons.
To delete the last digit:
Press the button.
5.Press the button on the radio or on the
steering wheel.
Alternative:
Turn the right rotary knob to dial the phone
number.
For your phone number to be displayed to the
person you are calling, the display of phone
numbers must be enabled by your service pro-
vider.
Keypad dialing
Use keypad dialing to gain access to network
services or to control devices, e.g. to remotely
access an answering machine. This requires the
DTMF code.
This function is available if a connection has
been established and the call is being made
using the hands-free system.
1.
Press the button.