MINI Countryman 2011 Owner's Manual (Mini Connected)
Manufacturer: MINI, Model Year: 2011, Model line: Countryman, Model: MINI Countryman 2011Pages: 254, PDF Size: 3.84 MB
Page 221 of 254
Giving and receiving assistanceMOBILITY
219
Connecting jumper cables
Connect the jumper cables in the correct
o r d e r , s o t h a t n o s parks which could cause
injury occur. <
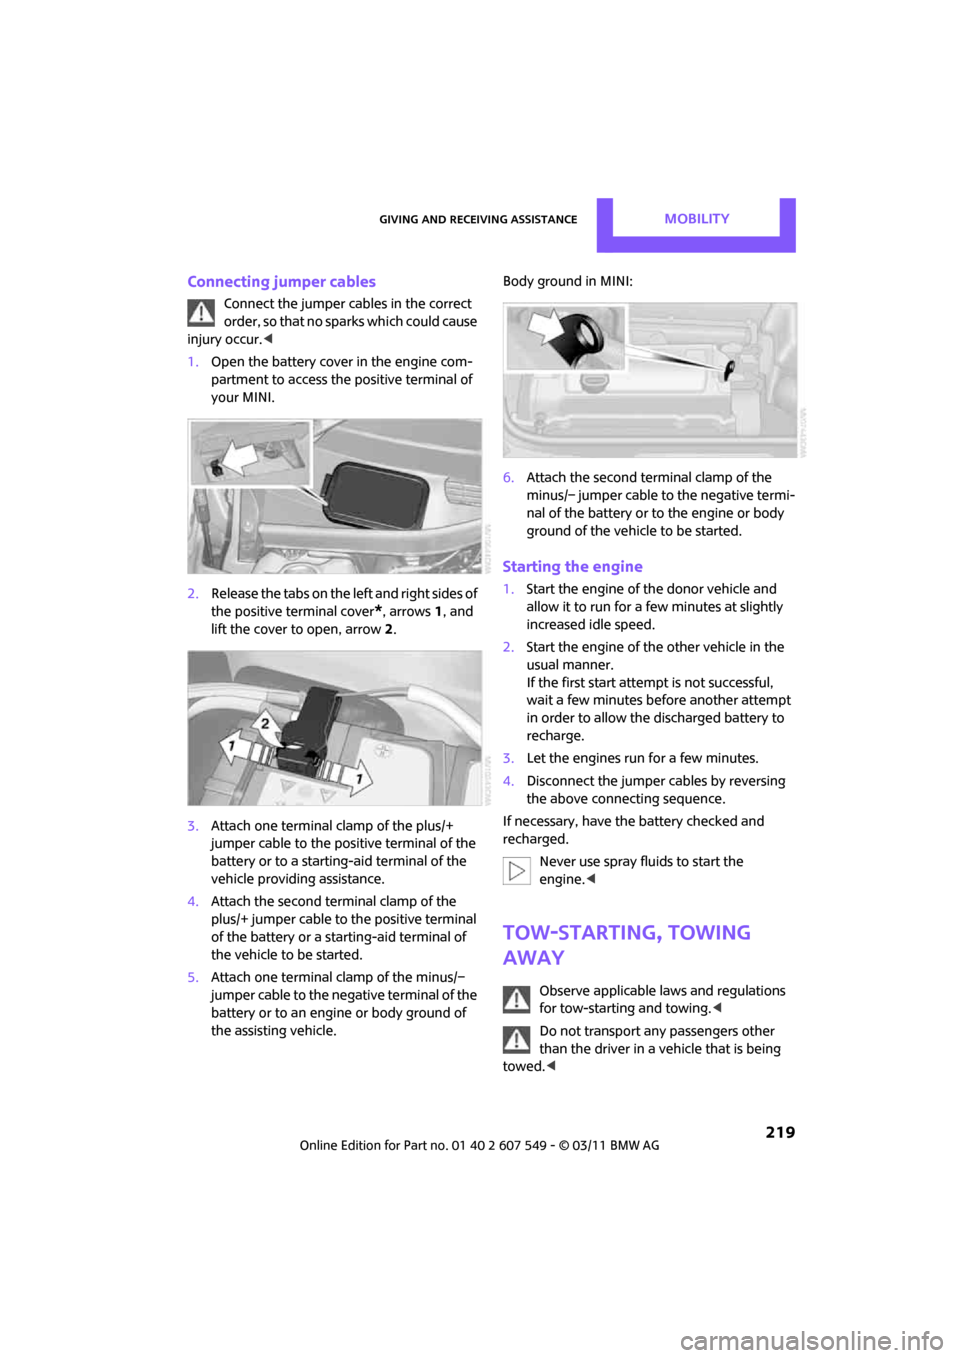
1. Open the battery cover in the engine com-
partment to access the positive terminal of
your MINI.
2. Release the tabs on the left and right sides of
the positive terminal cover
*, arrows 1, and
lift the cover to open, arrow 2.
3. Attach one terminal clamp of the plus/+
jumper cable to the positive terminal of the
battery or to a starting-aid terminal of the
vehicle providing assistance.
4. Attach the second terminal clamp of the
plus/+ jumper cable to the positive terminal
of the battery or a starting-aid terminal of
the vehicle to be started.
5. Attach one terminal clamp of the minus/–
jumper cable to the negative terminal of the
battery or to an engine or body ground of
the assisting vehicle. Body ground in MINI:
6.
Attach the second terminal clamp of the
minus/– jumper cable to the negative termi-
nal of the battery or to the engine or body
ground of the vehicle to be started.
Starting the engine
1.Start the engine of the donor vehicle and
allow it to run for a few minutes at slightly
increased idle speed.
2. Start the engine of the other vehicle in the
usual manner.
If the first start attempt is not successful,
wait a few minutes be fore another attempt
in order to allow the discharged battery to
recharge.
3. Let the engines run for a few minutes.
4. Disconnect the jumper cables by reversing
the above connecting sequence.
If necessary, have the battery checked and
recharged. Never use spray fluids to start the
engine. <
Tow-starting, towing
away
Observe applicable laws and regulations
for tow-starting and towing. <
Do not transport an y passengers other
than the driver in a vehicle that is being
towed. <
Page 222 of 254

MOBILITYGiving and receiving assistance
220
Using a tow fitting
The screw-in tow fitting must always be carried
in the car. It can be screwed in at the front or at
the right rear.
The tow fitting can be found under the right
front seat or in the pocket of the tire changing
set
* in the cargo area.
Use only the tow fitting provided with the
vehicle and screw it all the way in. Use the
tow fitting for towing on paved roads only. Avoid
lateral loading of the tow fitting, e.g. do not lift
the vehicle by the tow fitting. Otherwise, the tow
fitting and the vehicle could be damaged. <
Access to screw thread
Press the lower part of the cover. This will push
out the upper edge of the cover, which can then
be removed.
Front
Rear Being towed
Make sure that the igni
tion is switched on,
refer to page 46; otherwise, the low
beams, tail lamps, turn signals, and windshield
wipers may be unavailable. Do not tow the vehi-
cle with just the rear axle raised, as this would
allow the steering to turn. <
There is no power assist while the engine is off.
Thus, braking and steering will require increased
effort.
Switch on the hazard wa rning flashers, depend-
ing on local regulations.
Manual transmission
Gearshift lever in neutral position.
Automatic transmission
Tow vehicles with automatic transmission
only with a tow truck or with the front
wheels lifted; otherwise, the transmission can be
damaged. <
Towing methods
Do not lift vehicle by tow fitting or body
and chassis parts, otherwise damage may
result. <
With towbar
The towing vehicle must not be lighter
than the towed vehicle; otherwise, it may
be impossible to maintain control. <
The tow fittings used should be on the same side
on both vehicles. Should it prove impossible to
avoid mounting the tow bar at an angle, please
observe the following:
> Clearance and maneuver ing capability will
be sharply limited during cornering.
> The tow bar will generate lateral forces if it is
attached offset.
Attach the tow bar to the tow fittings only,
as attaching it to other parts of the vehicle
could result in damage. <
Page 223 of 254
Giving and receiving assistanceMOBILITY
221
With tow rope
When starting off in the towing vehicle, make
sure that the tow rope is taut.To avoid jerking and the associated
stresses on vehicle components when
towing, always use nylon ropes or nylon straps.
Attach the tow rope to the tow fittings only, as
attaching it to other parts of the vehicle could
result in damage. <
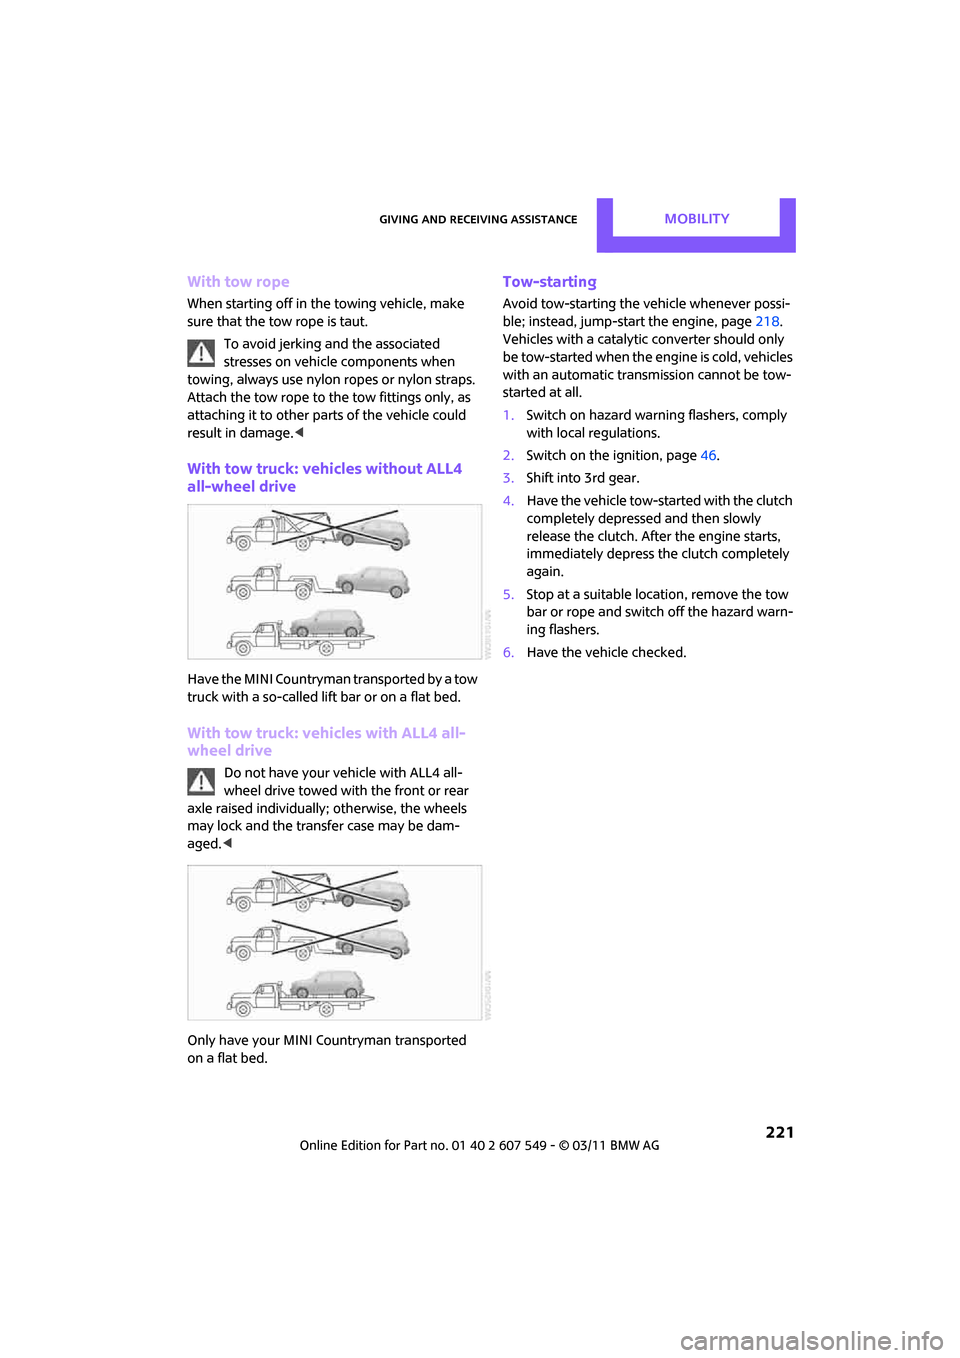
With tow truck: vehicles without ALL4
all-wheel drive
Have the MINI Countryman transported by a tow
truck with a so-called lift bar or on a flat bed.
With tow truck: vehicles with ALL4 all-
wheel drive
Do not have your vehicle with ALL4 all-
wheel drive towed with the front or rear
axle raised individually; otherwise, the wheels
may lock and the transfer case may be dam-
aged. <
Only have your MINI Countryman transported
on a flat bed.
Tow-starting
Avoid tow-starting the vehicle whenever possi-
ble; instead, jump-start the engine, page 218.
Vehicles with a catalytic converter should only
be tow-started when the engine is cold, vehicles
with an automatic transmission cannot be tow-
started at all.
1. Switch on hazard warn ing flashers, comply
with local regulations.
2. Switch on the ignition, page 46.
3. Shift into 3rd gear.
4. Have the vehicle tow-started with the clutch
completely depressed and then slowly
release the clutch. Afte r the engine starts,
immediately depress the clutch completely
again.
5. Stop at a suitable lo cation, remove the tow
bar or rope and switch off the hazard warn-
ing flashers.
6. Have the vehicle checked.
Page 224 of 254

Find Me.
Page 225 of 254
AT A GLANCE
CONTROLS
DRIVING TIPS
NAVIGATION
ENTERTAINMENT
Communications
MOBILITY
REFERENCE
Page 226 of 254

REFERENCETechnical data
224
Technical data
Engine data
Cooper Cooper S
Displacementcu in/cmμ 97.5/1,598 97.5/1,598
Number of cylinders 44
Maximum power out-
put hp
121181
At engine speed rpm 6,0005,500
Maximum torque
with overboost lb ft/Nm
114/155
– 177/240
192/260
At engine speed
with overboost rpm
4,250
– 1,600-5,000
1,700-4,500
Overboost briefly raises the maximum torque at high rates of acceleration, e. g. when passing.
Page 227 of 254

Technical dataREFERENCE
225
Dimensions
All dimensions in inches/mm. Minimum turning radius dia.: 38.1 ft/11.6 m.Information after the semicolon: different values for MINI Cooper S.
Page 228 of 254

REFERENCETechnical data
226
Weights
Never exceed either the approved axle loads or
the gross vehicle weight.
Capacities
CooperCooper SCooper S ALL4
Curb weight, ready for travel, with all optional extras
> Manual transmission lbs./kg 2,9 54/1,340 3,053/1,385 3,208/1,455
> Automatic transmis-
sion lbs./kg3,020/1,370 3,097/1,405 3,252/1,475
Approved gross weight
> Manual transmission lbs./kg 3,8 58/1,750 3,990/1,810 4,101/1,860
> Automatic transmis-
sion lbs./kg
3,924/1,780 4,034/1,830 4,145/1,880
Approved front axle load
> Manual transmission lbs./k g 2,028/920 2,105/955 2,161/980
> Automatic transmis-
sion lbs./kg2,094/950 2,150/975 2,205/1,000
Approved rear axle load lb s./kg 1,918/870 1,918/870 2,017/915
Approved roof load capac-
ity lbs./kg
165/75
165/75 165/75
Cargo area capacity cu ft/
liters 12.4 - 41.3/
350 - 1,170 12.4 - 41.3/
350 - 1,170 12.4 - 41.3/
350 - 1,170
US gal/US quartsLitersNotes
Fuel tank 12.4/– approx. 47 Fuel grade: page 189
Including reserve of 2.1/– approx. 8
Window washer system incl.
headlamp washer system –/4.2 approx. 4 For more details: page 53
Page 229 of 254
Short commands for the voice activation systemREFERENCE
227
Short commands for the voice
activation system
General information
Instructions for the voice activation system, refer
to page 21.
Having the possible spoken commands read
aloud: {Voice commands } The following short commands apply to vehicles
with voice activation systems. They do not work
for equipment with which only the mobile
phone can be operated by voice.
Useful short commands
*
FunctionCommand
Accessing tone control
{Tone }
Accessing settings {Settings }
Accessing the computer {Onboard info }
Accessing contacts
*{ Contacts }
Displaying the phone book
*{ Phonebook }
Accessing services
*{ Assist }
Selecting destination entry
*{ Enter address}
Accessing route guidance
*{ Guidance }
Page 230 of 254
REFERENCEShort commands for the voice activation system
228
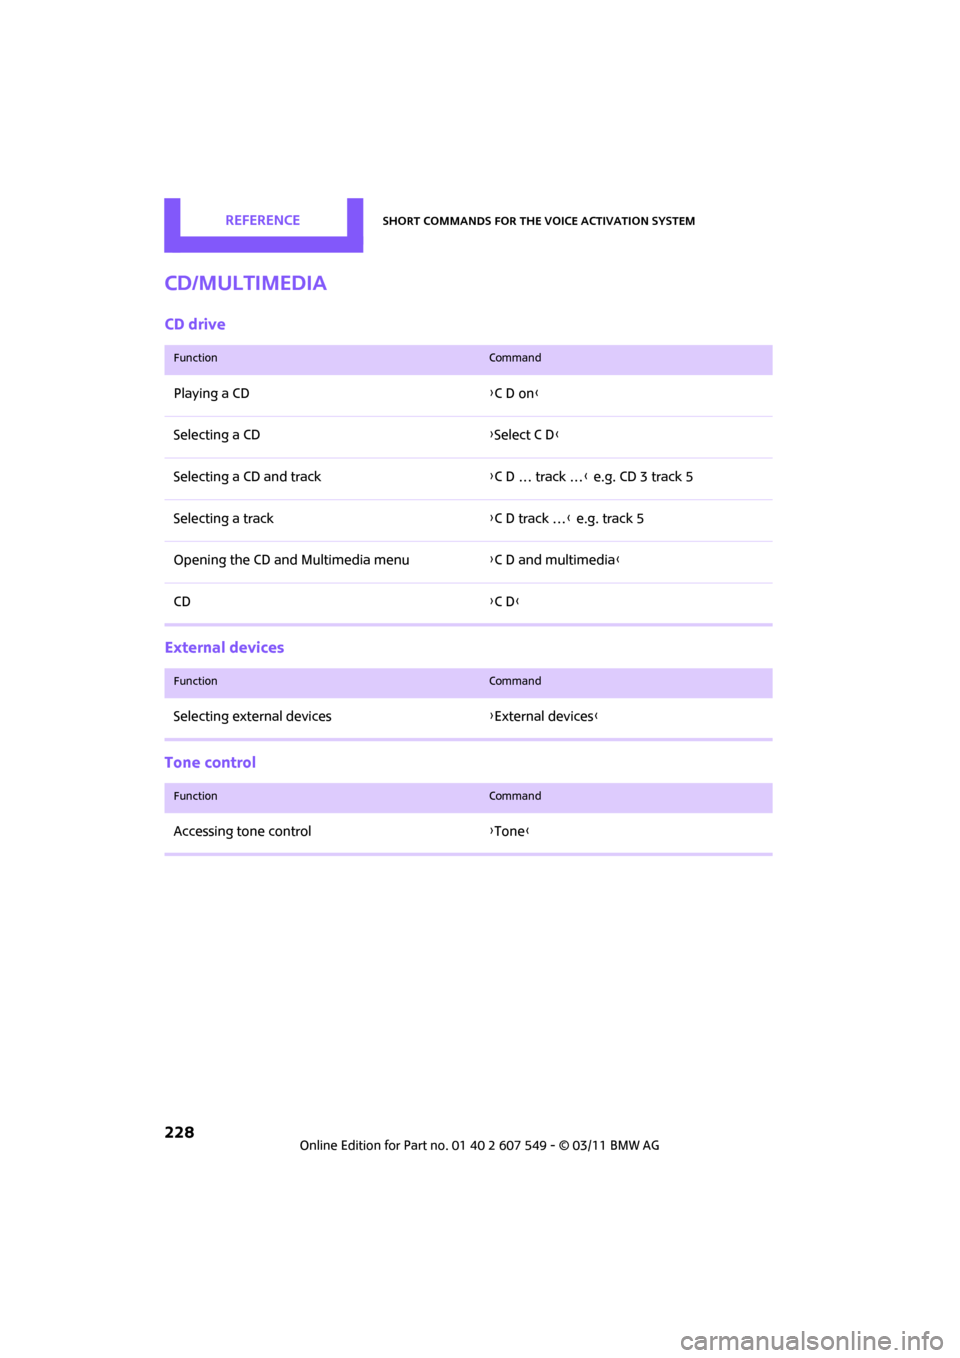
CD/Multimedia
CD drive
External devices
Tone control
FunctionCommand
Playing a CD{C D on }
Selecting a CD {Select C D }
Selecting a CD and track {C D … track … } e.g. CD 3 track 5
Selecting a track {C D track … } e.g. track 5
Opening the CD and Multimedia menu {C D and multimedia }
CD {C D}
FunctionCommand
Selecting external devices {External devices }
FunctionCommand
Accessing tone control {Tone }