key MINI Countryman 2011 User Guide
[x] Cancel search | Manufacturer: MINI, Model Year: 2011, Model line: Countryman, Model: MINI Countryman 2011Pages: 196, PDF Size: 3.06 MB
Page 44 of 196
ControlsDriving
42
Radio readiness and ignition off
All indicator and warning lamps in the displays
go out.
The ignition switches off automatically if the
driver's door is opened. Pressing the Start/Stop
button again switches the ignition back on.
The ignition is not switched off in situations such
as the following:
> The clutch or brake is depressed
> The low beams are switched on
Starting the engine
Do not allow the engine to run in enclosed
areas; otherwise, inha lation of the noxious
exhaust gases can lead to loss of consciousness
and death. Exhaust gase s contain carbon mon-
oxide, an odorless and colorless, but highly toxic
gas. Never leave an unattended vehicle with the
engine running; otherwise, such a vehicle repre-
sents a potential safety hazard.
Before leaving the car while the engine is run-
ning, place the transmission in neutral or move
the selector lever to position P and forcefully
apply the parking brake to prevent the car from
moving. <
Avoid frequent starting in quick succes-
sion or repeated start attempts in which
the engine does not start. Otherwise, the fuel is
not burned or inadequate ly burned and there is
a danger of overheatin g and damaging the cat-
alytic converter. <
Do not let the engine warm up with the vehicle
at a standstill. Move off immediately at a moder-
ate engine speed.
When starting the engi ne, do not depress the
accelerator pedal.
Manual transmission
Key in ignition lock or inside vehicle with Com-
fort Access, refer to page 27.
1. Depress the brake.
2. Depress the clutch.
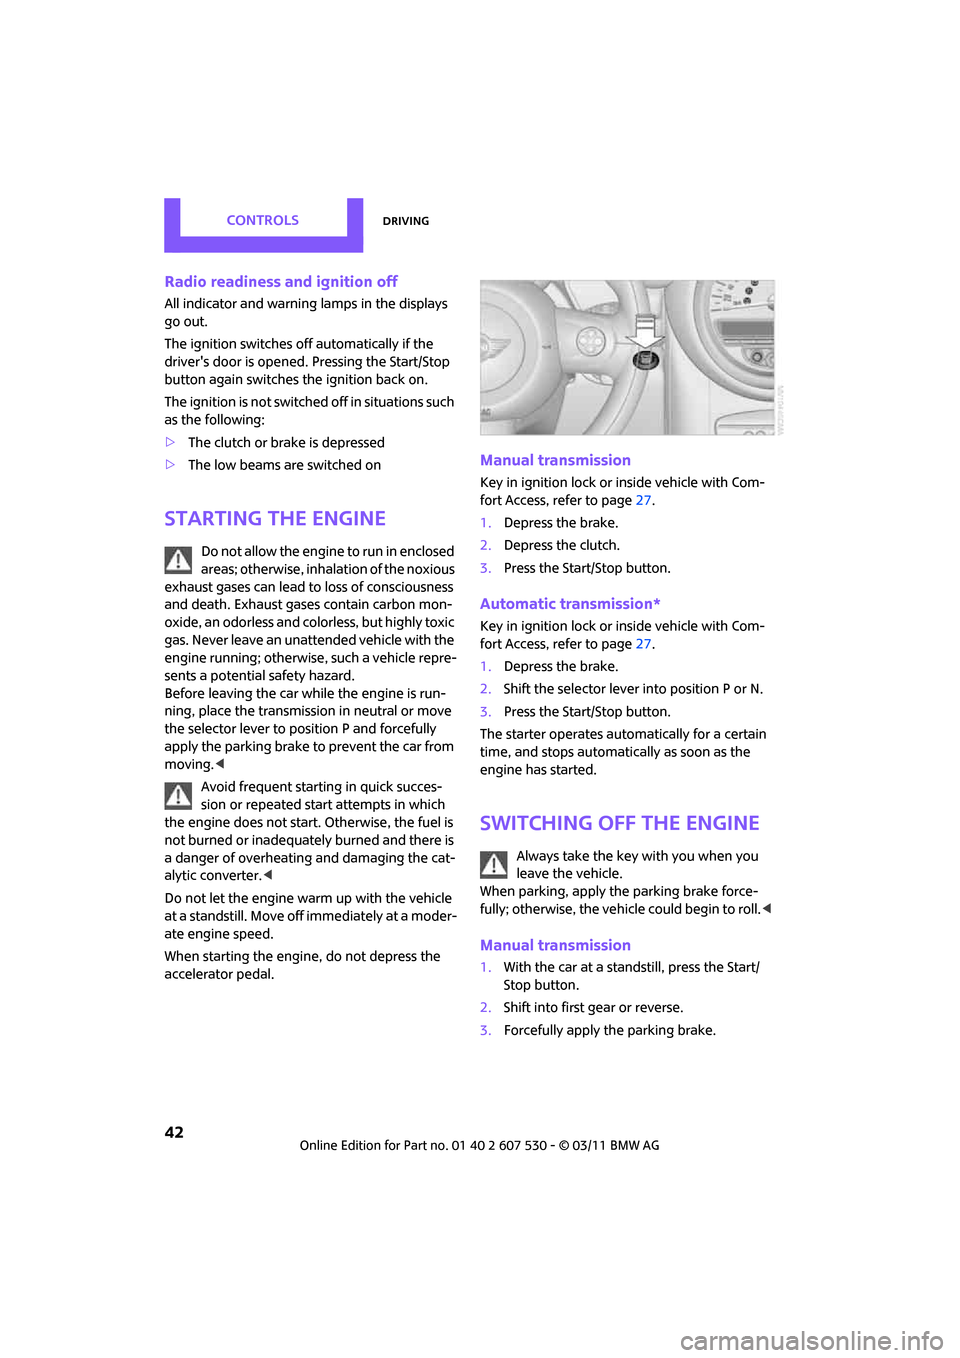
3. Press the Start/Stop button.
Automatic transmission*
Key in ignition lock or inside vehicle with Com-
fort Access, refer to page 27.
1. Depress the brake.
2. Shift the selector lever into position P or N.
3. Press the Start/Stop button.
The starter operates auto matically for a certain
time, and stops automati cally as soon as the
engine has started.
Switching off the engine
Always take the key with you when you
leave the vehicle.
When parking, apply the parking brake force-
fully; otherwise, the vehicle could begin to roll. <
Manual transmission
1.With the car at a standstill, press the Start/
Stop button.
2. Shift into first gear or reverse.
3. Forcefully apply the parking brake.
Page 45 of 196
DrivingControls
43
Automatic transmission*
1.With the car at a stop, move the selector
lever to position P.
2. Press the Start/Stop button.
3. Forcefully apply the parking brake.
Before driving into a car wash
By following these steps, the vehicle is able to
roll:
1.Place the remote control, even with Comfort
Access, in the ig nition lock.
2. Depress the brake.
3. Move the selector lever to position N.
4. Switch off the engine.
Parking brake
The parking brake is primarily intended to pre-
vent the vehicle from rolling while parked; it
brakes the rear wheels.
Applying
The lever locks in position automatically.
Releasing
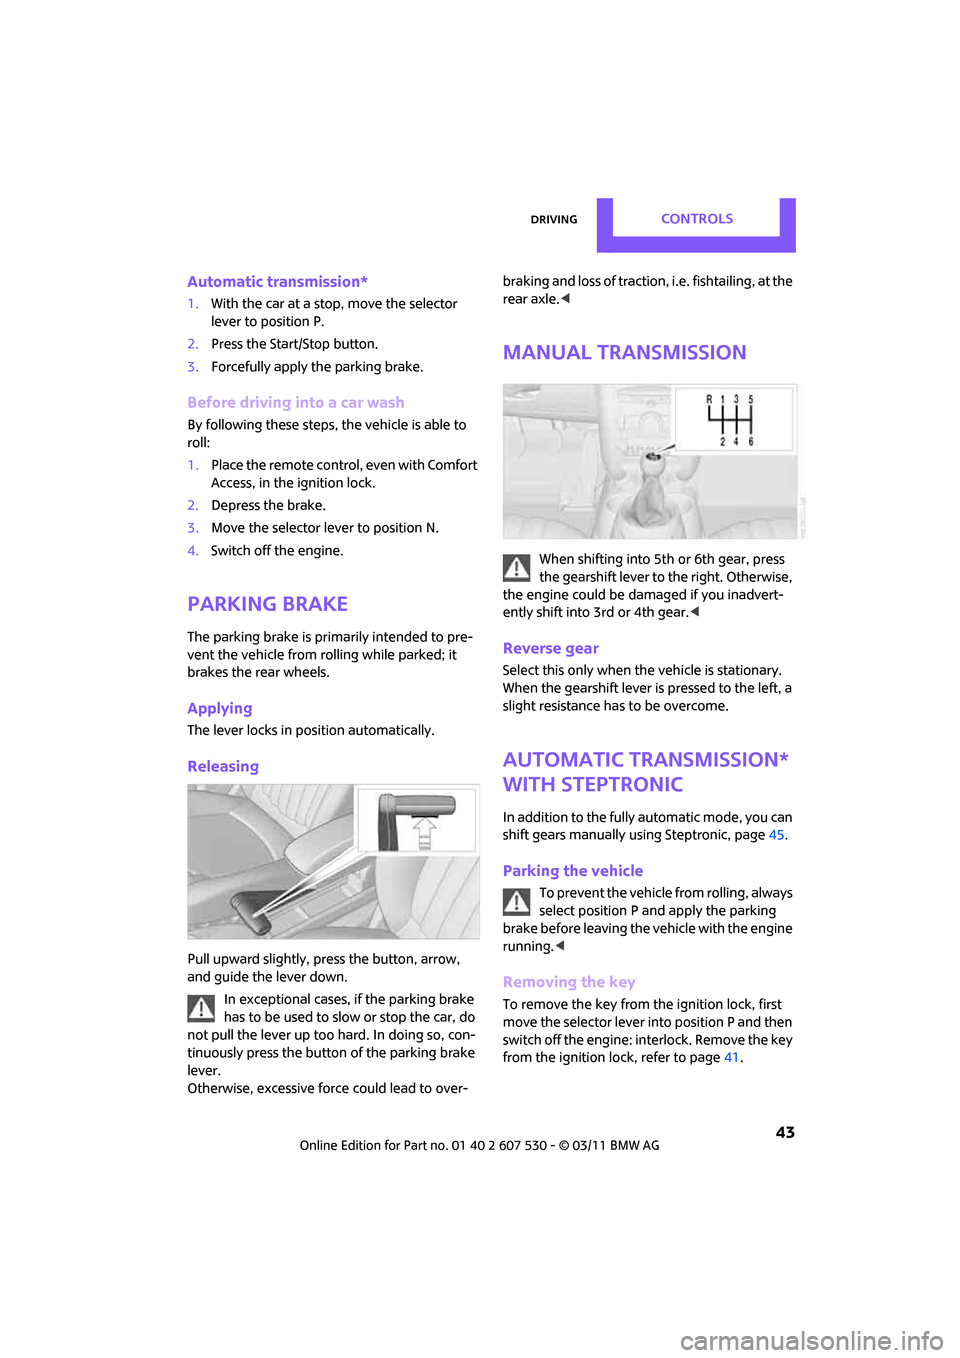
Pull upward slightly, press the button, arrow,
and guide the lever down.
In exceptional cases, if the parking brake
has to be used to slow or stop the car, do
not pull the lever up too hard. In doing so, con-
tinuously press the button of the parking brake
lever.
Otherwise, excessive force could lead to over- braking and loss of traction, i.e. fishtailing, at the
rear axle.
<
Manual transmission
When shifting into 5th or 6th gear, press
the gearshift lever to the right. Otherwise,
the engine could be damaged if you inadvert-
ently shift into 3rd or 4th gear.<
Reverse gear
Select this only when the vehicle is stationary.
When the gearshift lever is pressed to the left, a
slight resistance ha s to be overcome.
Automatic transmission*
with Steptronic
In addition to the fully automatic mode, you can
shift gears manually using Steptronic, page 45.
Parking the vehicle
To prevent the vehicle from rolling, always
select position P and apply the parking
brake before leaving the vehicle with the engine
running. <
Removing the key
To remove the key from the ignition lock, first
move the selector lever into position P and then
switch off the engine: interlock. Remove the key
from the ignition lock, refer to page 41.
Page 83 of 196
Practical interior accessoriesControls
81
Practical interior accessories
Integrated universal
remote control*
The concept
The integrated universal remote control can
replace as many as three hand-held transmitters
for various remote-controlled devices, such as
garage and gate openers and lighting systems.
The integrated universal remote control regis-
ters and stores signals from the original hand-
held transmitters.
The signal of an original hand-held transmitter
can be programmed on one of the three mem-
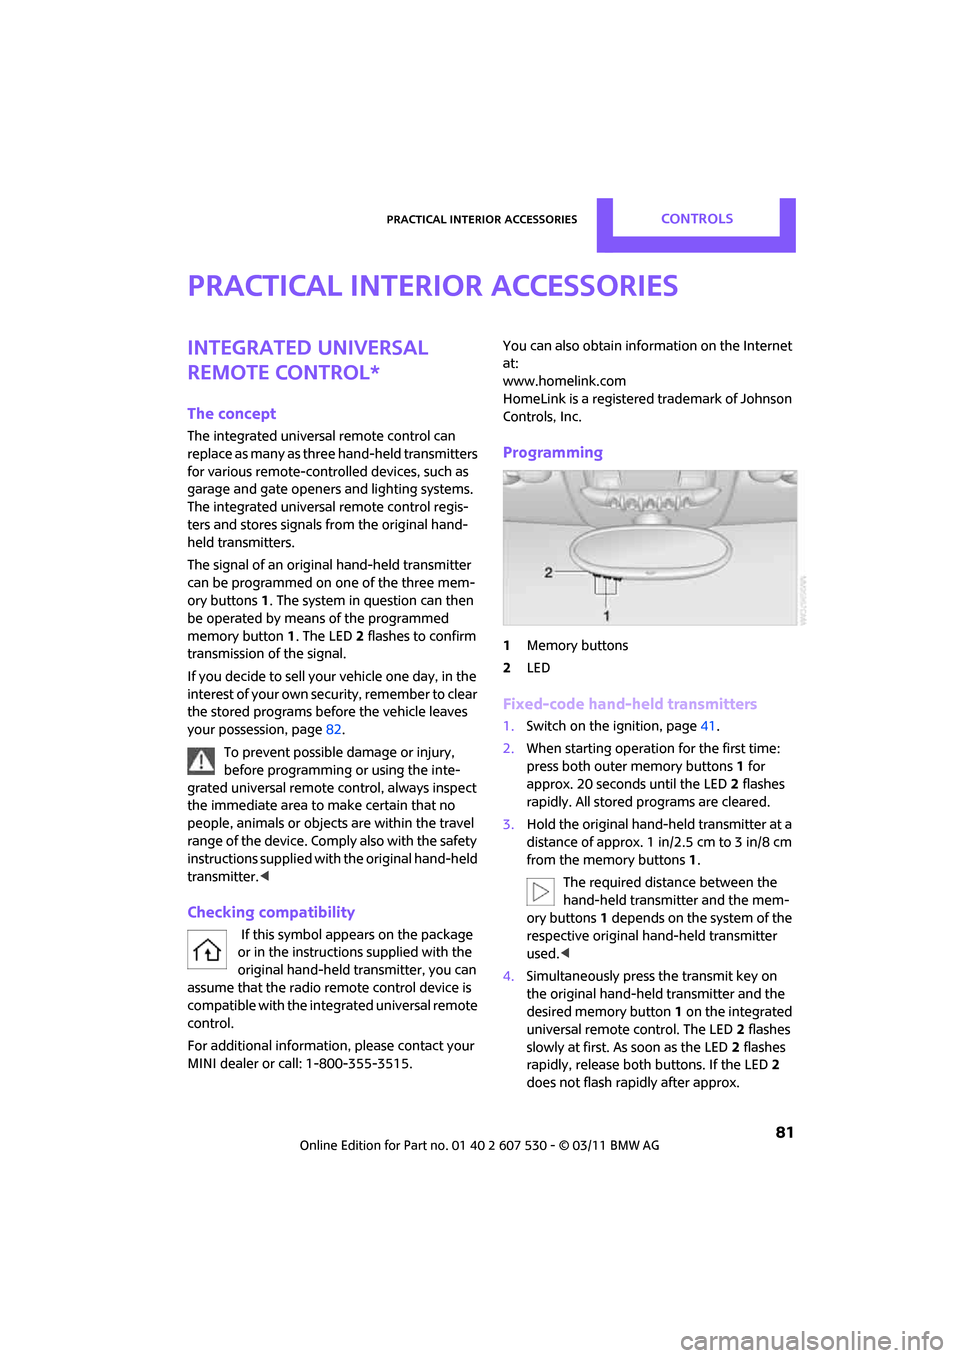
ory buttons 1. The system in question can then
be operated by means of the programmed
memory button 1. The LED 2 flashes to confirm
transmission of the signal.
If you decide to sell your vehicle one day, in the
interest of your own secu rity, remember to clear
the stored programs before the vehicle leaves
your possession, page 82.
To prevent possible damage or injury,
before programming or using the inte-
grated universal remote control, always inspect
the immediate area to make certain that no
people, animals or objects are within the travel
range of the device. Comply also with the safety
instructions supplied with the original hand-held
transmitter. <
Checking compatibility
If this symbol appears on the package
or in the instructions supplied with the
original hand-held transmitter, you can
assume that the radio re mote control device is
compatible with the inte grated universal remote
control.
For additional information, please contact your
MINI dealer or call: 1-800-355-3515. You can also obtain info
rmation on the Internet
at:
www.homelink.com
HomeLink is a registered trademark of Johnson
Controls, Inc.
Programming
1 Memory buttons
2 LED
Fixed-code hand-held transmitters
1.Switch on the ignition, page 41.
2. When starting operation for the first time:
press both outer memory buttons 1 for
approx. 20 seconds until the LED 2 flashes
rapidly. All stored programs are cleared.
3. Hold the original hand-held transmitter at a
distance of approx. 1 in/2.5 cm to 3 in/8 cm
from the memory buttons 1.
The required distance between the
hand-held transmitter and the mem-
ory buttons 1 depends on the system of the
respective original hand-held transmitter
used. <
4. Simultaneously press the transmit key on
the original hand-held transmitter and the
desired memory button 1 on the integrated
universal remote control. The LED 2 flashes
slowly at first. As soon as the LED 2 flashes
rapidly, release both buttons. If the LED 2
does not flash rapidly after approx.
Page 84 of 196
ControlsPractical interior accessories
82
60 seconds, alter the distance and repeat
this step.
Canada: if the LED is not flashing rapidly
after 60 seconds, chan ge the distance and
repeat the step or, if the programming was
interrupted by the hand-held transmitter,
press and hold the memory button and
press the button on the hand-held transmit-
ter for 2 seconds and release several times.
5. To program other original hand-held trans-
mitters, repeat steps 3 and 4.
The corresponding memory button1 is now
programmed with the signal of the original
hand-held transmitter.
You can operate the system with the engine
running or with the ignition switched on.
If the system fails to function even after
repeated programming, check whether
the original hand-held transmitter uses an alter-
nating-code system. To do so, either read the
instructions for the orig inal hand-held transmit-
ter or hold down the programmed memory
button 1 of the integrated universal remote con-
trol. If the LED 2 on the integrated universal
remote control flashes ra pidly and then remains
lit for about two seconds, then the original
hand-held transmitter uses an alternating-code
system. If it uses an alternating-code system,
program the memory buttons 1 as described
under Alternating-code hand-held transmit-
ters. <
Alternating-code hand-held
transmitters
To program the integrat ed universal remote
control, consult the oper ating instructions for
the device to be set. You will find information
there on the possibilities for synchronization or
programming of additional hand-held transmit-
ters.
When programming hand-held transmitters that
employ an alternating code, please observe the
following supplementary instructions: Programming will be easier with the aid of
a second person.
<
1. Park your vehicle within the range of the
remote-controlled device.
Do not exceed a distance of 164 ft/
50 m from the radio remote con-
trolled device. <
2. Program the integrated universal remote
control as described above in the section
Fixed-code hand-held transmitters.
3. Locate the button on the receiver of the
device to be set, e.g. on the drive unit.
4. Press the button on the receiver of the
device to be set. After step 4, you have
approx. 30 seconds for the next step 5.
5. Press and hold the programmed memory
button 1 on the integrated universal remote
control for approx. 3 seconds.
If necessary, repeat the step up to three
times.
The corresponding memory button1 is now
programmed with the signal of the original
hand-held transmitter.
Clearing stored programs
Press both outer memory buttons 1 for approx.
20 seconds until the LED 2 flashes: all stored
programs are cleared.
It is not possible to clear individual programs.
Reassigning individual programs
1. Hold the original hand-held transmitter at a
distance of approx. 1in/2.5cm to 3in/8cm
from the memory buttons 1.
The required distance between the
hand-held transmitter and the mem-
ory buttons 1 depends on the system of the
respective original hand-held transmitter
used. <
2. Press the desired memory button 1 of the
integrated universal remote control.
If the LED 2 flashes slowly after approx.
20 seconds, press the transmit key of the
Page 87 of 196
Practical interior accessoriesControls
85
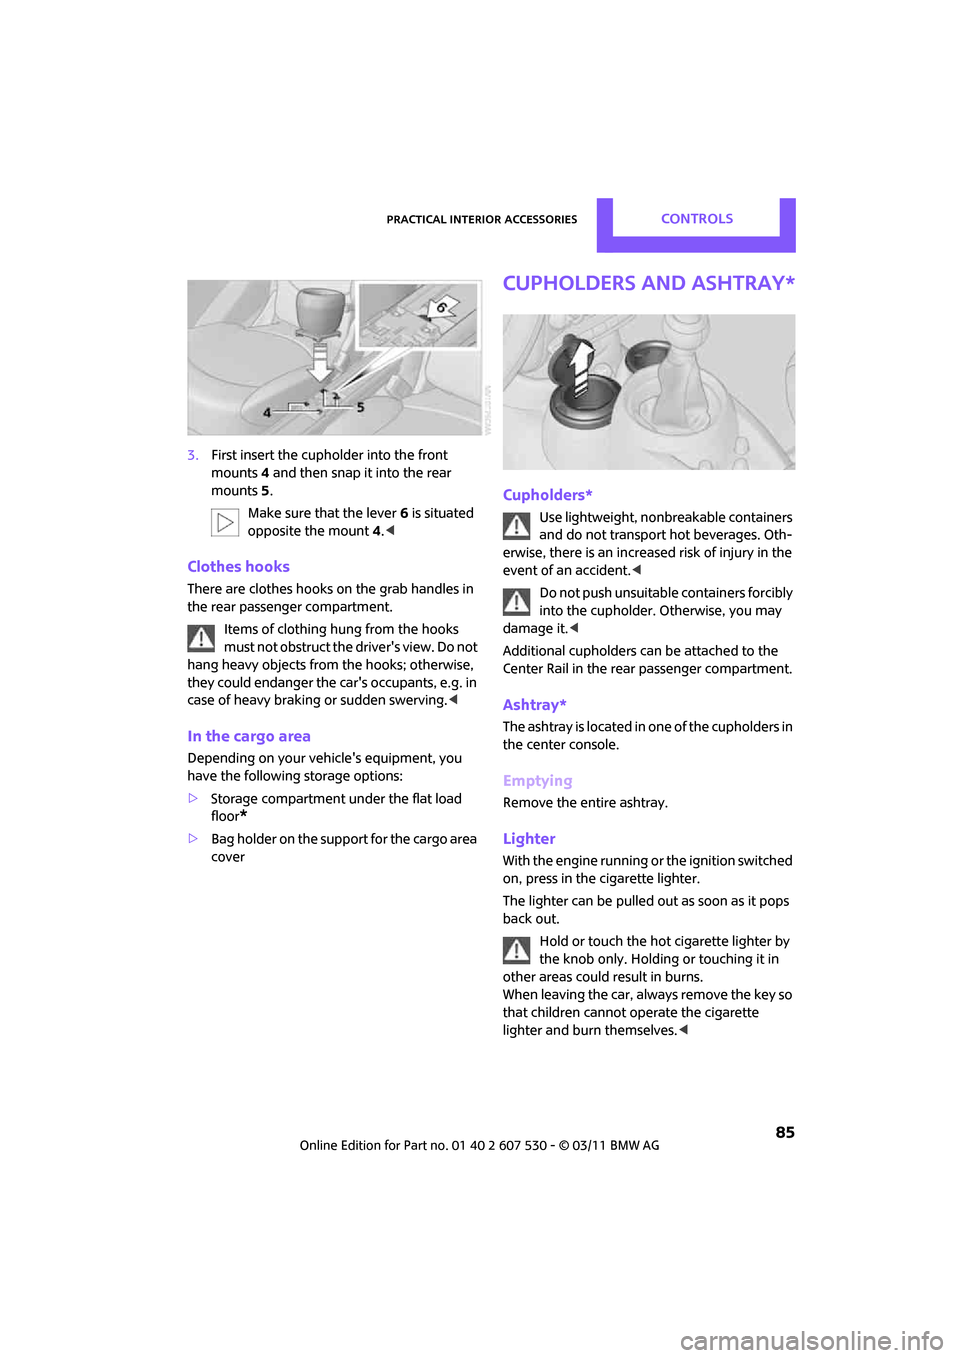
3.First insert the cupholder into the front
mounts 4 and then snap it into the rear
mounts 5.
Make sure that the lever 6 is situated
opposite the mount 4.<
Clothes hooks
There are clothes hooks on the grab handles in
the rear passenger compartment.
Items of clothing hung from the hooks
must not obstruct the driver's view. Do not
hang heavy objects from the hooks; otherwise,
they could endanger the car's occupants, e.g. in
case of heavy braking or sudden swerving. <
In the cargo area
Depending on your vehicle's equipment, you
have the following storage options:
>Storage compartment under the flat load
floor
*
>Bag holder on the support for the cargo area
cover
Cupholders and ashtray*
Cupholders*
Use lightweight, nonbreakable containers
and do not transport hot beverages. Oth-
erwise, there is an increased risk of injury in the
event of an accident. <
Do not push unsuitable containers forcibly
into the cupholder. Otherwise, you may
damage it.<
Additional cupholders can be attached to the
Center Rail in the rear passenger compartment.
Ashtray*
The ashtray is located in one of the cupholders in
the center console.
Emptying
Remove the entire ashtray.
Lighter
With the engine running or the ignition switched
on, press in the cigarette lighter.
The lighter can be pulled out as soon as it pops
back out.
Hold or touch the hot cigarette lighter by
the knob only. Holding or touching it in
other areas could re sult in burns.
When leaving the car, always remove the key so
that children cannot operate the cigarette
lighter and burn themselves. <
Page 116 of 196
CommunicationsTelephone
114
Telephone
Overview
The concept
Mobile phones or other external devices, e.g.
audio players, can be connected to the vehicle
via Bluetooth.
Bluetooth® is a registered trademark of Blue-
tooth® SIG, Inc.
Your MINI is equipped with a complete mobile
phone preparation. After a suitable mobile
phone is paired with the vehicle once, the
mobile phone can be controlled via the radio,
the buttons
* on the steering wheel, and by
voice
*.
It may be necessary for some functions to be
activated by the mobile phone provider. Only make entries when traffic conditions
permit. Do not hold the mobile phone in
your hand while you are driving; use the hands-
free system instead. If you do not observe this
precaution, your being distracted can endanger
vehicle occupants and other road users. <
Snap-in adapter*
The snap-in adapter, refer to page124, makes it
possible to:
> Accommodate the mobile phone.
> Recharge its battery.
> Connect it to an exte rnal antenna of the
vehicle.
This assures a better network connection
and constant sound quality.
A mobile phone that is connected to the vehicle
should not be operated via the mobile phone
keypad; otherwise, ma lfunctions may occur.
Suitable mobile phones
For precise information as to which mobile
phones and external devices with Bluetooth
interfaces are supported by the mobile phone
preparation, go to ww w.mini.com/connectivity.
*
Page 118 of 196
CommunicationsTelephone
116
10Switching displays 120
> "PHONE": telephone
> "COMP": computer
> "CONFIG": adjusting
11 Radio on/off, volume
>Press: to switch radio on/off
> Turn: adjusting volume 119
12 Ejecting CD
This symbol appears on the radio display
when a phone call is being made with the
hands-free system.
Pairing/unpairing mobile
phone
Overview
The pairing data of four mobile phones can be
stored simultaneously in the vehicle. When the
engine is running or the ignition is switched on,
each paired mobile phone is automatically
detected as soon as it is present in the passenger
compartment.
Requirements
> Suitable mobile ph one, refer to page114.
> Mobile phone operational.
> Bluetooth activated in vehicle, refer to
page 116, and in the mobile phone.
> Bluetooth presets in the mobile phone are
required, e.g. connection not confirmed or
visible, refer to Owner's Manual for the
mobile phone.
> A number with at least 4 and at most
16 digits has been established as the Blue-
tooth passkey. Only required once for pair-
ing.
> Ignition switched on.
Activating/deactivating Bluetooth link
Bluetooth is not permitted everywhere. Comply
with all safety guidelines and regulations.
To deactivate the Bluetooth connection:
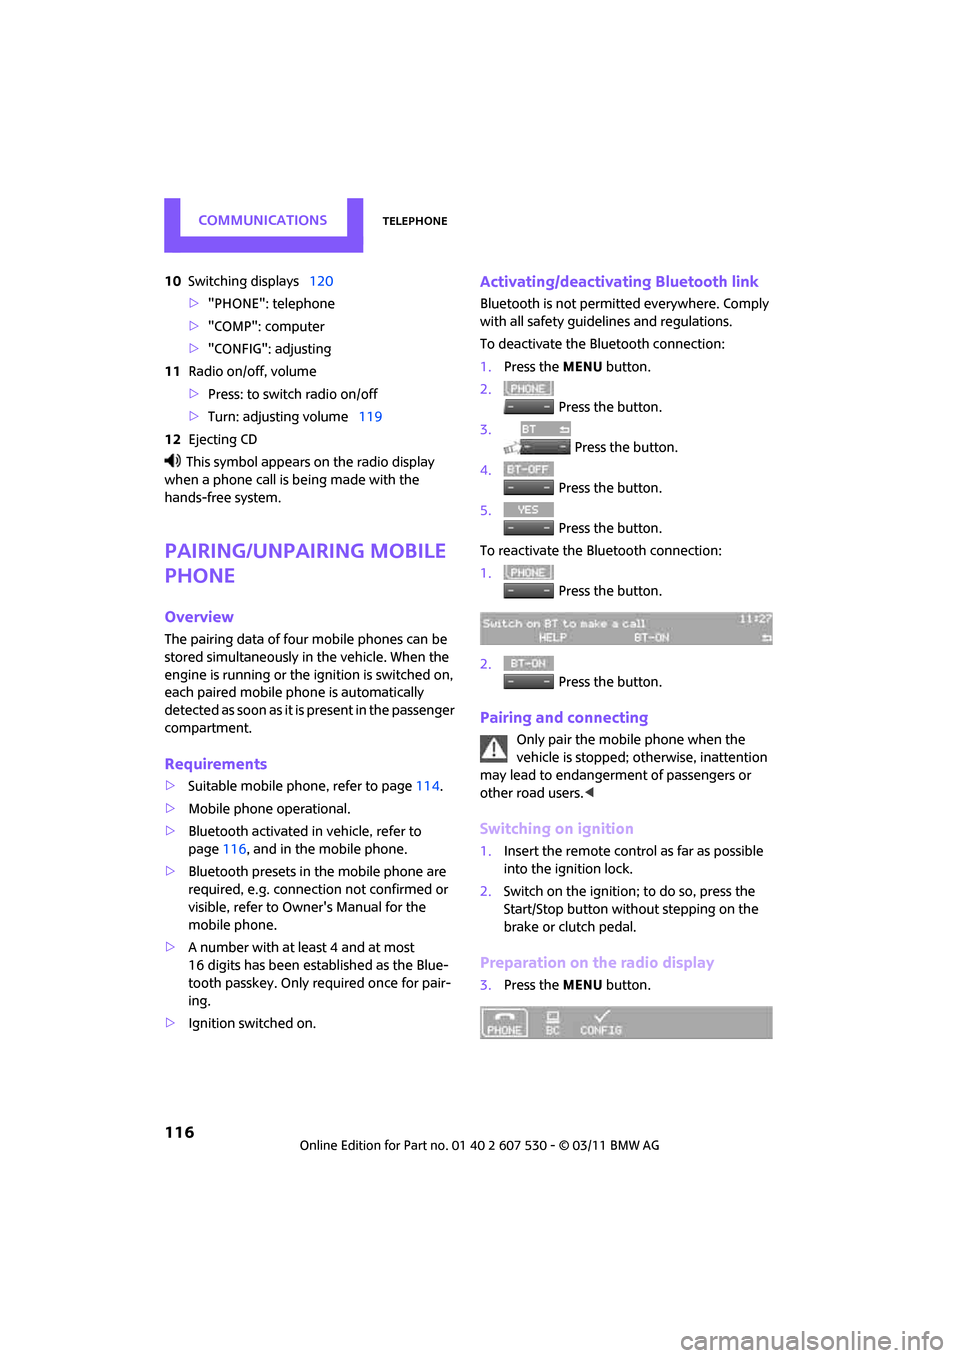
1.Press the MENU button.
2. Press the button.
3. Press the button.
4. Press the button.
5. Press the button.
To reactivate the Bluetooth connection:
1. Press the button.
2. Press the button.
Pairing and connecting
Only pair the mobile phone when the
vehicle is stopped; otherwise, inattention
may lead to endangerment of passengers or
other road users. <
Switching on ignition
1.Insert the remote control as far as possible
into the ignition lock.
2. Switch on the ignition; to do so, press the
Start/Stop button without stepping on the
brake or clutch pedal.
Preparation on the radio display
3.Press the MENU button.
Page 119 of 196
TelephoneCommunications
117
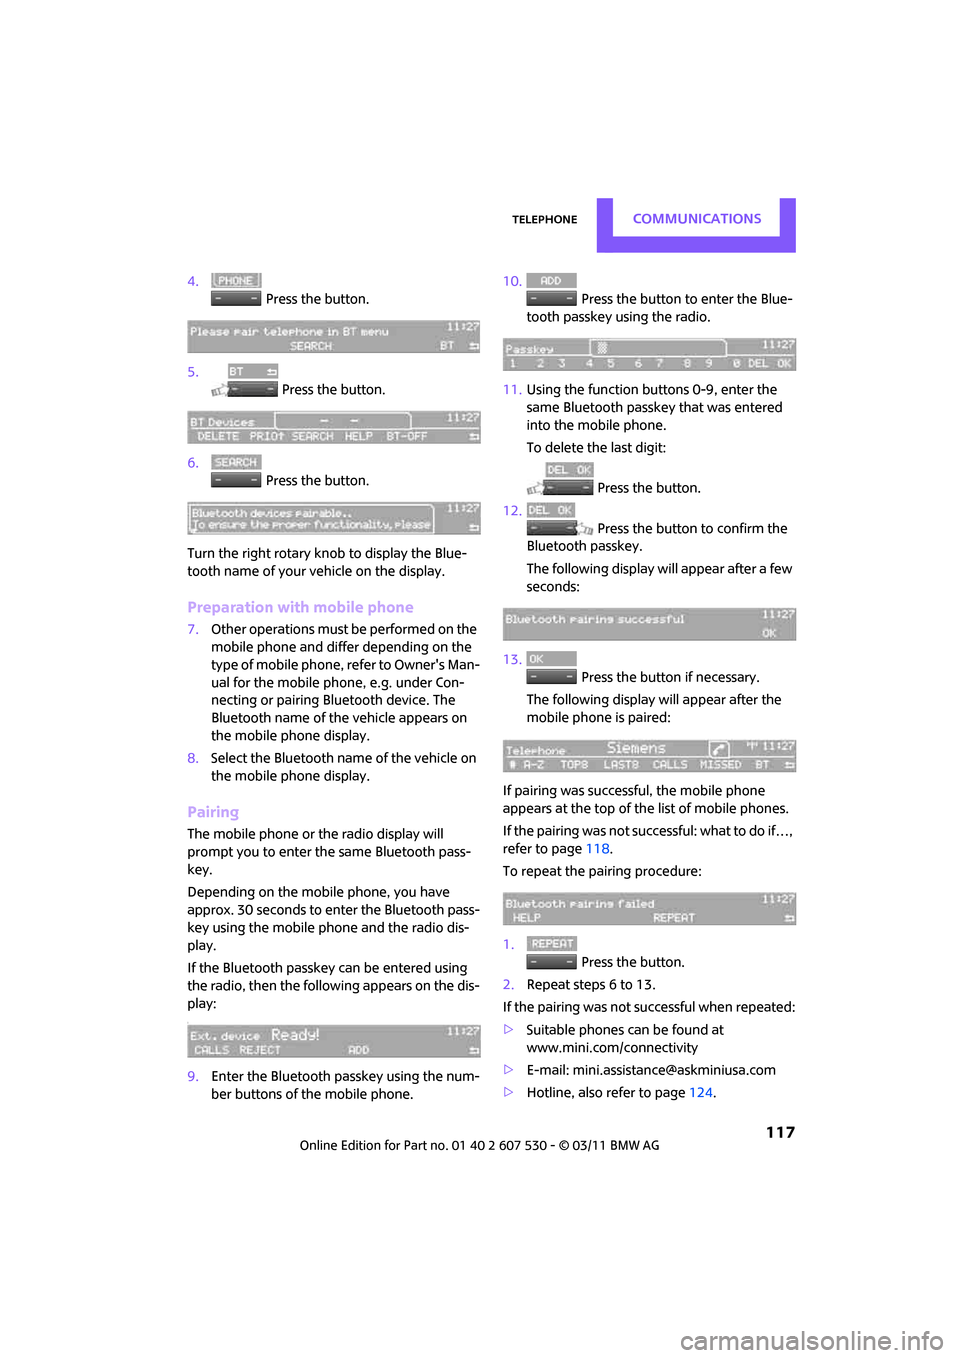
4. Press the button.
5. Press the button.
6. Press the button.
Turn the right rotary knob to display the Blue-
tooth name of your vehicle on the display.
Preparation with mobile phone
7. Other operations must be performed on the
mobile phone and differ depending on the
type of mobile phone, refer to Owner's Man-
ual for the mobile phone, e.g. under Con-
necting or pairing Bluetooth device. The
Bluetooth name of the vehicle appears on
the mobile phone display.
8. Select the Bluetooth name of the vehicle on
the mobile phone display.
Pairing
The mobile phone or the radio display will
prompt you to enter the same Bluetooth pass-
key.
Depending on the mobile phone, you have
approx. 30 seconds to enter the Bluetooth pass-
key using the mobile phone and the radio dis-
play.
If the Bluetooth passkey can be entered using
the radio, then the following appears on the dis-
play:
:
9.Enter the Bluetooth passkey using the num-
ber buttons of the mobile phone. 10.
Press the button to enter the Blue-
tooth passkey using the radio.
11. Using the function buttons 0-9, enter the
same Bluetooth passke y that was entered
into the mobile phone.
To delete the last digit:
Press the button.
12. Press the button to confirm the
Bluetooth passkey.
The following display will appear after a few
seconds:
13. Press the button if necessary.
The following display will appear after the
mobile phone is paired:
If pairing was successful, the mobile phone
appears at the top of the list of mobile phones.
If the pairing was not succ essful: what to do if…,
refer to page 118.
To repeat the pairing procedure:
1. Press the button.
2. Repeat steps 6 to 13.
If the pairing was not successful when repeated:
> Suitable phones can be found at
www.mini.com/connectivity
> E-mail: [email protected]
> Hotline, also refer to page 124.
Page 120 of 196
CommunicationsTelephone
118
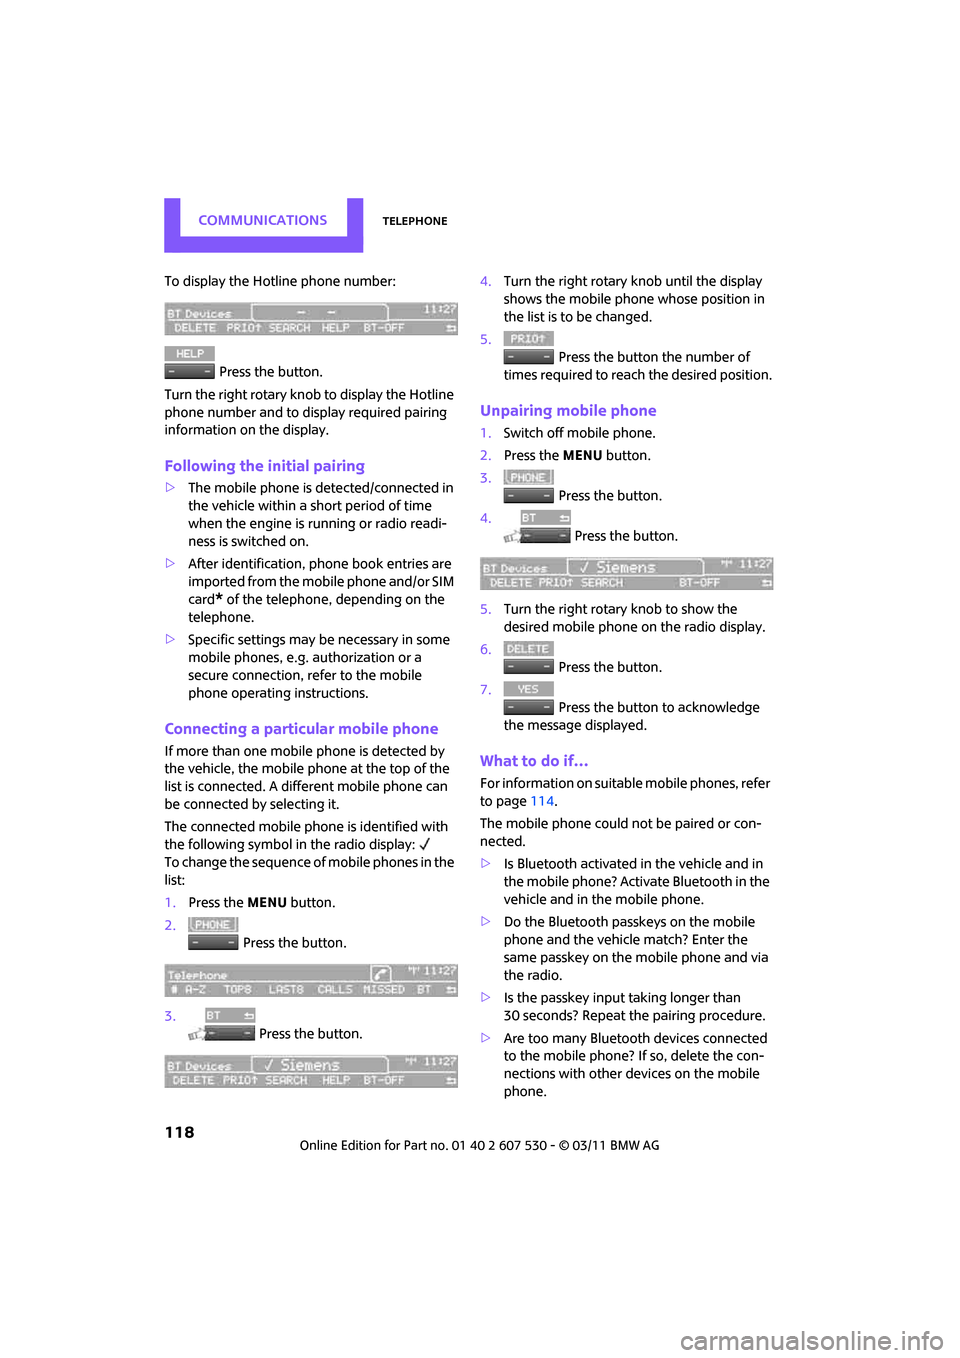
To display the Hotline phone number: Press the button.
Turn the right rotary knob to display the Hotline
phone number and to display required pairing
information on the display.
Following the initial pairing
> The mobile phone is detected/connected in
the vehicle within a short period of time
when the engine is running or radio readi-
ness is switched on.
> After identification, phone book entries are
imported from the mobile phone and/or SIM
card
* of the telephone, depending on the
telephone.
> Specific settings may be necessary in some
mobile phones, e.g. authorization or a
secure connection, re fer to the mobile
phone operating instructions.
Connecting a particular mobile phone
If more than one mobile phone is detected by
the vehicle, the mobile phone at the top of the
list is connected. A different mobile phone can
be connected by selecting it.
The connected mobile phone is identified with
the following symbol in the radio display:
To change the sequence of mobile phones in the
list:
1. Press the MENU button.
2. Press the button.
3. Press the button. 4.
Turn the right rotary knob until the display
shows the mobile phone whose position in
the list is to be changed.
5. Press the button the number of
times required to reach the desired position.
Unpairing mobile phone
1. Switch off mobile phone.
2. Press the MENU button.
3. Press the button.
4. Press the button.
5. Turn the right rotary knob to show the
desired mobile phone on the radio display.
6. Press the button.
7. Press the button to acknowledge
the message displayed.
What to do if…
For information on suitab le mobile phones, refer
to page 114.
The mobile phone could not be paired or con-
nected.
> Is Bluetooth activated in the vehicle and in
the mobile phone? Activate Bluetooth in the
vehicle and in the mobile phone.
> Do the Bluetooth passkeys on the mobile
phone and the vehicle match? Enter the
same passkey on the mobile phone and via
the radio.
> Is the passkey input taking longer than
30 seconds? Repeat th e pairing procedure.
> Are too many Bluetoot h devices connected
to the mobile phone? If so, delete the con-
nections with other devices on the mobile
phone.
Page 122 of 196
CommunicationsTelephone
120
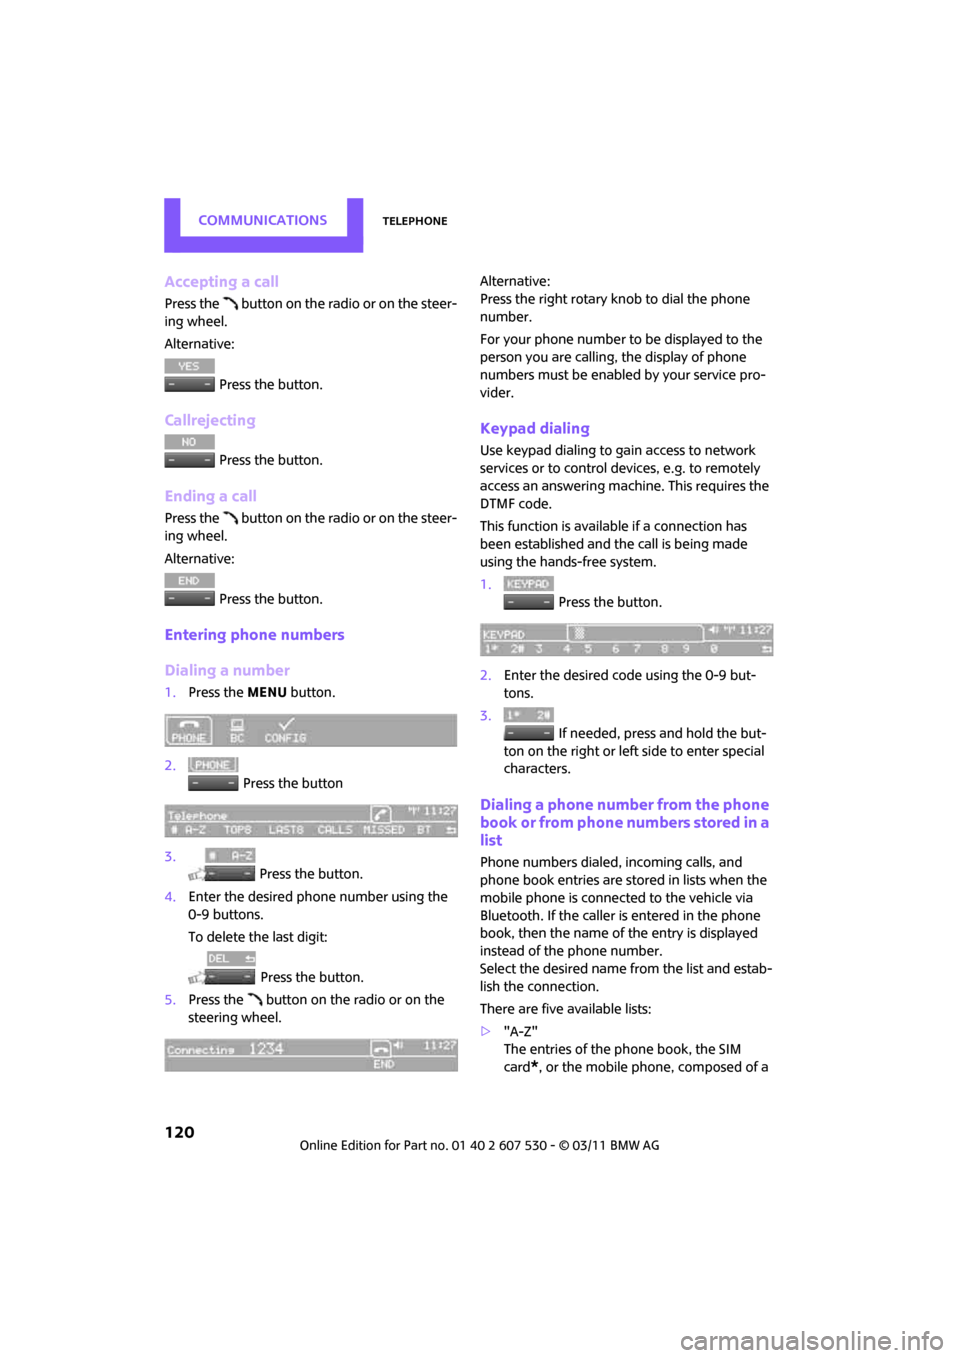
Accepting a call
Press the button on the radio or on the steer-
ing wheel.
Alternative: Press the button.
Callrejecting
Press the button.
Ending a call
Press the button on the radio or on the steer-
ing wheel.
Alternative: Press the button.
Entering phone numbers
Dialing a number
1.Press the MENU button.
2. Press the button
3. Press the button.
4. Enter the desired phone number using the
0-9 buttons.
To delete the last digit:
Press the button.
5. Press the button on the radio or on the
steering wheel. Alternative:
Press the right rotary knob to dial the phone
number.
For your phone number to be displayed to the
person you are calling, the display of phone
numbers must be enabled by your service pro-
vider.
Keypad dialing
Use keypad dialing to gain access to network
services or to control de
vices, e.g. to remotely
access an answering machine. This requires the
DTMF code.
This function is available if a connection has
been established and the call is being made
using the hands-free system.
1. Press the button.
2. Enter the desired code using the 0-9 but-
tons.
3.
If needed, press and hold the but-
ton on the right or left side to enter special
characters.
Dialing a phone number from the phone
book or from phone numbers stored in a
list
Phone numbers dialed, incoming calls, and
phone book entries are stored in lists when the
mobile phone is connected to the vehicle via
Bluetooth. If the caller is entered in the phone
book, then the name of the entry is displayed
instead of the phone number.
Select the desired name from the list and estab-
lish the connection.
There are five available lists:
> "A-Z"
The entries of the phone book, the SIM
card
*, or the mobile phone, composed of a