mirror controls MINI Countryman 2011 Owner's Manual
[x] Cancel search | Manufacturer: MINI, Model Year: 2011, Model line: Countryman, Model: MINI Countryman 2011Pages: 196, PDF Size: 3.06 MB
Page 12 of 196
AT A GLANCECockpit
10
Cockpit
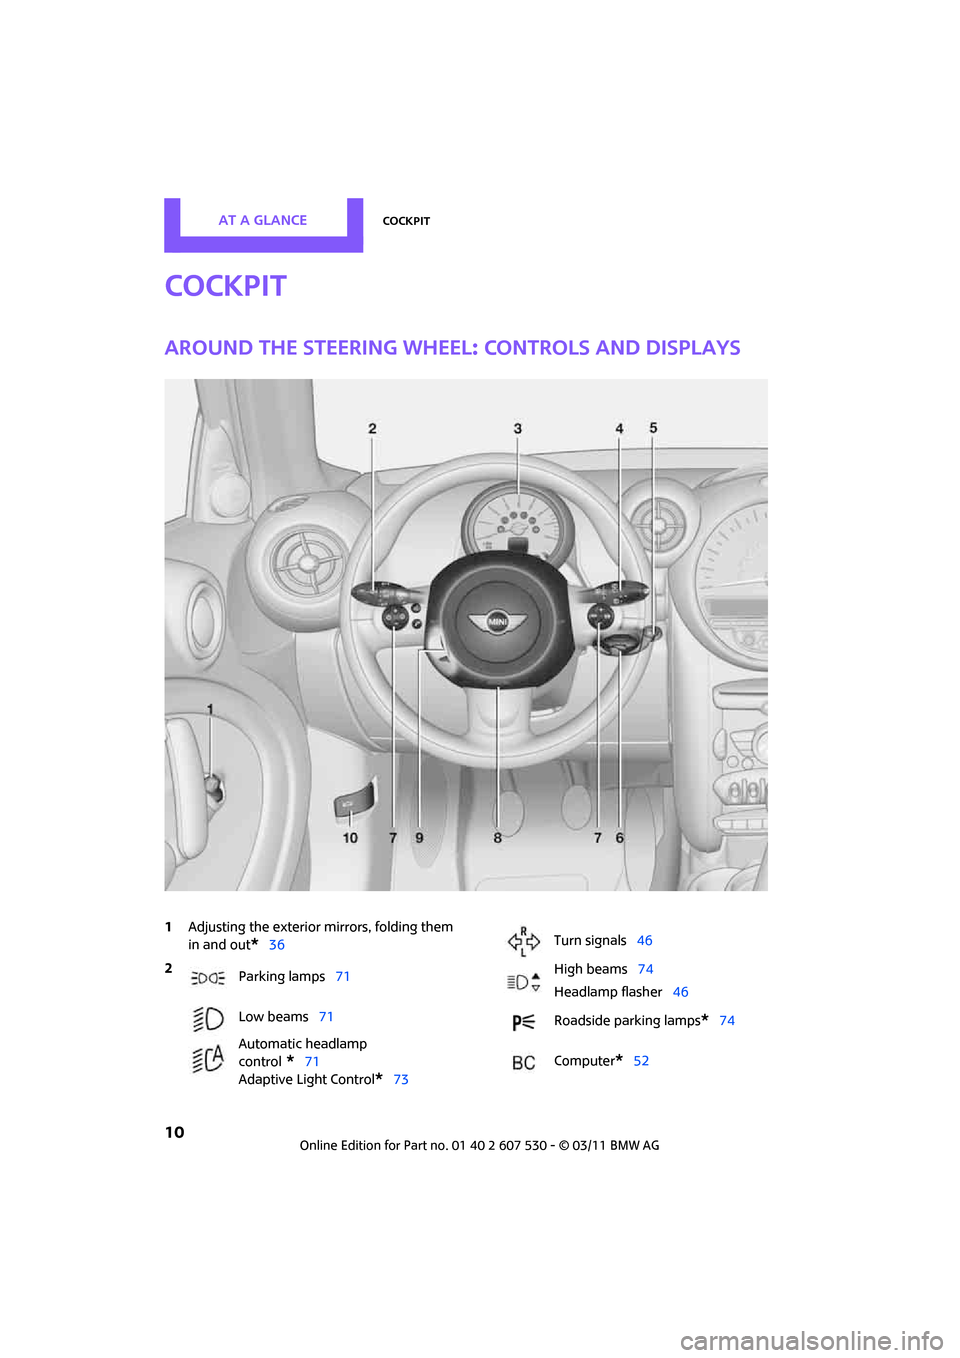
Around the steering wheel: Controls and displays
1Adjusting the exterior mirrors, folding them
in and out
*36
2
Parking lamps 71
Low beams 71
Automatic headlamp
control
*71
Adaptive Light Control
*73
Turn signals 46
High beams 74
Headlamp flasher 46
Roadside parking lamps
*74
Computer
*52
Page 38 of 196
ControlsAdjustments
36
Safety belt reminder
Front seats
The indicator lamps come on and an
acoustic signal sounds.Check whether
the safety belt has been fastened cor-
rectly. The 'Fasten safety belts'
reminder is issued when the driver's safety belt
has not been fastened. Th e 'Fasten safety belts'
reminder is also activate d at road speeds above
approx. 5 mph or 8 km/h if the front passenger's
safety belt has not been fastened, if objects are
placed on the front passenger seat, or if driver or
front passenger unfasten their safety belts.
Damage to safety belts
If the safety belts ar e damaged or stressed
in an accident: have th e safety belt system
and its seat-belt tensioners replaced and the
belt anchors checked. Have this work carried out
only by a MINI dealer or by a workshop that has
specially trained personnel working in accor-
dance with the specifications of the MINI manu-
facturer; otherwise, correct operation of these
safety systems is not ensured.<
Mirrors
Exterior mirrors
The mirror on the passenger's side is more
curved than the driver's mirror. The
objects seen in the mirro r are closer than they
appear. Do not gauge your distance from traffic
behind you on the basis of what you see in the
mirror; otherwise, there is an increased risk of an
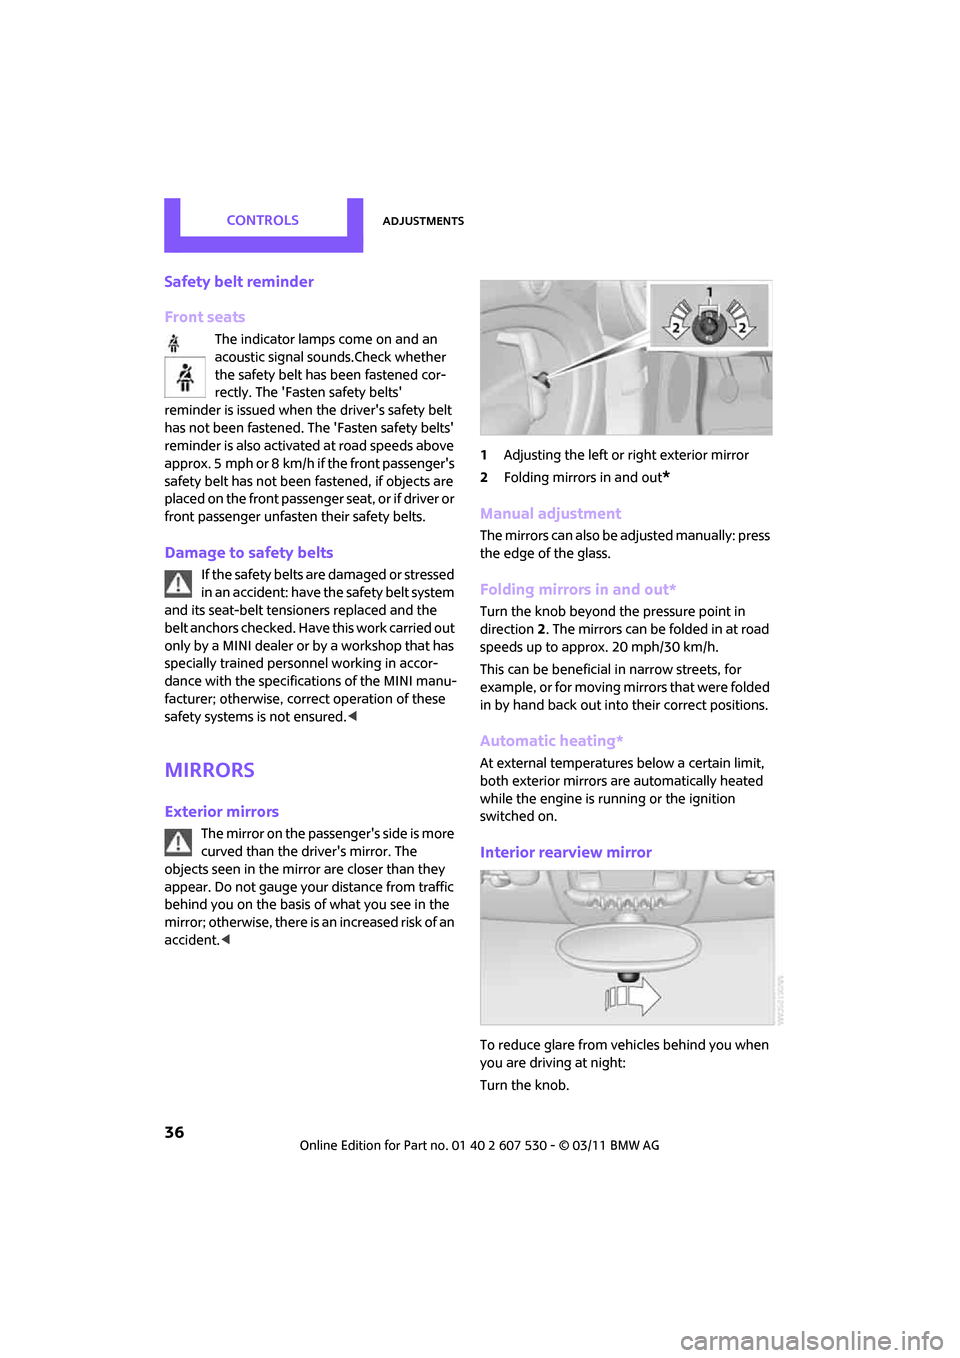
accident. < 1
Adjusting the left or right exterior mirror
2 Folding mirrors in and out
*
Manual adjustment
The mirrors can also be adjusted manually: press
the edge of the glass.
Folding mirrors in and out*
Turn the knob beyond the pressure point in
direction 2. The mirrors can be folded in at road
speeds up to approx. 20 mph/30 km/h.
This can be beneficial in narrow streets, for
example, or for moving mi rrors that were folded
in by hand back out into their correct positions.
Automatic heating*
At external temperatures below a certain limit,
both exterior mirrors are automatically heated
while the engine is running or the ignition
switched on.
Interior rearview mirror
To reduce glare from vehicles behind you when
you are driving at night:
Turn the knob.
Page 39 of 196
AdjustmentsControls
37
Interior and exterior mirrors,
automatic dimming feature*
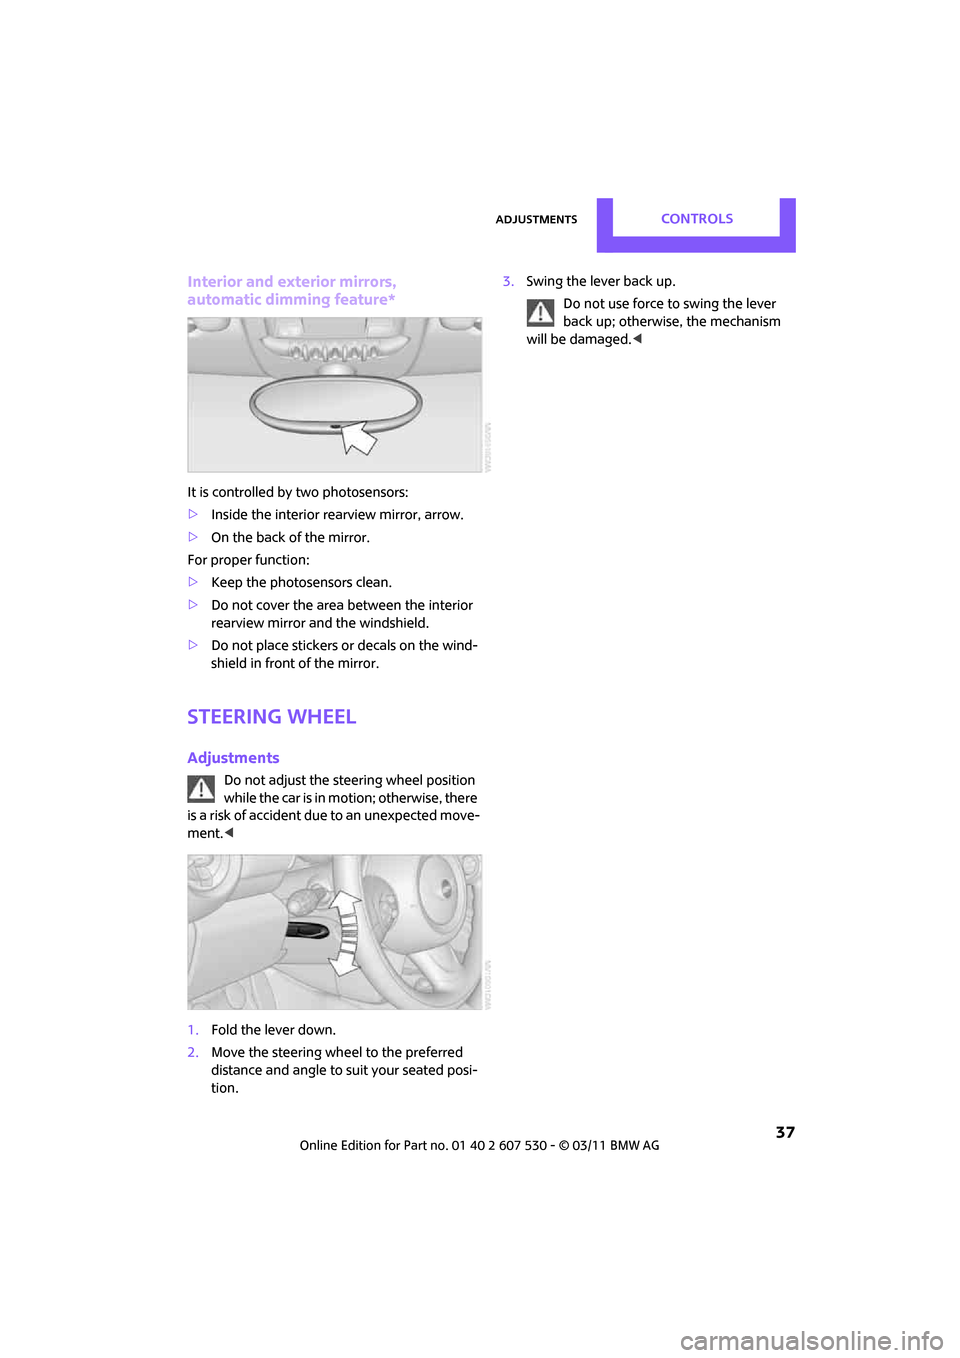
It is controlled by two photosensors:
>Inside the interior rearview mirror, arrow.
> On the back of the mirror.
For proper function:
> Keep the photosensors clean.
> Do not cover the area between the interior
rearview mirror and the windshield.
> Do not place stickers or decals on the wind-
shield in front of the mirror.
Steering wheel
Adjustments
Do not adjust the steering wheel position
while the car is in motion; otherwise, there
is a risk of accident due to an unexpected move-
ment. <
1. Fold the lever down.
2. Move the steering wheel to the preferred
distance and angle to su it your seated posi-
tion. 3.
Swing the lever back up.
Do not use force to swing the lever
back up; otherwise, the mechanism
will be damaged. <
Page 49 of 196
DrivingControls
47
8.Press the button to select:
>
Brief indication of a turn.
> Triple turn signal.
9. Press and hold the butt on until the display
changes. The setting is stored.
Wiper system
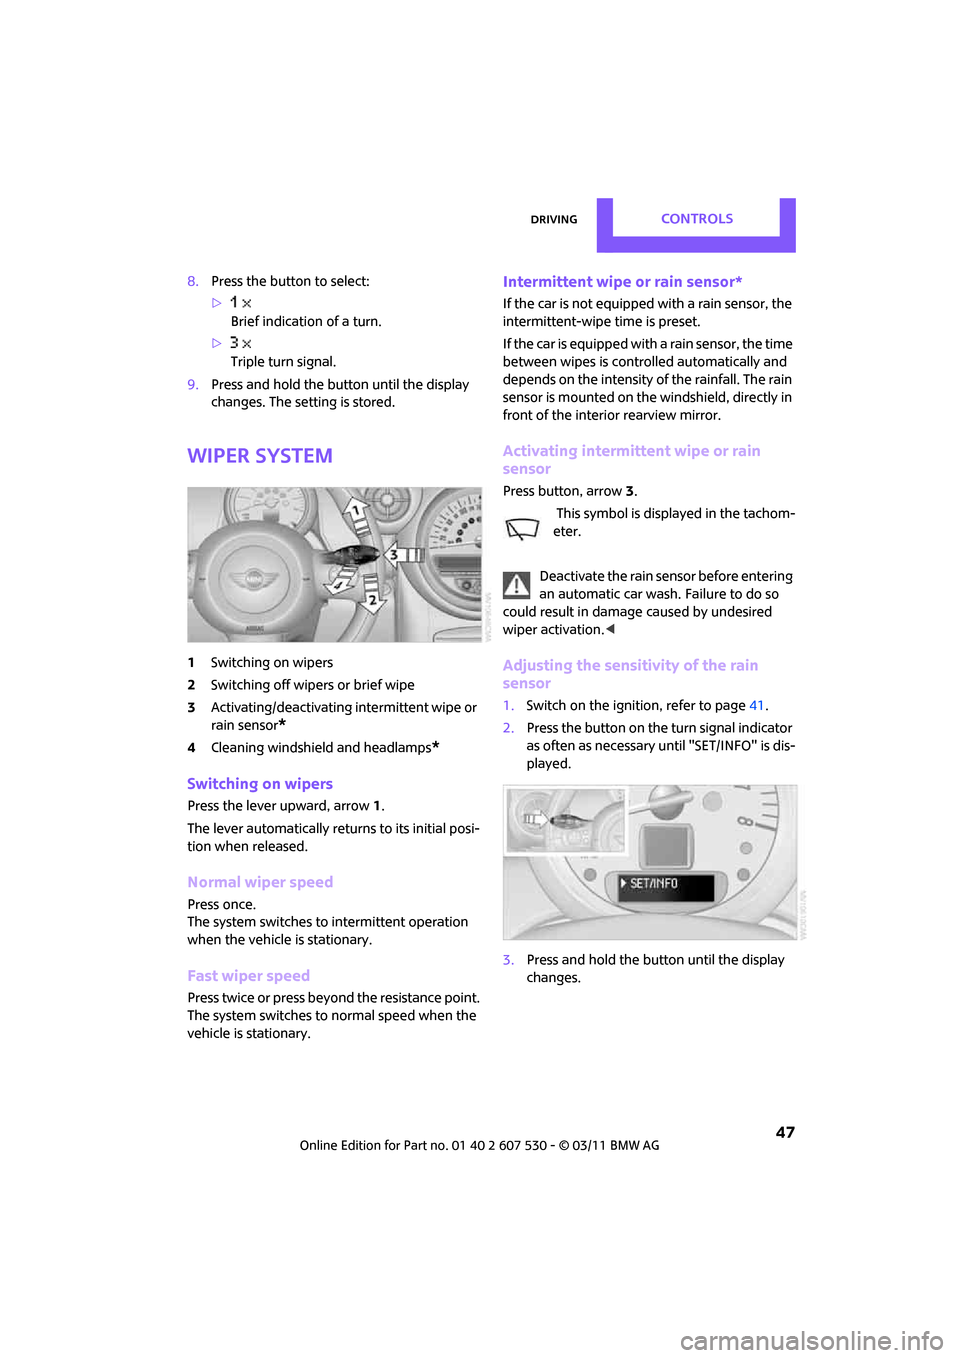
1 Switching on wipers
2 Switching off wipers or brief wipe
3 Activating/deactivating intermittent wipe or
rain sensor
*
4Cleaning windshield and headlamps*
Switching on wipers
Press the lever upward, arrow 1.
The lever automatically returns to its initial posi-
tion when released.
Normal wiper speed
Press once.
The system switches to intermittent operation
when the vehicle is stationary.
Fast wiper speed
Press twice or press beyo nd the resistance point.
The system switches to normal speed when the
vehicle is stationary.
Intermittent wipe or rain sensor*
If the car is not equipped with a rain sensor, the
intermittent-wipe time is preset.
If the car is equipped with a rain sensor, the time
between wipes is contro lled automatically and
depends on the intensity of the rainfall. The rain
sensor is mounted on the windshield, directly in
front of the interior rearview mirror.
Activating intermittent wipe or rain
sensor
Press button, arrow 3.
This symbol is displayed in the tachom-
eter.
Deactivate the rain sensor before entering
an automatic car wash. Failure to do so
could result in damage caused by undesired
wiper activation. <
Adjusting the sensitivity of the rain
sensor
1.Switch on the ignition, refer to page 41.
2. Press the button on the turn signal indicator
as often as necessary until "SET/INFO" is dis-
played.
3. Press and hold the butt on until the display
changes.
Page 71 of 196
Technology for driving comfort and safetyControls
69
activates or deactivates the front, side, and knee
airbags for the front passenger.Make sure that the front passenger's feet
remain in the footwell; otherwise, it is not
possible to guarantee the function of the front
passenger airbags. <
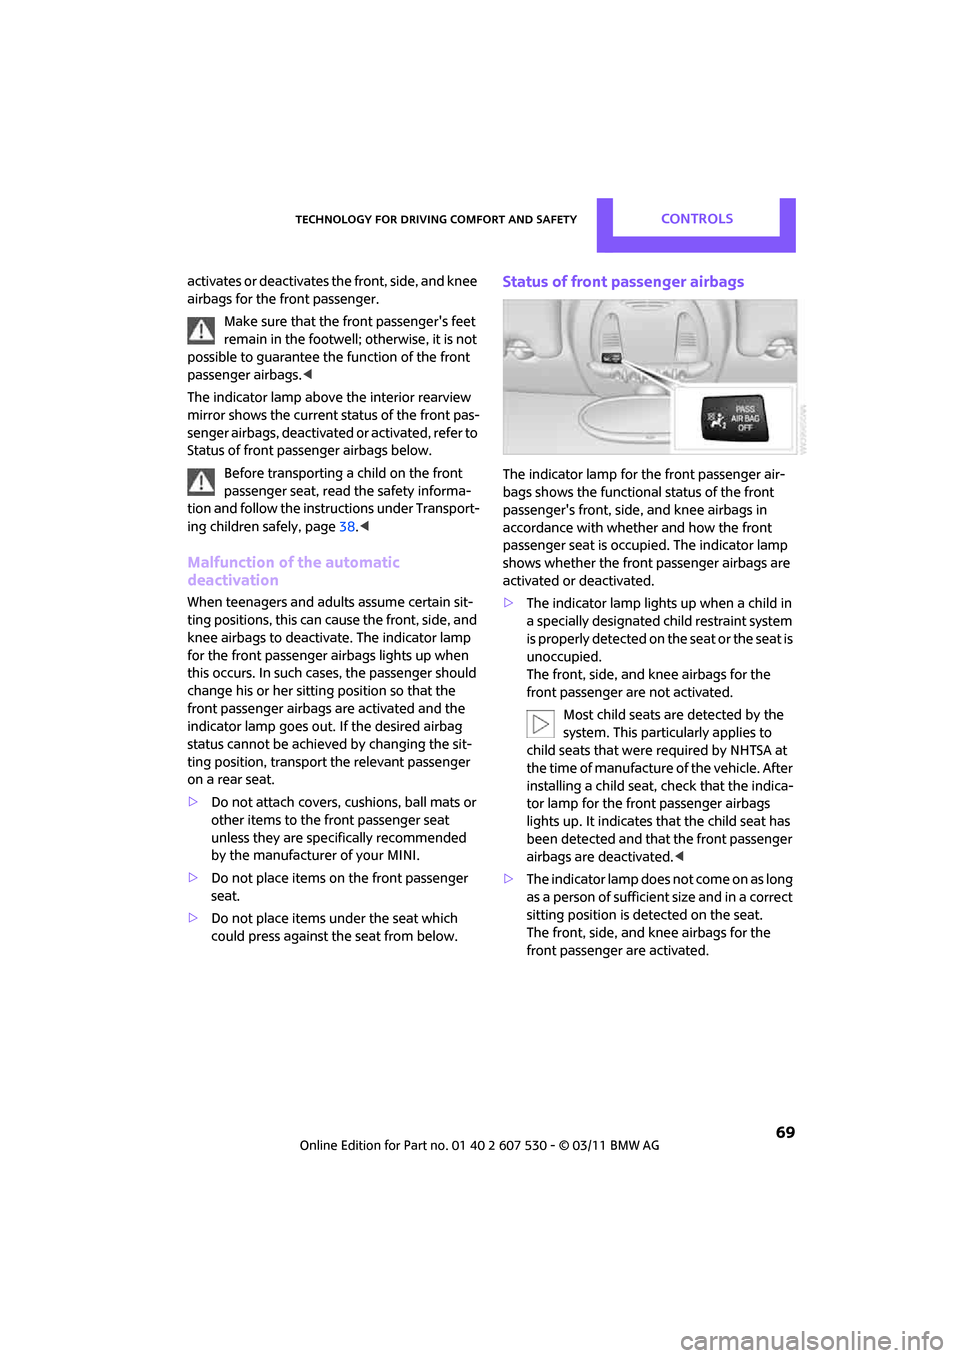
The indicator lamp above the interior rearview
mirror shows the current status of the front pas-
senger airbags, deactivate d or activated, refer to
Status of front passenger airbags below.
Before transporting a child on the front
passenger seat, read the safety informa-
tion and follow the instructions under Transport-
ing children safely, page 38.<
Malfunction of the automatic
deactivation
When teenagers and adul ts assume certain sit-
ting positions, this can cause the front, side, and
knee airbags to deactiva te. The indicator lamp
for the front passenger airbags lights up when
this occurs. In such cases, the passenger should
change his or her sittin g position so that the
front passenger airbags are activated and the
indicator lamp goes out. If the desired airbag
status cannot be achieved by changing the sit-
ting position, transport the relevant passenger
on a rear seat.
> Do not attach covers, cushions, ball mats or
other items to the front passenger seat
unless they are specifically recommended
by the manufacturer of your MINI.
> Do not place items on the front passenger
seat.
> Do not place items un der the seat which
could press against th e seat from below.
Status of front passenger airbags
The indicator lamp for the front passenger air-
bags shows the functional status of the front
passenger's front, side , and knee airbags in
accordance with whether and how the front
passenger seat is occupied. The indicator lamp
shows whether the front passenger airbags are
activated or deactivated.
> The indicator lamp lights up when a child in
a specially designated child restraint system
i s p r o p e r l y d e t e c t e d o n t h e s e a t o r t h e s e a t i s
unoccupied.
The front, side, and knee airbags for the
front passenger are not activated.
Most child seats are detected by the
system. This particularly applies to
child seats that were required by NHTSA at
the time of manufacture of the vehicle. After
installing a child seat, check that the indica-
tor lamp for the front passenger airbags
lights up. It indicates that the child seat has
been detected and that the front passenger
airbags are deactivated. <
> The indicator lamp does not come on as long
as a person of sufficient size and in a correct
sitting position is detected on the seat.
The front, side, and knee airbags for the
front passenger are activated.
Page 187 of 196
Everything from A to ZReference
185
Ignition key position 1, refer to Radio readiness 41
Ignition key position 2, refer to Ignition on 41
Ignition key, refer to Integrated key/remote
control 20
Ignition lock 41
Imprint 2
Incoming call 119
Indicator and warning lamps 13,162
– Tire Pressure Monitor TPM 65
Indicator lighting, refer to Instrument lighting 74
Individual air distribution 78
Individual settings, refer to Personal Profile 20
Inflation pressure monitoring,
refer to Tire Pressure Monitor
TPM 64
Initializing
– Flat Tire Monitor FTM 63
– glass roof, electric 30
Instrument cluster, refer to
Displays 12
Instrument lighting 74
Instrument panel, refer to
Cockpit 10
Instrument panel, refer to
Displays 12
Integrated key 20
Integrated universal remote
control 81
Interior lamps 75
– remote control 23
Interior rearview mirror 36
– automatic dimming feature 37
Interlock 44
Intermittent mode of the wipers 47
Internet page 4J
Jacking points 155
Jets, refer to Window washer
nozzles 48
Jumpering, refer to Jump-starting 158
Jump-starting 158
K
Key Memory, refer to Personal
Profile 20
Key, refer to Keys/remote controls 20
Keyless opening and closing,
refer to Comfort Access 27
Keyless-Go, refer to Comfort Access 27
Keypad dialing 120
Kickdown 44
– automatic transmission with
Steptronic 44
Knock control 129
L
Lamps and bulbs, replacing
bulbs 148
Lamps, refer to Parking lamps/
Low beams 71
Lashing eyes, refer to Securing cargo 96
LATCH child restraint fixing system 39
Leather care 146
LEDs light-emitting diodes 148
Length, refer to Dimensions 177
License plate lamp
– bulb replacement 152
Liftgate 25
– Comfort Access 28
– opening from outside 25
– opening/closing 25
– unlocking with remote control 23 Light
– automatic headlamp
control 71
Light alloy wheels, care 146
Light switch 71
Light-emitting diodes LEDs 148
Lighter 85
– socket 86
Lighting
– lamps and bulbs 148
– of the instruments 74
– of vehicle, refer to Lamps 71
Limit 173
Listening to test scan
– Radio MINI Boost CD 104
Load 95
Load securing equipment, refer to Securing cargo 96
Lock buttons of doors, refer to
Locking 24
Locking
– adjusting confirmation signal 22
– from inside 24
– from outside 22
– without remote control, refer
to Comfort Access 27
Locking and unlocking doors
– confirmation signals 22
– from inside 24
– from outside 21
Longlife oils
– approved motor oils 140
Low beams 71
– automatic 71
– replacing bulb 149
Lower back suppo rt, refer to
Lumbar support 33
Luggage compartment
– doors, refer to Liftgate 25
Lug
gage compartment
partition net, refer to Cargo
net 94
Luggage rack, re fer to Roof-
mounted luggage rack 97