warning light MINI Countryman 2012 (Mini Connected) User Guide
[x] Cancel search | Manufacturer: MINI, Model Year: 2012, Model line: Countryman, Model: MINI Countryman 2012Pages: 259, PDF Size: 3.07 MB
Page 78 of 259

Technology for driving comfort and safetyCONTROLS
77
Run-flat tires
You can continue driving with a damaged tire at
speeds up to 50 mph/80 km/h.If the vehicle is not equipped with run-flat
tires, do not continue driving; continuing
to drive can result in serious accidents. <
Continued driving with a flat tire
When driving with a damaged tire:
1.Avoid sudden braking and steering maneu-
vers.
2. Do not exceed a speed of 50 mph or
80 km/h.
3. At the next opportunity, check the air
pressure in all four tires.
If the inflation pressure is correct in all four
tires, then the Tire Pressure Monitor may not
have been reset. The system must then be
reset.
Possible driving distance with complete loss of
tire inflation pressure:
The distance it is possible to drive depends on
the load and the stress on the vehicle while
driving.
With an average load, it may be possible to drive
for approx. 50 miles/80 km.
When driving with damaged tires, the handling
characteristics change, e. g. the vehicle will skid
sooner when braking, braking distances will be
longer, or self-steering response will change.
Adapt your driving style accordingly. Avoid turn-
ing abruptly and driving over obstacles such as
curbs, potholes, etc.
Since the possible driving distance depends to a
considerable degree on the strain exerted on
the vehicle while driving, it can be shorter or,
with a gentle dr iving style, can also be longer,
depending on the speed, road condition, exter-
nal temperature, vehicle load, etc.
Drive cautiously and do not exceed a
speed of 50 mph/80 km/h.
A loss of tire inflation pressure results in a
change in the handling characteristics, e.g. reduced lane stability during braking, a longer
braking distance and
altered self-steering
properties. <
Vibrations or loud noises while driving can
indicate complete failure of the tire.
Reduce your speed and bring the vehicle to a
stop; otherwise, pieces of tire may come off,
which could result in an accident. Do not con-
tinue driving and contact your MINI dealer. <
Malfunction
The small warning lamp flashes in
yellow and then lights up continuously;
the larger warning lamp lights up in
yellow. On the onboard computer, the
tires are shown in gray and a message appears.
No flat tire can be detected.
Display in the following situations:
> Wheel without TPM electronics is mounted:
If need be, have it checked by your MINI
dealer.
> Malfunction:
Have the system checked
> TPM was unable to complete the resetting
procedure; reset the system again.
The small warning lamp flashes in
yellow and then lights up continuously;
the larger warning lamp lights up in
yellow. On the onboard computer, the
tires are shown in gray and a message appears.
No flat tire can be detected.
Display in the following situation:
> Interference due to sy stems or devices that
use the same radio frequency:
The system automatically reactivates once it
is outside of the field of interference.
Message for unsuccessful system reset
Yellow warning lamp comes on. A
message appears on the onboard
computer.
Online Edition for Part no. 01 40 2 914 849 - \251 07/12 BMW AG
Page 80 of 259
Technology for driving comfort and safetyCONTROLS
79
Protective action
Observe the instructions on page37 to
ensure the best possible personal protec-
tion. <
The front airbags help protect the driver and
front passenger by responding to frontal
impacts in which safety belts alone cannot pro-
vide adequate restraint. When needed, the head
and side airbags help provide protection in the
event of side impact. Th e relevant side airbag
supports the side upper body area. The head air
bag supports the head.
The airbags are designed to not be triggered in
every type of collision, e.g. not in minor acci-
dents, certain rollover si tuations or rear impacts.
Do not apply adhesive materials to the
cover panels of the airbags, cover them or
modify them in any other way.
Keep the dashboard and window on the passen-
g e r s i d e f r e e f r o m o b s t r u c t i o n , i . e . d o n o t c o v e r i t
with adhesive film or coverings, and do not affix
any holders such as for a navigation device or a
mobile phone.
Do not attach seat covers, cushions or other
objects not specifically approved for seats with
integral side airbags to the front seats. Do not
hang items of clothing such as coats or jackets
over the backrests. Do not attempt to remove
the airbag retention system from the vehicle. Do
not modify the individual components of the
system or its wiring in any way. This includes the
upholstery in the center of the steering wheel,
on the instrument panel, the doors, and the roof
pillars as well as the side s of the headliner. Do
not attempt to remove or dismantle the steering
wheel. <
Do not touch the individual components
immediately after the system has been
triggered, because there is a danger of burns.
Have the testing, repair , removal, and disposal
of airbag generators executed only by your MINI
dealer or a workshop that has the required
explosives licenses.
Otherwise, unprofessional attempts to service
the system could lead to failure in an emergency or undesired airbag activation, either of which
could result in personal injury.
<
Warning notices and in formation about the
airbags can also be found on the sun visors.
Automatic deactivation of the front
passenger airbags
The presence of a passenger in the front passen-
ger seat is detected by measuring the resistance
of the human body. The system correspondingly
activates or deactivates the front, side, and knee
airbags for the front passenger.
Make sure that the front passenger's feet
remain in the footwell; otherwise, it is not
possible to guarantee the function of the front
passenger airbags. <
The indicator lamp above the interior rearview
mirror shows the current st atus of the front pas-
senger airbags, deactivate d or activated, refer to
Status of front passenger airbags below.
Before transporting a child on the front
passenger seat, read the safety informa-
tion and follow the instructions under Transport-
ing children safely, page 44.<
Malfunction of the automatic
deactivation
When teenagers and adul ts assume certain sit-
ting positions, this can cause the front, side, and
knee airbags to deactivate. The indicator lamp
for the front passenger airbags lights up when
this occurs. In such case s, the passenger should
change his or her sittin g position so that the
front passenger airbags are activated and the
indicator lamp goes out. If the desired airbag
status cannot be achieved by changing the sit-
ting position, transport the relevant passenger
on a rear seat.
> Do not attach covers, cushions, ball mats or
other items to the front passenger seat
unless they are specifically recommended
by the manufacturer of your MINI.
Online Edition for Part no. 01 40 2 914 849 - \251 07/12 BMW AG
Page 81 of 259
CONTROLSTechnology for driving comfort and safety
80
>Do not place items on the front passenger
seat.
> Do not place items under the seat which
could press against the seat from below.
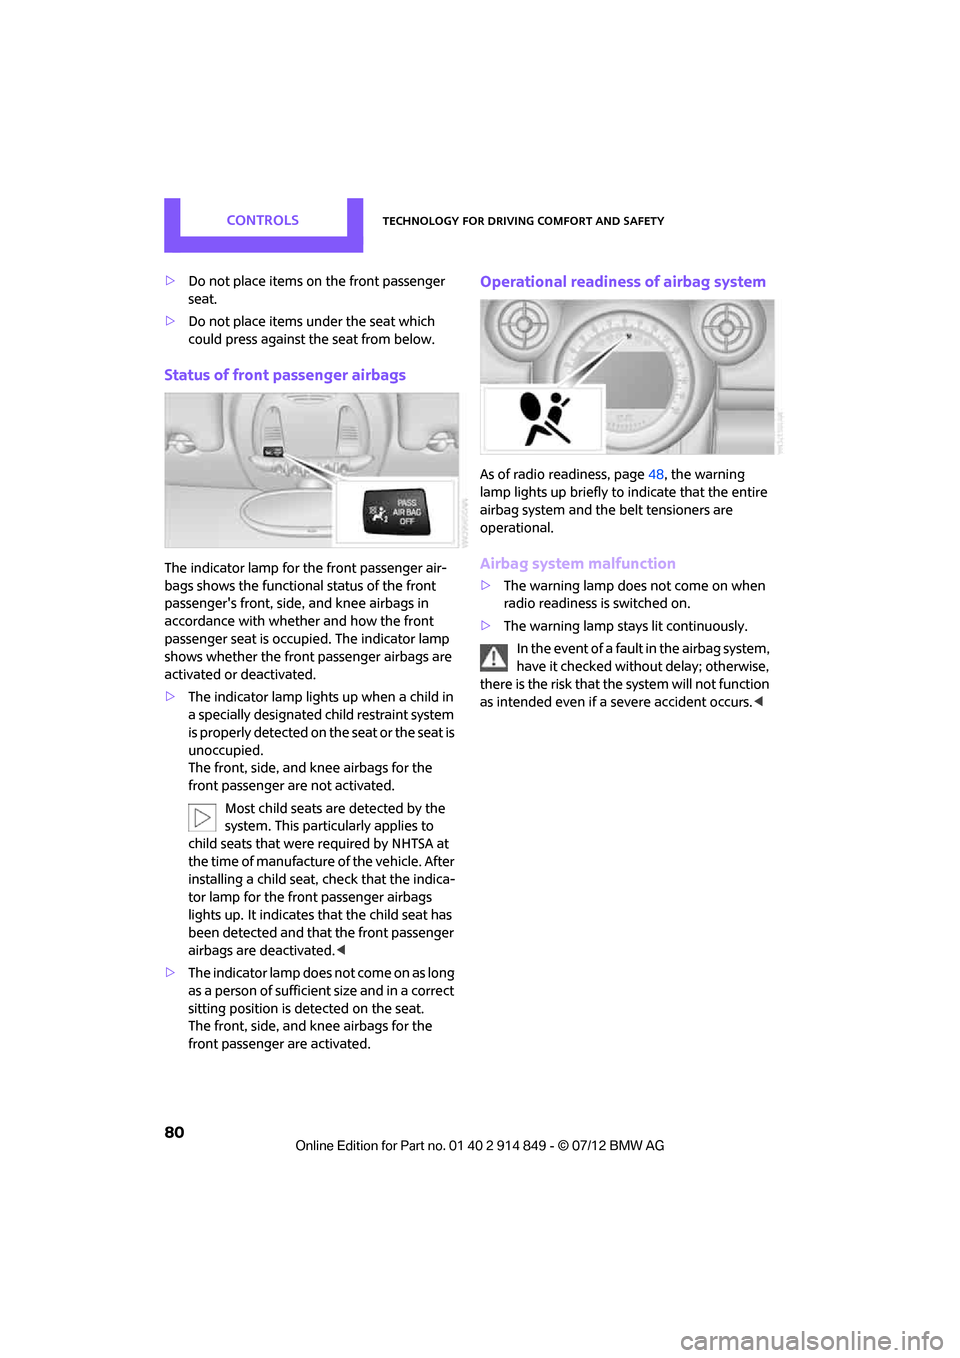
Status of front passenger airbags
The indicator lamp for the front passenger air-
bags shows the functional status of the front
passenger's front, side, and knee airbags in
accordance with whether and how the front
passenger seat is occupied. The indicator lamp
shows whether the front passenger airbags are
activated or deactivated.
> The indicator lamp lights up when a child in
a specially designated child restraint system
is properly detected on the seat or the seat is
unoccupied.
The front, side, and knee airbags for the
front passenger are not activated.
Most child seats are detected by the
system. This particularly applies to
child seats that were required by NHTSA at
the time of manufacture of the vehicle. After
installing a child seat, check that the indica-
tor lamp for the front passenger airbags
lights up. It indicates that the child seat has
been detected and that the front passenger
airbags are deactivated. <
> T h e i n d i c a t o r l a m p d o e s n o t c o m e o n a s l o n g
as a person of sufficient size and in a correct
sitting position is detected on the seat.
The front, side, and knee airbags for the
front passenger are activated.
Operational readines s of airbag system
As of radio readiness, page 48, the warning
lamp lights up briefly to indicate that the entire
airbag system and the belt tensioners are
operational.
Airbag system malfunction
> The warning lamp does not come on when
radio readiness is switched on.
> The warning lamp stays lit continuously.
In the event of a fault in the airbag system,
have it checked without delay; otherwise,
there is the risk that the system will not function
as intended even if a severe accident occurs. <
Online Edition for Part no. 01 40 2 914 849 - \251 07/12 BMW AG
Page 211 of 259
MOBILITYMaintenance
210
Socket for On-Board
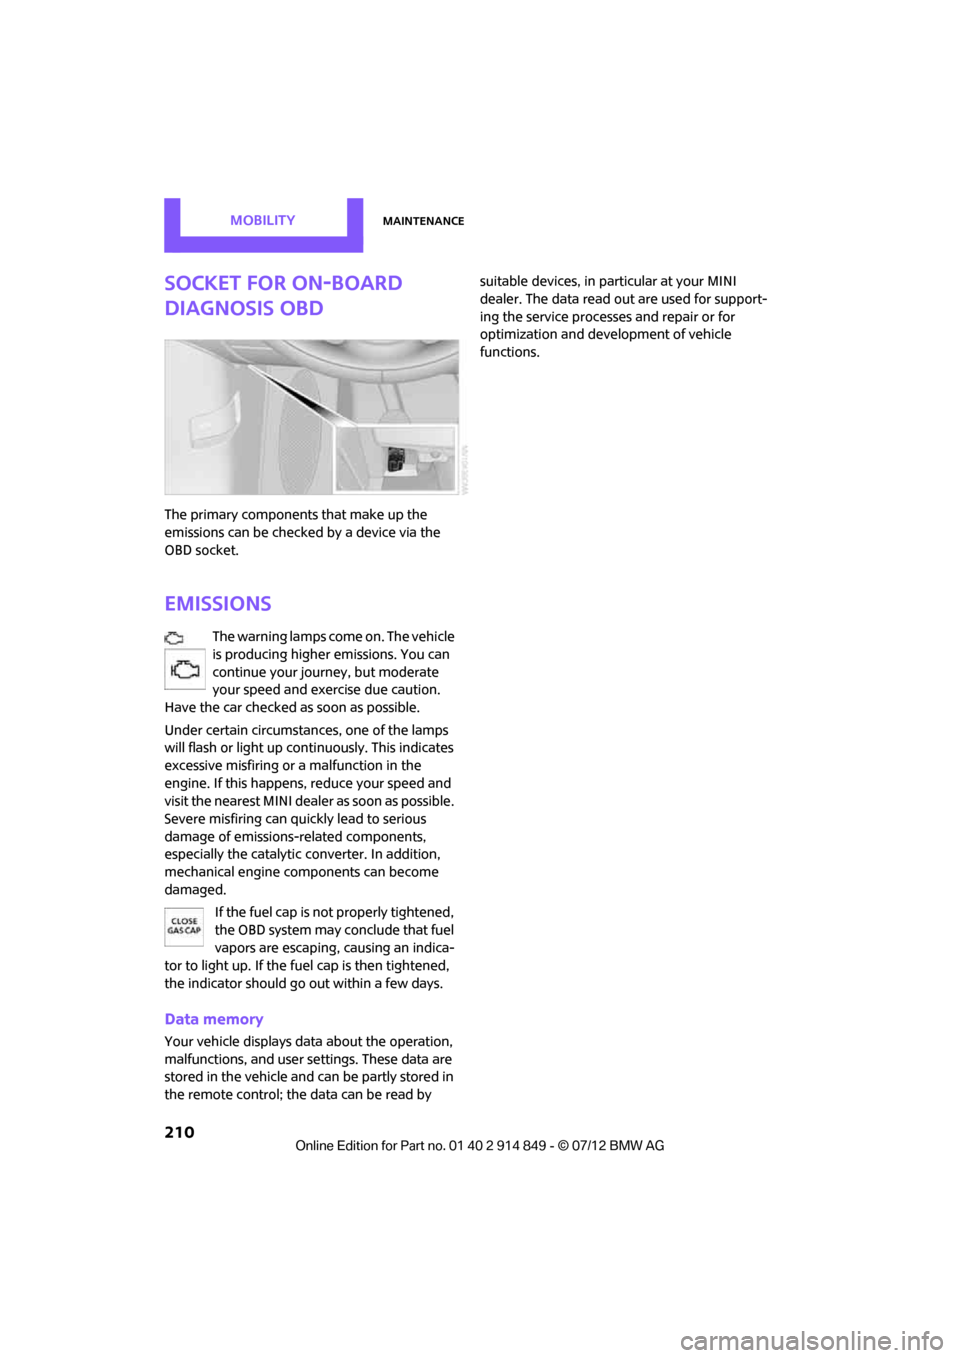
Diagnosis OBD
The primary components that make up the
emissions can be checked by a device via the
OBD socket.
Emissions
The warning lamps come on. The vehicle
is producing higher emissions. You can
continue your journey, but moderate
your speed and exercise due caution.
Have the car checked as soon as possible.
Under certain circumstances, one of the lamps
will flash or light up cont inuously. This indicates
excessive misfiring or a malfunction in the
engine. If this happens, reduce your speed and
visit the nearest MINI dealer as soon as possible.
Severe misfiring can quickly lead to serious
damage of emissions-related components,
especially the catalytic converter. In addition,
mechanical engine components can become
damaged.
If the fuel cap is not properly tightened,
the OBD system may conclude that fuel
vapors are escaping, causing an indica-
tor to light up. If the fuel cap is then tightened,
the indicator should go out within a few days.
Data memory
Your vehicle displays da ta about the operation,
malfunctions, and user settings. These data are
stored in the vehicle and can be partly stored in
the remote control; the data can be read by suitable devices, in pa
rticular at your MINI
dealer. The data read out are used for support-
ing the service processe s and repair or for
optimization and development of vehicle
functions.
Online Edition for Part no. 01 40 2 914 849 - \251 07/12 BMW AG
Page 220 of 259

Replacing componentsMOBILITY
219
Changing
All bulbs are integrated in a central bulb holder.
1.Switch off the light and remove the infrared
remote control from the ignition lock.
2. Push the cover panel out from the rear of the
cargo area side trim panel and remove it.
3. Open emergency release for the fuel filler
flap, see page 194, and then push to the
side with the foam insert.
Ensure that the emergency release is not
damaged.
4. Disengage the bulb holder by pressing down
on the clamping clip, arrow 1.
5. Take out bulb holder and pull out cable,
arrow 2.
6. Exerting gentle pressure, turn bulb to the left
and remove.
7. To insert the new bulb and install the bulb
holder, proceed in reverse order. Ensure that
the lamp holder engages in all the fasteners.
8. Put foam insert in its original position and
install the emergency fuel flap release.
9. Install cover.
License plate lamps
5watt bulb, C5W
1.Using a screwdriver, push the lamp to the
left in the tab of the lamp housing, arrow 1.
2. Remove the lamp, arrow 2.
3. Replace the bulb.
4. Insert the lamp.
Center brake lamp
This lamp uses LED technology for operation. In
the event of a malfunction, contact your MINI
dealer or a workshop that has specially trained
personnel working in accordance with the
specifications of your MINI manufacturer.
Repairing a flat tire
Safety measures in the event of a break-
down:
Park the vehicle as far as possible from moving
traffic and switch on the hazard warning
flashers.
Turn the steering wheel until the front wheels
are in the straight-ahead position and engage
the steering wheel lock. Engage the parking
brake and shift into 1st or reverse gear or place
the selector lever in position P.
All passengers should be outside the vehicle and
in a safe place, e.g. behind a guardrail.
Erect a warning triangle or warning flasher at the
appropriate distance if necessary. Comply with
all safety guidelines and regulations. <
Online Edition for Part no. 01 40 2 914 849 - \251 07/12 BMW AG
Page 225 of 259

MOBILITYReplacing components
224
Power failure
After a temporary power loss, some equipment
may not be fully functional and may require
initialization. Individual se ttings are also lost and
must be reprogrammed:
> Time and date
These values must be updated, page 64.
> Radio
In some cases, statio ns may have to be
stored again, page 139.
> Onboard monitor
Operability must be waited for, page114.
> Glass sunroof, electric
It may only be possible to tilt the sunroof, if
applicable. The system must be initialized.
Contact your near est MINI dealer.
Indicator and warning lamps
Lights up in red:
Battery is no longer being charged.
Alternator malfunction.
Switch off all unnecessary electrical consumers.
Have the battery checked without delay. Lights up in yellow:
Battery charge level very low, battery
aged, or battery not securely con-
nected.
Charge it by taking a long er drive or by using an
external charger. If the display appears again,
have the battery checked as soon as possible.
Fuses
Do not attempt to repair a blown fuse or
replace it with a fuse of a different color or
Ampere rating. To do this could cause a fire in
the vehicle resulting from a circuit overload.
Have fuses replaced by your MINI dealer. <
A fuse assignment diag ram is located on the
inside of the fuse box cover panels.
In the engine compartment
Opening the cover
Press the latch.
In the vehicle interior
On the right side of the footwell.
Opening the cover
Press out at the recess.
Online Edition for Part no. 01 40 2 914 849 - \251 07/12 BMW AG
Page 228 of 259
Giving and receiving assistanceMOBILITY
227
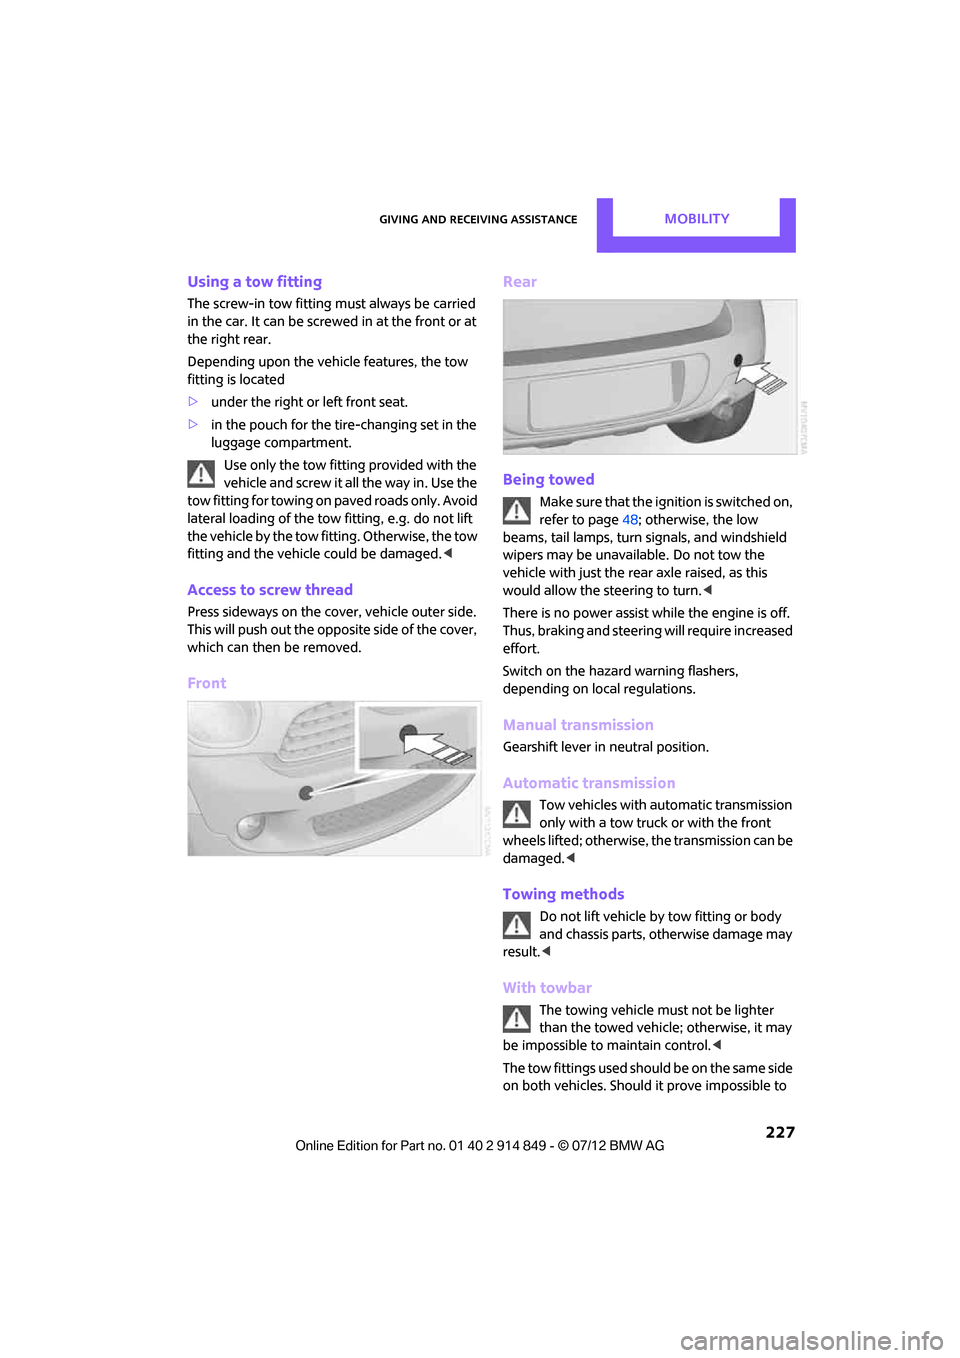
Using a tow fitting
The screw-in tow fitting must always be carried
in the car. It can be screwed in at the front or at
the right rear.
Depending upon the vehicle features, the tow
fitting is located
>under the right or left front seat.
> in the pouch for the tire-changing set in the
luggage compartment.
Use only the tow fitting provided with the
vehicle and screw it all the way in. Use the
tow fitting for towing on paved roads only. Avoid
lateral loading of the tow fitting, e.g. do not lift
the vehicle by the tow fitting. Otherwise, the tow
fitting and the vehicle could be damaged. <
Access to screw thread
Press sideways on the cover, vehicle outer side.
This will push out the oppo site side of the cover,
which can then be removed.
Front Rear
Being towed
Make sure that the ignition is switched on,
refer to page
48; otherwise, the low
beams, tail lamps, turn signals, and windshield
wipers may be unavailable. Do not tow the
vehicle with just the rear axle raised, as this
would allow the steering to turn. <
There is no power assist while the engine is off.
Thus, braking and steering will require increased
effort.
Switch on the hazard warning flashers,
depending on local regulations.
Manual transmission
Gearshift lever in neutral position.
Automatic transmission
Tow vehicles with automatic transmission
only with a tow truck or with the front
wheels lifted; otherwise, the transmission can be
damaged. <
Towing methods
Do not lift vehicle by tow fitting or body
and chassis parts, otherwise damage may
result. <
With towbar
The towing vehicle must not be lighter
than the towed vehicle; otherwise, it may
be impossible to maintain control. <
The tow fittings used should be on the same side
on both vehicles. Should it prove impossible to
Online Edition for Part no. 01 40 2 914 849 - \251 07/12 BMW AG
Page 245 of 259
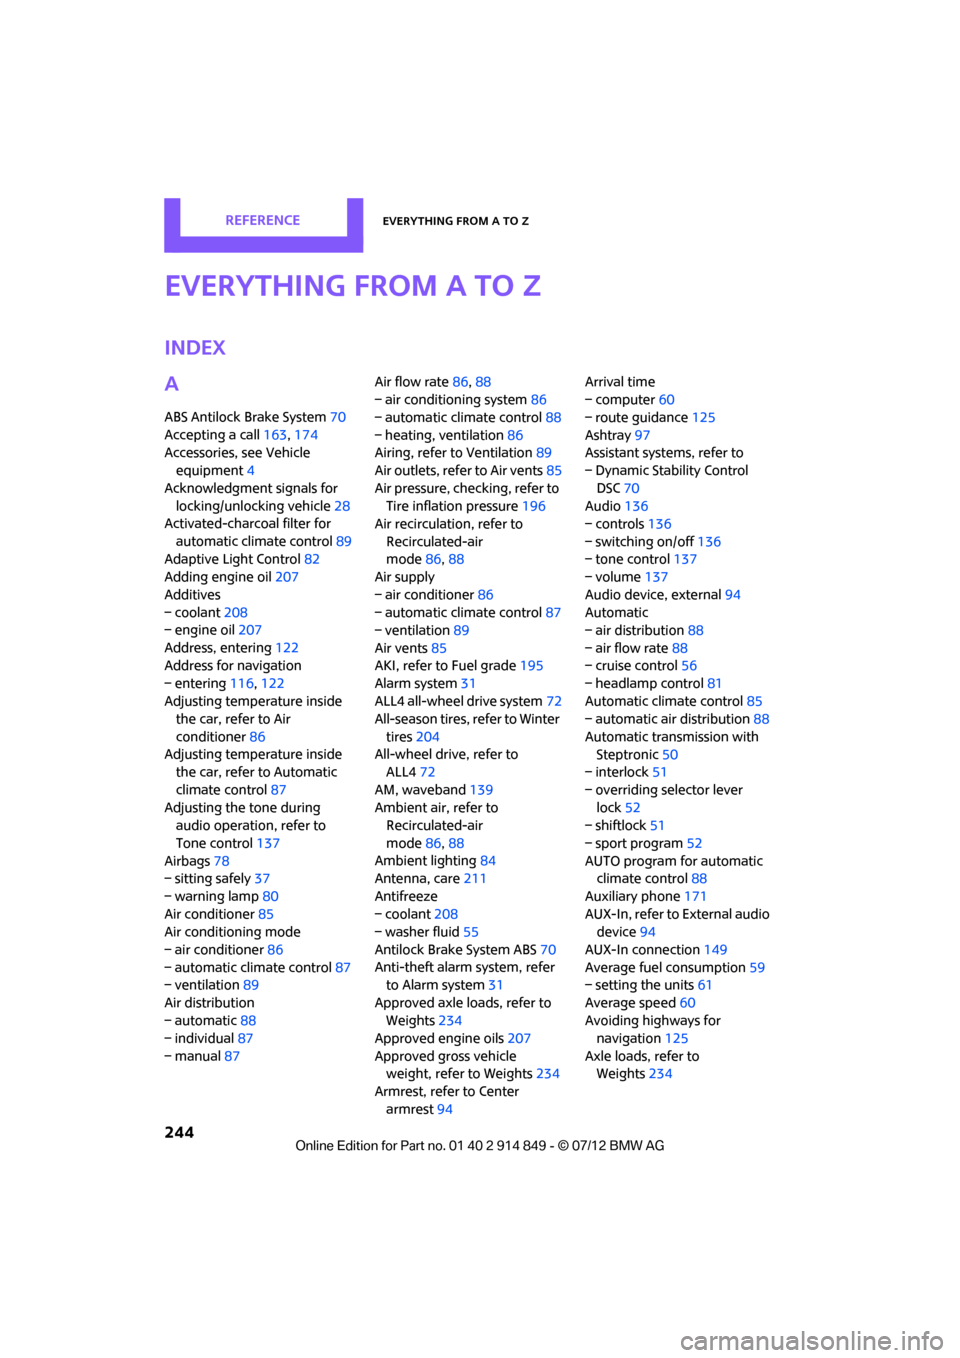
244
REFERENCEEverything from A to Z
Everything from A to Z
Index
A
ABS Antilock Brake System70
Accepting a call 163,174
Accessories, see Vehicle equipment 4
Acknowledgment signals for locking/unlocking vehicle 28
Activated-charcoa l filter for
automatic climate control 89
Adaptive Light Control 82
Adding engine oil 207
Additives
– coolant 208
– engine oil 207
Address, entering 122
Address for navigation
– entering 116,122
Adjusting temperature inside the car, refer to Air
conditioner 86
Adjusting temperature inside the car, refer to Automatic
climate control 87
Adjusting the tone during audio operation, refer to
Tone control 137
Airbags 78
– sitting safely 37
– warning lamp 80
Air conditioner 85
Air conditioning mode
– air conditioner 86
– automatic cl imate control87
– ventilation 89
Air distribution
– automatic 88
– individual 87
– manual 87 Air flow rate
86,88
– air conditioning system 86
– automatic climate control 88
– heating, ventilation 86
Airing, refer to Ventilation89
Air outlets, refe r to Air vents85
Air pressure, checking, refer to Tire inflation pressure 196
Air recirculation, refer to
Recirculated-air
mode 86,88
Air supply
– air conditioner 86
– automatic climate control 87
– ventilation 89
Air vents 85
AKI, refer to Fuel grade 195
Alarm system 31
ALL4 all-w h
ee
l drive system 72
All-season tires, refer to Winter
tires 204
All-wheel drive, refer to ALL4 72
AM, waveband 139
Ambient air, refer to Recirculated-air
mode 86,88
Ambient lighting 84
Antenna, care 211
Antifreeze
– coolant 208
– washer fluid 55
Antilock Brake System ABS 70
Anti-theft alarm system, refer to Alarm system 31
Approved axle loads, refer to Weights 234
Approved engine oils 207
Approved gross vehicle weight, refer to Weights 234
Armrest, refer to Center
armrest 94 Arrival time
– computer
60
– route guidance 125
Ashtray 97
Assistant systems, refer to
– Dynamic Stability Control
DSC 70
Audio 136
– controls 136
– switching on/off 136
– tone control 137
– volume 137
Audio device, external 94
Automatic
– air distribution 88
– air flow rate 88
– cruise control 56
– headlamp control 81
Automatic climate control 85
– automatic air distribution 88
Automatic transmission with Steptronic 50
– interlock 51
– overriding selector lever lock 52
– shiftlock 51
– sport program 52
AUTO program for automatic climate control 88
Auxiliary phone 171
AUX-In, refer to External audio device 94
AUX-In connection 149
Average fuel consumption 59
– sett in
g the
units 61
Average speed 60
Avoiding highways for navigation 125
Axle loads, refer to Weights 234
Online Edition for Part no. 01 40 2 914 849 - \251 07/12 BMW AG
Page 246 of 259
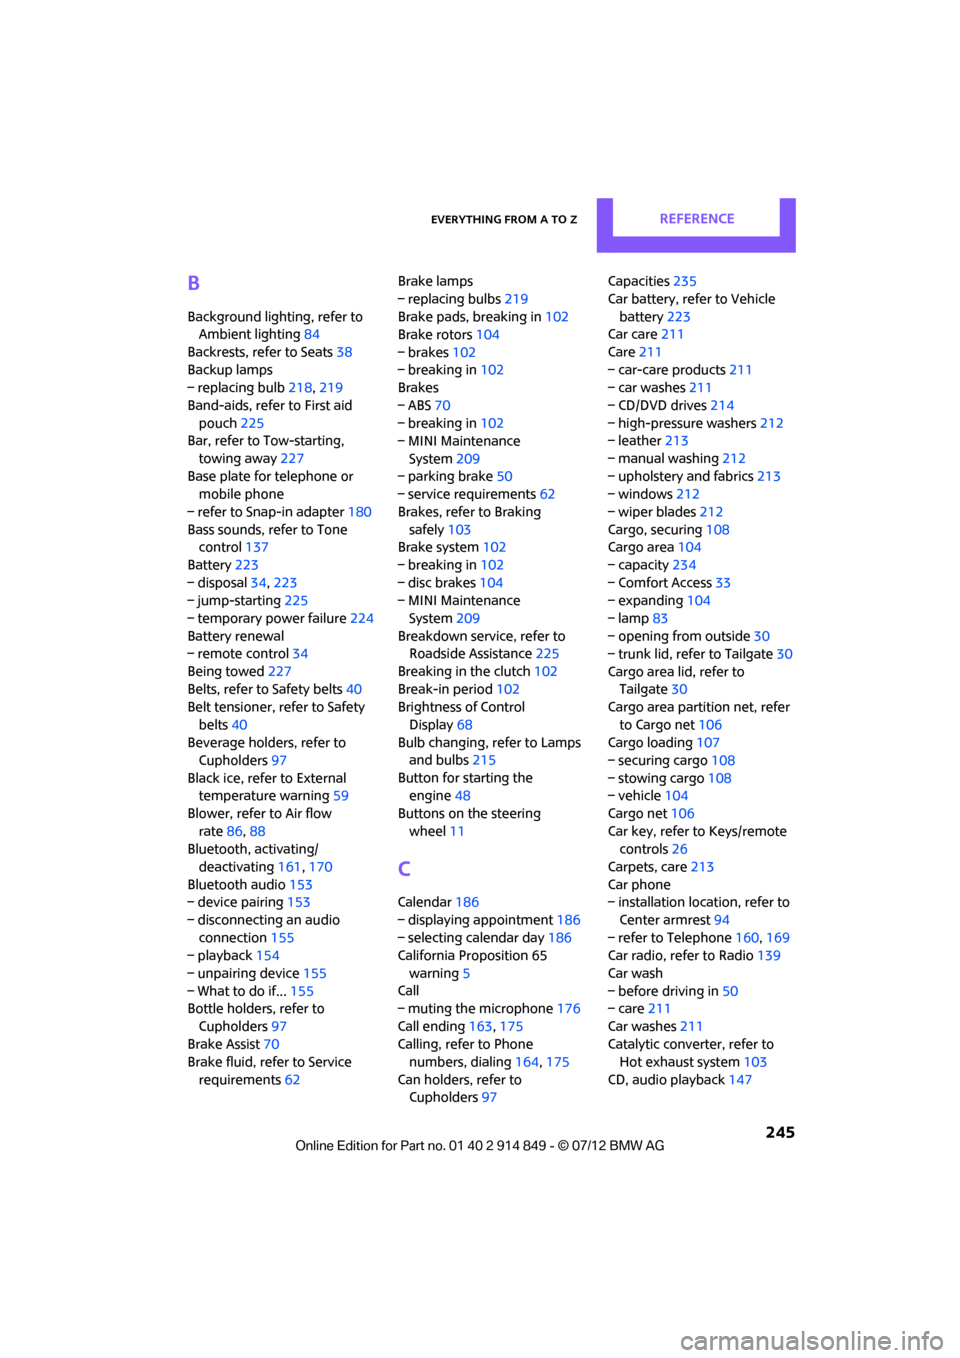
Everything from A to ZREFERENCE
245
B
Background lighting, refer to
Ambient lighting 84
Backrests, refer to Seats 38
Backup lamps
– replacing bulb 218,219
Band-aids, refer to First aid pouch 225
Bar, refer to Tow-starting,
towing away 227
Base plate for telephone or mobile phone
– refer to Snap-in adapter 180
Bass sounds, refer to Tone control 137
Battery 223
– disposal 34,223
– jump-starting 225
– temporary power failure 224
Battery renewal
– remote control 34
Being towed 227
Belts, refer to Safety belts 40
Belt tensioner, refer to Safety
belts 40
Beverage holders, refer to Cupholders 97
Black ice, refer to External temperature warning 59
Blower, refer to Air flow rate 86,88
Bluetooth, activating/
deactivating 161,170
Bluetooth audio 153
– device pairing 153
– disconnecting an audio connection 155
– playback 154
– unpairing device 155
– What to do if... 155
Bottle holders, refer to
Cupholders 97
Brake Assist 70
Brake fluid, refer to Service
requirements 62 Brake lamps
– replacing bulbs
219
Brake pads, breaking in 102
Brake rotors 104
– brakes 102
– breaking in 102
Brakes
– ABS 70
– breaking in 102
– MINI Maintenance
System 209
– parking brake 50
– service requirements 62
Br akes,
refer to Braking
safely 103
Brake system 102
– breaking in 102
– disc brakes 104
– MINI Maintenance
System 209
Breakdown service, refer to Roadside Assistance 225
Breaking in the clutch 102
Break-in period 102
Brightness of Control
Display 68
Bulb changing, refer to Lamps and bulbs 215
Button for starting the engine 48
Buttons on the steering wheel 11
C
Calendar 186
– displaying appointment 186
– selecting calendar day 186
California Proposition 65
warning 5
Call
– muting the microphone 176
Call ending 163,175
Calling, refer to Phone numbers, dialing 164,175
Can holders, refer to Cupholders 97 Capacities
235
Car battery, refer to Vehicle battery 223
Car care 211
Care 211
– car-care products 211
– car washes 211
– CD/DVD drives 214
– high-pressure washers 212
– leather 213
– manual washing 212
– upholstery and fabrics 213
– windows 212
– wiper blades 212
Cargo, securing 108
Cargo area 104
– capacity 234
– Comfort Access 33
– expanding 104
– lamp 83
– opening from outside 30
– trunk lid, refer to Tailgate 30
Cargo area lid, refer to Tailgate 30
Cargo area partition net, refer
to Cargo net 106
Cargo loading 107
– securing cargo 108
– stowing cargo 108
– vehicle 104
Cargo net 106
Car key, refer to Keys/remote controls 26
Carpets, care 213
Car phone
– installation location, refer to
Center armrest 94
– refer to Telephone 160,169
Car radio, refer to Radio 139
Car wash
– before driving in 50
– care 211
Car washes 211
Cataly tic convert
er, refer to
Hot exhaust system 103
CD, audio playback 147
Online Edition for Part no. 01 40 2 914 849 - \251 07/12 BMW AG
Page 248 of 259
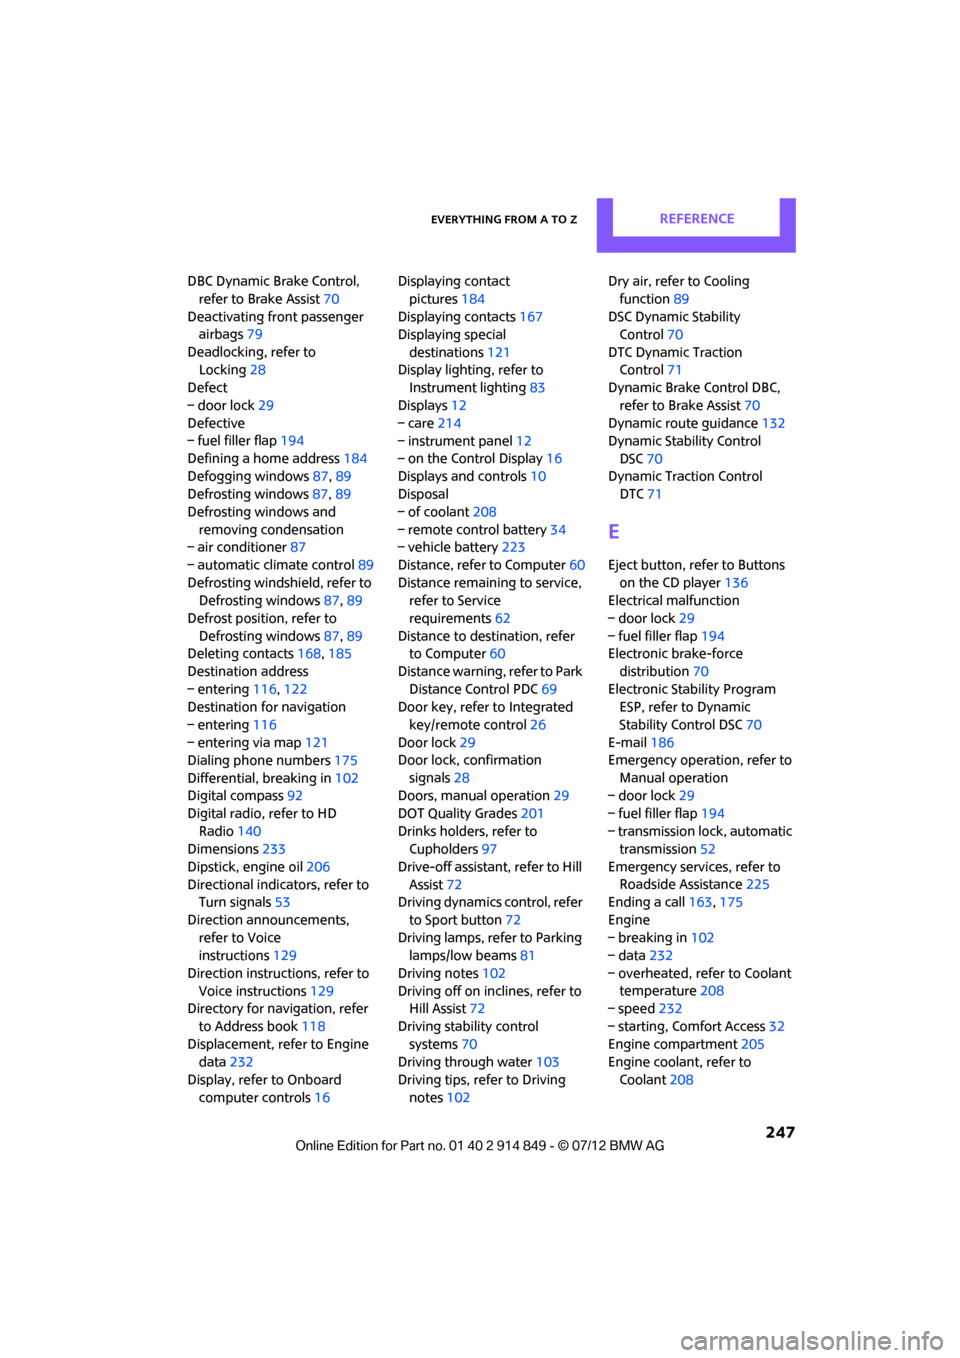
Everything from A to ZREFERENCE
247
DBC Dynamic Brake Control, refer to Brake Assist 70
Deactivating front passenger airbags 79
Deadlocking, refer to Locking 28
Defect
– door lock 29
Defective
– fuel filler flap 194
Defining a home address 184
Defogging windows 87,89
Defrosting windows 87,89
Defrosting windows and removing condensation
– air conditioner 87
– automatic climate control 89
Defrosting windshield, refer to Defrosting windows 87,89
Defrost position, refer to Defrosting windows 87,89
Deleting contacts 168,185
Destination address
– entering 116,122
Destination for navigation
– entering 116
– entering via map 121
Dialing phone numbers 175
Differential, breaking in 102
Digital compass 92
Digital radio, refer to HD Radio 140
Dimensions 233
Dipstick, engine oil 206
Directional indicators, refer to Turn signals 53
Direction announcements, refer to Voice
instructions 129
Direction instructions, refer to Voice instructions 129
Directory for navigation, refer
to Address book 118
Displacement, refer to Engine data 232
Display, refer to Onboard computer controls 16Displaying contact
pictures 184
Displaying contacts 167
Displaying special
destinations 121
Display lighting, refer to Instrument lighting 83
Displays 12
– care 214
– instrument panel 12
– on
th
e Control Display 16
Displays and controls 10
Disposal
– of coolant 208
– remote control battery 34
– vehicle battery 223
Distance, refe r to Computer 60
Distance remaining to service, refer to Service
requirements 62
Distance to dest ination, refer
to Computer 60
Distance warning, refer to Park Distance Control PDC 69
Door key, refer to Integrated
key/remote control 26
Door lock 29
Door lock, confirmation
signals 28
Doors, manual operation 29
DOT Quality Grades 201
Drinks holders, refer to Cupholders 97
Drive-off assistant, refer to Hill
Assist 72
Driving dynamics control, refer
to Sport button 72
Driving lamps, refer to Parking lamps/low beams 81
Driving notes 102
Driving off on inclines, refer to Hill Assist 72
Driving stability control systems 70
Driving through water 103
Driving tips, refer to Driving notes 102 Dry air, refer to Cooling
function 89
DSC Dynamic Stability Control 70
DTC Dynamic Traction Control 71
Dynamic Brake Control DBC,
refer to Brake Assist 70
Dynamic route guidance 132
Dynamic Stability Control
DSC 70
Dynamic Traction Control DTC 71
E
Eject button, refer to Buttons
on the CD player 136
Electrical malfunction
– door lock 29
– fuel filler flap 194
Electronic brake-force
distribution 70
Electronic Stability Program ESP, refer to Dynamic
Stability Control DSC 70
E-mail 186
Emergency operation, refer to
Manual operation
– door lock 29
– fuel filler flap 194
– transmission lock, automatic transmission 52
Emergency services, refer to Roadside Assistance 225
Ending a call 163,175
Engine
– breaking in 102
– data 232
– overheated, refer to Coolant temperature 208
– speed 232
– starting, Comfort Access 32
Engine compartment 205
Engine coolant, refer to
Coolant 208
Online Edition for Part no. 01 40 2 914 849 - \251 07/12 BMW AG