rear view mirror MINI Countryman 2012 Owner's Manual (Mini Connected)
[x] Cancel search | Manufacturer: MINI, Model Year: 2012, Model line: Countryman, Model: MINI Countryman 2012Pages: 259, PDF Size: 3.07 MB
Page 22 of 259
Voice activation systemAT A GLANCE
21
Voice activation system
Vehicle equipment
In this chapter, all production, country, and
optional equipment that is offered in the model
range is described. Equipment is also described
that is not available because of, for example,
selected options or count ry version. This also
applies to safety related functions and systems.
The concept
> By using the voice activation system, most of
the functions that are displayed on the
Control Display can be operated via voice
commands. The system supports the entry
process by means of announcements.
> Functions that can only be used while the
vehicle is not moving cannot be operated via
the voice activation system.
> The system includes a special microphone in
the vicinity of the rearview mirror.
Prerequisite
So that voice commands can be identified, set a
language on the Control Display that is sup-
ported by the voice activation system.
To set the language, see page 67.
Symbols in the Owner's Manual
Saying commands
Activating voice activation system
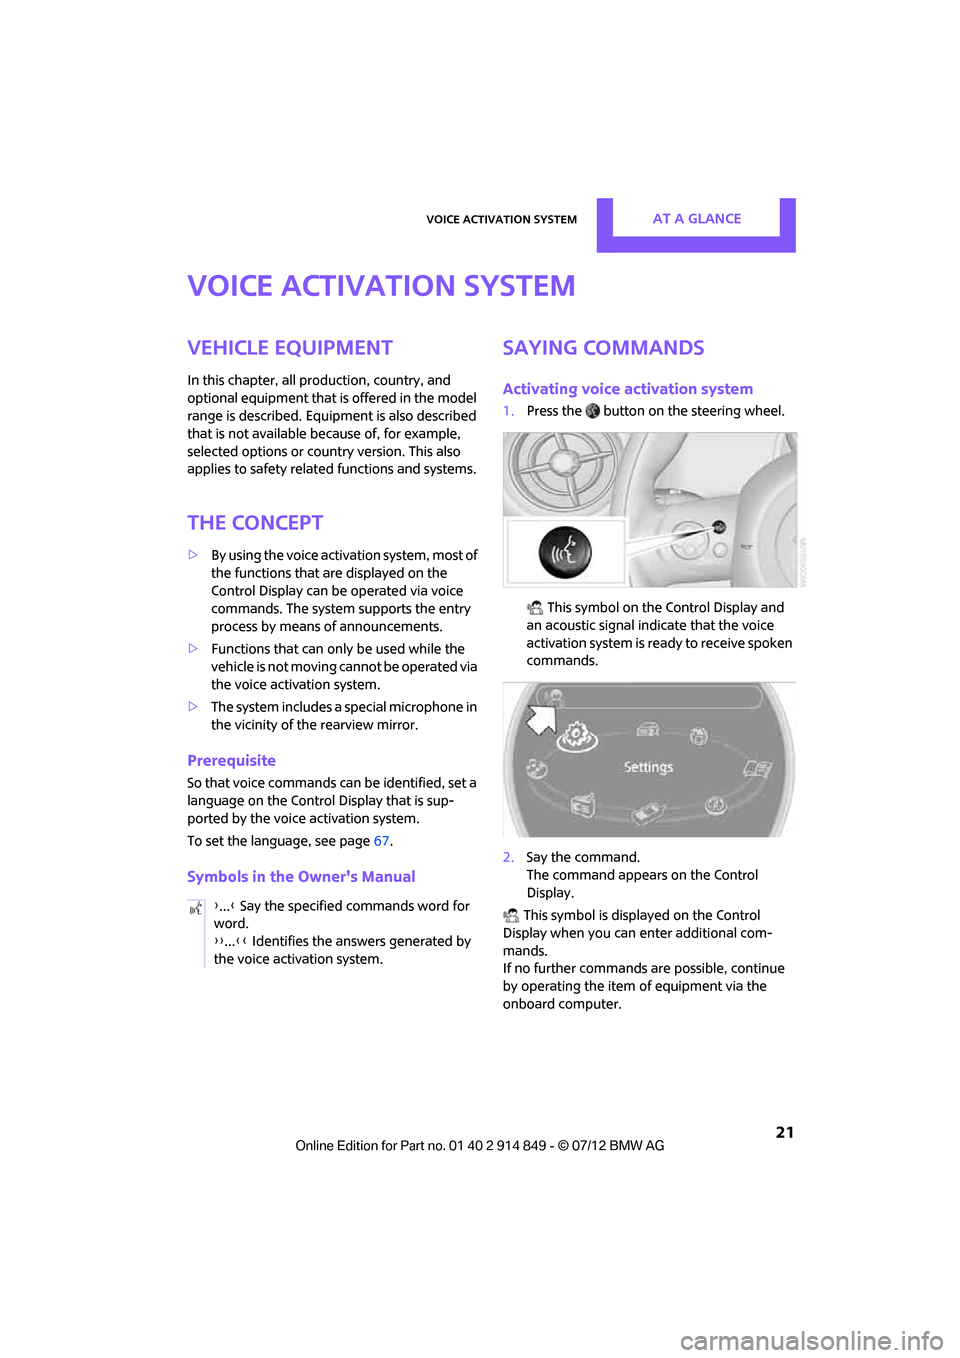
1.Press the button on the steering wheel.
This symbol on the Control Display and
an acoustic signal indicate that the voice
activation system is ready to receive spoken
commands.
2. Say the command.
The command appears on the Control
Display.
This symbol is displayed on the Control
Display when you can enter additional com-
mands.
If no further commands are possible, continue
by operating the item of equipment via the
onboard computer.
{
...} Say the specified commands word for
word.
{{ ...}} Identifies the answers generated by
the voice activation system.
Online Edition for Part no. 01 40 2 914 849 - \251 07/12 BMW AG
Page 44 of 259
AdjustmentsCONTROLS
43
Automatic heating
At external temperatures below a certain limit,
both exterior mirrors are automatically heated
while the engine is running or the ignition
switched on.
Interior rearview mirror
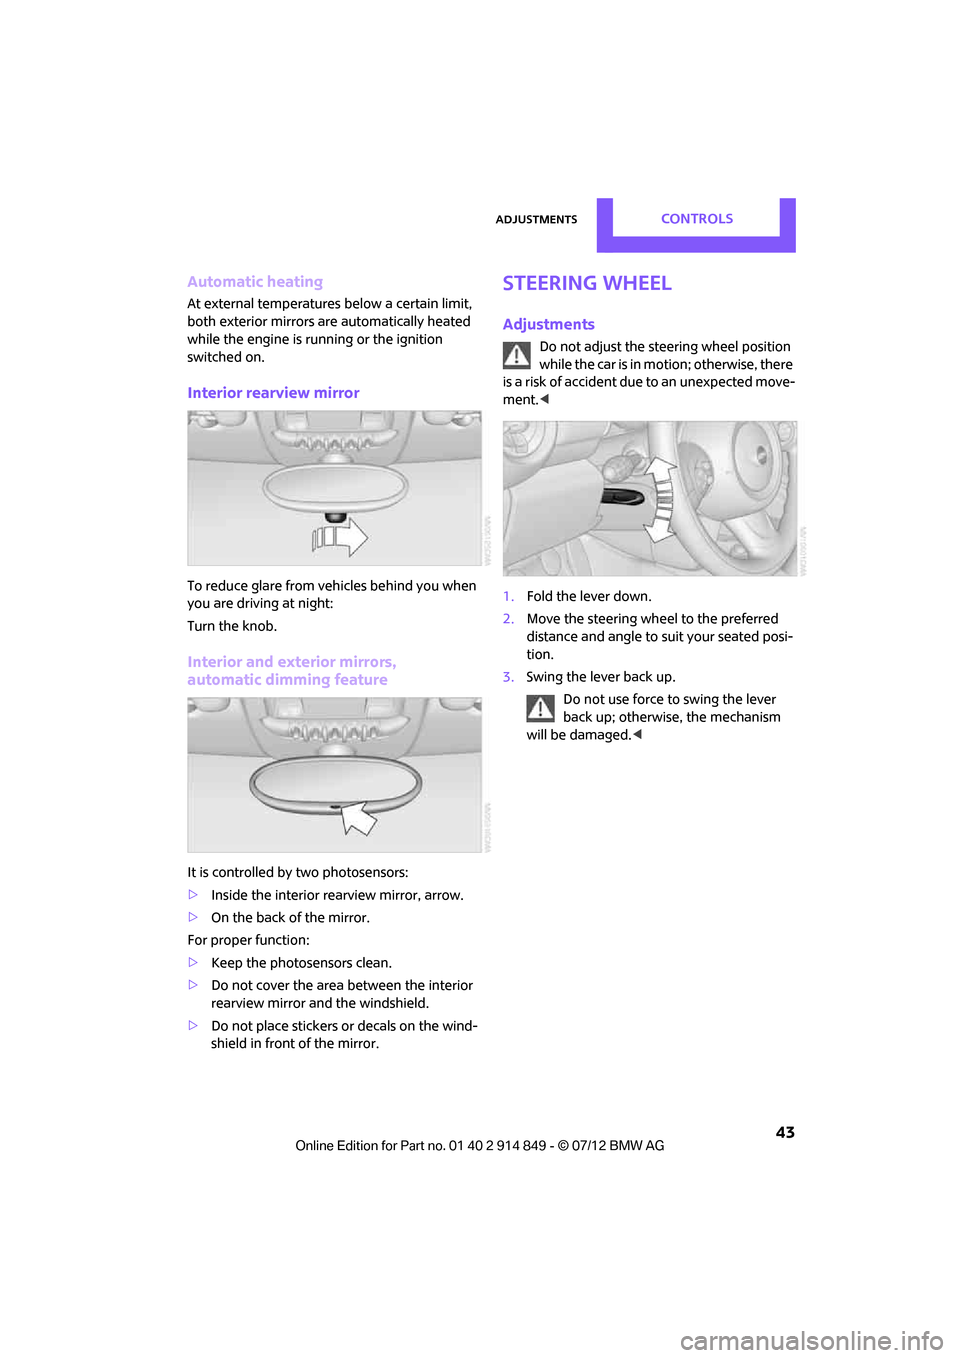
To reduce glare from vehicles behind you when
you are driving at night:
Turn the knob.
Interior and exterior mirrors,
automatic dimming feature
It is controlled by two photosensors:
> Inside the interior rearview mirror, arrow.
> On the back of the mirror.
For proper function:
> Keep the photosensors clean.
> Do not cover the area between the interior
rearview mirror and the windshield.
> Do not place stickers or decals on the wind-
shield in front of the mirror.
Steering wheel
Adjustments
Do not adjust the steering wheel position
while the car is in motion; otherwise, there
is a risk of accident du e to an unexpected move-
ment. <
1. Fold the lever down.
2. Move the steering wheel to the preferred
distance and angle to su it your seated posi-
tion.
3. Swing the lever back up.
Do not use force to swing the lever
back up; otherwise, the mechanism
will be damaged. <
Online Edition for Part no. 01 40 2 914 849 - \251 07/12 BMW AG
Page 55 of 259

CONTROLSDriving
54
Fast wiper speed
Press twice or press beyond the resistance point.
The system switches to normal speed when the
vehicle is stationary.
Intermittent wipe or rain sensor
If the car is not equipped with a rain sensor, the
intermittent-wipe time is preset.
If the car is equipped with a rain sensor, the time
between wipes is controlled automatically and
depends on the intensity of the rainfall. The rain
sensor is mounted on the windshield, directly in
front of the interior rearview mirror.
Activating intermittent wipe or rain
sensor
Press button, arrow 3.
This symbol is displayed in the tachom-
eter.
Deactivate the rain se nsor before entering
an automatic car wash . Failure to do so
could result in damage caused by undesired
wiper activation. <
Adjusting the sensitivity of the rain
sensor
1.Switch on the ignition, refer to page 48.
2. Press the button in the turn signal indicator
as often as necessary until "SET/INFO" is dis-
played.
3. Press and hold the button until the display
changes. 4.
Press the button as often as necessary until
the symbol and "SET" are displayed.
5. Press and hold the button until the display
changes.
6. Press the button to se lect the desired sensi-
tivity.
7. Wait, or press and hold the button until the
display changes.
The settings are stored.
Deactivating intermittent wipe or rain
sensor
Press the button again, arrow 3.
Brief wipe
Press the lever downward once, arrow 2.
Cleaning windshield and headlamps
Pull the lever, arrow 4 .
Washer fluid is sprayed onto the windshield and
the wipers are operated briefly.
When the vehicle lighting system is switched on,
the headlamps are cleaned at regular and
appropriate intervals.
Online Edition for Part no. 01 40 2 914 849 - \251 07/12 BMW AG
Page 80 of 259
Technology for driving comfort and safetyCONTROLS
79
Protective action
Observe the instructions on page37 to
ensure the best possible personal protec-
tion. <
The front airbags help protect the driver and
front passenger by responding to frontal
impacts in which safety belts alone cannot pro-
vide adequate restraint. When needed, the head
and side airbags help provide protection in the
event of side impact. Th e relevant side airbag
supports the side upper body area. The head air
bag supports the head.
The airbags are designed to not be triggered in
every type of collision, e.g. not in minor acci-
dents, certain rollover si tuations or rear impacts.
Do not apply adhesive materials to the
cover panels of the airbags, cover them or
modify them in any other way.
Keep the dashboard and window on the passen-
g e r s i d e f r e e f r o m o b s t r u c t i o n , i . e . d o n o t c o v e r i t
with adhesive film or coverings, and do not affix
any holders such as for a navigation device or a
mobile phone.
Do not attach seat covers, cushions or other
objects not specifically approved for seats with
integral side airbags to the front seats. Do not
hang items of clothing such as coats or jackets
over the backrests. Do not attempt to remove
the airbag retention system from the vehicle. Do
not modify the individual components of the
system or its wiring in any way. This includes the
upholstery in the center of the steering wheel,
on the instrument panel, the doors, and the roof
pillars as well as the side s of the headliner. Do
not attempt to remove or dismantle the steering
wheel. <
Do not touch the individual components
immediately after the system has been
triggered, because there is a danger of burns.
Have the testing, repair , removal, and disposal
of airbag generators executed only by your MINI
dealer or a workshop that has the required
explosives licenses.
Otherwise, unprofessional attempts to service
the system could lead to failure in an emergency or undesired airbag activation, either of which
could result in personal injury.
<
Warning notices and in formation about the
airbags can also be found on the sun visors.
Automatic deactivation of the front
passenger airbags
The presence of a passenger in the front passen-
ger seat is detected by measuring the resistance
of the human body. The system correspondingly
activates or deactivates the front, side, and knee
airbags for the front passenger.
Make sure that the front passenger's feet
remain in the footwell; otherwise, it is not
possible to guarantee the function of the front
passenger airbags. <
The indicator lamp above the interior rearview
mirror shows the current st atus of the front pas-
senger airbags, deactivate d or activated, refer to
Status of front passenger airbags below.
Before transporting a child on the front
passenger seat, read the safety informa-
tion and follow the instructions under Transport-
ing children safely, page 44.<
Malfunction of the automatic
deactivation
When teenagers and adul ts assume certain sit-
ting positions, this can cause the front, side, and
knee airbags to deactivate. The indicator lamp
for the front passenger airbags lights up when
this occurs. In such case s, the passenger should
change his or her sittin g position so that the
front passenger airbags are activated and the
indicator lamp goes out. If the desired airbag
status cannot be achieved by changing the sit-
ting position, transport the relevant passenger
on a rear seat.
> Do not attach covers, cushions, ball mats or
other items to the front passenger seat
unless they are specifically recommended
by the manufacturer of your MINI.
Online Edition for Part no. 01 40 2 914 849 - \251 07/12 BMW AG
Page 91 of 259
CONTROLSPractical interior accessories
90
Practical interior accessories
Vehicle equipment
In this chapter, all production, country, and
optional equipment that is offered in the model
range is described. Equipment is also described
that is not available because of, for example,
selected options or coun try version. This also
applies to safety relate d functions and systems.
Integrated universal
remote control
The concept
By using the Integrated universal remote con-
trol, up to 3 functions of remote controlled
devices, e.g., garage door openers or lighting
systems, can be operated . As a result, the uni-
versal remote control can replace up to 3 differ-
ent remote controls. To operate, the buttons on
the rearview mirror must be programmed with
the desired functions. For programming, the
remote control for each device is needed.
To prevent possible damage or injury,
before programming or using the inte-
grated universal remote control, always inspect
the immediate area to make certain that no
people, animals or object s are within the travel
range of the device.
Comply also with the safe ty instructions supplied
with the original hand-held transmitter. <
Before selling the vehicle, delete the stored
functions as a safe ty precaution, page.
Checking compatibility
Depending on your vehicle's equip-
ment, the glove compartment can be
ventilated and, if th e cooling function is
switched on, can also be cooled.
For additional informatio n, please contact your
MINI dealer or call: 1-800-355-3515. A list of compatible remote controls is available
on the Internet at www.homelink.com.
HomeLink is a registered trademark of Johnson
Controls, Inc.
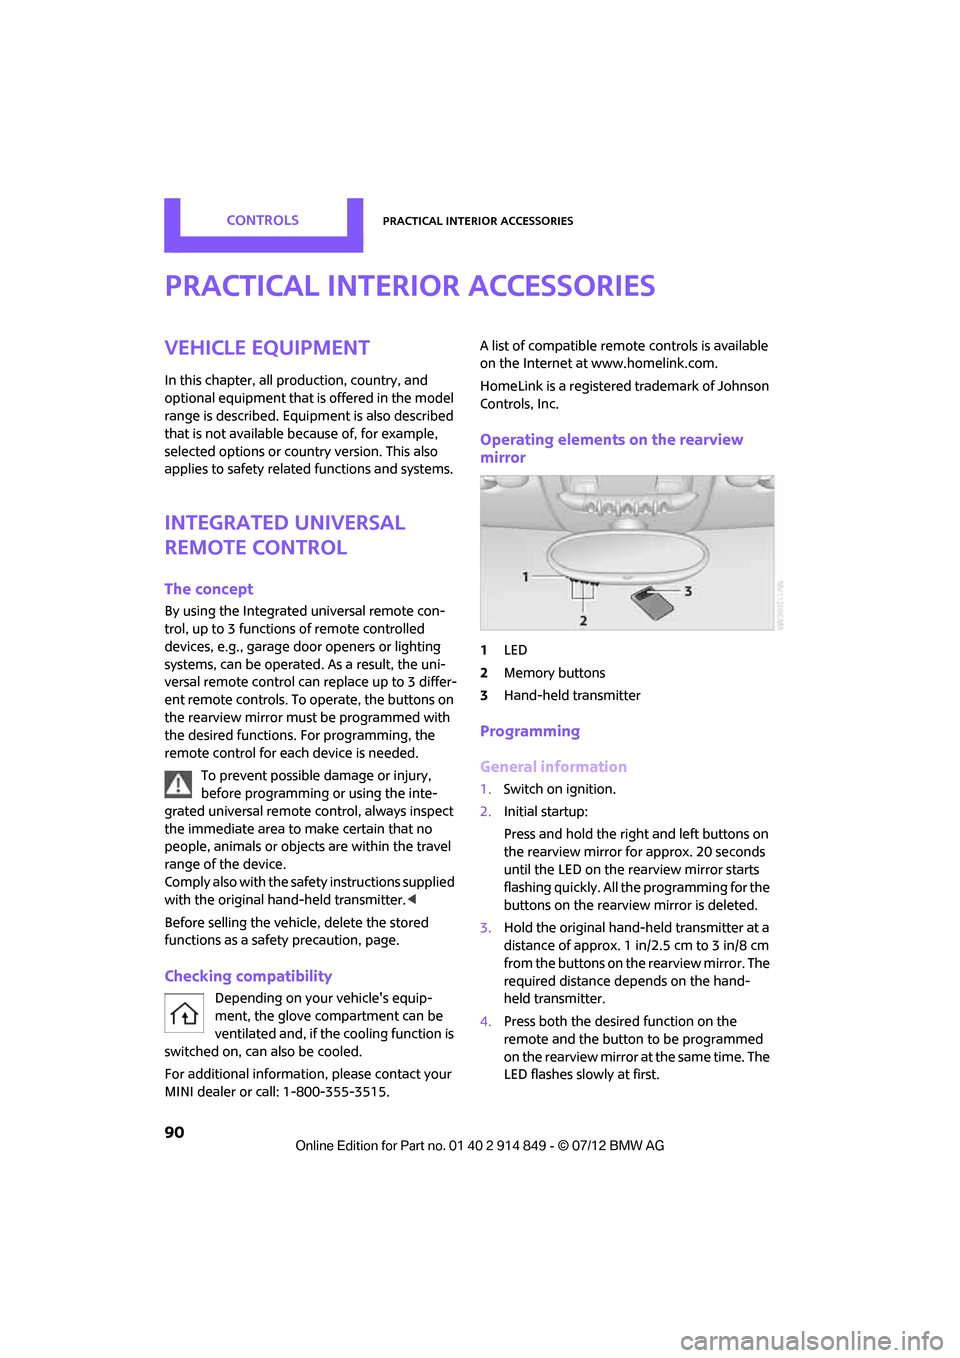
Operating elements on the rearview
mirror
1
LED
2 Memory buttons
3 Hand-held transmitter
Programming
General information
1.Switch on ignition.
2. Initial startup:
Press and hold the righ t and left buttons on
the rearview mirror for approx. 20 seconds
until the LED on the rearview mirror starts
flashing quickly. All the programming for the
buttons on the rearview mirror is deleted.
3. Hold the original hand-held transmitter at a
distance of approx. 1in/2.5cm to 3in/8cm
from the buttons on the rearview mirror. The
required distance depends on the hand-
held transmitter.
4. Press both the desired function on the
remote and the button to be programmed
on the rearview mirror at the same time. The
LED flashes slowly at first.
Online Edition for Part no. 01 40 2 914 849 - \251 07/12 BMW AG
Page 92 of 259
Practical interior accessoriesCONTROLS
91
5.As soon as the LED flashes rapidly, release
both buttons. The quick flashing indicates
that the button on the rearview mirror has
been programmed.
If the LED does not flash rapidly after
approx. 60 seconds, alter the distance
between the rearview mirror and hand-held
transmitter and repeat this step. Several
attempts at different distances may be
necessary. Wait at le ast 15 seconds before
each attempt.
Canada: if the progra mming was interrupted
by the hand-held transmitter, press and hold
the memory button and press the button on
the hand-held transmitter for 2 seconds and
release several times.
6. To program other functions on other
buttons, repeat steps 3 to 5.
You can operate the system with the engine
running or with the ignition switched on.
Special features of hopping-code
transmitter systems
If the device cannot be operated after being
programmed repeatedly, then check if the
device to be operated is equipped with a hop-
ping-code system. In a ddition, check in the
operating instructions for the device or press the
programmed button on the rearview mirror for a
longer period of time. If the LED on the rearview
mirror first flashes quickly and then is on for
2 seconds, then the device is equipped with a
hopping-code system. The flashing and the LED
being on repeats itself for approx. 20 seconds.
In addition, for devices with hopping-code
systems, the integrated universal remote control
and the device must be synchronized.
Information about synchronizing can be found
in the operating instructions for the device to be
set.
Programming will be easier with the aid of a
second person. Synchronizing:
1.
Park your vehicle within the range of the
remote-controlled device.
Do not exceed the 164 ft/50 m range of the
remote-controlled device.
2. Program the particular button on the rear-
view mirrors as described.
3. Find and press the button for synchronizing
the device to be set. There remain approx.
30 seconds for the next step.
4. Press and hold the programmed button on
the rearview mirror for approx. 3seconds
and then release. Repe at this step, possibly
up to three times, to complete the synchro-
nization. After the sy nchronization is com-
pleted, the programmed function is imple-
mented.
To reprogram individual buttons
1. Switch on ignition.
2. Press and hold the button to be pro-
grammed on the rearview mirror.
3. As soon as the LED on the rearview mirror
starts flashing slowly, hold the hand-held
transmitter of the devi ce to be operated
approx. 1in/2.5cm to 3in/8cm from the
buttons on the rearview mirror. The required
distance depends on the hand-held trans-
mitter.
4. Press and also hold the button with the
desired function on the hand-held trans-
mitter.
5. As soon as the LED on the rearview mirror
starts blinking faster, release both buttons.
The quick flashing indicates that the button
on the rearview mirror has been pro-
grammed. The device can now be operated
using the button on the rearview mirror.
Canada: if the LED is not flashing rapidly
after 60 seconds, chan ge the distance and
repeat the step or, if the programming was
interrupted by the hand-held transmitter,
press and hold the memory button and
press the button on the hand-held transmit-
ter for 2 seconds and release several times.
Online Edition for Part no. 01 40 2 914 849 - \251 07/12 BMW AG
Page 93 of 259
CONTROLSPractical interior accessories
92
Operation
Before using the integrated universal
remote control, always inspect the imme-
diate area to make certain that no people, ani-
mals or objects are within the travel range of the
device.
Comply also with the safe ty instructions supplied
with the original hand-held transmitter. <
The device, for example a garage door, can be
operated while the engine is running or when
the ignition is on by using the button on the
rearview mirror. In addition, while within the
reception range of the device, press the button
until the function is deleted. The LED on the
rearview mirror is constant ly on while the signal
is being transmitted.
Deleting stored functions
Press and hold the right and left buttons on the
rearview mirror for approx. 20 seconds until the
LED on the rearview mirror starts flashing
quickly. All stored functions are deleted. The
functions can not be deleted individually.
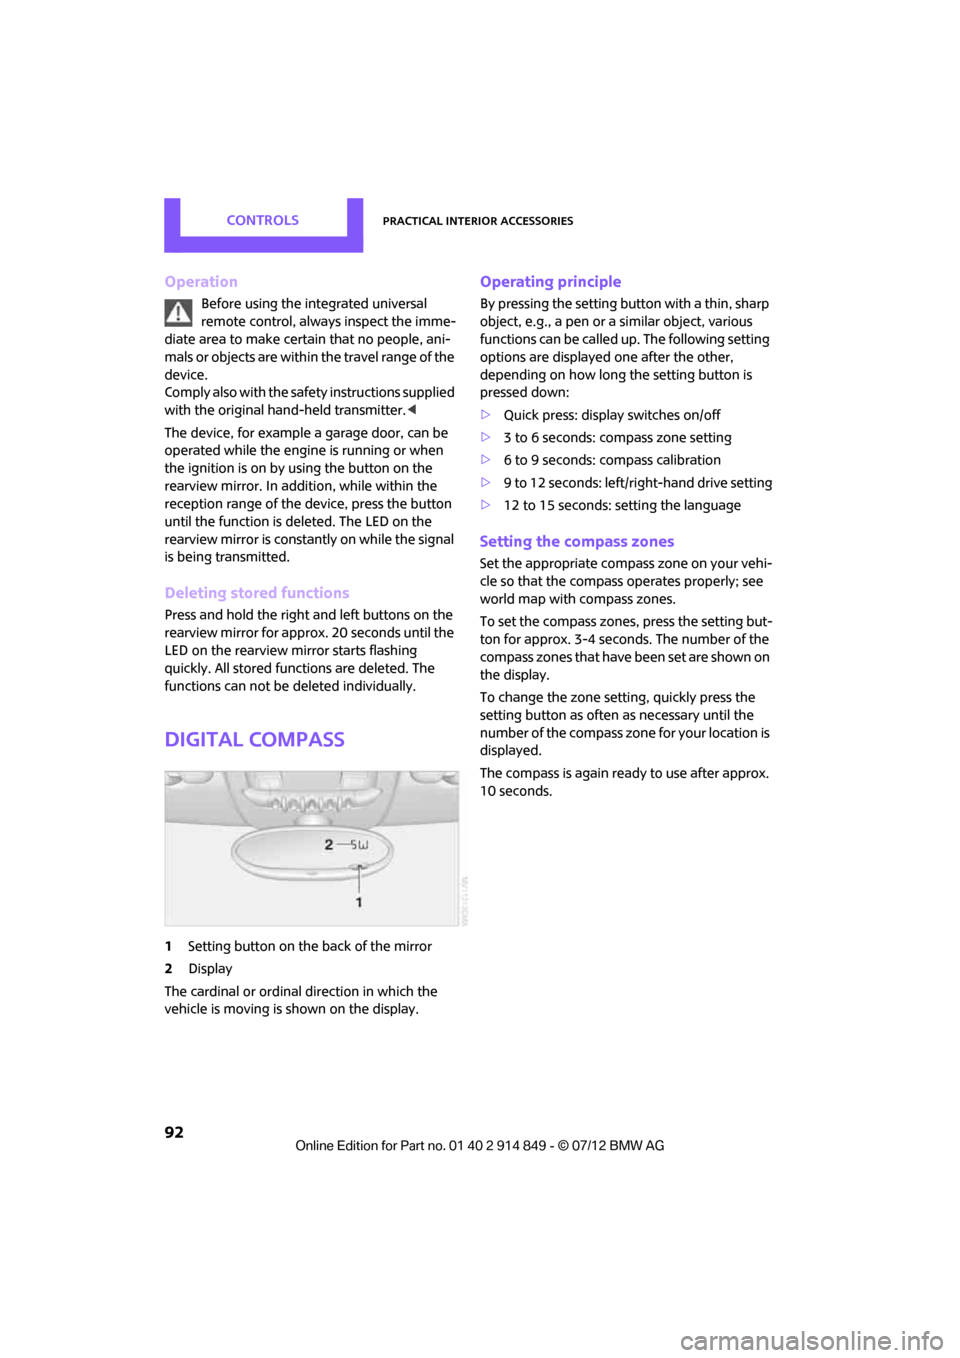
Digital compass
1Setting button on the back of the mirror
2 Display
The cardinal or ordinal direction in which the
vehicle is moving is shown on the display.
Operating principle
By pressing the setting button with a thin, sharp
object, e.g., a pen or a similar object, various
functions can be called up. The following setting
options are displayed one after the other,
depending on how long the setting button is
pressed down:
> Quick press: display switches on/off
> 3 to 6 seconds: compass zone setting
> 6 to 9 seconds: compass calibration
> 9 to 12 seconds: left/right-hand drive setting
> 12 to 15 seconds: setting the language
Setting the compass zones
Set the appropriate compass zone on your vehi-
cle so that the compass operates properly; see
world map with compass zones.
To set the compass zones, press the setting but-
ton for approx. 3-4 secon ds. The number of the
compass zones that have been set are shown on
the display.
To change the zone sett ing, quickly press the
setting button as often as necessary until the
number of the compass zone for your location is
displayed.
The compass is again ready to use after approx.
10 seconds.
Online Edition for Part no. 01 40 2 914 849 - \251 07/12 BMW AG
Page 251 of 259
REFERENCEEverything from A to Z
250
Interior rearview mirror43
– automatic dimming feature 43
Interlock 51
Intermittent mode of the wipers 53
Internal care 213
Internet page 4
J
Jacking points 222
Jets, refer to Window washer
nozzles 55
Joystick, refer to Onboard computer 16
Jumpering, refer to Jump- starting 225
Jump-starting 225
K
Key, refer to Keys/remote
controls 26
Keyless-Go, refer to Comfort
Access 32
Keyless opening and closing, refer to Comfort Access 32
Key Memory, refer to Personal Profile 26
Keypad dialing 165,176
Kickdown 51
– automatic transmission with
Steptronic 51
Knock control 195
L
Lamps, refer to Parking lamps/
Low beams 81
Lamps and bulbs, replacing bulbs 215
Lashing eyes, refer to Securing cargo 108
Last destinations 119LATCH child restraint fixing
system 45
Leather care 213
LEDs light-emitting diodes 216
Length, refer to Dimensions 233
License plate lamp
– bulb replacement 219
Light
– automatic headlamp
control 81
Light alloy wheels, care 213
Light-emitting diodes
LEDs 216
Lighter 97
– socket 98
Lighting
– lamps and bulbs 215
– of the instruments 83
– of vehicle, refer to Lamps 81
Light switch 81
Limit, refer to Speed limit 67
Load 107
Load securing equipment, refer to Securing cargo 108
Lock buttons of doors, refer to Locking 30
Locking
– adjusting confirmation signal 28
– from inside 30
– from outside 28
– without remote control, refer
to Comfort Access 32
Locking and unlocking doors
– confirmation signals 28
– from inside 30
– from outside 27
Longlife oils
– approved motor oils 207
Low beams 81
– automatic 81
– replacing bulb 216
Lower back support, refer to Lumbar support 38Luggage compartment
– doors, refer to Tailgate
30
Luggage compartment partition net, refer to Cargo
net 106
Luggage rack, re fer to Roof-
mounted luggage rack 109
Lumbar support 38
M
M+S tires, refer to Winter
tires 204
Main menu 17
Maintenance, refer to Service and Warranty Information
Booklet for US models and
Service Guide Booklet for
Canadian models
Maintenance system 209
Malfunction warnings, refer to Check Control 65
Manual air distribution 87
Manual mode
– automatic transmission with
Steptronic 52
Manual operation
– door lock 29
– fuel filler flap 194
– transmission lock, automatic
transmission 52
Manual transmission 50
Manual washing 212
Map
– changing scale 128
Map for navigation
– entering destination 121
Master key, refer to Integrated key/remote control 26
Maximum cooling 88
Maximum speed
– with winter tires 204
Medical assistance, refer to First aid pouch 225
MENU button 16
Online Edition for Part no. 01 40 2 914 849 - \251 07/12 BMW AG
Page 252 of 259
Everything from A to ZREFERENCE
251
Menus, refer to Onboard computer 16
Messages 185
Microfilter
– for air conditioner 87
– for automatic climate control 89
– MINI Maintenance System 209
Microfilter/activated-charcoal
filter
– MINI Maintenance System 209
Microphone for telephone 14
MINI Connected 190
MINI Internet page 4
MINI joystick, refer to Onboard computer 16
MINI Maintenance System 209
Mirror dimming feature 43
Mirrors 42
– exterior mirrors 42
– heating 43
– interior rearview mirror 43
Mobile phone
– adjusting volume 163,174
– connecting, refer to Mobile phone, pairing 160,170
– installation location, refer to Center armrest 94
– pairing 160,170
– What to do if…. 162,173
Mobile phone preparation
Bluetooth 169
Mobility Kit 220
Modifications, te chnical, refer
to For your own safety 4
Monitor, refer to MINI controls with navigation 16
Monitoring system for tire pressures, refer to Flat Tire
Monitor 73
Multifunctional steering wheel, refer to Buttons on
the steering wheel 11Multifunction switch
– refer to Turn signals/
headlamp flasher 53
– refer to Wiper system 53
N
Navigation
– storing current position 118
Navigation data 114
Navigation destination
– entering manually 116,122
– home address 119
Navigation instructions, refer to Switching voice
instructions on/off 129
Navigation system 114
– address book 118
– bypassing a route
section 126
– continuing route guidance 125
– destination entry 116
– dynamic route guidance 132
– entering a destination
manually 116,122
– planning a trip 123
– route list 126
– selecting destination via map 121
– selecting route criteria 125
– special destinations 120
– starting route guidance 125
– terminating route guidance 125
– voice instructions 129
– volume adjustment 129
Neck support, refer to Head restraints 39
Nets, refer to Storage compartments 95
New tires 203
North-facing map 127
Notes 187
Number of cylinders, refer to
Engine data 232 Number of safety belts
37
Nylon rope, refer to Tow rope 228
O
OBD socket, refer to Socket for
On-Board Diagnosis 210
Octane ratings, refer to Fuel specifications 195
Odometer 59
Office 182
– current office 182
– What to do if…. 188
Oil, refer to Engine oil 206
Oil consumption 206
Oil level 206
Oil types 207
Old batteries, refer to
Disposal 223
Onboard computer 16
– changing language 67
– menu guidance 17
– operating principles 16
– overview 16
– status information 19
Opening and closing
– Comfort Access 32
– from inside 30
– from outside 27
– using the door lock 29
– using the remote control 27
Opening and unlocking
– from inside 30
Options, selecting for navigation 125
Orientation menu, refer to Main menu 17
Outlets
– refer to Ventilation 89
Outlets, refer to Air vents 85
Output, refer to Engine
data 232
Outside-air mode
– automatic climate control 88
Overheated engine, refer to Coolant temperature 208
Online Edition for Part no. 01 40 2 914 849 - \251 07/12 BMW AG
Page 253 of 259
REFERENCEEverything from A to Z
252
P
Paintwork, care212
Park Distance Control PDC 69
Parking
– vehicle 49
Parking aid, refer to Park
Distance Control PDC 69
Parking brake 50
– indicator lamp 13
Parking lamps, replacing bulb 217
Parking lamps/low beams 81
Parts and accessories, see Vehicle equipment 4
Pathway lighting 82
Personal Profile 26
Phone numbers
– dialing 164
Pinch protection system
– windows 36
Plastic parts, care 214
Pollen
– refer to Microfilter/activated- charcoal filter for automatic
climate control 89
– refer to Microfilter for air conditioner 87
Power failure 224
Power window
– safety switch 36
Power windows 35
Power windows, refer to
Windows 35
Pressure, tires 196
Pressure moni toring, tires73
– Flat Tire Monitor 73
Pressure monitoring of tires, refer to Tire Pressure Monitor
TPM 75
Protective function, refer to Pinch protection system
– windows 36
Puncture
– Flat Tire Monitor 73
R
Radio
– controls136
– HD Radio 140
– satellite radio 141
– select waveband 139
– storing stations 140
– tone control 137
– volume 137
Radio key, refer to Integrated key/remote control 26
Radio position, refer to Radio
readiness 48
Radio readiness 48
– switched off 49
– switched on 48
Rain sensor 54
Random play sequence
– external devices 152
Range, refer to Cruising range 59
Reading aloud 188
Reading lamps 84
Rear lamps
– bulb replacement 219
Rear lamps, refer to Tail lamps 218
Rear-mounted luggage rack 109
Rear seat back rest, folding104
Rear seats
– adjusting 39
– folding down the backrests 104
Rearview mirror
– compass 92
Rearview mirror, refer to Mirrors 42
Rear window
– windshield wiper 55
Rear window defroster 86,88
Rear window safety switch 36
Reception
– quality 140
– radio station 140 Recirculated-air mode
86,88
Recirculation of air, refer to Recirculated-air
mode 86,88
Reclining seat , refer to
Backrest 38
Refueling 194
Rejecting a call 163,175
Releasing
– hood 206
Reminders 187
Remote control 26
– battery renewal 34
– Comfort Acces
s32
– garage door opener 90
– malfunctions 29,34
– service data 209
– tailgate 28
Replacement remote
control 26
Replacing bulbs, refer to Lamps and bulbs 215
Replacing tires, refer to New
wheels and tires 203
Reporting safety defects 7
Reserve warning, refer to Fuel gauge 58
Reservoir for washer
systems 55
Reset, refer to Resetting tone
settings 138
Restraint systems
– for children 44
– refer to Safety belts 40
Reverse
– CD player 148
Reverse gear
– automatic transmission with Steptronic 51
– manual transmission 50
Road map 127
Roadside Assistance 225
Roadside parking lamps 83
– replacing bulb 217
Road worthiness test, refer to
Service requirements 62
Online Edition for Part no. 01 40 2 914 849 - \251 07/12 BMW AG