Start MINI Countryman 2014 Owner's Guide
[x] Cancel search | Manufacturer: MINI, Model Year: 2014, Model line: Countryman, Model: MINI Countryman 2014Pages: 218, PDF Size: 5.45 MB
Page 88 of 218

Cooling functionThe passenger compartment can
only be cooled with the engine
running.
The cooling function cools and
dehumidifies the incoming air
before reheating it as required, according to
the temperature setting.
The cooling function helps to prevent conden‐
sation on the windows or to remove it quickly.
Depending on the weather, the windshield may
fog up briefly when the engine is started.
To cool the air faster and more intensively
when external temperatures are high, switch
on the recirculated air mode.
Recirculated air mode If the air outside the car has an
unpleasant odor or contains pol‐
lutants, shut off the supply to the
interior of the car temporarily.
The system then recirculates the
air currently within the vehicle.
Should the windows fog up in the recirculated-
air mode, press the AUTO button or switch off
the recirculated-air mode and increase the air
volume if necessary. Make sure that air can
flow onto the windshield.
Recirculated air mode is automatically deacti‐
vated at low external temperatures.
Only use recirculated air mode for a lim‐
ited period
The recirculated air mode should not be used
continuously for lengthy periods; otherwise, the
quality of the air inside the car will gradually
deteriorate. ◀Temperature
Turn upward, red, to raise thetemperature.
Turn downward, blue, to lower
the temperature.
Rear window defroster The rear window defroster
switches off automatically after a
certain period of time.
The rear window defroster
power may be lowered or even
switched off entirely to save on battery power.
Vent settings Direct the flow of air to the win‐
dows
, to the upper body
area
, or to the footwell .
Intermediate positions are possi‐
ble.
Windshield heating The windshield heating switches
off automatically after some
time.
The windshield heating may be
reduced or even switched off en‐
tirely to save on battery power.
Defrosting and defogging windows
1.Set the maximum air volume.2.Air distribution in position .
By switching on the cooling function, the
windows are defogged more rapidly.3.Set the highest temperature, red.4.Deactivate recirculated air mode.5.Switch on the windshield heating if neces‐
sary.6.Switch on the rear window defroster if nec‐
essary.Seite 88ControlsClimate88
Online Edition for Part no. 01 40 2 911 521 - VI/13
Page 91 of 218
When switching between different temperature
settings in rapid succession, the automatic cli‐
mate control does not have sufficient time to
adjust the set temperature.
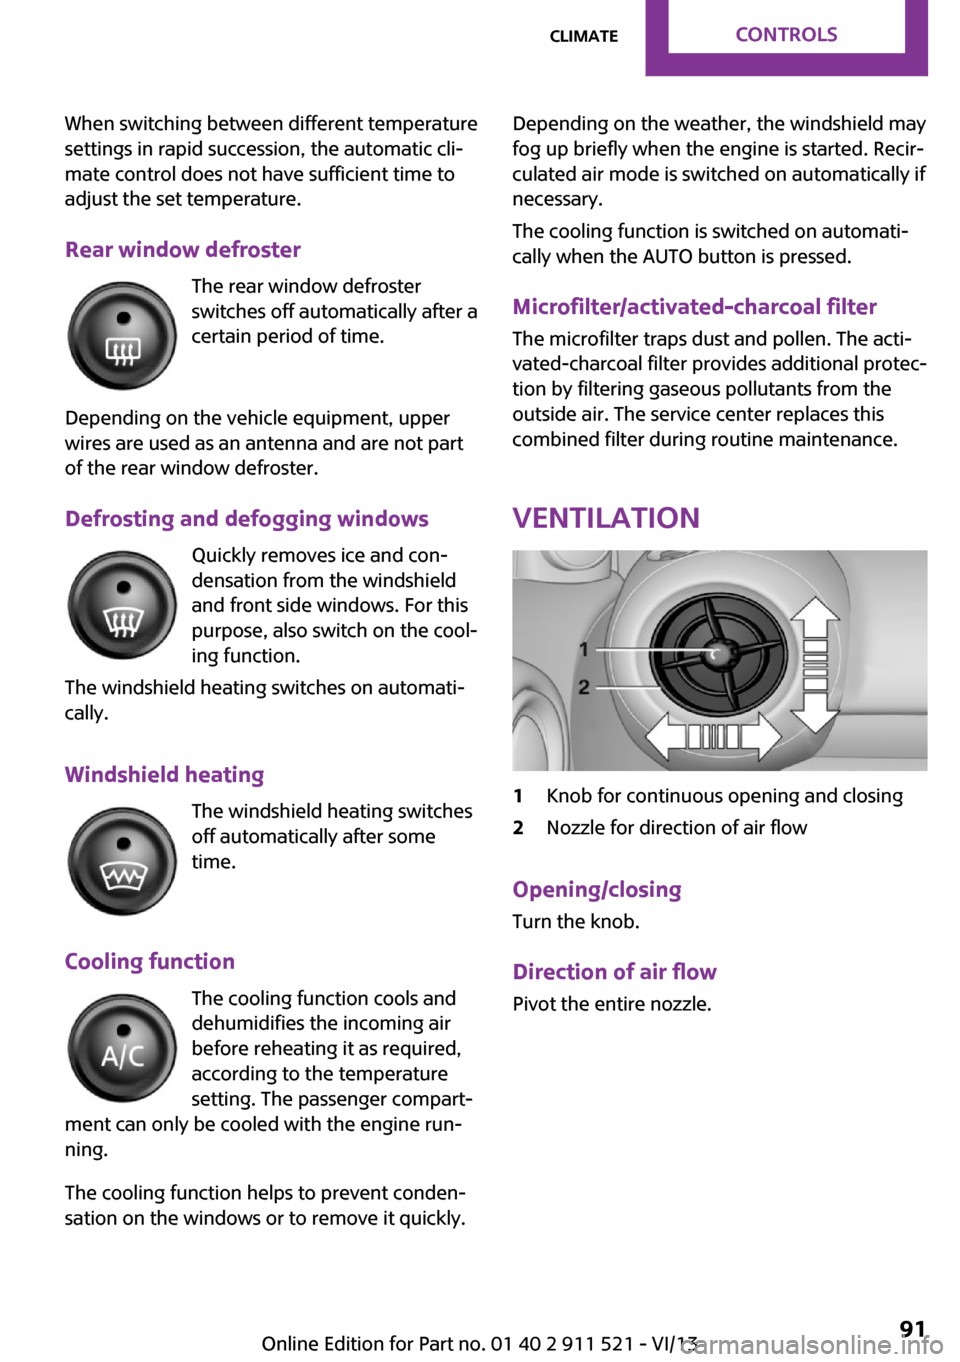
Rear window defroster The rear window defroster
switches off automatically after a
certain period of time.
Depending on the vehicle equipment, upper
wires are used as an antenna and are not part
of the rear window defroster.
Defrosting and defogging windows Quickly removes ice and con‐densation from the windshieldand front side windows. For this
purpose, also switch on the cool‐
ing function.
The windshield heating switches on automati‐
cally.
Windshield heating The windshield heating switches
off automatically after some
time.
Cooling function The cooling function cools and
dehumidifies the incoming air
before reheating it as required,
according to the temperature
setting. The passenger compart‐
ment can only be cooled with the engine run‐ ning.
The cooling function helps to prevent conden‐
sation on the windows or to remove it quickly.Depending on the weather, the windshield may
fog up briefly when the engine is started. Recir‐
culated air mode is switched on automatically if
necessary.
The cooling function is switched on automati‐
cally when the AUTO button is pressed.
Microfilter/activated-charcoal filter
The microfilter traps dust and pollen. The acti‐
vated-charcoal filter provides additional protec‐
tion by filtering gaseous pollutants from the
outside air. The service center replaces this
combined filter during routine maintenance.
Ventilation1Knob for continuous opening and closing2Nozzle for direction of air flow
Opening/closingTurn the knob.
Direction of air flow Pivot the entire nozzle.
Seite 91ClimateControls91
Online Edition for Part no. 01 40 2 911 521 - VI/13
Page 118 of 218
Saving fuelVehicle equipment
This chapter describes all series equipment as
well as country-specific and special equipment
offered for this model series.Therefore, it also
describes equipment that may not be found in
your vehicle, for instance due to the selected
special equipment or the country version. This
also applies to safety-related functions and sys‐
tems.
General information Your vehicle contains advanced technology for
the reduction of fuel consumption and emis‐
sions.
Fuel consumption depends on a number of dif‐
ferent factors. The implementation of certain
measures, driving style and regular mainte‐ nance can have an influence on fuel consump‐
tion and on the environmental impact.
Remove unnecessary cargo Additional weight increases fuel consumption.
Remove attached parts following use Remove unneeded auxiliary mirrors, roof or
rear luggage racks after use.
Attached parts on the vehicle impair the aero‐
dynamics and increase the fuel consumption.
Close both windows Open windows causes higher air resistance and
thus increases fuel consumption.
Check the tire inflation pressure
regularly
Check and, if necessary, correct the tire infla‐
tion pressure, refer to page 152, at least twice
a month and before starting on a long trip.Low tire inflation pressure increases rolling re‐
sistance and thus raises fuel consumption and
tire wear.
Drive away without delayDo not wait for the engine to warm-up while
the vehicle remains stationary. Start driving
right away, but at moderate engine speeds.
This is the fastest way for the cold engine to
reach its operating temperature.
Look well ahead when driving Avoid unnecessary acceleration and braking. To
achieve this, maintain a suitable distance to the
vehicle driving ahead of you.
Driving smoothly and looking ahead reduces
fuel consumption.
Avoid high engine speeds Use 1st gear to get the vehicle in motion. Be‐
ginning with 2nd gear, accelerate rapidly. When
accelerating, shift up before reaching high en‐
gine speeds.
When you reach the desired speed, shift into
the highest applicable gear and drive with the
engine speed as low as possible and at a con‐
stant speed.
As a rule: driving at low engine speeds lowers
fuel consumption and reduces wear.
Use coasting conditions
When approaching a red light, take your foot
off the accelerator and coast to a halt in the
highest applicable gear.
On a downhill slope, take your foot off the ac‐
celerator and coast in a suitable gear.
The flow of fuel is interrupted while coasting.Seite 118Driving tipsSaving fuel118
Online Edition for Part no. 01 40 2 911 521 - VI/13
Page 119 of 218

Switch off the engine during longer
stops
Switch off the engine during longer stops, e.g.,
at traffic lights, railroad crossings or in traffic
congestion.
Fuel savings are already achieved after the en‐
gine is turned off for as little as 4 seconds.
Automatic Engine Start/Stop Function
The Automatic Engine Start/Stop Function auto‐
matically switches the engine off during a stop.
If the engine is stopped and then started again,
fuel consumption and emissions drop com‐
pared to an engine that runs permanently.
Stopping the engine even for just a few sec‐
onds can result in savings.
In addition, fuel consumption depends on other
factors as well, such as driving style, road con‐
ditions, maintenance, and environmental fac‐
tors.
Switch off any functions that are not currently needed
Functions such as seat heating and the rear
window defroster require a lot of energy and
consume additional fuel, especially in city and
stop-and-go traffic.
Therefore, switch off these functions if they are
not actually needed.
Have maintenance carried out
Have vehicles maintained regularly to achieve
optimal vehicle economy and operating life.
Have the maintenance carried out by the serv‐
ice center.
Please also note the MINI maintenance system,
refer to page 169.Seite 119Saving fuelDriving tips119
Online Edition for Part no. 01 40 2 911 521 - VI/13
Page 125 of 218

▷"LANG": select the language of the dis‐
play texts.▷"CONSMP": change the unit of measure
for the average fuel consumption.▷"TEMP": change the unit of measure for
the external temperature.5.Highlight the desired menu item and press
the button.6.Create the desired setting.
Computer
The following vehicle information can be call up
via the computer:
▷Average fuel consumption▷Average speed▷Range
Displaying information
1.Switch on the radio ready state or the igni‐
tion.2. Press the button.3."COMP"
Average fuel consumption
The average fuel consumption is calculated for
the time during which the engine is running.
To start calculation of the average fuel con‐
sumption:
1."CONSMP"2."RESET"
The previous display is set to zero and the sys‐
tem begins recalculating the average fuel con‐
sumption.
Average speed
The average speed is calculated for the time
during which the engine is running.
To start calculation of the average speed:
1."SPEED"2."RESET"
Estimated range
"RANGE"
The display shows the estimated distance that
can be still be driven on the remaining fuel,
taking into consideration the driving style over
the last 18 miles/30 km.
Radio
Listening to the radio
The radio is designed for reception in the FM
and AM wavebands.
1.Switch on the radio, refer to page 123.2. Press this button if necessary.3."TUNER"4."FM" or"AM"
Press the corresponding button repeatedly
until the desired waveband is displayed.▷FM: FM1, FM2, FMA▷AM: AM, AMA
Selecting a station
The setting is stored for the remote control cur‐
rently in use.
Next station
Press the button.
The next station with reception is selected.
Selecting the station manually by
frequency
1. Press the button.2.▷Press the respective function button to
set the desired frequency.▷Turn the right knob until the desired
frequency is set.Seite 125Radio MINI Boost CDEntertainment125
Online Edition for Part no. 01 40 2 911 521 - VI/13
Page 129 of 218

Starting the CD playerA CD is contained in the CD player.1.Switch on the car radio if necessary.2. Press the button.3."CD"
Skipping to another track
Press the button repeatedly until
the desired track is played.
With the right knob:
Turn the right knob until the desired track is
played back.
Fast forward/reverse
Hold the button down.
Tracks can be heard but are distorted.
Briefly playing and selecting a track
"SC"
All tracks are played briefly one after the other.
To interrupt the function and select a track:
"SC"
Random playback "RND"
To end random playback:
"RND"
Compressed audio files CD players can play back CDs with compressed
audio data: MP3 and WMA.
Selecting a track
1."LIST"2.Select the desired directory using the right
knob.▷ : press the right knob to open a di‐
rectory.▷ : press the right knob to close a di‐
rectory.3.Select other directories if you wish.4.Highlight the desired track and press the
right knob.
You can scroll through the directories during
playback.
To change to the current track:
"CURR"
Displaying information on the track
Any information stored on the currently se‐
lected track can be displayed.
1."LIST"2."TRACK"
Ejecting a CD from the CD player
Press the button.
The CD emerges slightly from the CD drive.
Operational displays
▷"Insert CD"
The CD slot is empty.▷"Error CD"
The CD cannot be read or is defective.▷"Temp. CD"
Operating temperature is too high.
Notes
CD player Do not remove the cover
The CD players are officially designated
Class 1 laser products. Do not operate if the
cover is damaged; otherwise, severe eye dam‐
age can result. ◀
Seite 129Radio MINI Boost CDEntertainment129
Online Edition for Part no. 01 40 2 911 521 - VI/13
Page 136 of 218
TelephoneVehicle equipment
This chapter describes all series equipment as
well as country-specific and special equipment
offered for this model series.Therefore, it also
describes equipment that may not be found in
your vehicle, for instance due to the selected
special equipment or the country version. This
also applies to safety-related functions and sys‐
tems.
At a glance The concept
Mobile phones can be connected with the vehi‐
cle via Bluetooth.
After a suitable mobile phone is paired with the
vehicle once, you can operate the mobile
phone via the radio, the buttons on the steer‐
ing wheel, and via voice activation.
Bluetooth® is a registered trademark of Blue‐
tooth® SIG, Inc.
Certain functions may need to be enabled by
the mobile phone provider or service provider.
Using the mobile phone while driving
Make entries only when traffic and road
conditions allow. Do not hold the mobile phone
in your hand while you are driving; use the
hands-free system instead. If you do not ob‐
serve this precaution, you can endanger the ve‐
hicle occupants and other road users. ◀
Snap-in adapter The snap-in adapter is used to:▷Hold the mobile phone.▷Recharge the battery.▷Connect the mobile phone to an outside
antenna of the vehicle.This provides for better network reception
and consistent sound quality.
Do not operate a mobile phone that is con‐
nected to the vehicle on the mobile phone key‐
pad, as this may lead to a malfunction.
Approved mobile phones
Details on which mobile phones with a Blue‐
tooth interface are supported by the mobile
phone preparation package can be obtained at
www.mini.com/connectivity.
Notes At high temperatures, the charging function of
the mobile phone may be limited and functions
may not be executed.
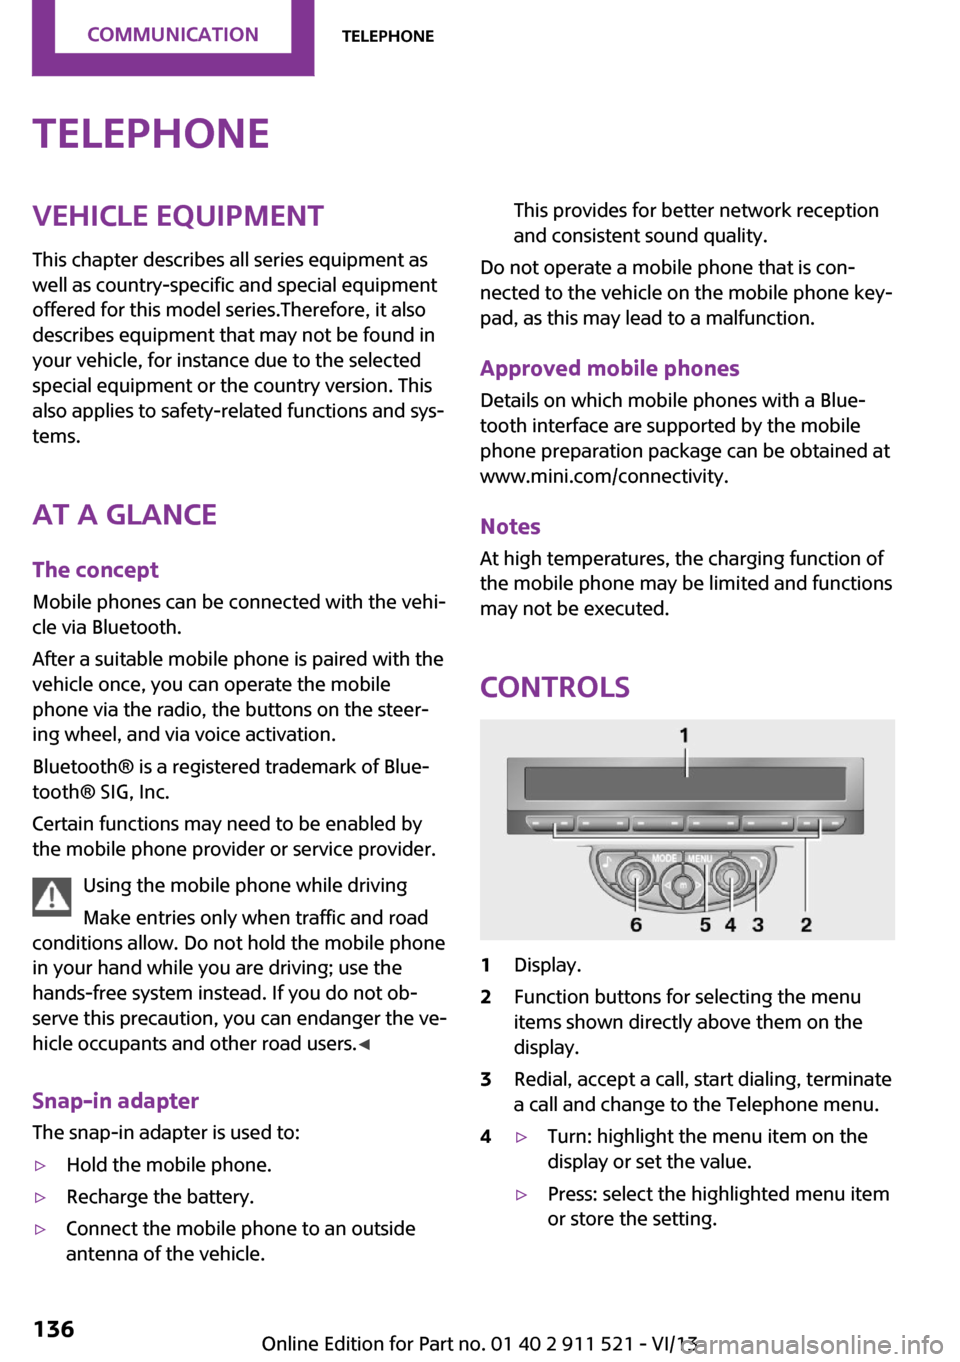
Controls
1Display.2Function buttons for selecting the menu
items shown directly above them on the
display.3Redial, accept a call, start dialing, terminate
a call and change to the Telephone menu.4▷Turn: highlight the menu item on the
display or set the value.▷Press: select the highlighted menu item
or store the setting.Seite 136CommunicationTelephone136
Online Edition for Part no. 01 40 2 911 521 - VI/13
Page 150 of 218
FuelVehicle equipmentThis chapter describes all series equipment as
well as country-specific and special equipment
offered for this model series.Therefore, it also
describes equipment that may not be found in
your vehicle, for instance due to the selected
special equipment or the country version. This
also applies to safety-related functions and sys‐
tems.
Fuel recommendation GasolineFor the best fuel economy, the gasoline should
be sulfur-free or very low in sulfur content.
Do not use fuels that are labeled at the fuel
pump as containing metals.
Only refuel with lead-free gasoline with‐
out metal additives
Do not refuel with leaded gasoline or gasoline
with metal additives, e. g., manganese or iron;
otherwise, the catalytic converter and other components will be permanently damaged. ◀
Fuels with a maximum ethanol content of
10 %, i.e., E10, may be used for refueling.
The ethanol should fulfill the following quality standards:
US: ASTM 4806–xx
CAN: CGSB-3.511–xx
xx: always adhere to the currently applicable
standard.
Do not refuel with ethanol E85
Do not refuel with E85, i.e., fuel with an
ethanol content of 85 %, or with Flex Fuel, as
this would damage the engine and fuel supply system. ◀The engine is knock controlled. Therefore, you
can refuel with different gasoline qualities.
Gasoline quality
The manufacturer of your MINI recommends:▷AKI 91.▷John Cooper Works AKI 93.
Minimum fuel grade
The manufacturer of your MINI recommends
AKI 89.
Minimum fuel grade
Do not fill up with fuel below the speci‐
fied minimum quality; otherwise, the engine
may not run properly. ◀
If you use gasoline with this minimum AKI rat‐
ing, the engine may produce knocking sounds
when starting at high outside temperatures.
This has no effect on the engine life.
Minimum fuel grade
The use of poor-quality fuels may result in
harmful engine deposits or damage. Addition‐
ally, problems relating to drivability, starting
and stalling, especially under certain environ‐
mental conditions such as high ambient tem‐
perature and high altitude, may occur.
If drivability problems are encountered, we rec‐
ommend switching to a high quality gasoline
brand and a higher octane grade — AKI num‐
ber — for a few tank fills. To avoid harmful en‐
gine deposits, it is highly recommended to pur‐
chase gasoline from BP or Top Tier retailers.
Failure to comply with these recommendations
may result in the need for unscheduled mainte‐
nance. ◀
Seite 150MobilityFuel150
Online Edition for Part no. 01 40 2 911 521 - VI/13
Page 180 of 218
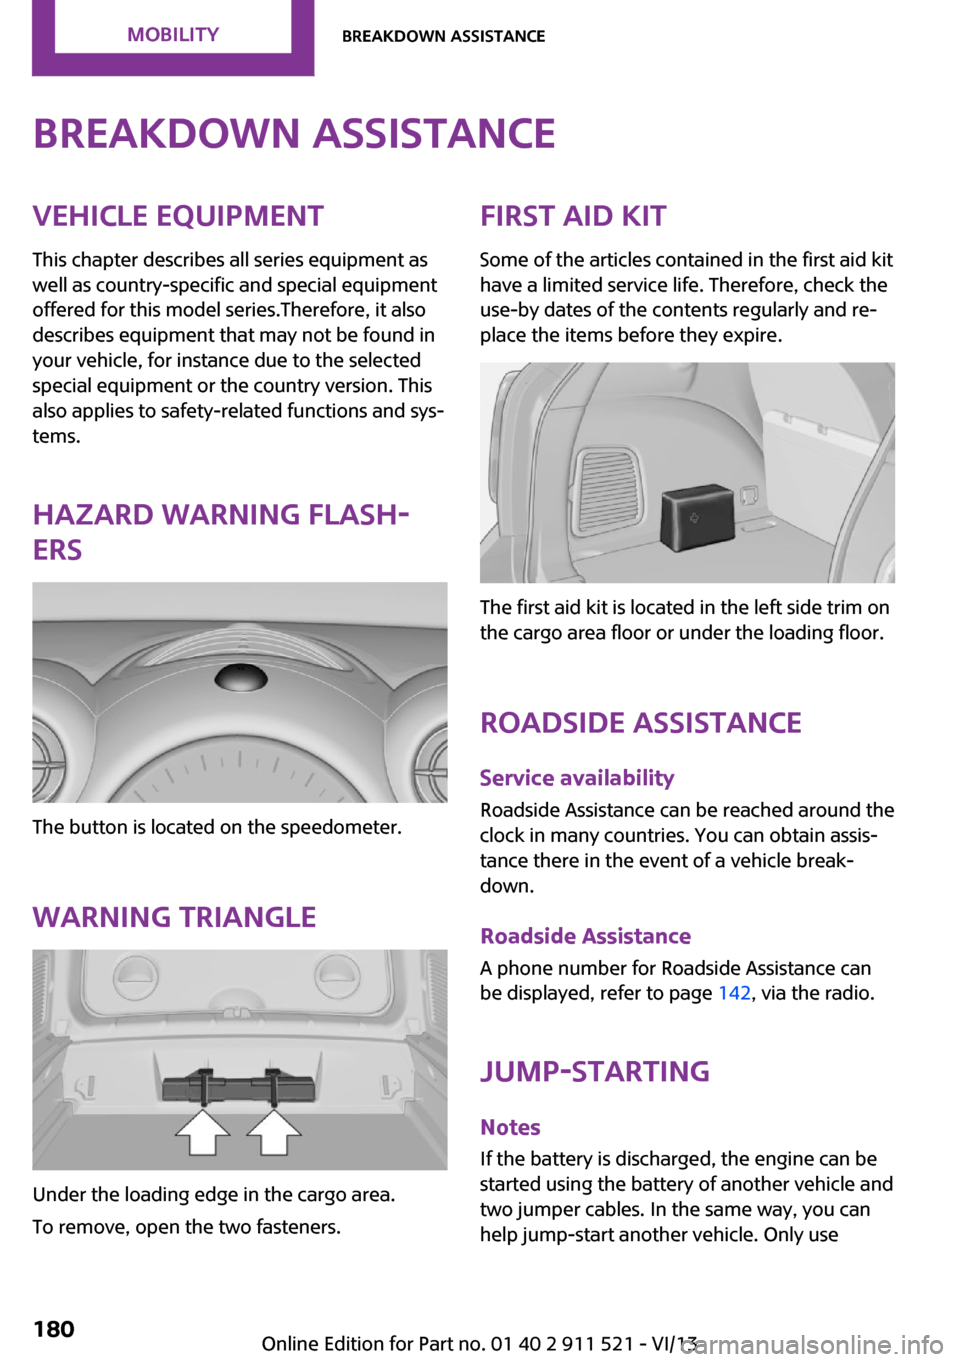
Breakdown assistanceVehicle equipment
This chapter describes all series equipment as
well as country-specific and special equipment
offered for this model series.Therefore, it also
describes equipment that may not be found in
your vehicle, for instance due to the selected
special equipment or the country version. This
also applies to safety-related functions and sys‐
tems.
Hazard warning flash‐
ers
The button is located on the speedometer.
Warning triangle
Under the loading edge in the cargo area.
To remove, open the two fasteners.
First aid kit
Some of the articles contained in the first aid kit
have a limited service life. Therefore, check the
use-by dates of the contents regularly and re‐
place the items before they expire.
The first aid kit is located in the left side trim on
the cargo area floor or under the loading floor.
Roadside Assistance Service availability
Roadside Assistance can be reached around the
clock in many countries. You can obtain assis‐
tance there in the event of a vehicle break‐
down.
Roadside Assistance A phone number for Roadside Assistance can
be displayed, refer to page 142, via the radio.
Jump-starting NotesIf the battery is discharged, the engine can be
started using the battery of another vehicle and
two jumper cables. In the same way, you can
help jump-start another vehicle. Only use
Seite 180MobilityBreakdown assistance180
Online Edition for Part no. 01 40 2 911 521 - VI/13
Page 181 of 218
jumper cables with fully insulated clamp han‐
dles.
To prevent personal injury or damage to both
vehicles, adhere strictly to the following proce‐
dure.
Do not touch live parts
To avoid the risk of potentially fatal injury,
always avoid all contact with electrical compo‐
nents while the engine is running. ◀
Preparation1.Check whether the battery of the other ve‐
hicle has a voltage of 12 volts and approxi‐
mately the same capacitance in Ah. This in‐
formation can be found on the battery.2.Switch off the engine of the assisting vehi‐
cle.3.Switch off any electronic systems/power
consumers in both vehicles.
Bodywork contact between vehicles
There must not be any contact between
the bodies of the two vehicles, otherwise there
is a danger of shorting. ◀
Connecting jumper cables
Connecting order
Connect the jumper cables in the correct
order; otherwise, there is the danger of injury
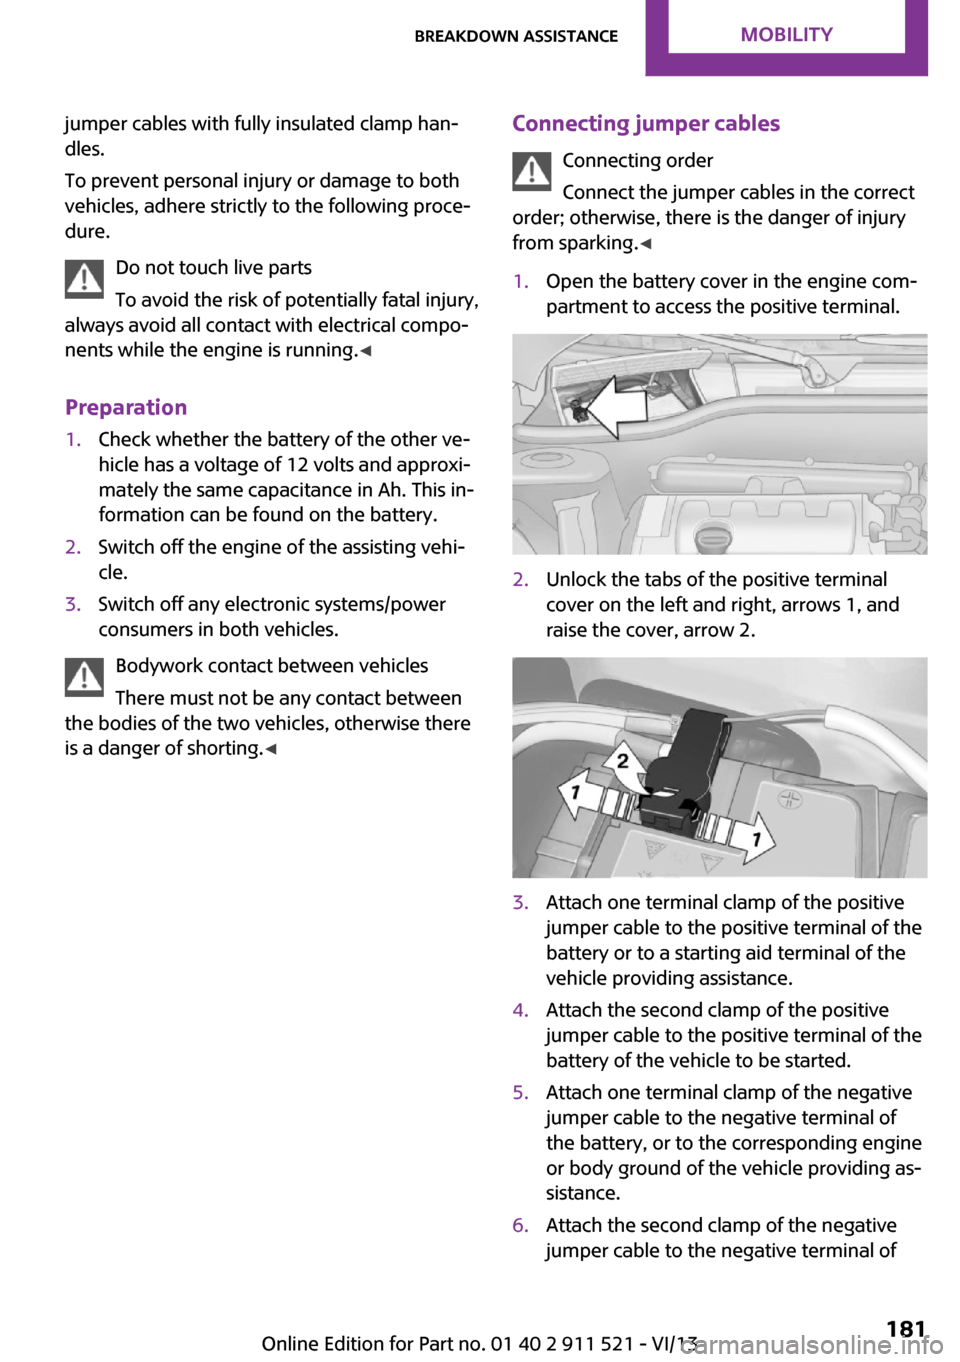
from sparking. ◀1.Open the battery cover in the engine com‐
partment to access the positive terminal.2.Unlock the tabs of the positive terminal
cover on the left and right, arrows 1, and
raise the cover, arrow 2.3.Attach one terminal clamp of the positive
jumper cable to the positive terminal of the
battery or to a starting aid terminal of the
vehicle providing assistance.4.Attach the second clamp of the positive
jumper cable to the positive terminal of the
battery of the vehicle to be started.5.Attach one terminal clamp of the negative
jumper cable to the negative terminal of
the battery, or to the corresponding engine
or body ground of the vehicle providing as‐
sistance.6.Attach the second clamp of the negative
jumper cable to the negative terminal ofSeite 181Breakdown assistanceMobility181
Online Edition for Part no. 01 40 2 911 521 - VI/13