Start MINI Countryman 2014 Owner's Guide
[x] Cancel search | Manufacturer: MINI, Model Year: 2014, Model line: Countryman, Model: MINI Countryman 2014Pages: 218, PDF Size: 5.45 MB
Page 182 of 218
the battery, or to the engine or body
ground of the vehicle to be started.
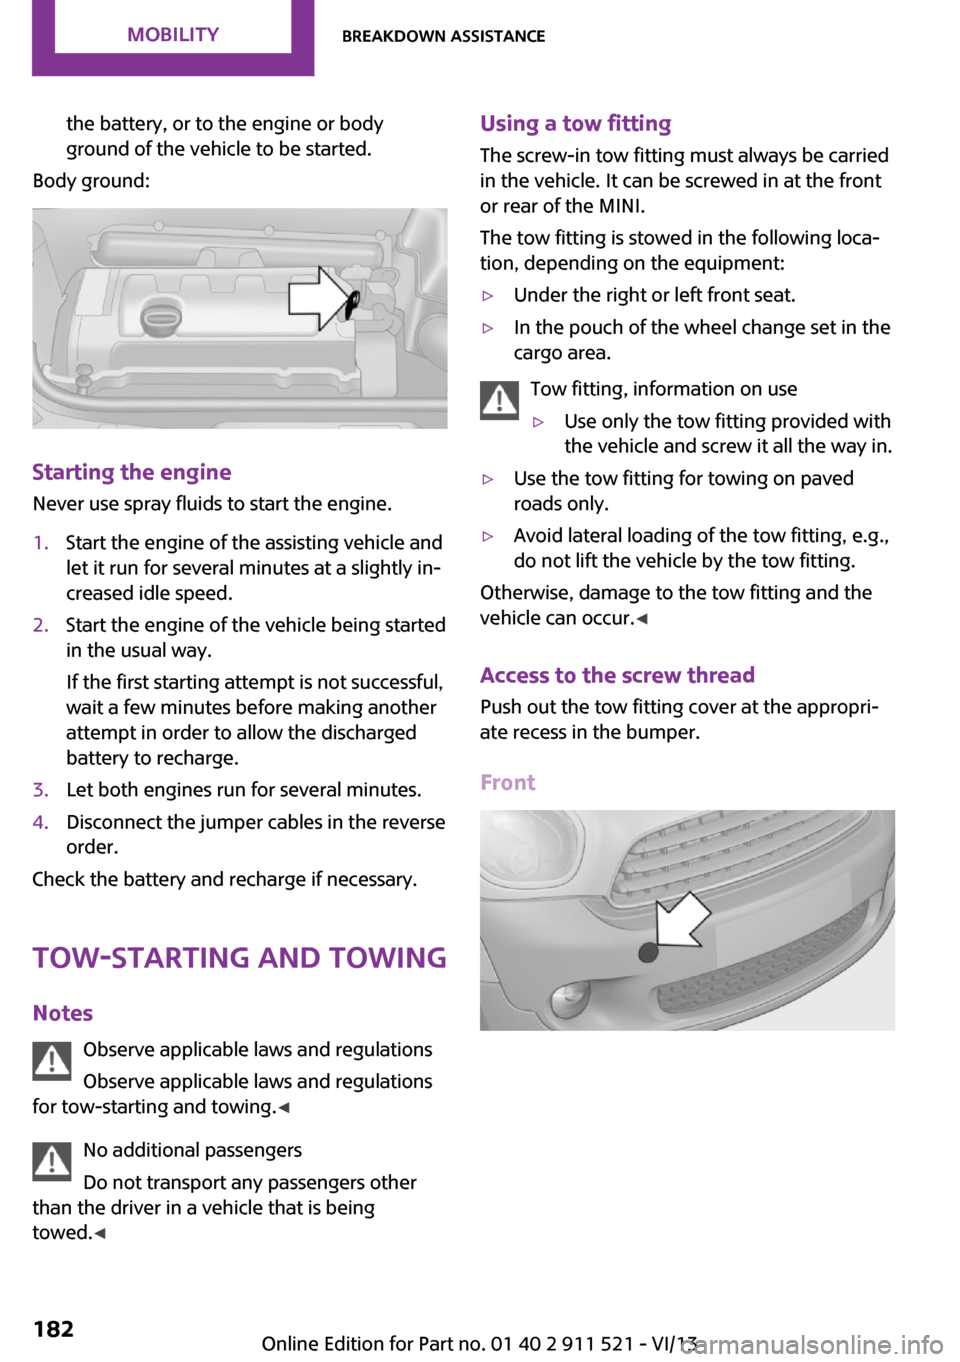
Body ground:
Starting the engine
Never use spray fluids to start the engine.
1.Start the engine of the assisting vehicle and
let it run for several minutes at a slightly in‐
creased idle speed.2.Start the engine of the vehicle being started
in the usual way.
If the first starting attempt is not successful,
wait a few minutes before making another
attempt in order to allow the discharged
battery to recharge.3.Let both engines run for several minutes.4.Disconnect the jumper cables in the reverse
order.
Check the battery and recharge if necessary.
Tow-starting and towing
Notes Observe applicable laws and regulations
Observe applicable laws and regulations
for tow-starting and towing. ◀
No additional passengers
Do not transport any passengers other
than the driver in a vehicle that is being
towed. ◀
Using a tow fitting
The screw-in tow fitting must always be carried
in the vehicle. It can be screwed in at the front
or rear of the MINI.
The tow fitting is stowed in the following loca‐
tion, depending on the equipment:▷Under the right or left front seat.▷In the pouch of the wheel change set in the
cargo area.
Tow fitting, information on use
▷Use only the tow fitting provided with
the vehicle and screw it all the way in.▷Use the tow fitting for towing on paved
roads only.▷Avoid lateral loading of the tow fitting, e.g.,
do not lift the vehicle by the tow fitting.
Otherwise, damage to the tow fitting and the
vehicle can occur. ◀
Access to the screw thread Push out the tow fitting cover at the appropri‐
ate recess in the bumper.
Front
Seite 182MobilityBreakdown assistance182
Online Edition for Part no. 01 40 2 911 521 - VI/13
Page 183 of 218

MINI Countryman: rear
MINI Paceman: rear
Being towedFollow the towing instructions
Follow all towing instructions, or vehicle
damage or accidents may occur. ◀
▷Make sure that the ignition is switched on;
otherwise, the low beams, tail lamps, turn
signals, and windshield wipers may be un‐
available.▷Do not tow the vehicle with the rear axle
tilted, as the front wheels could turn.▷When the engine is stopped, there is no
power assist. Consequently, more force
needs to be applied when braking and
steering.▷Larger steering wheel movements are re‐
quired.▷Switch on the hazard warning system, de‐
pending on local regulations.Manual transmission
Gearshift lever in neutral position.
Automatic transmission Towing vehicles with an automatic trans‐
mission
Only transport vehicles with an automatic
transmission on tow trucks or with raised front
wheels; otherwise, the transmission may be
damaged. ◀
Towing with a tow bar Light towing vehicle
The towing vehicle must not be lighter
than your vehicle, or it will not be possible to
control vehicle response. ◀
Correctly attach the tow bar
Only secure the tow bar on the tow fit‐
tings; damage can occur when it is secured on
other parts of the vehicle. ◀
The tow fittings used should be on the same
side on both vehicles.
Should it prove impossible to avoid mounting
the tow bar at an offset angle, please observe
the following:▷Clearance and maneuvering capability will
be sharply limited during cornering.▷The tow bar will generate lateral forces if it
is attached offset.
Towing with a tow rope
When starting to tow the vehicle, make sure
that the tow rope is taut.
To avoid jerking and the associated stresses on
the vehicle components when towing, always
use nylon ropes or nylon straps.
Attaching the tow rope correctly
Only secure the tow rope on the tow fit‐
ting; otherwise, damage can occur when it is
secured on other parts of the vehicle. ◀
Seite 183Breakdown assistanceMobility183
Online Edition for Part no. 01 40 2 911 521 - VI/13
Page 184 of 218
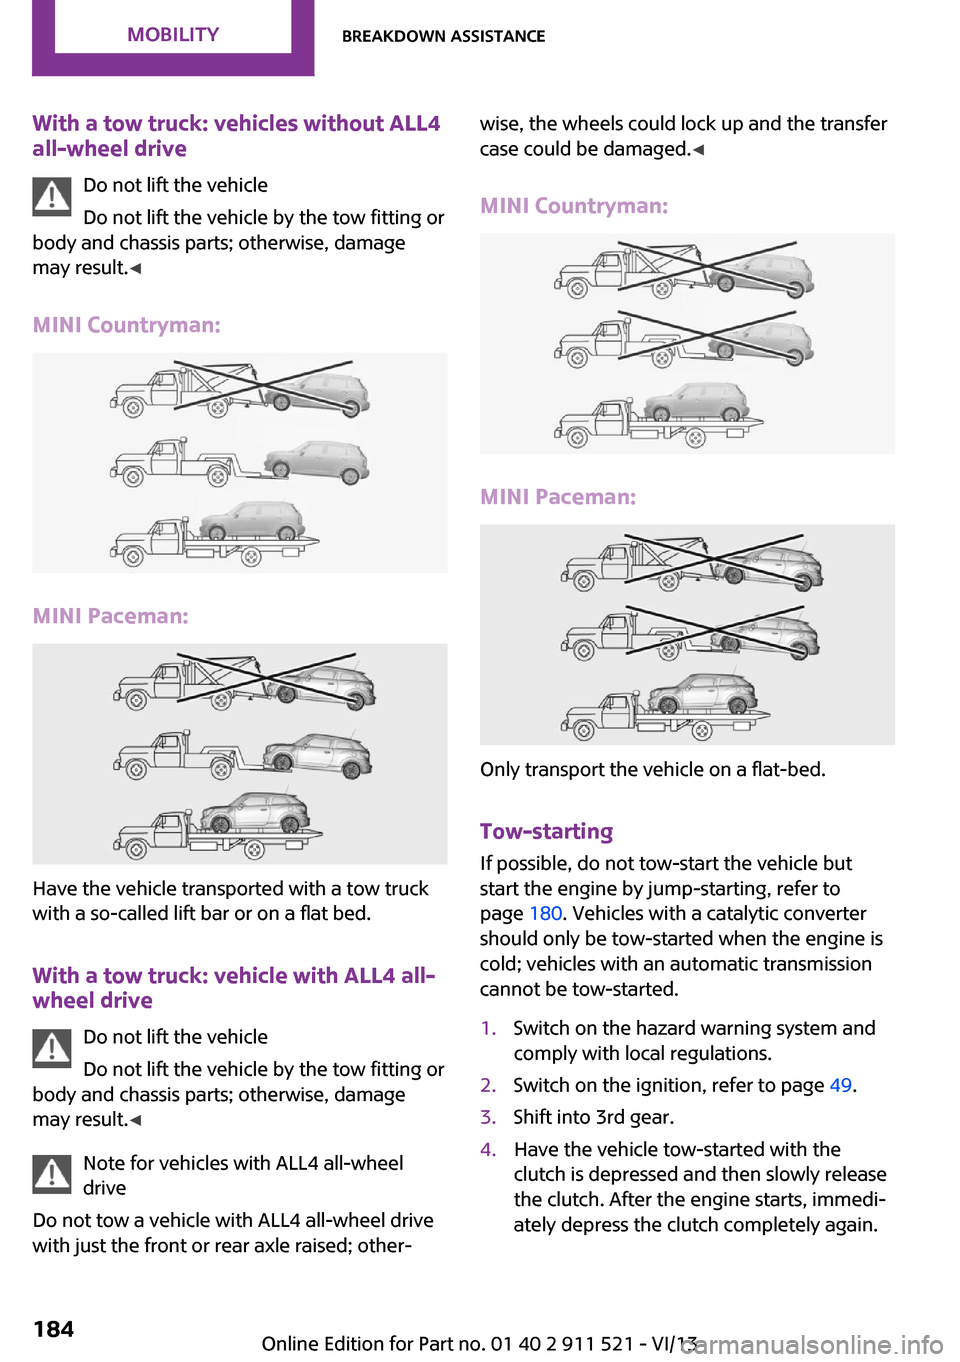
With a tow truck: vehicles without ALL4all-wheel drive
Do not lift the vehicle
Do not lift the vehicle by the tow fitting or
body and chassis parts; otherwise, damage
may result. ◀
MINI Countryman:
MINI Paceman:
Have the vehicle transported with a tow truck
with a so-called lift bar or on a flat bed.
With a tow truck: vehicle with ALL4 all-wheel drive
Do not lift the vehicle
Do not lift the vehicle by the tow fitting or
body and chassis parts; otherwise, damage
may result. ◀
Note for vehicles with ALL4 all-wheel
drive
Do not tow a vehicle with ALL4 all-wheel drive
with just the front or rear axle raised; other‐
wise, the wheels could lock up and the transfer
case could be damaged. ◀
MINI Countryman:
MINI Paceman:
Only transport the vehicle on a flat-bed.
Tow-starting
If possible, do not tow-start the vehicle but
start the engine by jump-starting, refer to page 180. Vehicles with a catalytic converter
should only be tow-started when the engine is
cold; vehicles with an automatic transmission
cannot be tow-started.
1.Switch on the hazard warning system and
comply with local regulations.2.Switch on the ignition, refer to page 49.3.Shift into 3rd gear.4.Have the vehicle tow-started with the
clutch is depressed and then slowly release
the clutch. After the engine starts, immedi‐
ately depress the clutch completely again.Seite 184MobilityBreakdown assistance184
Online Edition for Part no. 01 40 2 911 521 - VI/13
Page 191 of 218
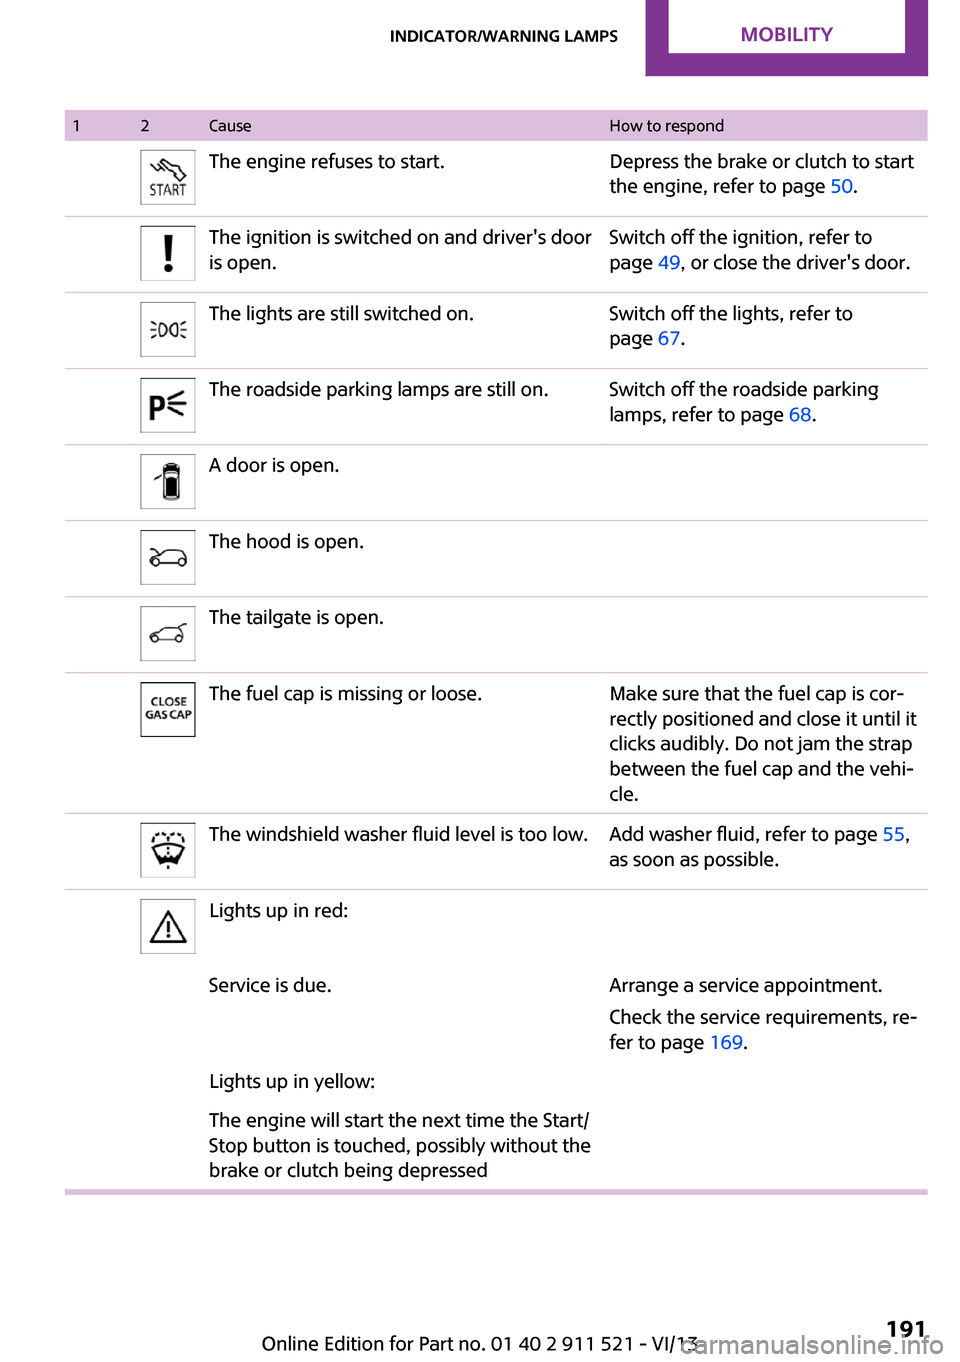
12CauseHow to respondThe engine refuses to start.Depress the brake or clutch to start
the engine, refer to page 50.The ignition is switched on and driver's door
is open.Switch off the ignition, refer to
page 49, or close the driver's door.The lights are still switched on.Switch off the lights, refer to
page 67.The roadside parking lamps are still on.Switch off the roadside parking
lamps, refer to page 68.A door is open.The hood is open.The tailgate is open.The fuel cap is missing or loose.Make sure that the fuel cap is cor‐
rectly positioned and close it until it
clicks audibly. Do not jam the strap
between the fuel cap and the vehi‐
cle.The windshield washer fluid level is too low.Add washer fluid, refer to page 55,
as soon as possible.Lights up in red:Service is due.Arrange a service appointment.
Check the service requirements, re‐
fer to page 169.Lights up in yellow:The engine will start the next time the Start/
Stop button is touched, possibly without the
brake or clutch being depressedSeite 191Indicator/warning lampsMobility191
Online Edition for Part no. 01 40 2 911 521 - VI/13
Page 192 of 218
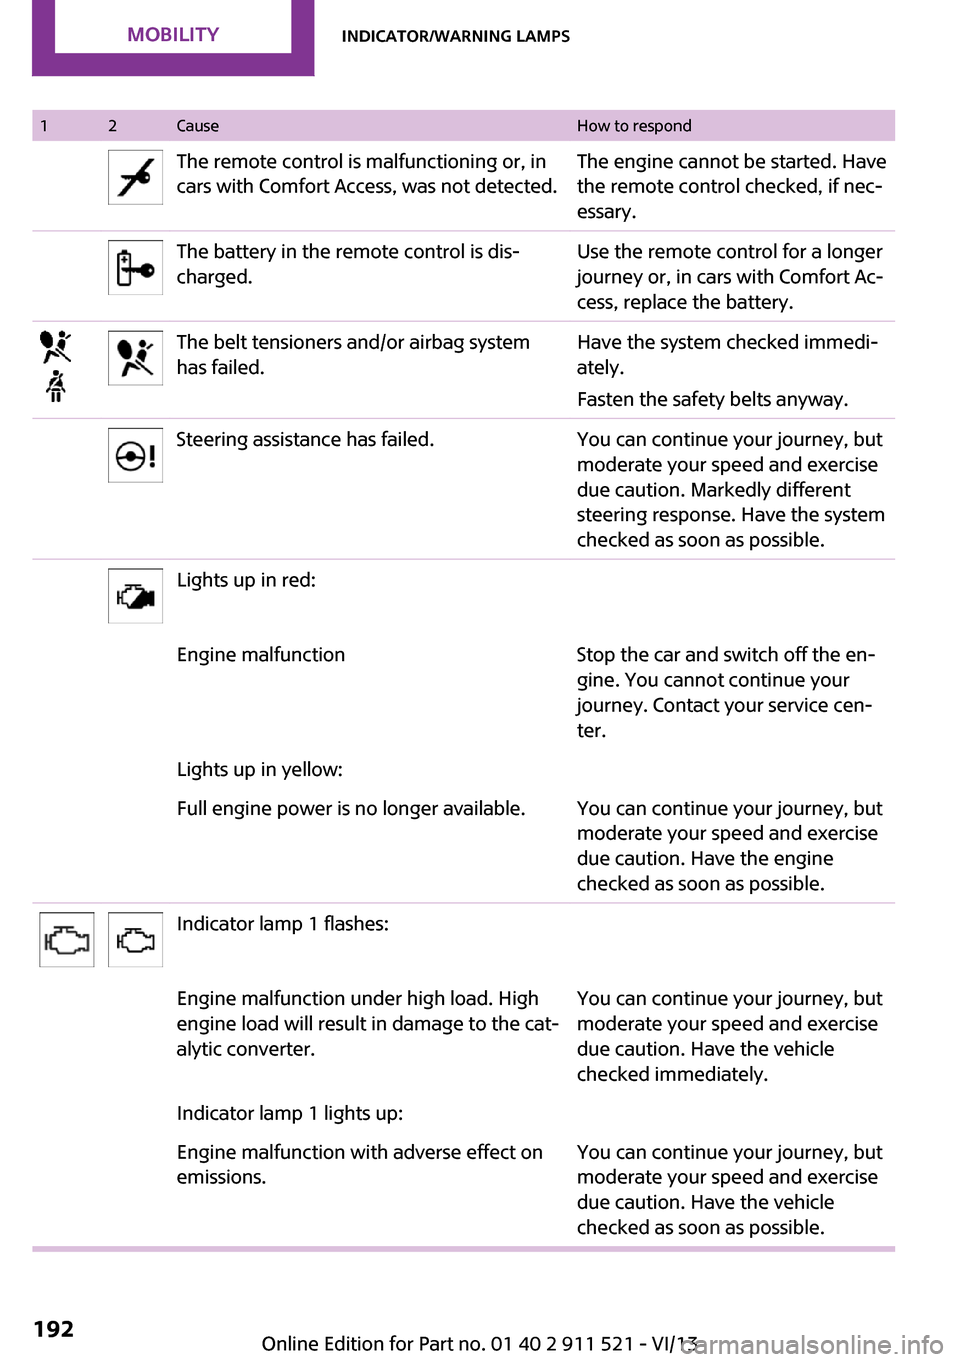
12CauseHow to respondThe remote control is malfunctioning or, in
cars with Comfort Access, was not detected.The engine cannot be started. Have
the remote control checked, if nec‐
essary.The battery in the remote control is dis‐
charged.Use the remote control for a longer
journey or, in cars with Comfort Ac‐
cess, replace the battery.The belt tensioners and/or airbag system
has failed.Have the system checked immedi‐
ately.
Fasten the safety belts anyway.Steering assistance has failed.You can continue your journey, but
moderate your speed and exercise
due caution. Markedly different
steering response. Have the system
checked as soon as possible.Lights up in red:Engine malfunctionStop the car and switch off the en‐
gine. You cannot continue your
journey. Contact your service cen‐
ter.Lights up in yellow:Full engine power is no longer available.You can continue your journey, but
moderate your speed and exercise
due caution. Have the engine
checked as soon as possible.Indicator lamp 1 flashes:Engine malfunction under high load. High
engine load will result in damage to the cat‐
alytic converter.You can continue your journey, but
moderate your speed and exercise
due caution. Have the vehicle
checked immediately.Indicator lamp 1 lights up:Engine malfunction with adverse effect on
emissions.You can continue your journey, but
moderate your speed and exercise
due caution. Have the vehicle
checked as soon as possible.Seite 192MobilityIndicator/warning lamps192
Online Edition for Part no. 01 40 2 911 521 - VI/13
Page 195 of 218
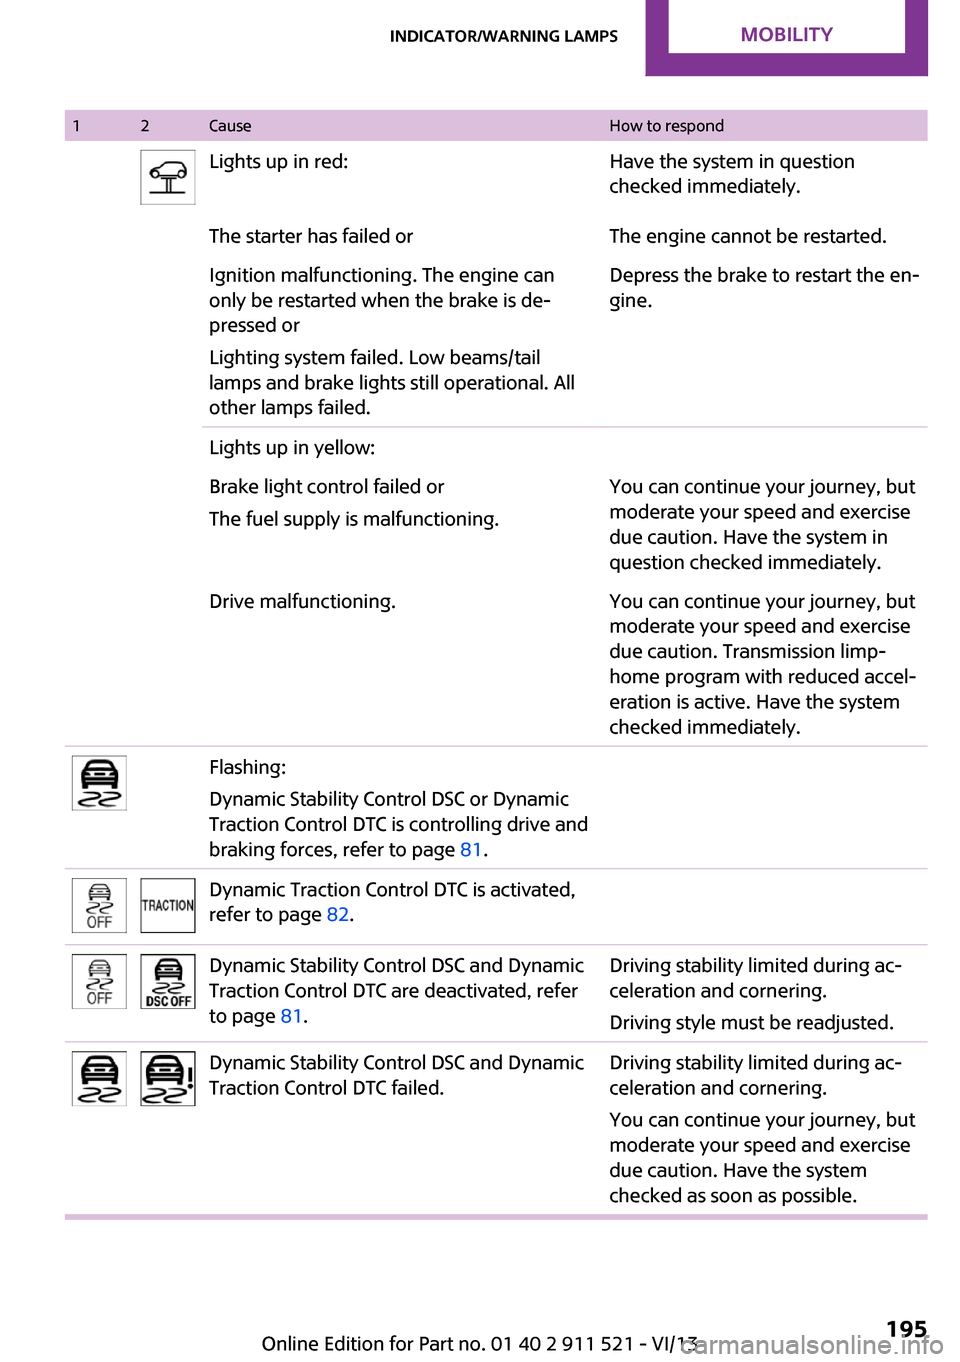
12CauseHow to respondLights up in red:Have the system in question
checked immediately.The starter has failed orThe engine cannot be restarted.Ignition malfunctioning. The engine can
only be restarted when the brake is de‐
pressed or
Lighting system failed. Low beams/tail
lamps and brake lights still operational. All
other lamps failed.Depress the brake to restart the en‐
gine.Lights up in yellow:Brake light control failed or
The fuel supply is malfunctioning.You can continue your journey, but
moderate your speed and exercise
due caution. Have the system in
question checked immediately.Drive malfunctioning.You can continue your journey, but
moderate your speed and exercise
due caution. Transmission limp-
home program with reduced accel‐
eration is active. Have the system
checked immediately.Flashing:
Dynamic Stability Control DSC or Dynamic
Traction Control DTC is controlling drive and
braking forces, refer to page 81.Dynamic Traction Control DTC is activated,
refer to page 82.Dynamic Stability Control DSC and Dynamic
Traction Control DTC are deactivated, refer
to page 81.Driving stability limited during ac‐
celeration and cornering.
Driving style must be readjusted.Dynamic Stability Control DSC and Dynamic
Traction Control DTC failed.Driving stability limited during ac‐
celeration and cornering.
You can continue your journey, but
moderate your speed and exercise
due caution. Have the system
checked as soon as possible.Seite 195Indicator/warning lampsMobility195
Online Edition for Part no. 01 40 2 911 521 - VI/13
Page 208 of 218
Everything from A to ZIndexA
ABS, Antilock Brake Sys‐ tem 81
Acoustic signal, refer to Check Control 65
Activated charcoal filter with automatic climate con‐
trol 91
Adaptive Light Control 69
Additives, engine oil 167
Airbags 72
Airbags, indicator/warning light 75
Air circulation, refer to Recir‐ culated air mode 88, 90
Air conditioner 87
Air conditioning 87
Air conditioning mode– Air conditioner 87– Automatic climate con‐
trol 89
Air distribution
– Automatic 90– Individual 88– Manual 88, 90
Air drying, refer to Cooling
function 91
Air flow rate 87, 90
Air pressure, refer to Tire infla‐ tion pressure 152
Air supply
– Air conditioner 87– Automatic climate con‐
trol 89
Alarm system 32
Alarm system
– Avoiding unintentional
alarms 32– Interior motion sensor 32– Tilt alarm sensor 32
ALL4 all-wheel system 83
All-wheel drive, refer to
ALL4 83
Alternating-code hand-held transmitter 93
Ambient lighting 71
Antifreeze, washer fluid 55
Antilock Brake System, ABS 81
Anti-slip control, refer to Dy‐ namic Stability Control
DSC 81
Anti-theft protection 23
Approved engine oils 167
Ashtray 96
Assistance, roadside 180
Assistance when driving off, refer to Hill drive-off assis‐
tant 83
Assistance with starting en‐ gine, refer to Jump-start‐
ing 180
Automatic– Air distribution 90– Air flow rate 90
Automatic car wash 186
Automatic climate control
– Automatic air distribution 90
Automatic, cruise control 84
Automatic headlamp con‐ trol 67
Automatic transmission with
Steptronic
– Kickdown 57– Overriding selector lever
lock 58
AUTO program with auto‐
matic climate control 90
AUX-IN port 130
Average fuel consumption 61
Average fuel consumption
– Setting the units 62Average speed 61
Average speed, refer to Com‐ puter 60
B Backrest curvature, refer to Lumbar support 37
Backrests, refer to Seats 36
Backup lamps, bulb replace‐ ment 175
Battery– Disposal 32– Remote control 22
Battery, refer to Vehicle bat‐
tery 178
Battery replacement
– Remote control 32
Belts, refer to Safety belts 38
Belt tensioners, refer to Safety belts 38
Bi-xenon headlamps 172
Blower, refer to Air flow rate 87, 90
Brake assistant 81
Brake discs, breaking in 110
Brake fluid, refer to Service re‐ quirements 64
Brake force distribution, elec‐ tronic 81
Brake pads, breaking in 110
Brakes
– Handbrake 51
Brakes, MINI maintenance
system 169
Brakes, service require‐ ments 64
Brake system, MINI mainte‐ nance system 169
Braking, notes 111
Seite 208ReferenceEverything from A to Z208
Online Edition for Part no. 01 40 2 911 521 - VI/13
Page 209 of 218
Breakdown assistance, Road‐side Assistance 180
Breaking in 110
Buckle tongue, rear– Height adjustment 39
Button for starting the engine,
refer to Start/Stop button 49
C
California Proposition 65 Warning 7
Car battery, refer to Vehicle battery 178
Car care products 187
Care, displays 189
Care, vehicle 187
Cargo area
– Comfort Access 30– Flat loading floor 99– Multi-function hook 101– Opening from the out‐
side 28– Partition net 100
Cargo area, enlarging
– Cargo cover 98
Cargo area lamp, refer to Inte‐
rior lamps 70
Cargo area tailgate, refer to Tailgate 28
Car horn, refer to Horn 14
Carpet, care 189
Car phone, refer to Tele‐ phone 136
Car wash 186
CBC, Cornering Brake Con‐ trol 81
CBS Condition Based Serv‐ ice 169
CD/DVD drives, care 189
Center armrest 103
Center console, refer to Around the center con‐
sole 17
Center rail 104
Center rail, refer to Storage compartments 104
Central locking– Comfort Access 30– From the inside 27– From the outside 24
Central locking system
– Concept 23– From the outside 23
Changes, technical, refer to
Safety 7
Changing wheels/tires 159
Check Control 65
Children, transporting 44
Child restraint fixing system
LATCH 45
Child restraint fixing sys‐ tems 44
Child restraint fixing systems, mounting 44
Child seat, mounting 44
Child seats, refer to Transport‐ ing children safely 44
Chrome parts, care 189
Circulation of air, refer to Re‐ circulated air mode 88, 90
Cleaning, displays 189
Cleaning, refer to Care 186
Climate 87
Climate mode
– Ventilation 91
Clock 59
Clock
– 12h/24h format 62
Closing
– From the inside 27– From the outside 24
Clutch, breaking in 110
Cockpit 14
Cold start, refer to Starting the engine 50
Combination instrument, refer to Displays 16
Combination switch, refer to Turn signal/high beams/
headlamp flasher 52
Combination switch, refer to Washer/wiper system 53
Comfort Access– In the car wash 31– Replacing the battery 32
Comfort area, refer to Around
the center console 17
Compartment for remote con‐ trol, refer to Ignition lock 49
Compass, digital 94
Computer 60
Computer, displaying informa‐ tion 60
Condition Based Service CBS 169
Confirmation signals for vehi‐ cle locking/unlocking 25
Consumption, refer to Aver‐ age fuel consumption 61
Control Display, care 189
Controls and displays 14
Control systems, driving stabil‐ ity 81
Convenient operation
– Windows 25
Coolant temperature 60
Cooling function, switching on and off 91
Cooling, maximum 90
Cornering Brake Control, CBC 81
Corrosion on brake discs 112
Cradle for telephone or mobile phone, refer to Snap-in
adapter 143
Cruise control 84
Cupholders 96
Current fuel consumption 61
Curve lights, refer to Adaptive Light Control 69
Cylinders, number of, refer to Engine data 204
D
Dashboard lighting, refer to Instrument lighting 70
Dashboard, refer to Cock‐ pit 14
Seite 209Everything from A to ZReference209
Online Edition for Part no. 01 40 2 911 521 - VI/13
Page 210 of 218
Dashboard, refer to Dis‐plays 16
Data, technical 204
Date– Display format 62– Setting 63
Daytime running lights 68
Decorative trim, care 189
Defogging windows 88
Defroster
– Rear window 88, 91
Defrosting windows 88
Defrost setting, refer to De‐ frosting windows 88
Digital compass 94
Dip stick, engine oil 166
Directional indicators, refer to Turn signals 52
Displacement, refer to Engine data 204
Display lighting, refer to In‐ strument lighting 70
Displays 16
Displays and controls 14
Displays, care 189
Displays, cleaning 189
Displays, refer to Instrument cluster 16
Disposal
– Remote control battery 32
Distance warning, refer to
Park Distance Control
PDC 85
Door key, refer to Remote control with integrated
key 22
Door lock 26
Door lock, confirmation sig‐ nals 25
Doors, manual operation 27
Doors, unlocking and locking
– Confirmation signals 25– From the inside 27– From the outside 24
DOT Quality Grades 156
Drive-off assistant, refer to Hill drive-off assistant 83
Driving notes, breaking
in 110
Driving off on hills, refer to Hill drive-off assistant 83
Driving on poor roads 113
Driving stability control sys‐ tems 81
Driving tips, refer to Driving notes 110
Dry air, refer to Cooling func‐ tion 91
DSC Dynamic Stability Con‐ trol 81
DTC Dynamic Traction Con‐ trol 82
Dynamic Stability Control DSC 81
Dynamic Traction Control DTC 82
E Electrical malfunction– Door lock 27– Fuel filler flap 148
Electronic brake-force distri‐
bution 81
Electronic Stability Program ESP, refer to Dynamic Stabil‐
ity Control DSC 81
Emergency activation
– Automatic transmission, re‐
fer to Overriding selector
lever lock 58
Emergency operation, fuel
filler flap, unlocking man‐
ually 148
Emergency operation, refer to
Manual operation
– Door lock 27
Energy, saving, refer to Saving
fuel 118
Engine, breaking in 110
Engine compartment 164
Engine oil, adding 166
Engine oil, additives, refer to Approved engine oils 167
Engine oil, alternative oil
types 167
Engine oil change intervals, refer to Service require‐
ments 64
Engine oil, dip stick 166
Engine oil, filling capacity 207
Engine oil, MINI maintenance system 169
Engine oil types, alterna‐ tive 167
Engine oil types, ap‐ proved 167
Engine, overheating, refer to Coolant temperature 60
Engine power, refer to Engine data 204
Engine, RPM 204
Engine start, assistance 180
Engine, starting 50
Engine, starting– Comfort Access 30
Engine, starting, Start/Stop
button 49
Engine, stopping, Start/Stop button 49
Engine, switching off 51
Equipment, interior 92
ESP Electronic Stability Pro‐ gram, refer to Dynamic Sta‐
bility Control DSC 81
Exchanging wheels/tires 159
Exterior mirrors 42
Exterior mirrors, adjusting 42
Exterior mirrors, folding in and out 42
Exterior sensors, care 189
External temperature dis‐ play 59
External temperature display
– Changing the units 62– On the computer 62
External temperature warn‐
ing 59
Externel temperature dis‐ play 59
Seite 210ReferenceEverything from A to Z210
Online Edition for Part no. 01 40 2 911 521 - VI/13
Page 212 of 218
Hood, opening 165
Hood, unlocking 165
Horn 14
Hydraulic brake assistant 81
I
Ice warning, refer to External temperature warning 59
Icy roads, refer to External temperature warning 59
Identification marks, run-flat tires 160
Identification marks, tires 156
Ignition 49
Ignition key position 1, refer to Radio ready state 49
Ignition key position 2, refer to Ignition on 49
Ignition key, refer to Remote control with integrated
key 22
Ignition lock 49
Ignition, switched off 50
Ignition, switched on 49
Indicator and warning lamps 17
Indicator and warning lamps– Tire Pressure Monitor
TPM 78
Indicator and warning lamps,
overview 190
Individual air distribution 88
Inflation pressure monitor, re‐ fer to Flat Tire Monitor 75
Inflation pressure monitor, re‐ fer to Tire Pressure Monitor
TPM 77
Inflation pressure, refer to Tire inflation pressure 152
Initializing
– Compass, refer to Calibrat‐
ing 95– Glass sunroof, electrical 33
Initializing, Flat Tire Monitor
FTM 75
Instrument cluster, refer to
Displays 16
Instrument lighting 70
Instruments, refer to Cock‐ pit 14
Integrated key 22
Interior equipment 92
Interior lamps 70
Interior lamps– Remote control 26
Interior mirror 43
Interior rearview mirror, com‐ pass 94
Interior temperature, setting
– Air conditioner 87– Automatic climate con‐
trol 89
Internet page 6
J Jump-starting 180
K
Keyless Go, refer to Comfort Access 30
Keyless opening and closing, refer to Comfort Access 30
Key Memory, refer to Personal Profile 22
Key, refer to Remote control with integrated key 22
Kickdown
– Automatic transmission with
Steptronic 57
Knee airbag 72
Knocking control 150
L Lamp and bulb replacement, bulb replacement 172
Lamp, replacing, refer to Lamp and bulb replace‐
ment 172
Lamps 67
Lamps, automatic headlamp
control 67
Lamps, parking lamps/low beams 67
Lap-and-shoulder belt, refer to Safety belts 38
LATCH child restraint fixing system 45
Leather, care 188
Leather care 188
LEDs, light-emitting di‐ odes 172
License plate lamp, bulb re‐ placement 175
Light-alloy wheels, care 189
Light-emitting diodes, LEDs 172
Lighter– Socket 96
Lighting
– Instruments 70
Lighting, lamp and bulb re‐
placement 172
Lighting, vehicle, refer to Lamps 67
Light switch 67
Lock buttons on doors, refer to Locking 27
Locking
– From the inside 27– From the outside 25– Setting the confirmation sig‐
nal 25– Without remote control, re‐
fer to Comfort Access 30
Locking, vehicle
– From the inside 27– From the outside 24
Longlife oils, alternative oil
types 167
Longlife oils, refer to Ap‐ proved engine oils 167
Low beams 67
Low beams
– Automatic 67
Low beams, automatic 67
Seite 212ReferenceEverything from A to Z212
Online Edition for Part no. 01 40 2 911 521 - VI/13