ECU MINI Countryman 2015 Owner's Manual (Mini Connected)
[x] Cancel search | Manufacturer: MINI, Model Year: 2015, Model line: Countryman, Model: MINI Countryman 2015Pages: 283, PDF Size: 6.76 MB
Page 22 of 283
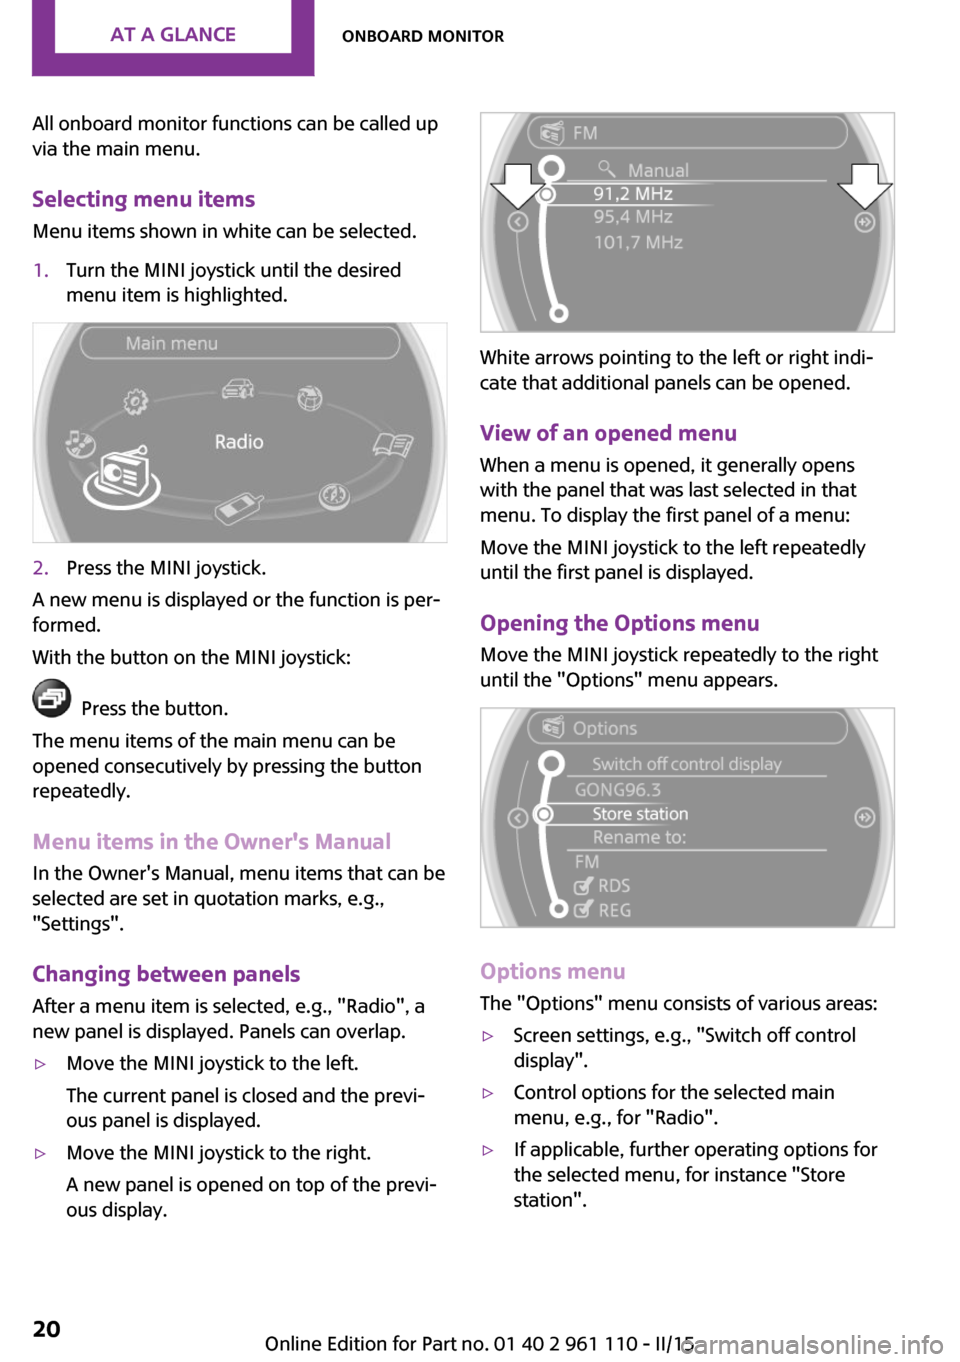
All onboard monitor functions can be called up
via the main menu.
Selecting menu items Menu items shown in white can be selected.1.Turn the MINI joystick until the desired
menu item is highlighted.2.Press the MINI joystick.
A new menu is displayed or the function is per‐
formed.
With the button on the MINI joystick:
Press the button.
The menu items of the main menu can be
opened consecutively by pressing the button
repeatedly.
Menu items in the Owner's Manual
In the Owner's Manual, menu items that can be
selected are set in quotation marks, e.g.,
"Settings".
Changing between panelsAfter a menu item is selected, e.g., "Radio", a
new panel is displayed. Panels can overlap.
▷Move the MINI joystick to the left.
The current panel is closed and the previ‐
ous panel is displayed.▷Move the MINI joystick to the right.
A new panel is opened on top of the previ‐
ous display.
White arrows pointing to the left or right indi‐
cate that additional panels can be opened.
View of an opened menu
When a menu is opened, it generally opens
with the panel that was last selected in that
menu. To display the first panel of a menu:
Move the MINI joystick to the left repeatedly
until the first panel is displayed.
Opening the Options menu Move the MINI joystick repeatedly to the right
until the "Options" menu appears.
Options menu
The "Options" menu consists of various areas:
▷Screen settings, e.g., "Switch off control
display".▷Control options for the selected main
menu, e.g., for "Radio".▷If applicable, further operating options for
the selected menu, for instance "Store
station".Seite 20AT A GLANCEOnboard monitor20
Online Edition for Part no. 01 40 2 961 110 - II/15
Page 27 of 283
The functions of the main menu have short
commands.
Some list items, such as the phone book en‐
tries, can also be selected via the voice activa‐
tion system. Say the list items exactly as they
are displayed on the list.
Having possible commands read aloud
You can have the system read possible com‐
mands aloud: ›Voice commands‹.
For example, if the "CD" menu is displayed, the
commands for the operating the CD player are
read out loud.
Executing functions using short
commands
Functions on the main menu can be performeddirectly by means of short commands, usually
irrespective of which menu item is currently se‐
lected, for instance ›Vehicle status‹.
List of short commands of the voice activation
system, refer to page 262.
Help dialog for the voice activation
system
Calling up help dialog: ›Help‹
Additional commands for the help dialog:▷›Help with examples‹: information about the current operating options and the most
important commands for them are an‐
nounced.▷›Help with voice activation‹: information
about the principle of operation for the
voice activation system is announced.Example: playing back a
CD
Via the main menu
The commands of the menu items are spoken
out loud, in the same way as they are selected
via the MINI joystick.1.Switch on the Entertainment sound output
if necessary.2. Press the button on the steering
wheel.3.›C D and multimedia‹
The medium last played is played back.4.›C D‹5.›C D drive‹
The CD is played back.6. Press the button on the steering
wheel again to select a specific track.7.›Track ...‹ e.g., CD track 4.
Via short commands
Playback of the CD can also be started using a
short command.
1.Switch on the Entertainment sound output
if necessary.2. Press the button on the steering
wheel.3.›C D drive Track ...‹ e.g., CD track 4.
Setting the voice dialog
You can set whether the system should use the
standard dialog or a shorter version.
In the shorter variant of the voice dialog, the
announcements from the system are issued in
an abbreviated form.
Seite 25Voice activation systemAT A GLANCE25
Online Edition for Part no. 01 40 2 961 110 - II/15
Page 38 of 283
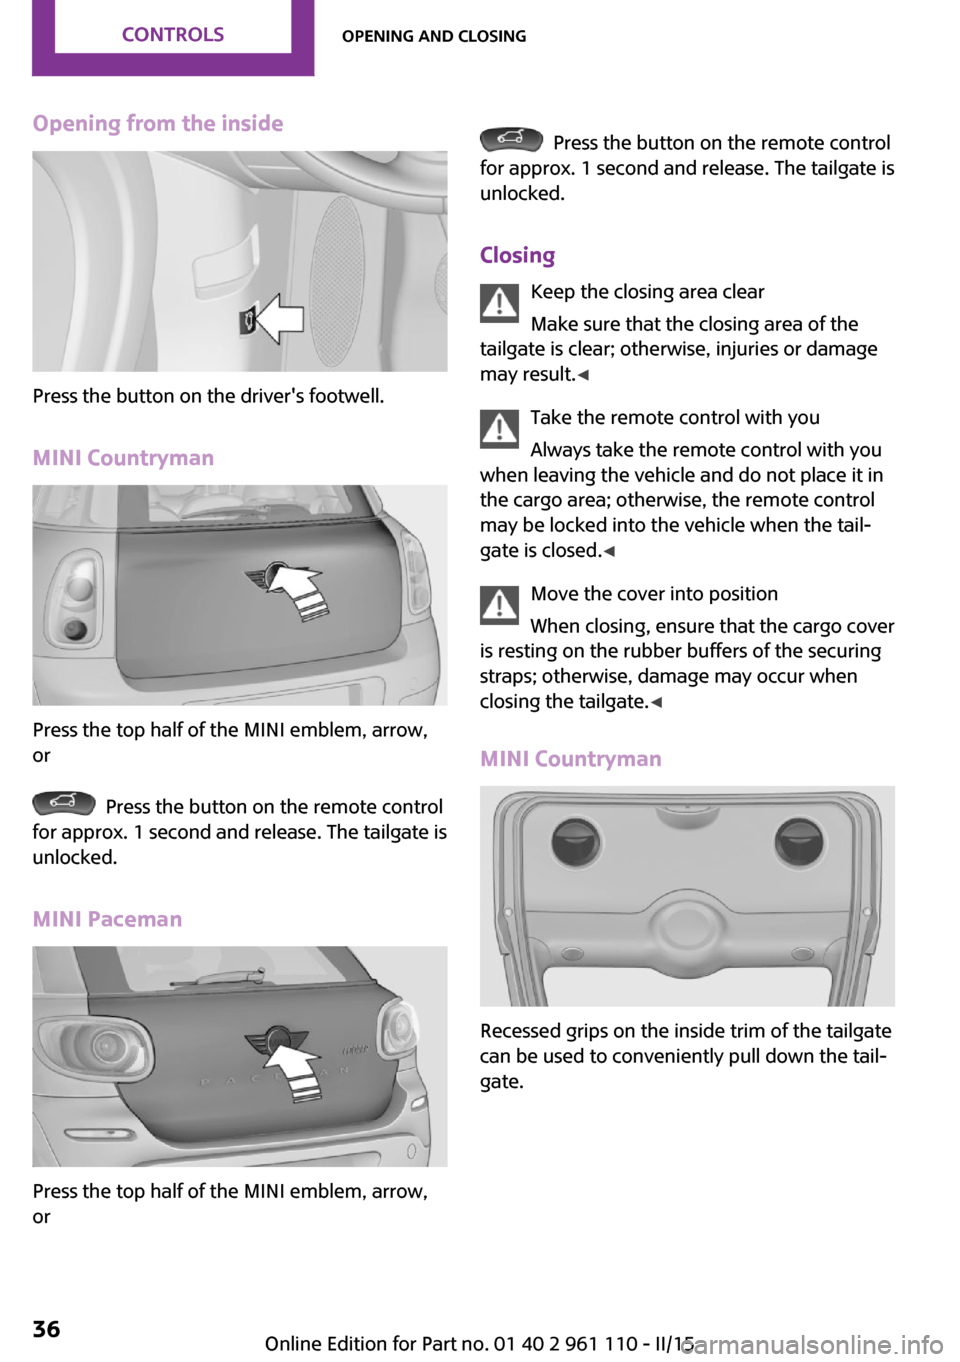
Opening from the inside
Press the button on the driver's footwell.
MINI Countryman
Press the top half of the MINI emblem, arrow,
or
Press the button on the remote control
for approx. 1 second and release. The tailgate is
unlocked.
MINI Paceman
Press the top half of the MINI emblem, arrow,
or
Press the button on the remote control
for approx. 1 second and release. The tailgate is
unlocked.
Closing Keep the closing area clear
Make sure that the closing area of the
tailgate is clear; otherwise, injuries or damage
may result. ◀
Take the remote control with you
Always take the remote control with you
when leaving the vehicle and do not place it in
the cargo area; otherwise, the remote control
may be locked into the vehicle when the tail‐
gate is closed. ◀
Move the cover into position
When closing, ensure that the cargo cover
is resting on the rubber buffers of the securing
straps; otherwise, damage may occur when
closing the tailgate. ◀
MINI Countryman
Recessed grips on the inside trim of the tailgate
can be used to conveniently pull down the tail‐
gate.
Seite 36CONTROLSOpening and closing36
Online Edition for Part no. 01 40 2 961 110 - II/15
Page 49 of 283
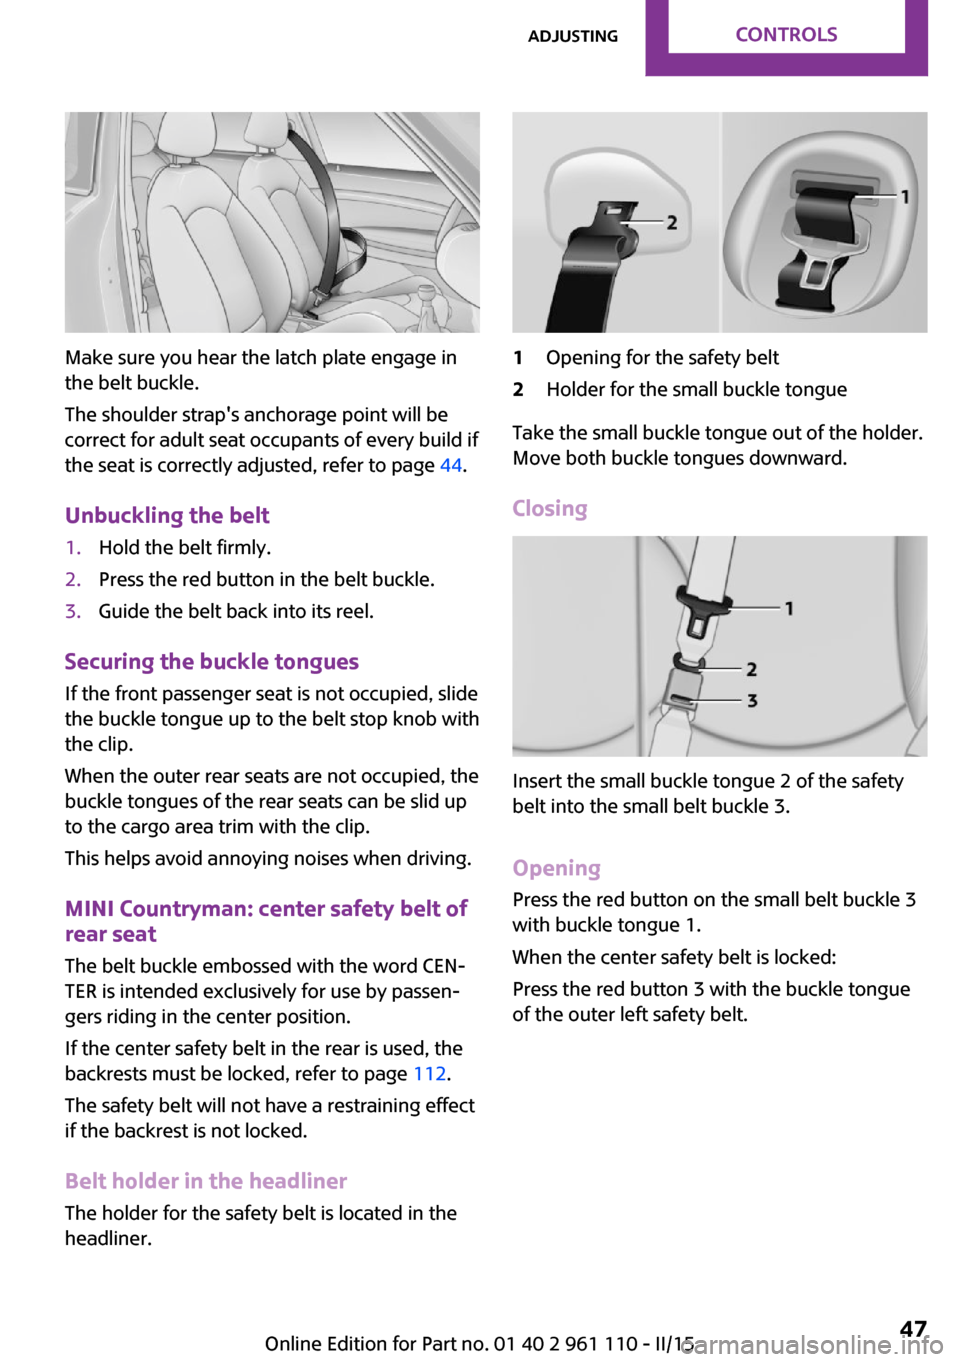
Make sure you hear the latch plate engage in
the belt buckle.
The shoulder strap's anchorage point will be
correct for adult seat occupants of every build if
the seat is correctly adjusted, refer to page 44.
Unbuckling the belt
1.Hold the belt firmly.2.Press the red button in the belt buckle.3.Guide the belt back into its reel.
Securing the buckle tongues
If the front passenger seat is not occupied, slide
the buckle tongue up to the belt stop knob with
the clip.
When the outer rear seats are not occupied, the
buckle tongues of the rear seats can be slid up
to the cargo area trim with the clip.
This helps avoid annoying noises when driving.
MINI Countryman: center safety belt of
rear seat
The belt buckle embossed with the word CEN‐
TER is intended exclusively for use by passen‐
gers riding in the center position.
If the center safety belt in the rear is used, the
backrests must be locked, refer to page 112.
The safety belt will not have a restraining effect
if the backrest is not locked.
Belt holder in the headliner
The holder for the safety belt is located in the
headliner.
1Opening for the safety belt2Holder for the small buckle tongue
Take the small buckle tongue out of the holder.
Move both buckle tongues downward.
Closing
Insert the small buckle tongue 2 of the safety
belt into the small belt buckle 3.
Opening Press the red button on the small belt buckle 3
with buckle tongue 1.
When the center safety belt is locked:
Press the red button 3 with the buckle tongue
of the outer left safety belt.
Seite 47AdjustingCONTROLS47
Online Edition for Part no. 01 40 2 961 110 - II/15
Page 55 of 283
NotesManufacturer's information for child re‐
straint fixing systems
To select, mount and use child restraint fixing
systems, observe the information provided by
the system manufacturer; otherwise, the pro‐
tective effect can be impaired. ◀
On the front passenger seat
Deactivating the airbags After installing a child restraint fixing system on
the front passenger seat, ensure that the front,
side, and knee airbags on the front passenger
side are deactivated.
Deactivating the front passenger airbags
If a child restraint fixing system is used in
the front passenger seat, the front passenger
airbags must be deactivated; otherwise, there
is an increased risk of injury to the child when
the airbags are triggered, even with a child re‐
straint fixing system. ◀
Seat position and height
Before installing a child restraint fixing system,
move the front passenger seat as far back as
possible and adjust its height to the highest po‐
sition to obtain the best possible position for
the belt and to offer optimal protection in the
event of an accident.
Do not change this seat position once it has
been set.Child seat security
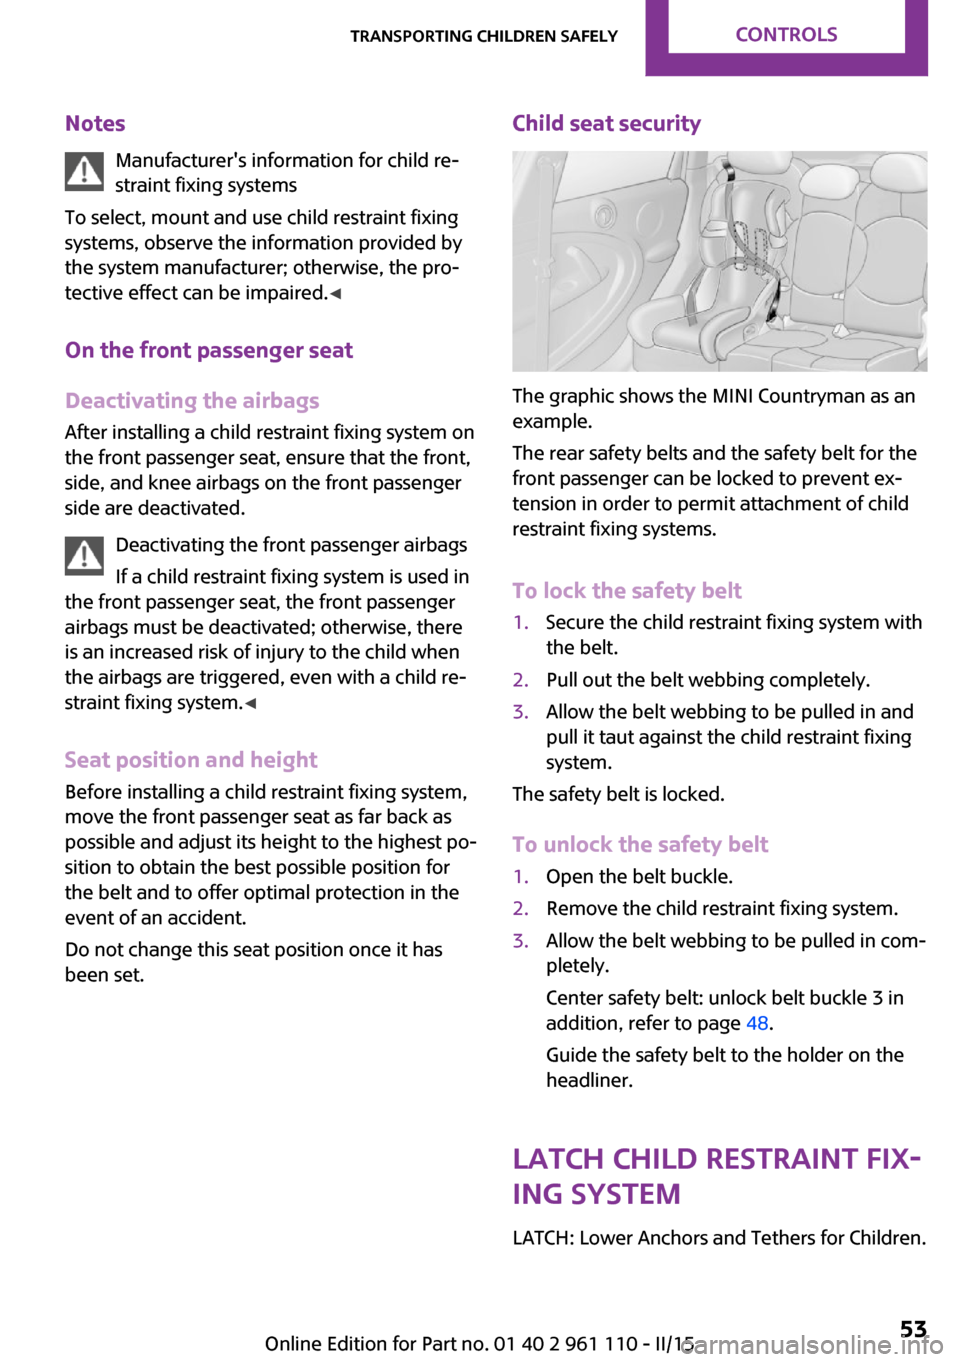
The graphic shows the MINI Countryman as an
example.
The rear safety belts and the safety belt for the
front passenger can be locked to prevent ex‐
tension in order to permit attachment of child
restraint fixing systems.
To lock the safety belt
1.Secure the child restraint fixing system with
the belt.2.Pull out the belt webbing completely.3.Allow the belt webbing to be pulled in and
pull it taut against the child restraint fixing
system.
The safety belt is locked.
To unlock the safety belt
1.Open the belt buckle.2.Remove the child restraint fixing system.3.Allow the belt webbing to be pulled in com‐
pletely.
Center safety belt: unlock belt buckle 3 in
addition, refer to page 48.
Guide the safety belt to the holder on the
headliner.
LATCH child restraint fix‐
ing system
LATCH: Lower Anchors and Tethers for Children.
Seite 53Transporting children safelyCONTROLS53
Online Edition for Part no. 01 40 2 961 110 - II/15
Page 56 of 283

NotesManufacturer's information for LATCH
child restraint fixing systems
To mount and use the LATCH child restraint fix‐
ing systems, observe the operating and safety
information from the system manufacturer;
otherwise, the level of protection may be re‐
duced. ◀
Mounts for the lower LATCH anchors
The lower anchors may be used to attach the
CRS to the vehicle seat up to a combined child
and CRS weight of 65 lb/30 kg when the child is
restrained by the internal harnesses.
Correctly engage the lower LATCH an‐
chors
Make sure that the lower LATCH anchors have properly engaged and that the child restraint
fixing system is resting snugly against the back‐
rest; otherwise, the degree of protection of‐
fered may be reduced. ◀
Before installing the child seat, pull the belt out
of the area for the child restraint fixing system.
MINI Countryman
The mounts for the lower LATCH anchors are
located at the points indicated by the arrows.
MINI Paceman
The mounts for the lower LATCH anchors are
located at the points indicated by the arrows.
The corresponding symbol shows the
mounts for the lower LATCH anchors.
Mounting LATCH child restraint fixing systems
1.Mount the child restraint fixing system; re‐
fer to the operating instructions of the sys‐
tem.2.Ensure that both LATCH anchors are prop‐
erly connected.
Child restraint fixing
systems with an upper re‐
taining strap
Mounting points LATCH mounting points
Only use the mounting points for the up‐
per LATCH retaining strap to secure child re‐
straint systems; otherwise, the mounting points
could be damaged. ◀
Seite 54CONTROLSTransporting children safely54
Online Edition for Part no. 01 40 2 961 110 - II/15
Page 57 of 283

MINI Countryman
There are two additional mounting points for
child restraint fixing systems with an upper re‐
taining strap, arrows.
MINI Paceman
There are two additional mounting points for
child restraint fixing systems with an upper re‐
taining strap, arrows.
Guide of the upper LATCH retaining
strap
Retaining strap
Make sure the upper retaining strap does
not run over sharp edges and is not twisted as
it passes to the top anchor. Otherwise, the
strap will not properly secure the child restraint
fixing system in the event of an accident. ◀
Outer seats:1Direction of travel2Head restraint3Cargo area floor4Hook for upper retaining strap5Mounting point6Backrest7Upper retaining strap of child restraint fix‐
ing system
MINI Countryman, center seat
1Direction of travel2Head restraint3Hook for upper retaining strap4Mounting point5Cargo area floor6Backrest7Upper retaining strap of child restraint fix‐
ing systemSeite 55Transporting children safelyCONTROLS55
Online Edition for Part no. 01 40 2 961 110 - II/15
Page 61 of 283
3.Press the Start/Stop button.
The ignition is activated automatically for a cer‐
tain time and is stopped as soon as the engine
starts.
Engine stop
General information Take the remote control with you
Take the remote control with you when
leaving the vehicle so that children, for exam‐
ple, cannot operate the windows and injure
themselves. ◀
Set the parking brake and further secure
the vehicle as required
Set the parking brake firmly when parking; oth‐
erwise, the vehicle may roll. On steep upward
and downward inclines, further secure the ve‐
hicle, for example, by turning the steering
wheel in the direction of the curb. ◀
Before driving into a car wash To make it possible for the vehicle to roll in an
automatic car wash, follow the information on
Washing in automatic car washes, refer to
page 250.
Switching off the engine
Manual transmission
1.With the vehicle at a standstill, press the
Start/Stop button.2.Shift into first gear or reverse.3.Set the parking brake firmly.4.Remove the remote control from the igni‐
tion lock.Steptronic transmission1.Engage transmission position P with the ve‐
hicle stopped.2.Press the Start/Stop button.3.Set the parking brake firmly.4.Remove the remote control from the igni‐
tion lock.
Parking brake
The concept
The parking brake is primarily intended to pre‐
vent the vehicle from rolling while parked; it
brakes the rear wheels.
Also follow the instructions under Switching off
the engine, refer to page 59.
Setting The lever engages automatically.
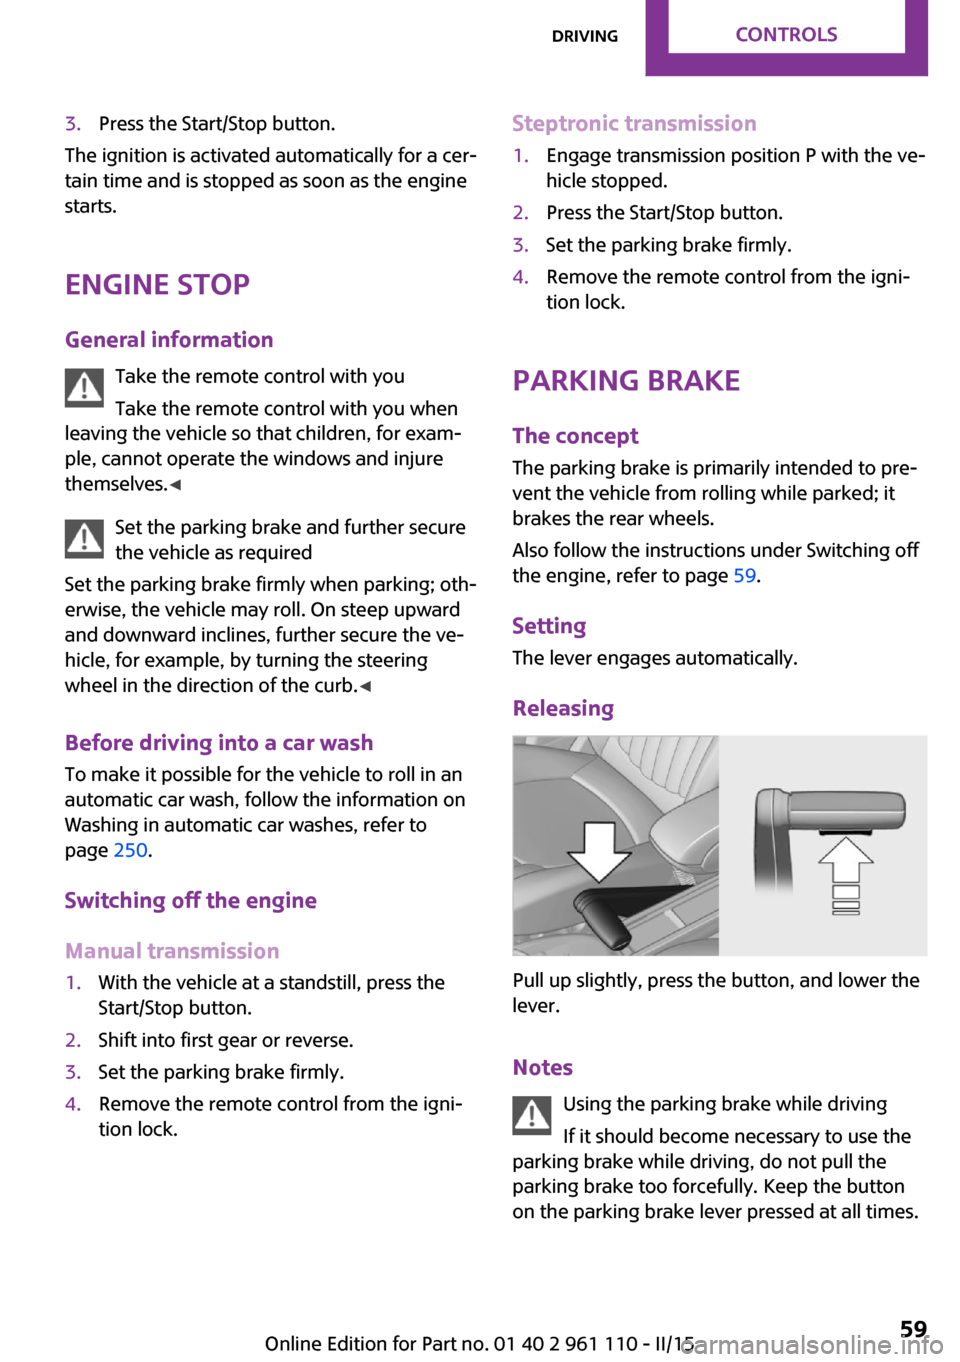
Releasing
Pull up slightly, press the button, and lower the
lever.
Notes Using the parking brake while driving
If it should become necessary to use the
parking brake while driving, do not pull the
parking brake too forcefully. Keep the button
on the parking brake lever pressed at all times.
Seite 59DrivingCONTROLS59
Online Edition for Part no. 01 40 2 961 110 - II/15
Page 66 of 283
Reverse gearSelect only when the vehicle is stationary. When
the gearshift lever is pressed to the left, a slight
resistance needs to be overcome.
Steptronic transmission In addition to the fully automatic mode, gears
can also be shifted manually using Steptronic,
refer to page 65.
Parking the vehicle Secure the vehicle
Before leaving the vehicle with the en‐
gine running, move the selector lever to posi‐
tion P and set the handbrake; otherwise, the
vehicle will begin moving. ◀
Disengaging the remote control
To remove the remote control from the ignition
lock, first move the selector lever to position P
and switch off the engine: interlock. Remove
the remote control from the ignition lock, refer
to page 57.
Selector lever positions
P R N D M/S + –
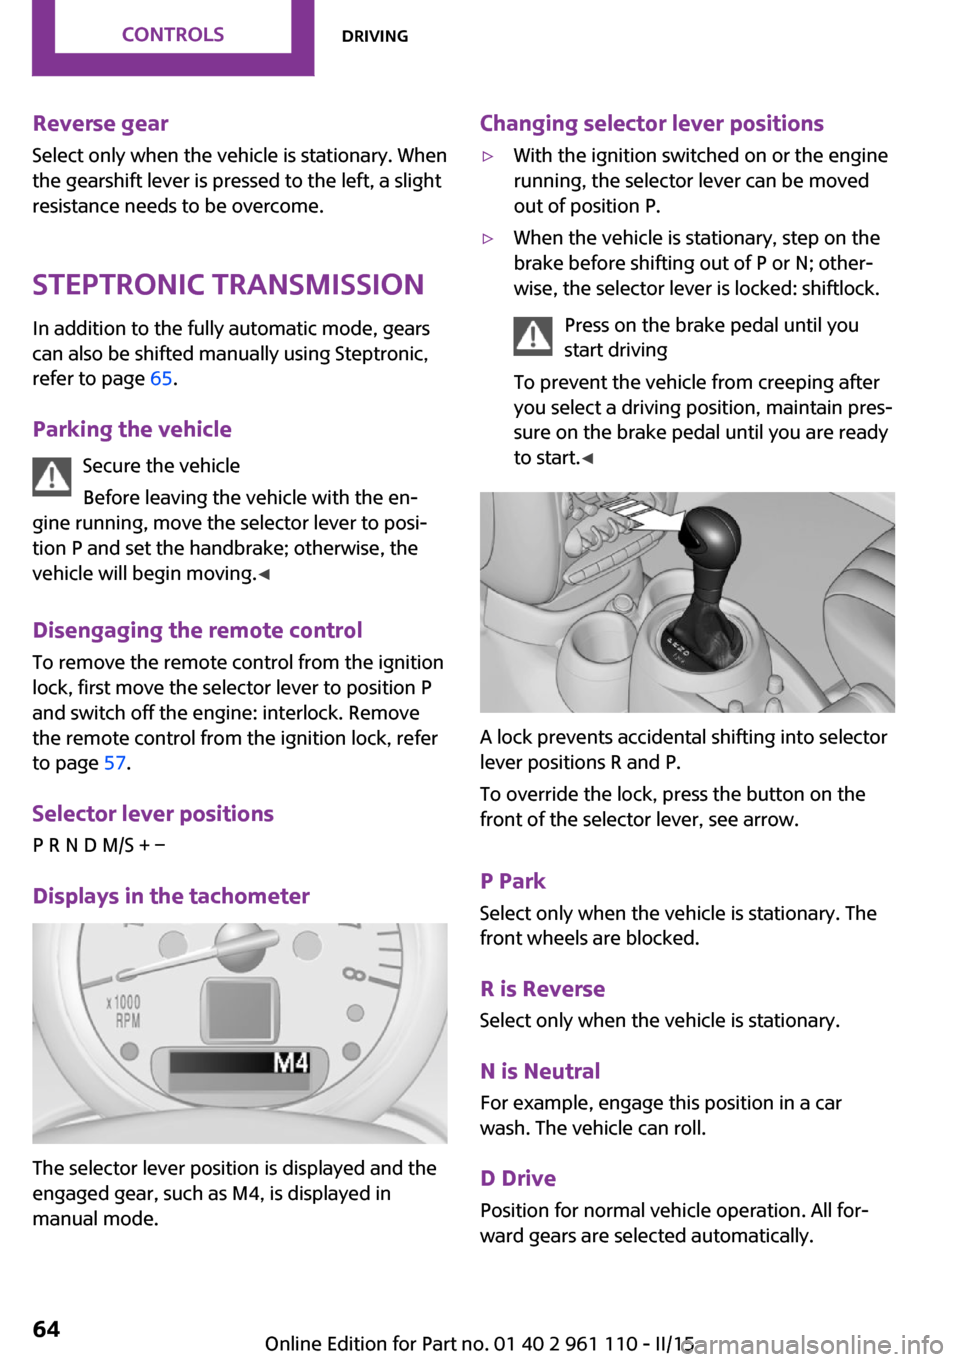
Displays in the tachometer
The selector lever position is displayed and the
engaged gear, such as M4, is displayed in
manual mode.
Changing selector lever positions▷With the ignition switched on or the engine
running, the selector lever can be moved
out of position P.▷When the vehicle is stationary, step on the
brake before shifting out of P or N; other‐
wise, the selector lever is locked: shiftlock.
Press on the brake pedal until you
start driving
To prevent the vehicle from creeping after
you select a driving position, maintain pres‐
sure on the brake pedal until you are ready
to start. ◀
A lock prevents accidental shifting into selector
lever positions R and P.
To override the lock, press the button on the
front of the selector lever, see arrow.
P Park
Select only when the vehicle is stationary. The
front wheels are blocked.
R is Reverse
Select only when the vehicle is stationary.
N is NeutralFor example, engage this position in a car
wash. The vehicle can roll.
D Drive Position for normal vehicle operation. All for‐
ward gears are selected automatically.
Seite 64CONTROLSDriving64
Online Edition for Part no. 01 40 2 961 110 - II/15
Page 69 of 283

DisplaysVehicle equipment
This chapter describes all series equipment as
well as country-specific and special equipment
offered for this model series. Therefore, it also
describes equipment that may not be found in
your vehicle, for instance due to the selected
special equipment or the country version. This
also applies to safety-related functions and sys‐
tems.
When using the features and systems described
here, adhere to local regulations.
Odometer, external tem‐
perature display, clock
At a glance1Current speed2Odometer, trip odometer, external temper‐
ature, time3Resetting the trip odometer
Press the button on the turn indicator lever to
open information in display area 2.
The following information is displayed consecu‐
tively:
▷Trip odometer▷Time▷External temperatureTrip odometer
Displaying the trip odometer Press button 3 briefly.
Resetting the trip odometer1.Press button 3 briefly.
The trip odometer is displayed.2.Press button 3 again.
The trip odometer is reset.
Time
Set the time, refer to page 71.
External temperature, external
temperature warning
If the display drops to +37 ℉/+3 ℃, a signal
sounds and a warning light lights up. There is
the increased danger of ice.
Ice on roads
Even at temperatures above
+37 ℉/+3 ℃, there can be a risk of ice on
roads.
Therefore, drive carefully on bridges and shady
roads, for example, to avoid the increased dan‐
ger of an accident. ◀
Units of measure To set the respective units of measure, miles or
km for the odometer and ℃ or ℉ for the exter‐
nal temperature, refer to page 71.
Seite 67DisplaysCONTROLS67
Online Edition for Part no. 01 40 2 961 110 - II/15