clock setting MINI Countryman 2015 Owner's Manual (Mini Connected)
[x] Cancel search | Manufacturer: MINI, Model Year: 2015, Model line: Countryman, Model: MINI Countryman 2015Pages: 283, PDF Size: 6.76 MB
Page 23 of 283

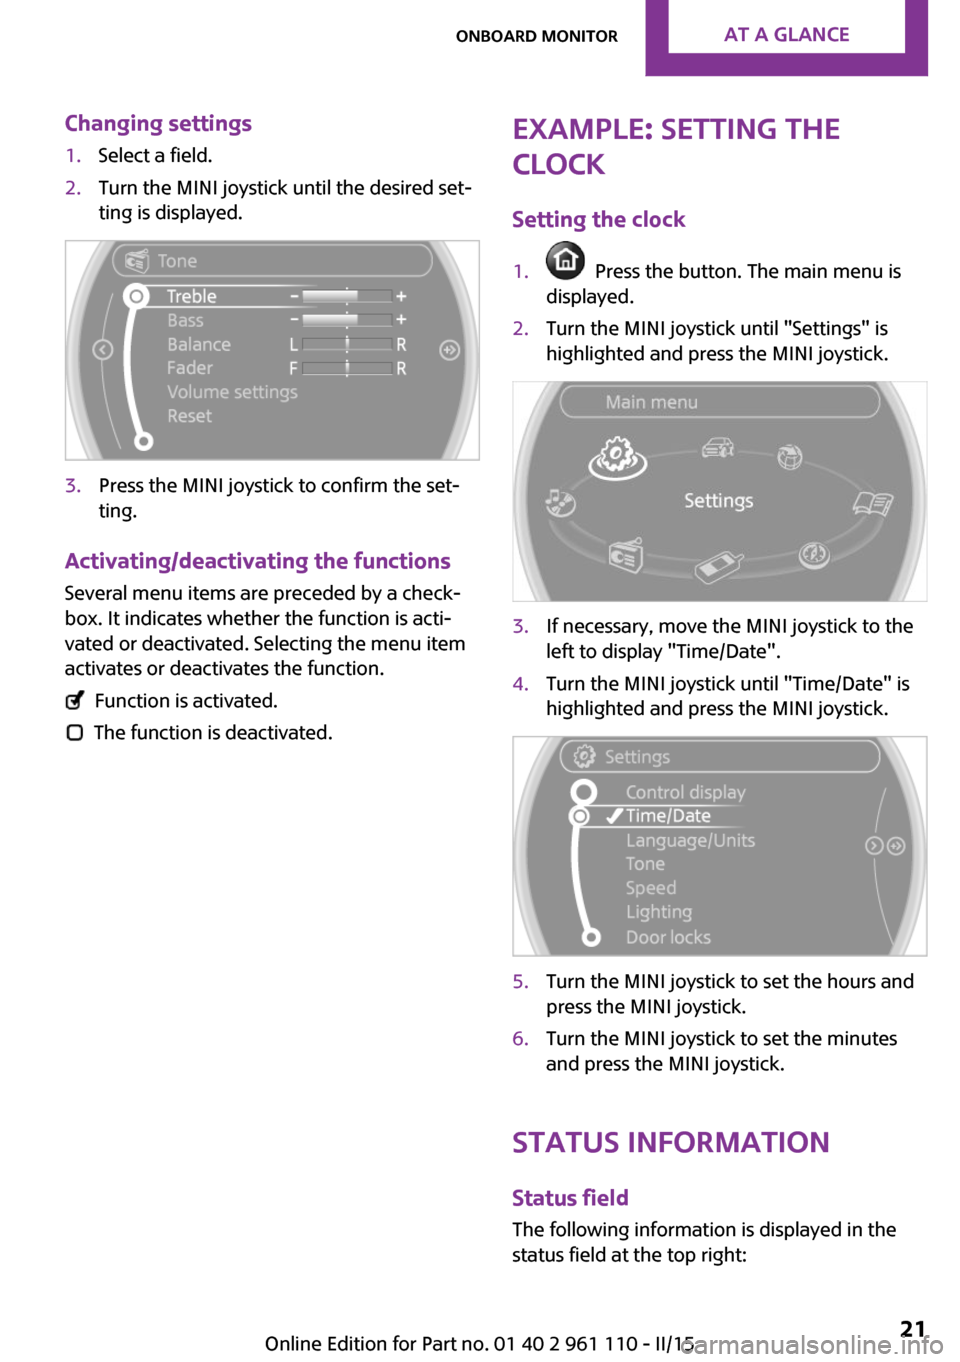
Changing settings1.Select a field.2.Turn the MINI joystick until the desired set‐
ting is displayed.3.Press the MINI joystick to confirm the set‐
ting.
Activating/deactivating the functions
Several menu items are preceded by a check‐box. It indicates whether the function is acti‐
vated or deactivated. Selecting the menu item
activates or deactivates the function.
Function is activated.
The function is deactivated.
Example: setting the
clock
Setting the clock1. Press the button. The main menu is
displayed.2.Turn the MINI joystick until "Settings" is
highlighted and press the MINI joystick.3.If necessary, move the MINI joystick to the
left to display "Time/Date".4.Turn the MINI joystick until "Time/Date" is
highlighted and press the MINI joystick.5.Turn the MINI joystick to set the hours and
press the MINI joystick.6.Turn the MINI joystick to set the minutes
and press the MINI joystick.
Status information
Status fieldThe following information is displayed in the
status field at the top right:
Seite 21Onboard monitorAT A GLANCE21
Online Edition for Part no. 01 40 2 961 110 - II/15
Page 33 of 283

▷While the vehicle is being unlocked, the re‐
mote control is recognized and the settings
stored with it are called up and imple‐
mented.▷Your personal settings will be recognized
and called up again even if the vehicle has
been used in the meantime by someone
else with another remote control.▷The individual settings are stored for no
more than three remote controls.
Personal Profile settings
The following functions and settings can be
stored in a profile.
More information on the settings can be found
under:
▷Response of the central locking system
when the car is being unlocked, refer to
page 32.▷Automatic locking of the vehicle, refer to
page 35.▷Triple turn signal activation, refer to
page 60.▷Settings for the displays on the onboard
monitor, in the speedometer, and in the
tachometer:▷12h/24h clock format, refer to
page 71.▷Date format, refer to page 72.▷Brightness of the Control Display, refer
to page 73.▷Language on the Control Display, refer
to page 72.▷Units of measure for fuel consumption,
distance covered/remaining distances,
and temperature, refer to page 71.▷Light settings:▷Headlamp courtesy delay feature, refer
to page 78.▷Daytime running lights, refer to
page 78.▷Automatic climate control, refer to
page 101: AUTO program, activating/deac‐
tivating the cooling function, setting the
temperature, air volume, and air distribu‐
tion.▷Entertainment:▷Tone settings, refer to page 154.▷Volume, refer to page 154.
Central locking system
The concept
The central locking system becomes active
when the driver's door is closed.
The system simultaneously engages and re‐
leases the locks on the following:
▷Doors.▷Tailgate.▷Fuel filler flap.
Operating from the outside
▷Via the remote control.▷Via the door lock.▷In cars with Comfort Access, via the door
handles on the driver's and front passenger
sides.
The following takes place simultaneously when
locking/unlocking the vehicle via the remote
control:
▷Depending on the vehicle equipment, the
anti-theft protection is switched on and off
as well. The anti-theft protection makes it
impossible to unlock the doors using the
lock buttons or door handles.▷The welcome lamps, interior lamps, and
ambient lighting are switched on and off.▷The alarm system is armed or disarmed, re‐
fer to page 39.Seite 31Opening and closingCONTROLS31
Online Edition for Part no. 01 40 2 961 110 - II/15
Page 69 of 283

DisplaysVehicle equipment
This chapter describes all series equipment as
well as country-specific and special equipment
offered for this model series. Therefore, it also
describes equipment that may not be found in
your vehicle, for instance due to the selected
special equipment or the country version. This
also applies to safety-related functions and sys‐
tems.
When using the features and systems described
here, adhere to local regulations.
Odometer, external tem‐
perature display, clock
At a glance1Current speed2Odometer, trip odometer, external temper‐
ature, time3Resetting the trip odometer
Press the button on the turn indicator lever to
open information in display area 2.
The following information is displayed consecu‐
tively:
▷Trip odometer▷Time▷External temperatureTrip odometer
Displaying the trip odometer Press button 3 briefly.
Resetting the trip odometer1.Press button 3 briefly.
The trip odometer is displayed.2.Press button 3 again.
The trip odometer is reset.
Time
Set the time, refer to page 71.
External temperature, external
temperature warning
If the display drops to +37 ℉/+3 ℃, a signal
sounds and a warning light lights up. There is
the increased danger of ice.
Ice on roads
Even at temperatures above
+37 ℉/+3 ℃, there can be a risk of ice on
roads.
Therefore, drive carefully on bridges and shady
roads, for example, to avoid the increased dan‐
ger of an accident. ◀
Units of measure To set the respective units of measure, miles or
km for the odometer and ℃ or ℉ for the exter‐
nal temperature, refer to page 71.
Seite 67DisplaysCONTROLS67
Online Edition for Part no. 01 40 2 961 110 - II/15
Page 73 of 283

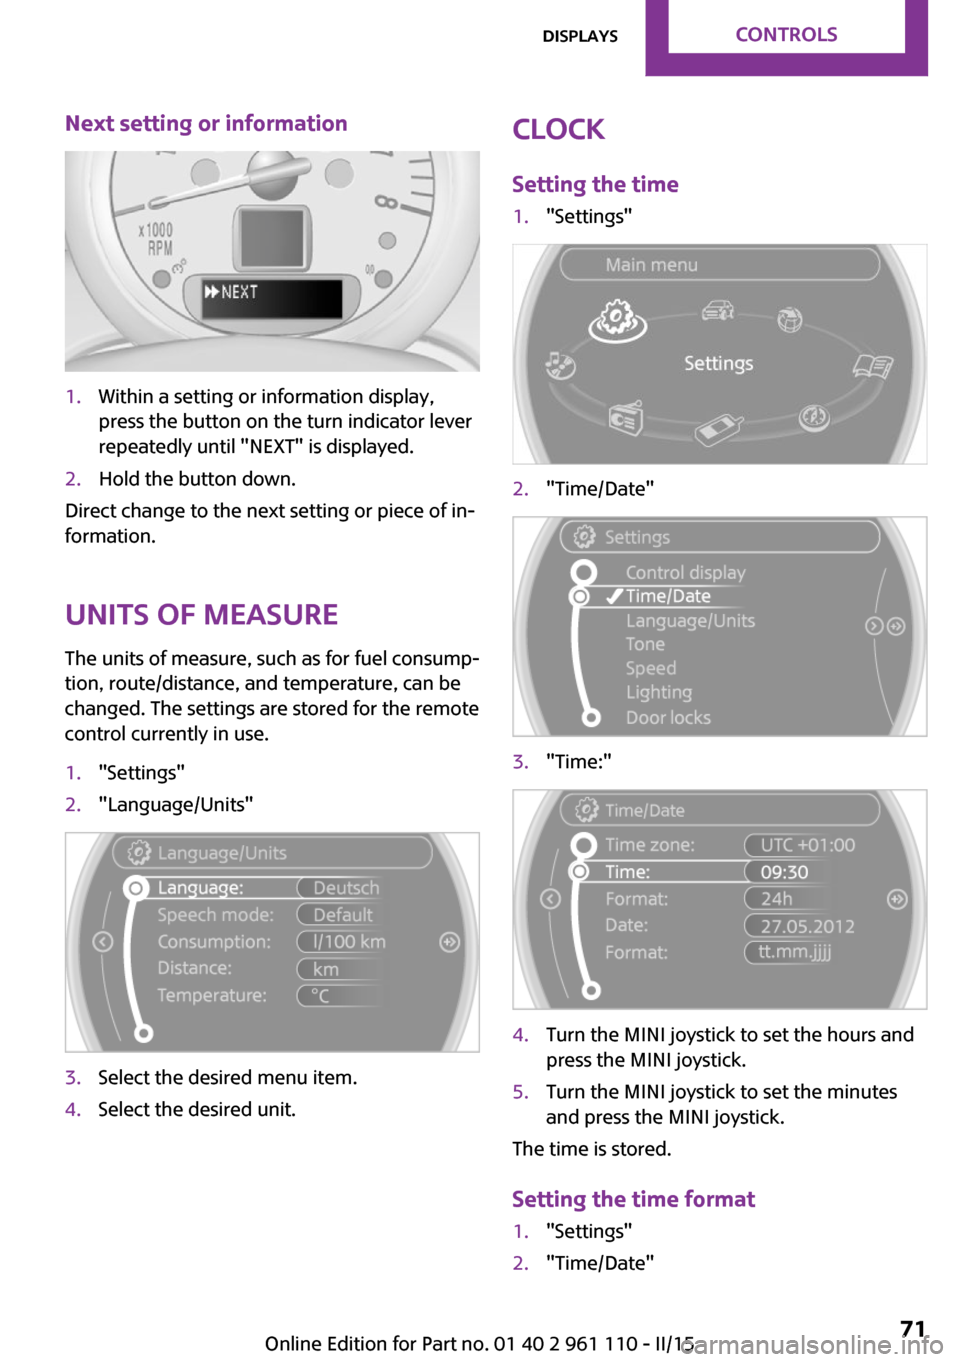
Next setting or information1.Within a setting or information display,
press the button on the turn indicator lever
repeatedly until "NEXT" is displayed.2.Hold the button down.
Direct change to the next setting or piece of in‐
formation.
Units of measure
The units of measure, such as for fuel consump‐
tion, route/distance, and temperature, can be
changed. The settings are stored for the remote
control currently in use.
1."Settings"2."Language/Units"3.Select the desired menu item.4.Select the desired unit.Clock
Setting the time1."Settings"2."Time/Date"3."Time:"4.Turn the MINI joystick to set the hours and
press the MINI joystick.5.Turn the MINI joystick to set the minutes
and press the MINI joystick.
The time is stored.
Setting the time format
1."Settings"2."Time/Date"Seite 71DisplaysCONTROLS71
Online Edition for Part no. 01 40 2 961 110 - II/15
Page 271 of 283

Black and white map dis‐play 148
Bluetooth audio 171
Bluetooth connection, activat‐ ing/deactivating, hands-free
system 179
Bluetooth connection, activat‐ ing/deactivating, mobile
phone preparation 189
Bluetooth hands-free sys‐ tem 178
Brake assistant 92
Brake discs, breaking in 120
Brake fluid, refer to Service re‐ quirements 73
Brake force distribution, elec‐ tronic 92
Brake pads, breaking in 120
Brake, refer to Parking brake 59
Brakes, MINI maintenance system 233
Brakes, service require‐ ments 73
Brake system, MINI mainte‐ nance system 233
Braking, notes 121
Braking, parking brake 59
Breakdown assistance, Road‐ side Assistance 245
Breaking in 120
Brightness on the Control Dis‐ play 73
Buckle tongue, height adjust‐ ment 47
Button for starting the engine, refer to Start/Stop button 57
C
Calendar 203
California Proposition 65 Warning 7
Car battery, refer to Vehicle battery 243
Car care products 251 Care, displays 253
Care, vehicle 251
Cargo area, Comfort Ac‐ cess 37
Cargo area door, refer to Tail‐ gate 35
Cargo area, enlarging, cargo cover 111
Cargo area, flat loading floor 113
Cargo area light, refer to Inte‐ rior lights 80
Cargo area, multi-function hook 114
Cargo area, opening from the outside 35
Cargo area, partition net 113
Car horn, refer to Horn 12
Carpet, care 253
Car phone, refer to Tele‐ phone 178
Car phone, refer to Telephone, mobile phone prepara‐
tion 188
Car wash 250
CBC, Cornering Brake Con‐ trol 92
CBS Condition Based Serv‐ ice 233
CD 164
CD/DVD drives, care 254
CD player 164
Center armrest 116
Center console, refer to Around the center con‐
sole 16
Center rail 116
Center rail, refer to Storage compartments 116
Central locking, Comfort Ac‐ cess 37
Central locking from the in‐ side 34
Central locking system, con‐ cept 31 Central locking system, from
the outside 31
Central screen, see Control Display 18
Changes, technical, refer to Safety 6
Changing wheels/tires 223
Check Control 74
Children, transporting 52
Child restraint fixing system LATCH 53
Child restraint fixing sys‐ tems 52
Child restraint fixing systems, mounting 52
Child seat, mounting 52
Child seats, refer to Transport‐ ing children safely 52
Chrome parts, care 253
Circulation of air, refer to Re‐ circulated air mode, air con‐
ditioner 100
Circulation of air, refer to Re‐ circulated air mode, auto‐
matic climate control 102
Cleaning, displays 253
Cleaning, refer to Care 250
Climate 99
Climate mode, ventila‐ tion 104
Clock 67
Clock, 12h/24h format 71
Clock, setting the time and date 71
Clock, setting the time zone 72
Closing from the inside 34
Closing, from the outside 32
Clutch, breaking in 120
Cockpit 12
Cold start, refer to Starting the engine 58
Combination instrument, refer to Displays 14 Seite 269Everything from A to ZREFERENCE269
Online Edition for Part no. 01 40 2 961 110 - II/15
Page 278 of 283

Remote control, servicedata 233
Remote control, univer‐ sal 105
Remote inquiry, hands-free system 181
Remote inquiry, mobile phone preparation package 193
Replacement remote con‐ trol 30
Replacing wheels/tires 223
Reporting safety defects 9
Reserve warning, refer to Fuel gauge 68
Reservoir for washer fluid, re‐ fer to Washer fluid reser‐
voir 63
Restraining systems, refer to Safety belts 46
Restraint systems for chil‐ dren 52
Retreaded tires 223
Reverse gear, manual trans‐ mission 64
Road, avoiding 143
Road detour 143
Roadside Assistance 245
Roadside parking light, bulb replacement 238
Roadside parking lights 78
RON recommended fuel grade 214
RON, refer to Fuel quality 214
Route 144
Route criteria, route 143
Route, displaying 144
Route section, bypassing 144
Rubber seals, care 253
Run-flat tires 224
Run-flat tires, flat tire 85
Run-flat tires, tire inflation pressure 216
S
Safe braking 121 Safety 6
Safety belts 46
Safety belts, care 253
Safety belts, damage 48
Safety belts, indicator/warning lamp 48
Safety belts, rear center safety belt 47
Safety belts, reminder 48
Safety systems, airbags 81
Safety systems, safety belts 46
Satellite radio 158
Saving fuel 128
Scale, changing during navi‐ gation 147
Screen, see Control Display 18
Seat adjustment 45
Seat adjustment, manual 44
Seat heating 46
Seats 44
Seats, adjusting 44
Seats, heating 46
Seats, sitting safely 44
Selector lever lock, overrid‐ ing 66
Selector lever lock, refer to Se‐ lector level positions, chang‐
ing, shiftlock 64
Selector lever positions, Step‐ tronic transmission 64
Selector lever, Steptronic transmission 64
Service and warranty 7
Service data in the remote control 233
Service interval display, refer to Condition Based Service
CBS 233
Service interval display, refer to Service requirements 73
Service requirements 73
Service requirements, CBS Condition Based Service 233
Settings and information 70 Settings, changing on the
Control Display 72
Settings, clock, 12h/24h mode 71
Settings, configuring, refer to Personal Profile 30
Settings, language 72
Shifting, manual transmis‐ sion 63
Shifting, Steptronic transmis‐ sion 65
Shift lever, Steptronic trans‐ mission 64
Shift paddles on the steering wheel 65
Short commands, voice acti‐ vation 262
Side airbags 81
Side windows, refer to Win‐ dows 41
Sitting safely 44
Sliding/tilting sunroof, refer to Glass sunroof, electrical 40
Slot for remote control 57
Snap-in adapter, mobile phone 198
Snow chains 227
Socket, OBD Onboard Diagno‐ sis 234
Software applications, iPhone 207
Software part number, hands- free system 178
Software part number, mobile phone preparation 188
Software update 174
Special destinations, naviga‐ tion 138
Special equipment, series equipment 6
Speed, average 69
Speed limit 90
Speed limit, setting 90
Speedometer 14
Speed, with winter tires 224 Seite 276REFERENCEEverything from A to Z276
Online Edition for Part no. 01 40 2 961 110 - II/15