tow MINI Countryman 2016 Owner's Manual (Mini Connected)
[x] Cancel search | Manufacturer: MINI, Model Year: 2016, Model line: Countryman, Model: MINI Countryman 2016Pages: 282, PDF Size: 6.79 MB
Page 39 of 282
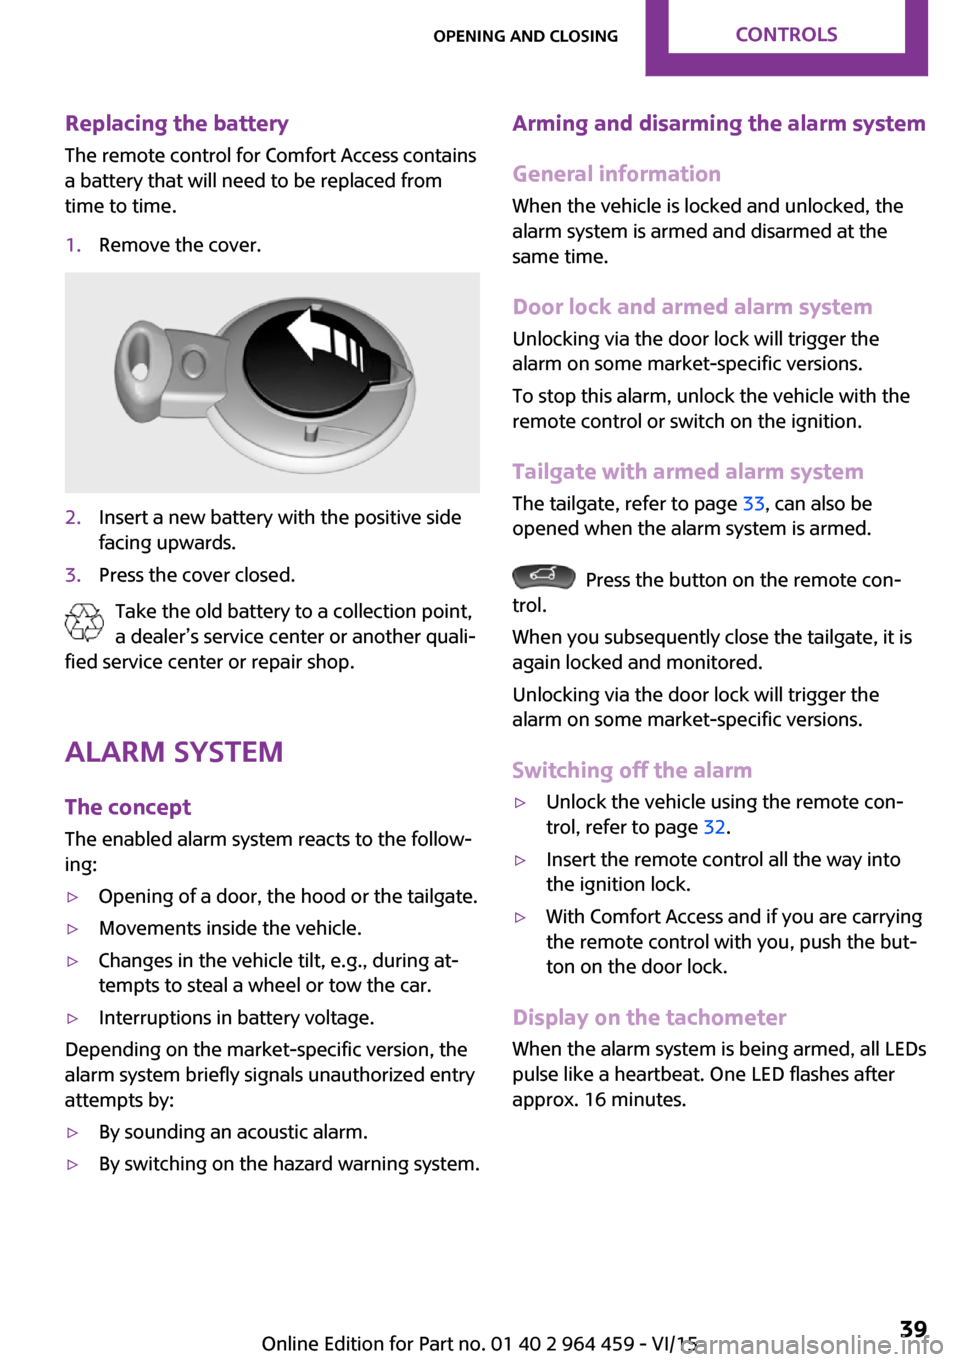
Replacing the battery
The remote control for Comfort Access contains
a battery that will need to be replaced from
time to time.1.Remove the cover.2.Insert a new battery with the positive side
facing upwards.3.Press the cover closed.
Take the old battery to a collection point,
a dealer’s service center or another quali‐
fied service center or repair shop.
Alarm system
The concept
The enabled alarm system reacts to the follow‐
ing:
▷Opening of a door, the hood or the tailgate.▷Movements inside the vehicle.▷Changes in the vehicle tilt, e.g., during at‐
tempts to steal a wheel or tow the car.▷Interruptions in battery voltage.
Depending on the market-specific version, the
alarm system briefly signals unauthorized entry
attempts by:
▷By sounding an acoustic alarm.▷By switching on the hazard warning system.Arming and disarming the alarm system
General information
When the vehicle is locked and unlocked, the
alarm system is armed and disarmed at the
same time.
Door lock and armed alarm systemUnlocking via the door lock will trigger the
alarm on some market-specific versions.
To stop this alarm, unlock the vehicle with the
remote control or switch on the ignition.
Tailgate with armed alarm system The tailgate, refer to page 33, can also be
opened when the alarm system is armed.
Press the button on the remote con‐
trol.
When you subsequently close the tailgate, it is
again locked and monitored.
Unlocking via the door lock will trigger the
alarm on some market-specific versions.
Switching off the alarm
▷Unlock the vehicle using the remote con‐
trol, refer to page 32.▷Insert the remote control all the way into
the ignition lock.▷With Comfort Access and if you are carrying
the remote control with you, push the but‐
ton on the door lock.
Display on the tachometer
When the alarm system is being armed, all LEDs
pulse like a heartbeat. One LED flashes after
approx. 16 minutes.
Seite 39Opening and closingCONTROLS39
Online Edition for Part no. 01 40 2 964 459 - VI/15
Page 40 of 282
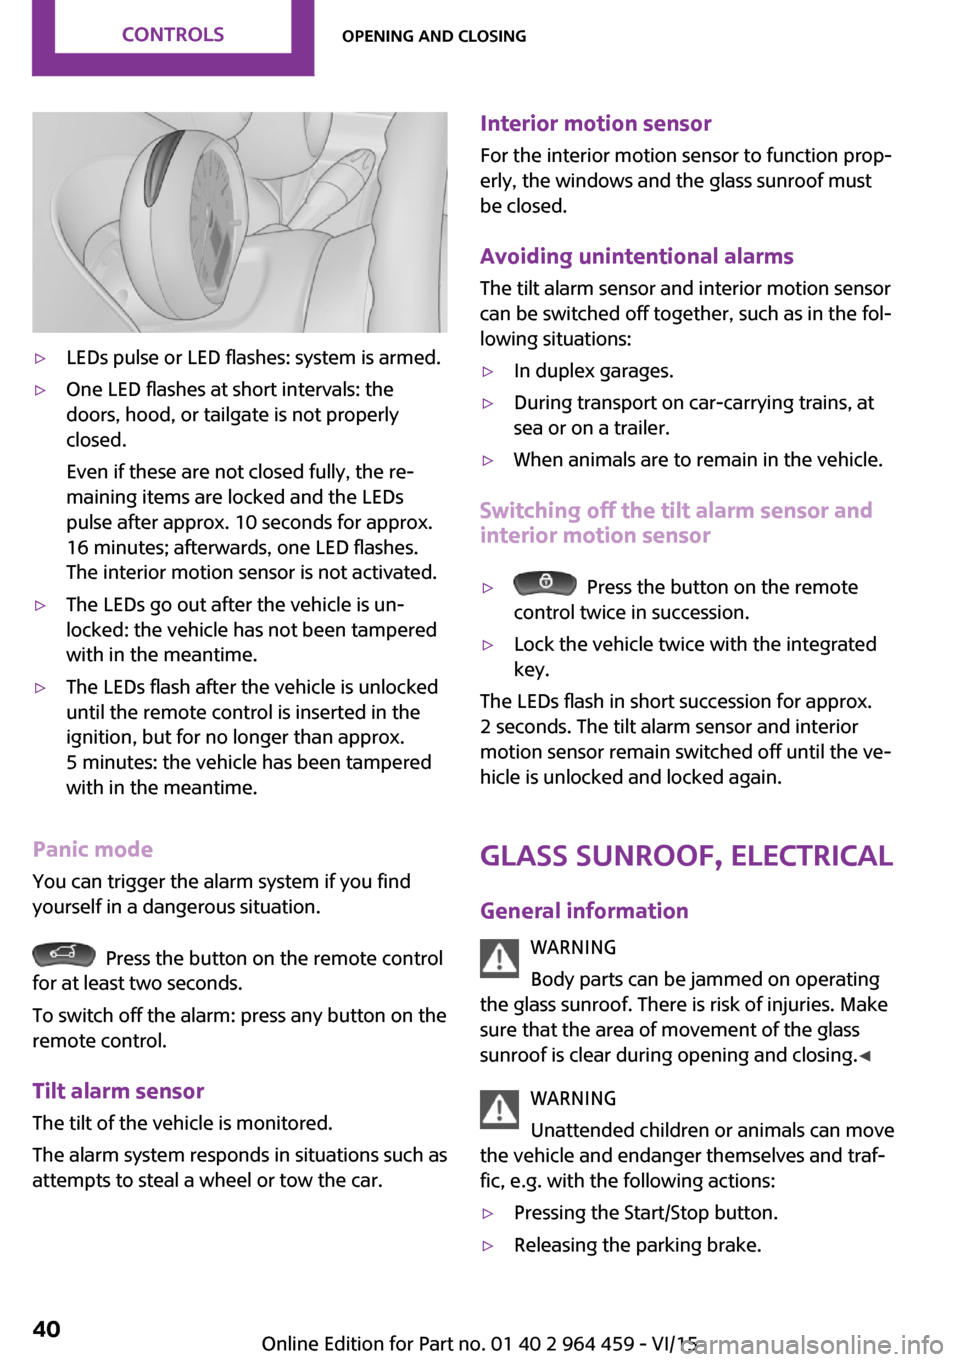
▷LEDs pulse or LED flashes: system is armed.▷One LED flashes at short intervals: the
doors, hood, or tailgate is not properly
closed.
Even if these are not closed fully, the re‐
maining items are locked and the LEDs
pulse after approx. 10 seconds for approx.
16 minutes; afterwards, one LED flashes.
The interior motion sensor is not activated.▷The LEDs go out after the vehicle is un‐
locked: the vehicle has not been tampered
with in the meantime.▷The LEDs flash after the vehicle is unlocked
until the remote control is inserted in the
ignition, but for no longer than approx.
5 minutes: the vehicle has been tampered
with in the meantime.
Panic mode
You can trigger the alarm system if you find
yourself in a dangerous situation.
Press the button on the remote control
for at least two seconds.
To switch off the alarm: press any button on the
remote control.
Tilt alarm sensor
The tilt of the vehicle is monitored.
The alarm system responds in situations such as
attempts to steal a wheel or tow the car.
Interior motion sensor
For the interior motion sensor to function prop‐
erly, the windows and the glass sunroof must be closed.
Avoiding unintentional alarms
The tilt alarm sensor and interior motion sensor
can be switched off together, such as in the fol‐
lowing situations:▷In duplex garages.▷During transport on car-carrying trains, at
sea or on a trailer.▷When animals are to remain in the vehicle.
Switching off the tilt alarm sensor and
interior motion sensor
▷ Press the button on the remote
control twice in succession.▷Lock the vehicle twice with the integrated
key.
The LEDs flash in short succession for approx.
2 seconds. The tilt alarm sensor and interior
motion sensor remain switched off until the ve‐
hicle is unlocked and locked again.
Glass sunroof, electrical
General information WARNING
Body parts can be jammed on operating
the glass sunroof. There is risk of injuries. Make
sure that the area of movement of the glass
sunroof is clear during opening and closing. ◀
WARNING
Unattended children or animals can move
the vehicle and endanger themselves and traf‐
fic, e.g. with the following actions:
▷Pressing the Start/Stop button.▷Releasing the parking brake.Seite 40CONTROLSOpening and closing40
Online Edition for Part no. 01 40 2 964 459 - VI/15
Page 48 of 282
MINI Countryman: center safety belt of
rear seat
The belt buckle embossed with the word CEN‐
TER is intended exclusively for use by passen‐
gers riding in the center position.
If the center safety belt in the rear is used, the
backrests must be locked, refer to page 112.
The safety belt will not have a restraining effect
if the backrest is not locked.
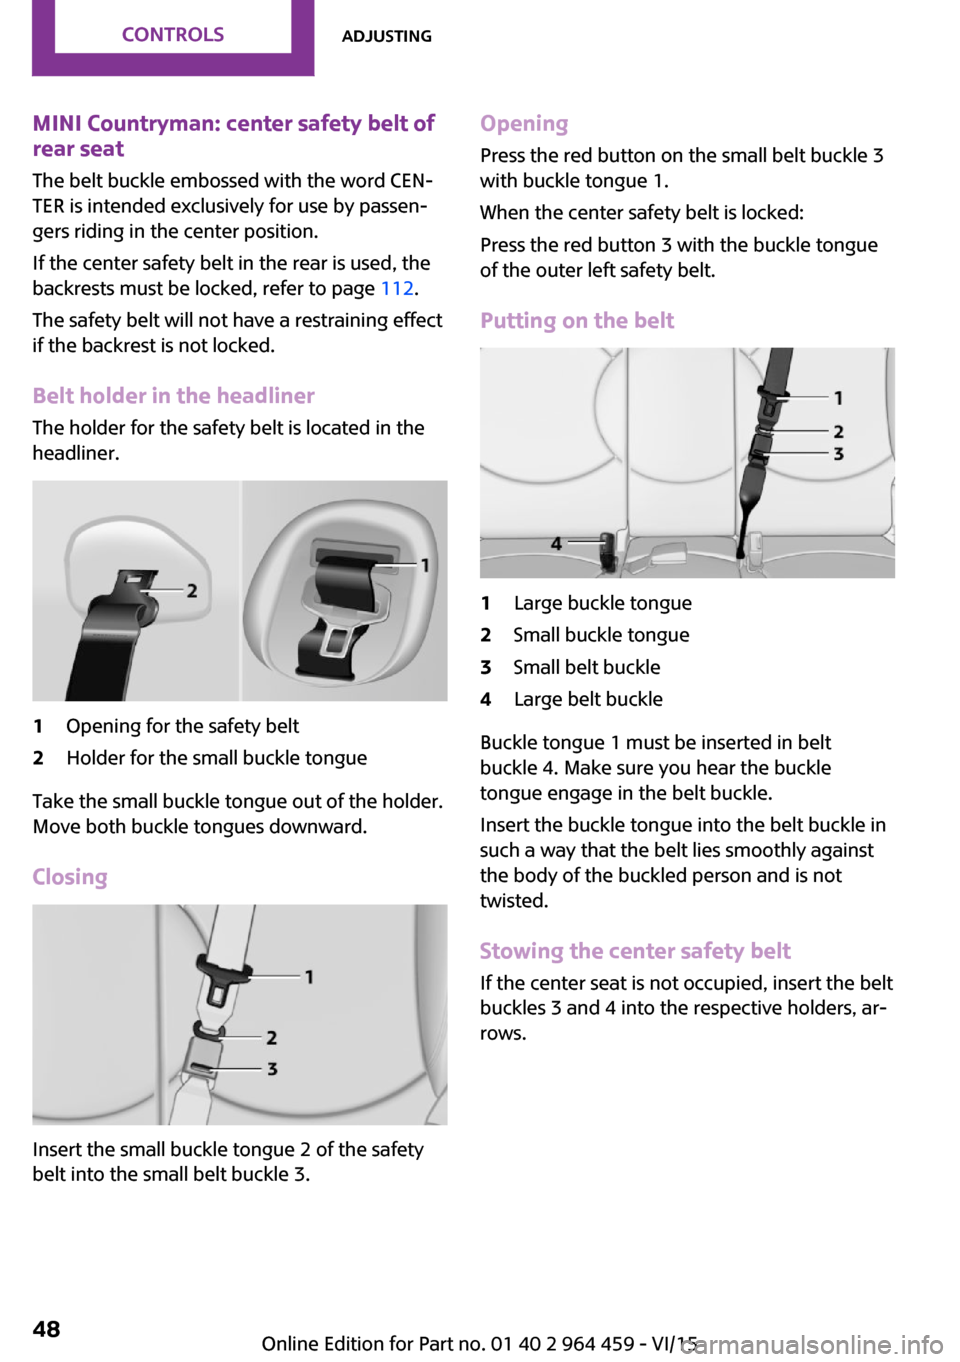
Belt holder in the headliner
The holder for the safety belt is located in the
headliner.1Opening for the safety belt2Holder for the small buckle tongue
Take the small buckle tongue out of the holder.
Move both buckle tongues downward.
Closing
Insert the small buckle tongue 2 of the safety
belt into the small belt buckle 3.
Opening
Press the red button on the small belt buckle 3
with buckle tongue 1.
When the center safety belt is locked:
Press the red button 3 with the buckle tongue
of the outer left safety belt.
Putting on the belt1Large buckle tongue2Small buckle tongue3Small belt buckle4Large belt buckle
Buckle tongue 1 must be inserted in belt
buckle 4. Make sure you hear the buckle
tongue engage in the belt buckle.
Insert the buckle tongue into the belt buckle in
such a way that the belt lies smoothly against
the body of the buckled person and is not
twisted.
Stowing the center safety belt
If the center seat is not occupied, insert the belt
buckles 3 and 4 into the respective holders, ar‐
rows.
Seite 48CONTROLSAdjusting48
Online Edition for Part no. 01 40 2 964 459 - VI/15
Page 66 of 282
R is Reverse
Select only when the vehicle is stationary.
N is NeutralFor example, engage this position in a car
wash. The vehicle can roll.
D Drive Position for normal vehicle operation. All for‐
ward gears are selected automatically.
Under normal operating conditions, fuel con‐
sumption is lowest when you are driving in po‐
sition D.
Kickdown
Kickdown is used to achieve maximum driving
performance. Press on the accelerator beyond
the resistance point at the full throttle position.
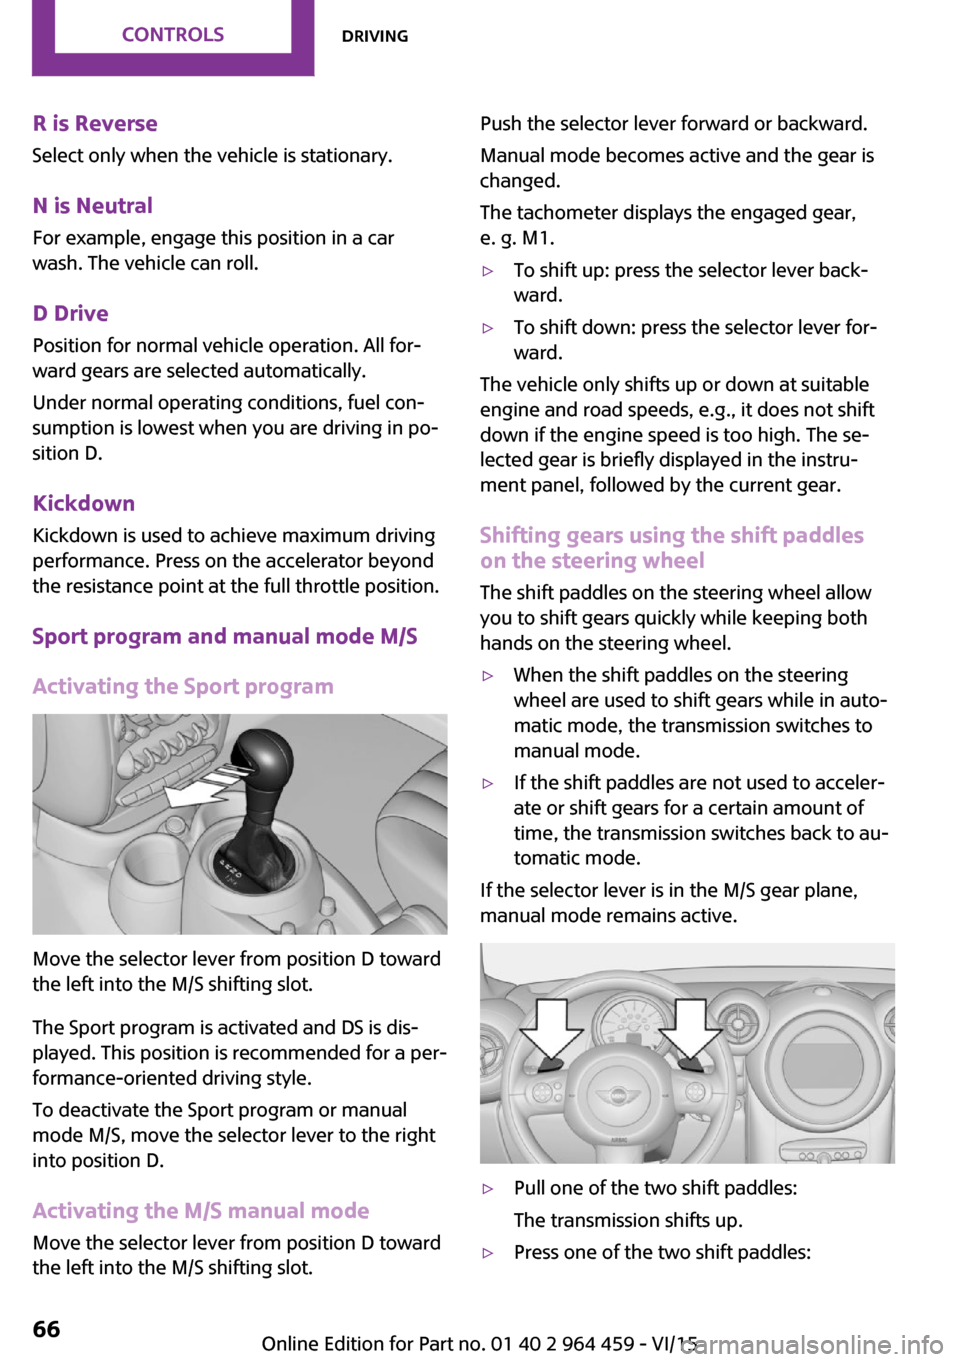
Sport program and manual mode M/SActivating the Sport program
Move the selector lever from position D toward
the left into the M/S shifting slot.
The Sport program is activated and DS is dis‐
played. This position is recommended for a per‐
formance-oriented driving style.
To deactivate the Sport program or manual
mode M/S, move the selector lever to the right
into position D.
Activating the M/S manual mode Move the selector lever from position D towardthe left into the M/S shifting slot.
Push the selector lever forward or backward.
Manual mode becomes active and the gear is
changed.
The tachometer displays the engaged gear,
e. g. M1.▷To shift up: press the selector lever back‐
ward.▷To shift down: press the selector lever for‐
ward.
The vehicle only shifts up or down at suitable
engine and road speeds, e.g., it does not shift
down if the engine speed is too high. The se‐
lected gear is briefly displayed in the instru‐
ment panel, followed by the current gear.
Shifting gears using the shift paddleson the steering wheel
The shift paddles on the steering wheel allow
you to shift gears quickly while keeping both hands on the steering wheel.
▷When the shift paddles on the steering
wheel are used to shift gears while in auto‐
matic mode, the transmission switches to
manual mode.▷If the shift paddles are not used to acceler‐
ate or shift gears for a certain amount of
time, the transmission switches back to au‐
tomatic mode.
If the selector lever is in the M/S gear plane,
manual mode remains active.
▷Pull one of the two shift paddles:
The transmission shifts up.▷Press one of the two shift paddles:Seite 66CONTROLSDriving66
Online Edition for Part no. 01 40 2 964 459 - VI/15
Page 103 of 282
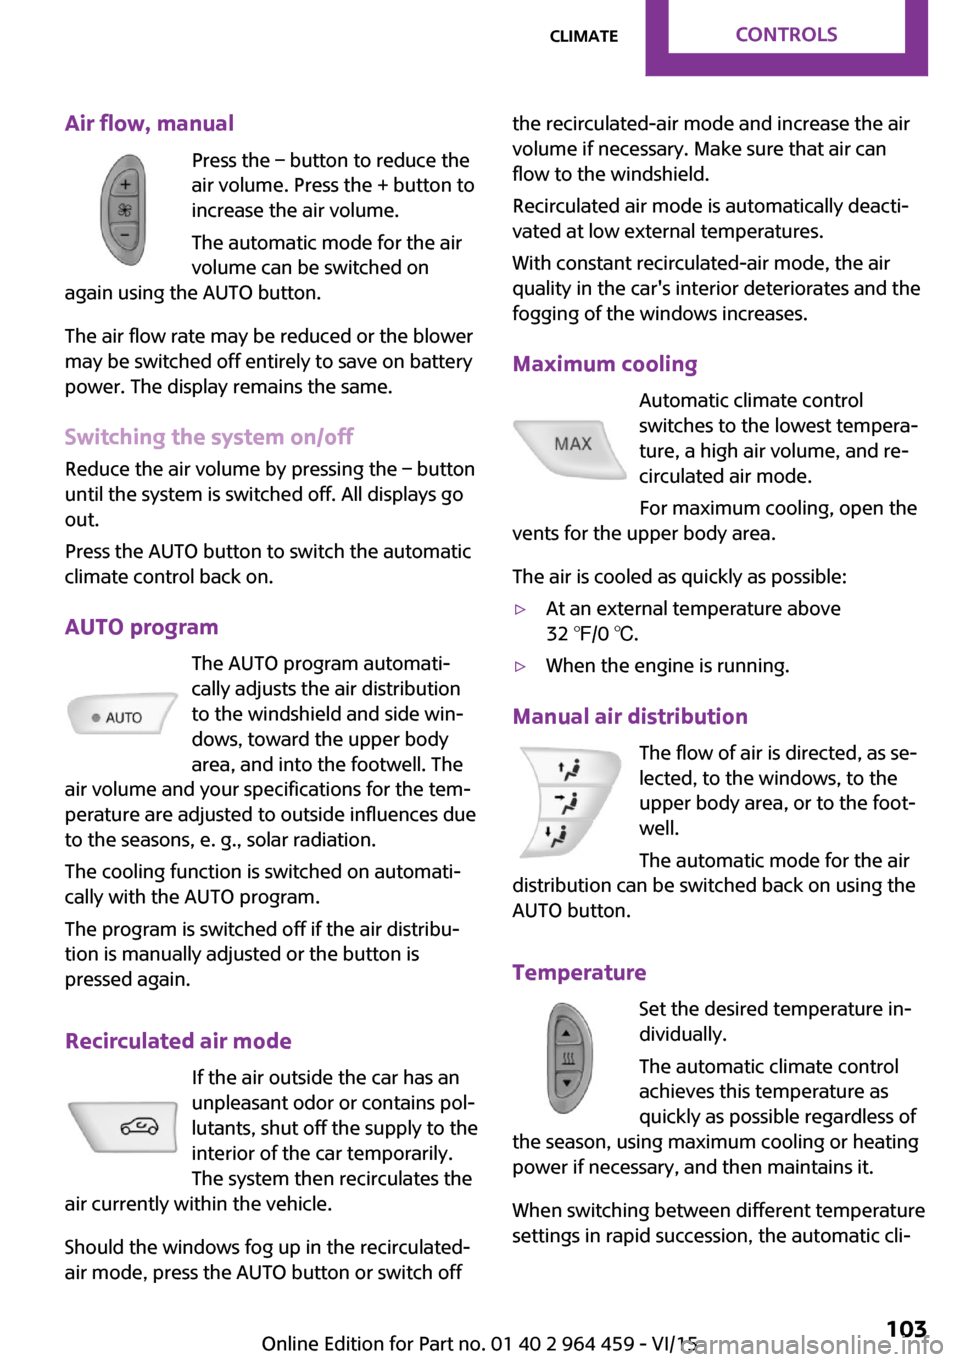
Air flow, manualPress the – button to reduce the
air volume. Press the + button to
increase the air volume.
The automatic mode for the air
volume can be switched on
again using the AUTO button.
The air flow rate may be reduced or the blower
may be switched off entirely to save on battery
power. The display remains the same.
Switching the system on/off Reduce the air volume by pressing the – button
until the system is switched off. All displays go
out.
Press the AUTO button to switch the automatic
climate control back on.
AUTO program The AUTO program automati‐
cally adjusts the air distribution
to the windshield and side win‐
dows, toward the upper body
area, and into the footwell. The
air volume and your specifications for the tem‐
perature are adjusted to outside influences due
to the seasons, e. g., solar radiation.
The cooling function is switched on automati‐
cally with the AUTO program.
The program is switched off if the air distribu‐
tion is manually adjusted or the button is
pressed again.
Recirculated air mode If the air outside the car has an
unpleasant odor or contains pol‐
lutants, shut off the supply to the
interior of the car temporarily.
The system then recirculates the
air currently within the vehicle.
Should the windows fog up in the recirculated-
air mode, press the AUTO button or switch offthe recirculated-air mode and increase the air
volume if necessary. Make sure that air can
flow to the windshield.
Recirculated air mode is automatically deacti‐
vated at low external temperatures.
With constant recirculated-air mode, the air
quality in the car's interior deteriorates and the
fogging of the windows increases.
Maximum cooling Automatic climate control
switches to the lowest tempera‐
ture, a high air volume, and re‐
circulated air mode.
For maximum cooling, open the
vents for the upper body area.
The air is cooled as quickly as possible:▷At an external temperature above
32 ℉/0 ℃.▷When the engine is running.
Manual air distribution
The flow of air is directed, as se‐
lected, to the windows, to the
upper body area, or to the foot‐
well.
The automatic mode for the air
distribution can be switched back on using the
AUTO button.
Temperature Set the desired temperature in‐
dividually.
The automatic climate control
achieves this temperature as
quickly as possible regardless of
the season, using maximum cooling or heating power if necessary, and then maintains it.
When switching between different temperature
settings in rapid succession, the automatic cli‐
Seite 103ClimateCONTROLS103
Online Edition for Part no. 01 40 2 964 459 - VI/15
Page 113 of 282

Flat loading floor
The maximum load on the loading floor is:
330 lbs, 150 kg.
Access to storage area
A storage area for items like the partition net is
found under the loading floor.1.Reach into the recess, arrow 1, on the rear
edge of the loading floor.2.Lift the loading floor at the rear, arrow 1,
and fold it forward, arrow 2.
MINI Countryman:
MINI Paceman:
Before closing the tailgate, lower the loading
floor back onto the cargo area floor.
Removing
The loading floor can be removed if necessary.
1.Fold up the loading floor.2.Pull it back slightly and out of the holders.3.Then remove it upward.
The folded loading floor can be stored in the
cargo area.
MINI Countryman: partition net
Before installing1.Remove the pouch with the partition net
from the storage compartment under the
loading floor in the cargo area.2.Take the partition net out of the pouch, un‐
roll it, and unfold it.
After use, fold and roll up the partition net
in the same manner and place it in the
pouch so that it can be stowed back under
the cargo floor panel. Ensure that hooks
and tensioning buckles do not rest on the
rod elements.3.Unfold the partition net to the point where
the rod elements engage.
Installation behind the front seats
1.Take out the cargo cover if necessary.2.Fold down the rear seat backrests, refer to
Enlarging the cargo area.3.Insert the retaining pins of the partition net
all the way into the front holders in the
headliner, arrow 1, and push forward.4.Attach the hooks, arrow 2, at the bottom of
the retaining straps on both sides to the
eyelets on the vehicle floor. Firmly attach
the partition net.5.Lash the partition net tightly. To do this,
tighten the retaining straps using the ten‐
sioning buckles.Seite 113Interior equipmentCONTROLS113
Online Edition for Part no. 01 40 2 964 459 - VI/15
Page 114 of 282
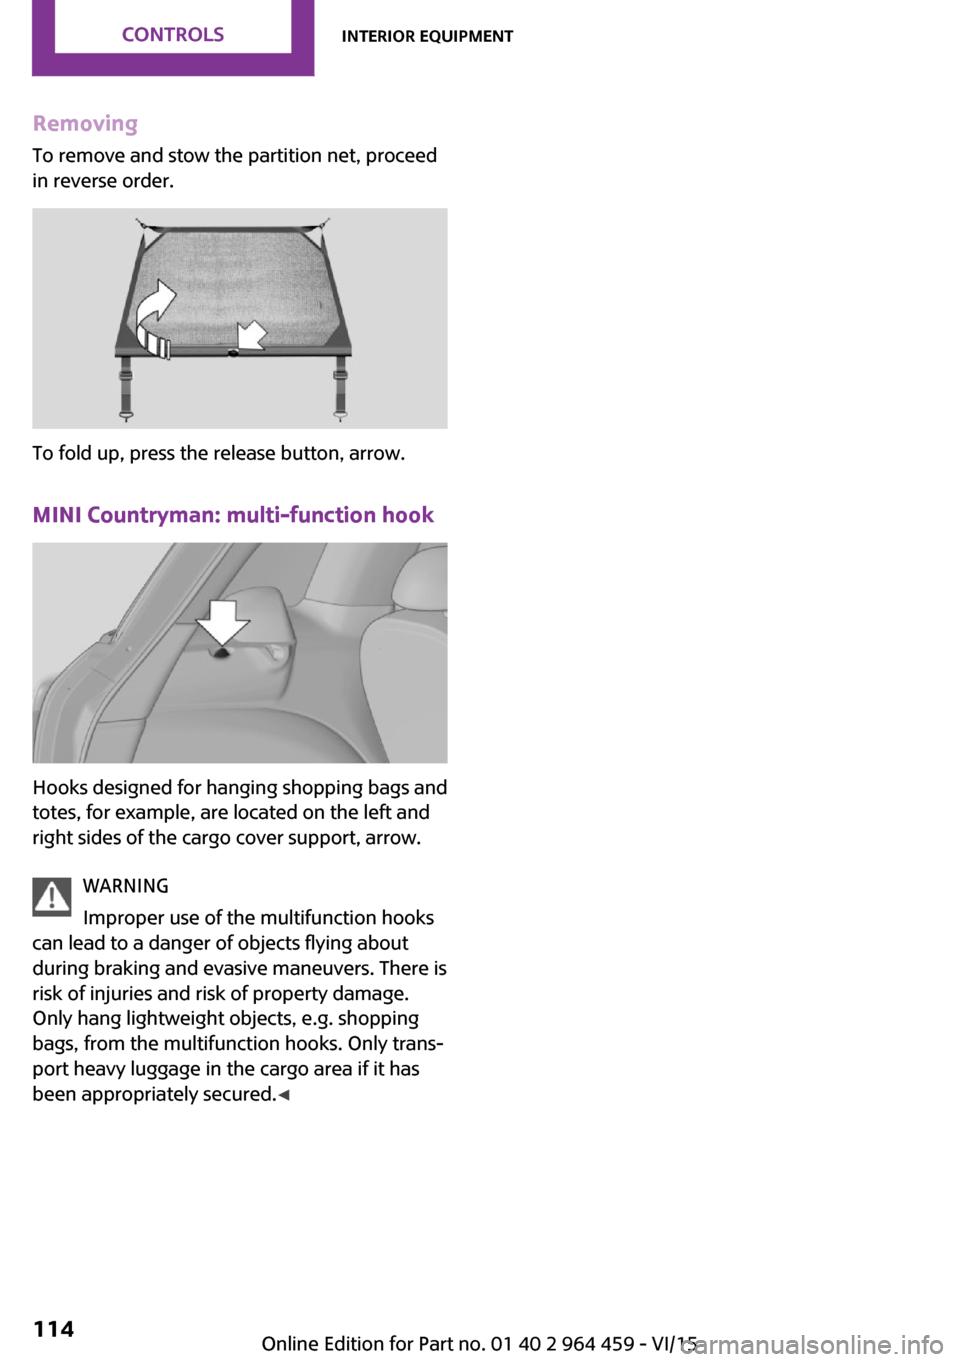
Removing
To remove and stow the partition net, proceed
in reverse order.
To fold up, press the release button, arrow.
MINI Countryman: multi-function hook
Hooks designed for hanging shopping bags and
totes, for example, are located on the left and
right sides of the cargo cover support, arrow.
WARNING
Improper use of the multifunction hooks
can lead to a danger of objects flying about
during braking and evasive maneuvers. There is
risk of injuries and risk of property damage.
Only hang lightweight objects, e.g. shopping
bags, from the multifunction hooks. Only trans‐
port heavy luggage in the cargo area if it has
been appropriately secured. ◀
Seite 114CONTROLSInterior equipment114
Online Edition for Part no. 01 40 2 964 459 - VI/15
Page 122 of 282

Objects in the area around the pedalsWARNING
Objects in the driver's floor area can limit
the pedal distance or block a depressed pedal.
There is risk of an accident. Stow objects in the
vehicle such that they are secured and cannot
enter into the driver's floor area. Use floor mats
that are suitable for the vehicle and can be
safely attached to the floor. Do not use loose
floor mats and do not layer several floor mats.
Make sure that there is sufficient clearance for
the pedals. Ensure that the floor mats are se‐
curely fastened again after they were removed,
e.g. for cleaning. ◀
Driving in wet conditions When roads are wet or there is heavy rain,
briefly exert gentle pressure on the brake pedal
every few miles.
Ensure that this action does not endanger other
road users.
The heat generated in this process helps dry
the brake discs and pads.
In this way braking efficiency will be available
when you need it.
Hills
Drive long or steep downhill gradients in the
gear in which the least braking is required. Oth‐
erwise, the brake system may overheat, result‐
ing in a reduction in the brake system effi‐
ciency.
You can increase the engine's braking effect by
shifting down, going all the way to first gear, if
necessary.
Downshifting in manual mode of the Steptronic
transmission, refer to page 66.
WARNING
Light but consistent brake pressure can
lead to high temperatures, brakes wearing out
and possibly even brake failure. There is risk ofan accident. Avoid placing excessive load on
the brake system. ◀
WARNING
In idle or with the engine switched off,
safety-relevant functions are restricted or not
available anymore, e.g. braking effect of the
engine or braking force and steering support.
There is risk of an accident. Do not drive in idle
or with the engine switched off. ◀
Brake disc corrosion Corrosion on the brake discs and contamina‐
tion on the brake pads are furthered by:▷Low mileage.▷Extended periods when the vehicle is not
used at all.▷Infrequent use of the brakes.
Corrosion occurs when the minimum pressure
that must be exerted by the pads during brake
applications to clean the discs is not reached.
Should corrosion form on the brake discs, the
brakes will tend to respond with a pulsating ef‐
fect that generally cannot be corrected.
When the vehicle is parked
When using the automatic climate control, con‐
densation water develops that exits under‐
neath the vehicle.
Therefore, traces of condensed water under the
vehicle are normal.
After the engine is switched off, the coolant
pump may continue running for some time in
the MINI Cooper S. This causes noises in the en‐
gine compartment.
Driving on poor roadsYour MINI with ALL4 all-wheel drive feels com‐
fortable on all streets and roads. It combines an
all-wheel drive system with the advantages of a
normal passenger car.
Seite 122DRIVING TIPSThings to remember when driving122
Online Edition for Part no. 01 40 2 964 459 - VI/15
Page 125 of 282
available cargo and luggage load capacity
calculated in Step 4.6.If your vehicle will be towing a trailer, load
from your trailer will be transfered to your
vehicle. Consult the manual for transporting
a trailer to determine how this may reduce
the available cargo and luggage load ca‐
pacity of your vehicle.
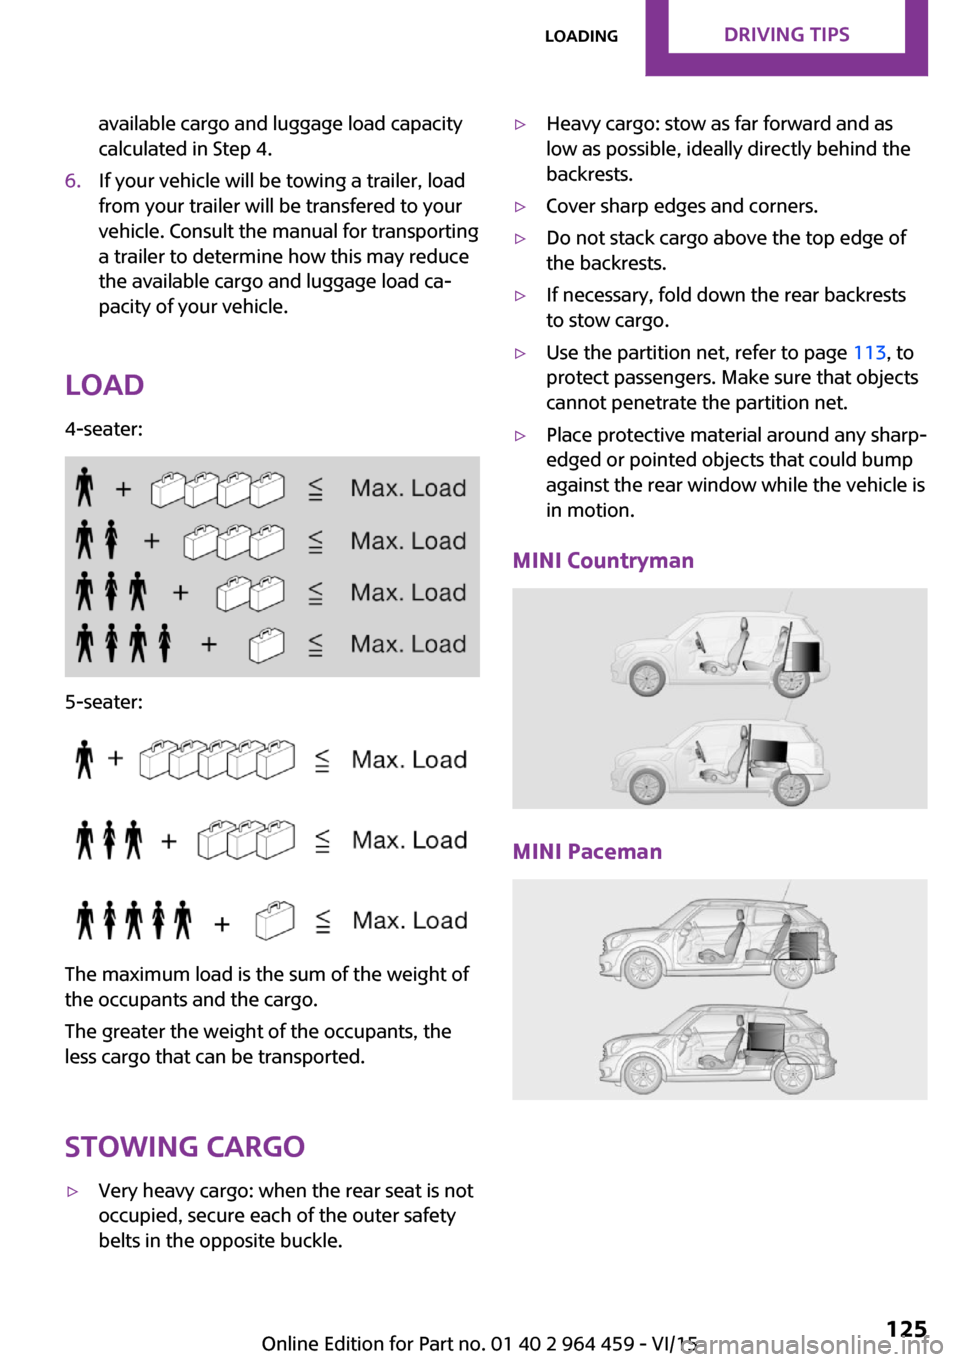
Load
4-seater:
5-seater:
The maximum load is the sum of the weight of
the occupants and the cargo.
The greater the weight of the occupants, the
less cargo that can be transported.
Stowing cargo
▷Very heavy cargo: when the rear seat is not
occupied, secure each of the outer safety
belts in the opposite buckle.▷Heavy cargo: stow as far forward and as
low as possible, ideally directly behind the
backrests.▷Cover sharp edges and corners.▷Do not stack cargo above the top edge of
the backrests.▷If necessary, fold down the rear backrests
to stow cargo.▷Use the partition net, refer to page 113, to
protect passengers. Make sure that objects
cannot penetrate the partition net.▷Place protective material around any sharp-
edged or pointed objects that could bump
against the rear window while the vehicle is
in motion.
MINI Countryman
MINI Paceman
Seite 125LoadingDRIVING TIPS125
Online Edition for Part no. 01 40 2 964 459 - VI/15
Page 126 of 282
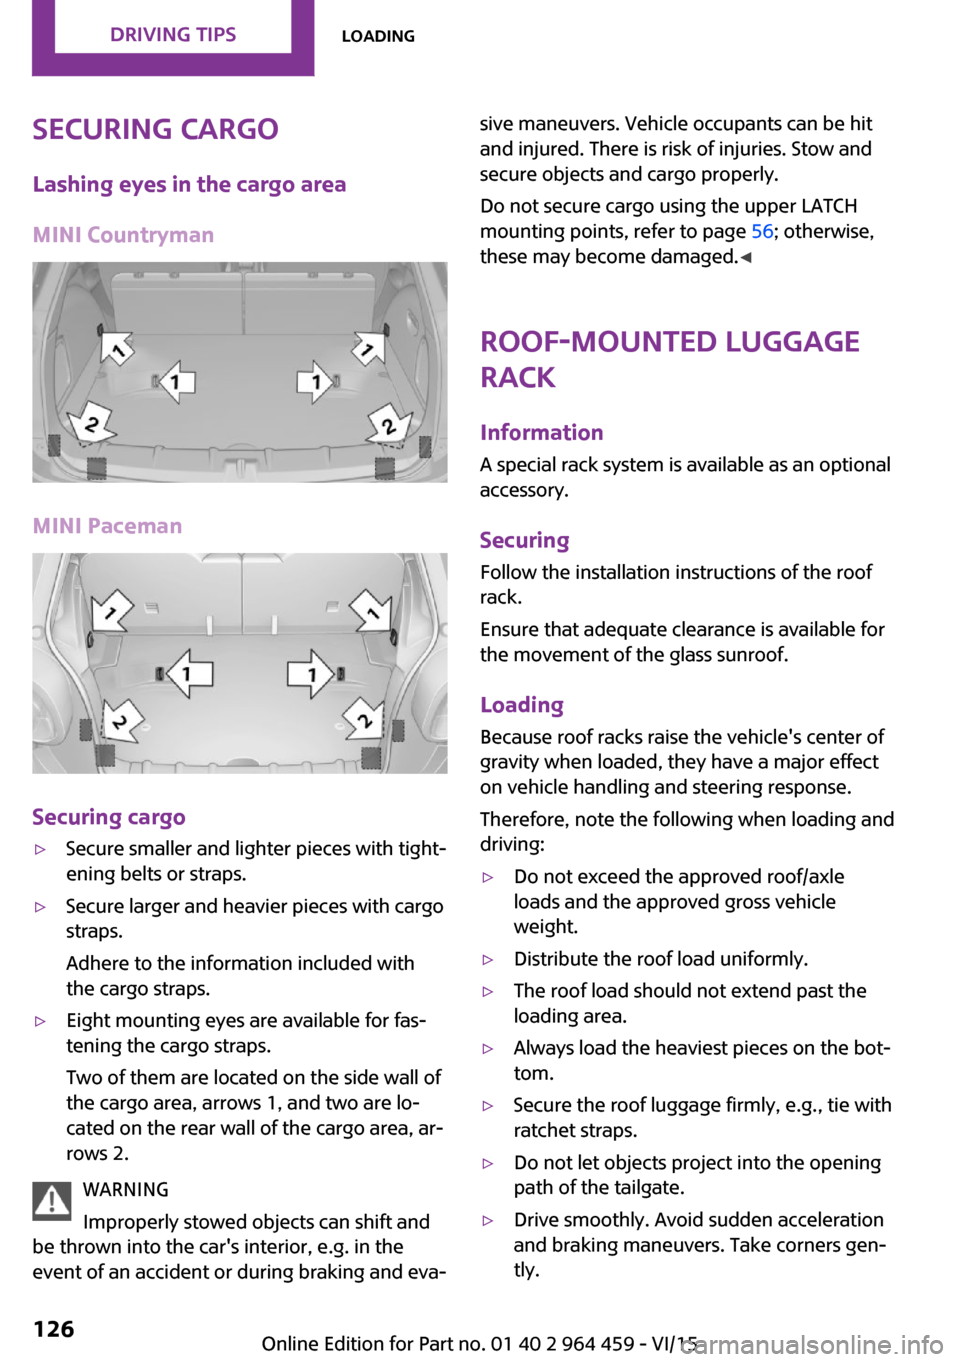
Securing cargoLashing eyes in the cargo area
MINI Countryman
MINI Paceman
Securing cargo
▷Secure smaller and lighter pieces with tight‐
ening belts or straps.▷Secure larger and heavier pieces with cargo
straps.
Adhere to the information included with
the cargo straps.▷Eight mounting eyes are available for fas‐
tening the cargo straps.
Two of them are located on the side wall of
the cargo area, arrows 1, and two are lo‐
cated on the rear wall of the cargo area, ar‐
rows 2.
WARNING
Improperly stowed objects can shift and
be thrown into the car's interior, e.g. in the
event of an accident or during braking and eva‐
sive maneuvers. Vehicle occupants can be hit
and injured. There is risk of injuries. Stow and
secure objects and cargo properly.
Do not secure cargo using the upper LATCH
mounting points, refer to page 56; otherwise,
these may become damaged. ◀
Roof-mounted luggage
rack
InformationA special rack system is available as an optional
accessory.
Securing
Follow the installation instructions of the roof
rack.
Ensure that adequate clearance is available for
the movement of the glass sunroof.
Loading Because roof racks raise the vehicle's center ofgravity when loaded, they have a major effect
on vehicle handling and steering response.
Therefore, note the following when loading and driving:▷Do not exceed the approved roof/axle
loads and the approved gross vehicle
weight.▷Distribute the roof load uniformly.▷The roof load should not extend past the
loading area.▷Always load the heaviest pieces on the bot‐
tom.▷Secure the roof luggage firmly, e.g., tie with
ratchet straps.▷Do not let objects project into the opening
path of the tailgate.▷Drive smoothly. Avoid sudden acceleration
and braking maneuvers. Take corners gen‐
tly.Seite 126DRIVING TIPSLoading126
Online Edition for Part no. 01 40 2 964 459 - VI/15