turn signal MINI Countryman 2016 Owner's Manual (Mini Connected)
[x] Cancel search | Manufacturer: MINI, Model Year: 2016, Model line: Countryman, Model: MINI Countryman 2016Pages: 282, PDF Size: 6.79 MB
Page 12 of 282
CockpitVehicle features and op‐
tions
This chapter describes all standard, country-
specific and optional features offered with the
series. It also describes features that are notnecessarily available in your car, e. g., due to
the selected options or country versions. This
also applies to safety-related functions and sys‐
tems.
When using the features and systems described
here, adhere to local regulations.
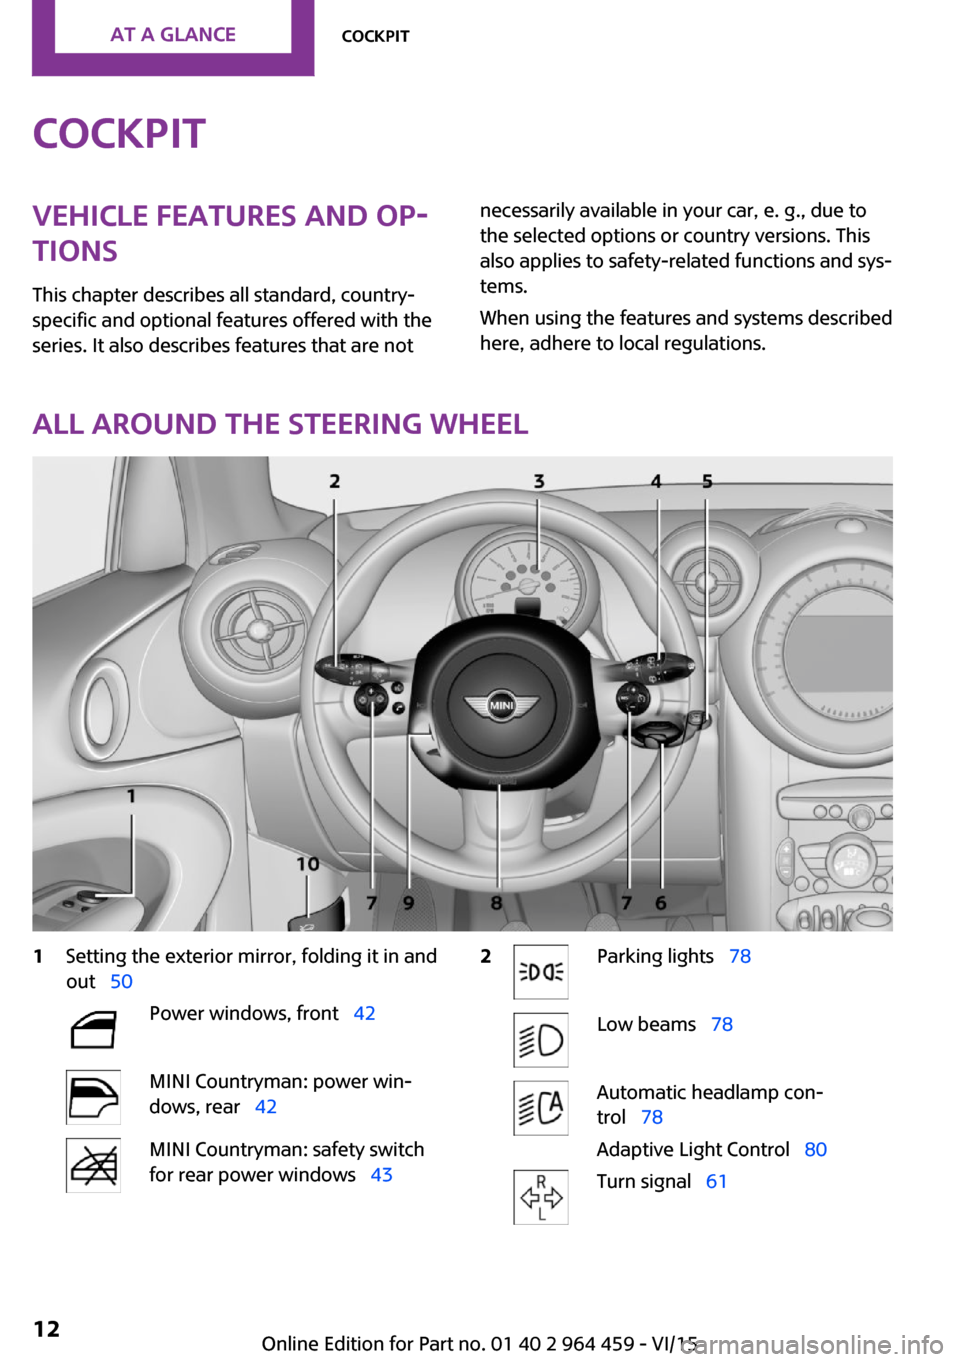
All around the steering wheel
1Setting the exterior mirror, folding it in and
out 50Power windows, front 42MINI Countryman: power win‐
dows, rear 42MINI Countryman: safety switch
for rear power windows 432Parking lights 78Low beams 78Automatic headlamp con‐
trol 78
Adaptive Light Control 80Turn signal 61Seite 12AT A GLANCECockpit12
Online Edition for Part no. 01 40 2 964 459 - VI/15
Page 15 of 282
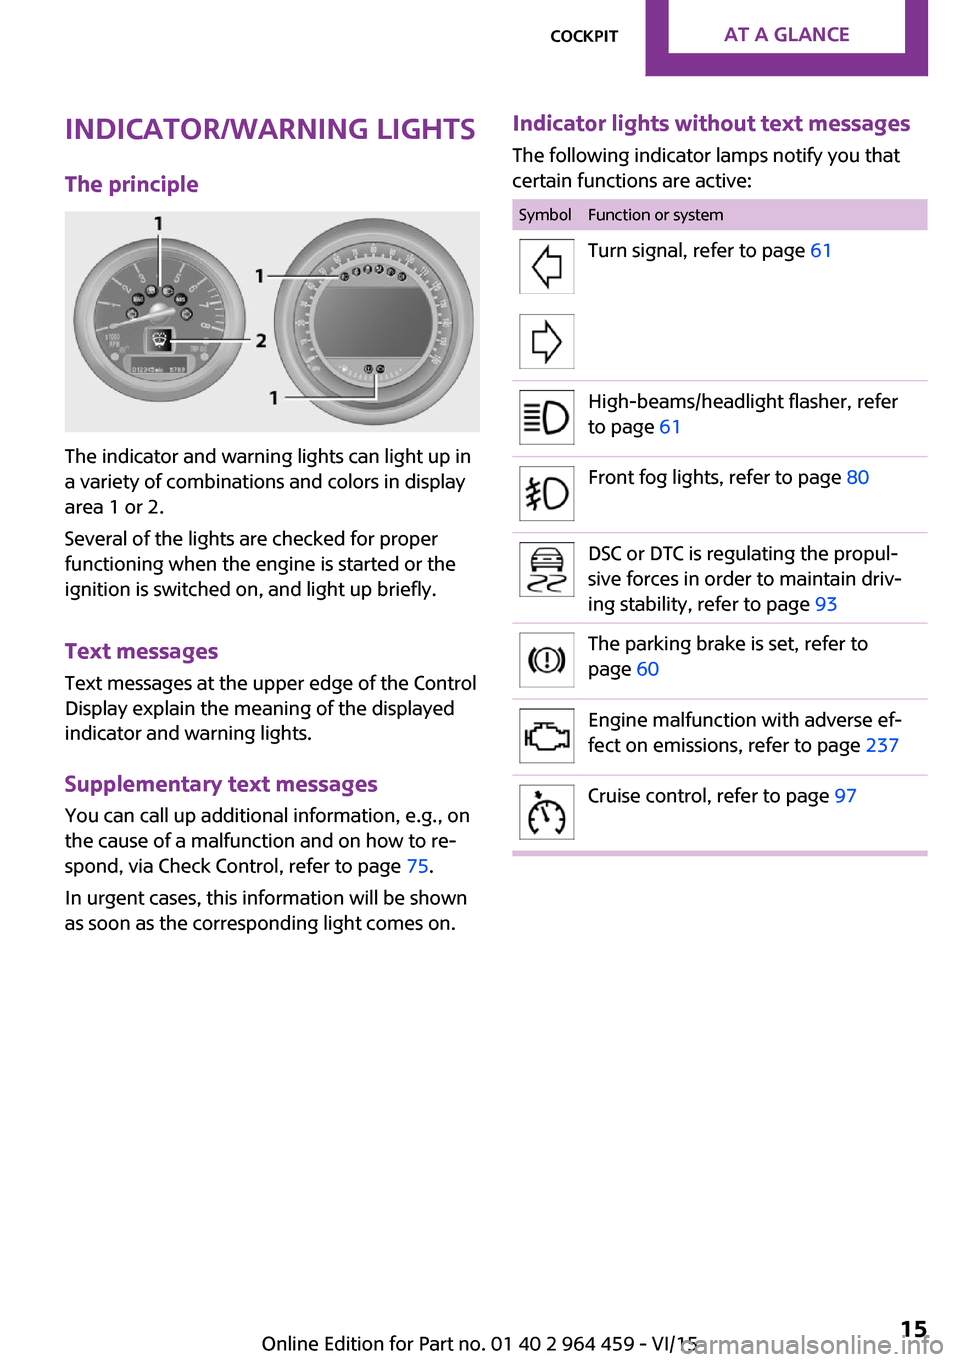
Indicator/warning lights
The principle
The indicator and warning lights can light up in
a variety of combinations and colors in display
area 1 or 2.
Several of the lights are checked for proper
functioning when the engine is started or the
ignition is switched on, and light up briefly.
Text messages
Text messages at the upper edge of the Control
Display explain the meaning of the displayed
indicator and warning lights.
Supplementary text messages
You can call up additional information, e.g., on
the cause of a malfunction and on how to re‐
spond, via Check Control, refer to page 75.
In urgent cases, this information will be shown
as soon as the corresponding light comes on.
Indicator lights without text messages
The following indicator lamps notify you that
certain functions are active:SymbolFunction or systemTurn signal, refer to page 61High-beams/headlight flasher, refer
to page 61Front fog lights, refer to page 80DSC or DTC is regulating the propul‐
sive forces in order to maintain driv‐
ing stability, refer to page 93The parking brake is set, refer to
page 60Engine malfunction with adverse ef‐
fect on emissions, refer to page 237Cruise control, refer to page 97Seite 15CockpitAT A GLANCE15
Online Edition for Part no. 01 40 2 964 459 - VI/15
Page 31 of 282

Personal Profile
The concept
You can set several of your vehicle's functions
to suit your personal needs and preferences.▷Through Personal Profile, most of these set‐
tings are stored for the remote control cur‐
rently in use.▷While the vehicle is being unlocked, the re‐
mote control is recognized and the settings
stored with it are called up and imple‐
mented.▷Your personal settings will be recognized
and called up again even if the vehicle has
been used in the meantime by someone
else with another remote control.▷The individual settings are stored for no
more than three remote controls.
Personal Profile settings
The following functions and settings can be
stored in a profile.
More information on the settings can be found
under:
▷Response of the central locking system
when the car is being unlocked, refer to
page 32.▷Automatic locking of the vehicle, refer to
page 35.▷Triple turn signal activation, refer to
page 61.▷Settings for the displays on the onboard
monitor, in the speedometer, and in the
tachometer:▷12h/24h clock format, refer to
page 72.▷Date format, refer to page 73.▷Brightness of the Control Display, refer
to page 74.▷Language on the Control Display, refer
to page 73.▷Units of measure for fuel consumption,
distance covered/remaining distances,
and temperature, refer to page 72.▷Light settings:▷Headlight courtesy delay feature, refer
to page 79.▷Daytime running lights, refer to
page 79.▷Automatic climate control, refer to
page 102: AUTO program, activating/deac‐
tivating the cooling function, setting the
temperature, air volume, and air distribu‐
tion.▷Entertainment:▷Tone settings, refer to page 154.▷Volume, refer to page 154.
Central locking system
The concept
The central locking system becomes active
when the driver's door is closed.
The system simultaneously engages and re‐
leases the locks on the following:
▷Doors.▷Tailgate.▷Fuel filler flap.
Operating from the outside
▷Via the remote control.▷Via the door lock.▷In cars with Comfort Access, via the door
handles on the driver's and front passenger
sides.
The following takes place simultaneously when
locking/unlocking the vehicle via the remote
control:
▷Depending on the vehicle equipment, the
anti-theft protection is switched on and off
as well. The anti-theft protection makes itSeite 31Opening and closingCONTROLS31
Online Edition for Part no. 01 40 2 964 459 - VI/15
Page 61 of 282

Releasing
Pull up slightly, press the button, and lower the
lever.
Information If for once use during driving is required, en‐
gage the parking brake slightly and hold the
button down.
The brake lights do not light up when the park‐
ing brake is pulled.
Turn signal, high-beams,
headlight flasher
1Turn signal2Switching on the high-beams3Switching off the high-beams/headlight
flasher
Turn signal
Press the lever beyond the resistance point.
To switch off manually, press the lever to the
resistance point.
Unusually rapid flashing of the indicator lamp
indicates that a turn signal bulb has failed.
Signaling a turn briefly Press the lever to the resistance point and hold
it there for as long as you want the turn signal
to flash.
Triple turn signal activation Press the lever to the resistance point.
The turn signal flashes three times.
This function can be activated or deactivated:1."Settings"2."Lighting"3."Triple turn signal"
Settings are stored for the remote control cur‐
rently in use.
Washer/wiper system
Information Do not use the wipers if the windshield is dry,
as this may damage the wiper blades or cause
them to become worn more quickly.
CAUTION
If the wipers are frozen to the windshield,
the wiper blades can be torn off and the wiper
motor overheat on switching on. There is risk of
property damage. Defrost the windshield prior
to switching the wipers on. ◀
Seite 61DrivingCONTROLS61
Online Edition for Part no. 01 40 2 964 459 - VI/15
Page 68 of 282

DisplaysVehicle features and op‐tions
This chapter describes all standard, country-
specific and optional features offered with the
series. It also describes features that are not
necessarily available in your car, e. g., due to
the selected options or country versions. This
also applies to safety-related functions and sys‐
tems.
When using the features and systems described
here, adhere to local regulations.
Odometer, external tem‐
perature display, clock
Overview1Current speed2Odometer, trip odometer, external temper‐
ature, time3Resetting the trip odometer
Press the button on the turn indicator lever to
open information in display area 2.
The following information is displayed consecu‐
tively:
▷Trip odometer▷Time▷External temperatureTrip odometer
Displaying the trip odometer Press button 3 briefly.
Resetting the trip odometer1.Press button 3 briefly.
The trip odometer is displayed.2.Press button 3 again.
The trip odometer is reset.
Time
Set the time, refer to page 72.
External temperature, external
temperature warning
If the display drops to +37 ℉/+3 ℃, a signal
sounds and a warning light lights up. There is
the increased danger of ice.
WARNING
Even at temperatures above +37 ℉/+3 ℃
there can be a danger of icy roads, e.g. on
bridges or shady sections of road. There is risk
of an accident. Adjust your driving style to the
weather conditions at low temperatures ◀
Units of measure
To set the respective units of measure, miles or
km for the odometer and ℃ or ℉ for the exter‐
nal temperature, refer to page 72.
Seite 68CONTROLSDisplays68
Online Edition for Part no. 01 40 2 964 459 - VI/15
Page 75 of 282
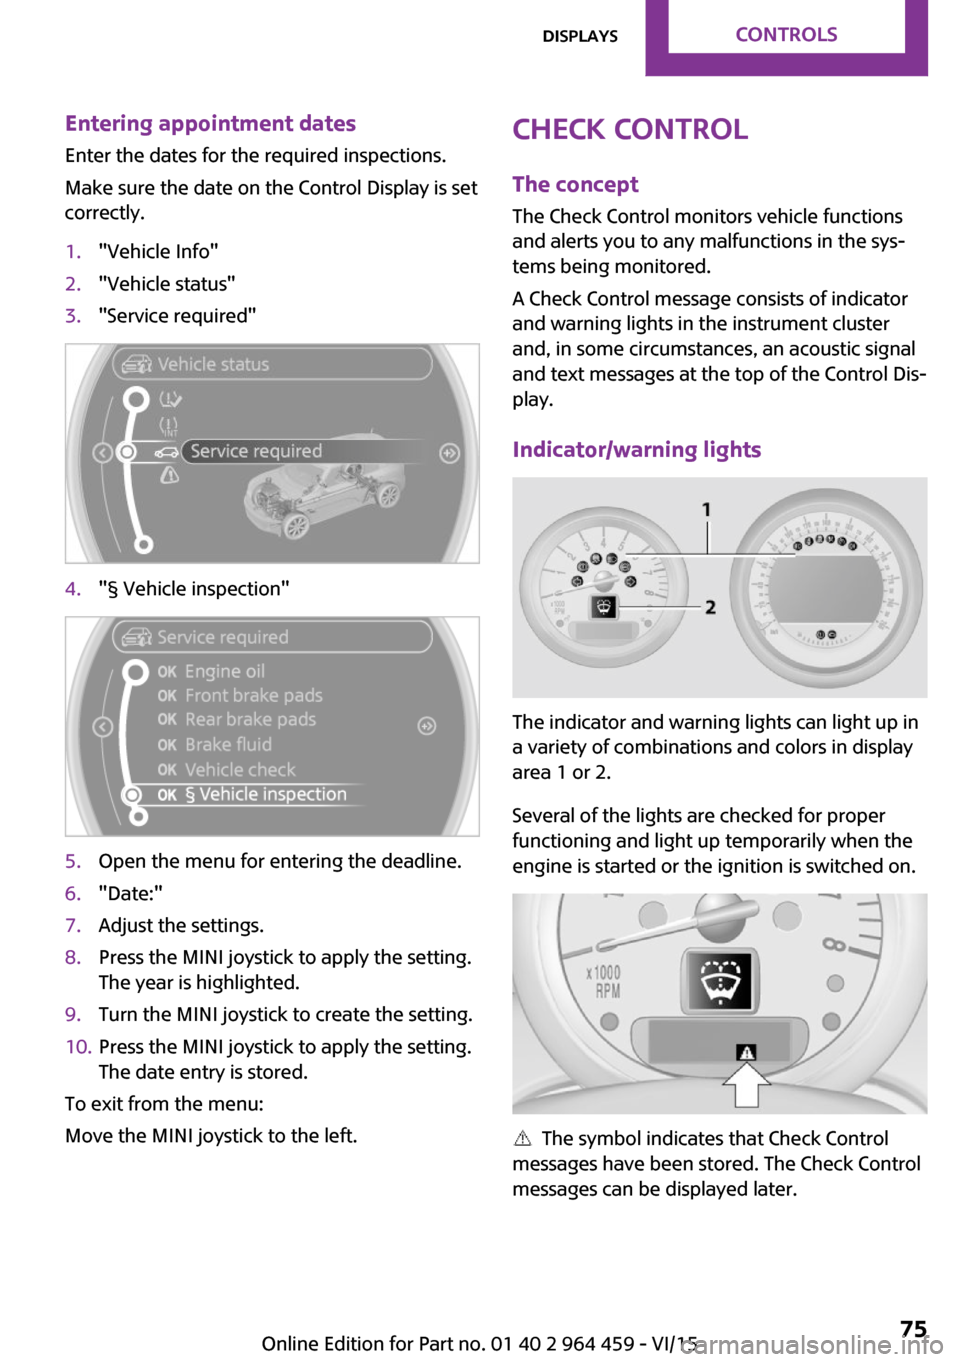
Entering appointment dates
Enter the dates for the required inspections.
Make sure the date on the Control Display is set
correctly.1."Vehicle Info"2."Vehicle status"3."Service required"4."§ Vehicle inspection"5.Open the menu for entering the deadline.6."Date:"7.Adjust the settings.8.Press the MINI joystick to apply the setting.
The year is highlighted.9.Turn the MINI joystick to create the setting.10.Press the MINI joystick to apply the setting.
The date entry is stored.
To exit from the menu:
Move the MINI joystick to the left.
Check Control
The concept
The Check Control monitors vehicle functions
and alerts you to any malfunctions in the sys‐
tems being monitored.
A Check Control message consists of indicator
and warning lights in the instrument cluster
and, in some circumstances, an acoustic signal
and text messages at the top of the Control Dis‐
play.
Indicator/warning lights
The indicator and warning lights can light up in
a variety of combinations and colors in display
area 1 or 2.
Several of the lights are checked for proper
functioning and light up temporarily when the
engine is started or the ignition is switched on.
The symbol indicates that Check Control
messages have been stored. The Check Control
messages can be displayed later.
Seite 75DisplaysCONTROLS75
Online Edition for Part no. 01 40 2 964 459 - VI/15
Page 79 of 282

The exterior lighting goes out automatically af‐
ter the vehicle is switched off.
System limits
The automatic headlamp control cannot serve
as a substitute for your personal judgment of
lighting conditions.
For example, the sensors are unable to detect
fog or hazy weather. To avoid safety risks, you
should always switch on the lights manually un‐
der these conditions.
High-beams/roadside parking lights1Turn signal/roadside parking light2Switching on the high-beams3Switching off the high-beams/headlight
flasher
To assist in parking, the vehicle can be illumi‐
nated on one side; note the country-specific
regulations.
The roadside parking lights drain the battery.
Therefore, do not leave them on for unduly
long periods of time; otherwise, the battery
might not have enough power to start the en‐
gine.
Switching on the roadside parking light
To switch on the roadside parking light on the
left or right, press the turn indicator lever up or
down after switching off the vehicle, arrow 1.
Switching off the roadside parking light
Press the lever up or down to the resistance
point.
Daytime running lights
The daytime running lights light up in switch
position 0, 1, or 3 when the ignition is switched
on.
The exterior lighting goes out automatically af‐
ter the vehicle is switched off.
In switch position 1, the parking lights light up
after the ignition is switched off.
Activating/deactivating
In some countries, driving with daytime run‐
ning lights is mandatory; for this reason, day‐
time running lights cannot be deactivated in
these cases.1."Settings"2."Lighting"3."Daytime running lamps"
Settings are stored for the remote control cur‐
rently in use.
Welcome lights If the light switch stays in switch position 2 or 3
after the vehicle is switched off, the parking
lights and the interior lights light up for a cer‐
tain period when the vehicle is unlocked.
Headlight courtesy delay feature The low beams stay lit for a short while after
the ignition is switched off, if the lights are
switched off and the headlight flasher is
switched on.
Seite 79LampsCONTROLS79
Online Edition for Part no. 01 40 2 964 459 - VI/15
Page 154 of 282
ToneVehicle features and op‐
tions
This chapter describes all standard, country-
specific and optional features offered with the
series. It also describes features that are not
necessarily available in your car, e. g., due to
the selected options or country versions. This
also applies to safety-related functions and sys‐
tems.
When using the features and systems described
here, adhere to local regulations.
General information The sound settings are stored for the remote
control currently in use.
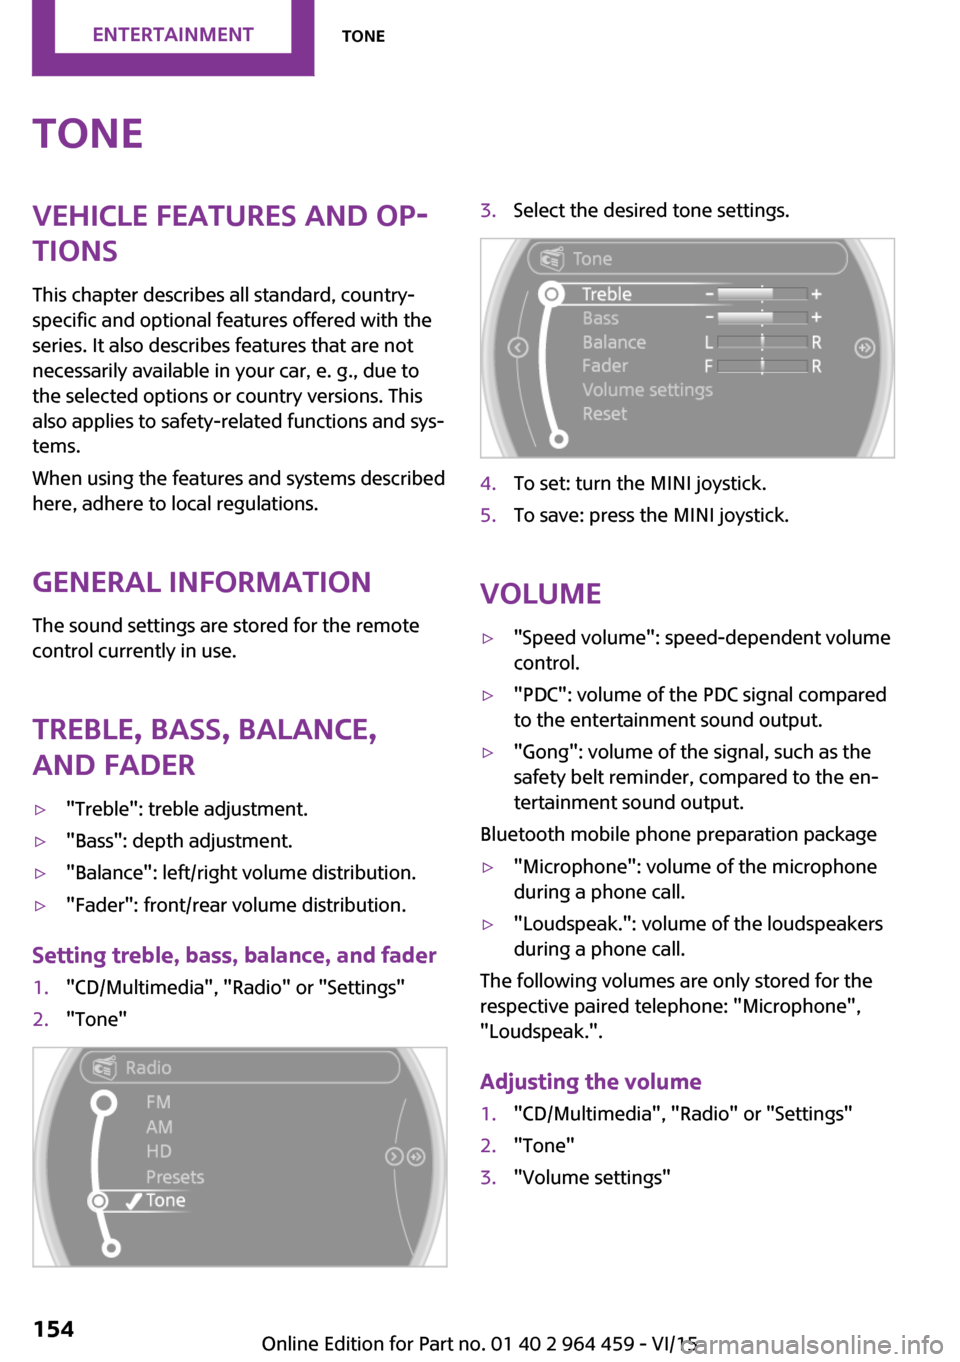
Treble, bass, balance,
and fader▷"Treble": treble adjustment.▷"Bass": depth adjustment.▷"Balance": left/right volume distribution.▷"Fader": front/rear volume distribution.
Setting treble, bass, balance, and fader
1."CD/Multimedia", "Radio" or "Settings"2."Tone"3.Select the desired tone settings.4.To set: turn the MINI joystick.5.To save: press the MINI joystick.
Volume
▷"Speed volume": speed-dependent volume
control.▷"PDC": volume of the PDC signal compared
to the entertainment sound output.▷"Gong": volume of the signal, such as the
safety belt reminder, compared to the en‐
tertainment sound output.
Bluetooth mobile phone preparation package
▷"Microphone": volume of the microphone
during a phone call.▷"Loudspeak.": volume of the loudspeakers
during a phone call.
The following volumes are only stored for the
respective paired telephone: "Microphone",
"Loudspeak.".
Adjusting the volume
1."CD/Multimedia", "Radio" or "Settings"2."Tone"3."Volume settings"Seite 154ENTERTAINMENTTone154
Online Edition for Part no. 01 40 2 964 459 - VI/15
Page 160 of 282
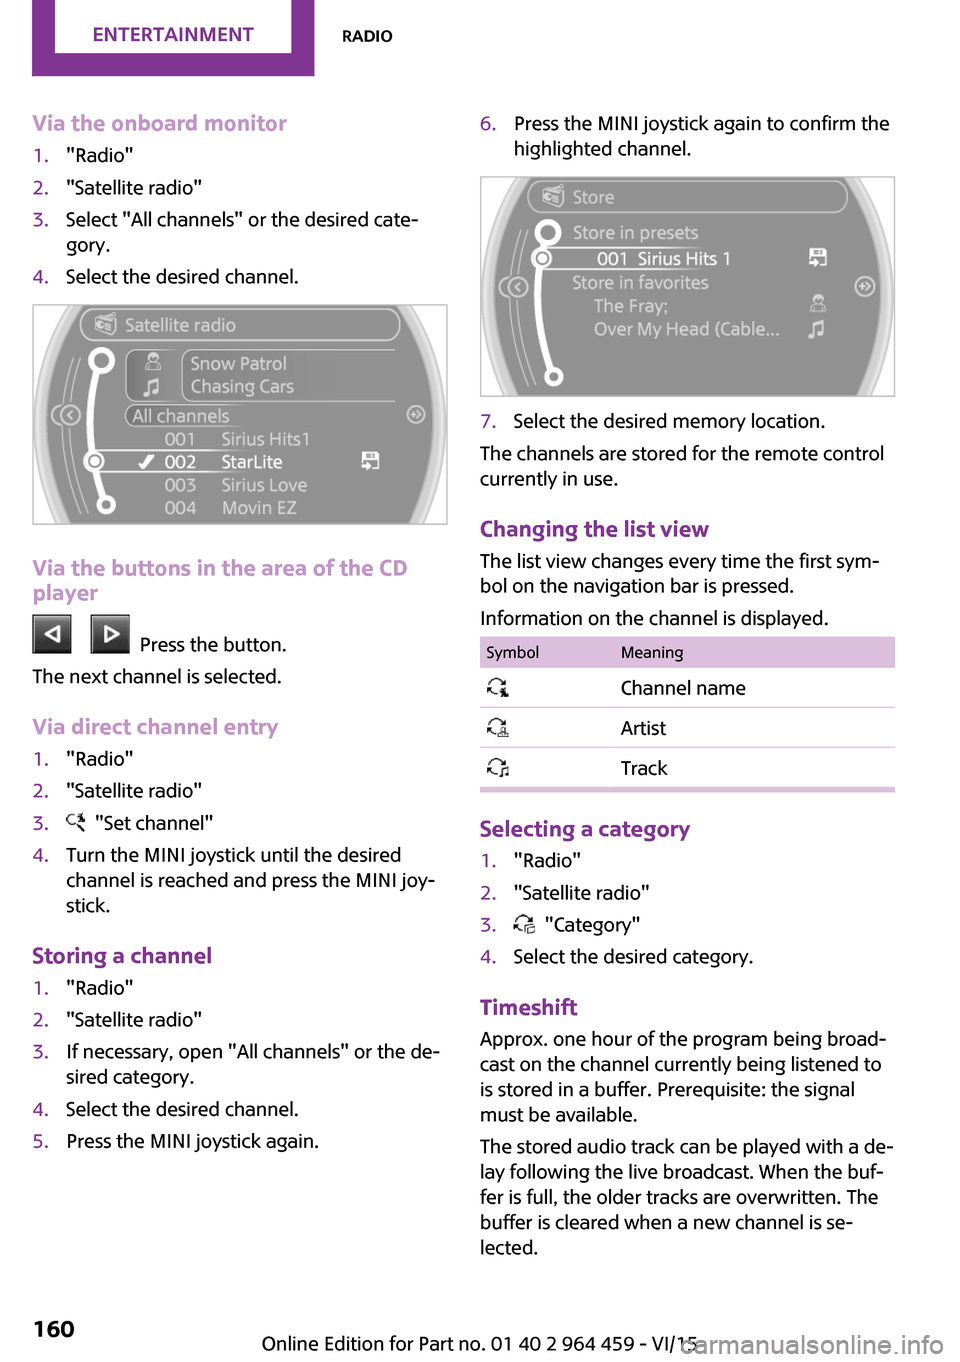
Via the onboard monitor1."Radio"2."Satellite radio"3.Select "All channels" or the desired cate‐
gory.4.Select the desired channel.
Via the buttons in the area of the CD
player
Press the button.
The next channel is selected.
Via direct channel entry
1."Radio"2."Satellite radio"3. "Set channel"4.Turn the MINI joystick until the desired
channel is reached and press the MINI joy‐
stick.
Storing a channel
1."Radio"2."Satellite radio"3.If necessary, open "All channels" or the de‐
sired category.4.Select the desired channel.5.Press the MINI joystick again.6.Press the MINI joystick again to confirm the
highlighted channel.7.Select the desired memory location.
The channels are stored for the remote control
currently in use.
Changing the list view
The list view changes every time the first sym‐
bol on the navigation bar is pressed.
Information on the channel is displayed.
SymbolMeaning Channel name Artist Track
Selecting a category
1."Radio"2."Satellite radio"3. "Category"4.Select the desired category.
Timeshift Approx. one hour of the program being broad‐
cast on the channel currently being listened to is stored in a buffer. Prerequisite: the signal
must be available.
The stored audio track can be played with a de‐
lay following the live broadcast. When the buf‐ fer is full, the older tracks are overwritten. The
buffer is cleared when a new channel is se‐
lected.
Seite 160ENTERTAINMENTRadio160
Online Edition for Part no. 01 40 2 964 459 - VI/15
Page 181 of 282
▷A multi-character passkey may be needed.▷Did it take longer than 30 seconds to enter
the passkey? Repeat the pairing procedure.▷Are too many Bluetooth devices connected
to the mobile phone or vehicle? Delete con‐
nections with other devices if necessary.▷The mobile phone is in power-save mode
or has only a limited remaining battery life.
Charge the mobile phone via the charging
cable.▷Depending on the mobile phone, it is possi‐
ble that only one mobile phone can be con‐
nected to the vehicle. Unpair the connected
mobile phone from the vehicle and pair
and connect only one mobile phone.
The mobile phone no longer reacts.
▷Switch the mobile phone off and on again.▷Is the ambient temperature too high or
low? Do not expose the mobile phone to
extreme environmental conditions.
No phone book entries or only some phone
book entries are displayed, or they are incom‐
plete.
▷Transmission of the phone book entries is
not yet complete.▷It is possible that only the phone book en‐
tries of the mobile phone or the SIM card
are transmitted.▷It may not be possible to display phone
book entries with special characters.▷The number of phone book entries to be
stored is too high.▷Is the data volume of the contact too large,
e. g., due to stored information such as
notes? Reduce the data volume of the con‐
tact.
The phone connection quality is poor.
▷The strength of the Bluetooth signal on the
mobile phone can be adjusted, depending
on the mobile phone.▷Place the mobile phone in the area of the
center console.If all points in this list have been checked and
the required function is still not available, con‐
tact the hotline or a dealer’s service center or
another qualified service center or repair shop.
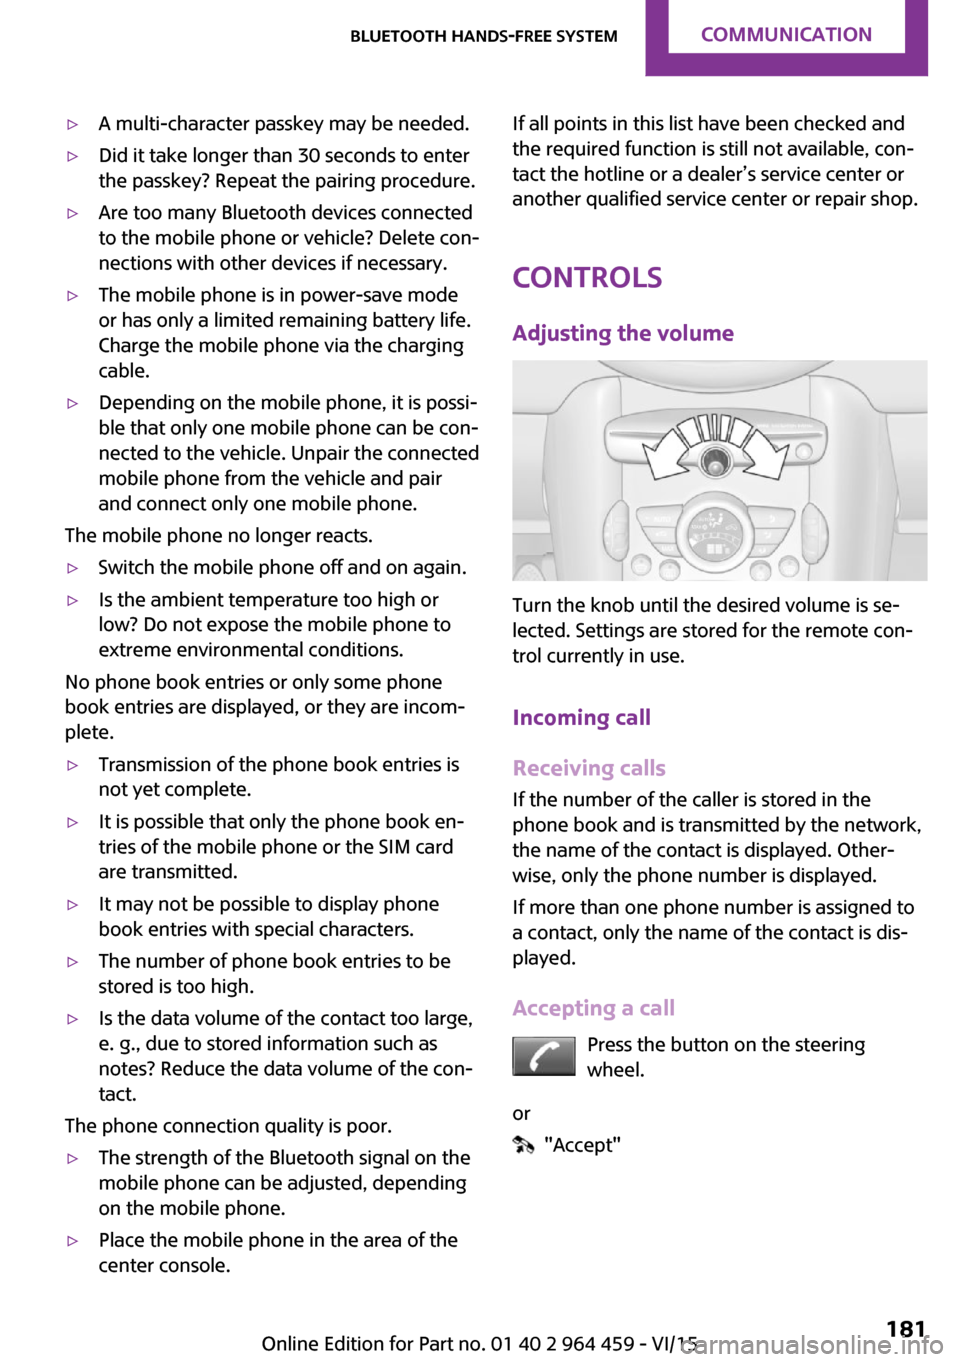
Controls Adjusting the volume
Turn the knob until the desired volume is se‐
lected. Settings are stored for the remote con‐
trol currently in use.
Incoming call
Receiving calls If the number of the caller is stored in the
phone book and is transmitted by the network,
the name of the contact is displayed. Other‐
wise, only the phone number is displayed.
If more than one phone number is assigned to
a contact, only the name of the contact is dis‐
played.
Accepting a call Press the button on the steering
wheel.
or
"Accept"
Seite 181Bluetooth hands-free systemCOMMUNICATION181
Online Edition for Part no. 01 40 2 964 459 - VI/15