warning MINI Countryman 2016 Owner's Manual (Mini Connected)
[x] Cancel search | Manufacturer: MINI, Model Year: 2016, Model line: Countryman, Model: MINI Countryman 2016Pages: 282, PDF Size: 6.79 MB
Page 7 of 282
be necessary to adapt your vehicle to poten‐
tially differing operating conditions and permit
requirements. If your vehicle does not comply
with the homologation requirements in a cer‐
tain country you may not be able to lodge war‐
ranty claims for your vehicle there. Further in‐
formation on warranty is available from a
dealer’s service center.
Maintenance and repairs
Advanced technology, e.g., the use of modern
materials and high-performance electronics,
requires suitable maintenance and repair work.
The manufacturer of your vehicle recommends
that you entrust corresponding procedures to a
MINI dealer’s service center. If you choose to
use another service facility, the manufacturer of
your vehicle recommends use of a facility that
performs work, e.g. maintenance and repair,
according to MINI specifications with properly
trained personnel, referred to in this Owner's
Manual as "another qualified service center or
repair shop".
If work is performed improperly, e.g. mainte‐
nance and repair, there is a risk of subsequent
damage and related safety risks.
Parts and accessories The manufacturer of your vehicle recommends
the use of parts and accessory products ap‐ proved by the manufacturer of the MINI.
Approved parts and accessories, and advice on
their use and installation are available from a
MINI dealer's service center.
MINI parts and accessories were tested by the
manufacturer of the MINI for their safety and
suitability in MINI vehicles.
The manufacturer of your vehicle warrants gen‐
uine MINI parts and accessories.
The manufacturer of your vehicle does not
evaluate whether each individual product from
another manufacturer can be used with MINI
vehicles without presenting a safety hazard,
even if a country-specific official approval wasissued. The manufacturer of your vehicle does
not evaluate whether these products are suita‐
ble for MINI vehicles under all usage conditions.
California Proposition 65 Warning
California laws require us to state the following
warning:
Engine exhaust and a wide variety of automo‐
bile components and parts, including compo‐
nents found in the interior furnishings in a vehi‐
cle, contain or emit chemicals known to the
State of California to cause cancer and birth de‐
fects and reproductive harm. In addition, cer‐
tain fluids contained in vehicles and certain
products of component wear contain or emit
chemicals known to the State of California to
cause cancer and birth defects or other repro‐
ductive harm. Battery posts, terminals and re‐
lated accessories contain lead and lead com‐
pounds. Wash your hands after handling. Used
engine oil contains chemicals that have caused
cancer in laboratory animals. Always protect
your skin by washing thoroughly with soap and
water.
Service and warranty
We recommend that you read this publication
thoroughly. Your vehicle is covered by the fol‐
lowing warranties:▷New Vehicle Limited Warranty.▷Rust Perforation Limited Warranty.▷Federal Emissions System Defect Warranty.▷Federal Emissions Performance Warranty.▷California Emission Control System Limited
Warranty.
Detailed information about these warranties is
listed in the Service and Warranty Information
Booklet for US models or in the Warranty and
Service Guide Booklet for Canadian models.
Your vehicle has been specifically adapted and
designed to meet the particular operating con‐
ditions and homologation requirements in your
country and continental region in order to de‐
Seite 7Information7
Online Edition for Part no. 01 40 2 964 459 - VI/15
Page 14 of 282
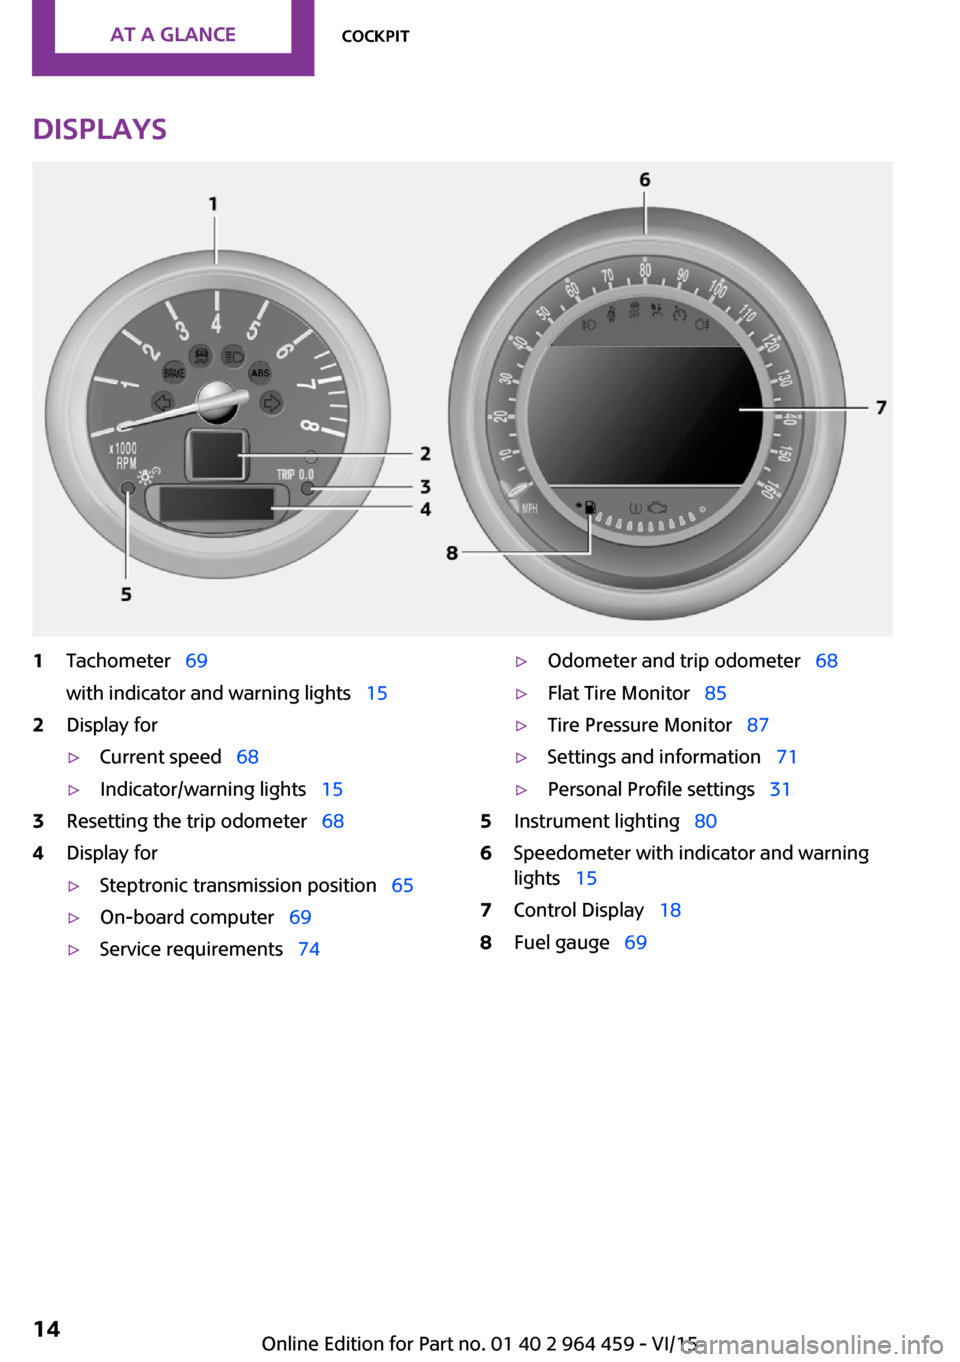
Displays1Tachometer 69
with indicator and warning lights 152Display for▷Current speed 68▷Indicator/warning lights 153Resetting the trip odometer 684Display for▷Steptronic transmission position 65▷On-board computer 69▷Service requirements 74▷Odometer and trip odometer 68▷Flat Tire Monitor 85▷Tire Pressure Monitor 87▷Settings and information 71▷Personal Profile settings 315Instrument lighting 806Speedometer with indicator and warning
lights 157Control Display 188Fuel gauge 69Seite 14AT A GLANCECockpit14
Online Edition for Part no. 01 40 2 964 459 - VI/15
Page 15 of 282
Indicator/warning lights
The principle
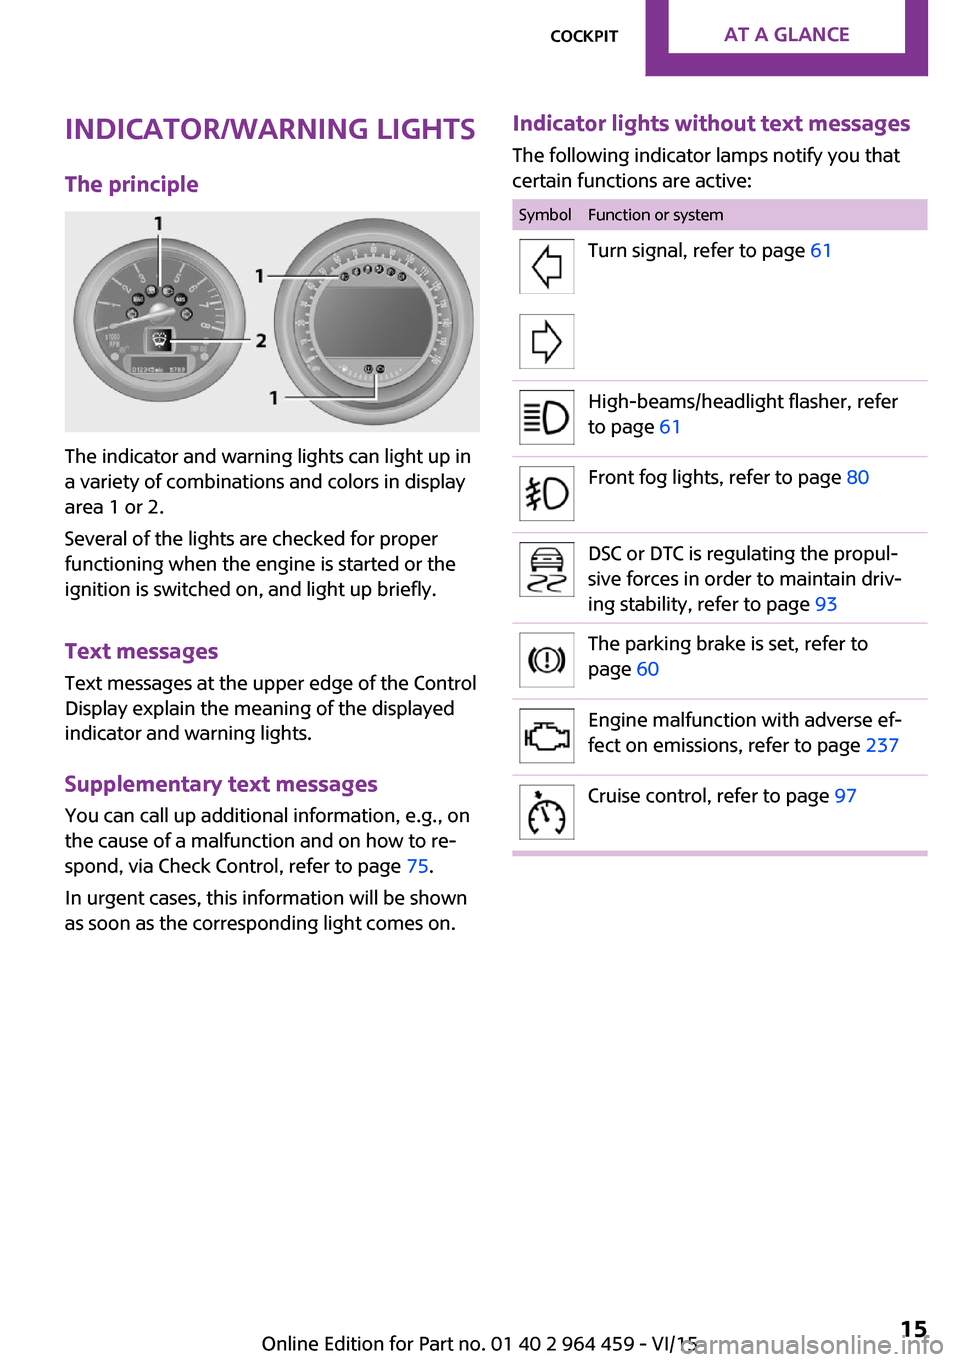
The indicator and warning lights can light up in
a variety of combinations and colors in display
area 1 or 2.
Several of the lights are checked for proper
functioning when the engine is started or the
ignition is switched on, and light up briefly.
Text messages
Text messages at the upper edge of the Control
Display explain the meaning of the displayed
indicator and warning lights.
Supplementary text messages
You can call up additional information, e.g., on
the cause of a malfunction and on how to re‐
spond, via Check Control, refer to page 75.
In urgent cases, this information will be shown
as soon as the corresponding light comes on.
Indicator lights without text messages
The following indicator lamps notify you that
certain functions are active:SymbolFunction or systemTurn signal, refer to page 61High-beams/headlight flasher, refer
to page 61Front fog lights, refer to page 80DSC or DTC is regulating the propul‐
sive forces in order to maintain driv‐
ing stability, refer to page 93The parking brake is set, refer to
page 60Engine malfunction with adverse ef‐
fect on emissions, refer to page 237Cruise control, refer to page 97Seite 15CockpitAT A GLANCE15
Online Edition for Part no. 01 40 2 964 459 - VI/15
Page 16 of 282
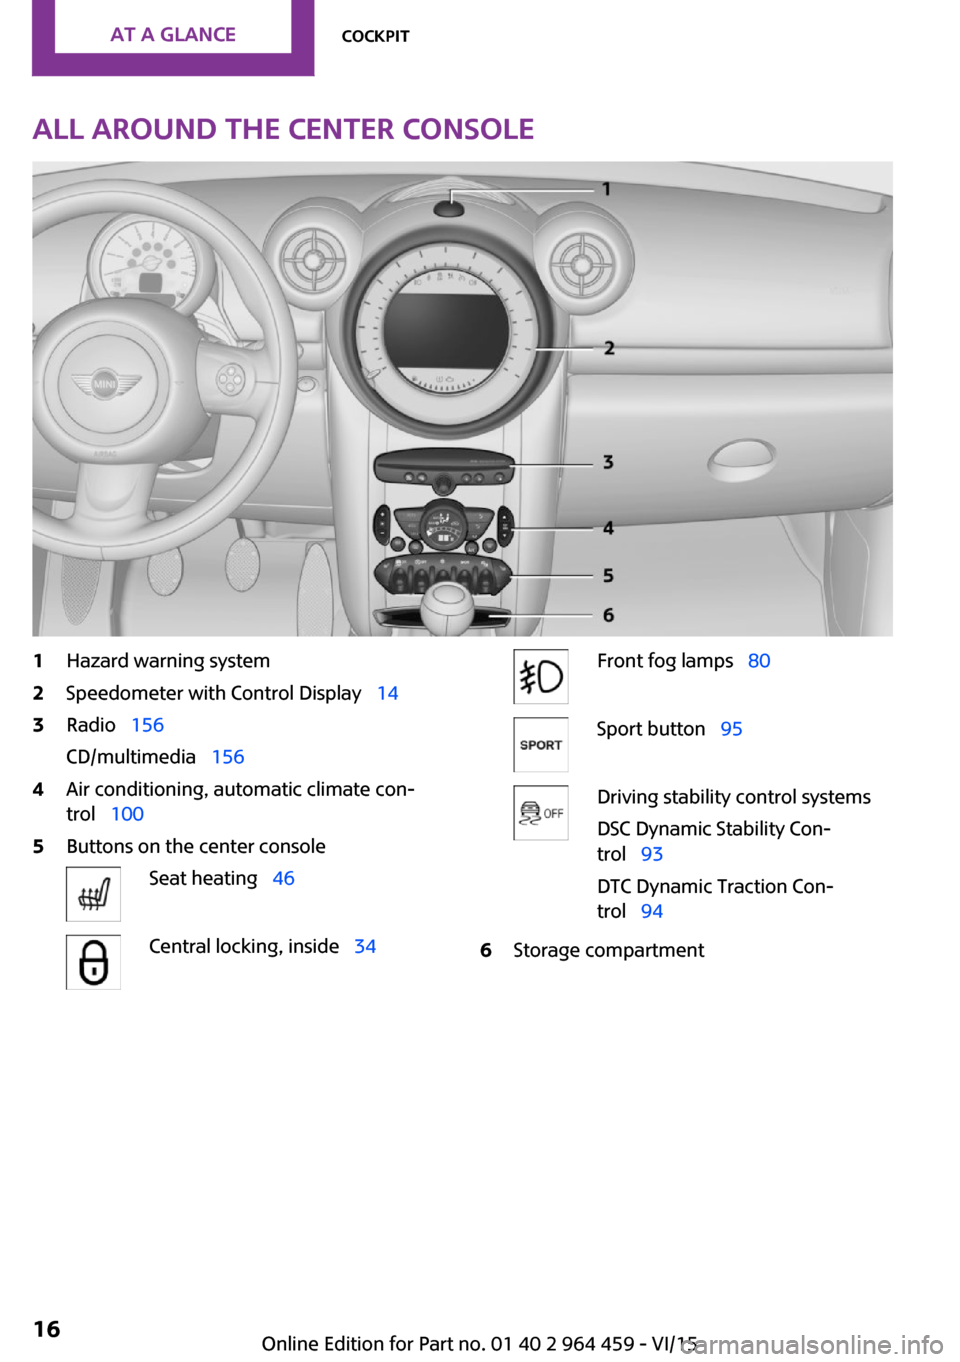
All around the center console1Hazard warning system2Speedometer with Control Display 143Radio 156
CD/multimedia 1564Air conditioning, automatic climate con‐
trol 1005Buttons on the center consoleSeat heating 46Central locking, inside 34Front fog lamps 80Sport button 95Driving stability control systems
DSC Dynamic Stability Con‐
trol 93
DTC Dynamic Traction Con‐
trol 946Storage compartmentSeite 16AT A GLANCECockpit16
Online Edition for Part no. 01 40 2 964 459 - VI/15
Page 17 of 282
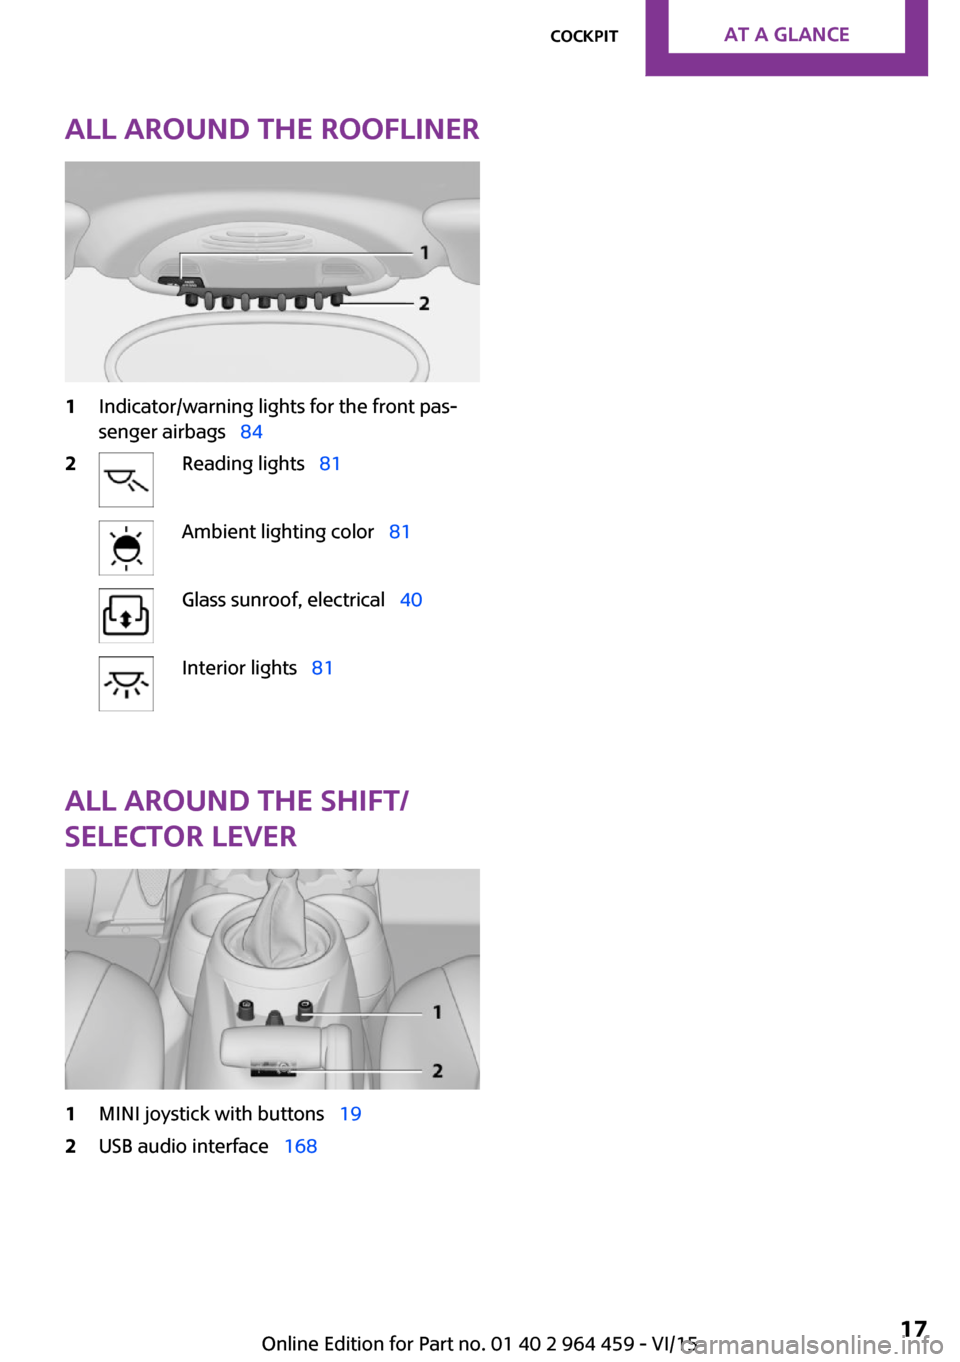
All around the roofliner1Indicator/warning lights for the front pas‐
senger airbags 842Reading lights 81Ambient lighting color 81Glass sunroof, electrical 40Interior lights 81
All around the shift/
selector lever
1MINI joystick with buttons 192USB audio interface 168Seite 17CockpitAT A GLANCE17
Online Edition for Part no. 01 40 2 964 459 - VI/15
Page 18 of 282
Onboard monitorVehicle features and op‐
tions
This chapter describes all standard, country-
specific and optional features offered with the
series. It also describes features that are not
necessarily available in your car, e. g., due to
the selected options or country versions. This
also applies to safety-related functions and sys‐
tems.
When using the features and systems described
here, adhere to local regulations.
The concept The onboard monitor combines the functions
of a large number of different switches. Thus,
these functions can be operated from a central
location.
WARNING
Operating the integrated information sys‐
tem and communication devices while driving
can distract from traffic. It is possible to lose
control of the vehicle. There is risk of an acci‐
dent. Only use the systems or devices when the
traffic situation allows. If necessary stop and
use the systems and devices while the vehicle is
stationary. ◀Control elements at a
glance
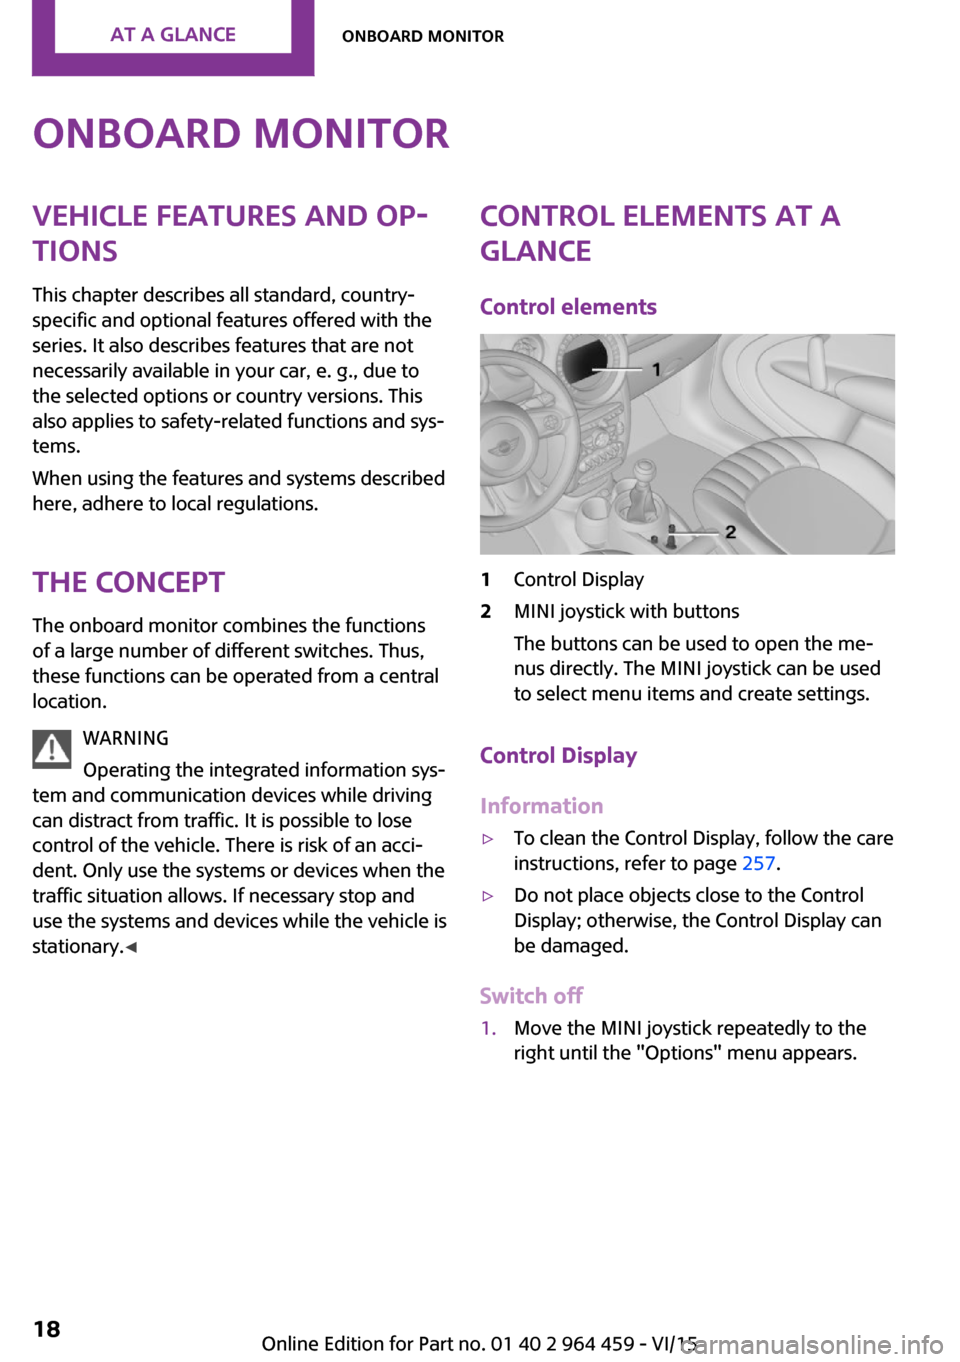
Control elements1Control Display2MINI joystick with buttons
The buttons can be used to open the me‐
nus directly. The MINI joystick can be used
to select menu items and create settings.
Control Display
Information
▷To clean the Control Display, follow the care
instructions, refer to page 257.▷Do not place objects close to the Control
Display; otherwise, the Control Display can
be damaged.
Switch off
1.Move the MINI joystick repeatedly to the
right until the "Options" menu appears.Seite 18AT A GLANCEOnboard monitor18
Online Edition for Part no. 01 40 2 964 459 - VI/15
Page 32 of 282
impossible to unlock the doors using the
lock buttons or door handles.▷The welcome lamps, interior lamps, and
ambient lighting are switched on and off.▷The alarm system is armed or disarmed, re‐
fer to page 39.
Operating from the inside
Via the switch/button for the central locking
system, refer to page 34.
In an accident of the necessary severity, the
central locking system unlocks automatically.
The hazard warning system and interior lamps
come on.
Opening and closing:
from the outside
Using the remote control
General information WARNING
People or animals in the vehicle can lock
the doors from the inside and lock themselves
in. The vehicle can then not be opened from
the outside. There is risk of injuries. Take the
remote control along so that the vehicle can be
opened from the outside. ◀
Unlocking
Press the button. The vehicle is un‐
locked.
The welcome lamps and interior lamps are
switched on.
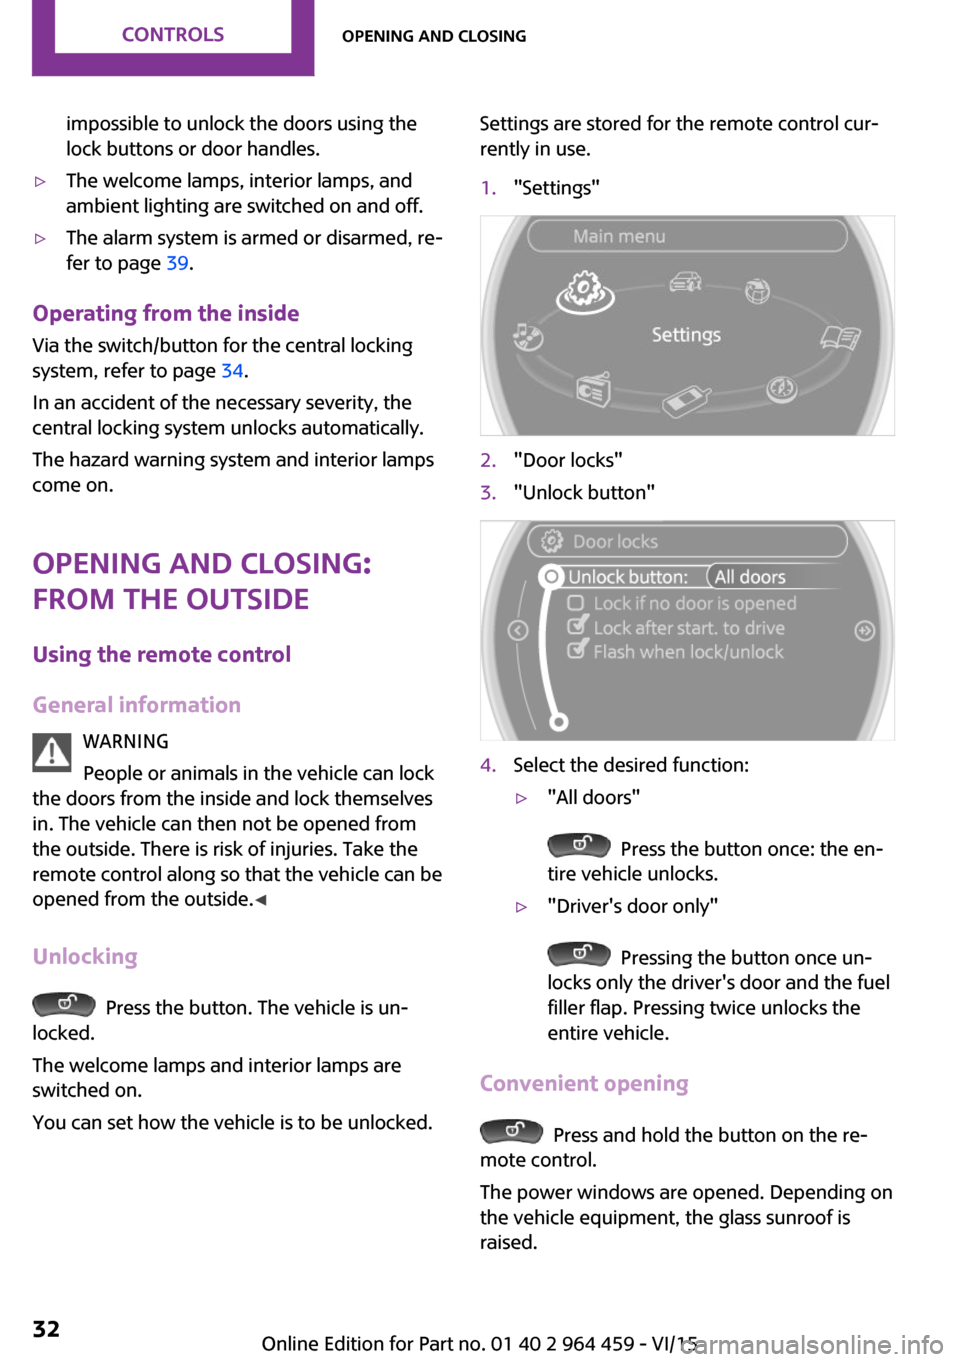
You can set how the vehicle is to be unlocked.
Settings are stored for the remote control cur‐
rently in use.1."Settings"2."Door locks"3."Unlock button"4.Select the desired function:▷"All doors"
Press the button once: the en‐
tire vehicle unlocks.
▷"Driver's door only"
Pressing the button once un‐
locks only the driver's door and the fuel
filler flap. Pressing twice unlocks the
entire vehicle.
Convenient opening
Press and hold the button on the re‐
mote control.
The power windows are opened. Depending on
the vehicle equipment, the glass sunroof is
raised.
Seite 32CONTROLSOpening and closing32
Online Edition for Part no. 01 40 2 964 459 - VI/15
Page 33 of 282
Convenient closing with the remote control is
not possible.
Locking
Press the button.
WARNING
Unlocking from the inside is only possible
with special knowledge.
If people must spend a longer time in the vehi‐
cle while it is very hot or cold outside, there is
risk of injuries or danger to life. Do not lock the
vehicle from the outside when there are people
in it. ◀
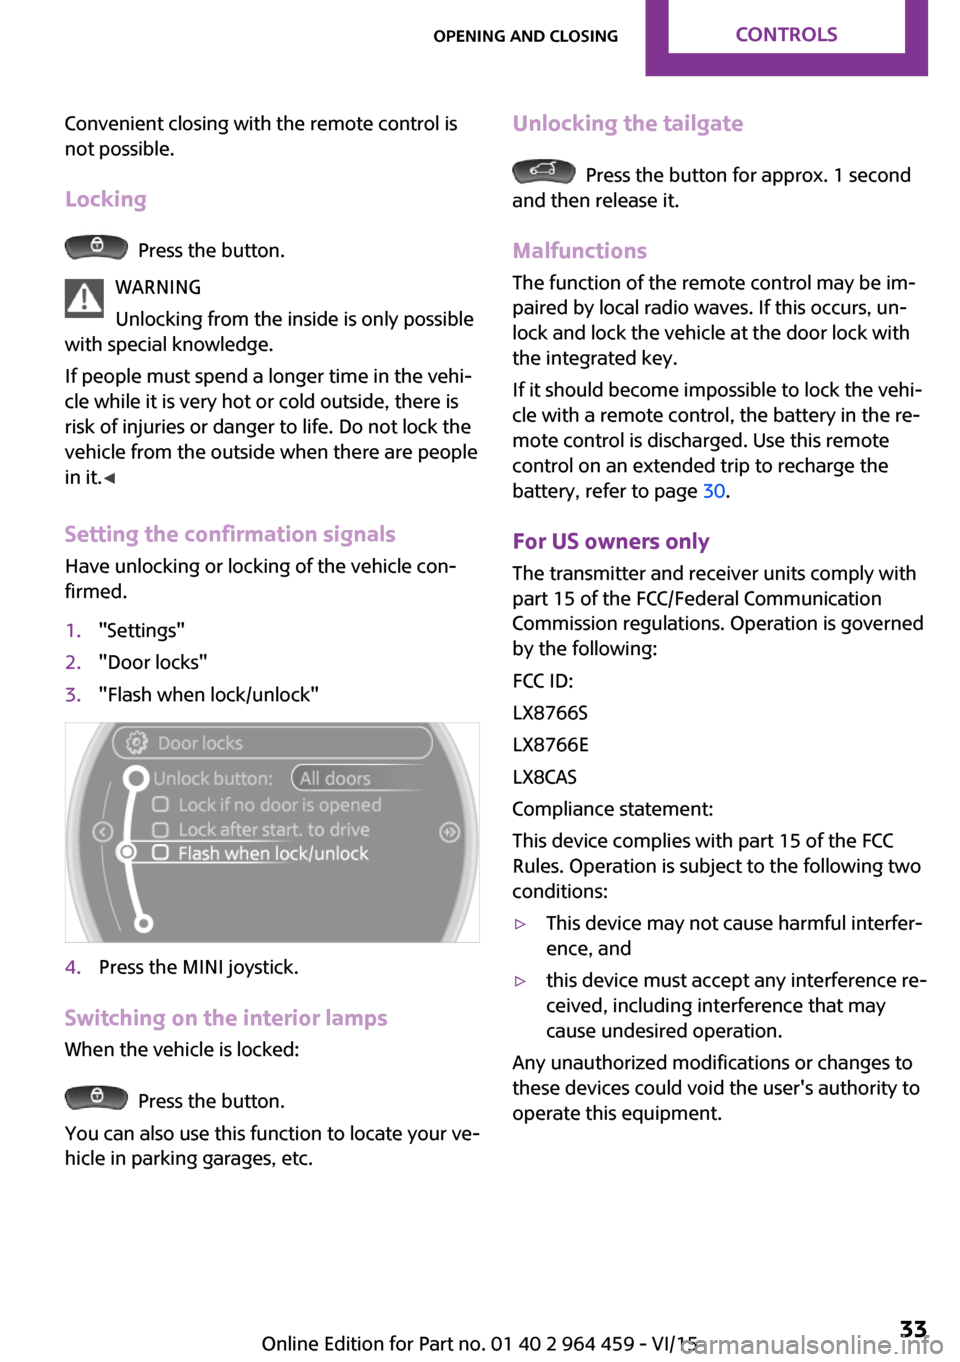
Setting the confirmation signals Have unlocking or locking of the vehicle con‐
firmed.
1."Settings"2."Door locks"3."Flash when lock/unlock"4.Press the MINI joystick.
Switching on the interior lamps
When the vehicle is locked:
Press the button.
You can also use this function to locate your ve‐
hicle in parking garages, etc.
Unlocking the tailgate
Press the button for approx. 1 second
and then release it.
Malfunctions
The function of the remote control may be im‐
paired by local radio waves. If this occurs, un‐
lock and lock the vehicle at the door lock with
the integrated key.
If it should become impossible to lock the vehi‐
cle with a remote control, the battery in the re‐
mote control is discharged. Use this remote
control on an extended trip to recharge the
battery, refer to page 30.
For US owners only The transmitter and receiver units comply with
part 15 of the FCC/Federal Communication
Commission regulations. Operation is governed
by the following:
FCC ID:
LX8766S
LX8766E
LX8CAS
Compliance statement:
This device complies with part 15 of the FCC
Rules. Operation is subject to the following two
conditions:
▷This device may not cause harmful interfer‐
ence, and▷this device must accept any interference re‐
ceived, including interference that may
cause undesired operation.
Any unauthorized modifications or changes to
these devices could void the user's authority to
operate this equipment.
Seite 33Opening and closingCONTROLS33
Online Edition for Part no. 01 40 2 964 459 - VI/15
Page 34 of 282
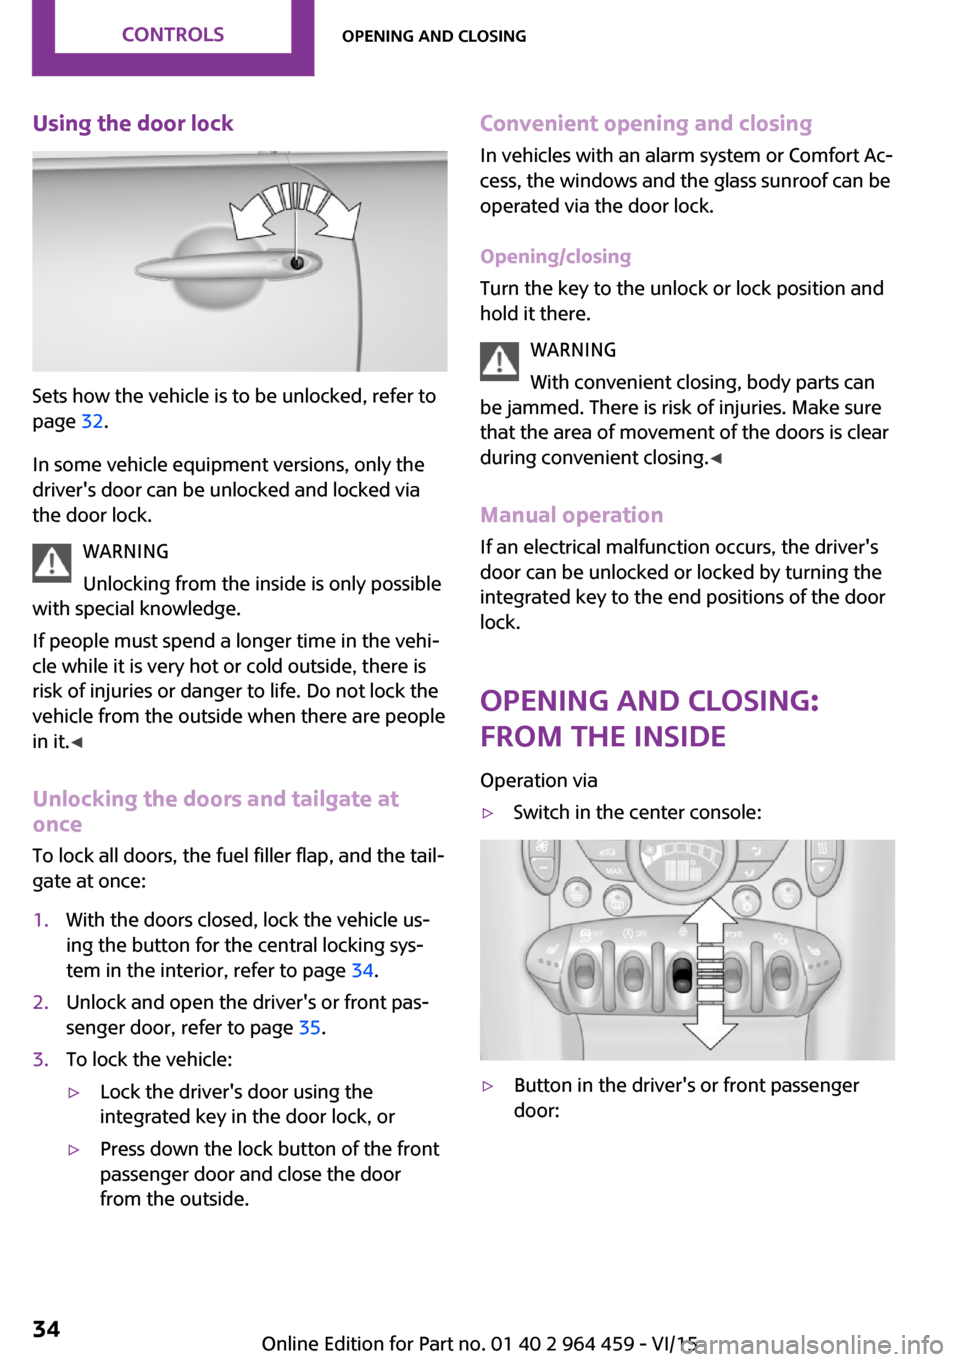
Using the door lock
Sets how the vehicle is to be unlocked, refer to
page 32.
In some vehicle equipment versions, only the
driver's door can be unlocked and locked via
the door lock.
WARNING
Unlocking from the inside is only possible
with special knowledge.
If people must spend a longer time in the vehi‐
cle while it is very hot or cold outside, there is
risk of injuries or danger to life. Do not lock the
vehicle from the outside when there are people
in it. ◀
Unlocking the doors and tailgate at
once
To lock all doors, the fuel filler flap, and the tail‐
gate at once:
1.With the doors closed, lock the vehicle us‐
ing the button for the central locking sys‐
tem in the interior, refer to page 34.2.Unlock and open the driver's or front pas‐
senger door, refer to page 35.3.To lock the vehicle:▷Lock the driver's door using the
integrated key in the door lock, or▷Press down the lock button of the front
passenger door and close the door
from the outside.Convenient opening and closing
In vehicles with an alarm system or Comfort Ac‐
cess, the windows and the glass sunroof can be
operated via the door lock.
Opening/closing
Turn the key to the unlock or lock position and
hold it there.
WARNING
With convenient closing, body parts can
be jammed. There is risk of injuries. Make sure
that the area of movement of the doors is clear
during convenient closing. ◀
Manual operation If an electrical malfunction occurs, the driver's
door can be unlocked or locked by turning the
integrated key to the end positions of the door
lock.
Opening and closing:
from the inside
Operation via▷Switch in the center console:▷Button in the driver's or front passenger
door:Seite 34CONTROLSOpening and closing34
Online Edition for Part no. 01 40 2 964 459 - VI/15
Page 35 of 282
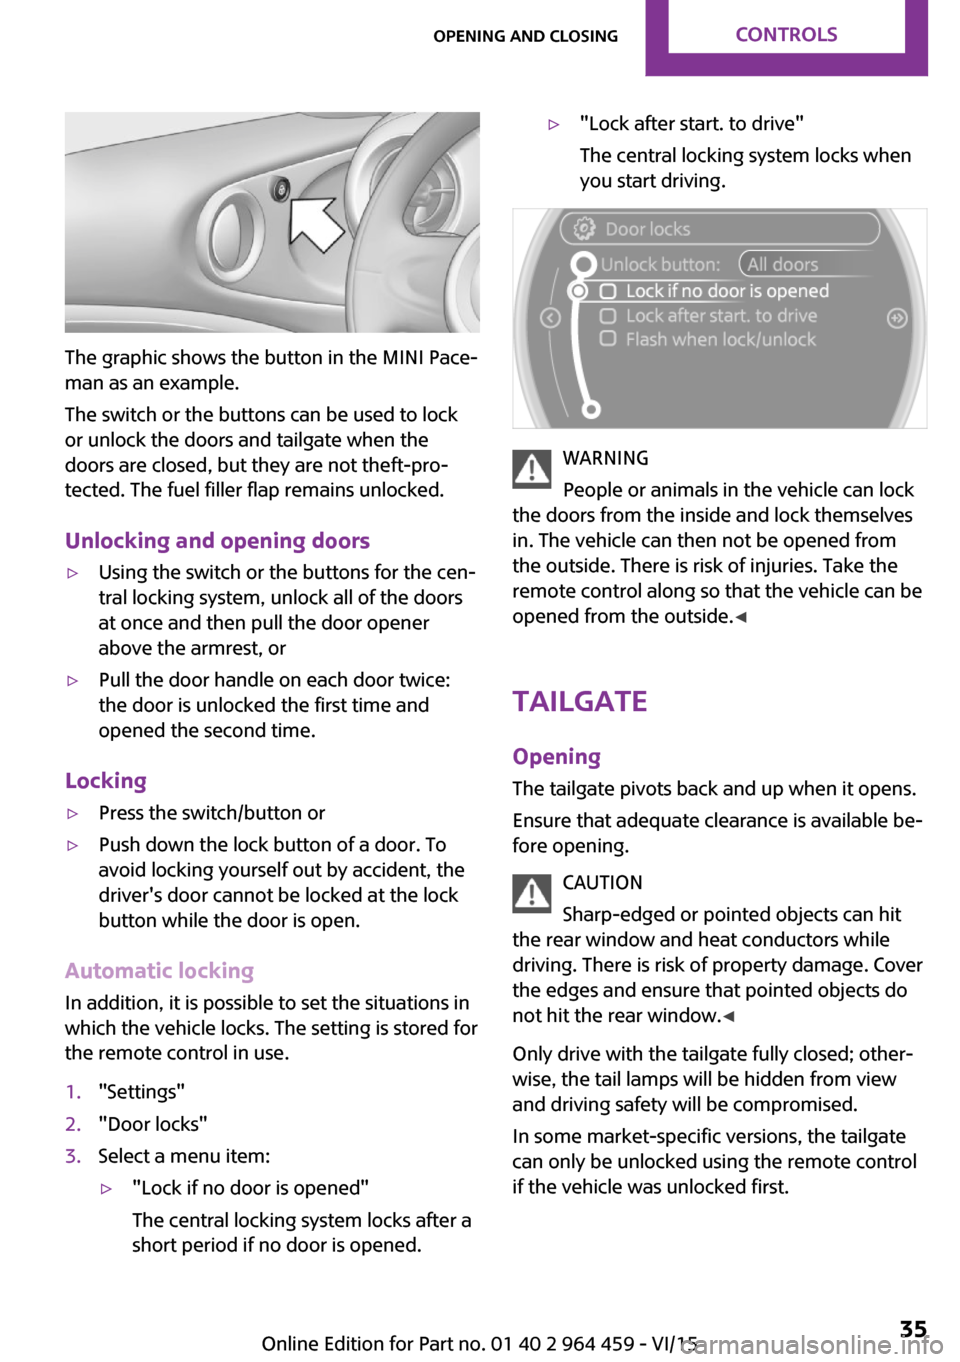
The graphic shows the button in the MINI Pace‐
man as an example.
The switch or the buttons can be used to lock
or unlock the doors and tailgate when the
doors are closed, but they are not theft-pro‐
tected. The fuel filler flap remains unlocked.
Unlocking and opening doors
▷Using the switch or the buttons for the cen‐
tral locking system, unlock all of the doors
at once and then pull the door opener
above the armrest, or▷Pull the door handle on each door twice:
the door is unlocked the first time and
opened the second time.
Locking
▷Press the switch/button or▷Push down the lock button of a door. To
avoid locking yourself out by accident, the
driver's door cannot be locked at the lock
button while the door is open.
Automatic locking
In addition, it is possible to set the situations in
which the vehicle locks. The setting is stored for
the remote control in use.
1."Settings"2."Door locks"3.Select a menu item:▷"Lock if no door is opened"
The central locking system locks after a
short period if no door is opened.▷"Lock after start. to drive"
The central locking system locks when
you start driving.
WARNING
People or animals in the vehicle can lock
the doors from the inside and lock themselves
in. The vehicle can then not be opened from
the outside. There is risk of injuries. Take the
remote control along so that the vehicle can be
opened from the outside. ◀
Tailgate Opening The tailgate pivots back and up when it opens.
Ensure that adequate clearance is available be‐
fore opening.
CAUTION
Sharp-edged or pointed objects can hit
the rear window and heat conductors while
driving. There is risk of property damage. Cover
the edges and ensure that pointed objects do
not hit the rear window. ◀
Only drive with the tailgate fully closed; other‐
wise, the tail lamps will be hidden from view
and driving safety will be compromised.
In some market-specific versions, the tailgate
can only be unlocked using the remote control
if the vehicle was unlocked first.
Seite 35Opening and closingCONTROLS35
Online Edition for Part no. 01 40 2 964 459 - VI/15