wheel MINI COUNTRYMAN PACEMAN 2014 Owner's Manual
[x] Cancel search | Manufacturer: MINI, Model Year: 2014, Model line: COUNTRYMAN PACEMAN, Model: MINI COUNTRYMAN PACEMAN 2014Pages: 218, PDF Size: 5.45 MB
Page 103 of 218
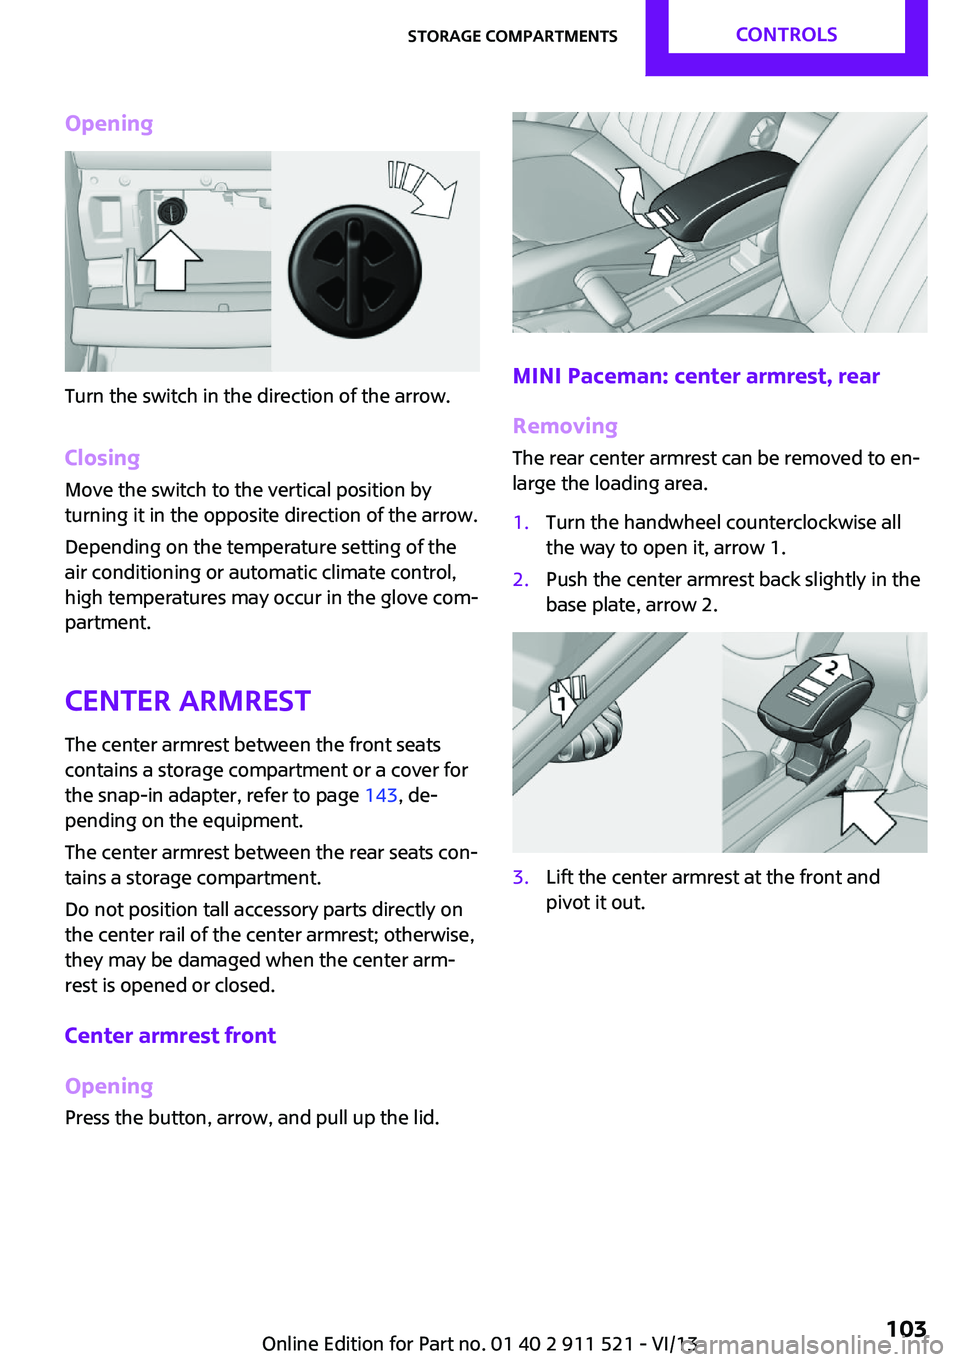
Opening
Turn the switch in the direction of the arrow.ClosingMove the switch to the vertical position by
turning it in the opposite direction of the arrow.
Depending on the temperature setting of the
air conditioning or automatic climate control,
high temperatures may occur in the glove com‐
partment.
Center armrest
The center armrest between the front seats
contains a storage compartment or a cover for
the snap-in adapter, refer to page 143, de‐
pending on the equipment.
The center armrest between the rear seats con‐
tains a storage compartment.
Do not position tall accessory parts directly on
the center rail of the center armrest; otherwise, they may be damaged when the center arm‐
rest is opened or closed.
Center armrest front
Opening
Press the button, arrow, and pull up the lid.MINI Paceman: center armrest, rear
Removing
The rear center armrest can be removed to en‐
large the loading area.
1.Turn the handwheel counterclockwise all
the way to open it, arrow 1.2.Push the center armrest back slightly in the
base plate, arrow 2.3.Lift the center armrest at the front and
pivot it out.Seite 103Storage compartmentsControls103
Online Edition for Part no. 01 40 2 911 521 - VI/13
Page 104 of 218
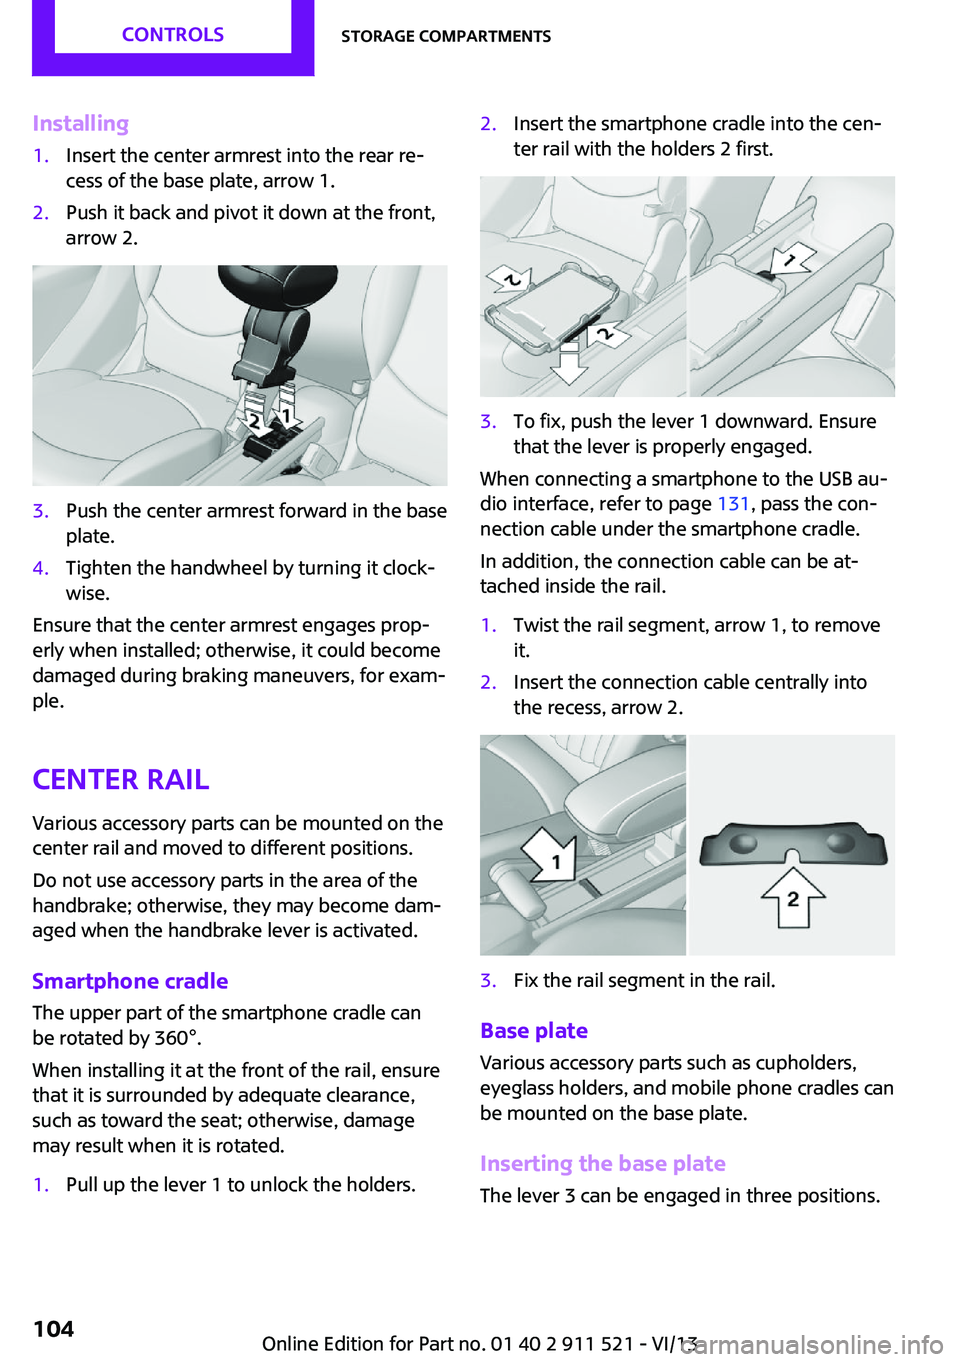
Installing1.Insert the center armrest into the rear re‐
cess of the base plate, arrow 1.2.Push it back and pivot it down at the front,
arrow 2.3.Push the center armrest forward in the base
plate.4.Tighten the handwheel by turning it clock‐
wise.
Ensure that the center armrest engages prop‐
erly when installed; otherwise, it could become
damaged during braking maneuvers, for exam‐
ple.
Center rail Various accessory parts can be mounted on the
center rail and moved to different positions.
Do not use accessory parts in the area of the
handbrake; otherwise, they may become dam‐
aged when the handbrake lever is activated.
Smartphone cradle The upper part of the smartphone cradle can
be rotated by 360°.
When installing it at the front of the rail, ensure
that it is surrounded by adequate clearance,
such as toward the seat; otherwise, damage
may result when it is rotated.
1.Pull up the lever 1 to unlock the holders.2.Insert the smartphone cradle into the cen‐
ter rail with the holders 2 first.3.To fix, push the lever 1 downward. Ensure
that the lever is properly engaged.
When connecting a smartphone to the USB au‐
dio interface, refer to page 131, pass the con‐
nection cable under the smartphone cradle.
In addition, the connection cable can be at‐
tached inside the rail.
1.Twist the rail segment, arrow 1, to remove
it.2.Insert the connection cable centrally into
the recess, arrow 2.3.Fix the rail segment in the rail.
Base plate
Various accessory parts such as cupholders,
eyeglass holders, and mobile phone cradles can
be mounted on the base plate.
Inserting the base plate
The lever 3 can be engaged in three positions.
Seite 104ControlsStorage compartments104
Online Edition for Part no. 01 40 2 911 521 - VI/13
Page 113 of 218
Driving on poor roadsYour MINI with ALL4 all-wheel drive feels com‐
fortable on all streets and roads. It combines an
all-wheel drive system with the advantages of a
normal passenger car.
Do not drive on unpaved terrain
Do not drive on unpaved terrain, as oth‐
erwise the vehicle may be damaged. ◀
For your own safety and the safety of passen‐
gers and the vehicle, adhere to the following
points:▷Familiarize yourself with the vehicle before
driving; never take risks.▷Adjust speeds according to road conditions.
The steeper and rougher the road surface
is, the lower the speed should be.▷When driving on steep uphill and downhill
grades: the engine oil and coolant should
be filled nearly to the MAX mark.▷Watch for stones, holes, and other obsta‐
cles and drive around these where possible.▷On bumps and rough roads, avoid contact
between the vehicle body and the ground.
The maximum ground clearance is 6 in‐
ches/15 cm and may vary with the loaded
cargo.▷When driving through water, do not exceed
the maximum water height of 12 in‐
ches/30 cm and drive at walking speed.▷After driving through water, press on the
brake pedal several times at low speeds to
dry the brakes.▷Depending on the prevailing terrain, acti‐
vate Dynamic Traction Control DTC briefly,
refer to page 82.▷When the wheels spin, accelerate to enable
the driving stability control systems to dis‐
tribute the drive force to the individual
wheels.After driving on poor roads
Adhere to the following points to ensure vehi‐
cle safety:▷Remove excessive accumulations of dirt
and mud from the vehicle body.▷Clear mud, snow, ice, etc., from the wheels
and tires and check for damage.Seite 113Things to remember when drivingDriving tips113
Online Edition for Part no. 01 40 2 911 521 - VI/13
Page 136 of 218
TelephoneVehicle equipment
This chapter describes all series equipment as
well as country-specific and special equipment
offered for this model series.Therefore, it also
describes equipment that may not be found in
your vehicle, for instance due to the selected
special equipment or the country version. This
also applies to safety-related functions and sys‐
tems.
At a glance The concept
Mobile phones can be connected with the vehi‐
cle via Bluetooth.
After a suitable mobile phone is paired with the
vehicle once, you can operate the mobile
phone via the radio, the buttons on the steer‐
ing wheel, and via voice activation.
Bluetooth® is a registered trademark of Blue‐
tooth® SIG, Inc.
Certain functions may need to be enabled by
the mobile phone provider or service provider.
Using the mobile phone while driving
Make entries only when traffic and road
conditions allow. Do not hold the mobile phone
in your hand while you are driving; use the
hands-free system instead. If you do not ob‐
serve this precaution, you can endanger the ve‐
hicle occupants and other road users. ◀
Snap-in adapter The snap-in adapter is used to:▷Hold the mobile phone.▷Recharge the battery.▷Connect the mobile phone to an outside
antenna of the vehicle.This provides for better network reception
and consistent sound quality.
Do not operate a mobile phone that is con‐
nected to the vehicle on the mobile phone key‐
pad, as this may lead to a malfunction.
Approved mobile phones
Details on which mobile phones with a Blue‐
tooth interface are supported by the mobile
phone preparation package can be obtained at
www.mini.com/connectivity.
Notes At high temperatures, the charging function of
the mobile phone may be limited and functions
may not be executed.
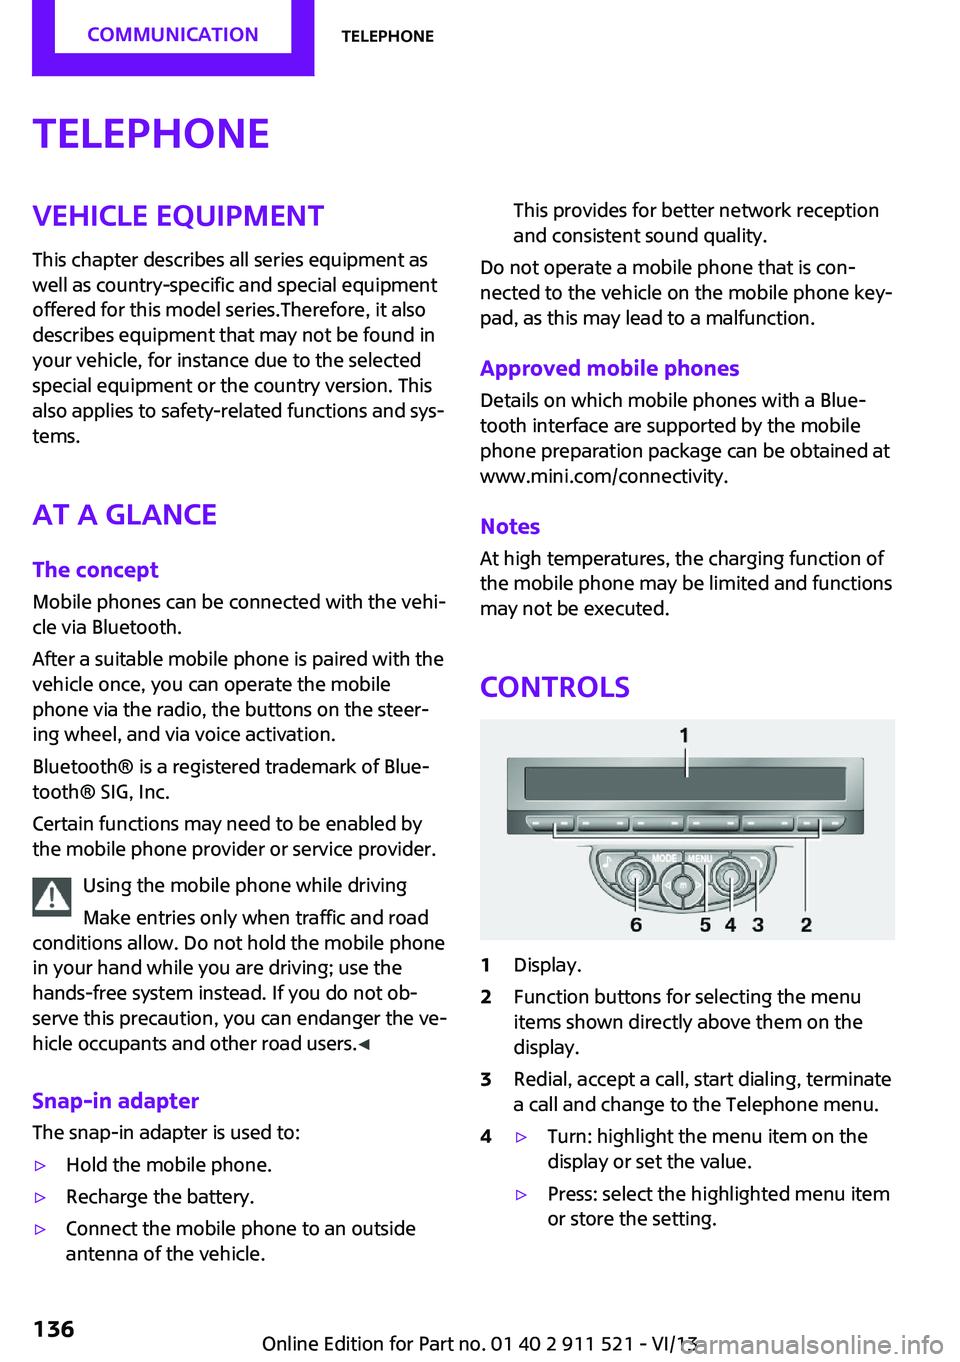
Controls
1Display.2Function buttons for selecting the menu
items shown directly above them on the
display.3Redial, accept a call, start dialing, terminate
a call and change to the Telephone menu.4▷Turn: highlight the menu item on the
display or set the value.▷Press: select the highlighted menu item
or store the setting.Seite 136CommunicationTelephone136
Online Edition for Part no. 01 40 2 911 521 - VI/13
Page 140 of 218
▷Dial a stored phone number, such as from
the list of accepted calls.▷End the call.
When the ignition and the radio ready state are
switched off, such as after the remote control is
removed, an existing call can be continued for
up to 25 minutes on the hands-free system.
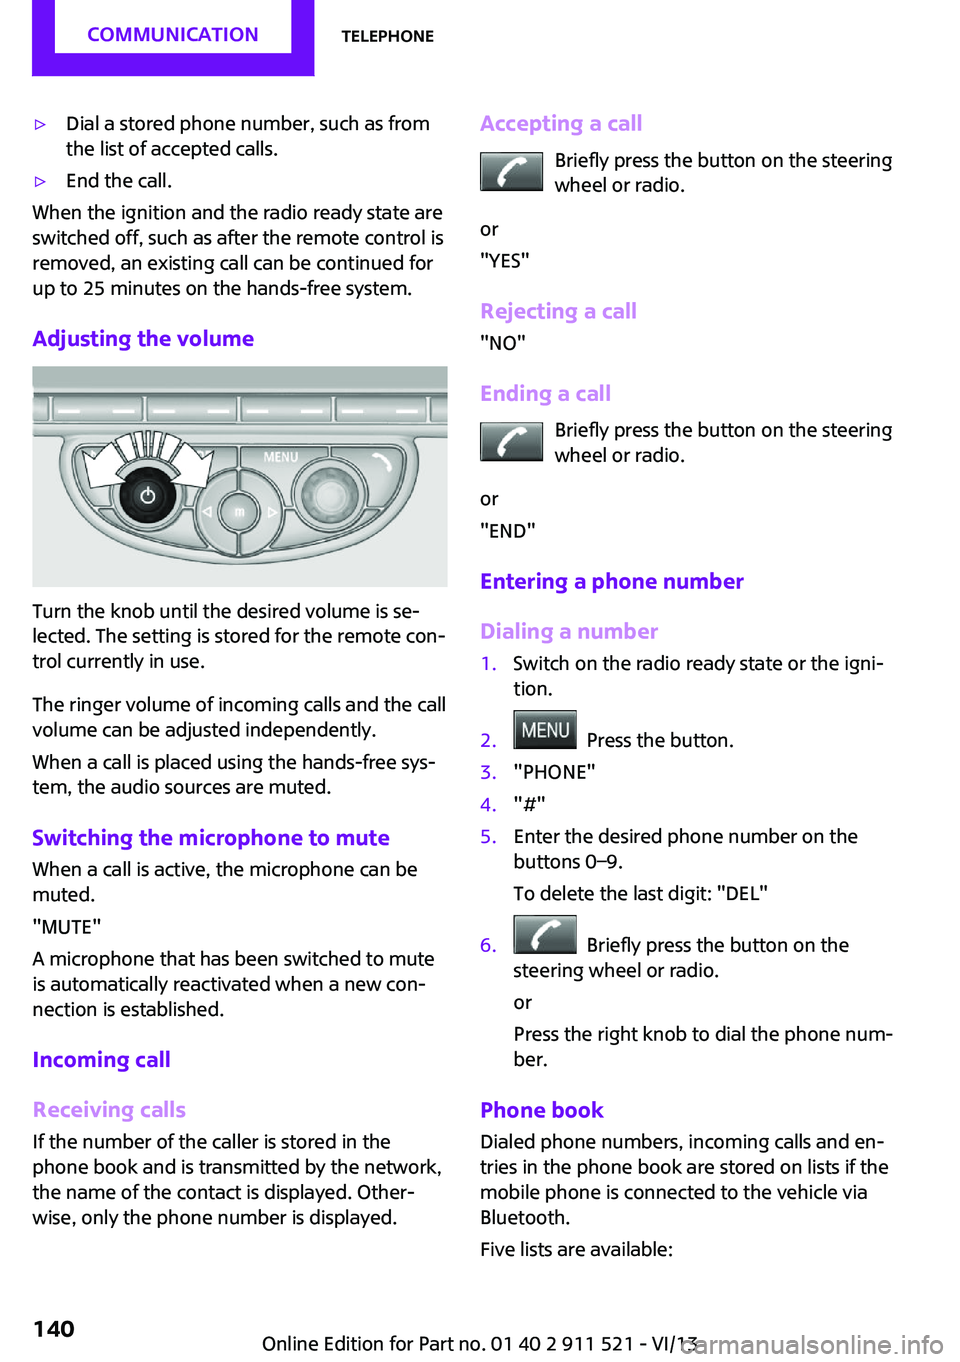
Adjusting the volume
Turn the knob until the desired volume is se‐
lected. The setting is stored for the remote con‐
trol currently in use.
The ringer volume of incoming calls and the call
volume can be adjusted independently.
When a call is placed using the hands-free sys‐
tem, the audio sources are muted.
Switching the microphone to mute
When a call is active, the microphone can be
muted.
"MUTE"
A microphone that has been switched to mute
is automatically reactivated when a new con‐
nection is established.
Incoming call
Receiving calls If the number of the caller is stored in the
phone book and is transmitted by the network,
the name of the contact is displayed. Other‐
wise, only the phone number is displayed.
Accepting a call
Briefly press the button on the steering
wheel or radio.
or
"YES"
Rejecting a call
"NO"
Ending a call Briefly press the button on the steering
wheel or radio.
or
"END"
Entering a phone number
Dialing a number1.Switch on the radio ready state or the igni‐
tion.2. Press the button.3."PHONE"4."#"5.Enter the desired phone number on the
buttons 0–9.
To delete the last digit: "DEL"6. Briefly press the button on the
steering wheel or radio.
or
Press the right knob to dial the phone num‐
ber.
Phone book
Dialed phone numbers, incoming calls and en‐
tries in the phone book are stored on lists if the
mobile phone is connected to the vehicle via
Bluetooth.
Five lists are available:
Seite 140CommunicationTelephone140
Online Edition for Part no. 01 40 2 911 521 - VI/13
Page 141 of 218
▷"A-Z"
Entries of the phone book of the SIM card
or of the mobile phone, which consist of a
name and phone number, are sorted in al‐
phabetical order.▷"TOP8"
The Top 8 list contains the eight phone
numbers that were dialed most frequently.▷"LAST8"
The last eight phone numbers that were di‐
aled are stored. The phone number dialed
last is at the top of the list.▷"CALLS"
The phone numbers of the last eight ac‐
cepted calls are stored. For this to be possi‐
ble, it must be possible to transmit the
phone number of the caller.▷"MISSED"
The phone numbers of the last eight calls
that were not accepted are stored. For this
to be possible, it must be possible to trans‐
mit the phone number of the caller.
Dialing a phone number from the phone
book
The list A-Z is available for phone book entries.
If entries with different names but the same
phone number are transferred to the vehicle
from the mobile phone, only one entry is dis‐
played.
The display of the phone book entries on the
radio may differ from the display on the mobile
phone, such as the order of the first and last
names.
1.Switch on the radio ready state or the igni‐
tion.2. Press the button.3."PHONE"4."A-Z"5. The arrows indicate that additional
letters can be displayed.Turn the right knob to display additional
letters if necessary.6.Turn the right knob to select the first letter
of the entry.7.Select the entry with the function button.
The phone number is dialed.
To display all entries:
1.Turn the right knob to select the first letter
of the entry and press the knob.2.Turn the right knob to select the desired
entry and press the knob.
or
Press the button on the steering
wheel or radio to dial the number.
The phone number is dialed.
Editing and dialing a phone number
from the phone book
You can edit the phone number of an entry be‐
fore making a call. This change is not stored in
the phone book.
1.Selecting an entry.2."EDIT"3.To delete a digit: "DEL"4.Enter additional digits on the buttons 0–9.5.Press the right knob to dial the phone num‐
ber.
Dialing a phone number from the phone
book using the buttons on the steering
wheel
1. Press and hold the button to dis‐
play the Telephone menu.2.Press the arrow buttons on the steering
wheel to leaf through the phone book.3. Press the button to dial the phone
number.
Seite 141TelephoneCommunication141
Online Edition for Part no. 01 40 2 911 521 - VI/13
Page 152 of 218
Wheels and tiresVehicle equipment
This chapter describes all series equipment as
well as country-specific and special equipment
offered for this model series.Therefore, it also
describes equipment that may not be found in
your vehicle, for instance due to the selected
special equipment or the country version. This
also applies to safety-related functions and sys‐
tems.
Tire inflation pressure Safety information
It is not merely the tires' service life, but also
driving comfort and, to a great extent, driving
safety that depend on the condition of the tires
and the maintenance of the specified tire pres‐
sure.
Checking the pressure Check the tire inflation pressure regularly
Regularly check the tire inflation pressure
and correct it as needed: at least twice a month
and before a long trip. If you fail to observe this
precaution, you may be driving on tires with in‐
correct tire pressures, a condition that may not
only compromise your vehicle's driving stabil‐
ity, but also lead to tire damage and the risk of
an accident.
Do not drive with depressurized or flat tires, ex‐
cept for run-flat tires. A flat tire will seriously
impair your vehicle's handling and braking re‐
sponse. Attempts to drive on a flat tire can lead
to a loss of control over the vehicle. ◀
Only check the tire inflation pressure when the
tires are cold. This means after a maximum of
1.25 miles/2 km driving or when the vehicle
has been parked for at least 2 hours. When thetires are warm, the tire inflation pressure is
higher.
After correcting the tire inflation pressure, reset
the Tire Pressure Monitor, refer to page 78
or reinitialize the Flat Tire Monitor, refer to
page 75.
To check the inflation pressure, there is a valve
extension behind the bumper.
Pressure specifications
The tables below provide all the correct infla‐
tion pressures for the specified tire sizes at am‐
bient temperature.
The inflation pressures apply to the tire sizes
approved and tire brands recommended by the
manufacturer of the MINI; a list of these is
available from the service center.
For correct identification of the right tire infla‐
tion pressures, observe the following:▷Tire sizes of your vehicle▷Maximum allowable driving speed
Tire inflation pressures for driving up to
100 mph or 160 km/h
For normal driving up to 100 mph/160 km/h,
adjust pressures to the respective tire inflation
pressures listed on the following pages in the
column for traveling speeds up to 100 mph/
160 km/h to achieve optimum driving comfort.
These tire inflation pressures can also be found
on the driver's side door pillar when the driver's
door is open.
Seite 152MobilityWheels and tires152
Online Edition for Part no. 01 40 2 911 521 - VI/13
Page 153 of 218
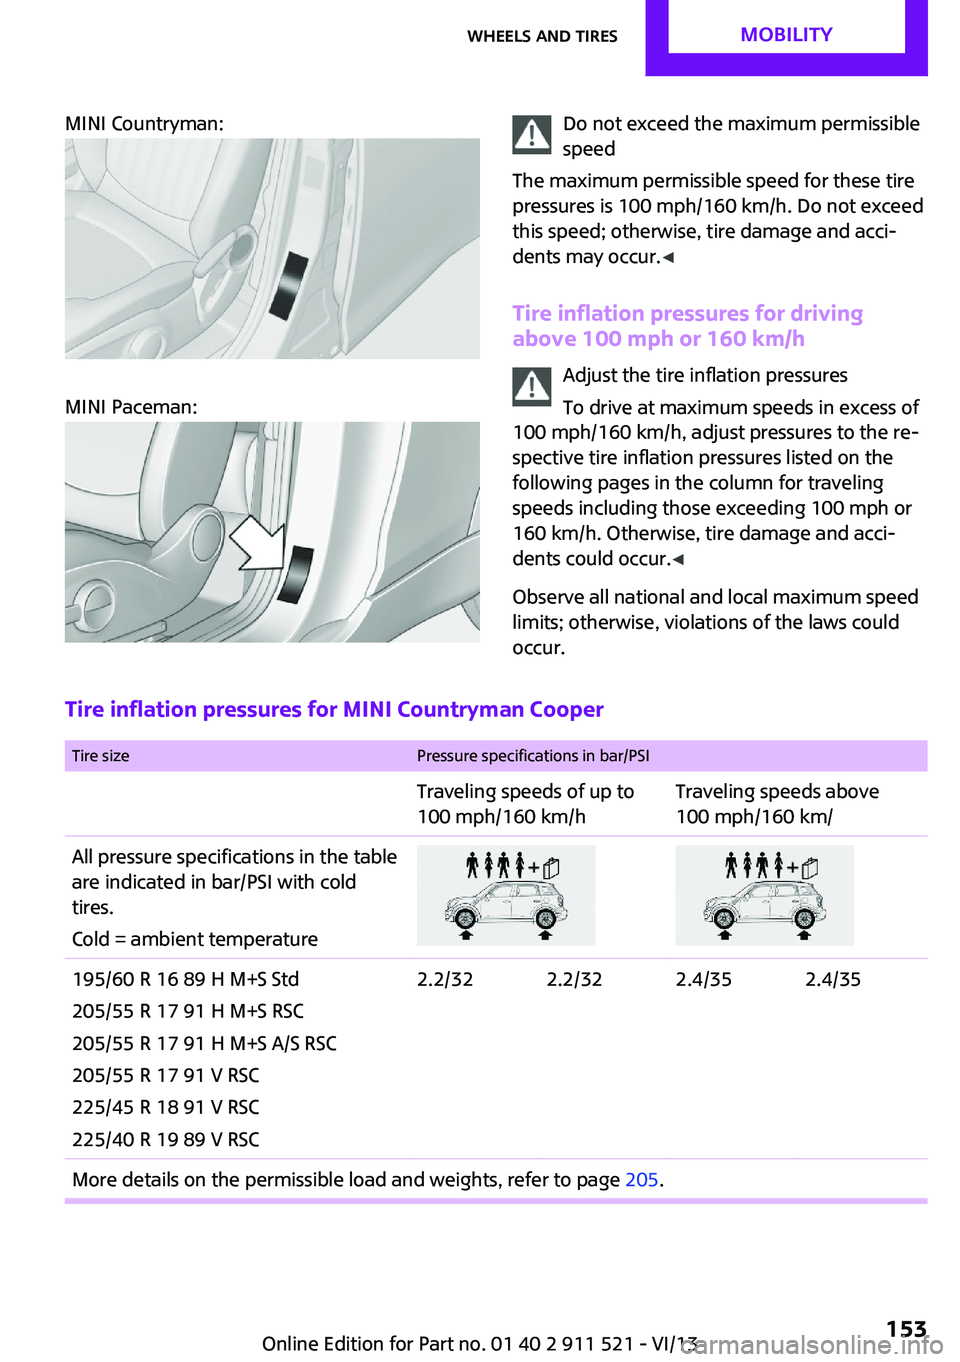
MINI Countryman:
MINI Paceman:
Do not exceed the maximum permissible
speed
The maximum permissible speed for these tire
pressures is 100 mph/160 km/h. Do not exceed
this speed; otherwise, tire damage and acci‐
dents may occur. ◀
Tire inflation pressures for driving
above 100 mph or 160 km/h
Adjust the tire inflation pressures
To drive at maximum speeds in excess of
100 mph/160 km/h, adjust pressures to the re‐
spective tire inflation pressures listed on the
following pages in the column for traveling
speeds including those exceeding 100 mph or
160 km/h. Otherwise, tire damage and acci‐
dents could occur. ◀
Observe all national and local maximum speed limits; otherwise, violations of the laws could
occur.
Tire inflation pressures for MINI Countryman Cooper
Tire sizePressure specifications in bar/PSITraveling speeds of up to
100 mph/160 km/hTraveling speeds above
100 mph/160 km/All pressure specifications in the table are indicated in bar/PSI with cold
tires.
Cold = ambient temperature195/60 R 16 89 H M+S Std
205/55 R 17 91 H M+S RSC
205/55 R 17 91 H M+S A/S RSC
205/55 R 17 91 V RSC
225/45 R 18 91 V RSC
225/40 R 19 89 V RSC2.2/322.2/322.4/352.4/35More details on the permissible load and weights, refer to page 205.Seite 153Wheels and tiresMobility153
Online Edition for Part no. 01 40 2 911 521 - VI/13
Page 154 of 218
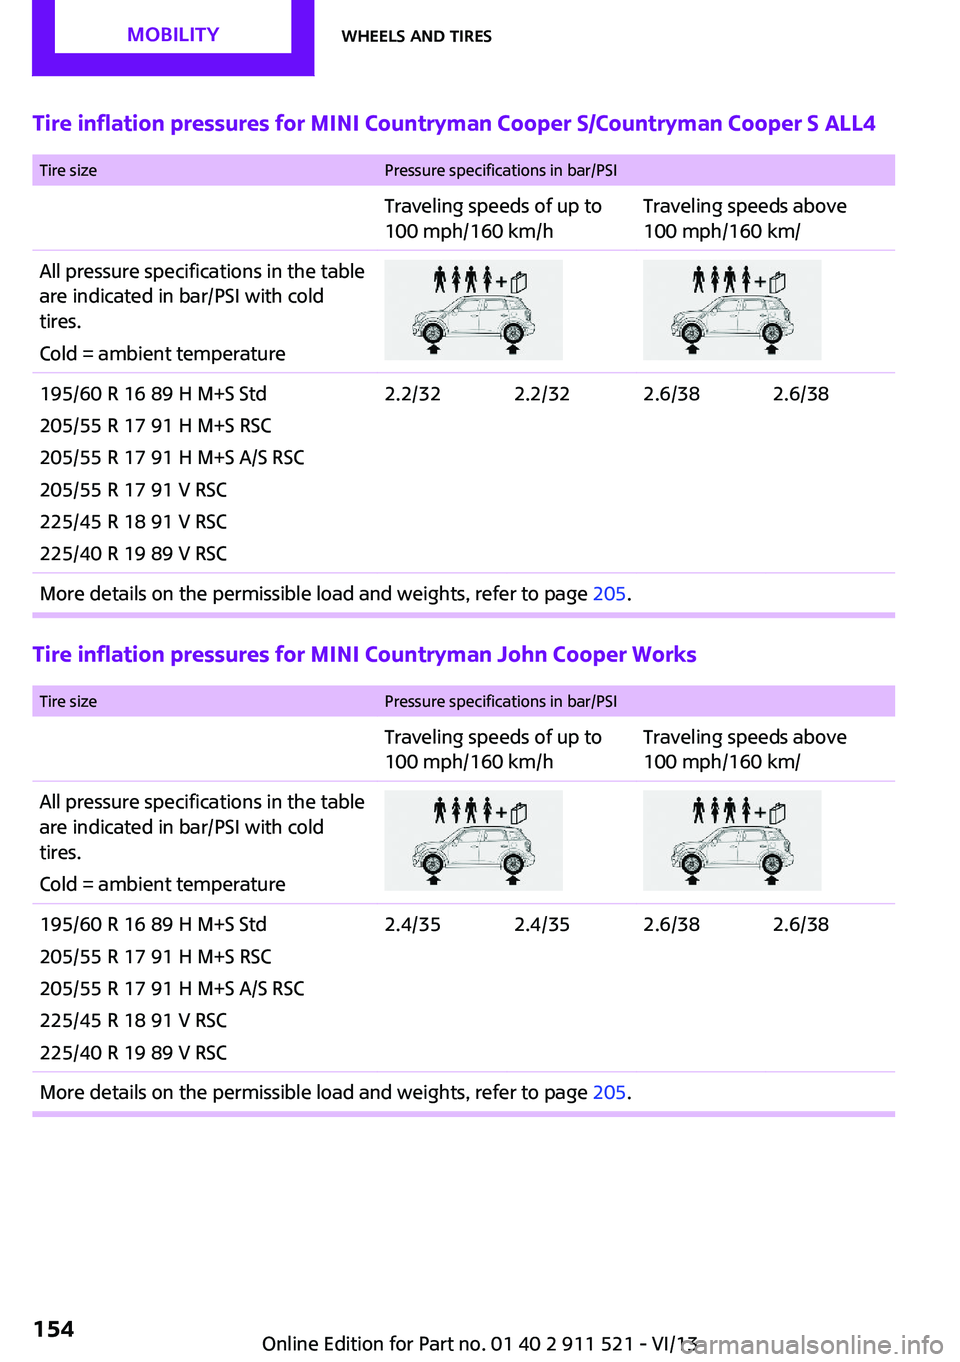
Tire inflation pressures for MINI Countryman Cooper S/Countryman Cooper S ALL4
Tire sizePressure specifications in bar/PSITraveling speeds of up to
100 mph/160 km/hTraveling speeds above
100 mph/160 km/All pressure specifications in the table are indicated in bar/PSI with cold
tires.
Cold = ambient temperature195/60 R 16 89 H M+S Std
205/55 R 17 91 H M+S RSC
205/55 R 17 91 H M+S A/S RSC
205/55 R 17 91 V RSC
225/45 R 18 91 V RSC
225/40 R 19 89 V RSC2.2/322.2/322.6/382.6/38More details on the permissible load and weights, refer to page 205.
Tire inflation pressures for MINI Countryman John Cooper Works
Tire sizePressure specifications in bar/PSITraveling speeds of up to
100 mph/160 km/hTraveling speeds above
100 mph/160 km/All pressure specifications in the table are indicated in bar/PSI with cold
tires.
Cold = ambient temperature195/60 R 16 89 H M+S Std
205/55 R 17 91 H M+S RSC
205/55 R 17 91 H M+S A/S RSC
225/45 R 18 91 V RSC
225/40 R 19 89 V RSC2.4/352.4/352.6/382.6/38More details on the permissible load and weights, refer to page 205.Seite 154MobilityWheels and tires154
Online Edition for Part no. 01 40 2 911 521 - VI/13
Page 155 of 218
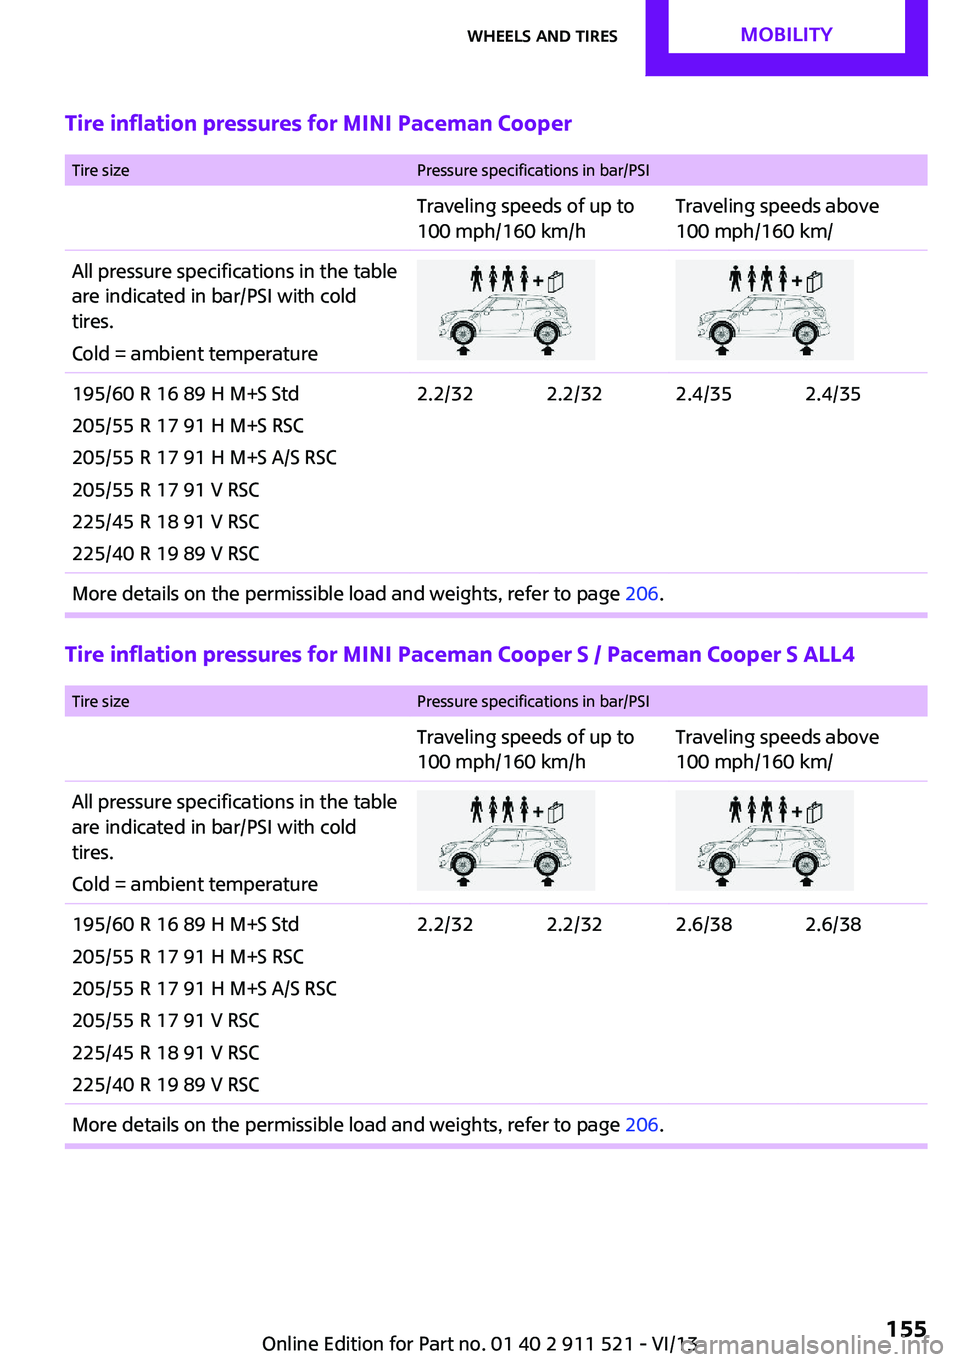
Tire inflation pressures for MINI Paceman Cooper
Tire sizePressure specifications in bar/PSITraveling speeds of up to
100 mph/160 km/hTraveling speeds above
100 mph/160 km/All pressure specifications in the table are indicated in bar/PSI with cold
tires.
Cold = ambient temperature195/60 R 16 89 H M+S Std
205/55 R 17 91 H M+S RSC
205/55 R 17 91 H M+S A/S RSC
205/55 R 17 91 V RSC
225/45 R 18 91 V RSC
225/40 R 19 89 V RSC2.2/322.2/322.4/352.4/35More details on the permissible load and weights, refer to page 206.
Tire inflation pressures for MINI Paceman Cooper S / Paceman Cooper S ALL4
Tire sizePressure specifications in bar/PSITraveling speeds of up to
100 mph/160 km/hTraveling speeds above
100 mph/160 km/All pressure specifications in the table are indicated in bar/PSI with cold
tires.
Cold = ambient temperature195/60 R 16 89 H M+S Std
205/55 R 17 91 H M+S RSC
205/55 R 17 91 H M+S A/S RSC
205/55 R 17 91 V RSC
225/45 R 18 91 V RSC
225/40 R 19 89 V RSC2.2/322.2/322.6/382.6/38More details on the permissible load and weights, refer to page 206.Seite 155Wheels and tiresMobility155
Online Edition for Part no. 01 40 2 911 521 - VI/13