change time MINI Coupe 2012 User Guide
[x] Cancel search | Manufacturer: MINI, Model Year: 2012, Model line: Coupe, Model: MINI Coupe 2012Pages: 218, PDF Size: 3.84 MB
Page 90 of 218
LampsCONTROLS
89
Welcome lamps
If you leave the light switch in the low beam or
automatic headlamp control position when you
switch off the ignition, the parking lamps and
interior lamps come on for a certain time as soon
as the vehicle is unlocked.
Pathway lighting
If you activate the headlamp flasher after
switching off the ignition with the lamps
switched off, the lo w beams come on and
remain on for a certain time.
The setting is stored for the remote control in
use, refer to Personal Profile, page 22.
Setting the duration or deactivating the
function
1. Switch on the ignition, refer to page 55.
2. Press the button in the turn signal indicator
as often as necessary until "SET/INFO" is
displayed.
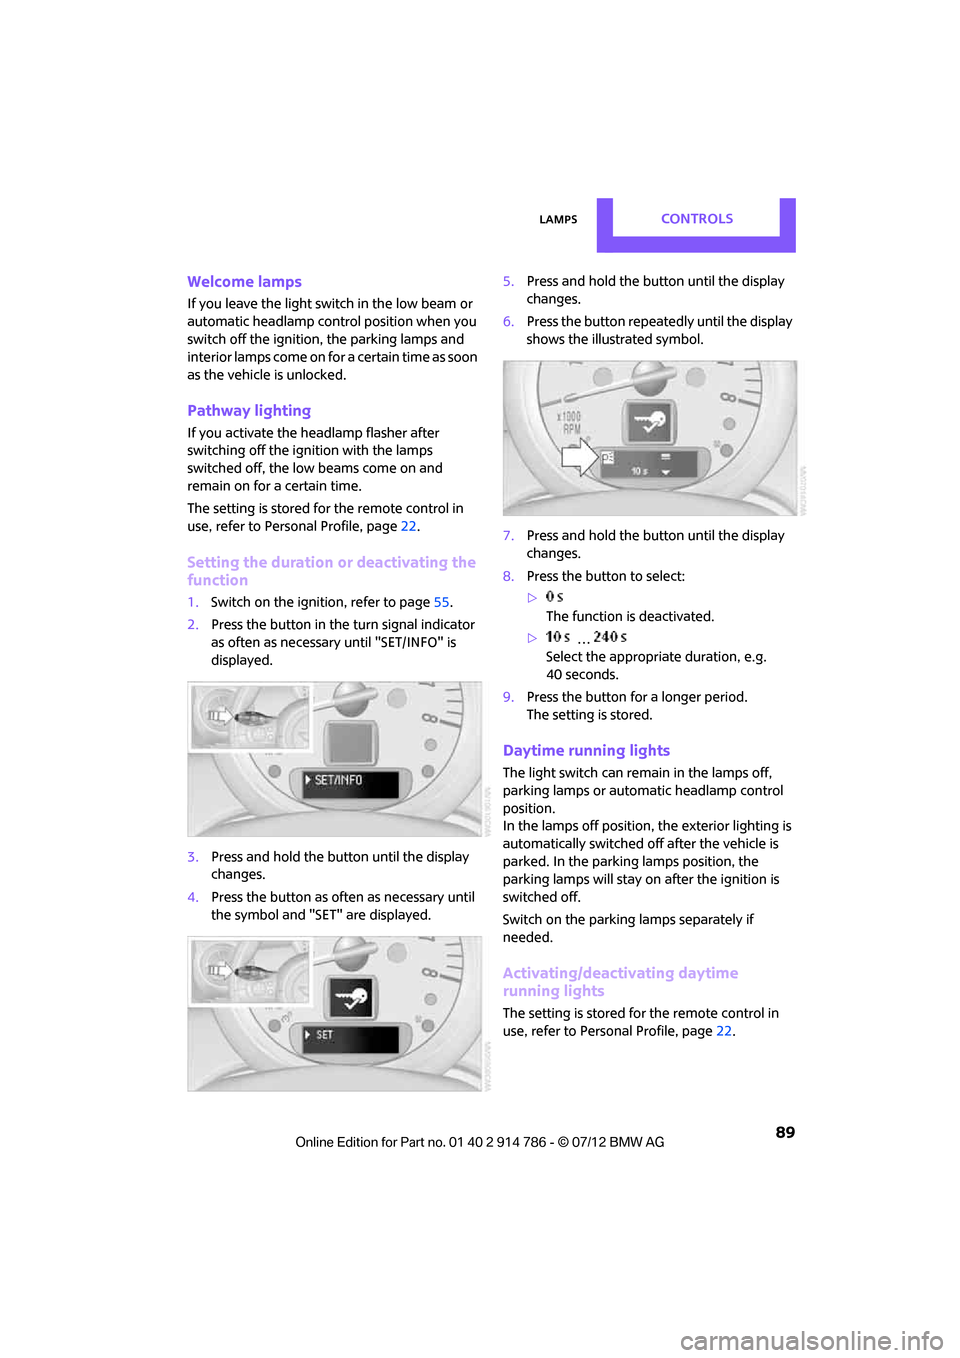
3. Press and hold the butt on until the display
changes.
4. Press the button as of ten as necessary until
the symbol and "SET" are displayed. 5.
Press and hold the butt on until the display
changes.
6. Press the button repeatedly until the display
shows the illustrated symbol.
7. Press and hold the butt on until the display
changes.
8. Press the button to select:
>
The function is deactivated.
> …
Select the appropriate duration, e.g.
40 seconds.
9. Press the button for a longer period.
The setting is stored.
Daytime running lights
The light switch can remain in the lamps off,
parking lamps or automatic headlamp control
position.
In the lamps off position, the exterior lighting is
automatically switched of f after the vehicle is
parked. In the parking lamps position, the
parking lamps will stay on after the ignition is
switched off.
Switch on the parking lamps separately if
needed.
Activating/deactivating daytime
running lights
The setting is stored for the remote control in
use, refer to Personal Profile, page 22.
Online Edition for Part no. 01 40 2 914 786 - \251 07/12 BMW AG
Page 91 of 218
CONTROLSLamps
90
1.Switch on the ignition, refer to page 55.
2. Press the button in the turn signal indicator
as often as necessary until "SET/INFO" is
displayed.
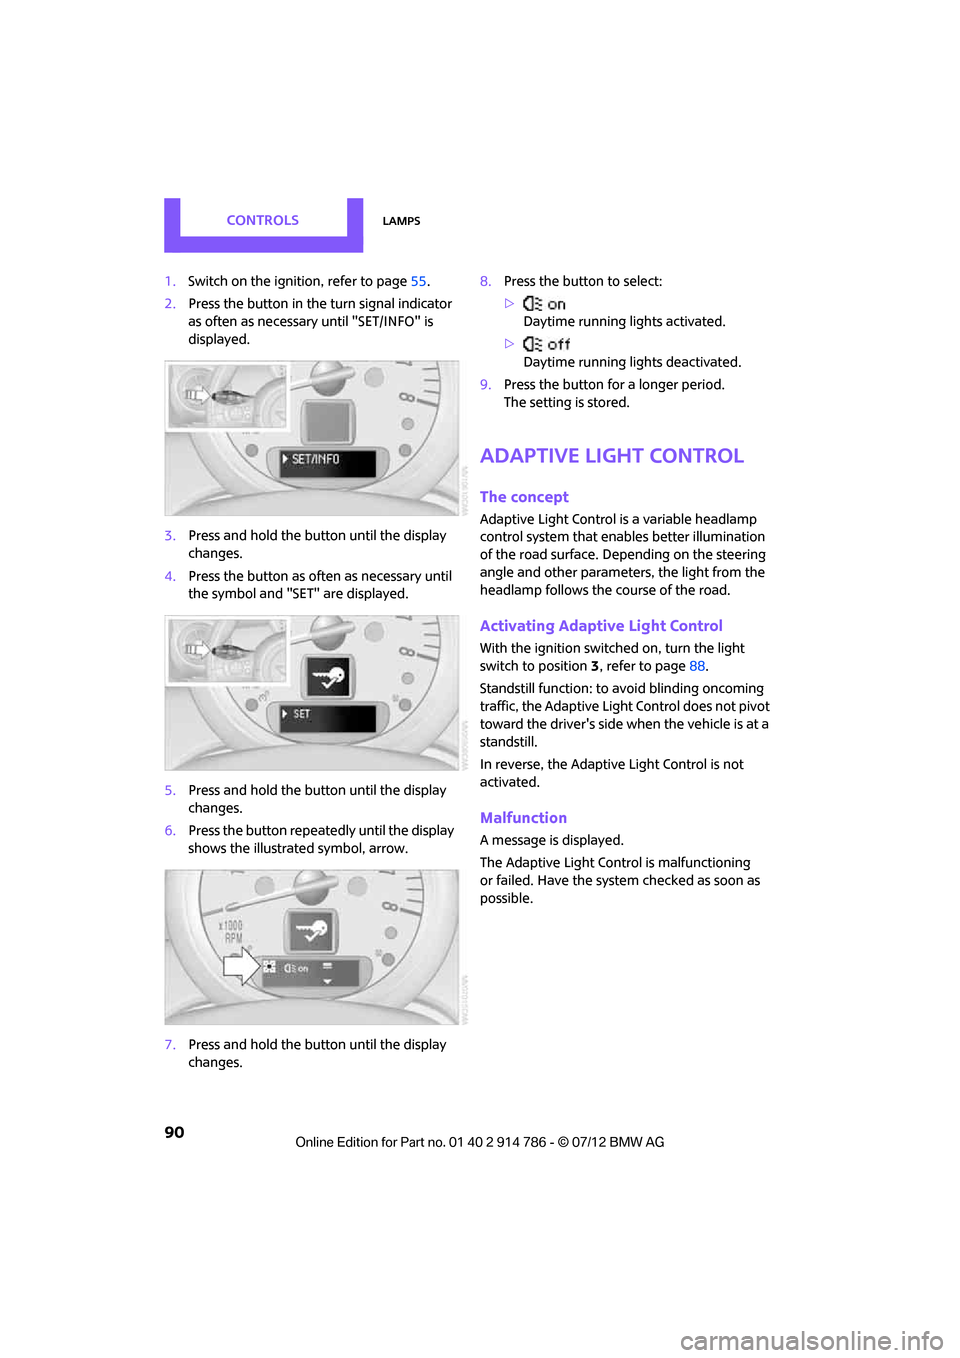
3. Press and hold the button until the display
changes.
4. Press the button as often as necessary until
the symbol and "SET" are displayed.
5. Press and hold the button until the display
changes.
6. Press the button repeatedly until the display
shows the illustra ted symbol, arrow.
7. Press and hold the button until the display
changes. 8.
Press the button to select:
>
Daytime running lights activated.
> Daytime running lights deactivated.
9. Press the button for a longer period.
The setting is stored.
Adaptive Light Control
The concept
Adaptive Light Control is a variable headlamp
control system that enables better illumination
of the road surface. Depending on the steering
angle and other parameters, the light from the
headlamp follows the course of the road.
Activating Adaptive Light Control
With the ignition switched on, turn the light
switch to position 3, refer to page 88.
Standstill function: to avoid blinding oncoming
traffic, the Adaptive Light Control does not pivot
toward the driver's side when the vehicle is at a
standstill.
In reverse, the Adaptive Light Control is not
activated.
Malfunction
A message is displayed.
The Adaptive Light Control is malfunctioning
or failed. Have the system checked as soon as
possible.
Online Edition for Part no. 01 40 2 914 786 - \251 07/12 BMW AG
Page 97 of 218
CONTROLSClimate
96
Air distribution
Direct the flow of air to the
windows , to the upper body
area or to the footwell .
Intermediate settings are possible.
Windshield heating
The windshield heating is switched
off automatically after a short time.
The front window heating is
lowered or switched off entirely to reduce the
drain on the battery.
Defrosting windows and removing
condensation
1. Set air flow rate to the maximum level.
2. Set air distribution to position .
Condensation is removed from the windows
more quickly when the cooling function is
also activated.
3. Set to the highest temperature, red.
4. Deactivate recirculated-air mode.
5. Turn on windshield heating if necessary.
6. Turn on rear window defroster if necessary.
Microfilter
The microfilter captures dust and pollen. The
microfilter is changed by your MINI dealer
during routine maintenance work.
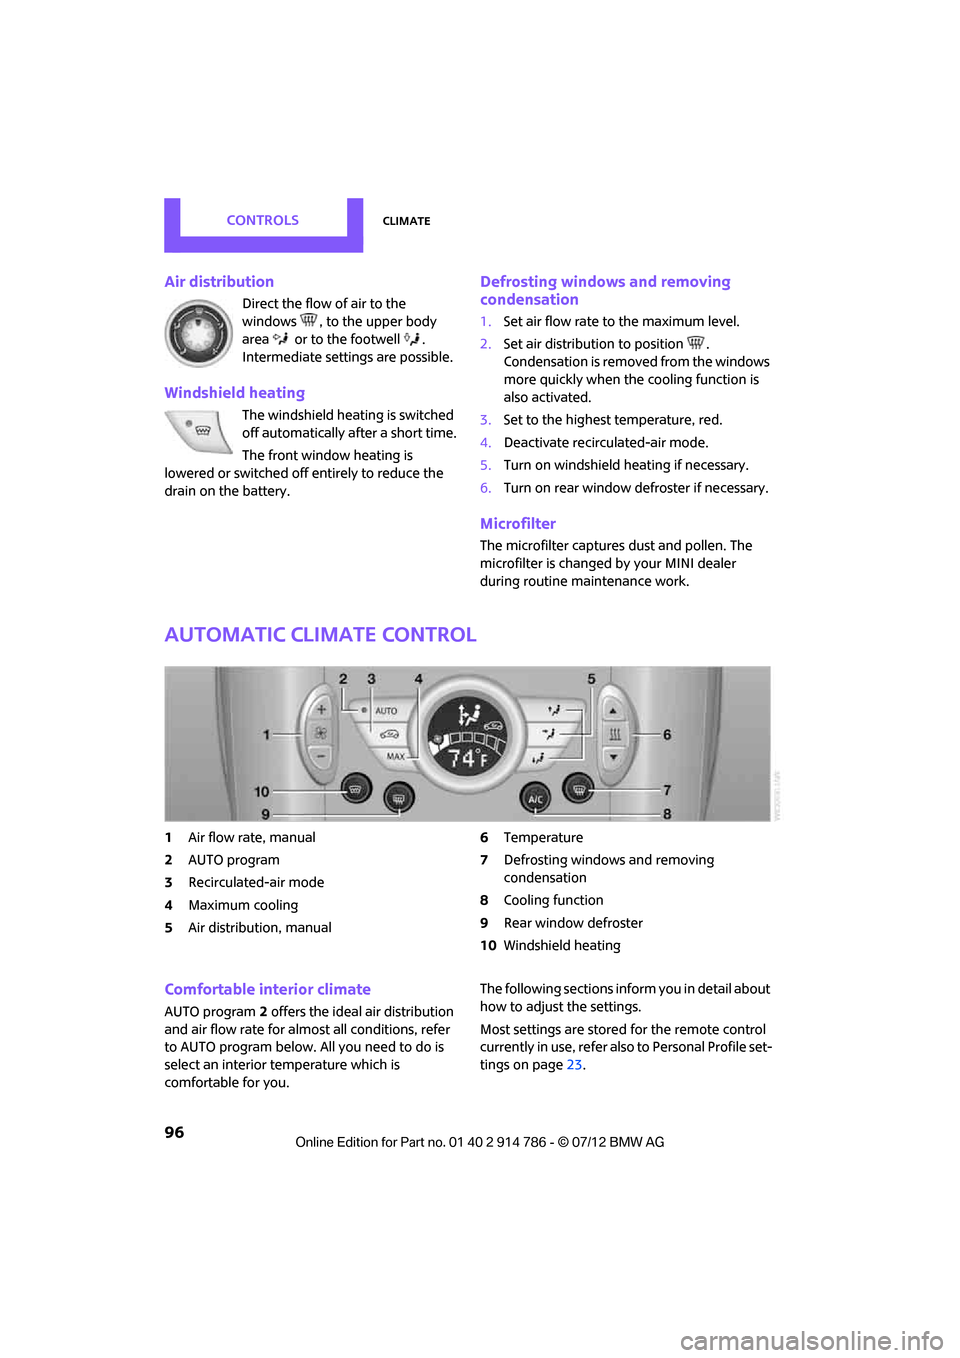
Automatic climate control
1Air flow rate, manual
2 AUTO program
3 Recirculated-air mode
4 Maximum cooling
5 Air distribution, manual 6
Temperature
7 Defrosting windows and removing
condensation
8 Cooling function
9 Rear window defroster
10 Windshield heating
Comfortable interior climate
AUTO program 2 offers the ideal air distribution
and air flow rate for almo st all conditions, refer
to AUTO program below. All you need to do is
select an interior temperature which is
comfortable for you. The following sections inform you in detail about
how to adjust the settings.
Most settings are stored
for the remote control
currently in use, refer also to Personal Profile set-
tings on page 23.
Online Edition for Part no. 01 40 2 914 786 - \251 07/12 BMW AG
Page 98 of 218
ClimateCONTROLS
97
Air flow rate, manual
Press the – button to reduce air flow. Press
the + button to increase it.
You can reactivate the automatic mode
for the air flow rate with the AUTO button.
The air flow rate is lowered or switched off
entirely to reduce the drain on the battery. The
display remains the same.
Switching the system on/off
Reduce the air flow by pressing the – button
repeatedly until the system is switched off. All
displays go out.
Press the AUTO button to switch the automatic
climate control back on.
AUTO program
The AUTO program adjusts the air
distribution to the windshield and
side windows, toward the upper body area and
into the footwell for you. The air flow rate and
your temperature specific ations will be adapted
to outside influences in accordance with sea-
sonal changes, e.g. sunlight.
The cooling function is automatically switched
on along with the AUTO program.
The program is switched of f if the air distribution
is manually adjusted or if the button is pressed
again.
Convertible Program
If the convertible top is open, the Convertible
Program is activated. During the Convertible
Program, the automatic cl imate control is opti-
mized for driving with the convertible top down.
Furthermore, with increasing vehicle speed, the
airflow is also increased.
If attaching the wind reflector, the perfor-
mance of the Convertible Program can be
significantly improved.<
Recirculated-air mode
If there are odors or pollutants in
the outside air, the supply of out-
side air can be shut off. The system
then recirculates the air currently within the
vehicle.
If condensation starts to form on the inside
window surfaces, press the AUTO button or
switch off the recirculated-air mode and, if
necessary, increase the air flow rate. Ensure that
air can flow onto the windshield.
The recirculated-air mode should not be
used over an extended period of time;
otherwise, the air quality in the passenger
compartment will deteriorate continuously. <
Maximum cooling
The automatic climate control
switches to the lowest tempera-
ture, high airflow and the recircu-
lated-air mode.
For maximum cooling, open the air vents for the
upper body area.
The air is cooled as quickly as possible:
> For an outside temperature of more than
327 /06
> While the motor is running.
Air distribution, manual
The flow of air is directed to the
windows, to the upper body area or
to the footwell as selected.
You can switch the automatic air
distribution back on by pressing the AUTO
button.
Temperature
Set the desired temperature individually.
The automatic climat e control achieves
this temperature as quickly as possible
regardless of the season, using maximum
cooling or heating power if necessary, and then
maintains it.
Online Edition for Part no. 01 40 2 914 786 - \251 07/12 BMW AG
Page 125 of 218
ENTERTAINMENTRadio MINI Boost CD
124
USB device
For audio playback over the vehicle speakers,
connect the USB device to the USB interface.
After first connecting
Track information is transferred to the vehicle.
The time required is dependent on the USB
device and on the number of tracks.
The data from up to four USB devices or for
approx. 20,000 tracks can be stored in the
vehicle.
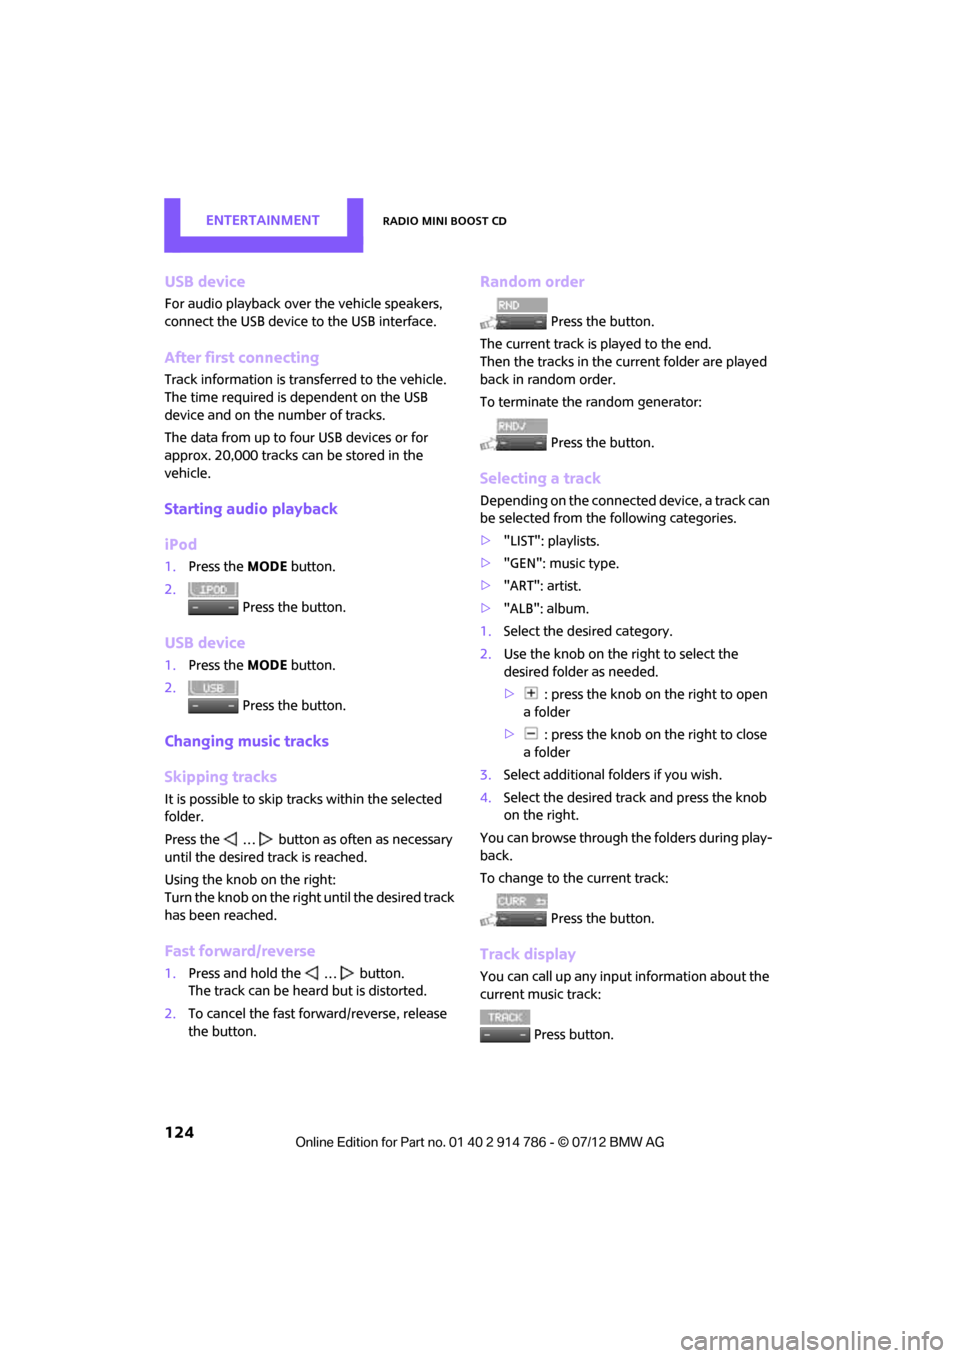
Starting audio playback
iPod
1. Press the MODEbutton.
2. Press the button.
USB device
1.Press the MODEbutton.
2. Press the button.
Changing music tracks
Skipping tracks
It is possible to skip tr acks within the selected
folder.
Press the … button as often as necessary
until the desired track is reached.
Using the knob on the right:
Turn the knob on the right until the desired track
has been reached.
Fast forward/reverse
1. Press and hold the … button.
The track can be heard but is distorted.
2. To cancel the fast forward/reverse, release
the button.
Random order
Press the button.
The current track is played to the end.
Then the tracks in the current folder are played
back in random order.
To terminate the random generator:
Press the button.
Selecting a track
Depending on the connected device, a track can
be selected from the following categories.
>"LIST": playlists.
> "GEN": music type.
> "ART": artist.
> "ALB": album.
1. Select the desired category.
2. Use the knob on the right to select the
desired folder as needed.
> : press the knob on the right to open
afolder
> : press the knob on the right to close
afolder
3. Select additional folders if you wish.
4. Select the desired track and press the knob
on the right.
You can browse through the folders during play-
back.
To change to the current track:
Press the button.
Track display
You can call up any input information about the
current music track: Press button.
Online Edition for Part no. 01 40 2 914 786 - \251 07/12 BMW AG
Page 133 of 218
COMMUNICATIONSTelephone
132
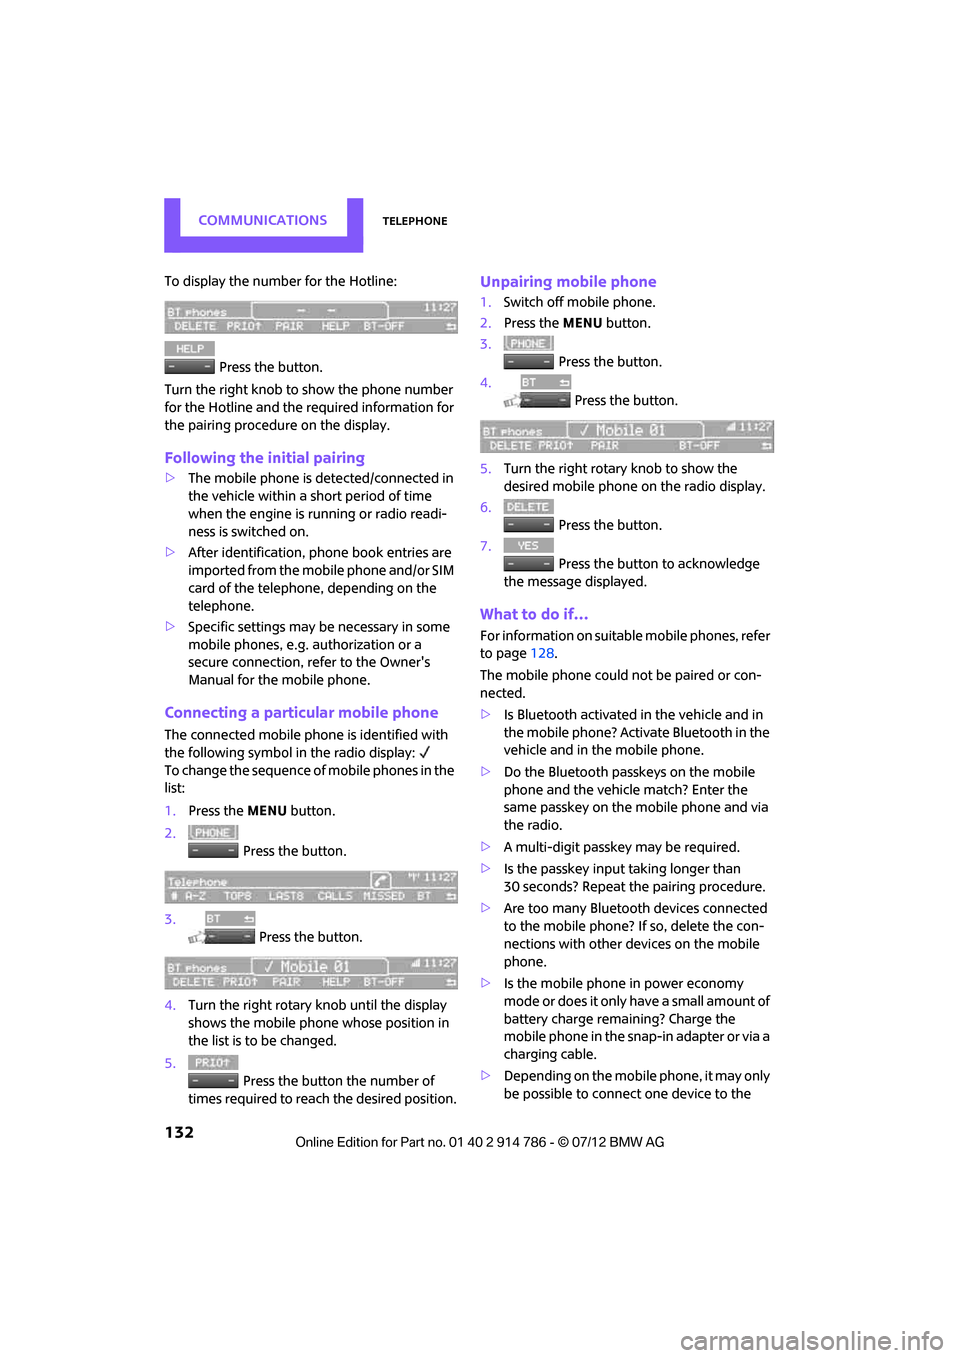
To display the number for the Hotline: Press the button.
Turn the right knob to show the phone number
for the Hotline and the re quired information for
the pairing procedure on the display.
Following the initial pairing
> The mobile phone is detected/connected in
the vehicle within a short period of time
when the engine is running or radio readi-
ness is switched on.
> After identification, phone book entries are
imported from the mobile phone and/or SIM
card of the telephone, depending on the
telephone.
> Specific settings may be necessary in some
mobile phones, e.g. authorization or a
secure connection, re fer to the Owner's
Manual for the mobile phone.
Connecting a particular mobile phone
The connected mobile phone is identified with
the following symbol in the radio display:
To change the sequence of mobile phones in the
list:
1. Press the MENU button.
2. Press the button.
3. Press the button.
4. Turn the right rotary knob until the display
shows the mobile phone whose position in
the list is to be changed.
5. Press the button the number of
times required to reach the desired position.
Unpairing mobile phone
1. Switch off mobile phone.
2. Press the MENU button.
3. Press the button.
4. Press the button.
5. Turn the right rotary knob to show the
desired mobile phone on the radio display.
6. Press the button.
7. Press the button to acknowledge
the message displayed.
What to do if…
For information on suitab le mobile phones, refer
to page 128.
The mobile phone could not be paired or con-
nected.
> Is Bluetooth activated in the vehicle and in
the mobile phone? Activate Bluetooth in the
vehicle and in the mobile phone.
> Do the Bluetooth passkeys on the mobile
phone and the vehicle match? Enter the
same passkey on the mobile phone and via
the radio.
> A multi-digit passkey may be required.
> Is the passkey input taking longer than
30 seconds? Repeat th e pairing procedure.
> Are too many Bluetoot h devices connected
to the mobile phone? If so, delete the con-
nections with other devices on the mobile
phone.
> Is the mobile phone in power economy
m o d e o r d o e s i t o n l y have a small amount of
battery charge remaining? Charge the
mobile phone in the snap-in adapter or via a
charging cable.
> Depending on the mobile phone, it may only
be possible to connect one device to the
Online Edition for Part no. 01 40 2 914 786 - \251 07/12 BMW AG
Page 163 of 218
MOBILITYCare
162
Automatic transmission
Before driving into the car wash, make sure that
the vehicle can roll:
1.Place the remote control, even with Comfort
Access, in the ignition lock.
2. Move the selector lever to position N.
3. Release the parking brake.
4. Switch off the engine.
5. Insert the remote control in the ignition lock
so that the vehicle can roll.
Steam jets/high-pressure washers
When using steam jets or high-pressure
washers, make sure that you maintain
sufficient distance from the vehicle and do not
exceed a maximum temperature of 140 7/
60 6 .
If the distance is too close, the pressure too high,
or the temperature too high, parts of the vehicle
can be damaged, or water can penetrate.
Observe the operating instructions for high-
pressure washers. <
Do not spray sensors, such as the Park
Distance Control, with high-pressure
washers for a long time or at a distance of less
than 1 ft/30 cm. <
Manual washing
Use a great deal of water and, if necessary, car
shampoo when washing your car by hand. Clean
the vehicle with a sponge or a washing brush
applying a slight amount of pressure.
Before cleaning the windshield, deacti-
vate the rain sensor or turn off the ignition
to prevent unintentional wiping. <
Observe local regulations regarding
washing vehicles by hand. <
Headlamps
Do not wipe dry and do not use abrasive or
corrosive cleaning agents. Remove dirt and
contamination, such as in sects, by soaking with
shampoo and then washing with plenty of
water. Do not remove accumulated ice and snow with
an ice scraper; use window deicers instead.
Windows
Clean the outside and inside of the windows and
mirrors with a window cleaner.
Do not clean the mirrors with cleaners
containing quartz. <
Wiper blades
Clean with soapy water and change regularly to
prevent the formation of streaks.
Wax, preservatives and dirt on the
windows cause streaks when the wind-
shield wipers are on, and can cause premature
wear of the wiper blades and interfere with the
rain sensor. <
Care of the convertible top
The appearance and service life of the conver-
tible top largely depends on its proper care and
operation.
Please follow these instructions:
>Never attempt to fold and stow the conver-
tible top in the convertible compartment
when the top is wet or frozen. Otherwise,
water stains, mildew, and chafe marks may
occur.
> If water spots occur on the inside headliner
despite precautions, remove them using a
microfiber cloth and interior cleaner.
> If the vehicle is parked in an enclosed area
for a longer period of time, make sure that
there is sufficient ventilation.
> Remove any bird droppings immediately,
since they have corrosive properties which
will corrode the conver tible top and damage
the rubber seals.
When attempting to remove stains from
the convertible top, do not use spot
removers, paint thinners, solvents, gasoline, or
similar fluids. These cleaners may damage the
rubber seals. The improper care or cleaning
methods may cause the convertible top and its
seams to leak. <
Online Edition for Part no. 01 40 2 914 786 - \251 07/12 BMW AG
Page 167 of 218
MOBILITYReplacing components
166
2.Press together the lo cking spring, arrows1,
and fold out the wiper blade, arrow 2.
3. Pull the wiper blade forward and out of the
catch mechanism.
4. Press the new wiper blade into the fixture
until it engages audibly.
To avoid damage, make sure that the
wiper arms are against the windshield
before you open the hood. <
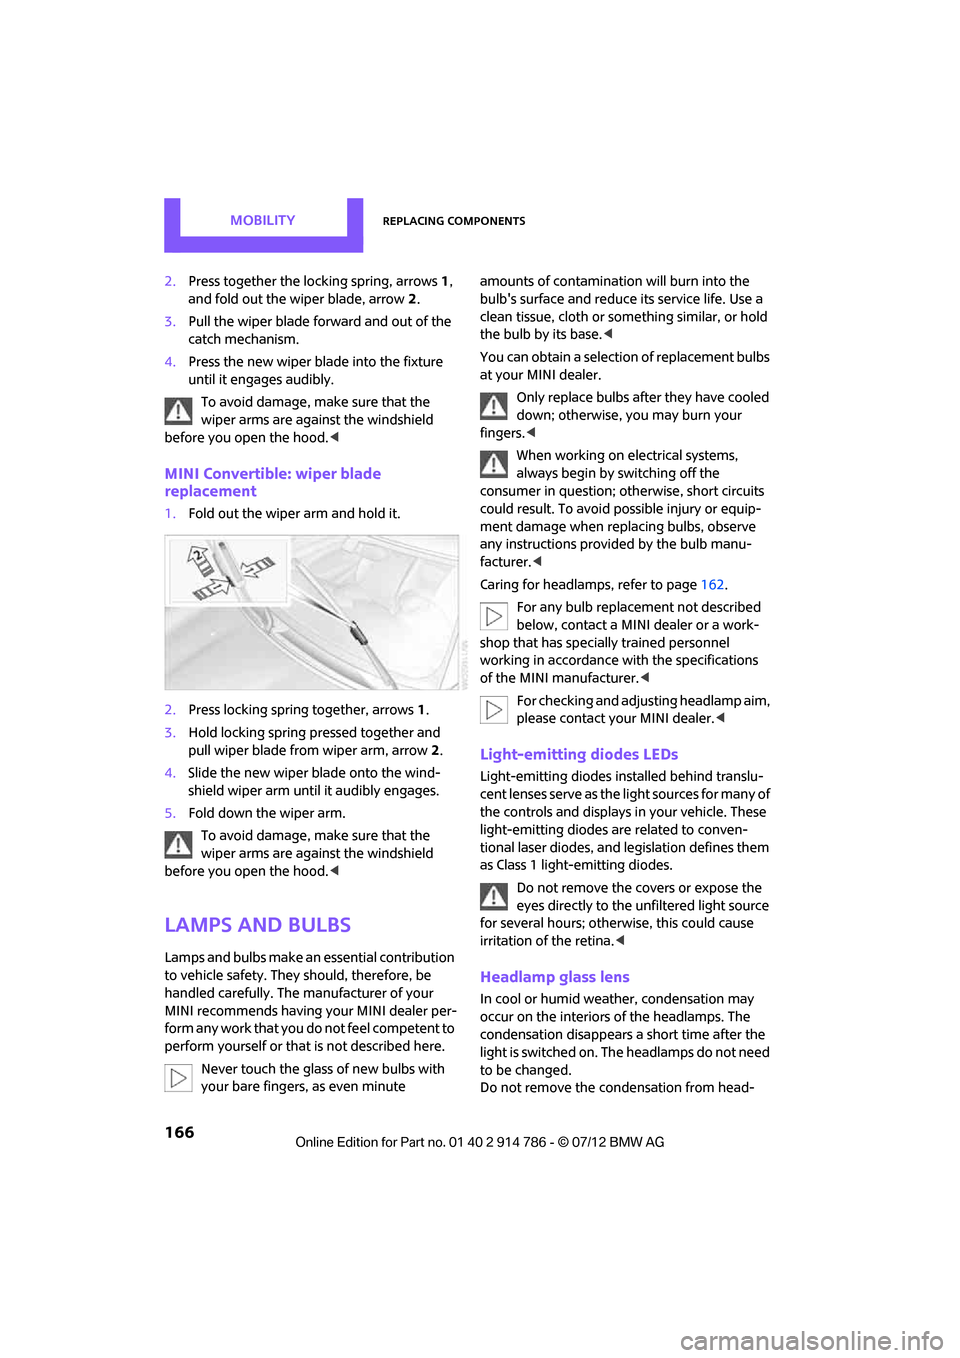
MINI Convertible: wiper blade
replacement
1.Fold out the wiper arm and hold it.
2. Press locking spring together, arrows1.
3. Hold locking spring pressed together and
pull wiper blade from wiper arm, arrow 2.
4. Slide the new wiper blade onto the wind-
shield wiper arm until it audibly engages.
5. Fold down the wiper arm.
To avoid damage, make sure that the
wiper arms are against the windshield
before you open the hood. <
Lamps and bulbs
Lamps and bulbs make an essential contribution
to vehicle safety. They should, therefore, be
handled carefully. The manufacturer of your
MINI recommends having your MINI dealer per-
form any work that you do not feel competent to
perform yourself or that is not described here.
Never touch the glass of new bulbs with
your bare fingers, as even minute amounts of contaminatio
n will burn into the
bulb's surface and reduce its service life. Use a
clean tissue, cloth or some thing similar, or hold
the bulb by its base. <
You can obtain a selectio n of replacement bulbs
at your MINI dealer.
Only replace bulbs after they have cooled
down; otherwise, you may burn your
fingers. <
When working on electrical systems,
always begin by switching off the
consumer in question; ot herwise, short circuits
could result. To avoid possible injury or equip-
ment damage when replacing bulbs, observe
any instructions provided by the bulb manu-
facturer. <
Caring for headlamp s, refer to page162.
For any bulb replacement not described
below, contact a MINI dealer or a work-
shop that has specia lly trained personnel
working in accordance wi th the specifications
of the MINI manufacturer. <
For checking and adjusting headlamp aim,
please contact your MINI dealer. <
Light-emitting diodes LEDs
Light-emitting diodes installed behind translu-
cent lenses serve as the light sources for many of
the controls and displays in your vehicle. These
light-emitting diodes are related to conven-
tional laser diodes, and legislation defines them
as Class 1 light-emitting diodes.
Do not remove the covers or expose the
eyes directly to the unfiltered light source
for several hours; otherw ise, this could cause
irritation of the retina. <
Headlamp glass lens
In cool or humid weather, condensation may
occur on the interiors of the headlamps. The
condensation disappears a short time after the
light is switched on. The headlamps do not need
to be changed.
Do not remove the condensation from head-
Online Edition for Part no. 01 40 2 914 786 - \251 07/12 BMW AG
Page 168 of 218
Replacing componentsMOBILITY
167
lamps, despite driving with lights on, and if
condensation increases, e.g., because of water
droplets, have this checked by your MINI dealer.
Xenon lamps
The service life of these bulbs is very long and
the probability of failure very low, provided that
they are not switched on and off an excessive
number of times. If a xenon lamp fails neverthe-
less, switch on the fog lamps and continue the
journey with great care, provided that local
legislation does not prohibit this.
Work on the xenon lighting system,
including lamp replacem ent, is only to be
carried out only by your MINI dealer. Due to high
voltage, there is a risk of fatal injury if work on
the xenon lamps is carried out improperly. <
Halogen low beams and high beams
H13 bulb, 60/55 watts
The H13 bulb is pressurized. Therefore,
wear safety glasses an d protective gloves.
Otherwise, there is a risk of injury if the bulb is
damaged. <
Be careful when inst alling the cover;
otherwise, leaks co uld occur and cause
damage to the headlamp system. <
Accessing the lamp from the engine
compartment
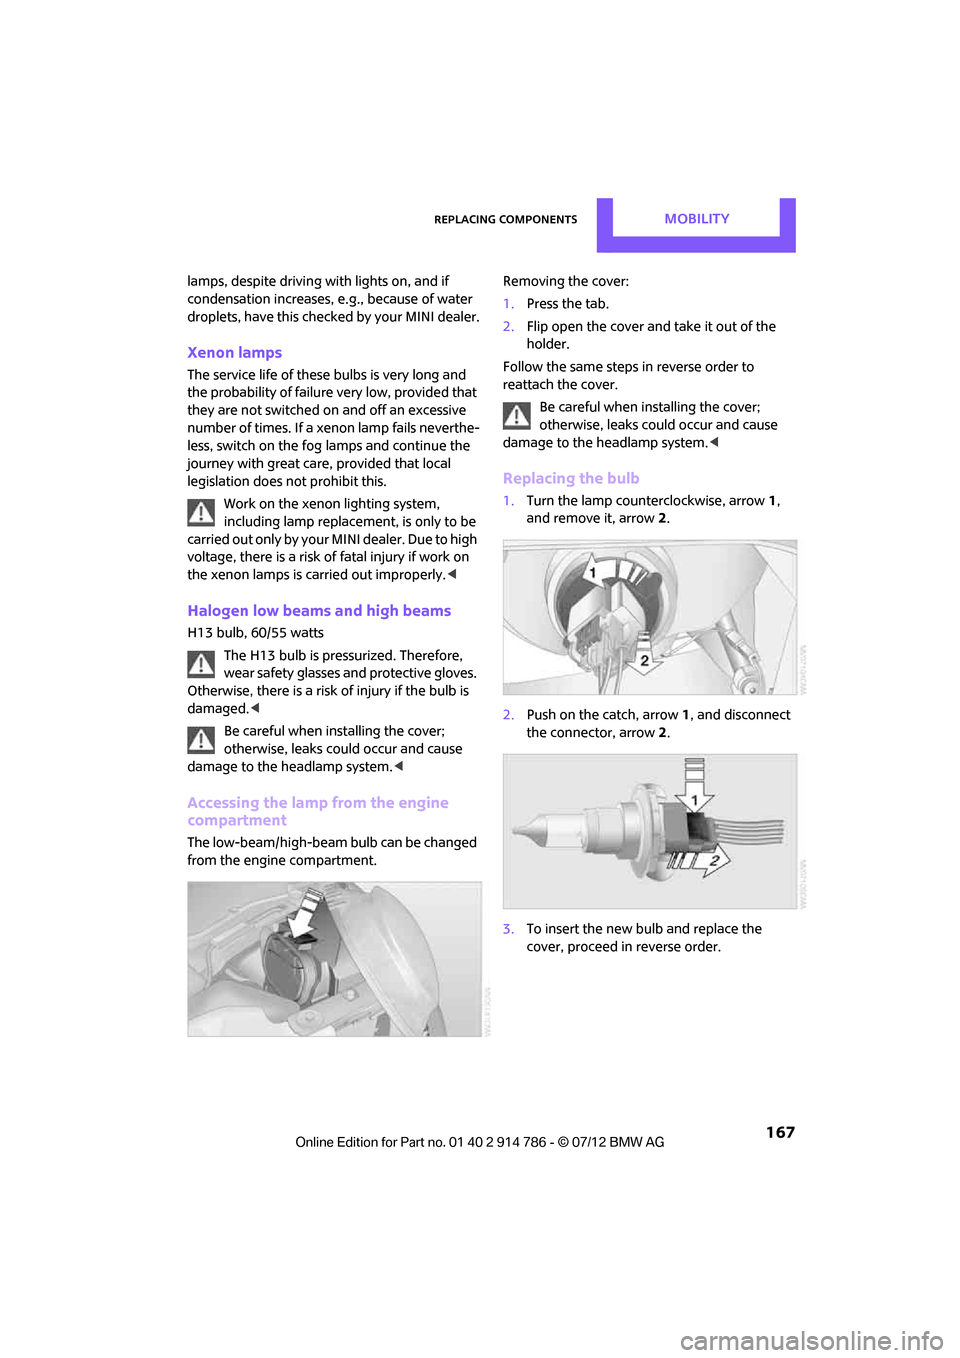
The low-beam/high-beam bulb can be changed
from the engine compartment. Removing the cover:
1.
Press the tab.
2. Flip open the cover and take it out of the
holder.
Follow the same steps in reverse order to
reattach the cover. Be careful when inst alling the cover;
otherwise, leaks could occur and cause
damage to the headlamp system. <
Replacing the bulb
1.Turn the lamp counterclockwise, arrow 1,
and remove it, arrow 2.
2. Push on the catch, arrow 1, and disconnect
the connector, arrow 2.
3. To insert the new bulb and replace the
cover, proceed in reverse order.
Online Edition for Part no. 01 40 2 914 786 - \251 07/12 BMW AG
Page 175 of 218
MOBILITYReplacing components
174
9.Pull the space-saver spare tire underneath
the vehicle out toward the rear.
10. Position the space-save r spare tire with the
valve facing upward.
11. Unscrew the valve extension from the valve
of the space-saver spare tire.
12. Unscrew the dust cap from the extension
and place it on the valve of the space-saver
spare tire.
Due to its different dimensions, the
damaged wheel cannot be placed in the
recess for the space-saver spare tire. <
Driving with the space-saver spare tire
Drive cautiously and do not exceed a
speed of 50 mph/80 km/h. Changes may
occur in vehicle handling such as lower track
stability during braking, longer braking dis-
tances and changes in self-steering properties
when close to the handling limit. These proper-
ties are more noticeable with winter tires. <
Only one space-saver spare tire may be
mounted at one time. Mount a wheel and
tire of the original size as soon as possible, to
avoid any safety risks. <
Check the tire inflat ion pressure at the
earliest opportunity an d correct it if neces-
sary. Replace the defective tire as soon as possi-
ble and have the new wheel/tire assembly bal-
anced. <
Preparing for a tire change
Observe the safety precautions regarding
flat tires on page 170.< Additional safety measures when
changing tires:
Only change the tire wh en parked on a surface
that is level, firm and not slippery.
The vehicle or the jack could slip sideways on
soft or slippery support surfaces, such as snow,
ice, flagstones, etc.
Do not use a wooden block or similar object as a
support base for the jack, as this would prevent
it from extending to its full support height and
reduce its load-carrying capacity.
Do not lie under the vehicle or start the engine
when the vehicle is supported by the jack; other-
wise, there is a risk of fatal injury. <
1. Place the foldable chock behind the front
wheel on the other side of the vehicle or in
front of the wheel if the vehicle is on an
incline. If the wheel is changed on a surface
with a more severe sl ope, take additional
precautions to secure the vehicle from
rolling.
2. Uncover the lug bolts if necessary.
3. Loosen the lug bolts by a half turn.
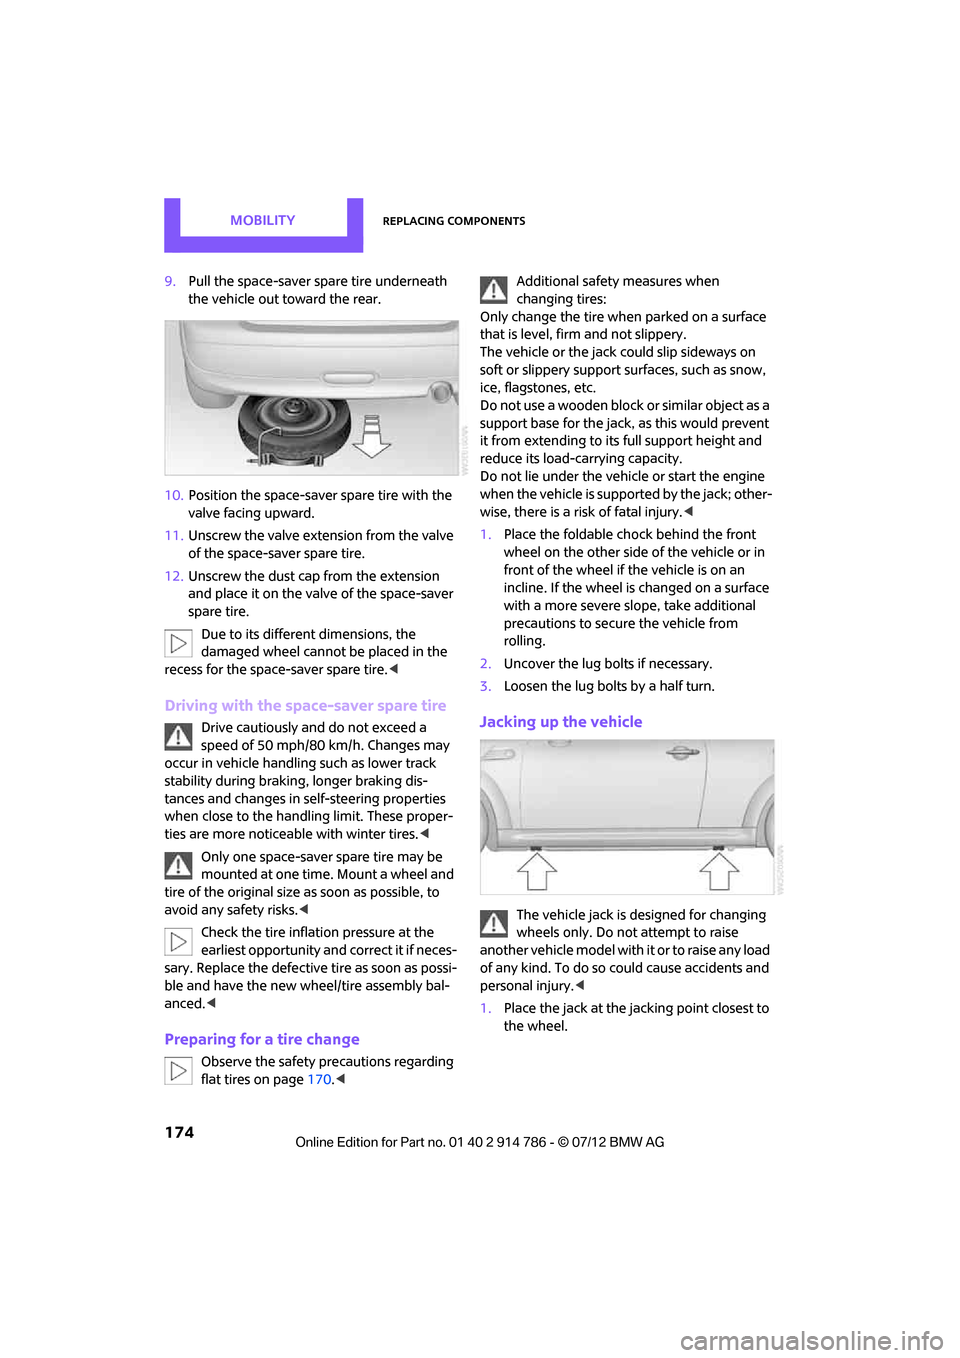
Jacking up the vehicle
The vehicle jack is designed for changing
wheels only. Do not attempt to raise
another vehicle model with it or to raise any load
of any kind. To do so could cause accidents and
personal injury. <
1. Place the jack at the jacking point closest to
the wheel.
Online Edition for Part no. 01 40 2 914 786 - \251 07/12 BMW AG