tow MINI Coupe 2012 User Guide
[x] Cancel search | Manufacturer: MINI, Model Year: 2012, Model line: Coupe, Model: MINI Coupe 2012Pages: 218, PDF Size: 3.84 MB
Page 94 of 218
LampsCONTROLS
93
To turn off, press the respective switch forward
again or back.
Ambient lighting
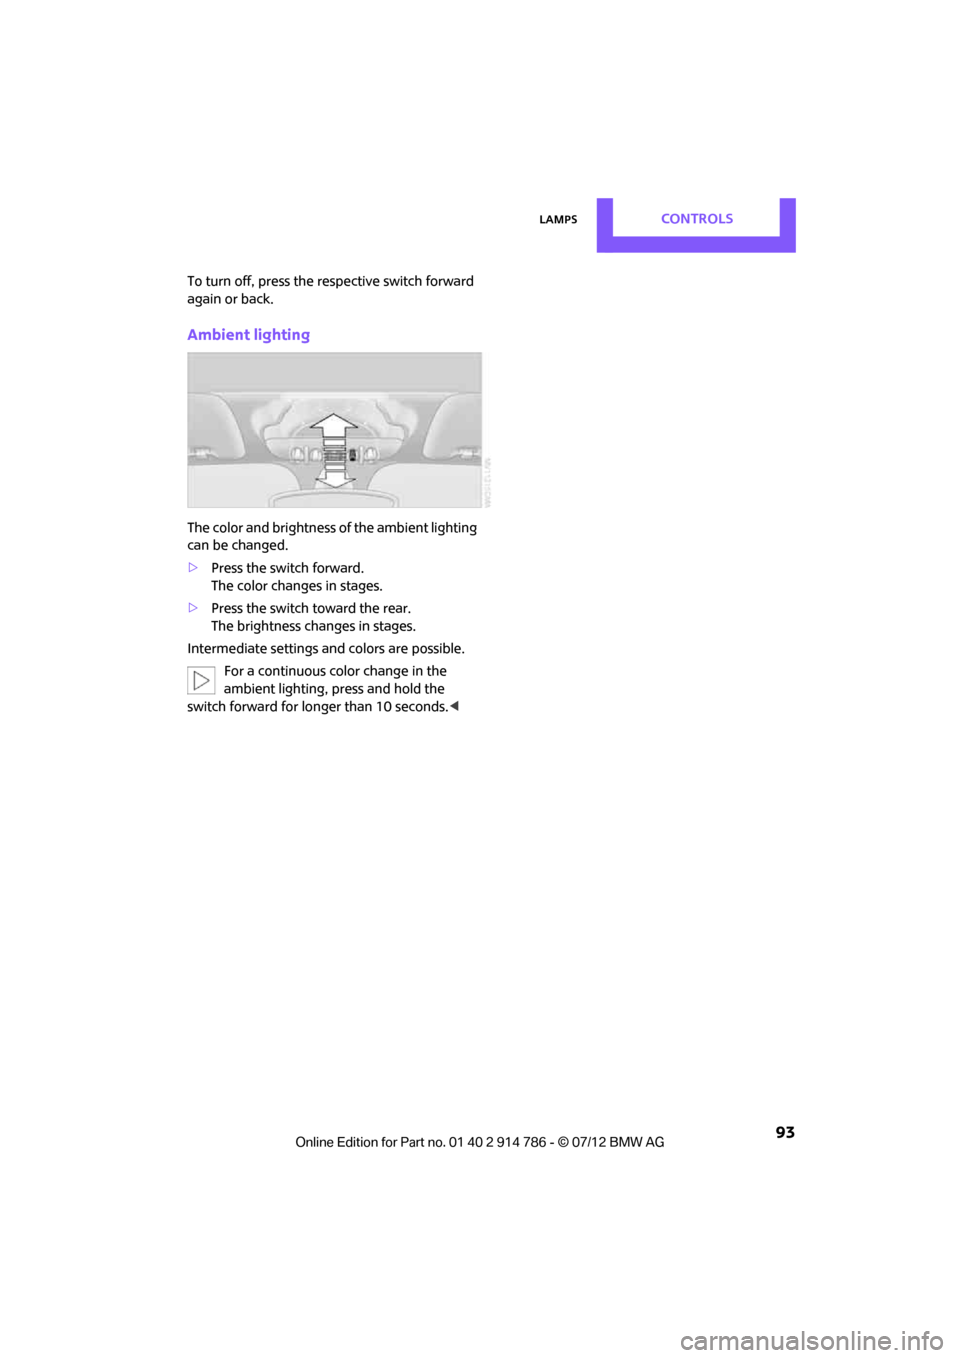
The color and brightness of the ambient lighting
can be changed.
>Press the switch forward.
The color changes in stages.
> Press the switch toward the rear.
The brightness changes in stages.
Intermediate settings and colors are possible. For a continuous color change in the
ambient lighting, press and hold the
switch forward for lo nger than 10 seconds. <
Online Edition for Part no. 01 40 2 914 786 - \251 07/12 BMW AG
Page 95 of 218
CONTROLSClimate
94
Climate
Vehicle equipment
In this chapter, all production, country, and
optional equipment that is offered in the model
range is described. Equipment is also described that is not available because of, for example,
selected options or coun
try version. This also
applies to safety relate d functions and systems.
Equipment versions
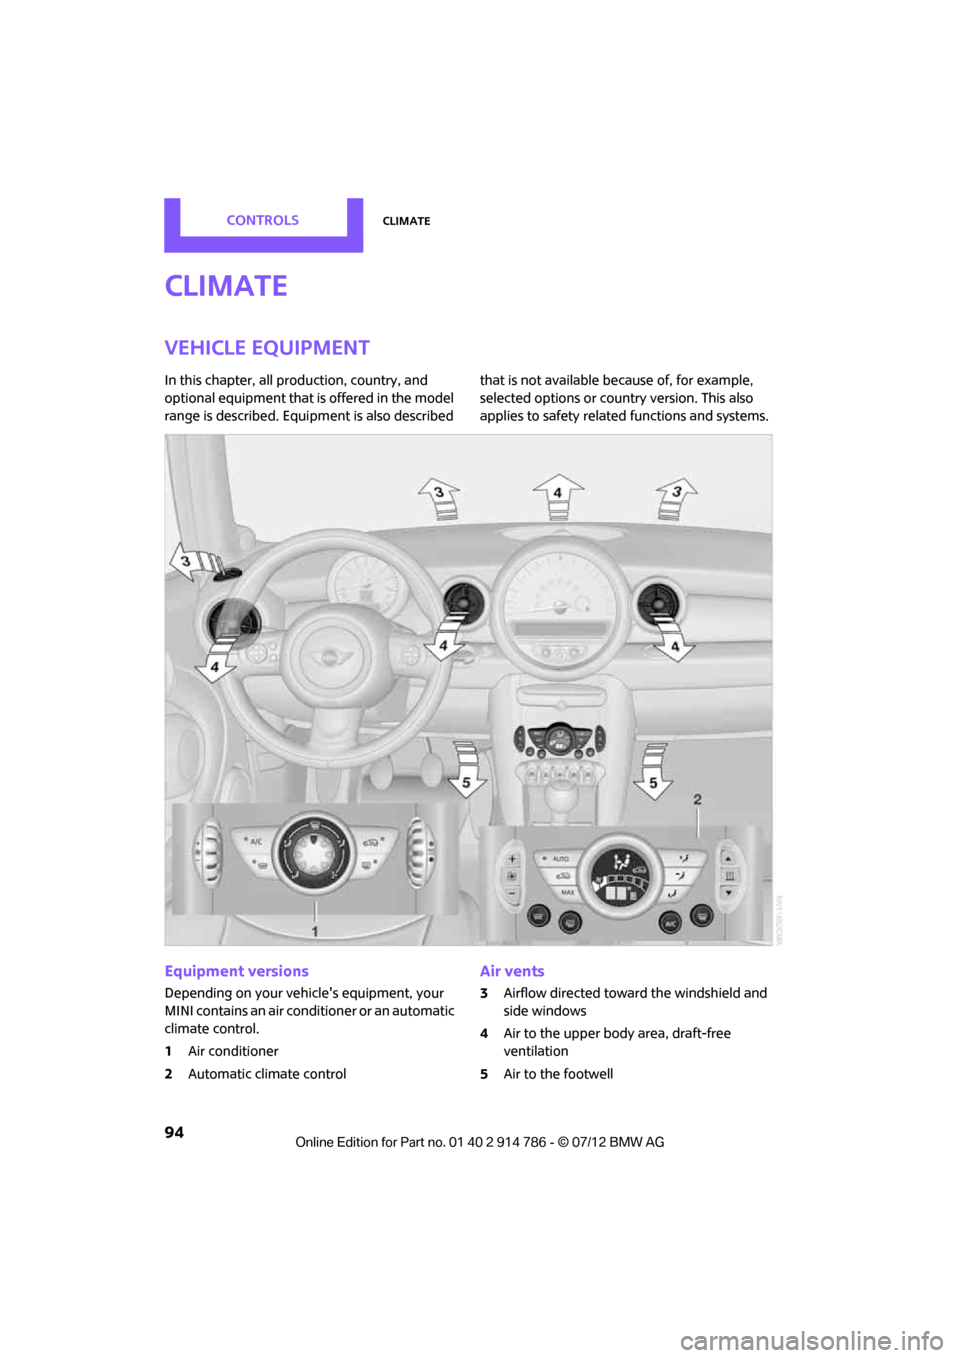
Depending on your vehicle's equipment, your
MINI contains an air conditioner or an automatic
climate control.
1Air conditioner
2 Automatic climate control
Air vents
3Airflow directed toward the windshield and
side windows
4 Air to the upper body area, draft-free
ventilation
5 Air to the footwell
Online Edition for Part no. 01 40 2 914 786 - \251 07/12 BMW AG
Page 98 of 218
ClimateCONTROLS
97
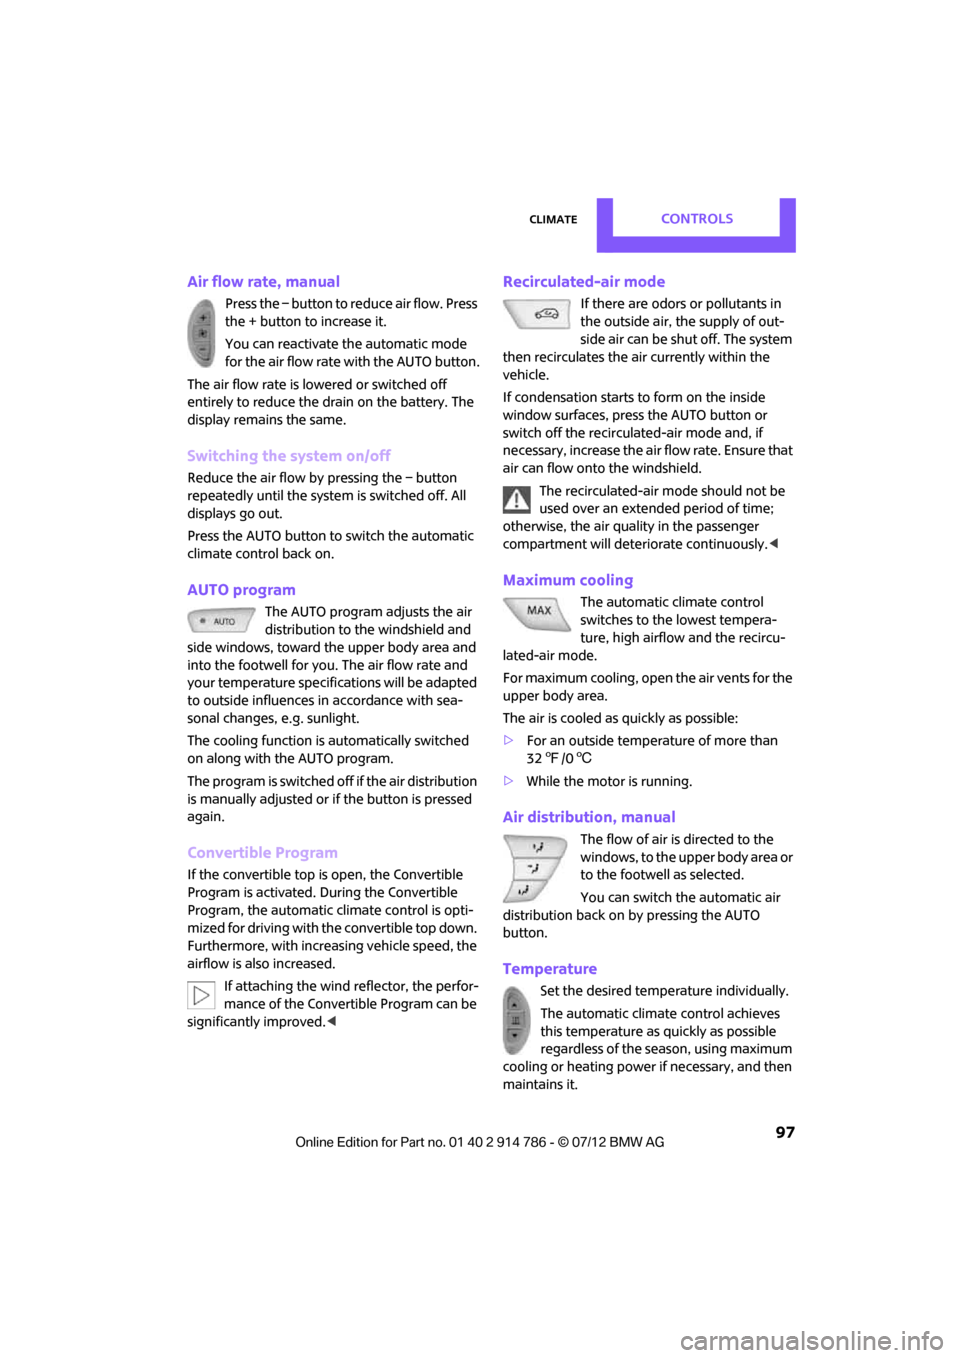
Air flow rate, manual
Press the – button to reduce air flow. Press
the + button to increase it.
You can reactivate the automatic mode
for the air flow rate with the AUTO button.
The air flow rate is lowered or switched off
entirely to reduce the drain on the battery. The
display remains the same.
Switching the system on/off
Reduce the air flow by pressing the – button
repeatedly until the system is switched off. All
displays go out.
Press the AUTO button to switch the automatic
climate control back on.
AUTO program
The AUTO program adjusts the air
distribution to the windshield and
side windows, toward the upper body area and
into the footwell for you. The air flow rate and
your temperature specific ations will be adapted
to outside influences in accordance with sea-
sonal changes, e.g. sunlight.
The cooling function is automatically switched
on along with the AUTO program.
The program is switched of f if the air distribution
is manually adjusted or if the button is pressed
again.
Convertible Program
If the convertible top is open, the Convertible
Program is activated. During the Convertible
Program, the automatic cl imate control is opti-
mized for driving with the convertible top down.
Furthermore, with increasing vehicle speed, the
airflow is also increased.
If attaching the wind reflector, the perfor-
mance of the Convertible Program can be
significantly improved.<
Recirculated-air mode
If there are odors or pollutants in
the outside air, the supply of out-
side air can be shut off. The system
then recirculates the air currently within the
vehicle.
If condensation starts to form on the inside
window surfaces, press the AUTO button or
switch off the recirculated-air mode and, if
necessary, increase the air flow rate. Ensure that
air can flow onto the windshield.
The recirculated-air mode should not be
used over an extended period of time;
otherwise, the air quality in the passenger
compartment will deteriorate continuously. <
Maximum cooling
The automatic climate control
switches to the lowest tempera-
ture, high airflow and the recircu-
lated-air mode.
For maximum cooling, open the air vents for the
upper body area.
The air is cooled as quickly as possible:
> For an outside temperature of more than
327 /06
> While the motor is running.
Air distribution, manual
The flow of air is directed to the
windows, to the upper body area or
to the footwell as selected.
You can switch the automatic air
distribution back on by pressing the AUTO
button.
Temperature
Set the desired temperature individually.
The automatic climat e control achieves
this temperature as quickly as possible
regardless of the season, using maximum
cooling or heating power if necessary, and then
maintains it.
Online Edition for Part no. 01 40 2 914 786 - \251 07/12 BMW AG
Page 111 of 218
DRIVING TIPSThings to remember when driving
110
Split-folding rear seats
To be able to transport larger objects, the rear
backrest can be folded down.
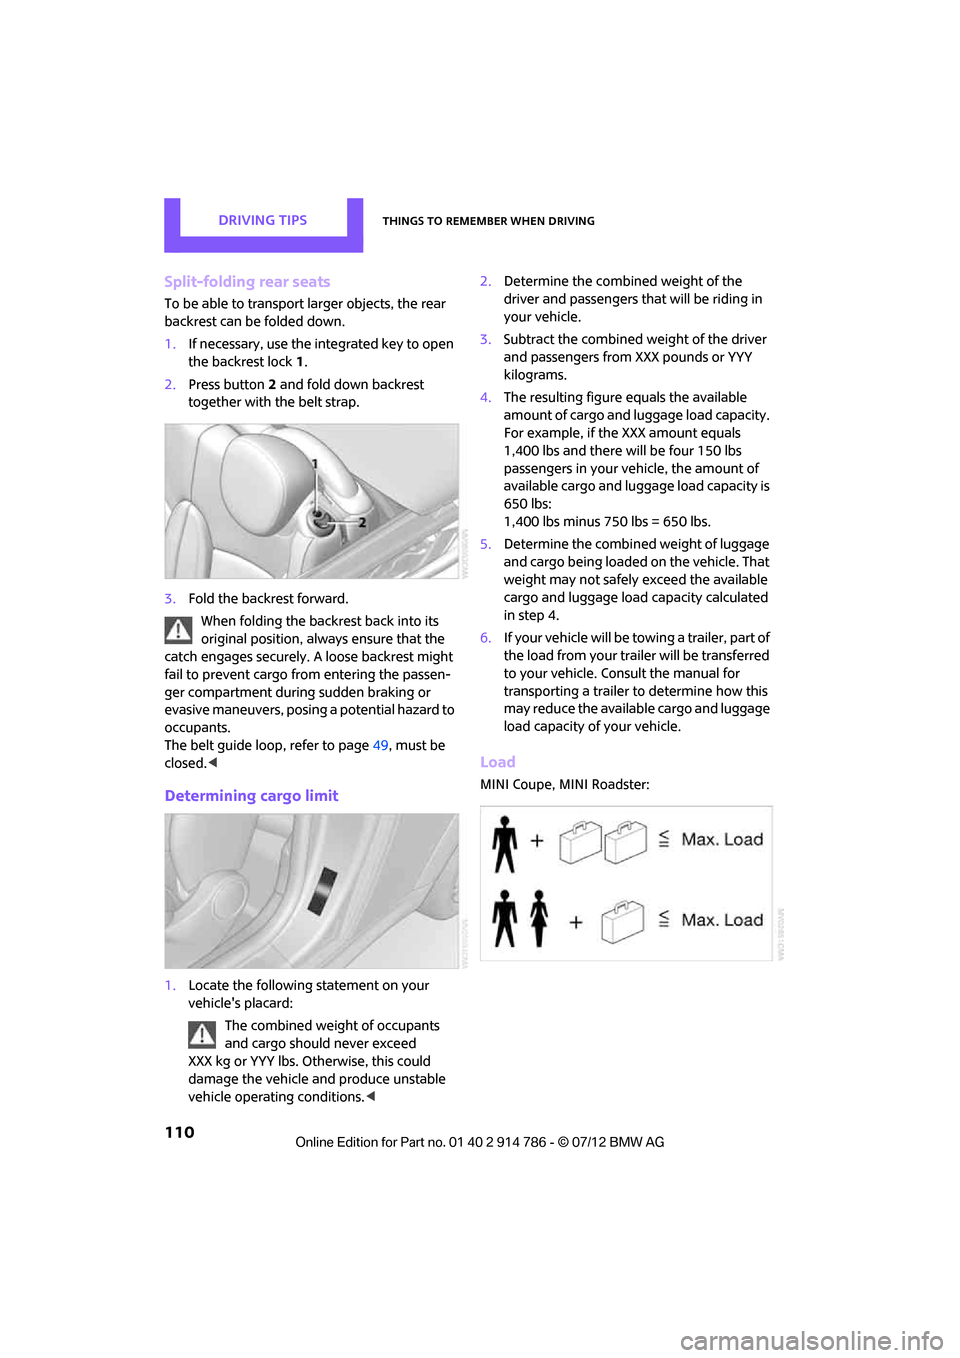
1.If necessary, use the integrated key to open
the backrest lock 1.
2. Press button 2 and fold down backrest
together with the belt strap.
3. Fold the backrest forward.
When folding the backrest back into its
original position, alwa ys ensure that the
catch engages securely. A loose backrest might
fail to prevent cargo from entering the passen-
ger compartment during sudden braking or
evasive maneuvers, posing a potential hazard to
occupants.
The belt guide loop, refer to page 49, must be
closed. <
Determining cargo limit
1.Locate the following statement on your
vehicle's placard:
The combined weight of occupants
and cargo should never exceed
XXX kg or YYY lbs. Otherwise, this could
damage the vehicle and produce unstable
vehicle operating conditions. <2.
Determine the combined weight of the
driver and passengers that will be riding in
your vehicle.
3. Subtract the combined weight of the driver
and passengers from XXX pounds or YYY
kilograms.
4. The resulting figure equals the available
amount of cargo and luggage load capacity.
For example, if the XXX amount equals
1,400 lbs and there will be four 150 lbs
passengers in your vehicle, the amount of
available cargo and luggage load capacity is
650 lbs:
1,400 lbs minus 750 lbs = 650 lbs.
5. Determine the combined weight of luggage
and cargo being loaded on the vehicle. That
weight may not safely exceed the available
cargo and luggage load capacity calculated
in step 4.
6. If your vehicle will be towing a trailer, part of
the load from your trailer will be transferred
to your vehicle. Consult the manual for
transporting a trailer to determine how this
may reduce the available cargo and luggage
load capacity of your vehicle.
Load
MINI Coupe, MINI Roadster:
Online Edition for Part no. 01 40 2 914 786 - \251 07/12 BMW AG
Page 112 of 218
Things to remember when drivingDRIVING TIPS
111
MINI Convertible:
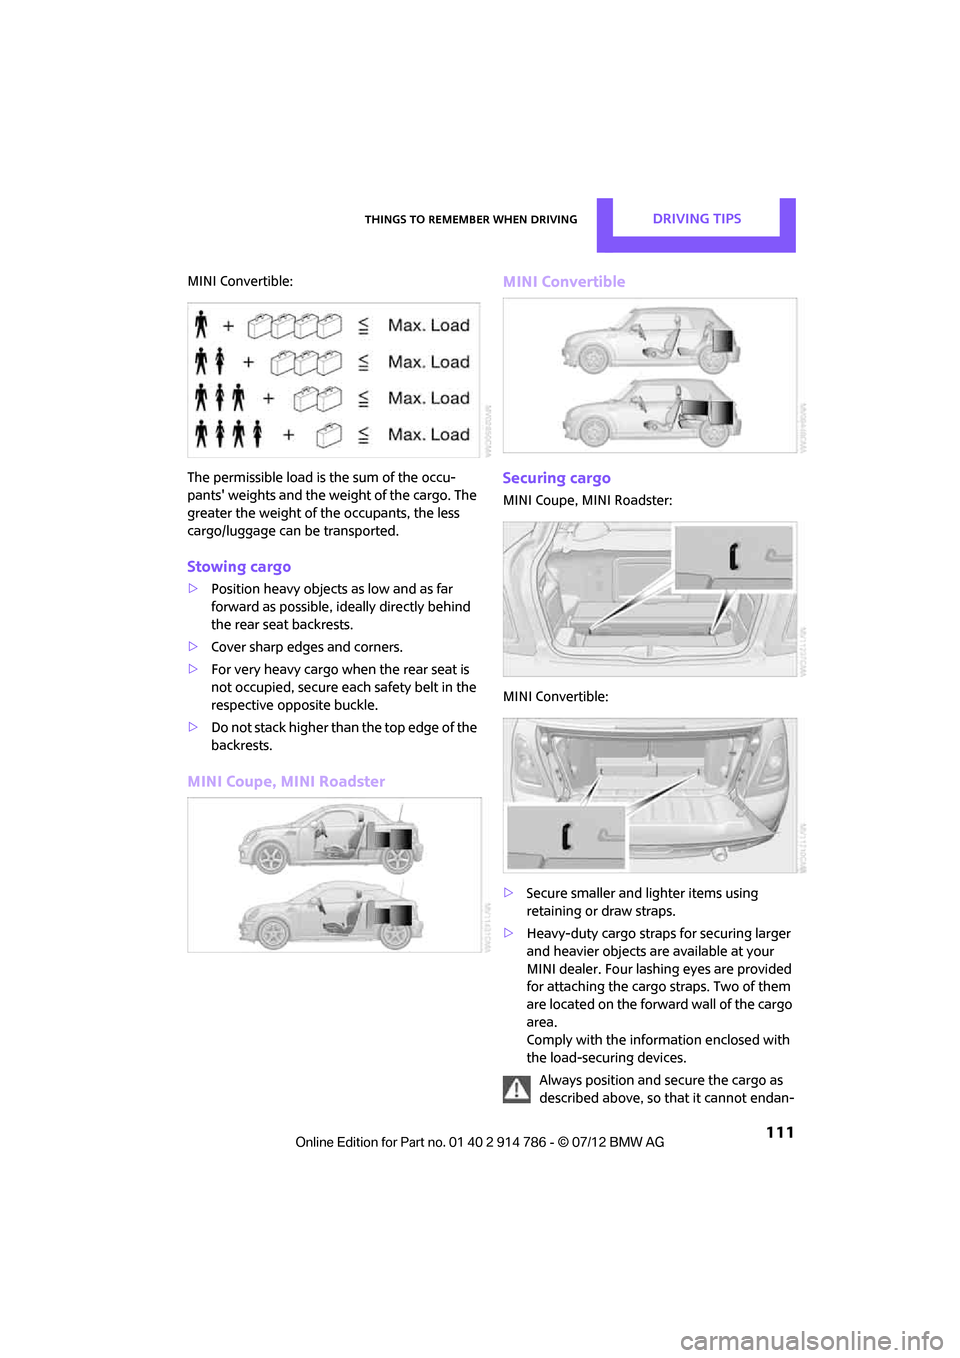
The permissible load is the sum of the occu-
pants' weights and the weight of the cargo. The
greater the weight of the occupants, the less
cargo/luggage can be transported.
Stowing cargo
>Position heavy objects as low and as far
forward as possible, id eally directly behind
the rear seat backrests.
> Cover sharp edges and corners.
> For very heavy cargo when the rear seat is
not occupied, secure each safety belt in the
respective opposite buckle.
> Do not stack higher than the top edge of the
backrests.
MINI Coupe, MINI Roadster MINI Convertible
Securing cargo
MINI Coupe, MINI Roadster:
MINI Convertible:
>
Secure smaller and lighter items using
retaining or draw straps.
> Heavy-duty cargo straps for securing larger
and heavier objects ar e available at your
MINI dealer. Four lashing eyes are provided
for attaching the cargo straps. Two of them
are located on the forward wall of the cargo
area.
Comply with the information enclosed with
the load-securing devices.
Always position and secure the cargo as
described above, so that it cannot endan-
Online Edition for Part no. 01 40 2 914 786 - \251 07/12 BMW AG
Page 138 of 218
TelephoneCOMMUNICATIONS
137
General information
Detailed information on snap-in adapters that
compatibly support mobile phone functions can
be found at your MINI dealer.
Do not expose your mobile phone to extreme
ambient conditions, for ex ample, very high tem-
peratures; otherwise, functions on your mobile
phone may not work. Follow the operating
instructions for your mobile phone.
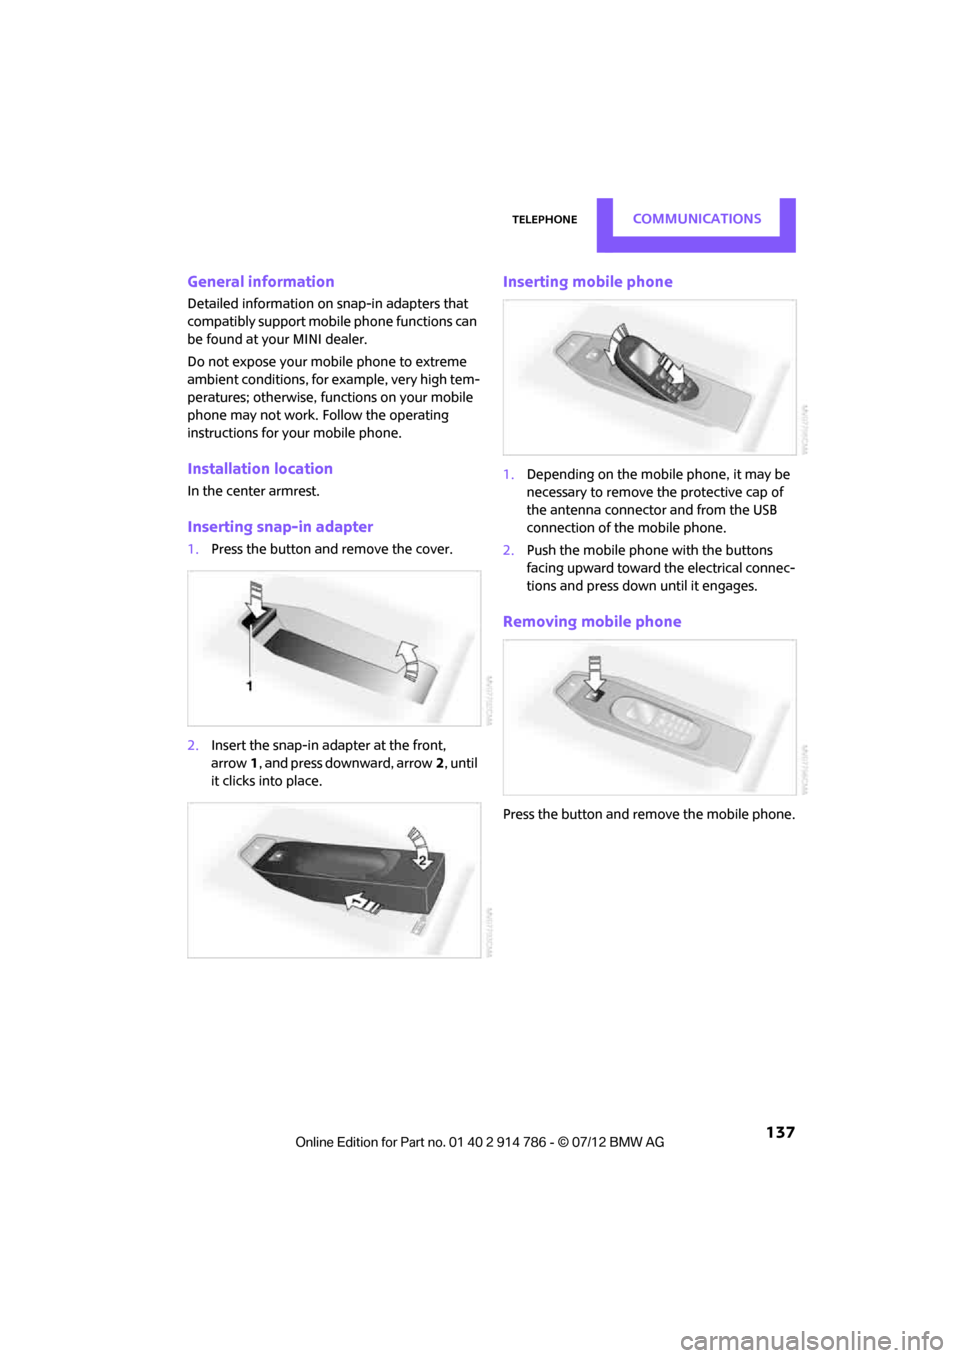
Installation location
In the center armrest.
Inserting snap-in adapter
1. Press the button an d remove the cover.
2. Insert the snap-in adapter at the front,
arrow 1, and press downward, arrow 2, until
it clicks into place.
Inserting mobile phone
1. Depending on the mobile phone, it may be
necessary to remove the protective cap of
the antenna connector and from the USB
connection of the mobile phone.
2. Push the mobile phone with the buttons
facing upward toward the electrical connec-
tions and press down until it engages.
Removing mobile phone
Press the button and remove the mobile phone.
Online Edition for Part no. 01 40 2 914 786 - \251 07/12 BMW AG
Page 153 of 218
MOBILITYWheels and tires
152
Winter tires
When winter tires wear down past a tread depth
of 0.16 in/4 mm, they become perceptibly less
suitable for winter conditions. In the interest of
safety, new tires should be installed.
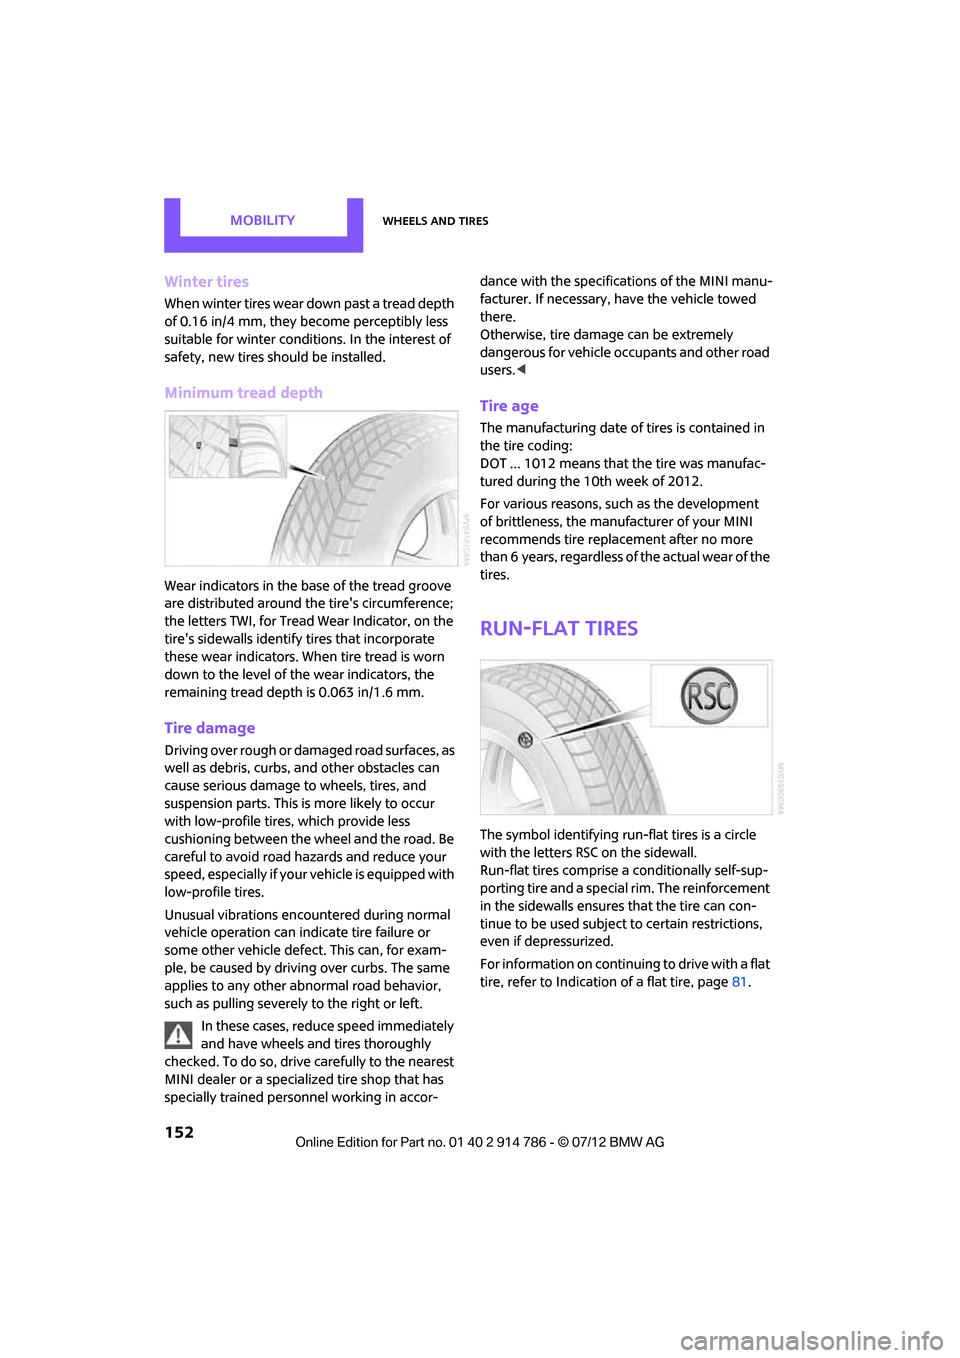
Minimum tread depth
Wear indicators in the base of the tread groove
are distributed around the tire's circumference;
the letters TWI, for Tread Wear Indicator, on the
tire's sidewalls identify tires that incorporate
these wear indicators. When tire tread is worn
down to the level of the wear indicators, the
remaining tread dept h is 0.063 in/1.6 mm.
Tire damage
Driving over rough or damaged road surfaces, as
well as debris, curbs, and other obstacles can
cause serious damage to wheels, tires, and
suspension parts. This is more likely to occur
with low-profile tire s, which provide less
cushioning between the wheel and the road. Be
careful to avoid road hazards and reduce your
speed, especially if your vehicle is equipped with
low-profile tires.
Unusual vibrations encountered during normal
vehicle operation can indicate tire failure or
some other vehicle defect . This can, for exam-
ple, be caused by drivin g over curbs. The same
applies to any other abnormal road behavior,
such as pulling severely to the right or left.
In these cases, reduce speed immediately
and have wheels and tires thoroughly
checked. To do so, drive carefully to the nearest
MINI dealer or a specialized tire shop that has
specially trained personnel working in accor- dance with the specifications of the MINI manu-
facturer. If necessary, have the vehicle towed
there.
Otherwise, tire damage can be extremely
dangerous for vehicle occupants and other road
users.
<
Tire age
The manufacturing date of tires is contained in
the tire coding:
DOT ... 1012 means that the tire was manufac-
tured during the 10th week of 2012.
For various reasons, such as the development
of brittleness, the manufacturer of your MINI
recommends tire replac ement after no more
than 6 years, regardless of the actual wear of the
tires.
Run-flat tires
The symbol identifying run-flat tires is a circle
with the letters RSC on the sidewall.
Run-flat tires comprise a conditionally self-sup-
porting tire and a special rim. The reinforcement
in the sidewalls ensures that the tire can con-
tinue to be used subject to certain restrictions,
even if depressurized.
For information on continuing to drive with a flat
tire, refer to Indication of a flat tire, page 81.
Online Edition for Part no. 01 40 2 914 786 - \251 07/12 BMW AG
Page 157 of 218
MOBILITYEngine compartment
156
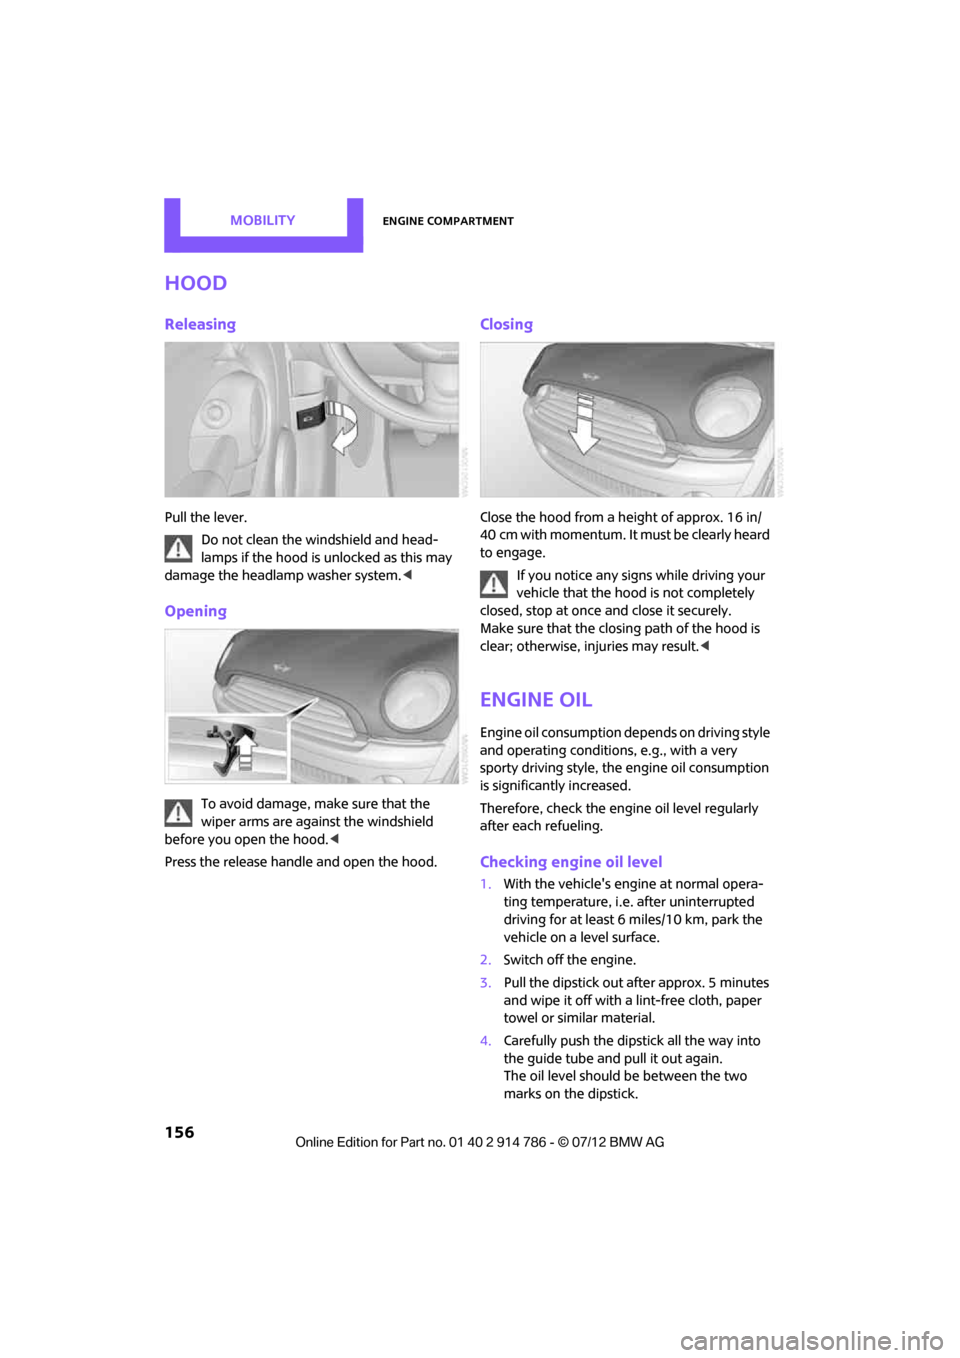
Hood
Releasing
Pull the lever.Do not clean the windshield and head-
lamps if the hood is unlocked as this may
damage the headlamp washer system. <
Opening
To avoid damage, make sure that the
wiper arms are against the windshield
before you open the hood. <
Press the release handle and open the hood.
Closing
Close the hood from a height of approx. 16 in/
40 cm with momentum. It must be clearly heard
to engage.
If you notice any signs while driving your
vehicle that the hood is not completely
closed, stop at once and close it securely.
Make sure that the closing path of the hood is
clear; otherwise, injuries may result. <
Engine oil
Engine oil consumption depends on driving style
and operating conditions, e.g., with a very
sporty driving style, the engine oil consumption
is significantly increased.
Therefore, check the engine oil level regularly
after each refueling.
Checking engine oil level
1. With the vehicle's engine at normal opera-
ting temperature, i.e. after uninterrupted
driving for at least 6 miles/10 km, park the
vehicle on a level surface.
2. Switch off the engine.
3. Pull the dipstick out after approx. 5 minutes
and wipe it off with a lint-free cloth, paper
towel or similar material.
4. Carefully push the dipstick all the way into
the guide tube and pull it out again.
The oil level should be between the two
marks on the dipstick.
Online Edition for Part no. 01 40 2 914 786 - \251 07/12 BMW AG
Page 163 of 218
MOBILITYCare
162
Automatic transmission
Before driving into the car wash, make sure that
the vehicle can roll:
1.Place the remote control, even with Comfort
Access, in the ignition lock.
2. Move the selector lever to position N.
3. Release the parking brake.
4. Switch off the engine.
5. Insert the remote control in the ignition lock
so that the vehicle can roll.
Steam jets/high-pressure washers
When using steam jets or high-pressure
washers, make sure that you maintain
sufficient distance from the vehicle and do not
exceed a maximum temperature of 140 7/
60 6 .
If the distance is too close, the pressure too high,
or the temperature too high, parts of the vehicle
can be damaged, or water can penetrate.
Observe the operating instructions for high-
pressure washers. <
Do not spray sensors, such as the Park
Distance Control, with high-pressure
washers for a long time or at a distance of less
than 1 ft/30 cm. <
Manual washing
Use a great deal of water and, if necessary, car
shampoo when washing your car by hand. Clean
the vehicle with a sponge or a washing brush
applying a slight amount of pressure.
Before cleaning the windshield, deacti-
vate the rain sensor or turn off the ignition
to prevent unintentional wiping. <
Observe local regulations regarding
washing vehicles by hand. <
Headlamps
Do not wipe dry and do not use abrasive or
corrosive cleaning agents. Remove dirt and
contamination, such as in sects, by soaking with
shampoo and then washing with plenty of
water. Do not remove accumulated ice and snow with
an ice scraper; use window deicers instead.
Windows
Clean the outside and inside of the windows and
mirrors with a window cleaner.
Do not clean the mirrors with cleaners
containing quartz. <
Wiper blades
Clean with soapy water and change regularly to
prevent the formation of streaks.
Wax, preservatives and dirt on the
windows cause streaks when the wind-
shield wipers are on, and can cause premature
wear of the wiper blades and interfere with the
rain sensor. <
Care of the convertible top
The appearance and service life of the conver-
tible top largely depends on its proper care and
operation.
Please follow these instructions:
>Never attempt to fold and stow the conver-
tible top in the convertible compartment
when the top is wet or frozen. Otherwise,
water stains, mildew, and chafe marks may
occur.
> If water spots occur on the inside headliner
despite precautions, remove them using a
microfiber cloth and interior cleaner.
> If the vehicle is parked in an enclosed area
for a longer period of time, make sure that
there is sufficient ventilation.
> Remove any bird droppings immediately,
since they have corrosive properties which
will corrode the conver tible top and damage
the rubber seals.
When attempting to remove stains from
the convertible top, do not use spot
removers, paint thinners, solvents, gasoline, or
similar fluids. These cleaners may damage the
rubber seals. The improper care or cleaning
methods may cause the convertible top and its
seams to leak. <
Online Edition for Part no. 01 40 2 914 786 - \251 07/12 BMW AG
Page 166 of 218
Replacing componentsMOBILITY
165
Replacing components
Vehicle equipment
In this chapter, all production, country, and
optional equipment that is offered in the model
range is described. Equipment is also described
that is not available because of, for example,
selected options or count ry version. This also
applies to safety related functions and systems.
Toolkit
Your vehicle comes with a toolkit that varies
with the equipment version; it is stored under-
neath the flat load floor.
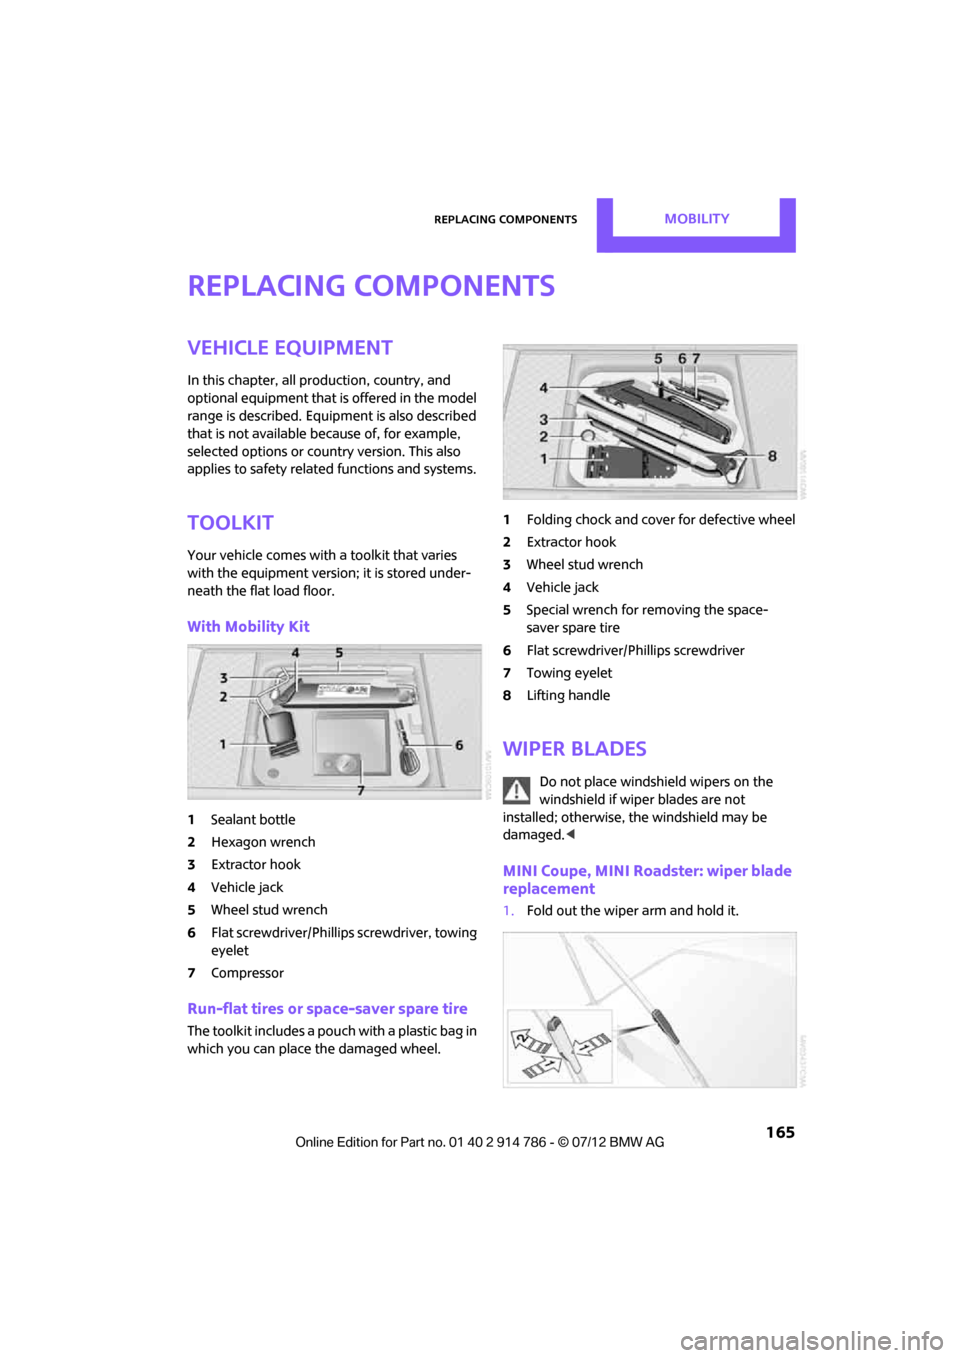
With Mobility Kit
1 Sealant bottle
2 Hexagon wrench
3 Extractor hook
4 Vehicle jack
5 Wheel stud wrench
6 Flat screwdriver/Phillips screwdriver, towing
eyelet
7 Compressor
Run-flat tires or space-saver spare tire
The toolkit includes a pouch with a plastic bag in
which you can place the damaged wheel. 1
Folding chock and cove r for defective wheel
2 Extractor hook
3 Wheel stud wrench
4 Vehicle jack
5 Special wrench for removing the space-
saver spare tire
6 Flat screwdriver/Phillips screwdriver
7 Towing eyelet
8 Lifting handle
Wiper blades
Do not place windshield wipers on the
windshield if wiper blades are not
installed; otherwise, the windshield may be
damaged. <
MINI Coupe, MINI Roadster: wiper blade
replacement
1.Fold out the wiper arm and hold it.
Online Edition for Part no. 01 40 2 914 786 - \251 07/12 BMW AG