steering MINI Coupe 2012 Owner's Guide
[x] Cancel search | Manufacturer: MINI, Model Year: 2012, Model line: Coupe, Model: MINI Coupe 2012Pages: 218, PDF Size: 3.84 MB
Page 172 of 218
Replacing componentsMOBILITY
171
In the event of a flat tire, different procedures
should be followed depending on the equip-
ment included in your vehicle:
>MINI Mobility Kit, refer to the following
section
> Run-flat tires, page 173
> Tire change with space-saver spare tire,
page 173
MINI Mobility Kit
Preparations
Use of the MINI Mobility Kit may be ineffective if
the tire puncture meas ures approx. 1/8 in/4 mm
or more. Contact the nearest MINI dealer if the
tire cannot be made driv able with the Mobility
Kit.
Do not remove foreign bodies which have
penetrated the tire if possible.
Follow the instructions on using the
Mobility Kit found on the compressor
and the sealant bottle. <
Remove the adhesive label for the speed limit
from the sealant bottle and affix it to the
steering wheel.
Sealant and compressor
1 Sealant bottle and adhesi ve label with speed
limit
2 Filling hose
Note the use-by date on the sealant
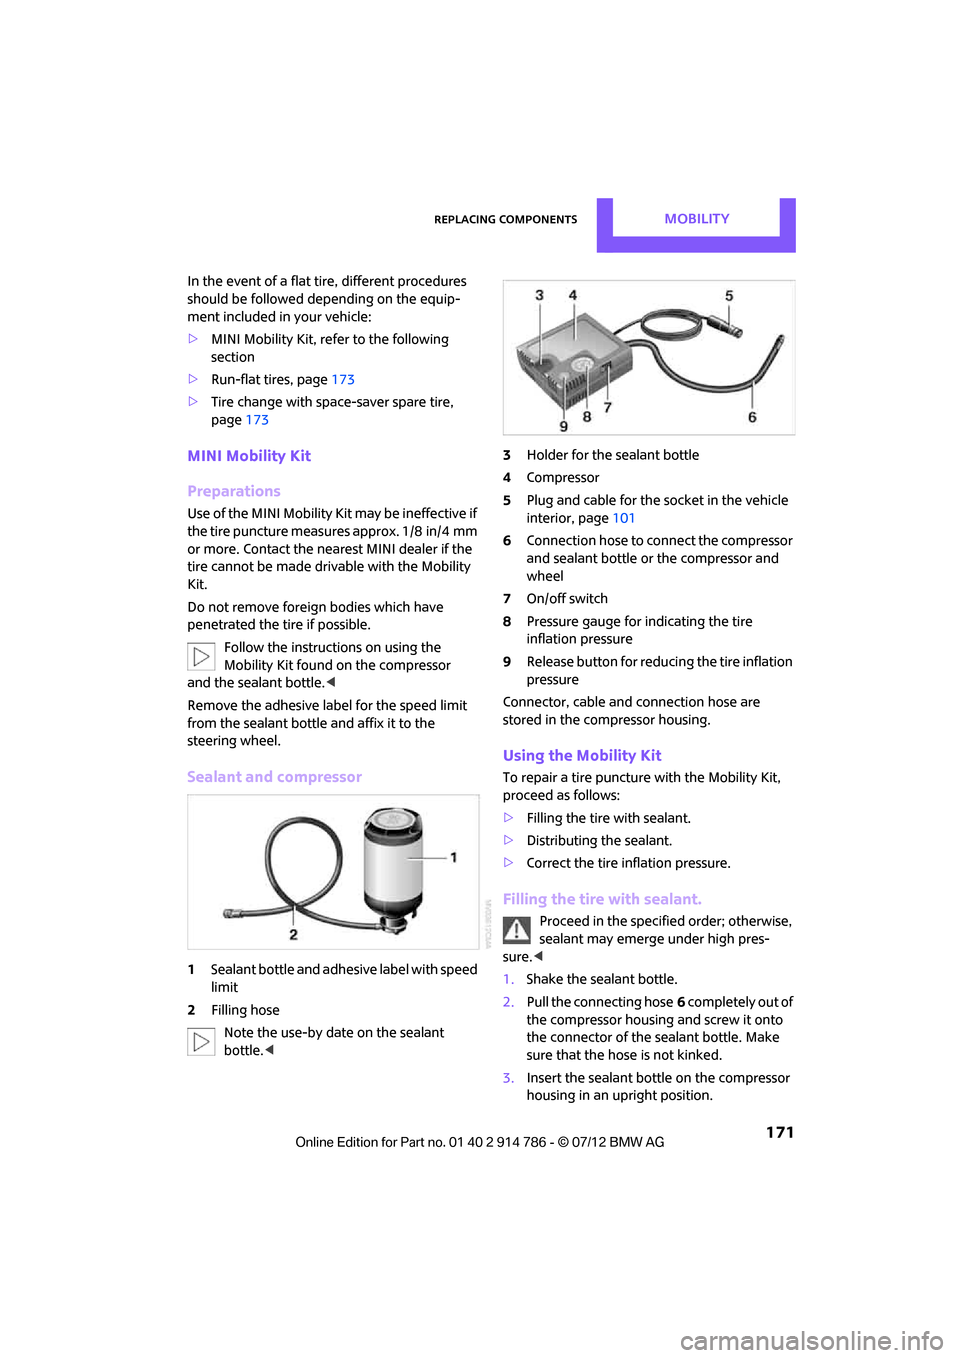
bottle. < 3
Holder for the sealant bottle
4 Compressor
5 Plug and cable for the socket in the vehicle
interior, page 101
6 Connection hose to connect the compressor
and sealant bottle or the compressor and
wheel
7 On/off switch
8 Pressure gauge for indicating the tire
inflation pressure
9 Release button for reduci ng the tire inflation
pressure
Connector, cable and connection hose are
stored in the compressor housing.
Using the Mobility Kit
To repair a tire puncture with the Mobility Kit,
proceed as follows:
> Filling the tire with sealant.
> Distributing the sealant.
> Correct the tire inflation pressure.
Filling the tire with sealant.
Proceed in the specified order; otherwise,
sealant may emerge under high pres-
sure. <
1. Shake the sealant bottle.
2. Pull the connecting hose 6 completely out of
the compressor housing and screw it onto
the connector of the sealant bottle. Make
sure that the hose is not kinked.
3. Insert the sealant bottle on the compressor
housing in an upright position.
Online Edition for Part no. 01 40 2 914 786 - \251 07/12 BMW AG
Page 175 of 218
MOBILITYReplacing components
174
9.Pull the space-saver spare tire underneath
the vehicle out toward the rear.
10. Position the space-save r spare tire with the
valve facing upward.
11. Unscrew the valve extension from the valve
of the space-saver spare tire.
12. Unscrew the dust cap from the extension
and place it on the valve of the space-saver
spare tire.
Due to its different dimensions, the
damaged wheel cannot be placed in the
recess for the space-saver spare tire. <
Driving with the space-saver spare tire
Drive cautiously and do not exceed a
speed of 50 mph/80 km/h. Changes may
occur in vehicle handling such as lower track
stability during braking, longer braking dis-
tances and changes in self-steering properties
when close to the handling limit. These proper-
ties are more noticeable with winter tires. <
Only one space-saver spare tire may be
mounted at one time. Mount a wheel and
tire of the original size as soon as possible, to
avoid any safety risks. <
Check the tire inflat ion pressure at the
earliest opportunity an d correct it if neces-
sary. Replace the defective tire as soon as possi-
ble and have the new wheel/tire assembly bal-
anced. <
Preparing for a tire change
Observe the safety precautions regarding
flat tires on page 170.< Additional safety measures when
changing tires:
Only change the tire wh en parked on a surface
that is level, firm and not slippery.
The vehicle or the jack could slip sideways on
soft or slippery support surfaces, such as snow,
ice, flagstones, etc.
Do not use a wooden block or similar object as a
support base for the jack, as this would prevent
it from extending to its full support height and
reduce its load-carrying capacity.
Do not lie under the vehicle or start the engine
when the vehicle is supported by the jack; other-
wise, there is a risk of fatal injury. <
1. Place the foldable chock behind the front
wheel on the other side of the vehicle or in
front of the wheel if the vehicle is on an
incline. If the wheel is changed on a surface
with a more severe sl ope, take additional
precautions to secure the vehicle from
rolling.
2. Uncover the lug bolts if necessary.
3. Loosen the lug bolts by a half turn.
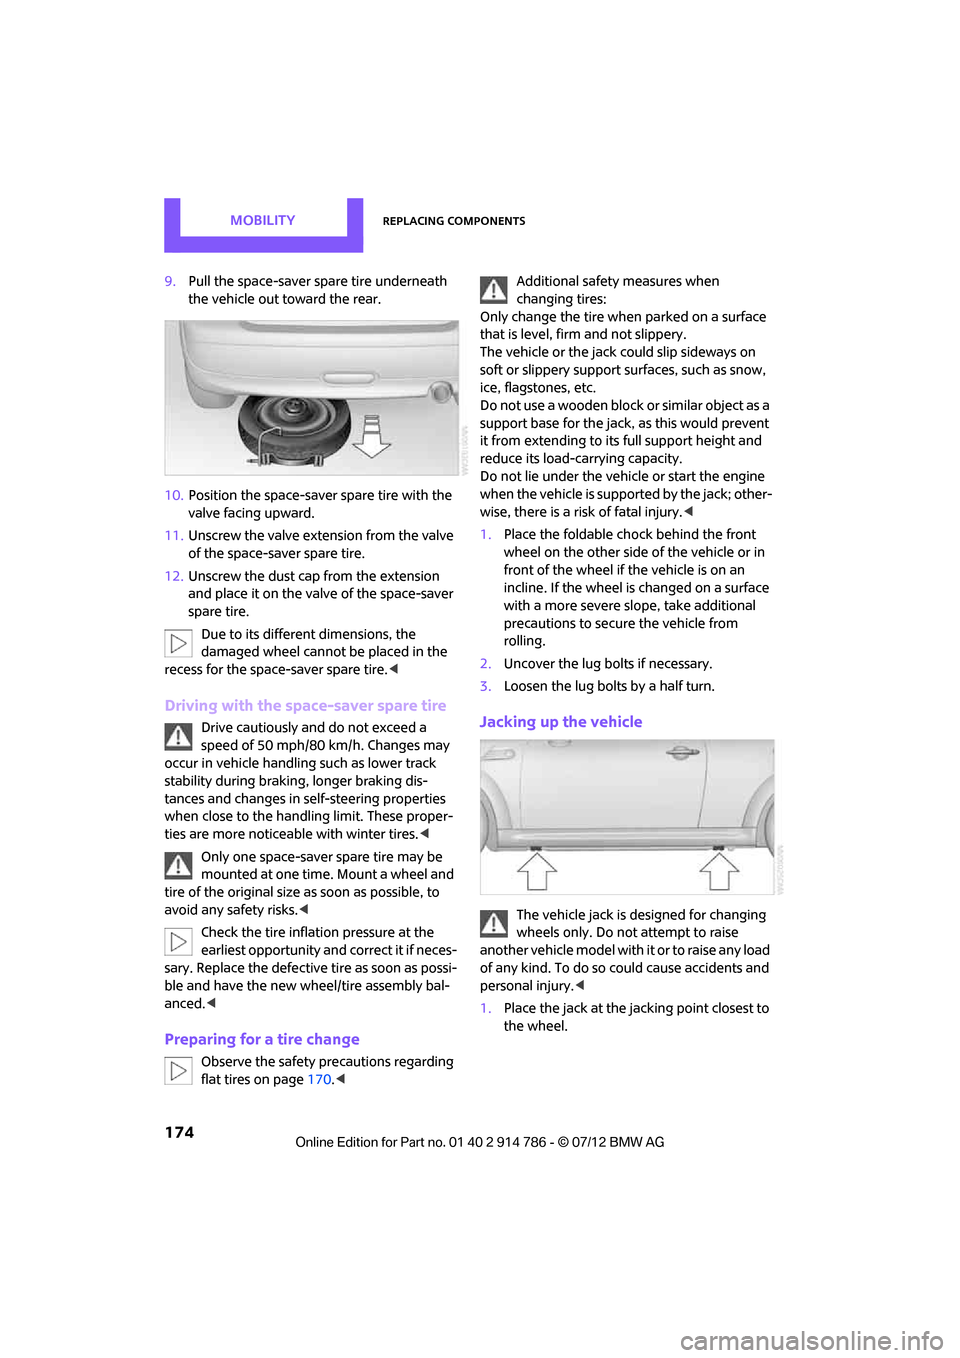
Jacking up the vehicle
The vehicle jack is designed for changing
wheels only. Do not attempt to raise
another vehicle model with it or to raise any load
of any kind. To do so could cause accidents and
personal injury. <
1. Place the jack at the jacking point closest to
the wheel.
Online Edition for Part no. 01 40 2 914 786 - \251 07/12 BMW AG
Page 180 of 218
Giving and receiving assistanceMOBILITY
179
Using a tow fitting
The screw-in tow fitting must always be carried
in the car. It can be screwed in at the front or
rear of the MINI.
It is stored in the toolkit in the cargo area under-
neath the cover on the right-hand side,
page165.
Use only the tow fitting provided with the
vehicle and screw it all the way in. Use the
tow fitting for towing on paved roads only. Avoid
lateral loading of the tow fitting, e.g. do not lift
the vehicle by the tow fitting. Otherwise, the tow
fitting and the vehicle could be damaged. <
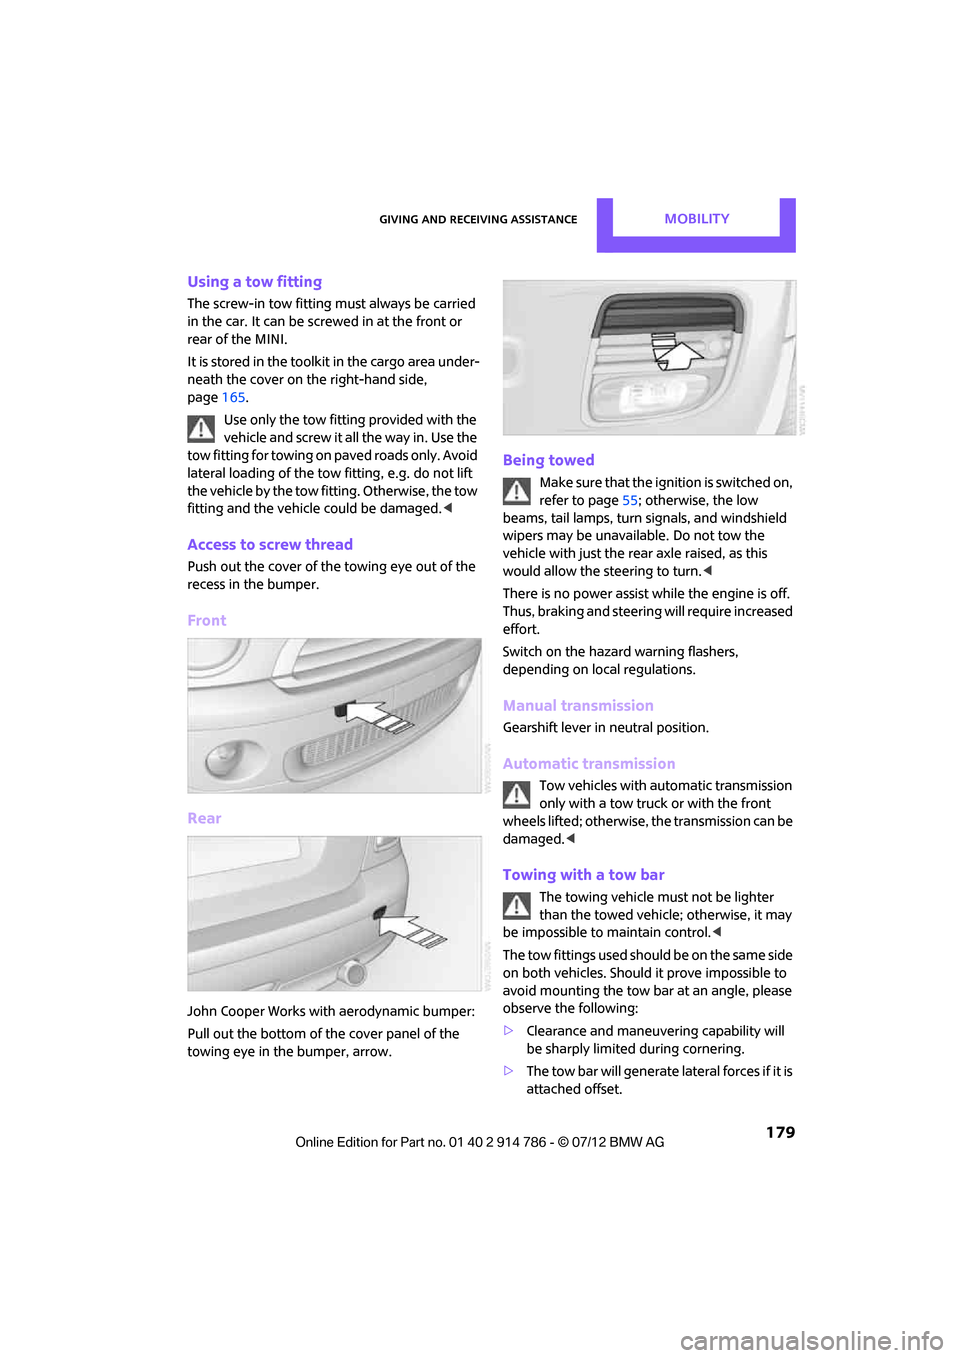
Access to screw thread
Push out the cover of the towing eye out of the
recess in the bumper.
Front
Rear
John Cooper Works with aerodynamic bumper:
Pull out the bottom of the cover panel of the
towing eye in the bumper, arrow.
Being towed
Make sure that the ignition is switched on,
refer to page55; otherwise, the low
beams, tail lamps, turn signals, and windshield
wipers may be unavailable. Do not tow the
vehicle with just the rear axle raised, as this
would allow the steering to turn. <
There is no power assist while the engine is off.
Thus, braking and steering will require increased
effort.
Switch on the hazard warning flashers,
depending on local regulations.
Manual transmission
Gearshift lever in neutral position.
Automatic transmission
Tow vehicles with automatic transmission
only with a tow truck or with the front
wheels lifted; otherwise, the transmission can be
damaged. <
Towing with a tow bar
The towing vehicle must not be lighter
than the towed vehicle; otherwise, it may
be impossible to maintain control. <
The tow fittings used should be on the same side
on both vehicles. Should it prove impossible to
avoid mounting the tow bar at an angle, please
observe the following:
> Clearance and maneuvering capability will
be sharply limited during cornering.
> The tow bar will generate lateral forces if it is
attached offset.
Online Edition for Part no. 01 40 2 914 786 - \251 07/12 BMW AG
Page 185 of 218
MOBILITYIndicator and warning lamps
184
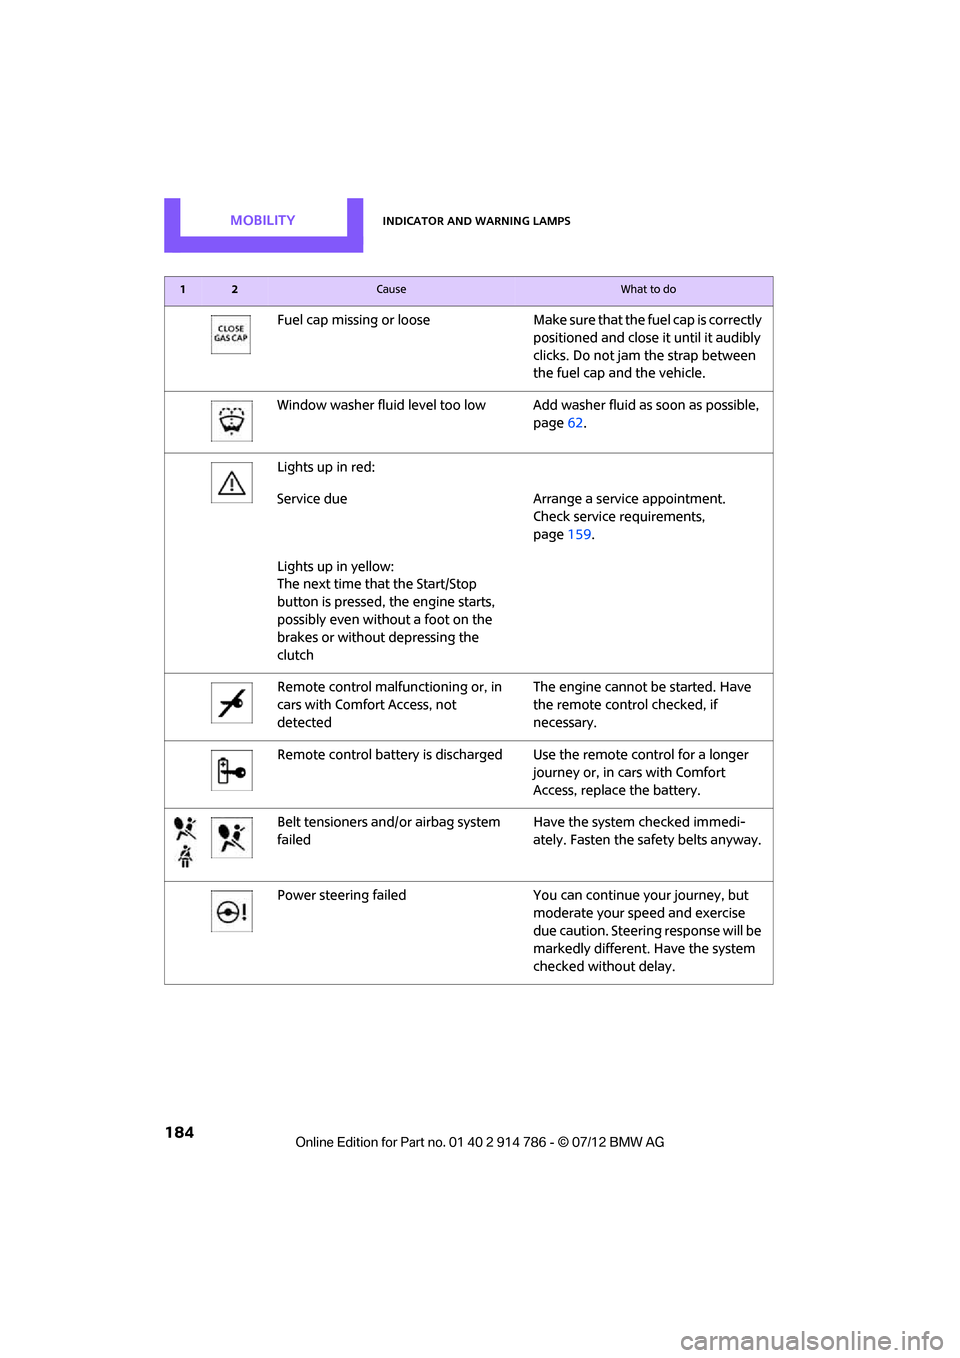
Fuel cap missing or looseMake sure that the fuel cap is correctly
positioned and close it until it audibly
clicks. Do not jam the strap between
the fuel cap and the vehicle.
Window washer fluid level too low Add washer fluid as soon as possible,
page 62.
Lights up in red:
Service due Arrange a service appointment.
Check service requirements,
page 159.
Lights up in yellow:
The next time that the Start/Stop
button is pressed, the engine starts,
possibly even without a foot on the
brakes or without depressing the
clutch
Remote control malfunctioning or, in
cars with Comfort Access, not
detected The engine cannot be started. Have
the remote control checked, if
necessary.
Remote control battery is discharged Use the remote control for a longer journey or, in cars with Comfort
Access, replace the battery.
Belt tensioners and/ or airbag system
failed Have the system checked immedi-
ately. Fasten the safety belts anyway.
Power steering failed You can continue your journey, but
moderate your speed and exercise
due caution. Steering response will be
markedly different. Have the system
checked without delay.
12Cause What to do
Online Edition for Part no. 01 40 2 914 786 - \251 07/12 BMW AG
Page 208 of 218
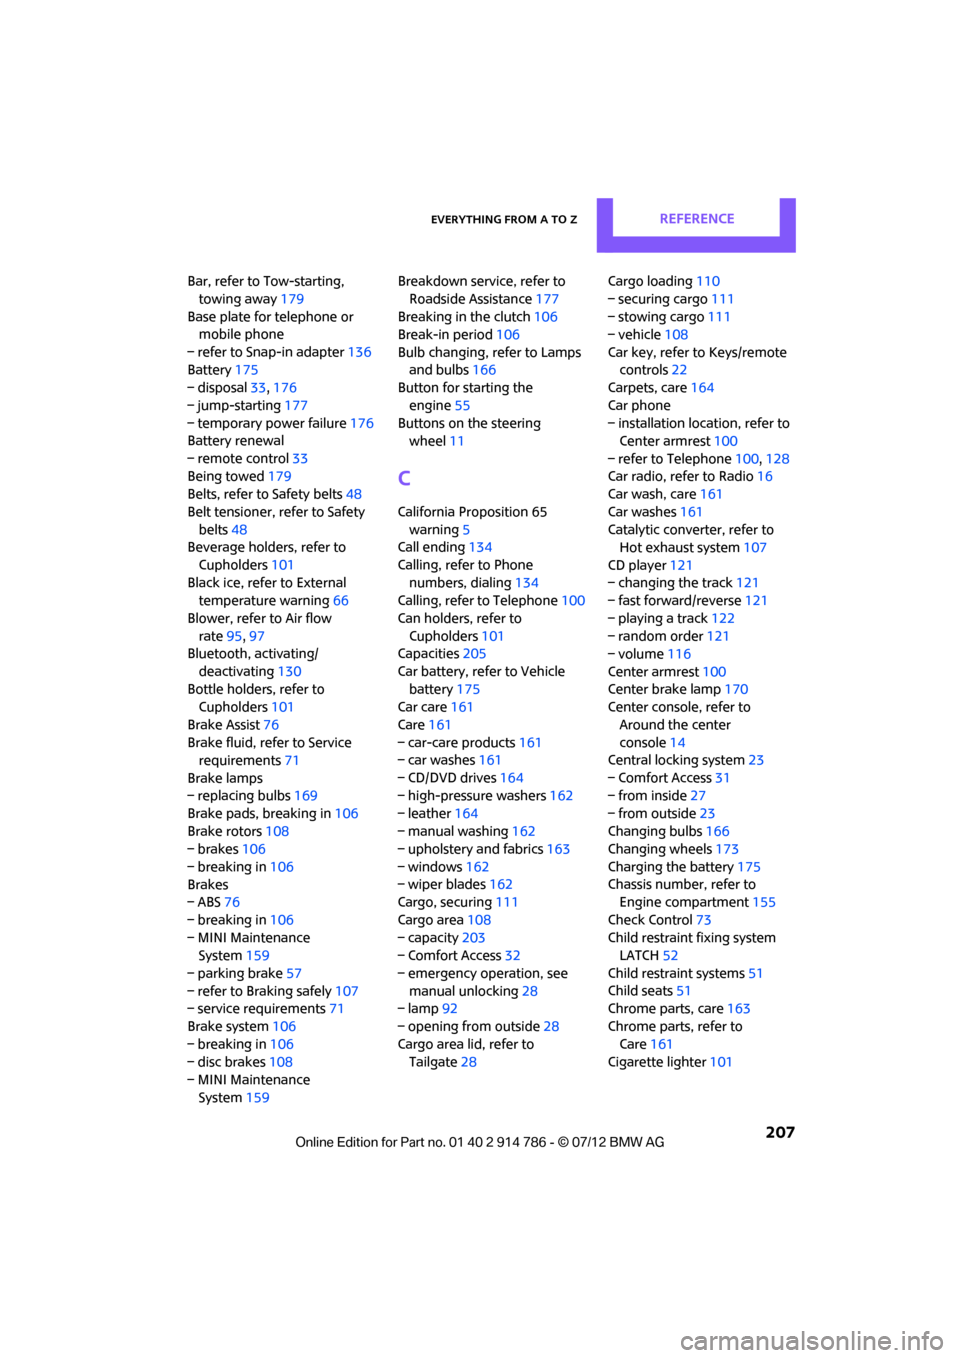
Everything from A to ZREFERENCE
207
Bar, refer to Tow-starting, towing away 179
Base plate for telephone or mobile phone
– refer to Snap-in adapter 136
Battery 175
– disposal 33,176
– jump-starting 177
– temporary power failure 176
Battery renewal
– remote control 33
Being towed 179
Belts, refer to Safety belts 48
Belt tensioner, refer to Safety belts 48
Beverage holders, refer to
Cupholders 101
Black ice, refer to External temperature warning 66
Blower, refer to Air flow rate 95,97
Bluetooth, activating/
deactivating 130
Bottle holders, refer to Cupholders 101
Brake Assist 76
Brake fluid, refer to Service requirements 71
Brake lamps
– replacing bulbs 169
Brake pads, breaking in 106
Brake rotors 108
– brakes 106
– breaking in 106
Brakes
– ABS 76
– breaking in 106
– MINI Maintenance System 159
– parking brake 57
– refer to Braking safely 107
– service requirements 71
Brake system 106
– breaking in 106
– disc brakes 108
– MINI Maintenance System 159 Breakdown service, refer to
Roadside Assistance 177
Breaking in the clutch 106
Break-in period 106
Bulb changing, refer to Lamps and bulbs 166
Button for starting the
engine 55
Buttons on the steering wheel 11
C
California Proposition 65
warning 5
Call ending 134
Calling, refer to Phone numbers, dialing 134
Calling, refer to Telephone 100
Can holders, refer to Cupholders 101
Capacities 205
Car battery, refer to Vehicle battery 175
Car care 161
Care 161
– car-care products 161
– car washes 161
– CD/DVD drives 164
– high-pressure washers 162
– leather 164
– manual washing 162
– upholstery and fabrics 163
– windows 162
– wiper blades 162
Cargo, securing 111
Cargo area 108
– capacity 203
– Comfort Access 32
– emergency operation, see manual unlocking 28
– lamp 92
– opening from outside 28
Cargo area lid, refer to Tailgate 28 Cargo loading
110
– securing cargo 111
– stowing cargo 111
– vehicle 108
Car key, refer to Keys/remote controls 22
Carpets, care 164
Car phone
– installation location, refer to Center armrest 100
– refer to Telephone 100,128
Car radio, refer to Radio 16
Car wash, care 161
Car washes 161
Catalytic converter, refer to Hot exhaust system 107
CD player 121
– changing the track 121
– fast forward/reverse 121
– playing a track 122
– random order 121
– volume 116
Center armrest 100
Ce
nter brake lamp 170
Center console, refer to
Around the center
console 14
Central locking system 23
– Comfort Access 31
– from inside 27
– from outside 23
Changing bulbs 166
Changing wheels 173
Charging the battery 175
Chassis number, refer to Engine compartment 155
Check Control 73
Child restraint fixing system LATCH 52
Child restraint systems 51
Child seats 51
Chrome parts, care 163
Chrome parts, refer to Care 161
Cigarette lighter 101
Online Edition for Part no. 01 40 2 914 786 - \251 07/12 BMW AG
Page 211 of 218
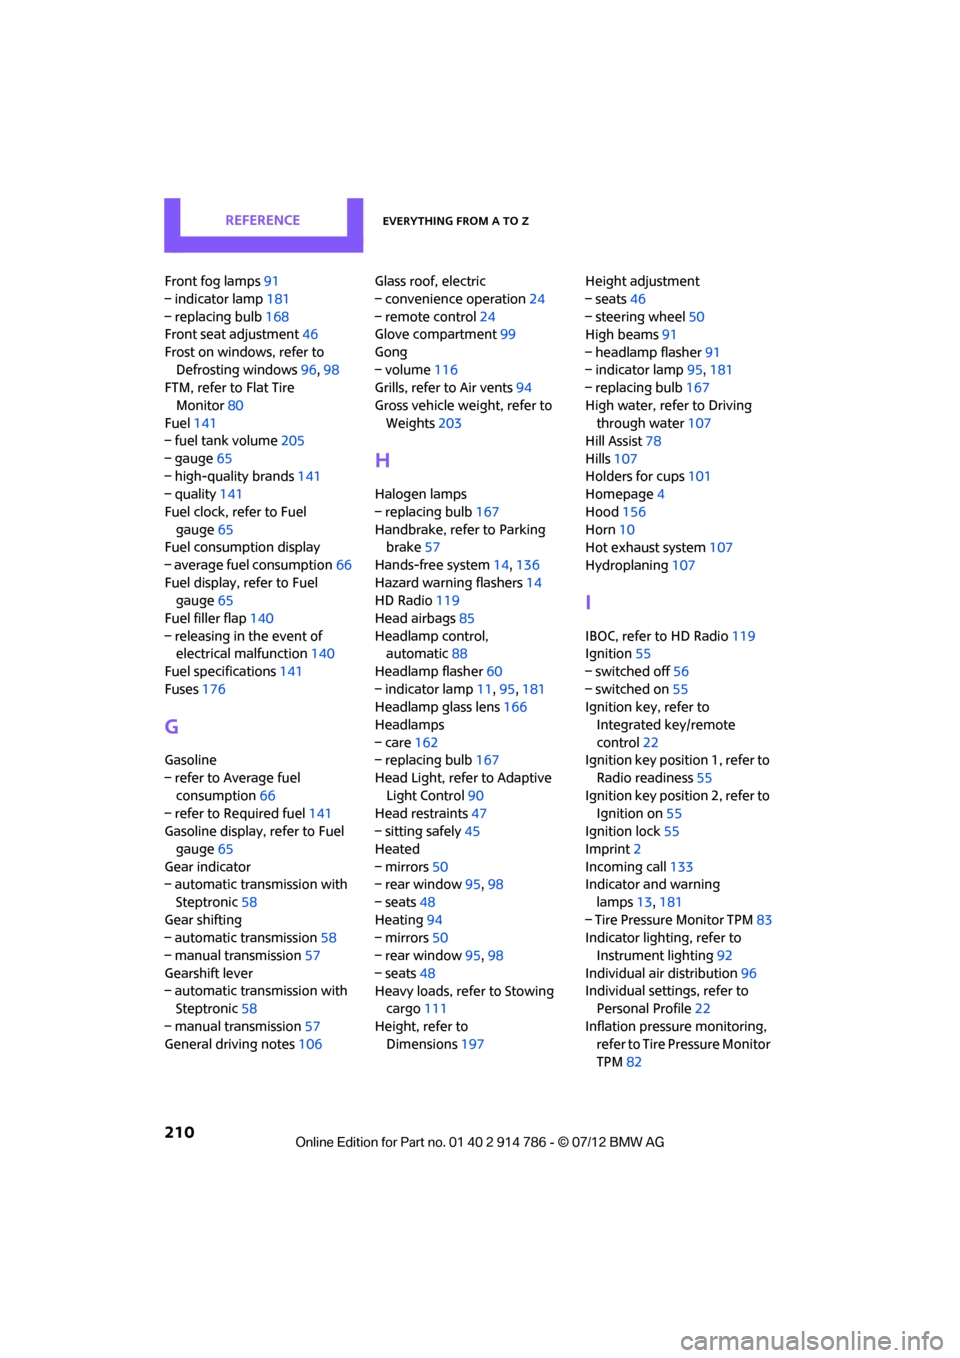
REFERENCEEverything from A to Z
210
Front fog lamps91
– indicator lamp 181
– replacing bulb 168
Front seat adjustment 46
Frost on windows, refer to Defrosting windows 96,98
FTM, refer to Flat Tire
Monitor 80
Fuel 141
– fuel tank volume 205
– gauge 65
– high-quality brands 141
– quality 141
Fuel clock, refer to Fuel gauge 65
Fuel consumption display
– average fuel consumption 66
Fuel display, refer to Fuel gauge 65
Fuel filler flap 140
– releasing in the event of electrical malfunction 140
Fuel specifications 141
Fuses 176
G
Gasoline
– refer to Average fuel
consumption 66
– refer to Required fuel 141
Gasoline display, refer to Fuel gauge 65
Gear indicator
– automatic transmission with Steptronic 58
Gear shifting
– automatic transmission 58
– manual transmission 57
Gearshift lever
– automatic transmission with Steptronic 58
– manual transmission 57
General driving notes 106Glass roof, electric
– convenience operation
24
– remote control 24
Glove compartment 99
Gong
– volume 116
Grills, refer to Air vents 94
Gross vehicle weight, refer to Weights 203
H
Halogen lamps
– replacing bulb 167
Handbrake, refe r to Parking
brake 57
Hands-free system 14,136
Hazard warning flashers 14
HD Radio 119
Head airbags 85
Headlamp control, automatic 88
Headlamp flasher 60
– indicator lamp 11,95,181
Headlamp glass lens 166
Headlamps
– care 162
– replacing bulb 167
Head Light, refer to Adaptive Light Control 90
Head restraints 47
– sitting safely 45
Heated
– mirrors 50
– rear window 95,98
– seats 48
Heating 94
– mirrors 50
– rear window 95,98
– seats 48
Heavy loads, refer to Stowing cargo 111
Height, refer to Dimensions 197 Height adjustment
– seats
46
– steering wheel 50
High beams 91
– headlamp flasher 91
– indicator lamp 95,181
– replacing bulb 167
High water, refer to Driving through water 107
Hill Assist 78
Hills 107
Holders for cups 101
Homepage 4
Hood 156
Horn 10
Hot exhaust system 107
Hydroplaning 107
I
IBOC, refer to HD Radio 119
Ignition 55
– switched off 56
– switched on 55
Ignition key, refer to
Integrated key/remote
control 22
Ignition key position 1, refer to
Radio readiness 55
Ignition key position 2, refer to
Ignition on 55
Ignition lock 55
Imprint 2
Incoming call 133
Indicator and warning lamps 13,181
– Tire Pressure Monitor TPM 83
Indicator lighting, refer to Instrument lighting 92
Individual air distribution 96
Individual settings, refer to Personal Profile 22
Inflation pressure monitoring, refer to Tire Pressure Monitor
TPM 82
Online Edition for Part no. 01 40 2 914 786 - \251 07/12 BMW AG
Page 213 of 218
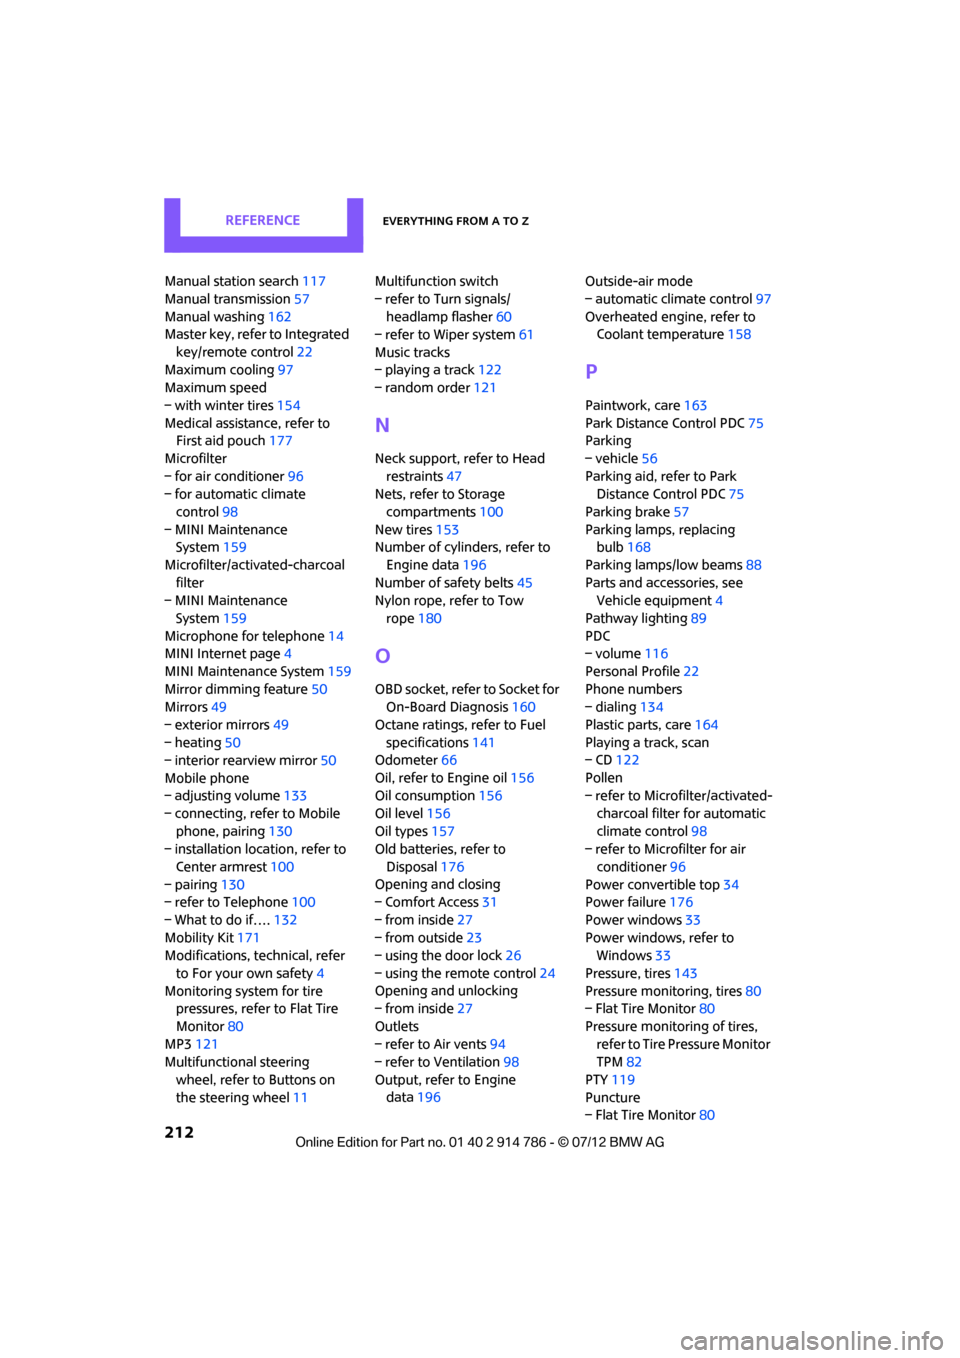
REFERENCEEverything from A to Z
212
Manual station search117
Manual transmission 57
Manual washing 162
Master key, refer to Integrated
key/remote control 22
Maximum cooling 97
Maximum speed
– with winter tires 154
Medical assistance, refer to First aid pouch 177
Microfilter
– for air conditioner 96
– for automatic climate
control 98
– MINI Maintenance System 159
Microfilter/activated-charcoal filter
– MINI Maintenance
System 159
Microphone for telephone 14
MINI Internet page 4
MINI Maintenance System 159
Mirror dimming feature 50
Mirrors 49
– exterior mirrors 49
– heating 50
– interior rearview mirror 50
Mobile phone
– adjusting volume 133
– connecting, refer to Mobile phone, pairing 130
– installation location, refer to
Center armrest 100
– pairing 130
– refer to Telephone 100
– What to do if…. 132
Mobility Kit 171
Modifications, technical, refer
to For your own safety 4
Monitoring syst em for tire
pressures, refer to Flat Tire
Monitor 80
MP3 121
Multifunctional steering
wheel, refer to Buttons on
the steering wheel 11Multifunction switch
– refer to Turn signals/
headlamp flasher 60
– refer to Wiper system 61
Music tracks
– playing a track 122
– random order 121
N
Neck support, refer to Head
restraints 47
Nets, refer to Storage
compartments 100
New tires 153
Number of cylinders, refer to
Engine data 196
Number of safety belts 45
Nylon rope, refer to Tow
rope 180
O
OBD socket, refer to Socket for
On-Board Diagnosis 160
Octane ratings, refer to Fuel specifications 141
Odometer 66
Oil, refer to Engine oil 156
Oil consumption 156
Oil level 156
Oil types 157
Old batteries, refer to
Disposal 176
Opening and closing
– Comfort Access 31
– from inside 27
– from outside 23
– using the door lock 26
– using the remote control 24
Opening and unlocking
– from inside 27
Outlets
– refer to Air vents 94
– refer to Ventilation 98
Output, refer to Engine data 196 Outside-air mode
– automatic climate control
97
Overheated engine, refer to Coolant temperature 158
P
Paintwork, care163
Park Distance Control PDC 75
Parking
– vehicle 56
Parking aid, refer to Park Distance Control PDC 75
Parking brake 57
Parking lamps, replacing bulb 168
Parking lamps/low beams 88
Parts and accessories, see Vehicle equipment 4
Pathway lighting 89
PDC
– volume 116
Personal Profile 22
Phone numbers
– dialing 134
Plastic parts, care 164
Playing a track, scan
– CD 122
Pollen
– refer to Microfilter/activated- charcoal filter for automatic
climate control 98
– refer to Microfilter for air
conditioner 96
Power convertible top 34
Power failure 176
Power windows 33
Power windows, refer to Windows 33
Pressure, tires 143
Pressure moni toring, tires80
– Flat Tire Monitor 80
Pressure monitori ng of tires,
refer to Tire Pressure Monitor
TPM 82
PTY 119
Puncture
– Flat Tire Monitor 80
Online Edition for Part no. 01 40 2 914 786 - \251 07/12 BMW AG
Page 215 of 218
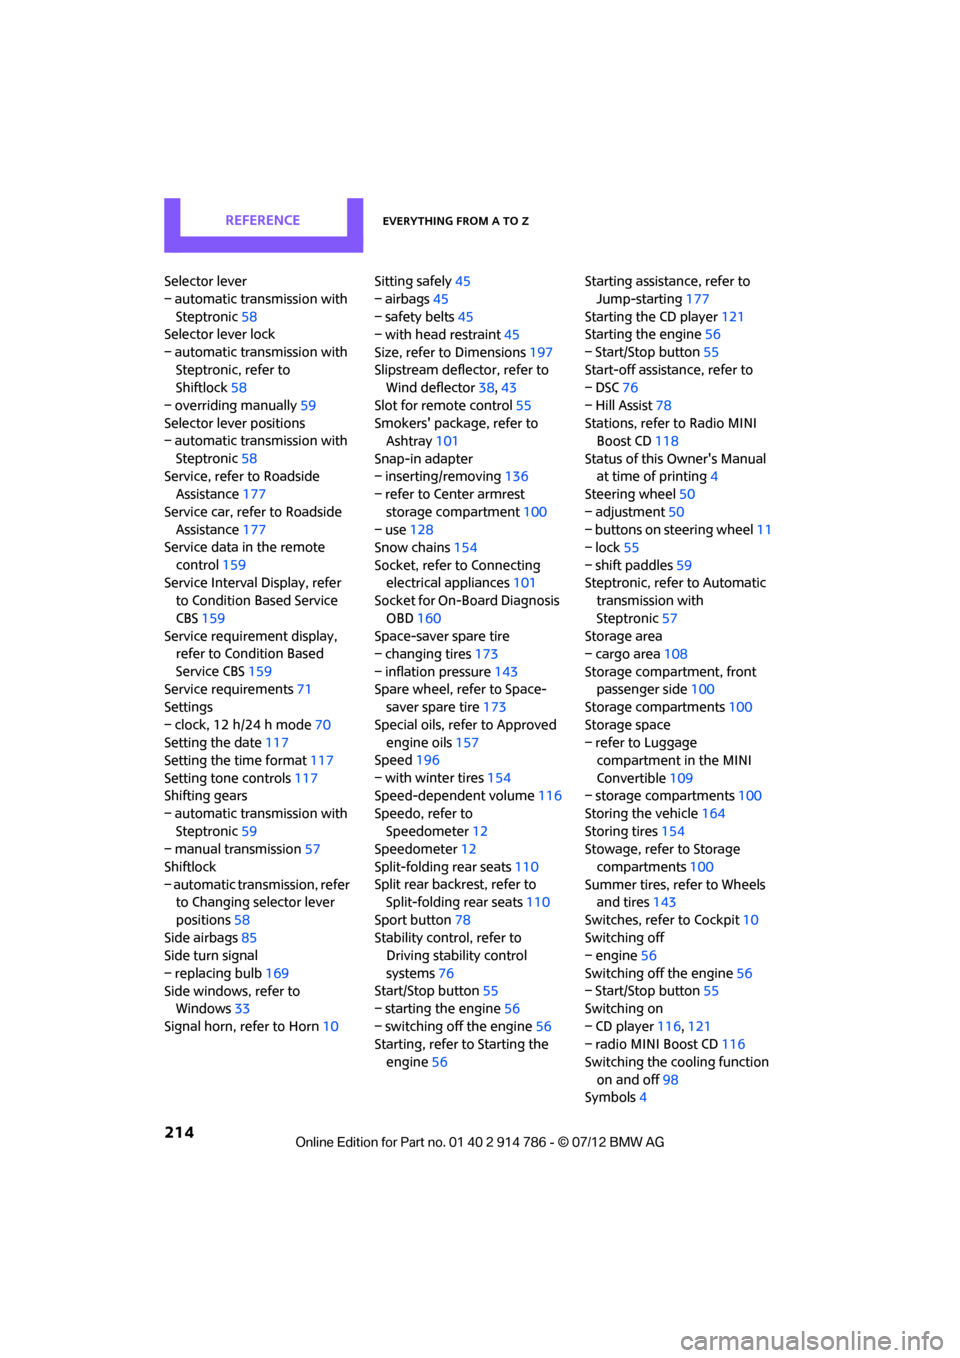
REFERENCEEverything from A to Z
214
Selector lever
– automatic transmission with Steptronic 58
Selector lever lock
– automatic transmission with Steptronic, refer to
Shiftlock 58
– overriding manually 59
Selector lever positions
– automatic transmission with
Steptronic 58
Service, refer to Roadside Assistance 177
Service car, refer to Roadside Assistance 177
Service data in the remote
control 159
Service Interval Display, refer to Condition Based Service
CBS 159
Service requirement display, refer to Condition Based
Service CBS 159
Service requirements 71
Settings
– clock, 12 h/24 h mode 70
Setting the date 117
Setting the time format 117
Setting tone controls 117
Shifting gears
– automatic transmission with Steptronic 59
– manual transmission 57
Shiftlock
– automatic transmission, refer to Changing selector lever
positions 58
Side airbags 85
Side turn signal
– replacing bulb 169
Side windows, refer to Windows 33
Signal horn, refer to Horn 10Sitting safely
45
– airbags 45
– safety belts 45
– with head restraint 45
Size, refer to Dimensions 197
Slipstream deflec tor, refer to
Wind deflector 38,43
Slot for remote control 55
Smokers' package, refer to Ashtray 101
Snap-in adapter
– inserting/removing 136
– refer to Center armrest
storage compartment 100
– use 128
Snow chains 154
Socket, refer to Connecting electrical appliances 101
Socket for On-Board Diagnosis
OBD 160
Space-saver spare tire
– changing tires 173
– inflation pressure 143
Spare wh
eel, refer to Space-
saver spare tire 173
Special oils, refer to Approved engine oils 157
Speed 196
– with winter tires 154
Speed-dependent volume 116
Speedo, refer to Speedometer 12
Speedometer 12
Split-folding rear seats 110
Split rear backrest, refer to Split-folding rear seats 110
Sport button 78
Stability contro l, refer to
Driving stability control
systems 76
Start/Stop button 55
– starting the engine 56
– switching off the engine 56
Starting, refer to Starting the engine 56 Starting assistance, refer to
Jump-starting 177
Starting the CD player 121
Starting the engine 56
– Start/Stop button 55
Start-off assistance, refer to
– DSC 76
– Hill Assist 78
Stations, refer to Radio MINI
Boost CD 118
Status of this Owner's Manual at time of printing 4
Steering wheel 50
– adjustment 50
– buttons on steering wheel 11
– lock 55
– shift paddles 59
Steptronic, refer to Automatic transmission with
Steptronic 57
Storage area
– cargo area 108
Storage compartment, front passenger side 100
Storage compartments 100
Storage space
– refer to Luggage compartment in the MINI
Convertible 109
– storage compartments 100
Storing the vehicle 164
Storing tires 154
Stowage, refer to Storage
compartments 100
Summer tires, refer to Wheels and tires 143
Switches, refer to Cockpit 10
Switching off
– engine 56
Switching off
the engine56
– Start/Stop button 55
Switching on
– CD player 116,121
– radio MINI Boost CD 116
Switching the cooling function
on and off 98
Symbols 4
Online Edition for Part no. 01 40 2 914 786 - \251 07/12 BMW AG