heating MINI COUPE ROADSTER CONVERTIBLE 2012 Owners Manual
[x] Cancel search | Manufacturer: MINI, Model Year: 2012, Model line: COUPE ROADSTER CONVERTIBLE, Model: MINI COUPE ROADSTER CONVERTIBLE 2012Pages: 283, PDF Size: 9.38 MB
Page 16 of 283

CockpitAT A GLANCE
15
5Switches in the center console 6
USB audio interface 160
7 Buttons on the center console
8 Changing to a differen t menu on the Control
Display
9 MINI joystick 17
Move in four directions, turn or press
10 Accessing the main me nu on the Control
Display 18
Air distribution to the footwell
Automatic air distribution and flow
rate
Maximum cooling
or Cooling function
Defrosting windows
Rear window defroster
Windshield heating
Air flow rate
Seat heating
53
Power windows 38
MINI Convertible: central power
window unit 39
Rear fog lamp 98
Front fog lamps 98
Central locking system, inside 32
Sport button85
Driving stability control systems
Dynamic Stability Control DSC 83
Dynamic Traction Control DTC 84
00320051004F004C00510048000300280047004C0057004C005200510003
Page 34 of 283
Opening and closingCONTROLS
33
Automatic locking
You can also set the situations in which the car
locks. The setting is stored for the remote
control in use.
1. "Settings"
2. "Door locks"
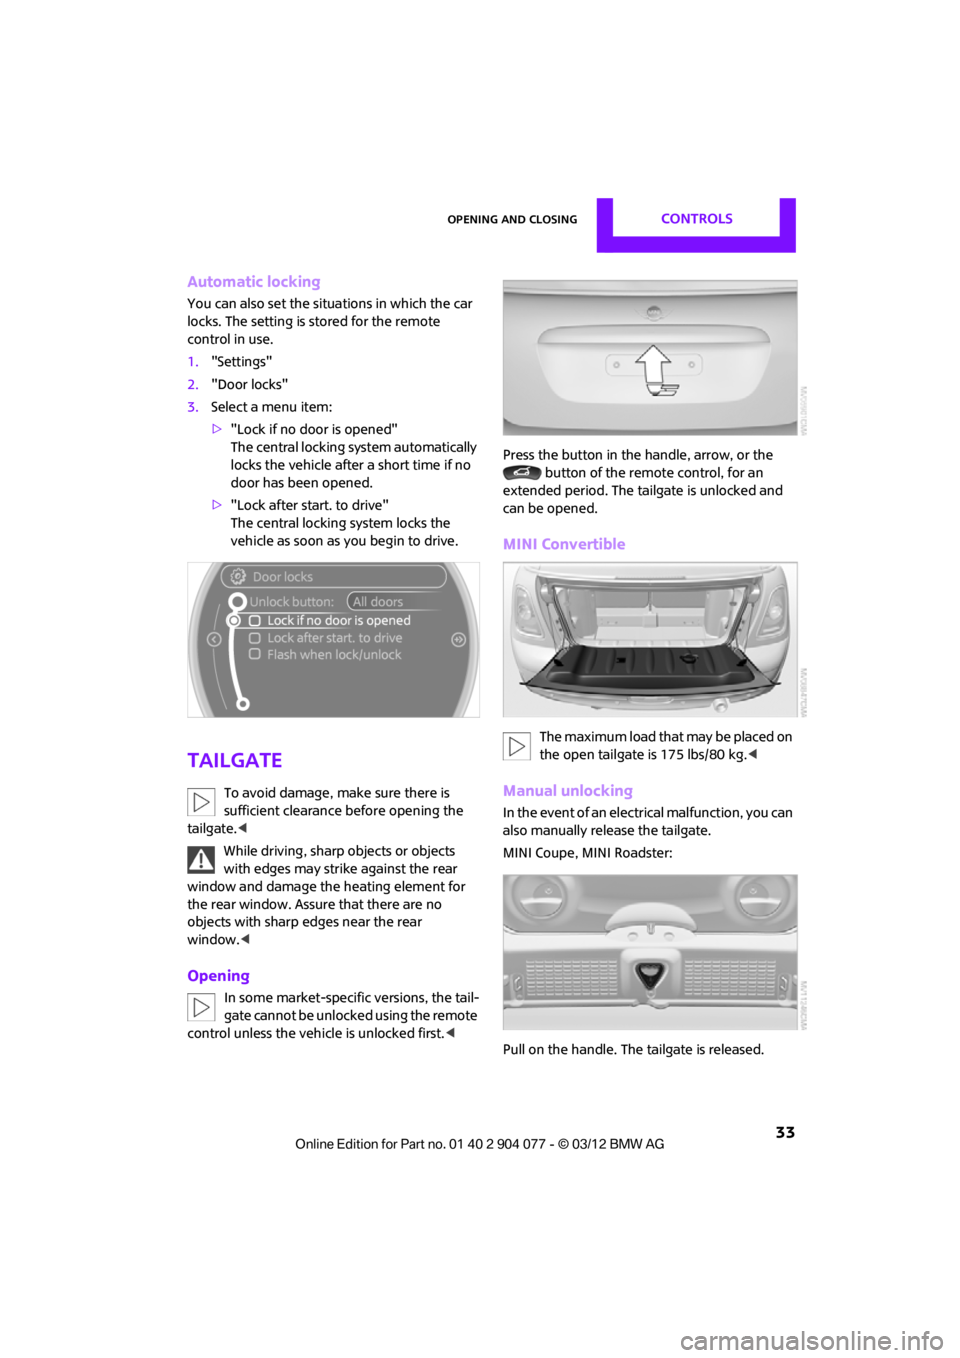
3. Select a menu item:
>"Lock if no door is opened"
The central locking system automatically
locks the vehicle after a short time if no
door has been opened.
> "Lock after start. to drive"
The central locking system locks the
vehicle as soon as you begin to drive.
Tailgate
To avoid damage, make sure there is
sufficient clearance before opening the
tailgate. <
While driving, sharp objects or objects
with edges may strike against the rear
window and damage the heating element for
the rear window. Assure that there are no
objects with sharp edges near the rear
window. <
Opening
In some market-specific versions, the tail-
gate cannot be unlocked using the remote
control unless the vehicle is unlocked first.
extended period. The tailgate is unlocked and
can be opened.
MINI Convertible
The maximum load that may be placed on
the open tailgate is 175 lbs/80 kg. <
Manual unlocking
In the event of an electrical malfunction, you can
also manually release the tailgate.
MINI Coupe, MINI Roadster:
Pull on the handle. The tailgate is released.
00320051004F004C00510048000300280047004C0057004C005200510003
Page 54 of 283
AdjustmentsCONTROLS
53
Removing
Only remove a head restraint if no one will be
sitting on the seat in question.Reinstall the head restraint before
transporting passengers, as otherwise the
head restraint cannot provide its protective
function. <
Front
1.Pull up as far as it will go.
2. Fold the backrest forward slightly.
3. Press button 1 and pull the head restraint
out as far as it will go.
4. Fold back the backrest.
MINI Convertible: rear
1.Pull up as far as it will go.
2. Press button 1 and pull the head restraint
out completely.
Seat heating
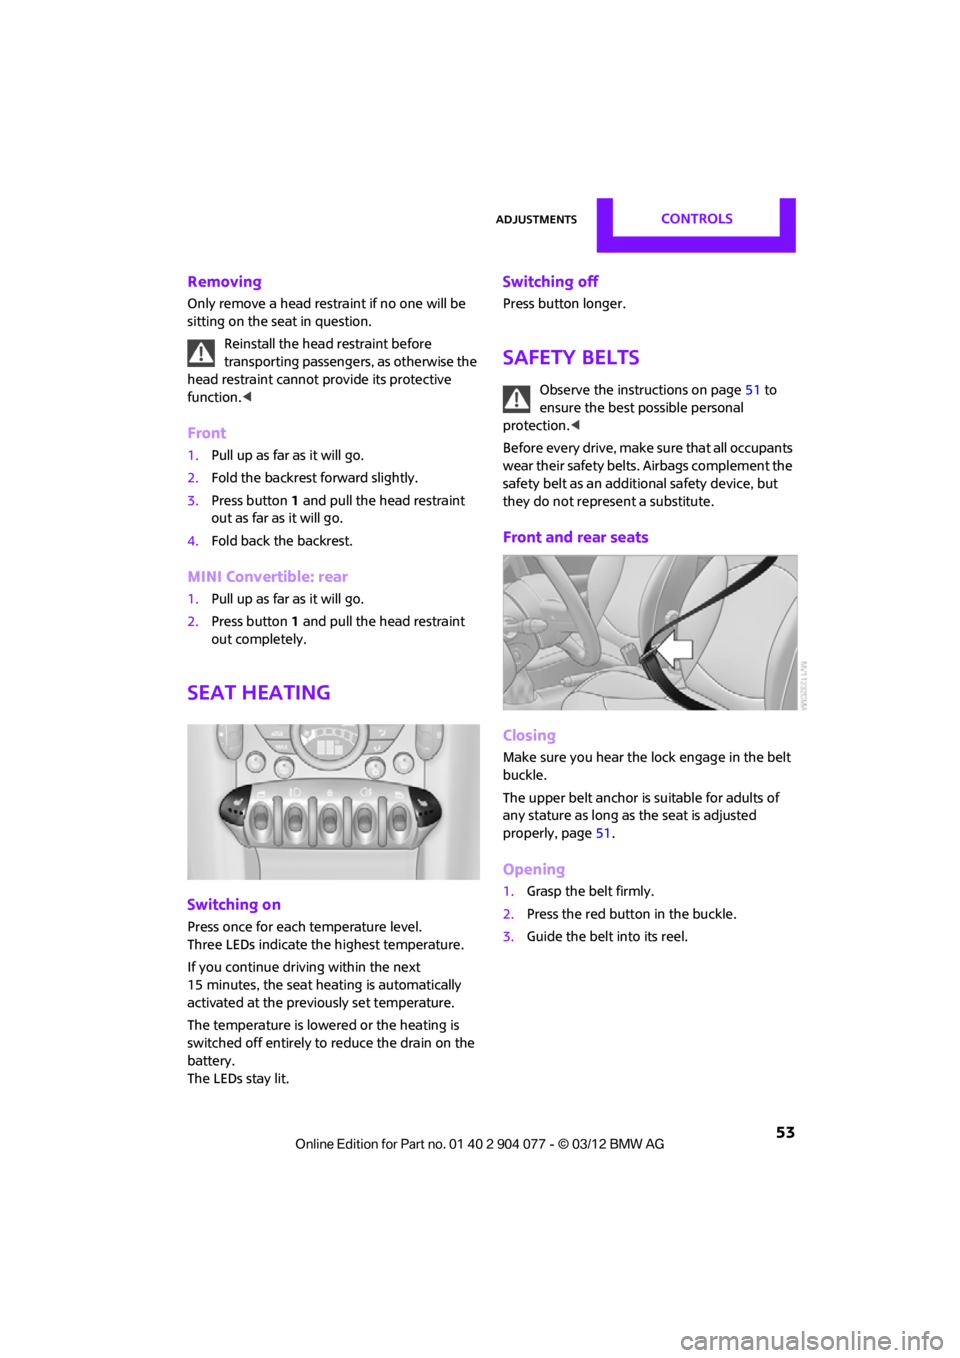
Switching on
Press once for each temperature level.
Three LEDs indicate the highest temperature.
If you continue driving within the next
15 minutes, the seat heating is automatically
activated at the previously set temperature.
The temperature is lowered or the heating is
switched off entirely to reduce the drain on the
battery.
The LEDs stay lit.
Switching off
Press button longer.
Safety belts
Observe the instructions on page 51 to
ensure the best possible personal
protection.<
Before every drive, make sure that all occupants
wear their safety belts. Airbags complement the
safety belt as an additi onal safety device, but
they do not represent a substitute.
Front and rear seats
Closing
Make sure you hear the lock engage in the belt
buckle.
The upper belt anchor is suitable for adults of
any stature as long as the seat is adjusted
properly, page 51.
Opening
1.Grasp the belt firmly.
2. Press the red button in the buckle.
3. Guide the belt into its reel.
00320051004F004C00510048000300280047004C0057004C005200510003
Page 55 of 283
CONTROLSAdjustments
54
MINI Convertible: rear belt guide
Please ensure that the belt guide loop,
arrow, is locked when putting on the rear
safety belts.<
Safety Belt Reminder
Front seats
The indicator lamps come on and an
acoustic signal sounds. In addition, a
message appears on the Control Dis-
play. Check whether the safety belt has
been fastened correctly. The Safety Belt
Reminder is issued when the driver's safety belt
has not been fastened. The Safety Belt Reminder
is also activated at ro ad speeds above approx.
5 mph or 8 km/h if the front passenger's safety
belt has not been fastened , if objects are placed
on the front passenger seat, or if driver or front
passenger unfasten their safety belts.
Damage to safety belts
If the safety belts ar e damaged or stressed
in an accident: have th e safety belt system
and its seat-belt tensioners replaced and the
belt anchors checked. Have this work carried out
only by a MINI dealer or by a workshop that has
specially trained personnel working in accor-
dance with the specifications of the MINI manu-
facturer; otherwise, correct operation of these
safety systems is not ensured.<
Mirrors
Exterior mirrors
The front passenger's mirror is more con-
vex than the driver's mirror. The objects
seen in the mirror are closer than they appear.
Do not gauge your distance from traffic behind
you on the basis of what you see in the mirror;
otherwise, there is an increased risk of an
accident. <
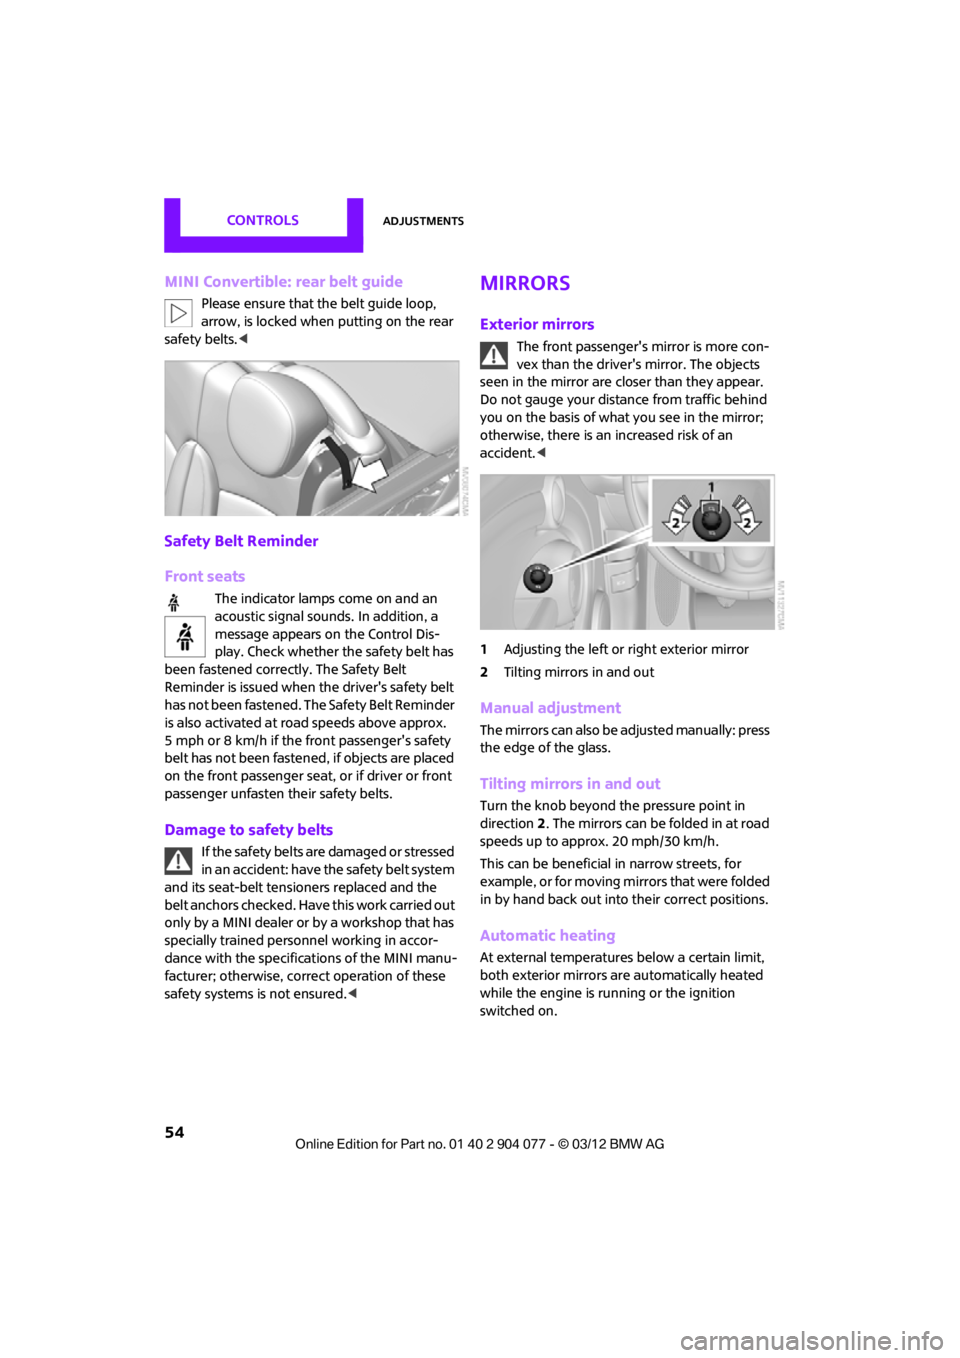
1 Adjusting the left or right exterior mirror
2 Tilting mirrors in and out
Manual adjustment
The mirrors can also be adjusted manually: press
the edge of the glass.
Tilting mirrors in and out
Turn the knob beyond the pressure point in
direction 2. The mirrors can be folded in at road
speeds up to approx. 20 mph/30 km/h.
This can be beneficial in narrow streets, for
example, or for moving mi rrors that were folded
in by hand back out into their correct positions.
Automatic heating
At external temperatures below a certain limit,
both exterior mirrors are automatically heated
while the engine is running or the ignition
switched on.
00320051004F004C00510048000300280047004C0057004C005200510003
Page 62 of 283
DrivingCONTROLS
61
Radio readiness and ignition off
All indicator and warning lamps in the displays
go out.
The ignition switches off automatically if the
driver's door is opened. Pressing the Start/Stop
button again switches the ignition back on.
The ignition is not switched off in situations such
as the following:
>The clutch or brake is depressed
> The low beams are switched on
Starting the engine
Do not allow the engine to run in enclosed
areas; otherwise, inhalation of the noxious
exhaust gases can lead to loss of consciousness
and death. Exhaust gases contain carbon mon-
oxide, an odorless and colorless, but highly toxic
gas. Never leave an unattended vehicle with the
engine running; otherwise, such a vehicle repre-
sents a potential safety hazard.
Before leaving the car while the engine is run-
ning, place the transmission in neutral or move
the selector lever to position P and forcefully
apply the parking brake to prevent the car from
moving. <
Avoid frequent starting in quick succes-
sion or repeated start attempts in which
the engine does not start. Otherwise, the fuel
is not burned or inadequately burned and there
is a danger of overheating and damaging the
catalytic converter. <
Do not let the engine warm up with the vehicle
at a standstill. Move of f immediately at a moder-
ate engine speed.
When starting the engine, do not depress the
accelerator pedal.
Manual transmission
Key in ignition lock or inside vehicle with
Comfort Access, refer to page 36.
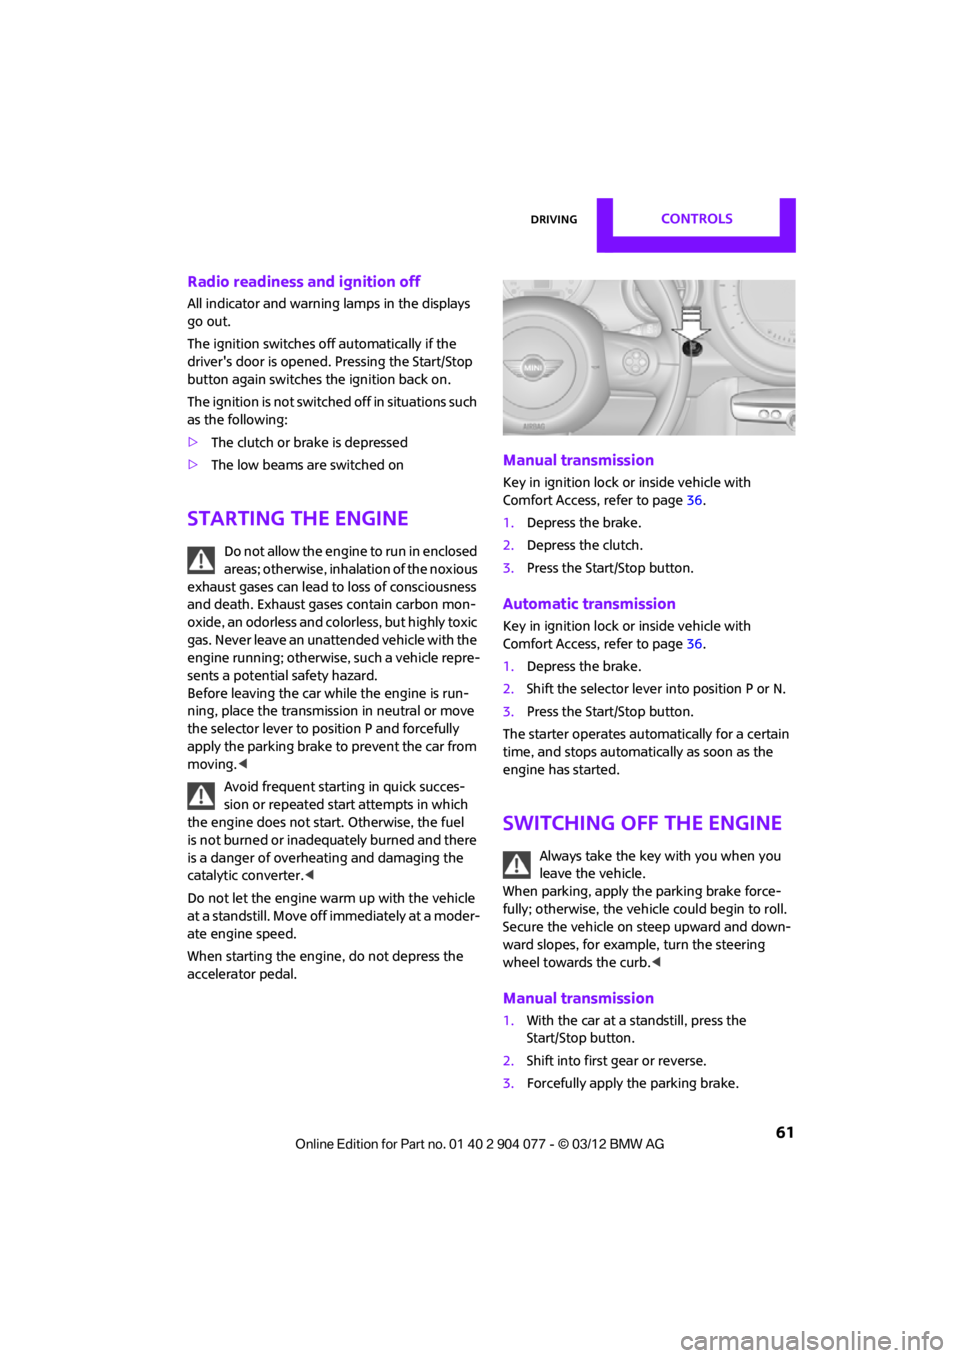
1. Depress the brake.
2. Depress the clutch.
3. Press the Start/Stop button.
Automatic transmission
Key in ignition lock or inside vehicle with
Comfort Access, refer to page 36.
1. Depress the brake.
2. Shift the selector lever into position P or N.
3. Press the Start/Stop button.
The starter operates auto matically for a certain
time, and stops automatically as soon as the
engine has started.
Switching off the engine
Always take the key with you when you
leave the vehicle.
When parking, apply the parking brake force-
fully; otherwise, the vehicle could begin to roll.
Secure the vehicle on steep upward and down-
ward slopes, for example, turn the steering
wheel towards the curb. <
Manual transmission
1.With the car at a standstill, press the
Start/Stop button.
2. Shift into first gear or reverse.
3. Forcefully apply the parking brake.
00320051004F004C00510048000300280047004C0057004C005200510003
Page 103 of 283
CONTROLSClimate
102
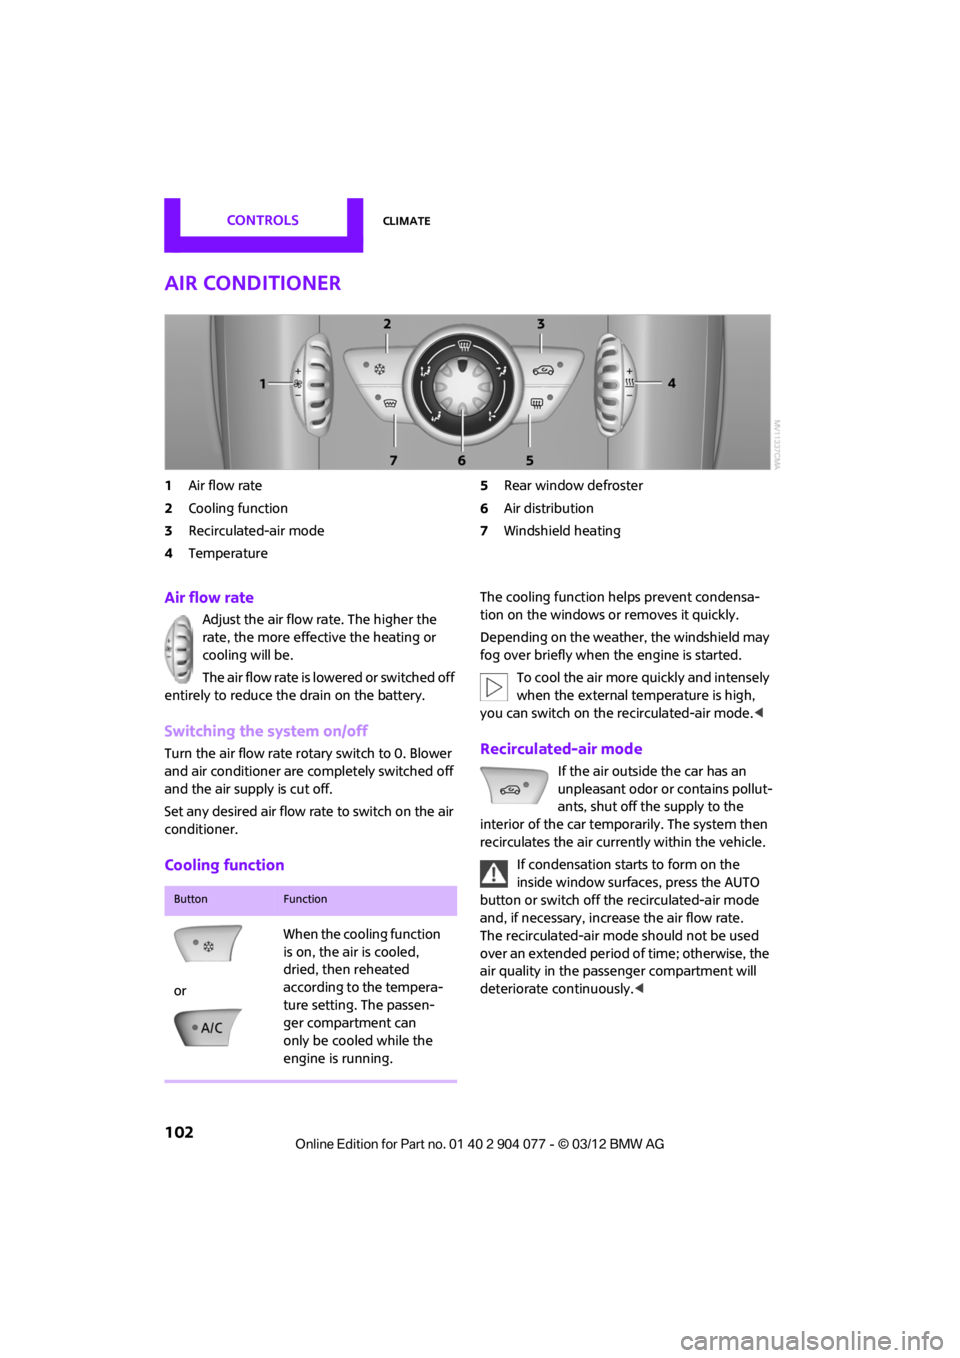
Air conditioner
1Air flow rate
2 Cooling function
3 Recirculated-air mode
4 Temperature 5
Rear window defroster
6 Air distribution
7 Windshield heating
Air flow rate
Adjust the air flow rate. The higher the
rate, the more effective the heating or
cooling will be.
The air flow rate is lowered or switched off
entirely to reduce the drain on the battery.
Switching the system on/off
Turn the air flow rate rota ry switch to 0. Blower
and air conditioner are co mpletely switched off
and the air supply is cut off.
Set any desired air flow rate to switch on the air
conditioner.
Cooling function
The cooling function helps prevent condensa-
tion on the windows or removes it quickly.
Depending on the weather, the windshield may
fog over briefly when the engine is started.
To cool the air more quickly and intensely
when the external temperature is high,
you can switch on the recirculated-air mode.<
Recirculated-air mode
If the air outside the car has an
unpleasant odor or contains pollut-
ants, shut off the supply to the
interior of the car temporarily. The system then
recirculates the air currently within the vehicle.
If condensation starts to form on the
inside window surfac es, press the AUTO
button or switch off the recirculated-air mode
and, if necessary, increa se the air flow rate.
The recirculated-air mode should not be used
over an extended period of time; otherwise, the
air quality in the passenger compartment will
deteriorate continuously.<
ButtonFunction
or When the cooling function
is on, the air is cooled,
dried, then reheated
according to the tempera-
ture setting. The passen-
ger compartment can
only be cooled while the
engine is running.
00320051004F004C00510048000300280047004C0057004C005200510003
Page 104 of 283
ClimateCONTROLS
103
Temperature
Turn upward, red, to increase the
temperature.
Turn downward, blue, to decrease the
temperature.
Rear window defroster
The defroster is switched off
automatically after a certain time.
The rear window heating is lowered
or switched off entirely to reduce the drain on
the battery.
Air distribution
Direct the flow of air to the
windows , to the upper body
area or to the footwell .
Intermediate settings are possible.
Windshield heating
The windshield heating is switched
off automatically after a short time.
The front window heating is low-
ered or switched off entirely to reduce the drain
on the battery.
Defrosting windows and removing
condensation
1. Set air flow rate to the maximum level.
2. Set air distributi on to position .
Condensation is removed from the windows
more quickly when the cooling function is
also activated.
3. Set to the highest temperature, red.
4. Deactivate recirculated-air mode.
5. Turn on windshield heating if necessary.
6. Turn on rear window defroster if necessary.
Microfilter
The microfilter captures dust and pollen. The
microfilter is changed by your MINI dealer
during routine maintenance work.
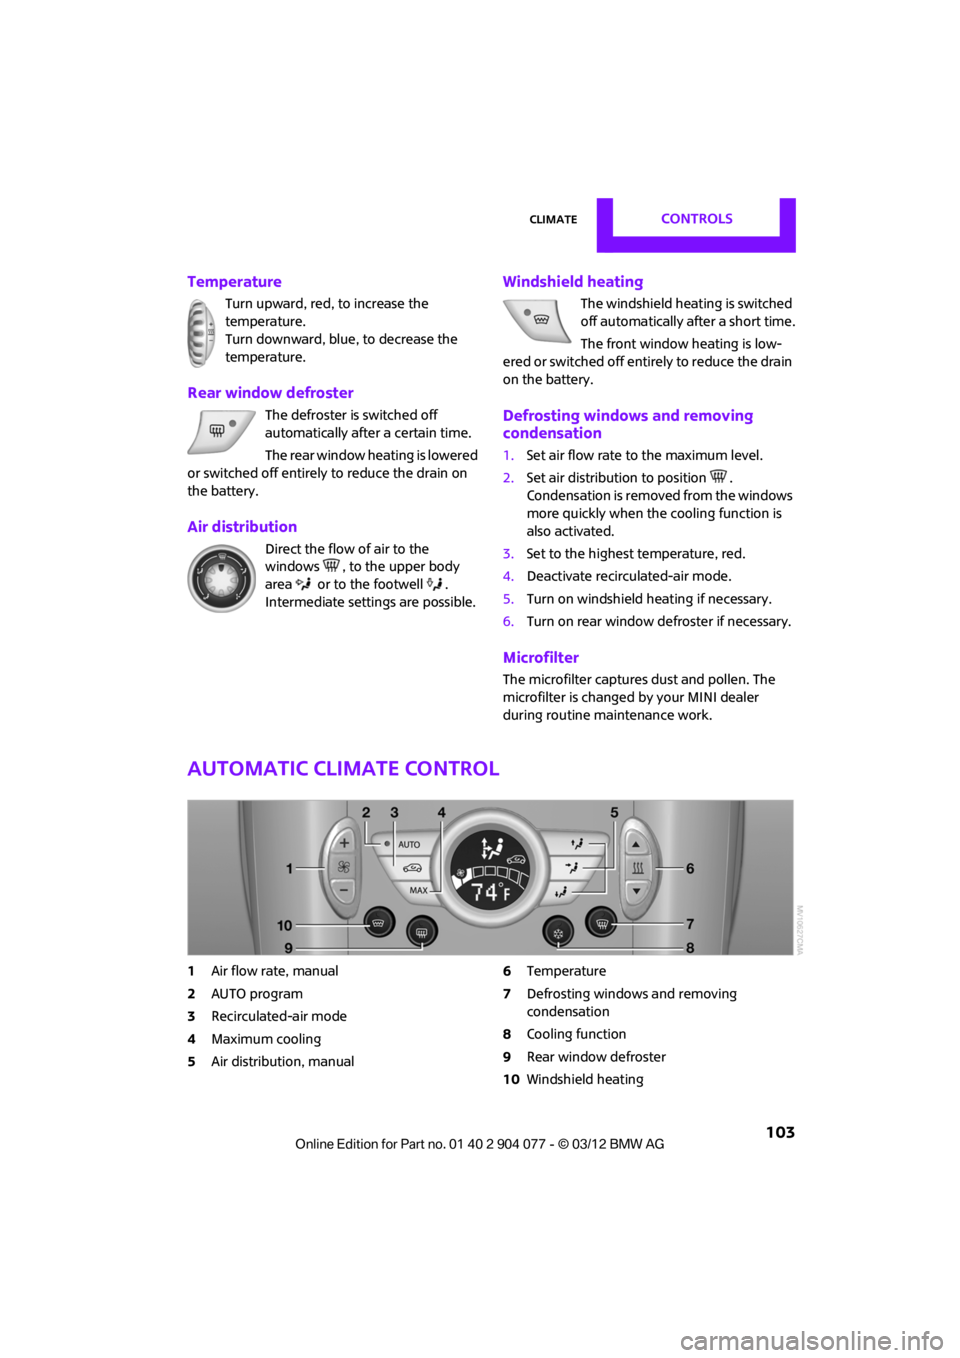
Automatic climate control
1 Air flow rate, manual
2 AUTO program
3 Recirculated-air mode
4 Maximum cooling
5 Air distribution, manual 6
Temperature
7 Defrosting windows and removing
condensation
8 Cooling function
9 Rear window defroster
10 Windshield heating
00320051004F004C00510048000300280047004C0057004C005200510003
Page 106 of 283
ClimateCONTROLS
105
Temperature
Set the desired temperature individually.
The automatic climate control achieves
this temperature as quickly as possible
regardless of the season, using maximum
cooling or heating power if necessary, and then
maintains it.
If you switch between different tempera-
ture settings in quic k succession, the auto-
matic climate control do es not have enough
time to achieve the set temperature. <
Rear window defroster
The defroster is switched off
automatically after a certain time.
Defrosting windows and removing
condensation
Quickly removes ice and condensa-
tion from the windshield and front
side windows.
For this purpose, also switch on the
cooling function.
The windshield heatin g is switched on
automatically.
Windshield heating
The windshield heating is switched
off automatically after a certain
time.
Cooling function
The cooling function helps prevent condensa-
tion on the windows or removes it quickly.
Depending on the weather, the windshield may
fog over briefly when the engine is started. The
recirculated-air mode may be switched on auto-
matically.
When the AUTO button is pressed, the cooling
function switches on automatically.
Microfilter/activated-charcoal filter
The microfilter captures dust and pollen. The
activated-charcoal filter provides additional pro-
tection by filtering gase ous pollutants from the
outside air. Your MINI dealer replaces this com-
bined filter as a standard part of your scheduled
maintenance.
You can call up further information in the service
requirements display, page 75.
ButtonFunction
or When the cooling function
is on, the air is cooled,
dried, then reheated
according to the tempera-
ture setting. The passen-
ger compartment can
only be cooled while the
engine is running.
00320051004F004C00510048000300280047004C0057004C005200510003
Page 115 of 283
DRIVING TIPSThings to remember when driving
114
Things to remember when driving
Vehicle equipment
In this chapter, all production, country, and
optional equipment that is offered in the model
range is described. Equipment is also described
that is not available because of, for example,
selected options or coun try version. This also
applies to safety relate d functions and systems.
Break-in period
Moving parts need breaking-in time to adjust to
each other. Please follow the instructions below
in order to achieve the optimal service life and
economy of operation for your vehicle.
Engine and differential
Always obey all official speed limits.
Up to 1,200 miles/2,000 km
Drive at varying engine and road speeds, but do
not exceed the following:
> Gasoline engine
4,500 rpm or 100 mph/160 km/h
Avoid full-throttle operation and use of the
transmission's kickdown mode.
After driving 1,200 miles/2,000 km
Engine and vehicle speeds can be gradually
increased.
Tires
Due to technical factors associated with their
manufacture, tires do not achieve their full
traction potential until af ter an initial break-in
period. Therefore, drive cautiously during the
first 200 miles/300 km.
Brake system
Brakes require an initial break-in period of
approx. 300 miles/500 km to achieve optimized
contact and wear patterns between brake pads
and rotors. Drive cautiously during this break-in
period.
Clutch
The function of the clutch reaches its optimal
level only after a distan ce driven of approx.
300 miles/500 km. During this break-in period,
engage the clutch gently.
Following part replacement
The same break-in procedures should be
observed if any of the components mentioned
above have to be renewed in the course of the
vehicle's operating life.
General driving notes
Close the tailgate
Only drive with the t ailgate closed. Failure
to do so may endanger passengers or
other road users or may damage the vehicle in
the event of an accident or a braking and eva-
sive maneuver. In addi tion, exhaust gas may
flow into the passenger compartment. <
If special circumstances make it absolutely
necessary to drive with the tailgate open:
1. Coupe: close all windows.
2. Switch off the recirculated-air mode and
switch the airflow contro l of the heating, air
conditioner, or automa tic climate control to
high, refer to page 102 or104.
00320051004F004C00510048000300280047004C0057004C005200510003
Page 117 of 283
DRIVING TIPSThings to remember when driving
116
Never drive with the clutch held down,
with the transmission in neutral or with
the engine switched off; otherwise, engine brak-
ing action will not be present or there will be no
power assistance to the brakes or steering.
Never allow floor mats, carpets or any other
objects to protrude into the area around the
pedals; otherwise, pedal function could be
impaired. <
Corrosion on brake rotors
When the vehicle is driven only occasionally,
during extended periods when the vehicle is not
used at all, and in op erating conditions where
brake applications are less frequent, there is an
increased tendency for corrosion to form on
rotors, while contaminants accumulate on the
brake pads. This occurs because the minimum
pressure which must be exerted by the pads
during brake applications to clean the rotors is
not reached.
Should corrosion form on the brake rotors, the
brakes will tend to respond with a pulsating
effect that even extended application will fail to
cure.
When the vehicle is parked
Condensation forms while the automatic climate
control is in operation, and then exits under the
vehicle. Traces of condensed water under the
vehicle are therefore normal.
In the MINI Cooper S, the coolant pump may
continue to run for some time after the engine is
switched off. This will generate noise in the
engine compartment.
Cargo loading
To avoid loading the tires beyond their
approved carrying ca pacity, never over-
load the vehicle. Overloading can lead to over-
heating and increases the rate at which damage
develops inside the tires. The ultimate result can
assume the form of a sudden blowout.
<
MINI Coupe: cargo area cover
Do not place any objects on the cover;
otherwise, they could endanger the car's
occupants, e.g. in the case of braking or sudden
swerving, or they may damage the cover. <
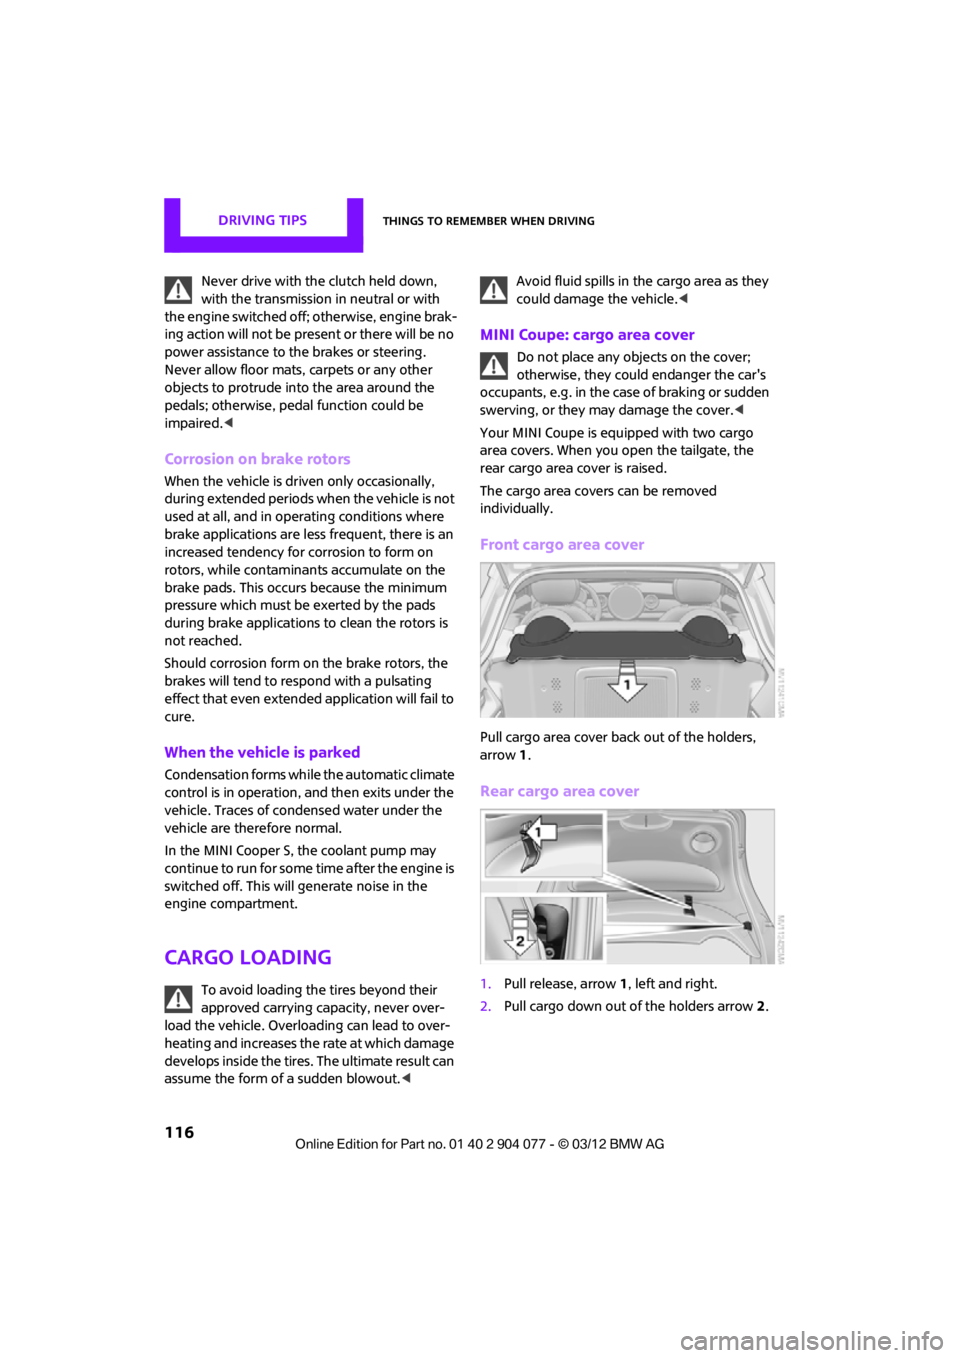
Your MINI Coupe is equipped with two cargo
area covers. When you open the tailgate, the
rear cargo area cover is raised.
The cargo area covers can be removed
individually.
Front cargo area cover
Pull cargo area cover back out of the holders,
arrow 1.
Rear cargo area cover
1. Pull release, arrow 1, left and right.
2. Pull cargo down out of the holders arrow 2.
00320051004F004C00510048000300280047004C0057004C005200510003