turn signal MINI Hardtop 2 Door 2002 Owner's Manual
[x] Cancel search | Manufacturer: MINI, Model Year: 2002, Model line: Hardtop 2 Door, Model: MINI Hardtop 2 Door 2002Pages: 140, PDF Size: 1.63 MB
Page 14 of 140
12
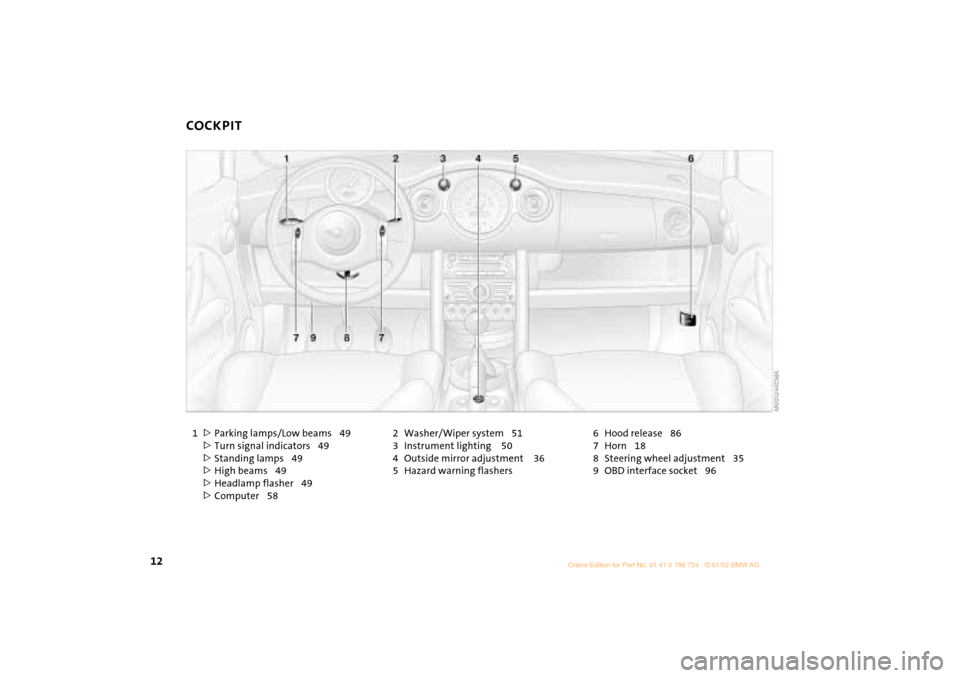
COCKPIT
1
>
Parking lamps/Low beams 49
>
Turn signal indicators 49
>
Standing lamps 49
>
High beams 49
>
Headlamp flasher 49
>
Computer 582 Washer/Wiper system 51
3 Instrument lighting 50
4 Outside mirror adjustment 36
5 Hazard warning flashers6 Hood release 86
7 Horn 18
8 Steering wheel adjustment 35
9 OBD interface socket 96
Page 19 of 140
17
OVERVIEW REPAIRS OPERATION CONTROLS DATA INDEX
INDICATOR AND WARNING LAMPS
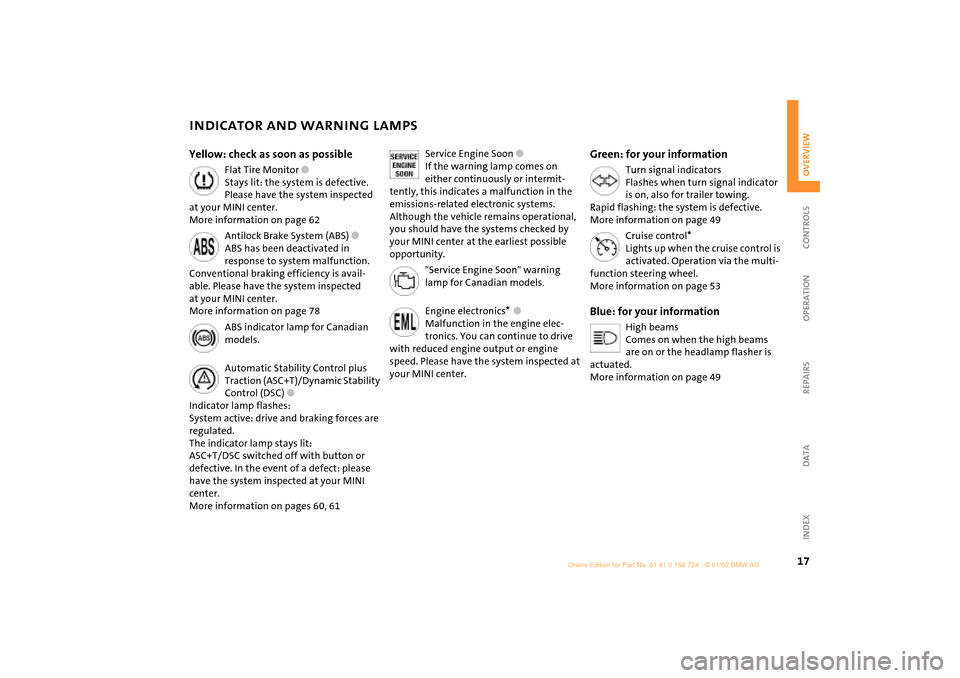
Yellow: check as soon as possible
Flat Tire Monitor
l
Stays lit: the system is defective.
Please have the system inspected
at your MINI center.
More information on page 62
Antilock Brake System (ABS)
l
ABS has been deactivated in
response to system malfunction.
Conventional braking efficiency is avail-
able. Please have the system inspected
at your MINI center.
More information on page 78
ABS indicator lamp for Canadian
models.
Automatic Stability Control plus
Traction (ASC+T)/Dynamic Stability
Control (DSC)
l
Indicator lamp flashes:
System active: drive and braking forces are
regulated.
The indicator lamp stays lit:
ASC+T/DSC switched off with button or
defective. In the event of a defect: please
have the system inspected at your MINI
center.
More information on pages 60, 61
Service Engine Soon
l
If the warning lamp comes on
either continuously or intermit-
tently, this indicates a malfunction in the
emissions-related electronic systems.
Although the vehicle remains operational,
you should have the systems checked by
your MINI center at the earliest possible
opportunity.
"Service Engine Soon" warning
lamp for Canadian models
.
Engine electronics
*
l
Malfunction in the engine elec-
tronics. You can continue to drive
with reduced engine output or engine
speed. Please have the system inspected at
your MINI center.
Green: for your information
Turn signal indicators
Flashes when turn signal indicator
is on, also for trailer towing.
Rapid flashing: the system is defective.
More information on page 49
Cruise control
*
Lights up when the cruise control is
activated. Operation via the multi-
function steering wheel.
More information on page 53
Blue: for your information
High beams
Comes on when the high beams
are on or the headlamp flasher is
actuated.
More information on page 49
Page 51 of 140
49
OVERVIEW REPAIRS OPERATIONCONTROLS DATA INDEX
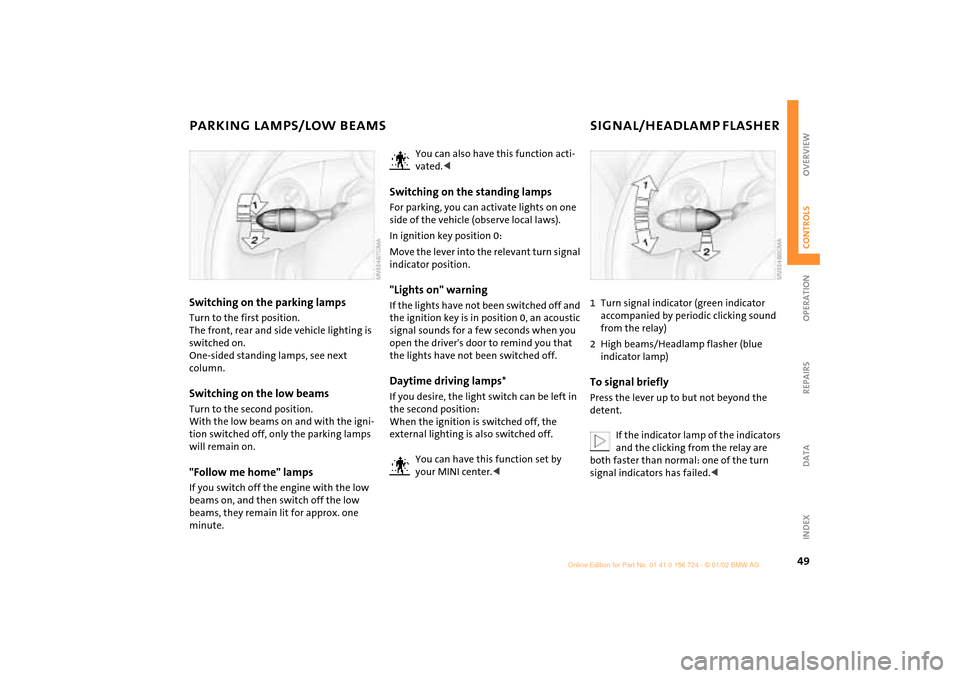
PARKING LAMPS/LOW BEAMS SIGNAL/HEADLAMP FLASHER Switching on the parking lampsTurn to the first position.
The front, rear and side vehicle lighting is
switched on.
One-sided standing lamps, see next
column.Switching on the low beamsTurn to the second position.
With the low beams on and with the igni-
tion switched off, only the parking lamps
will remain on."Follow me home" lampsIf you switch off the engine with the low
beams on, and then switch off the low
beams, they remain lit for approx. one
minute.
You can also have this function acti-
vated.<
Switching on the standing lampsFor parking, you can activate lights on one
side of the vehicle (observe local laws).
In ignition key position 0:
Move the lever into the relevant turn signal
indicator position."Lights on" warningIf the lights have not been switched off and
the ignition key is in position 0, an acoustic
signal sounds for a few seconds when you
open the driver's door to remind you that
the lights have not been switched off.Daytime driving lamps*If you desire, the light switch can be left in
the second position:
When the ignition is switched off, the
external lighting is also switched off.
You can have this function set by
your MINI center.<
1 Turn signal indicator (green indicator
accompanied by periodic clicking sound
from the relay)
2 High beams/Headlamp flasher (blue
indicator lamp)To signal brieflyPress the lever up to but not beyond the
detent.
If the indicator lamp of the indicators
and the clicking from the relay are
both faster than normal: one of the turn
signal indicators has failed.<
Page 60 of 140

58
CLOCK COMPUTER
*
Settings
From ignition key position 1:
Left button: hours
Right button: minutes
Move forward in increments:
Press the button
or
Fast forward:
Press and hold the button
Changeover from 24-hour to 12-hour
mode:
Press both buttons at the same time for
approx. 5 seconds.
Mode selectionWith the ignition key in position 1 and
higher, you can use the button in the turn
signal indicator lever to retrieve informa-
tion from the computer for display in the
tachometer. By pressing the button briefly,
you can call up a new function for display.
The displays appear in the following order:
Outside temperature, cruising range,
average fuel consumption, average vehicle
speed.
Starting with ignition key position 1, the
last active setting is displayed.
If the vehicle is equipped with a navi-
gation system, see chapter covering
the computer in the navigation system
Owner's Manual.<
Page 61 of 140

59
OVERVIEW REPAIRS OPERATIONCONTROLS DATA INDEX
COMPUTER
*
Outside temperature
If the vehicle is equipped with a tacho-
meter, but not with a computer, the
temperature is always displayed.
You can display the exterior tempera-
ture and distance driven in other
units of measurement.
the remaining fuel in the tank.
Average speed Ð
Average fuel consumption Press the button in the turn signal indicator
lever for a longer period.
The average speed value/consumption
value on display is recalculated.
Any time spent when the vehicle is
stationary and the engine is switched off
is ignored for the calculation.
Page 104 of 140

102
LAMPS AND BULBSTurn signal indicators, front 21 Watt bulb
1. Open the hood
2. Reach into the opening for the turn
signal indicators from above
3. Apply gentle pressure to the bulb holder
while turning it to the left
4. Remove and replace the bulb.Parking lamps and standing lamps 5 Watt bulb
The parking lamps and standing lamps are
integrated in the lamp housing of the turn
signal indicator.
1. Turn the bulb holder to the left and pull
out
2. Remove and replace the bulb.
Side turn signal indicators5 Watt bulb
1. Press the bulb towards the rear of the
vehicle and remove
2. Remove and replace the bulb.Side marker lampsSide marker lamps in the wheelhouse
paneling of the bumper.
Please contact a MINI center in case of a
malfunction.
Fog lamps* H7 bulb, 55 Watts
Please contact a MINI center in case of a
malfunction.
Page 105 of 140

103
OVERVIEW REPAIRSOPERATION CONTROLS DATA INDEX
LAMPS AND BULBSTail lamps Rear lamp (3): 21/5 Watt bulb
Other bulbs: 21 Watts
1 Rear fog lamp (not active) red
2 Turn signal indicator yellow
3 Rear lamp red
4 Rear lamp/brake lamp red
To make this clear, the illustration shows a
dismantled tail lamp with the bulb holder
removed. All of the bulbs are integrated in
the bulb holder.
To reach the bulb holder, remove the cover
of the side trim panel in the luggage
compartment. Replacing bulbs1. Unplug the power supply
2. Release the bulb holder, see arrow, and
remove
3. Apply gentle pressure to the bulb while
turning it to the left
4. Remove and replace the bulb
5. Plug in the power supply receptacle
6. Press the bulb holder into position until
you hear it engage.
Backup lampAccess to the lamp via the rear or underside
of the bumper.
1. Press the clips together
2. Push the lamp out of the bumper
3. Apply gentle pressure to the bulb while
turning it to the left
4. Remove and replace the bulb.
Page 118 of 140

116
TOW-STARTING AND TOWINGTow-starting
On vehicles with Continuously Vari-
able automatic Transmission (CVT), it
is not permitted to start the engine by tow-
starting. The transmission could be
damaged.
For jump-starting, see page 113
.<
Only tow-start vehicles with a catalytic
converter when the engine is cold, other-
wise, unburned fuel in the catalytic
converter could catch fire. It is better to use
jumper cables.
1. Switch on the hazard warning flashers
(comply with national regulations)
2. Ignition key in position 2
3. Engage 3rd gear
4. Tow-start with the clutch pedal pressed
5. Slowly release the clutch
6. When the engine starts, press the clutch
pedal again
7. Switch off the hazard warning flashers.
Have the cause of the starting problems
rectified by your MINI center.
Towing
Only tow vehicles with Continuously
Variable automatic Transmission
(CVT) with the front wheels raised or on a
special transport vehicle, otherwise the
transmission can be damaged.<
1 Ignition key in position 1:
The brake lamps, turn signals, horn and
windshield wipers can be operated
2 Switch on the hazard warning flashers
(comply with national regulations).
If the electrical system has failed, place
some kind of warning on the towed vehicle,
e. g. a sign or warning triangle in the rear
window.
Ensure that if the electrical system
has failed the ignition key is in posi-
tion 1, otherwise the steering lock could
engage and make it impossible to steer the
vehicle.
When the engine is not running, there is no
power-assist. This means that greater
effort is required for braking and
steering.<
Towing with a commercial tow truck >Do not tow with sling-type equipment
>Use a wheel-lift or flatbed carrier
>Please comply with applicable towing
laws.
Never allow passengers to ride in a
towed vehicle for any reason.<
Page 130 of 140
EVERYTHING FROM A TO Z
128A
ABS (Antilock Brake
System) 16,
17,
78
Activated-charcoal filter 69
Adjusting
backrest 33
seats 31
steering wheel 35
thigh support 33
Air conditioner operation 65
automatic climate
control 68
Air conditioner system 64
Air distribution
air conditioner system 65
automatic climate
control 68,
69
Air pressure 80
Air recirculation 65,
68
Air supply
air conditioner system 65
automatic climate
control 69
Air vents 66,
69
Air, dry 65, 68
Airbags 16, 31,
37
All-season tires 85
Antenna 94 Antifreeze 91
Antilock Brake System
(ABS) 16,
17,
78
Aquaplaning 76
ASC+T (Automatic Stability
Control plus
Traction) 16, 17,
60
Ashtray 70
Automatic air distribution 68
Automatic air supply 68
Automatic car wash 94
Automatic cruise control 53
Automatic dimming of interior
rearview mirror 37
Automatic program, see
Automatic air
distribution 68
Automatic Stability Control
plus Traction
(ASC+T) 16,
17,
60
Average fuel consumption 59
Average speed 59
Axle loads 122
B
Backrest, adjusting 33
Backup lamps 45
bulb replacement 103
Bar, towing 115
Battery 111,
113,
114,
124
capacity 124
charge current 15
charging 111
maintenance 111
Battery changing
remote control 22
Battery, remote control 22
Beverage holder 70
Blower 65,
69
BMW 6
Bore 120
Brake 16
Brake fluid change 57
Brake fluid level 15,
79,
92
Brake hydraulic system 15
Brake lamp
bulb replacement 103
Brake pads 76,
79
Brake rotors 76
Brake system 76, 79
brake fluid 92
Brakes 79 Break-in procedure 76
Breaking in the vehicle 76
Bridging 113,
114
Bulb replacement 101
backup lamps 103
brake lamp, third 104
footwell lamps 105
front fog lamps 102
front turn signal
indicators 102
glove compartment
lamp 105
high beams 101
interior lamps 104
license plate lamp 104
low beams 101
luggage compartment
lamps 105
parking lamps 102
rear lamps 103
side turn signal
indicators 102
standing lamps 102
tail lamps 103
vanity mirror 105
Hilfsrahmen fŸr Querverweise
Page 133 of 140
EVERYTHING FROM A TO Z
131
OVERVIEW REPAIRS OPERATION CONTROLS DATA INDEX
G
Gasoline 78
Gasoline gauge 55
Gear display 48
Continuously Variable
automatic Transmission
(CVT) 48
General driving notes 76
Glove compartment 70
Glove compartment lamps
bulb replacement 105
Grilles 66,
69
Gross weight 122
H
Handbrake 44
Hazard warning flashers 12
Head airbags 37
Head restraints 34
Headlamp cleaning
system 52,
89
filling 89
Headlamp flasher 49
Headlamps
care 94,
101
cleaning 52 Heated
outside mirrors 36
rear window 65,
68
seats 34
windshield 65, 68
windshield washer jets 52
Heavy cargo 72
Height 121
High beams 17, 49
bulb replacement 101
Hood 16,
86
Horn 12
Hubcap remover 100,
106
I
Ignition lock 42
Illuminated vanity mirror 36
Imitation leather 95
Imprint 6
Indicator lamps 15
Individual air distribution 69
INSPECTION 57
Instrument cluster, see Display
elements 13
Instrument lighting 50
Instrument panel 12
Interface socket
for Onboard Diagnostics 96 Interior lamps 50
bulb replacement 104
Interior rearview mirror 36
automatic dimming 37
Interlock 42
Interval display 93
J
Jack 100,
106
Jump-starting 113,
114
K
Keys 22
multifunction steering
wheel 18
Kickdown 47 L
Lamps 49,
101
backup lamps 103
brake lamp 103,
104
daytime driving lamps 49
fog lamps 50
footwell lamps 105
front fog lamps 102
glove compartment 105
high beams 101
instrument lighting 50 interior lamps 50,
104
license plate lamp 104
low beams 49,
101
luggage compartment
lamps 105
parking lamps 49,
102
reading lamps 50
rear fog lamp 103
standing lamps 49, 102
tail lamp 103
turn signal indicators 102
xenon lamps 101
Lashing eyes 72
LATCH child-restraint
system 41
Leather care 95
LED light-emitting diodes 51
Length 121
License plate lamp
bulb replacement 104
Light-alloy wheels 94
"Lights on" warning 49
Loading 72
Load-securing devices 72
Low beams 49
bulb replacement 101
Luggage compartment 72
content 122