reset MINI Hardtop 2 Door 2005 Owner's Manual
[x] Cancel search | Manufacturer: MINI, Model Year: 2005, Model line: Hardtop 2 Door, Model: MINI Hardtop 2 Door 2005Pages: 165, PDF Size: 2.32 MB
Page 15 of 165

13
OVERVIEW REPAIRS OPERATION CONTROLS DATA INDEX
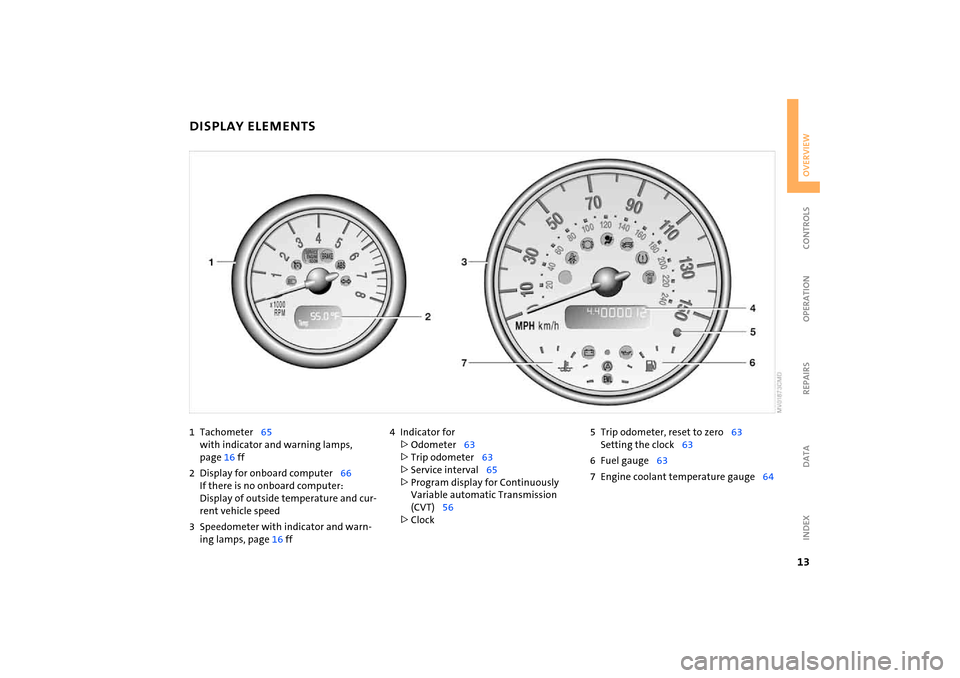
1 Tachometer
65
with indicator and warning lamps,
page
16 ff
2 Display for onboard computer
66
If there is no onboard computer:
Display of outside temperature and cur
-
rent vehicle speed3 Speedometer with indicator and warn
-
ing lamps, page
16 ff
4 Indicator for>Odometer
63
>Trip odometer
63
>Service interval
65
>Program display for Continuously
Variable automatic Transmission
(CVT)
56
>Clock
5 Trip odometer, reset to zero
63
Setting the clock
63
6 Fuel gauge
63
7 Engine coolant temperature gauge
64
DISPLAY ELEMENTS
Page 16 of 165

14
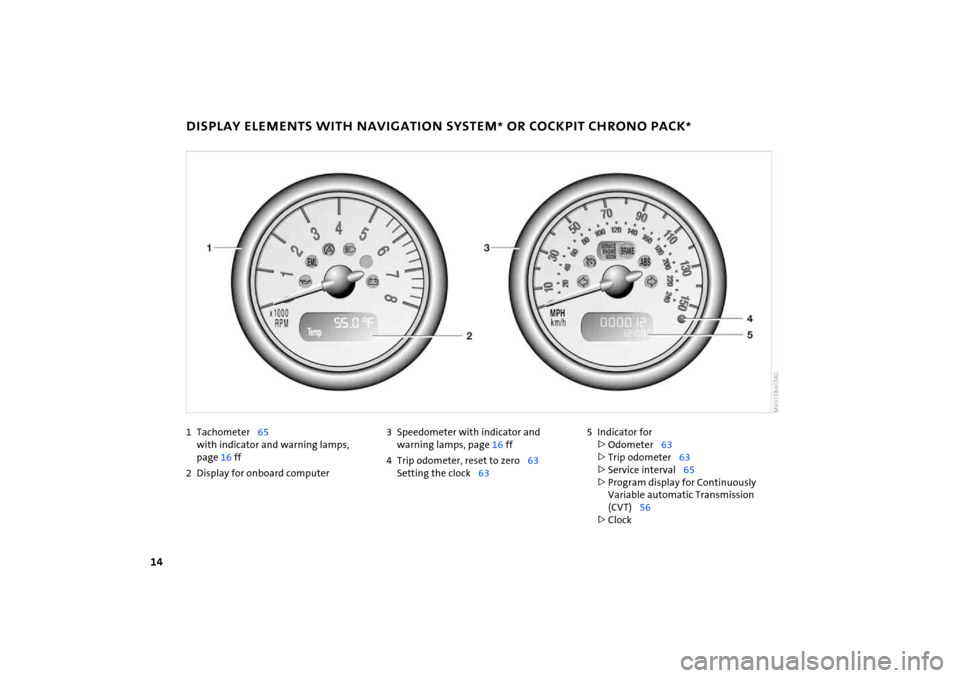
1Tachometer
65
with indicator and warning lamps,
page
16 ff
2 Display for onboard computer
3 Speedometer with indicator and
warning lamps, page
16 ff
4 Trip odometer, reset to zero
63
Setting the clock
63
5 Indicator for>Odometer
63
>Trip odometer
63
>Service interval
65
>Program display for Continuously
Variable automatic Transmission
(CVT)
56
>Clock
DISPLAY ELEMENTS WITH NAVIGATION SYSTEM
* OR COCKPIT CHRONO PACK
*
Page 50 of 165

48
VEHICLE MEMORY
TRANSPORTING CHILDREN SAFELY
>Setting units for outside temperature
and fuel consumption display, refer to
page
66
>Setting units for display of temperatures
specified for automatic climate control
system, refer to page
80
>Volume control PDC, refer to page
74
>Acoustic alarm for starting PDC activa
-
tion, refer to page
74.
This symbol alerts you to Vehicle Memory functions in the Owner's
Manual.
ate slightly differently from the descrip
-
tions used in this Owner's Manual. If you
decide to sell your vehicle one day, please
remember to have the memory functions
reset to their default configuration.<
The proper place for childrenChildren should always sit in the rear:Accident research shows that the safest
place for children in a vehicle is in the rear
seat.Older children should be tightly secured
with a safety belt, after they have out
-
grown a booster seat that is appropriate for
their age, height and weight.
A child sitting in the rear seat and not properly restrained may place his or
her head on or near the airbag, if so
equipped. For example, a child – even
though belted in – may fall asleep with his
or her head against the side airbag. It may
be difficult for a driver to ensure that chil
-
dren in the rear seat will remain properly
positioned at all times and do not place
their heads on or near the side airbag.
Therefore, we recommend that the rear
side airbags, if provided, be deactivated if
you plan to transport children in the rear
seat.
years of age and
children less than 5
ft / 150
cm tall
should always ride in the rear and the
restraint systems should be secured with
the vehicle's safety belts.
system that has first been properly
restrained. We strongly urge you to care
-
fully read and comply with the instructions
for installation and use provided by the
child-restraint's manufacturer whenever
you use such a device.All rear seating positions in your vehicle
meet the recommendations of SAE
J1819,
an industry-recommended practice for
securing child-restraint systems in motor
vehicles.
Exception for the front passenger seat
Should it one day be necessary to use a child-restraint system on the front
passenger seat, the airbags on the front
passenger side must be deactivated. Other
-
wise, there is a significant risk of injury to
children if the airbags deploy, even if they
are seated in a child-restraint system. Have
the front passenger airbags permanently
deactivated only by your MINI Dealer or a
workshop that has specially trained per
-
sonnel working in accordance with the
specifications of the MINI manufacturer.<
Page 65 of 165

63
OVERVIEW REPAIRS OPERATIONCONTROLS DATA INDEX
ODOMETER
CLOCK
FUEL GAUGE
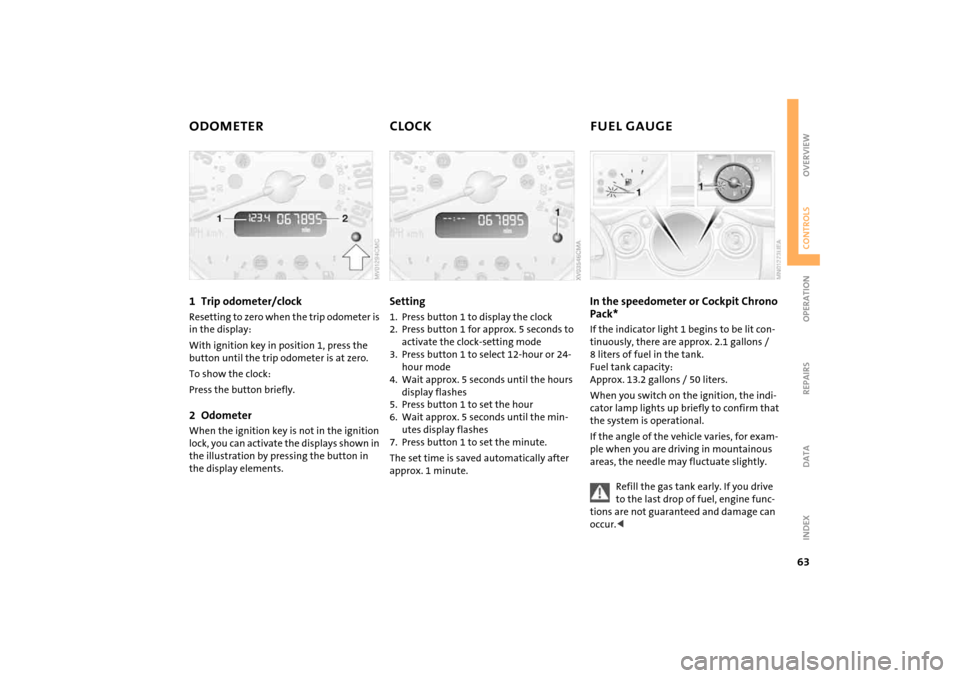
1 Trip odometer/clock
Resetting to zero when the trip odometer is
in the display:With ignition key in position
1, press the
button until the trip odometer is at zero.
To show the clock:Press the button briefly.2 Odometer
When the ignition key is not in the ignition
lock, you can activate the displays shown in
the illustration by pressing the button in
the display elements.
Setting 1. Press button
1 to display the clock
2. Press button
1 for approx. 5
seconds to
activate the clock-setting mode
3. Press button
1 to select 12-hour or 24-
hour mode
4. Wait approx. 5
seconds until the hours
display flashes
5. Press button
1 to set the hour
6. Wait approx. 5
seconds until the min
-
utes display flashes
7. Press button
1 to set the minute.
The set time is saved automatically after
approx. 1
minute.
In the speedometer or Cockpit Chrono Pack* If the indicator light
1 begins to be lit con
-
tinuously, there are approx. 2.1
gallons
/
8
liters of fuel in the tank.
Fuel tank capacity:
Approx. 13.2
gallons
/ 50
liters.
When you switch on the ignition, the indi
-
cator lamp lights up briefly to confirm that
the system is operational. If the angle of the vehicle varies, for exam
-
ple when you are driving in mountainous
areas, the needle may fluctuate slightly.
Refill the gas tank early. If you drive to the last drop of fuel, engine func
-
tions are not guaranteed and damage can
occur.<
Page 134 of 165

132
BATTERYStorage location MINI COOPER and MINI COOPER Convert
-
ible:The battery is located in the engine com
-
partment. Exact location, refer to page
106
.
MINI COOPER
S and MINI COOPER
S Con
-
vertible:The battery is located in the luggage com
-
partment under the floor mat.Battery careThe battery is absolutely maintenance-free,
that is, the original electrolyte will normally
last for the service life of the battery under
moderate climatic conditions. Your MINI
Dealer will be glad to advise you if you have
any questions regarding the battery. Charging the batteryOnly charge the battery in the vehicle via
the terminals in the engine compartment
with the engine switched off, refer to
'Jump-starting', page
134
ff.
Disposal
After replacing old batteries, return the used batteries to your MINI
Dealer or to a recycling point. Maintain the
battery in an upright position for transport
and storage. Secure the battery to prevent
it from tilting during transport.<
Power failure After a temporary power failure, e.g. due to
a discharged battery, some of your vehicle's
equipment will function only to a limited
extent and must be reinitialized or read
-
justed. Individual settings are also lost and
must be reprogrammed:>Time:
Must be reset, refer to page
63
>Electric power windows:
Must be reinitialized, refer to page
32
>Radio
*:
The stations must be reset, refer to the
Owner's Manual for Radio>Navigation system
*:
It may take some time for its operability
to be restored, refer to the Owner's Man
-
ual for Navigation System.