MINI Hardtop 2 Door 2006 Owners Manual
Manufacturer: MINI, Model Year: 2006, Model line: Hardtop 2 Door, Model: MINI Hardtop 2 Door 2006Pages: 168, PDF Size: 2.22 MB
Page 91 of 168

89
OVERVIEW REPAIRS OPERATIONCONTROLS DATA INDEX
LUGGAGE COMPARTMENT IN THE MINI CONVERTIBLE
Loading aid
When the convertible top is closed, you can
load the vehicle more easily by releasing
the convertible top and folding it up.
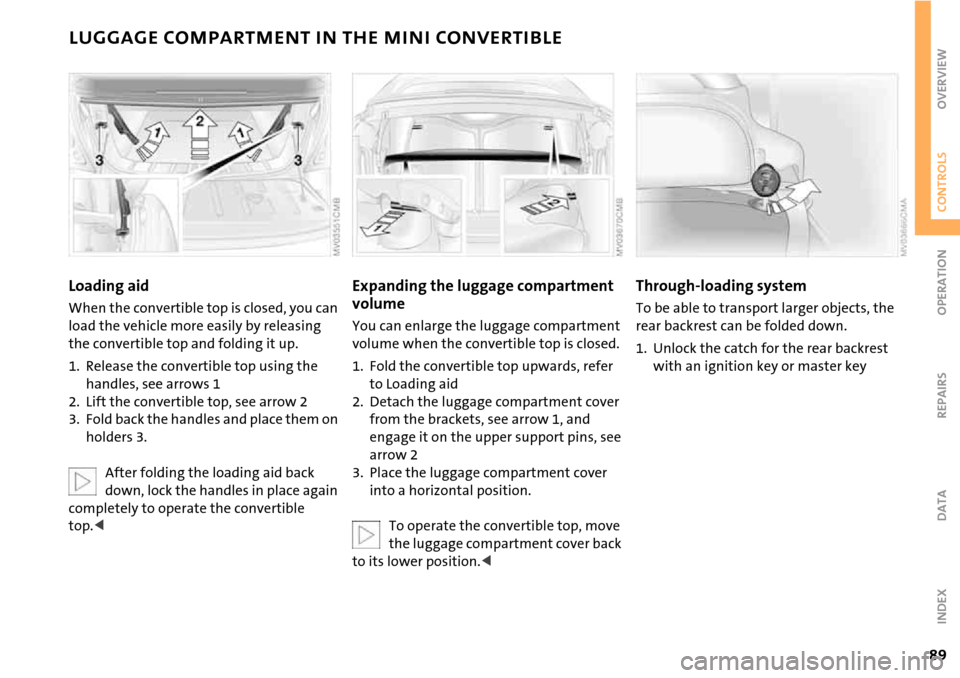
1. Release the convertible top using the
handles, see arrows 1
2. Lift the convertible top, see arrow 2
3. Fold back the handles and place them on
holders 3.
After folding the loading aid back
down, lock the handles in place again
completely to operate the convertible
top.<
Expanding the luggage compartment
volume
You can enlarge the luggage compartment
volume when the convertible top is closed.
1. Fold the convertible top upwards, refer
to Loading aid
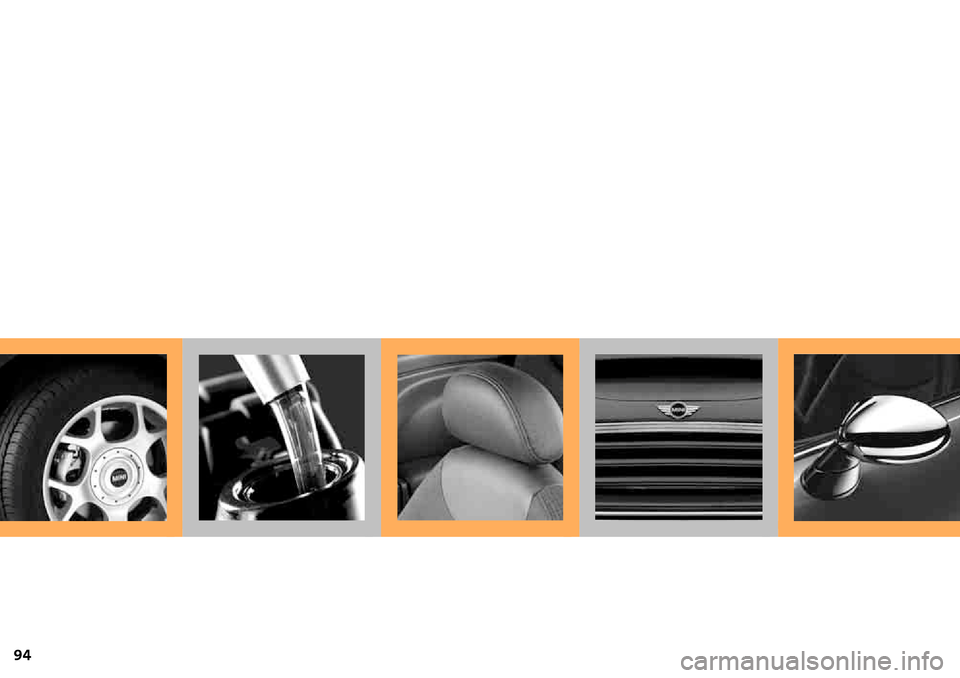
2. Detach the luggage compartment cover
from the brackets, see arrow 1, and
engage it on the upper support pins, see
arrow 2
3. Place the luggage compartment cover
into a horizontal position.
To operate the convertible top, move
the luggage compartment cover back
to its lower position.<
Through-loading system
To be able to transport larger objects, the
rear backrest can be folded down.
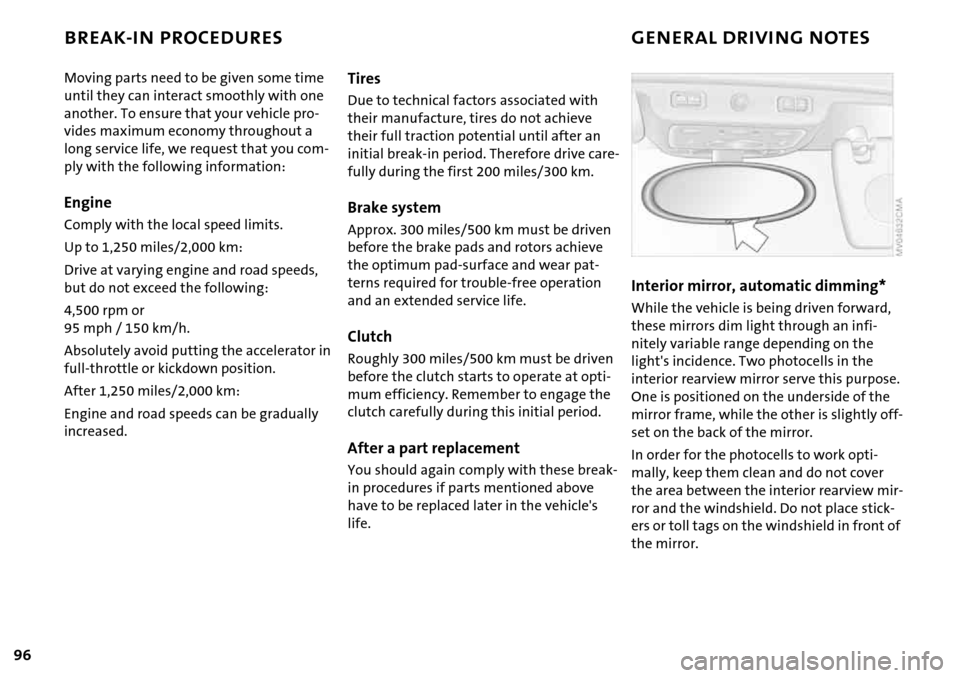
1. Unlock the catch for the rear backrest
with an ignition key or master key
Page 92 of 168

90
LUGGAGE COMPARTMENT IN THE MINI CONVERTIBLE LOADING CARGO
2. Pull the lever to release the catch
3. Fold the backrest forward.
When folding the backrest back into
its original position, always ensure
that the catch engages securely. A loose
backrest might fail to prevent cargo from
entering the passenger compartment dur-
ing sudden braking or evasive maneuvers,
posing a potential hazard to occupants.<
Avoid overloading the vehicle so that
the permissible carrying capacity of
the tires is not exceeded. Overloading can
lead to overheating and damage inside the
tires. Depending on the circumstances, this
can result in sudden air loss.<
Page 93 of 168

91
OVERVIEW REPAIRS OPERATIONCONTROLS DATA INDEX
LOADING CARGO
Determining cargo limit
1. Locate the following statement on your
vehicle's placard:
The combined weight of occu-
pants and cargo should never
exceed XXX kg or YYY lbs, as this could
otherwise result in damage to the vehi-
cle and unstable driving conditions.<
2. Determine the combined weight of the
driver and passengers that will be riding
in your vehicle
3. Subtract the combined weight of the
driver and passenger from XXX kilo-
grams or YYY pounds
4. The resulting figure equals the available
amount of cargo and luggage load
capacity.
For example, if the YYY amount equals
1,400 lbs. and there will be four 150 lbs.
passengers in your vehicle, the amount
of available cargo and luggage load
capacity is 800 lbs.:
1,400 lbs. minus 600 lbs. = 800 lbs.
5. Determine the combined weight of lug-
gage and cargo being loaded on the
vehicle. That weight may not safely
exceed the available cargo and luggage
load capacity calculated in Step 4
6. If your vehicle will be towing a trailer,
load from your trailer will be transferred
to your vehicle. Consult the manual for
transporting a trailer to determine how
this may reduce the available cargo and
luggage load capacity of your vehicle.
Cargo and luggage load capacity
The permissible load is the sum of the occu-
pants' weights and the weight of the cargo.
The greater the weight of the occupants,
the less cargo can be transported.
Page 94 of 168

92
LOADING CARGO
Stowing cargo
>Place heavy cargo as far forward as possi-
ble, directly behind the backrests, and as
low as possible
>Cover sharp edges and corners
>Do not pile objects higher than the top
edges of the backrests.
For very heavy cargo when the rear seat is
unoccupied, fasten each safety belt in the
opposite buckle. This provides additional
stabilization for the backrests.Securing the load
As an example, the illustration shows the
luggage compartment of the MINI.
>Secure smaller and lighter items using
the luggage compartment net
* or elas-
tic straps
>Secure larger and heavier items with
load-securing devices
*. Lashing eyelets
are provided at the inner corners of the
luggage compartment for attaching
these load-securing devices.
Comply with the information enclosed
with the load-securing devices.
Page 95 of 168

93
OVERVIEW REPAIRS OPERATIONCONTROLS DATA INDEX
LOADING CARGO ROOF-MOUNTED LUGGAGE RACK*
Always position and secure the load
as described above. If you do not, it
can pose a danger to the passengers during
braking and evasive maneuvers, for exam-
ple.
Do not exceed the permissible gross weight
and axle load, refer to page149 ff; other-
wise the vehicle's operating safety is no
longer assured and it will not be in compli-
ance with the certification regulations.
Do not stow heavy or hard objects in the
passenger compartment without first
securing them. Otherwise they would be
thrown around during braking and evasive
maneuvers and endanger the occupants.
that there is sufficient space for the move-
ment of the glass sunroof and that no
objects protrude into the swiveling area of
the tailgate; otherwise damage can occur.
Do not secure the roof-mounted luggage
rack to the MINI's trim strips or to the MINI
Convertible top. Otherwise, the lack of a
secure hold could lead to damage or acci-
dents.<
Special roof-mounted luggage racks
for your MINI are available as acces-
sories from your MINI Dealer.<
Page 96 of 168

94
Page 97 of 168

OVERVIEW
CONTROLS
OPERATION, CARE, MAINTENANCE
OWNER SERVICE PROCEDURES
INDEX TECHNICAL DATA
95
OVERVIEW REPAIRSOPERATIONCONTROLS DATA INDEX
Operation
Page 98 of 168

96
BREAK-IN PROCEDURES GENERAL DRIVING NOTES
Moving parts need to be given some time
until they can interact smoothly with one
another. To ensure that your vehicle pro-
vides maximum economy throughout a
long service life, we request that you com-
ply with the following information:
Engine
Comply with the local speed limits.
Up to 1,250 miles/2,000 km:
Drive at varying engine and road speeds,
but do not exceed the following:
4,500 rpm or
95 mph / 150 km/h.
Absolutely avoid putting the accelerator in
full-throttle or kickdown position.
After 1,250 miles/2,000 km:
Engine and road speeds can be gradually
increased.
Tires
Due to technical factors associated with
their manufacture, tires do not achieve
their full traction potential until after an
initial break-in period. Therefore drive care-
fully during the first 200 miles/300 km.
Brake system
Approx. 300 miles/500 km must be driven
before the brake pads and rotors achieve
the optimum pad-surface and wear pat-
terns required for trouble-free operation
and an extended service life.
Clutch
Roughly 300 miles/500 km must be driven
before the clutch starts to operate at opti-
mum efficiency. Remember to engage the
clutch carefully during this initial period.
After a part replacement
You should again comply with these break-
in procedures if parts mentioned above
have to be replaced later in the vehicle's
life.
Interior mirror, automatic dimming*
While the vehicle is being driven forward,
these mirrors dim light through an infi-
nitely variable range depending on the
light's incidence. Two photocells in the
interior rearview mirror serve this purpose.
One is positioned on the underside of the
mirror frame, while the other is slightly off-
set on the back of the mirror.
In order for the photocells to work opti-
mally, keep them clean and do not cover
the area between the interior rearview mir-
ror and the windshield. Do not place stick-
ers or toll tags on the windshield in front of
the mirror.
Page 99 of 168

97
OVERVIEW REPAIRSOPERATIONCONTROLS DATA INDEX
GENERAL DRIVING NOTES
Safe braking
Your vehicle is equipped with ABS as a stan-
dard feature. If you are in a situation which
requires full braking, it is best to brake
using maximum brake pressure. Since the
vehicle remains maneuverable, you can still
go around any obstacles with the smallest
possible steering movements.
The pulsation of the brake pedal, together
with the sound of hydraulic regulation,
indicates to you that ABS is actively taking
effect.
Wet roads:
It is a good idea to periodically dry the
brakes with a gentle application when driv-
ing in rain and on wet roads. Monitor traffic
conditions to ensure that this maneuver
does not hinder other road users. The
resulting heat dries brake rotors and pads.
Then if the braking force is needed, it is
immediately available.
Driving downhill:
To prevent overheating and the
resulting reduced efficiency of the
brake system, drive down extended or
steep mountain gradients in the gear
which requires the least brake applications.
Otherwise, even light but consistent pres-
sure on the brake can lead to high tempera-
tures, brake wear and possibly even brake
failure.<
The braking effect of the engine can be
increased by downshifting in the manual
mode of the automatic transmission, to
first gear if necessary, refer to page58. This
protects the brakes from excessive loads.
Do not coast with the clutch
depressed, the transmission in idle or
the engine switched off. Otherwise, the
engine provides no braking effect, and
there is no power-assist for braking or
steering.
Make sure that there are no floor mats,
floor carpets or other objects in the vicinity
of the pedals; otherwise pedal function
could be impeded.<
Corrosion on the brake rotors:
When the vehicle is driven only occasion-
ally, during extended periods when the
vehicle is not used at all, and in operating
conditions where brake applications are
less frequent, there is an increased ten-
dency for corrosion of the brake rotors and
accumulation of contamination on the
brake pads. This occurs because the mini-
mal pressure that must be exerted by the pads to clean the rotors by brake applica-
tions is not reached.
Corrosion on brake rotors is signaled by a
running or pulsation during braking; even
extended subsequent braking will not cure
this phenomenon.
Hydroplaning
When driving on wet or slushy roads,
reduce road speed. If you do not, a
wedge of water can form between tires
and road surface. This phenomenon is char-
acterized by a partial or complete loss of
contact between the tires and the road sur-
face. The ultimate results are loss of steer-
ing and braking control.<
Page 100 of 168

98
GENERAL DRIVING NOTES
Mobile communications in the vehicle
The manufacturer of your MINI rec-
ommends that you do not use mobile
devices, e.g. mobile phones, inside the vehi-
cle without directly connecting them to an
outside antenna. Otherwise, interference
between the vehicle electronics and the
mobile device cannot be ruled out. In addi-
tion, it is not ensured that the radiation
emitted during mobile transmission will be
directed outside of the vehicle.<
Driving through water
Do not drive through water on the
road if it is deeper than 1 ft/30 cm,
and then only at walking speed at the
most. Otherwise, the vehicle's engine, the
electrical systems and the transmission
may be damaged.<
Use the parking brake on inclines
Do not hold the vehicle in place on
slopes by slipping or 'riding' the
clutch. Use the parking brake instead. Oth-
erwise, a high degree of clutch wear could
result.<
Clothes hooks
When suspending clothing from the
hooks, ensure that they will not
obstruct the driver's vision. Do not hang
heavy objects on the hooks. If you do, they
could injure the occupants during braking
or evasive maneuvers.<
Hot exhaust system
High temperatures occur in every
vehicle's exhaust system. Do not
remove the heat protection plates fitted in
the area of the exhaust system and do not
apply body-cavity protectant to this area.
When driving, standing at idle, and parking
the vehicle, take care to avoid contact
between the hot exhaust system and flam-
mable materials, e.g. hay, grass, leaves, etc.
Such contact could lead to a fire resulting in
serious personal injury and property dam-
age.<
Parking the vehicle
Condensation forms in the air conditioning
system during operation, and then exits
under the vehicle. Traces of condensed
water on the ground are therefore normal.
Close the tailgate
Drive the vehicle only when the tail-
gate is completely closed. Otherwise,
exhaust fumes could penetrate the interior
of the vehicle.<
Should it be absolutely necessary to drive
with the tailgate open:
1. Close all windows as well as the glass
sunroof or the sliding sunroof of the
MINI Convertible
2. Sharply increase the air supply for the
heater, the air conditioning or the auto-
matic climate control, refer to page78
or81.