lock MINI Hardtop 2 Door 2006 Owner's Guide
[x] Cancel search | Manufacturer: MINI, Model Year: 2006, Model line: Hardtop 2 Door, Model: MINI Hardtop 2 Door 2006Pages: 168, PDF Size: 2.22 MB
Page 56 of 168

54
STARTING THE ENGINE SWITCHING OFF THE ENGINE PARKING BRAKE
Manual transmission
1. Engage the parking brake
2. Gearshift lever in idle position
3. Depress the clutch
4. Start the engine.
Automatic transmission with
Steptronic
1. Press the footbrake
2. Put the selector lever in position P or N
3. Start the engine.
Special starting conditions
In the following situations, depress the
accelerator pedal halfway and continue
starting the engine for up to approx.
10 seconds:
>If the engine does not start on the first
attempt, for instance if the engine is very
hot or cold.
>The engine is started at very low temper-
atures, below approx. +57/–156, at
high altitudes above 3,300 ft/1000 m.You should never remove the ignition
key when the vehicle is in motion, as
the steering lock could engage.
When you leave the vehicle, always remove
the ignition key and engage the steering
lock.
When parking on inclines, engage the park-
ing brake, or the vehicle could roll.<
Manual transmission
Turn the ignition key to position 1 or 0.
Automatic transmission with
Steptronic
Engage selector lever position P, turn the
ignition key to position 1 or 0.
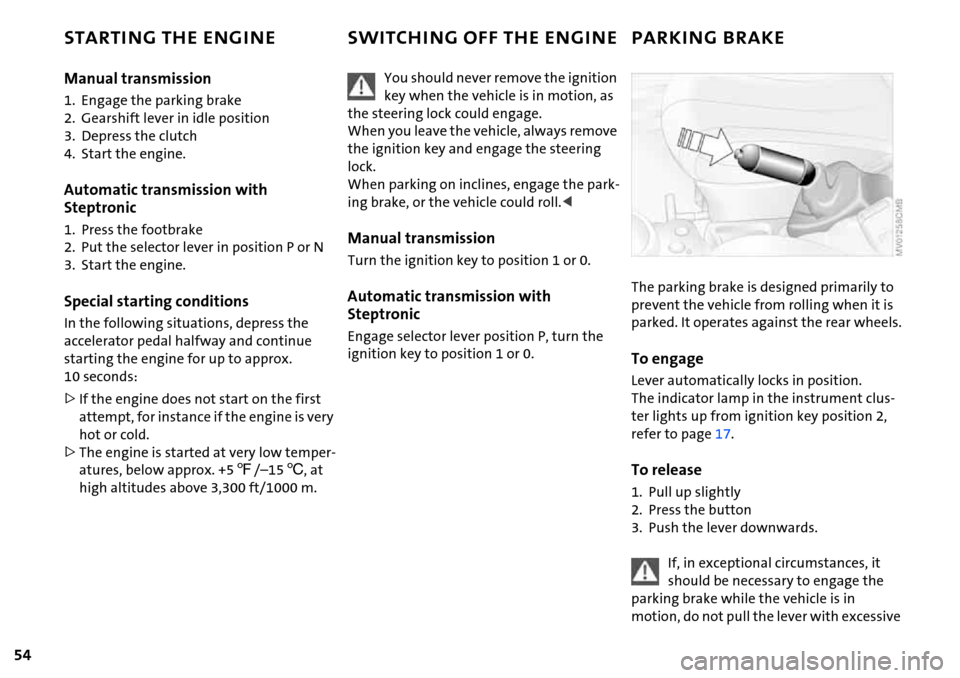
The parking brake is designed primarily to
prevent the vehicle from rolling when it is
parked. It operates against the rear wheels.
To engage
Lever automatically locks in position.
The indicator lamp in the instrument clus-
ter lights up from ignition key position 2,
refer to page17.
To release
1. Pull up slightly
2. Press the button
3. Push the lever downwards.
If, in exceptional circumstances, it
should be necessary to engage the
parking brake while the vehicle is in
motion, do not pull the lever with excessive
Page 58 of 168

56
AUTOMATIC TRANSMISSION WITH STEPTRONIC*
In addition to the fully automatic mode,
you can shift gears manually using Step-
tronic, refer to page57.
Selector lever positions
P R N D M/S + –
Range selection
>The selector lever can be moved out of
position P when the ignition is switched
on or the engine is running: interlock.
>While the vehicle is stationary and
before shifting out of P or N, depress the
footbrake in order to disengage the
selector lever's lock mechanism: shift-
lock.
Keep your foot on the brake until start-
ing off, otherwise the vehicle will start
to move when a drive position is
engaged.
A lock prevents the selector lever from
being inadvertently moved into the R and P
positions. To override the lock, press the
button on the front of the selector lever
knob, see arrow.
If the engine speed is too high when
the vehicle is at a standstill, the selec-
tor lever is also blocked to protect the
transmission.
If the selector lever is not placed in
position P when the vehicle is parked, the
position display of the selector lever stays
on. This can lead to battery discharge.<
PPark
Select only when the vehicle is completely
stopped. The transmission locks to prevent
the drive wheels from turning.
RReverse
Select only when the vehicle is completely
stopped.
NNeutral, idle
Select this when you are in a car wash, for
example. The vehicle can roll.
D Drive: automatic driving position
This position is designed for driving under
all normal operating conditions.
Under normal operation conditions, fuel
consumption is lowest when you drive in
position D.
Page 68 of 168

66
ODOMETER CLOCK FUEL GAUGE
1 Trip odometer/clock
2Odometer
Trip odometer/clock
To switch between the trip odometer and
the clock:
Press the button.
To reset the trip odometer to zero:
Press the button until the trip odometer
shows zero.
To set the clock, refer to the information
below.
Odometer
When the ignition key is not in the ignition
lock, you can activate the displays shown in
the illustration by pressing the button in
the display elements.
Setting
The clock must be shown on the display.
1. If necessary, press button 1 to display
the clock
2. Press button 1 for approx. 5 seconds to
activate the clock-setting mode
3. Press button 1 to select 12-hour or
24-hour mode
4. Wait approx. 5 seconds until the hours
display is shown
5. Press button 1 to set the hour
6. Wait approx. 5 seconds until the min-
utes display is shown
7. Press button 1 to set the minute.
The time entered is stored automatically
after approx. 1 minute.
In the speedometer or Cockpit Chrono
Pack*
If the LED begins to be lit continuously,
there are approx. 2.1 gallons/8 liters of fuel
left in the tank.
Fuel tank capacity:
Approx. 13.2 gallons/50 liters.
When you switch on the ignition, the LED
lights up briefly to confirm that the system
is operational.
If the angle of the vehicle varies, for exam-
ple when you are driving in mountainous
areas, the needle may fluctuate slightly.
Refill the gas tank early. If you drive
to the last drop of fuel, engine func-
tions are not guaranteed and damage can
occur.<
Page 73 of 168

71
OVERVIEW REPAIRS OPERATIONCONTROLS DATA INDEX
DRIVING STABILITY CONTROL SYSTEMS
Your MINI or MINI Convertible is equipped
with a series of systems that help maintain
driving stability even in adverse driving sit-
uations.
Antilock Brake System (ABS)
ABS keeps the wheels from locking during
braking. Steering stability is maintained
even during full brake applications. In this
way, active safety is enhanced.
ABS is operational each time the engine is
started. Braking safely, refer to page97.
Electronic Brake Force Distribution
(EBD)
The system controls brake-force applica-
tion at the rear wheels in order to obtain
increased stability in the vehicle's braking
response.
All Season traction Control (ASC)*
ASC prevents slip at the drive wheels while
starting off and accelerating the vehicle.
ASC also recognizes unstable vehicle condi-
tions, such as fishtailing or nose-diving. In
these cases, and subject to physical limits,
ASC helps to keep the vehicle on a steady
course by reducing engine speed and by
applying brakes at individual wheels. This
system optimizes driving stability and trac-tion, especially when just starting off,
when accelerating or when cornering.
The ASC is operational each time you start
the engine. It integrates the Antilock Brake
System (ABS) and Electronic Brake Force
Distribution (EBD).
The laws of physics cannot be
repealed, even with ASC. An appropri-
ate driving style always remains the
responsibility of the driver. Avoid using the
additional safety margin provided by the
system as an excuse for taking unnecessary
risks.
Do not make any modifications to the ASC
system. Allow only authorized technicians
to perform service procedures on the
ASC.<
Dynamic Stability Control (DSC)*
DSC prevents slip at the drive wheels while
starting off and accelerating the vehicle.
DSC also recognizes unstable vehicle condi-
tions, such as fishtailing or nose-diving. In
these cases, and subject to physical limits,
DSC helps to keep the vehicle on a steady
course by reducing engine speed and by
applying brakes at individual wheels.
The DSC is operational every time you start
the engine. It integrates All Season traction
Control (ASC).
The laws of physics cannot be
repealed, even with DSC. An appro-
priate driving style always remains the
responsibility of the driver. Avoid using the
additional safety margin provided by the
system as an excuse for taking unnecessary
risks.
Do not make any modifications to the DSC
system. Allow only authorized technicians
to perform service procedures on the
DSC.<
Page 81 of 168

79
OVERVIEW REPAIRS OPERATIONCONTROLS DATA INDEX
AIR CONDITIONING SYSTEM
Air volume/Blower
You can select blower speeds
from 1 to 4. Position 0: fan is off.
The heating, ventilation and air
conditioning operate in position
1 or higher.
Temperature
Turn to the right, red, to increase
the temperature.
Turn to the left, blue, to cool the
air.
Air distribution
Air distribution towards upper
body region , upper body
region and footwell , footwell
, footwell and windows ,
and windows .
Intermediate positions are possible, refer to
illustration and overview on page78.
Rear window defroster
The LED is lit when the rear win-
dow defroster is on.
The heater switches off auto-
matically after a short time.
Windshield heating*
The LED is lit when the wind-
shield heating is on.
The windshield heating switches
off automatically after a short time.
Cooling function
The LED is lit when the cooling
function is on.
The air is cooled and dehumidi-
fied and, depending on the temperature
setting, rewarmed.
Depending on the weather, the windshield
can fog up temporarily after the engine is
started.
When the cooling function is on, con-
densation forms which then exits
under the vehicle. Traces of condensed water
on the ground are therefore normal.<
Recirculated air mode
The LED is lit when the recircu-
lated air mode is on. Supply of
outside air into the vehicle is
blocked.
The air within the vehicle is recirculated.
If the windows fog up in the recircu-
lated air mode, turn the recirculated
air mode off and, if necessary, increase the
air supply. The recirculated air mode should
not be used constantly over a longer period
of time; otherwise the air quality in the
vehicle's interior will gradually deterio-
rate.<
Page 84 of 168

82
AUTOMATIC CLIMATE CONTROL*
Automatic air distribution and volume
The LED is lit when the AUTO pro-
gram is on.
Automatic adjustment of the air distribu-
tion and volume, and adaptation of the
specified temperatures to external influ-
ences, e.g. outside temperature and insola-
tion.
In the automatic program (AUTO), the air
conditioning is activated automatically. To
create a pleasant air climate, the air tem-
perature coming from the vents in the
upper body area is lower than the air tem-
perature in the footwell.
Air volume/Blower
Switching automatic climate control
off/on
Press the left or right half of the
button to vary the air volume.
Automatic adjustment of the air volume is
deactivated.
Switching air conditioner on/off.
Press the left half of the button while the
blower is at the lowest setting. The blower,
heating and air conditioning are switched
off. All displays go out.
Switch the automatic climate control back
on by pressing any button.
Cooling function
The LED is lit when the cooling
function is on.
The air is cooled and dehumidified and,
depending on the temperature setting,
rewarmed.
The cooling function is automatically acti-
vated in the AUTO program.
Depending on the weather, the windshield
can fog up temporarily after the engine is
started.
When the air conditioning is on, con-
densation is formed which then exits
under the vehicle. Traces of condensed
water on the ground are therefore nor-
mal.<
Recirculated air mode
The LED is lit when the recirculated
air mode is on. Supply of outside air
into the vehicle is blocked.
The air within the vehicle is recirculated.
In the automatic program (AUTO) in hot
weather conditions, the recirculated air
mode is activated temporarily to enable
faster cooling.
The LED for the recirculated air button is
not lit.
The recirculated air mode should not
be used constantly over a longer
period of time; otherwise the air quality in
the vehicle's interior will gradually deterio-
rate. If the windows fog up in the recircu-
lated air mode, turn the recirculated air
mode off and, if necessary, increase the air
supply.<
Rear window defroster and windshield
heating*
The LED comes on when the rear
window/windshield heating is on.
The heater switches off automatically after
a short time.
Temperature
Tap or turn the wheel in the
appropriate direction to change
the temperature step by step.
The figures in the display provide
a general indication of interior tempera-
ture. When you start the vehicle, the sys-
tem ensures that the selected temperature
is achieved as quickly as possible and then
maintained.
Permanent heating with maximum
power output at temperature selec-
tion HI. Permanent cooling at LO. With the
Page 91 of 168

89
OVERVIEW REPAIRS OPERATIONCONTROLS DATA INDEX
LUGGAGE COMPARTMENT IN THE MINI CONVERTIBLE
Loading aid
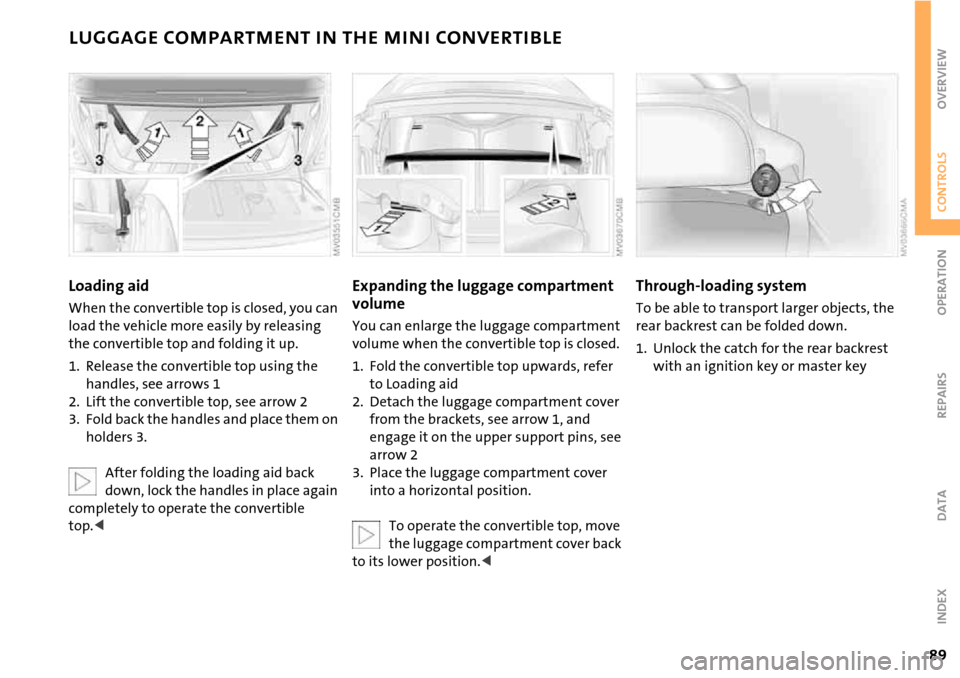
When the convertible top is closed, you can
load the vehicle more easily by releasing
the convertible top and folding it up.
1. Release the convertible top using the
handles, see arrows 1
2. Lift the convertible top, see arrow 2
3. Fold back the handles and place them on
holders 3.
After folding the loading aid back
down, lock the handles in place again
completely to operate the convertible
top.<
Expanding the luggage compartment
volume
You can enlarge the luggage compartment
volume when the convertible top is closed.
1. Fold the convertible top upwards, refer
to Loading aid
2. Detach the luggage compartment cover
from the brackets, see arrow 1, and
engage it on the upper support pins, see
arrow 2
3. Place the luggage compartment cover
into a horizontal position.
To operate the convertible top, move
the luggage compartment cover back
to its lower position.<
Through-loading system
To be able to transport larger objects, the
rear backrest can be folded down.
1. Unlock the catch for the rear backrest
with an ignition key or master key
Page 101 of 168

99
OVERVIEW REPAIRSOPERATIONCONTROLS DATA INDEX
REFUELING
Always switch off the engine before
refueling; otherwise no fuel can be
added to the tank and the SERVICE ENGINE
SOON lamp may come on.<
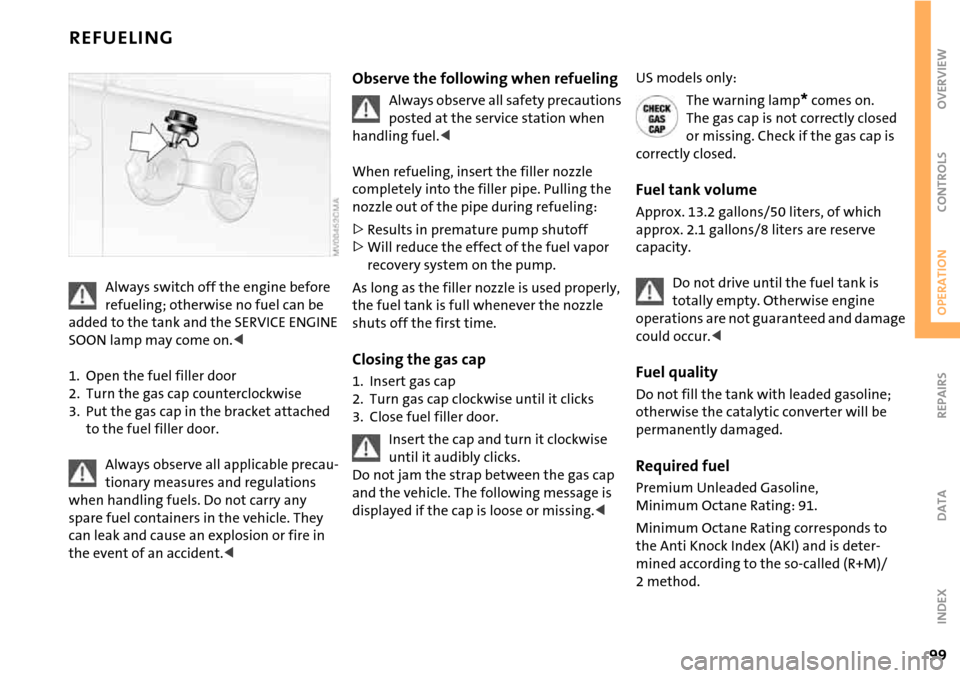
1. Open the fuel filler door
2. Turn the gas cap counterclockwise
3. Put the gas cap in the bracket attached
to the fuel filler door.
Always observe all applicable precau-
tionary measures and regulations
when handling fuels. Do not carry any
spare fuel containers in the vehicle. They
can leak and cause an explosion or fire in
the event of an accident.<
Observe the following when refueling
Always observe all safety precautions
posted at the service station when
handling fuel.<
When refueling, insert the filler nozzle
completely into the filler pipe. Pulling the
nozzle out of the pipe during refueling:
>Results in premature pump shutoff
>Will reduce the effect of the fuel vapor
recovery system on the pump.
As long as the filler nozzle is used properly,
the fuel tank is full whenever the nozzle
shuts off the first time.
Closing the gas cap
1. Insert gas cap
2. Turn gas cap clockwise until it clicks
3. Close fuel filler door.
Insert the cap and turn it clockwise
until it audibly clicks.
Do not jam the strap between the gas cap
and the vehicle. The following message is
displayed if the cap is loose or missing.<
US models only:
The warning lamp
* comes on.
The gas cap is not correctly closed
or missing. Check if the gas cap is
correctly closed.
Fuel tank volume
Approx. 13.2 gallons/50 liters, of which
approx. 2.1 gallons/8 liters are reserve
capacity.
Do not drive until the fuel tank is
totally empty. Otherwise engine
operations are not guaranteed and damage
could occur.<
Fuel quality
Do not fill the tank with leaded gasoline;
otherwise the catalytic converter will be
permanently damaged.
Required fuel
Premium Unleaded Gasoline,
Minimum Octane Rating: 91.
Minimum Octane Rating corresponds to
the Anti Knock Index (AKI) and is deter-
mined according to the so-called (R+M)/
2method.
Page 102 of 168

100
REFUELING
Do not use leaded gasoline; other-
wise the lambda probe and catalytic
converter will be permanently damaged.<
Use high-quality brands
Field experience has indicated significant
differences in fuel quality: volatility, com-
position, additives, etc., among gasolines
offered for sale in the United States and
Canada. Fuels containing up to and includ-
ing 10 % ethanol or other oxygenates with
up to 2.8 % oxygen by weight, that is, 15 %
MTBE or 3 % methanol plus an equivalent
amount of co-solvent, will not void the
applicable warranties with respect to
defects in materials or workmanship.
The use of poor-quality fuels may
result in driveability, starting and
stalling problems especially under certain
environmental conditions such as high
ambient temperature and high altitude.
Should you encounter driveability prob-
lems which you suspect could be related to
the fuel you are using, we recommend that
you respond by switching to a recognized
high-quality brand.
Failure to comply with these recommenda-
tions may result in unscheduled mainte-
nance.<
Manual release with the MINI
In the event of an electrical malfunction,
the fuel filler door can be unlocked manu-
ally.
1. Remove the side trim panel on the left-
hand side of the luggage compartment
2. Pull the white lever toward the rear.
The fuel filler door is released
3. Open the fuel filler door.
Manual release with the MINI
Convertible
In the event of an electrical malfunction,
the fuel filler door can be unlocked manu-
ally.
1. Remove the cover of the side trim panel
on the left-hand side, see arrow 1
2. Pull the green strap toward the rear, see
arrow 2.
The fuel filler door is released
3. Open the fuel filler door.
Page 113 of 168

111
OVERVIEW REPAIRSOPERATIONCONTROLS DATA INDEX
BONNET
Do not attempt to service your vehi-
cle if you do not have the required
technical background. If you are not famil-
iar with the regulations to be observed,
have the necessary work on your vehicle
carried out only by a MINI Dealer or a work-
shop that has specially trained personnel
working in accordance with the specifica-
tions of the MINI manufacturer.
Work that is improperly carried out could
result in consequential damage and pose
safety hazards.<
To unlock
Pull the lever in the right door area beneath
the instrument panel.
To open
1. Reach under the bonnet
2. Pull the release lever
3. Open the bonnet.
To close
Allow the bonnet to fall from a height of
approx. 1 ft/30 cm.
Make sure that the closing range of
the bonnet is unobstructed, other-
wise personal injury could result.
If it is determined that the bonnet is not
completely closed while driving, stop
immediately and close it securely, also refer
to page17.<