light MINI Hardtop 2 Door 2007 Owner's Guide
[x] Cancel search | Manufacturer: MINI, Model Year: 2007, Model line: Hardtop 2 Door, Model: MINI Hardtop 2 Door 2007Pages: 148, PDF Size: 2.43 MB
Page 73 of 148

ReferenceAt a glance Controls Driving tips Mobility
71
Opening
Turn the switch to the horizontal position, see
arrow.
Closing
Turn the switch to the vertical position.
Depending on the temperature setting of the air
conditioning or the automatic climate control,
high temperatures may result in the glove com-
partment.
Center armrest*
Storage compartment
The center armrest between the front seats con-
tains either a compartment or the cover for the
mobile phone base plate
* or the snap-in
adapter
*.
Opening
The cover slides along guide rails and can be
opened fully by pushing it back and lifting it.
Closing
Push the cover forwards.
Connection for external
audio device
You can connect an external audio device such
as a CD or MP3 player and play audio recordings
over the vehicle loudspeakers. The volume and
tone settings can be adjusted via the car radio,
refer to the Owner's Manual for Radio.
>Connection for audio playback:
3.5 mm jack
>Power supply for the additional device via
the cigarette lighter socket or the socket in
the center console, page72
Storage compartments
inside the vehicle
Depending on your vehicle's equipment, you
will find storage compartments in the doors,
next to the rear seats and in the center console
*.
Nets
* are located in the passenger footwell and
on the backs of the front seat backrests.
Page 74 of 148

Practical interior accessories
72
Storage compartment on the front
passenger side*
Opening
Briefly press the bottom edge of the cover.
Closing
Push the cover back into its original position.
To prevent injury in the event of an acci-
dent, close the storage compartment after
use while the vehicle is being driven.<
Clothes hooks
There are clothes hooks on the grab handles in
the rear passenger compartment.
Items of clothing hung from the hooks
must not obstruct the driver's view. Do not
hang heavy objects from the hooks, otherwise
they could endanger the car's occupants, e.g. in
case of heavy braking or sudden swerving.<
Cup holders and ash-
tray*
Cup holders
Two cup holders are located in the front of the
center console, another is in the rear at the back
of the center console.
Do not place glass containers in the cup
holders, as this increases the risk of injury
in the event of an accident.<
Ashtray*
The ashtray is located in one of the cup holders
in the center console.
Emptying
Remove the entire ashtray.
Lighter
With the engine running or the ignition switched
on, press in the cigarette lighter.
The lighter can be pulled out as soon as it pops
back out.
Hold or touch the hot cigarette lighter by
the knob only. Holding or touching it in
other areas could result in burns.
When leaving the car, always remove the key so
that children cannot operate the cigarette
lighter and burn themselves.<
Connecting electrical
appliances
In your MINI, you can use electrical devices such
as a flashlight, car vacuum cleaner, etc., up to
approx. 200 watts at 12 volts, as long as one of
the following sockets is available. Avoid damag-
ing the sockets by attempting to insert plugs of
unsuitable shape or size.
Cigarette lighter socket
Remove the lighter* or cover from the socket.
Socket in the cargo area
Pull out the cover.
Page 79 of 148
ReferenceAt a glance Controls Driving tips Mobility
77
that the radiation which results from transmis-
sion will be dissipated from the vehicle inte-
rior.<
Hydroplaning
When driving on wet or slushy roads,
reduce road speed. If you do not, a wedge
of water can form between tires and road sur-
face. This situation, known as hydroplaning, can
cause partial or complete loss of tire contact
with the road surface, so that the car cannot be
steered or braked properly.<
The risk of hydroplaning increases with declining
tread depth on the tires, refer also to Tread
depth on page91.
Driving through water
Drive through water on the road only if it is
not deeper than 1 ft/30 cm, and then only
at walking speed at the most. Otherwise, the
vehicle's engine, the electrical systems and the
transmission may be damaged.<
Parking brake on inclines
On inclines, do not hold the vehicle with
the clutch; use the parking brake. Other-
wise greater clutch wear will result.<
For information on driving off using Hill Start
Assist
*, refer to page55.
Braking safely
Your MINI is equipped with ABS. If you are in a
situation which requires full braking, it is best to
brake using maximum brake pressure. Since the
vehicle maintains steering responsiveness, you
can still avoid possible obstacles with a mini-
mum of steering effort.
The pulsation of the brake pedal, together with
the sound of hydraulic regulation, indicates that
ABS is actively taking effect.
Driving in wet conditions
When roads are wet or there is heavy rain, briefly
exert gentle pressure on the brake pedal every
few miles. Monitor traffic conditions to ensure
that this maneuver does not endanger other
road users. The heat generated in this process helps dry the pads and rotors to ensure that
Then full braking force will be immediately avail-
able when it is needed.
Hills
To prevent overheating and the resulting
reduced efficiency of the brake system,
drive long or steep downhill gradients in the
gear in which the least braking is required. Even
light but consistent brake pressure can lead to
high temperatures, brake wear and possibly
even brake failure.<
You can increase the engine's braking effect by
shifting down, all the way to first gear if neces-
sary. This strategy helps you avoid placing
excessive loads on the brake system. Downshift-
ing in manual mode of the automatic transmis-
sion, page38.
Never drive with the clutch held down,
with the transmission in idle or with the
engine switched off; otherwise, engine braking
action will not be present or there will be no
power assistance to the brakes or steering.
Never allow floor mats, carpets or any other
objects to protrude into the area around the
pedals, otherwise pedal function could be
impaired.<
Corrosion on brake rotors
When the vehicle is driven only occasionally,
during extended periods when the vehicle is not
used at all, and in operating conditions where
brake applications are less frequent, there is an
increased tendency for corrosion to form on
rotors, while contaminants accumulate on the
brake pads. This occurs because the minimum
pressure which must be exerted by the pads
during brake applications to clean the rotors is
not reached.
Should corrosion form on the brake rotors, the
brakes will tend to respond with a pulsating
effect that even extended application will fail to
cure.
When the vehicle is parked
Condensation forms while the automatic climate
control is in operation, and then exits under the
Page 82 of 148
Things to remember when driving
80
>For very heavy cargo when the rear seat is
not occupied, secure each safety belt in the
respective opposite buckle.
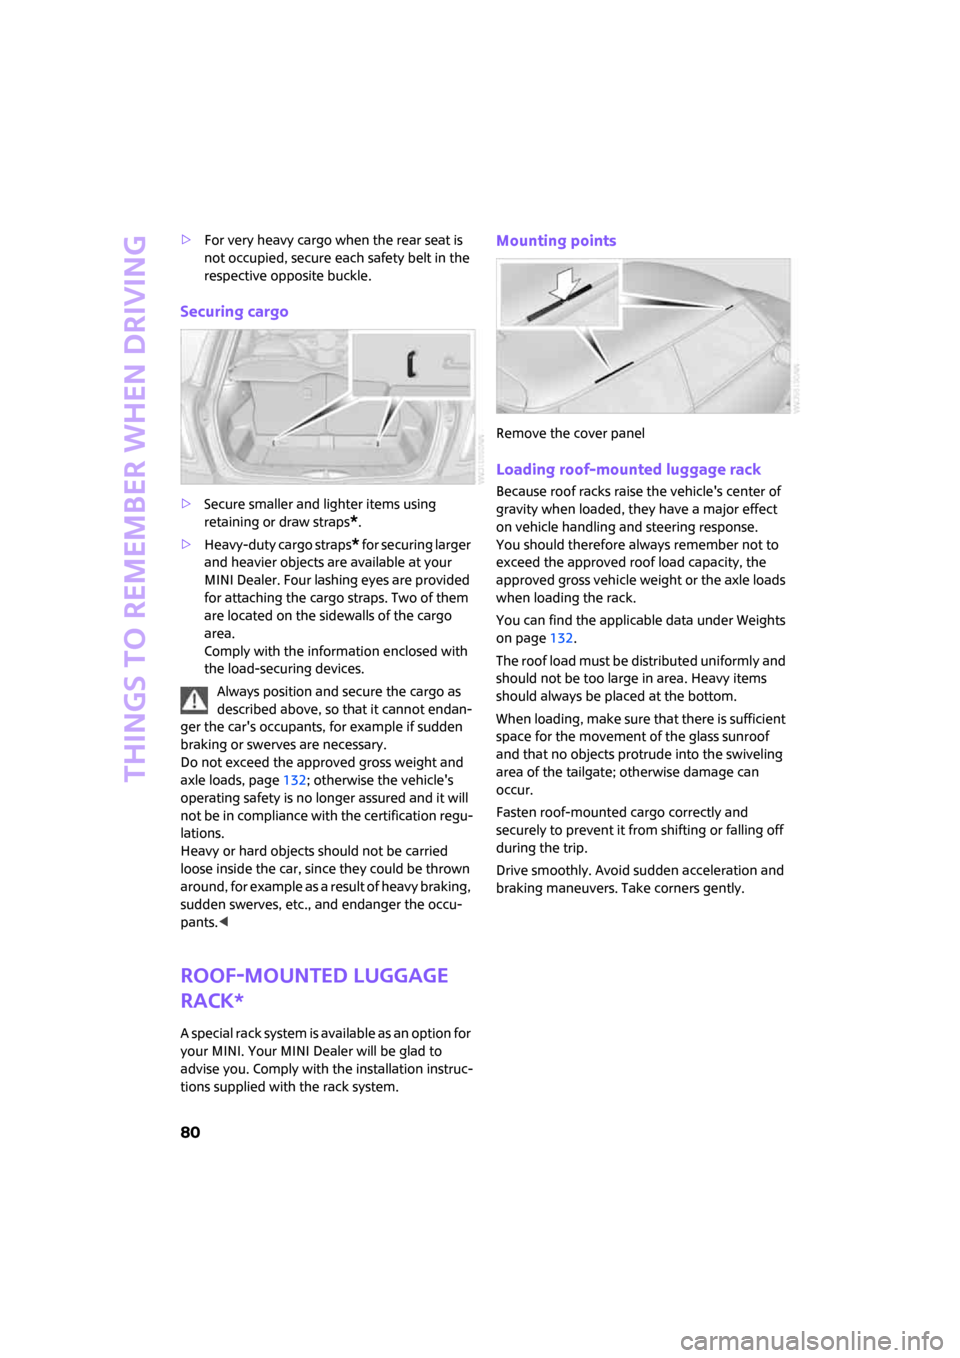
Securing cargo
>Secure smaller and lighter items using
retaining or draw straps
*.
>Heavy-duty cargo straps
* for securing larger
and heavier objects are available at your
MINI Dealer. Four lashing eyes are provided
for attaching the cargo straps. Two of them
are located on the sidewalls of the cargo
area.
Comply with the information enclosed with
the load-securing devices.
Always position and secure the cargo as
described above, so that it cannot endan-
ger the car's occupants, for example if sudden
braking or swerves are necessary.
Do not exceed the approved gross weight and
axle loads, page132; otherwise the vehicle's
operating safety is no longer assured and it will
not be in compliance with the certification regu-
lations.
Heavy or hard objects should not be carried
loose inside the car, since they could be thrown
around, for example as a result of heavy braking,
sudden swerves, etc., and endanger the occu-
pants.<
Roof-mounted luggage
rack*
A special rack system is available as an option for
your MINI. Your MINI Dealer will be glad to
advise you. Comply with the installation instruc-
tions supplied with the rack system.
Mounting points
Remove the cover panel
Loading roof-mounted luggage rack
Because roof racks raise the vehicle's center of
gravity when loaded, they have a major effect
on vehicle handling and steering response.
You should therefore always remember not to
exceed the approved roof load capacity, the
approved gross vehicle weight or the axle loads
when loading the rack.
You can find the applicable data under Weights
on page132.
The roof load must be distributed uniformly and
should not be too large in area. Heavy items
should always be placed at the bottom.
When loading, make sure that there is sufficient
space for the movement of the glass sunroof
and that no objects protrude into the swiveling
area of the tailgate; otherwise damage can
occur.
Fasten roof-mounted cargo correctly and
securely to prevent it from shifting or falling off
during the trip.
Drive smoothly. Avoid sudden acceleration and
braking maneuvers. Take corners gently.
Page 95 of 148
ReferenceAt a glance Controls Driving tips Mobility
93
Run-Flat Tires*
When mounting new tires or changing over from
summer to winter tires and vice versa, mount
Run-Flat Tires for your own safety. Keep in mind
that no space-saver spare tire is available in the
event of a flat. Your MINI Dealer will be glad to
advise you.
For safety reasons, the manufacturer of
your MINI recommends having Run-Flat
Tires replaced, not repaired, if they are dam-
aged.<
Special characteristics of winter tires
The manufacturer of your MINI recommends
winter tires for driving in adverse winter road
conditions. Although all-season M+S tires pro-
vide better winter traction than summer tires,
they generally fail to provide the same levels of
cold-weather performance as winter tires.
Pay attention to speed
Always comply with the speed limit for the
winter tires mounted on your car; failure
to do so could result in tire damage and acci-
dents.<
If the car is capable of speeds higher than that
permitted for the winter tires, a label stating the
maximum permitted speed for the mounted
tires must be displayed in your field of view. Spe-
cialist tire dealers and your MINI Dealer can sup-
ply these labels.
Storage
Always store wheels and tires in a cool, dry place
with as little exposure to light as possible.
Always protect tires against all contact with oil,
grease and fuels.
Do not exceed the maximum tire inflation pres-
sure indicated on the sidewall of the tire.
Swapping wheels among the axles
The manufacturer of your MINI recommends
that you swap the front wheels with the rear
wheels and vice-versa at intervals of 3,000 to
4,000 miles/5,000 to 7,000 km. This will counter
the varying rates of tire wear at the front and
rear axles, which will have a positive effect on the handling characteristics of your MINI. The
direction in which the tires rotate should be kept
the same.
Snow chains*
Only certain types of fine-link snow chains have
been tested by the manufacturer of your MINI,
classified as road-safe and recommended. Con-
tact your MINI Dealer for more details.
Only attach snow chains in pairs to the front
wheels with the following tires.
>175/65 R 15 M+S
>175/60 R 16 M+S
Observe the manufacturer's instructions when
mounting snow chains. Do not exceed a speed
of 30 mph or 50 km/h.
Do not initialize the Flat Tire Monitor if
snow chains are mounted, otherwise the
instrument might issue an incorrect reading.<
Page 101 of 148

ReferenceAt a glance Controls Driving tips Mobility
99
Exhaust emission values
The warning lamps light up. The exhaust
emission values have turned poor and
there is a danger of engine damage. You
can continue your journey, but moder-
ate your speed and exercise due caution. Have
the car checked as soon as possible.
Canadian models display these warning
lamps.
Under certain conditions one of the lamps
flashes or stays lit continuously. This indicates
excessive misfiring or a malfunction in the
engine. If this happens, reduce your speed and
visit the nearest MINI Dealer as soon as possible.
Severe misfiring can quickly lead to serious dam-
age of emissions-related components, espe-
cially the catalytic converter. In addition,
mechanical engine components can become
damaged.
If the fuel filler cap is not properly tightened, the
OBD system may conclude that fuel vapors are
escaping, causing an indicator to light up. If the
filler cap is then tightened, the indicator should
go out within a few days.
Event data recorders
Your vehicle may be equipped with one or sev-
eral measuring or diagnostic modules or a
device for recording or sending certain vehicle
data or information.
Page 102 of 148

Care
100
Care
Suitable car-care products
Use the cleaning and car-care products
available at your MINI Dealer.<
Cleaning agents may contain hazardous
or health-damaging substances. Follow
the warning and hazard instructions on the
packaging. For interior cleaning, always open
the doors or windows of the vehicle.
Do not use any products that are not intended
for cleaning the vehicle.<
Washing your vehicle
You can wash your new MINI in an automatic car
wash from the first day. Preference should be
given to cloth car washes. If, due to lack of avail-
ability, brush car washes must be used, modern
systems with soft brushes should be given pref-
erence.
When using steam jets or high-pressure
washers, ensure that you maintain a suffi-
cient distance to the vehicle. If the jet is too close
or the pressure is too high, this can lead to dam-
age or initial damage that can develop into more
serious damage. Water that enters vehicle com-
ponents can lead to damage over the long term.
After washing the vehicle, apply the brakes
briefly to dry them, otherwise water can reduce
braking efficiency over the short term and the
brake rotors can corrode.
Switch the rain sensor off when passing through
an automatic car wash, page40. Failure to do so
could result in damage caused by undesired
wiper activation.<
Rod antenna
If necessary, for example before entering a car
w a s h o r a g a r a g e w i t h a n e l e v a t o r r a m p , r e m o v e
the rod antenna.
Headlamps
Do not wipe dry and do not use abrasive or cor-
rosive cleaning agents. Remove dirt and con-
tamination, such as insects, by soaking with
shampoo and then rinsing with plenty of water. Always use a deicer spray to remove accumu-
lated ice and snow; never use a scraper. Use
window de-icers.
Vehicle paintwork
Regular care contributes greatly to driving safety
and value retention.
Environmental influences varying from one
region to the next can affect the vehicle paint-
work. Base the frequency and scope of car care
on these various influences.
Care of upholstery
Depressions that come about on the upholstery
material of the seats in daily use can be brushed
out using a slightly damp brush against the
grain.
The fact that velour lays down is not a quality
defect but rather is inevitable, as it is with home
textiles or clothing.
In the case of strong sunlight and longer parking
periods, cover the seats or all windows to pre-
vent discoloration.
Care of special parts
Light-alloy wheels*
Especially in the winter months, care for the
wheel rims with wheel rim cleaner. Do not use
acidic, strongly alkaline and abrasive cleaning
agents or steam jets. Follow the manufacturer's
instructions.
Chrome parts*
Carefully clean vehicle parts such as the radiator
grill and door handles with copious quantities of
water and, if necessary, a shampoo additive,
especially when contaminated with road salt.
For additional treatment, use chrome polish.
Rubber parts
Treat only with water or rubber care products.
Page 105 of 148
ReferenceAt a glance Controls Driving tips Mobility
103
Caring for headlamps, refer to page100.
For any bulb replacement not described
below, contact a MINI Dealer or a work-
shop that has specially trained personnel work-
ing in accordance with the specifications of the
MINI manufacturer.<
For checking and adjusting headlamp aim,
please contact your MINI Dealer.<
Light-emitting diodes LEDs
Light-emitting diodes installed behind translu-
cent lenses serve as the light sources for many of
the controls and displays in your vehicle. These
light-emitting diodes are related to conven-
tional laser diodes, and legislation defines them
as Class 1 light-emitting diodes.
Do not remove the covers or expose the
eyes directly to the unfiltered light source
for several hours, otherwise this could cause irri-
tation to the retina.<
Bi-Xenon lamps*
The service life of these bulbs is very long and
the probability of failure very low, provided that
they are not switched on and off an excessive
number of times. If a xenon lamp fails neverthe-
less, switch on the fog lamps and continue the
journey with great care, provided that local leg-
islation does not prohibit this.
Have any work on the xenon lamp system,
including bulb replacement, carried out
only by a MINI Dealer or a workshop that has
specially trained personnel working in accor-
dance with the specifications of the MINI manu-
facturer. Due to high voltage, there is a risk of
fatal injury if work on the xenon lamps is carried
out improperly.<
Halogen low beams and high beams
H13 bulb, 60/55 watts
The H13 bulb is pressurized. Therefore,
wear safety glasses and protective gloves.
Otherwise there is a risk of injury if the bulb is
damaged.
age to the headlamp system.<
Accessing the lamp from the engine
compartment
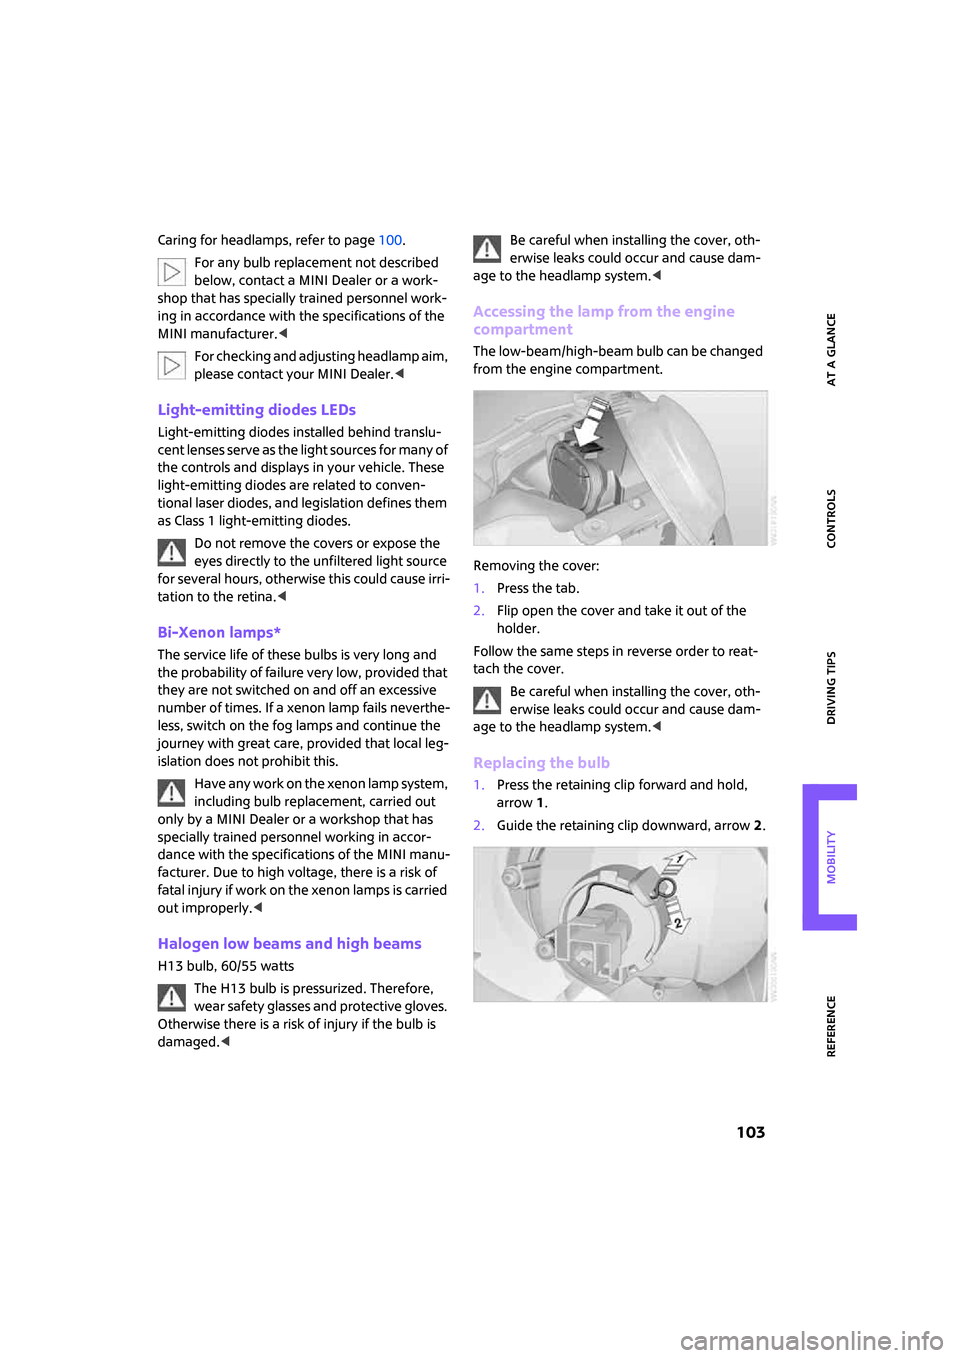
The low-beam/high-beam bulb can be changed
from the engine compartment.
Removing the cover:
1.Press the tab.
2.Flip open the cover and take it out of the
holder.
Follow the same steps in reverse order to reat-
tach the cover.
Be careful when installing the cover, oth-
erwise leaks could occur and cause dam-
age to the headlamp system.<
Replacing the bulb
1.Press the retaining clip forward and hold,
arrow1.
2.Guide the retaining clip downward, arrow2.
Page 109 of 148
ReferenceAt a glance Controls Driving tips Mobility
107
6Wrench, screwdriver/Phillips screwdriver,
towing eyelet
7Compressor, hose with manometer and plug
for cigarette lighter socket
8Package with filling hose, valve remover and
valve core
Use of the MINI Mobility System may be
ineffective if the tire puncture measures
approx. 1/8 in/4 mm or more. Contact the near-
est MINI Dealer if the tire cannot be made driv-
able with the MINI Mobility System.<
Liquid sealant
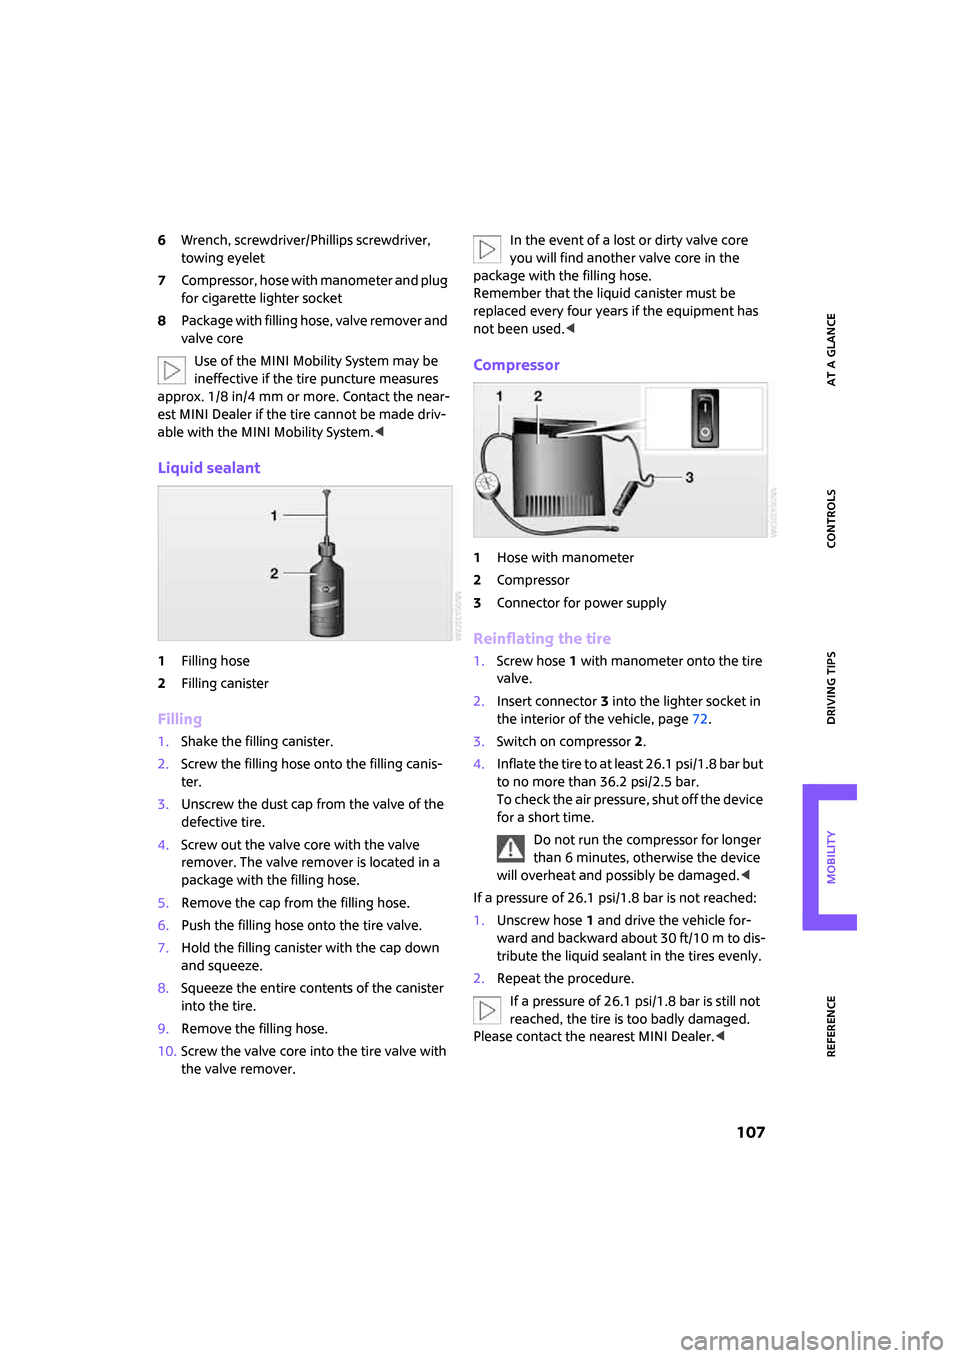
1Filling hose
2Filling canister
Filling
1.Shake the filling canister.
2.Screw the filling hose onto the filling canis-
ter.
3.Unscrew the dust cap from the valve of the
defective tire.
4.Screw out the valve core with the valve
remover. The valve remover is located in a
package with the filling hose.
5.Remove the cap from the filling hose.
6.Push the filling hose onto the tire valve.
7.Hold the filling canister with the cap down
and squeeze.
8.Squeeze the entire contents of the canister
into the tire.
9.Remove the filling hose.
10.Screw the valve core into the tire valve with
the valve remover.In the event of a lost or dirty valve core
you will find another valve core in the
package with the filling hose.
Remember that the liquid canister must be
replaced every four years if the equipment has
not been used.<
Compressor
1Hose with manometer
2Compressor
3Connector for power supply
Reinflating the tire
1.Screw hose1 with manometer onto the tire
valve.
2.Insert connector 3 into the lighter socket in
the interior of the vehicle, page72.
3.Switch on compressor2.
4.Inflate the tire to at least 26.1 psi/1.8 bar but
to no more than 36.2 psi/2.5 bar.
To check the air pressure, shut off the device
for a short time.
Do not run the compressor for longer
than 6 minutes, otherwise the device
will overheat and possibly be damaged.<
If a pressure of 26.1 psi/1.8 bar is not reached:
1.Unscrew hose 1 and drive the vehicle for-
ward and backward about 30 ft/10 m to dis-
tribute the liquid sealant in the tires evenly.
2.Repeat the procedure.
If a pressure of 26.1 psi/1.8 bar is still not
reached, the tire is too badly damaged.
Please contact the nearest MINI Dealer.<
Page 111 of 148
ReferenceAt a glance Controls Driving tips Mobility
109
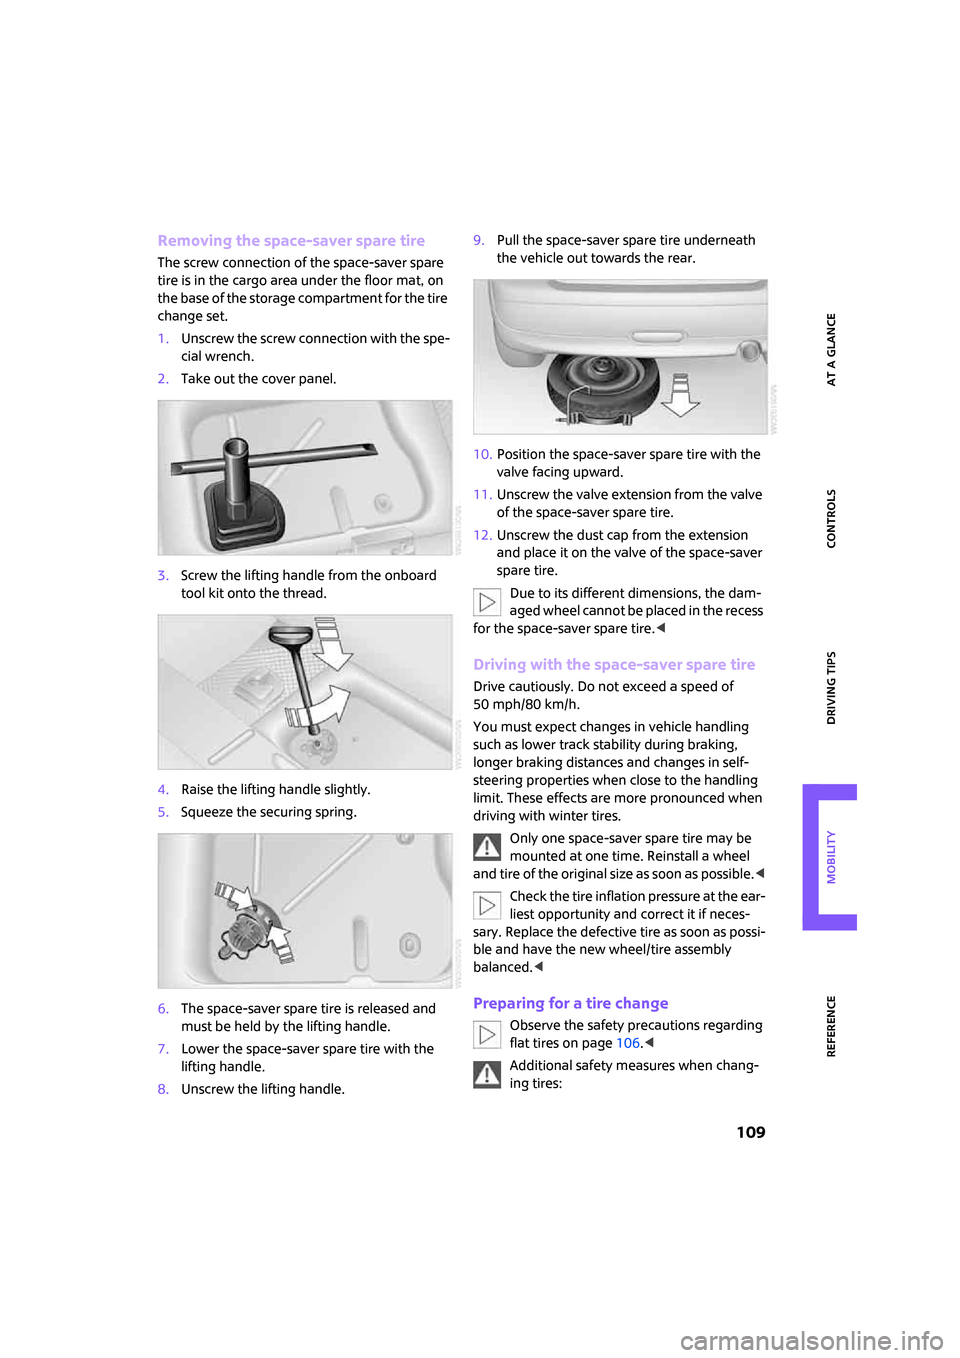
Removing the space-saver spare tire
The screw connection of the space-saver spare
tire is in the cargo area under the floor mat, on
the base of the storage compartment for the tire
change set.
1.Unscrew the screw connection with the spe-
cial wrench.
2.Take out the cover panel.
3.Screw the lifting handle from the onboard
tool kit onto the thread.
4.Raise the lifting handle slightly.
5.Squeeze the securing spring.
6.The space-saver spare tire is released and
must be held by the lifting handle.
7.Lower the space-saver spare tire with the
lifting handle.
8.Unscrew the lifting handle.9.Pull the space-saver spare tire underneath
the vehicle out towards the rear.
10.Position the space-saver spare tire with the
valve facing upward.
11.Unscrew the valve extension from the valve
of the space-saver spare tire.
12.Unscrew the dust cap from the extension
and place it on the valve of the space-saver
spare tire.
Due to its different dimensions, the dam-
aged wheel cannot be placed in the recess
for the space-saver spare tire.<
Driving with the space-saver spare tire
Drive cautiously. Do not exceed a speed of
50 mph/80 km/h.
You must expect changes in vehicle handling
such as lower track stability during braking,
longer braking distances and changes in self-
steering properties when close to the handling
limit. These effects are more pronounced when
driving with winter tires.
Only one space-saver spare tire may be
mounted at one time. Reinstall a wheel
and tire of the original size as soon as possible.<
Check the tire inflation pressure at the ear-
liest opportunity and correct it if neces-
sary. Replace the defective tire as soon as possi-
ble and have the new wheel/tire assembly
balanced.<
Preparing for a tire change
Observe the safety precautions regarding
flat tires on page106.<
Additional safety measures when chang-
ing tires: